

Alpine Tips
DIY ascending stirrups
The traditional way to ascend a rope on a big wall is with your ladders. However, there's a lighter weight, simpler, and less expensive option - stirrups. Here's a simple way to make your own.

Premium Members can read the entire article here:
Back in the day, I saw a slideshow by the great Hans Florine of his Yosemite big wall speed climbing exploits.
If memory serves, there were a few slides showing him jumaring amazingly fast up fixed ropes on El Cap, using only a length of 1 inch webbing between the ascenders and his feet, rather than the standard aid ladders.
That’s simple, lightweight, and inexpensive, three things every climber should like!
Here's how you can make some “aid stirrups” for the second to clean the route.
Typically, ascending a rope on a big wall is done with the ladders that you use for leading, but stirrups have several advantages, as I cover in this detailed article.
Personally, I’m a fan of these sweet stirrups made by Skot's Wall Gear.
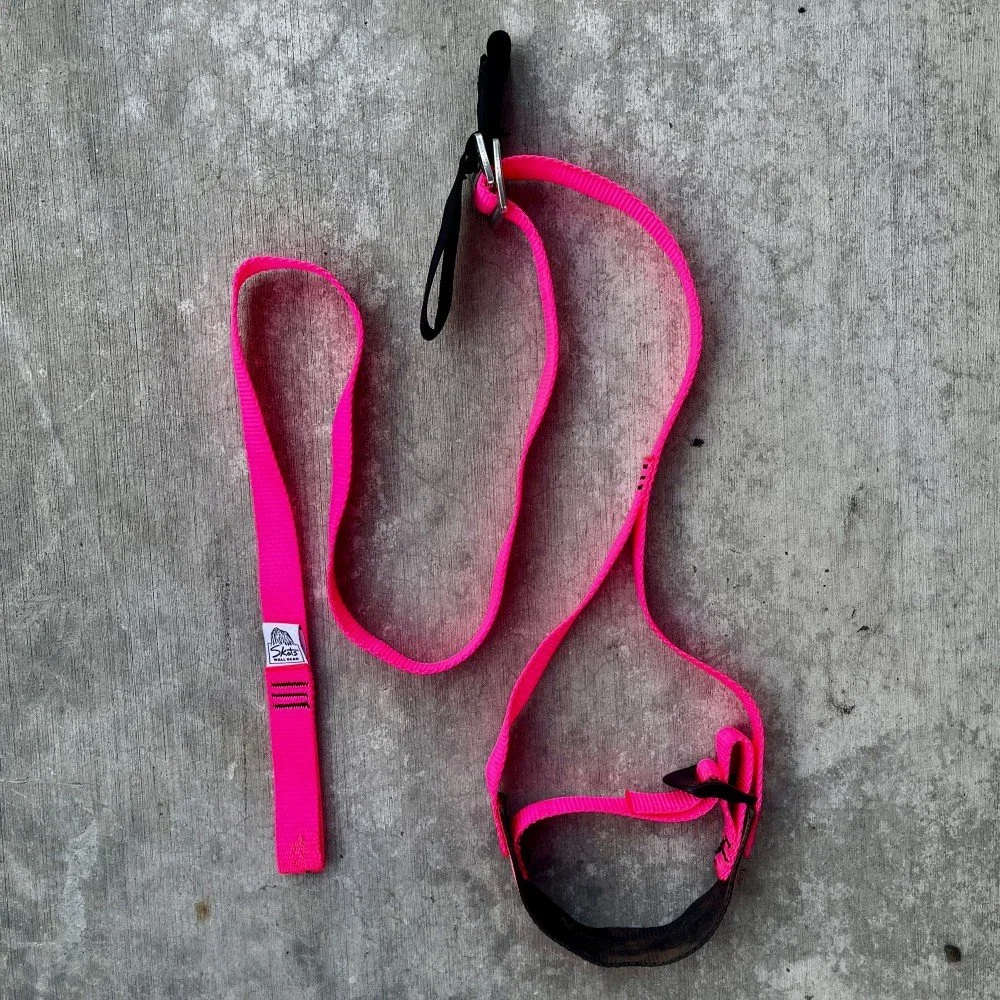
But like I said, if you want a DIY, low cost version to start or experiment with, you can try this setup.
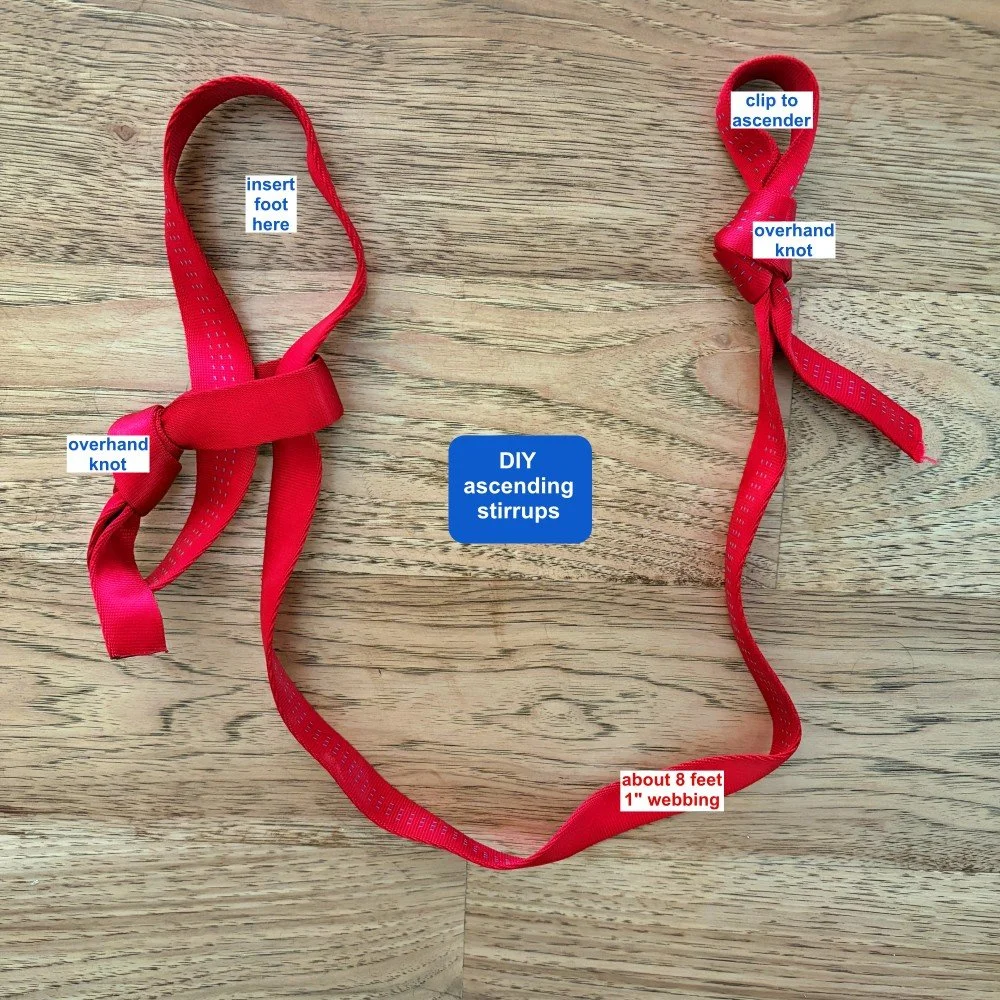
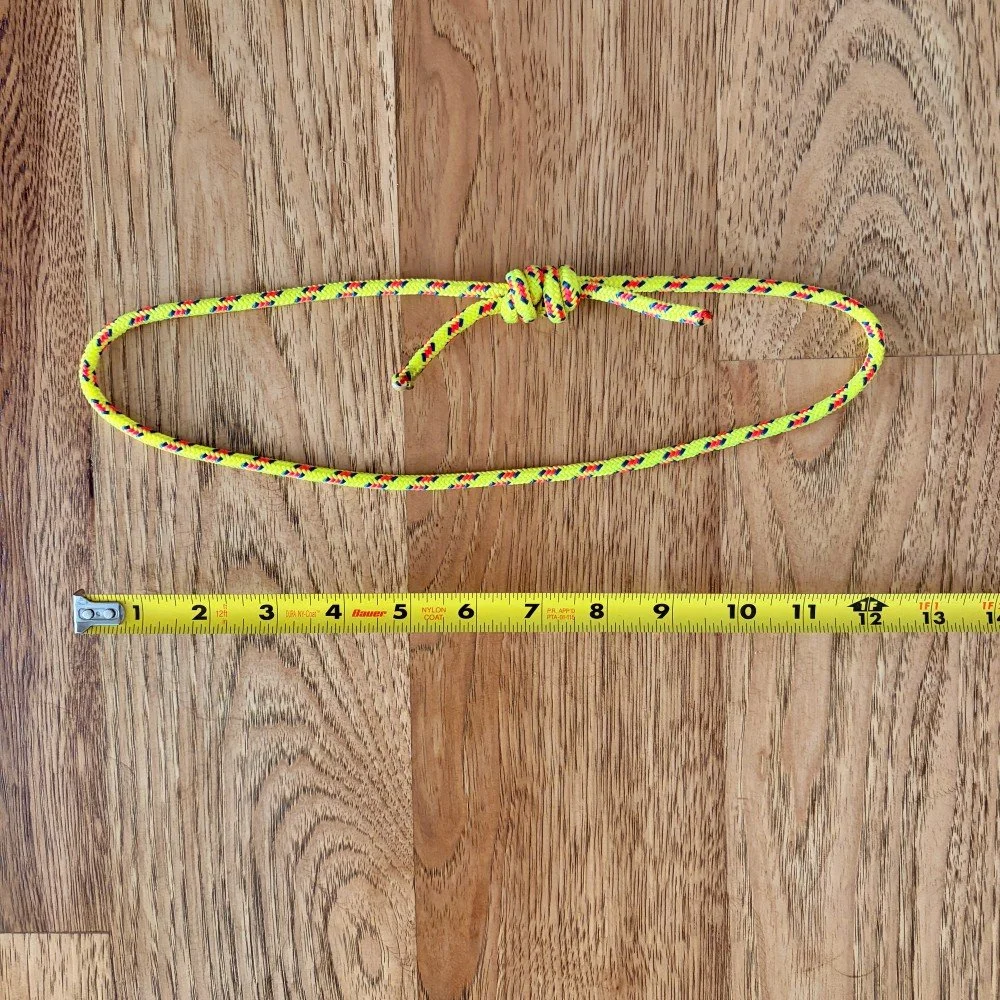
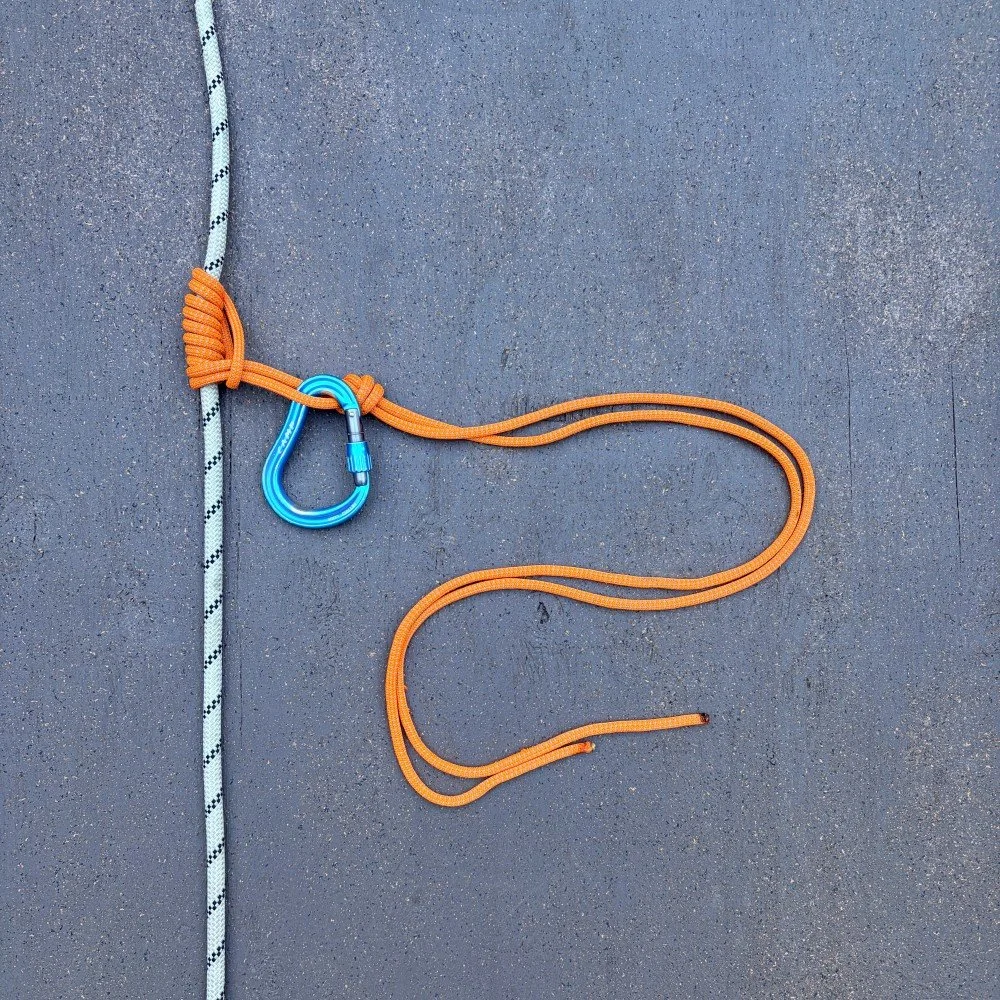
Begin with about 16 feet / 5 meters of 1 inch tubular webbing. (This makes 2 stirrups. If you're tall, buy more webbing, it's cheap.)
Tie a small overhand loop in each end. (In the photo above, my loops are a little too big; you could go slightly smaller.)
Clip one loop to your ascender with a non-locking carabiner.
Push a bight of webbing through the other overhand loop. This bight becomes an adjustable loop that cinches down down on your foot when you weight it.
Don't cinch these knots down tight yet. Practice on a fixed rope to get the length dialed in. You are almost certain to make some small adjustments to the length, so be patient with this. Have some needle nose pliers on hand if the overhand knots need encouragement to loosen up.
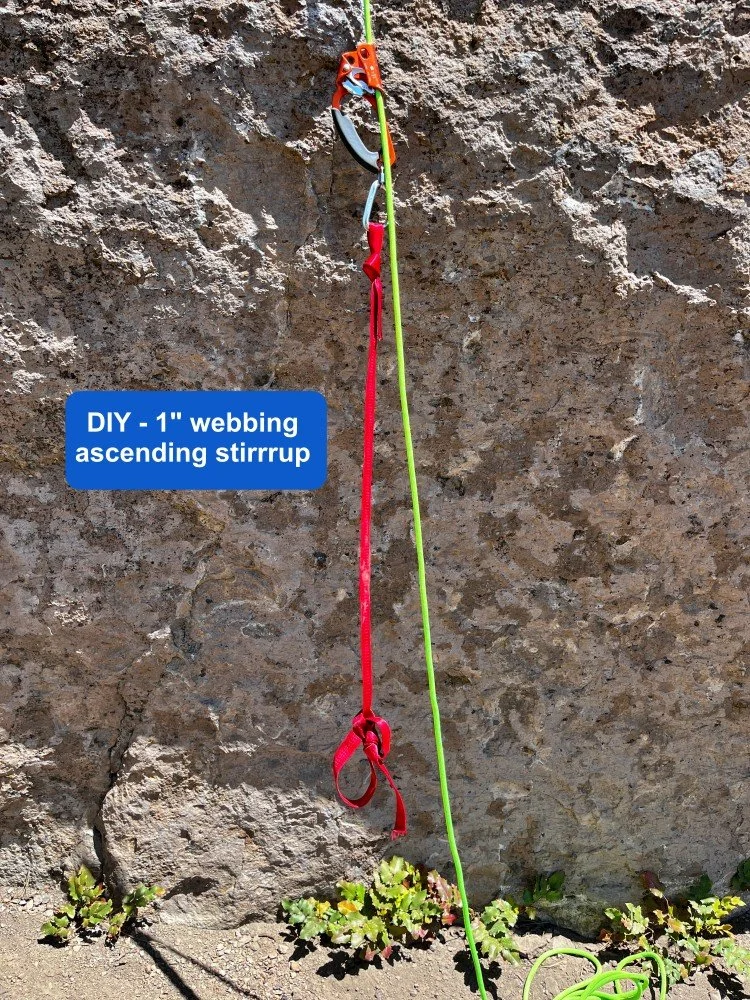
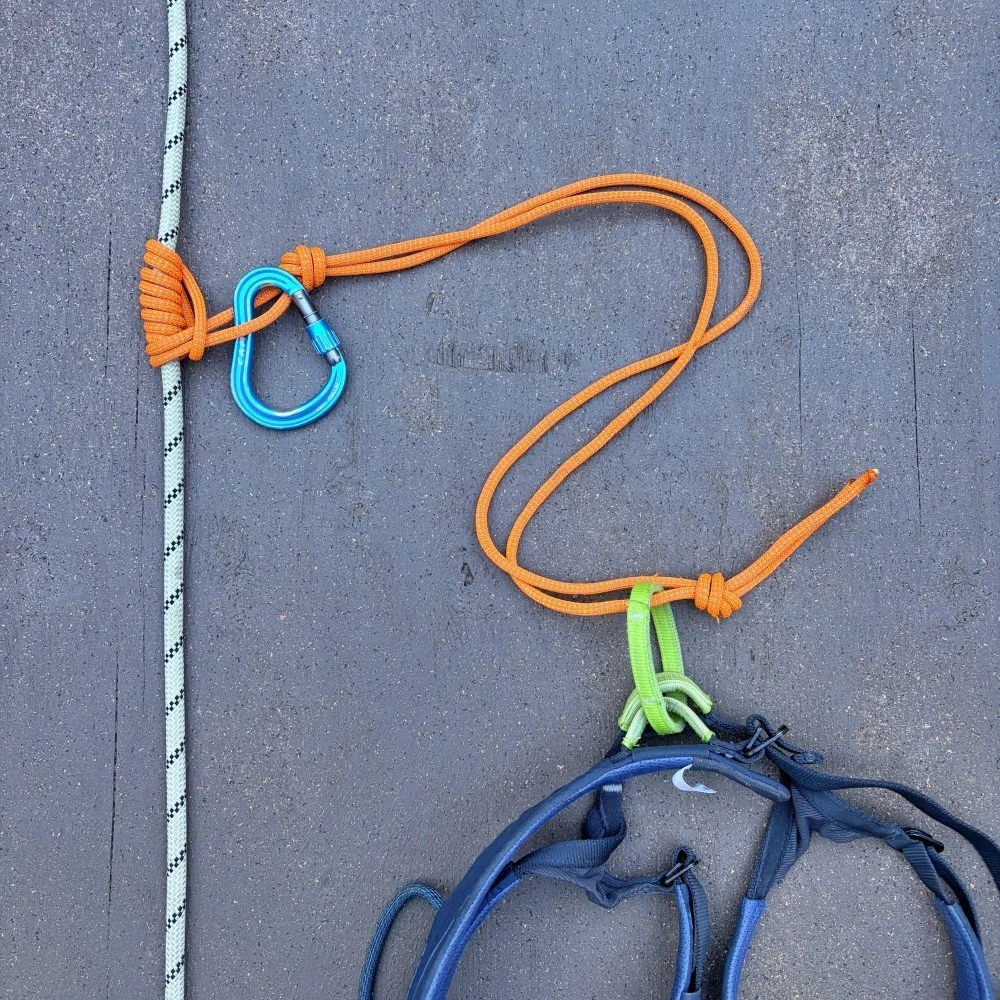
Here’s what it looks like prior to lift off. Handled ascender clipped to rope, non-locking carabiner clipped to ascender, small overhand loop of stirrup clipped to the carabiner.
Required but not shown for clarity:
Tether connecting your harness to the ascender with a locking carabiner
Second ascender, carabiner, stirrup, tether and locker for your other foot
Why do you want to color-code your stirrups?
Why does one need to be longer than the other?
How can you be sure that overhand knot never comes untied?
What's a key technique for efficient rope climbing?
Want to see a video of expert ascending technique from a speed climb on the Nose?
Join my Premium Membership to read the rest of the article. Thanks for your support!
Premium Members can read the entire article here:

Anchors: Do you need lockers everywhere, all the time?
A topic of much debate among climbers: do you need locking carabiners on every component, of every anchor, all of the time? Let's take a closer look.
Premium Members can read the entire article here:
Many people (including some highly qualified guides) advocate for locking carabiners on every component, of every anchor, all the time.
Do you really need to do this?
(To be clear, we're talking about recreational climbing and not professional riggers, rope access, arborists, etc.)
As a broad generalization: most American climbers think you don't, and many European (British?) climbers apparently think you do.
In some situations, like setting up an “all-day” top rope, lockers everywhere might be a good idea.
But for standard multipitch climbing, I feel it's unnecessary.
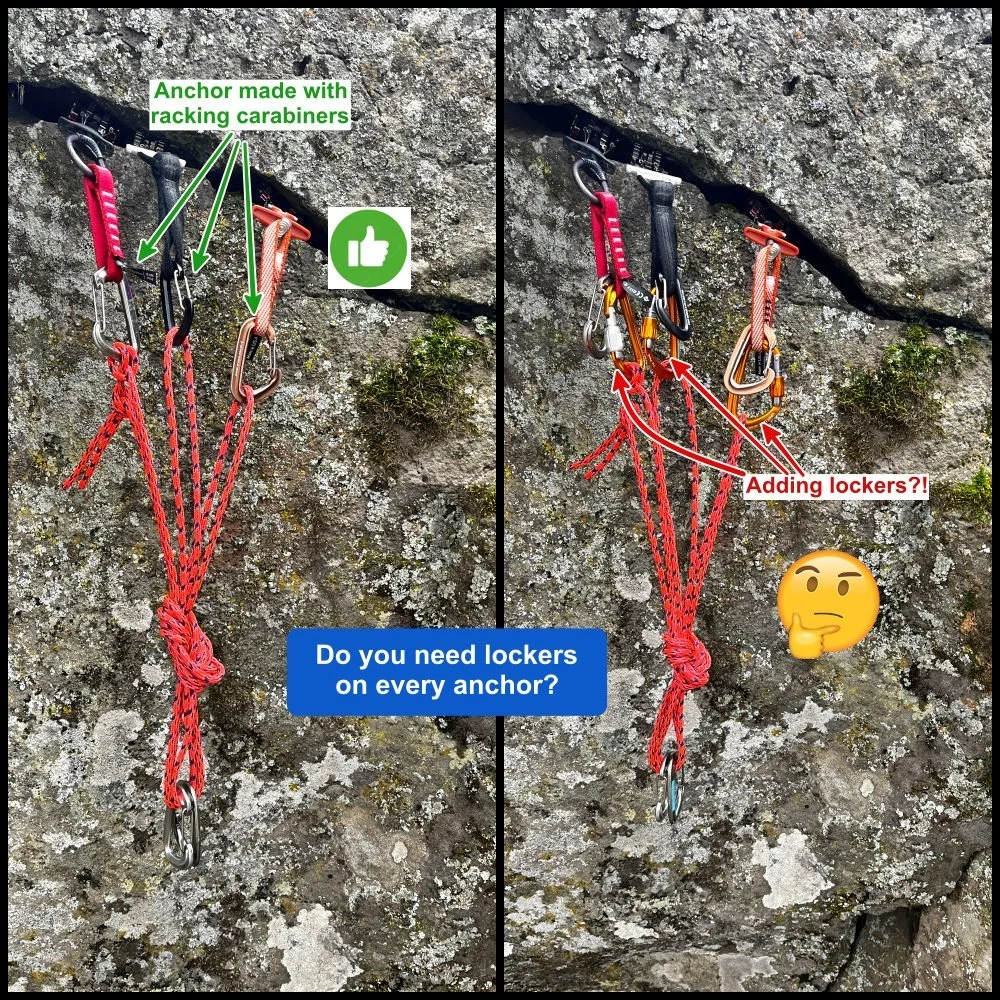
Imagine the following scenario:
You’re multipitch trad climbing with a rack of cams.
Each cam has its own non-locking racking carabiner clipped to it.
At the top of your pitch, you find a nice crack.
You place three cams to build your anchor.
You take out a sling to build your anchor.
What happens next?
Ignore the racking carabiners, and take three extra lockers and add those to the cams. (Or maybe fiddle with the racking carabiners, removing one and adding it to another cam to make opposite and opposed carabiners, etc.)
Use those convenient racking carabiners to build your anchor!
Keep in mind, if your partner did the same thing on the previous pitch, that means you're both carrying 6+ extra lockers!
A conservative approach would be #1; adding lockers to each cam.
However, for me, #2 is completely acceptable.
Why is it okay to use non-locking carabiners on a multipitch anchor?
If you don't have lockers, and you want some extra security, what are some things you can do?
What's my go-to lightweight locker?
Join my Premium Membership to read the rest of the article. Thanks for your support.
Premium Members can read the entire article here:
Transformers! Your ATC belay device is also an ascender
Your ATC Guide or similar plaquette-style belay device is great for belay and rappel, but can also be rigged as an ascender. Learn how here.
Premium Members can read the entire article here:
Note - This post discusses techniques and methods used in vertical rope work. If you do them wrong, you could die. Always practice vertical rope techniques under the supervision of an experienced climber, and ideally in a progression: from flat ground, to staircase, to vertical close to the ground before you ever try them in a real climbing situation.
This is an updated version of a previous article on this topic.
First off, a few disclaimers and cautionary notes . . .
Using a belay device in this manner is not explicitly approved by any manufacturer, as far as I know. Alpinesavvy offers ideas and information, not advice. Use this at your own risk. Instruction from a qualified professional is highly recommended when learning any new belay technique.
This technique can FAIL if you use a skinny rope and a large belay device!
I was easily able to put this into failure mode with a single strand rappel using an old style Black Diamond ATC Guide, and an 8 mm rope. Under even a small load, the rope strands can become inverted. This causes them to either jam together and you can't move the rope at all, or even worse, the strands become reversed, and you will fall / slide under load. Be sure and test this in a controlled environment with your preferred rope and belay device before you ever try it for real!
This is why you should NEVER use a Reverso style device like this to rope solo!
If using a skinny rope, be extra careful. Matching your ropes to the proper size belay device is always important, especially in this case. Consider using a device such as the Black Diamond ATC Alpine Guide, specifically made for smaller diameter ropes. You’ve been warned, be careful.
A primary rule of rope ascending: always be connected to the rope by two points. These examples show a single point of connection. The second point can be a backup knot below the device, or a tether of some kind from your harness to a friction hitch above you, that you might be using for your foot.
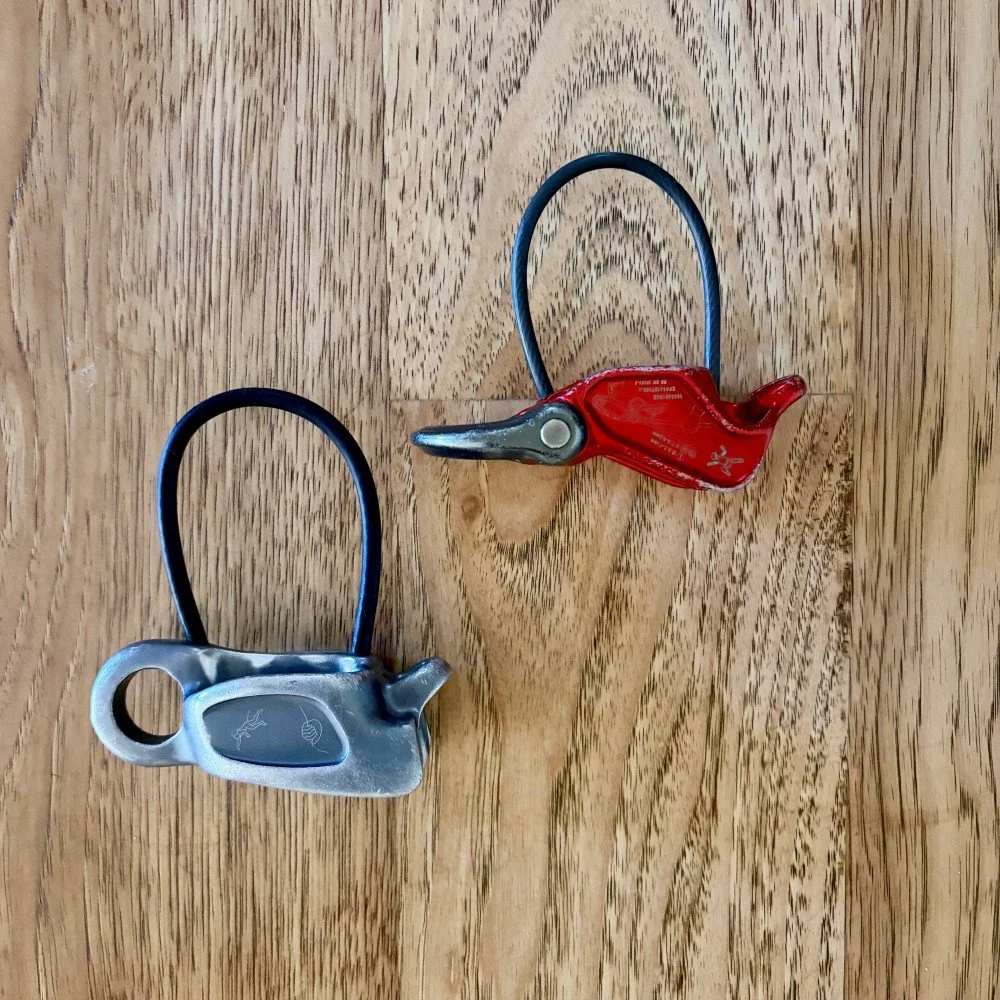
Guide plate (aka “plaquette”) belay devices, such as the DMM Pivot, Black Diamond ATC Guide and Petzl Reverso, are standard gear. The auto locking feature when belaying your second directly off the anchor has another nifty capability: rope ascender.
You don’t want to use this for multi pitching rope ascending, like on a big wall climb, because it adds extra friction and it’s not quite as secure as a dedicated ascending system. But, for improvised rope climbing, such as in a rescue scenario, or if you find you need to ascend a rappel rope for some reason, this is a pretty cool trick.
A few notes . . .
Doing this is usually faster than the old school method of ascending a rope with two prusik loops.
The effectiveness of this system, and the ease that you can ascend, greatly depends on the type of belay device you are using, the rope diameter, how old/stiff the rope sheath is, and other variables. Generally, if you have a newer smaller diameter rope with a smoother sheath, this is going to be easier. If you have a newer style belay device made for smaller diameter ropes, and and try this with a crusty, stiff-sheath 10mm rope, you will have a L O T of friction and hassle pulling the rope through the device.
Practice, practice, practice in a controlled environment before you ever try this in the real world.
If you’re on lower angle terrain, you might just be able to step up on the rock and pull slack through your device. If it's steeper, you'll probably need to rig some kind of a step for your foot, which I cover in this tip.
There are two possible scenarios for this:
Starting from a ledge, flat ground or otherwise secure stance
When you’re already on rappel
Let's look at each one.
Method 1 - Rigging to ascend from a ledge or flat ground
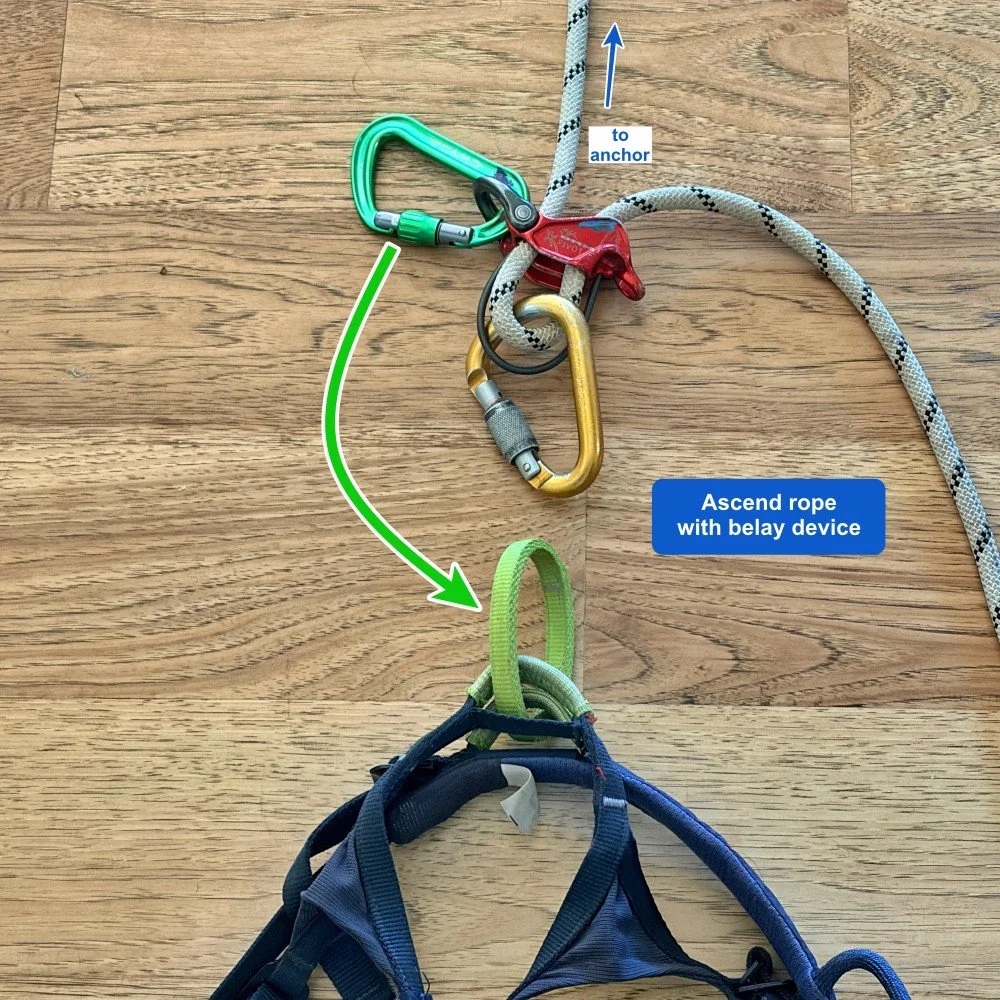
Let’s start with the easiest set up, and assume you’re on the ground or a ledge and have a rope you need to climb. This rope can be a single strand or a double strand. (Hopefully this is obvious, but this rope needs to be fixed in some way at the top anchor, either directly tied, or looped through an anchor point like a standard rappel. )
You rig your belay device just like you would to belay up your follower directly off the anchor, and clip the “anchor” carabiner to your belay loop. One locking carabiner goes in the “ear”, which you would clip to the anchor master point (here, the green one), and one locking carabiner blocking the rope the rope (here, the yellow one), goes to your belay loop.
Note: this system works a bit better if the rope blocking carabiner is round metal stock, rather than some weight shaving I-beam type construction. The rope slides more easily and there’s a bit less friction on the rounded metal. If you have one, use it, if you don’t, no biggie.
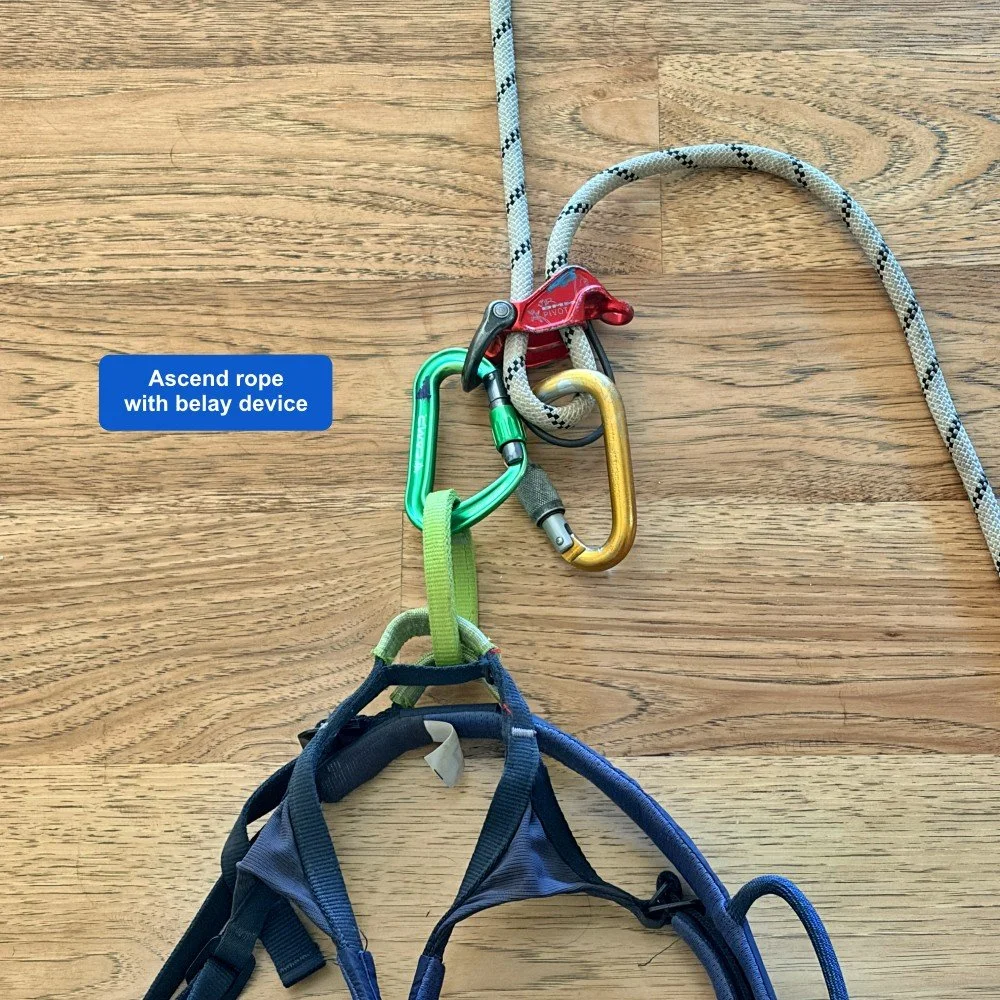
Standard set up, just like you would for a direct belay from the anchor (green carabiner would clip to masterpoint, yellow carabiner blocks the rope, the strand to the “climber”, here the anchor, is always on the top.)
Now, clip the green carabiner to your belay loop. If you sit back in your harness, the rope should lock off.
Method 2 - Rigging to ascend while on rappel
Hopefully this won’t happen very often, but sometimes when rappelling, you need to go back up the rope. Maybe you missed the anchors, or maybe the rope got stuck above you, and you were careless and went below it without untangling the mess. Whatever, it doesn’t really matter, you were rapping down and now you need to climb up. Here’s how to do it.
There’s two different ways this can be rigged. It depends on whether you’re rappelling from an extended rappel or from your belay loop . An extended rappel is easier and safer; lots more on extended rappels at this Tip.
Let’s look at each one.
First off, when you’re doing any shenanigans like this way off the deck, tie a hard backup “aka “catastrophe knot”) in the rope below you.
This is an overhand on a bight in both strands, clipped to your belay loop. This is insurance; if you screw up any part of the next couple steps, you’re not going to fall to the ground. So do this first.
If you were rapping with an autoblock, going hands-free to do this is easy. If not, use the old-school #CraftyRopeTrick of wrapping the rope a few times around your leg to go hands free.
“Catastrophe knot” - Overhand on a bight in both strands, clipped to your belay loop with a locker.

Note: Both these methods require you unweight your rappel device for a moment. Hopefully you can find some kind of a stance where you can temporarily unweight the rope. If you can’t do this, you’ll have to get creative. Add a short prusik plus a foot loop and standing in it, or use the #CraftyRopeTrick of wrapping a few loops of rope around your foot and standing up, temporarily unweighting your rappel device.
Note: For clarity, the catastrophe knot backup is not shown in the following photos.
A - Rappelling from an extended rappel and transitioning to rope ascending (easier and lower risk method)
An extended rappel makes this method safer, because you don’t need to unclip your rappel carabiner as described below in method B. When you do this for the first time, you might actually amaze yourself, because it’s so fast and easy, it almost seems like a magic trick.
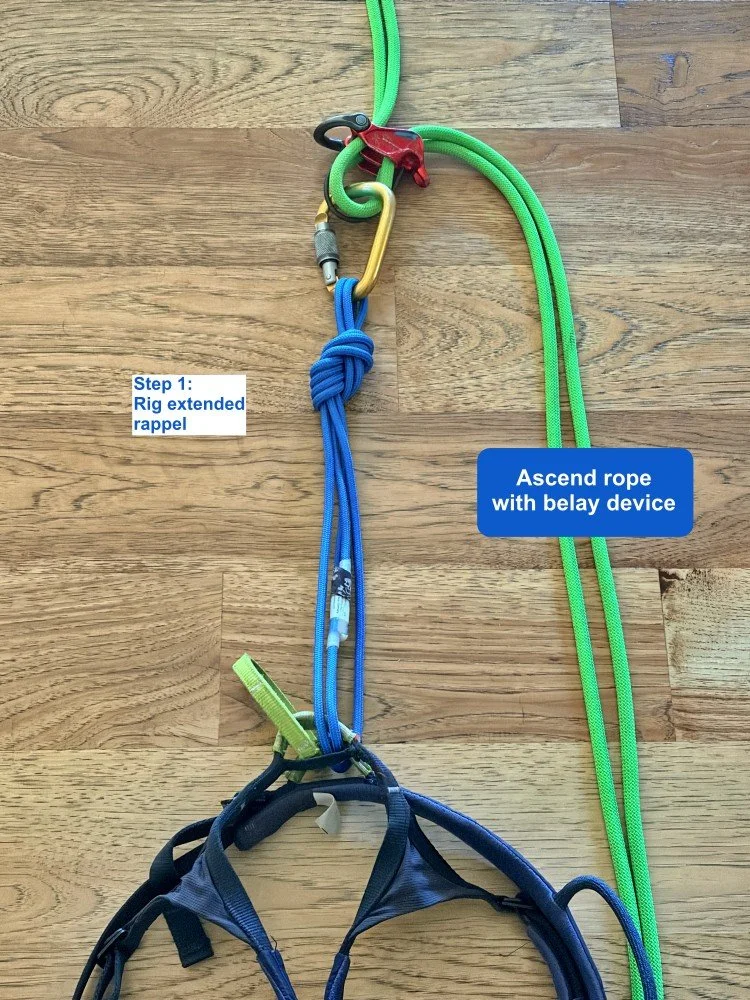
The extended rappel rigging shown below, with a basket hitched 120 cm sling, is one of various ways to do it. The extended rappel is covered in depth here.
(For clarity, this photo doesn’t show an autoblock backup below the rappel device. If you only have a short way to ascend, you can leave it on. For a longer climb back up the rope, it's probably better to take it off, as shown in the video below. )
1 - Rig an extended rappel (The method shown below, a basket hitched 120 cm sling, is one of many ways you could do it.)
Step 2: Clip a locking carabiner into the “ear” on your rappel device.
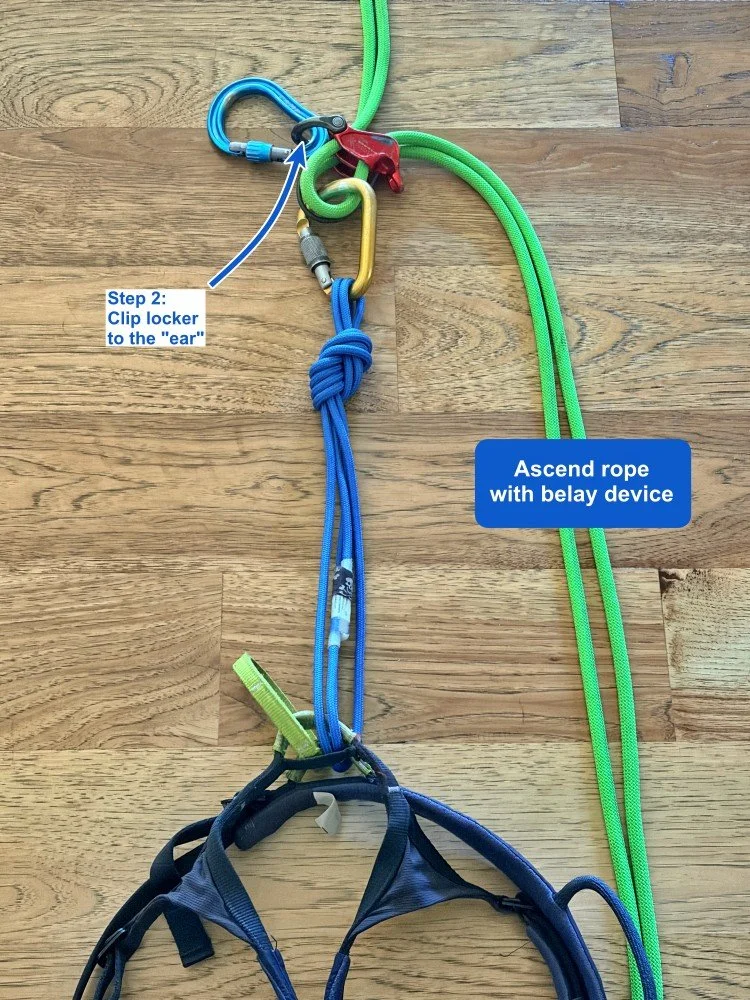
Step 3: Unweight your device using one of the methods mentioned above, and clip the locker on the “ear” to your belay loop. Note the gold carabiner and blue rap extension sling stay attached the whole time.
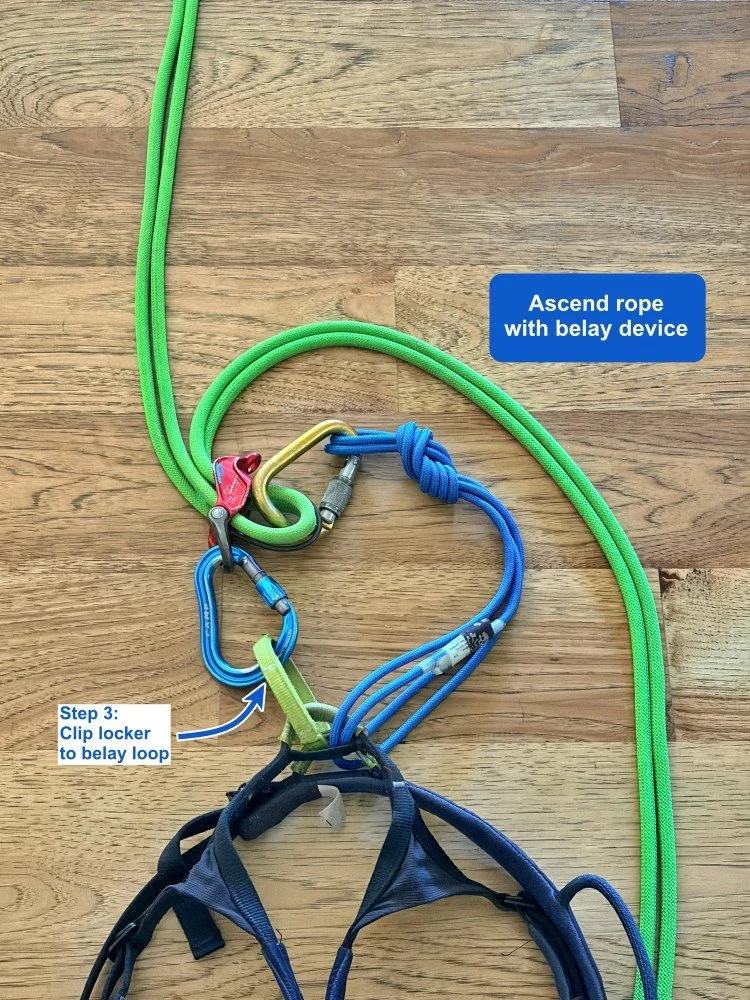
Schweeeeeet, you’re ready to ascend!
Your extension gives you enough slack for the blocking carabiner to properly work. Nice! One more reason to use an extended rappel.
Bonus: one more cool thing about this method: if you want to transition back to rappel, simply unclip the blue carabiner from your belay loop and you’re back into rappelling position.
Want to see a nice tutorial video on how rig this AND ascend the rope?
How about the trick to doing this on rappel when you don't have an extension. and why you need to be really careful?
Join my Premium Membership to read the rest of the article. Thanks for your support.
Premium Members can read the entire article here:

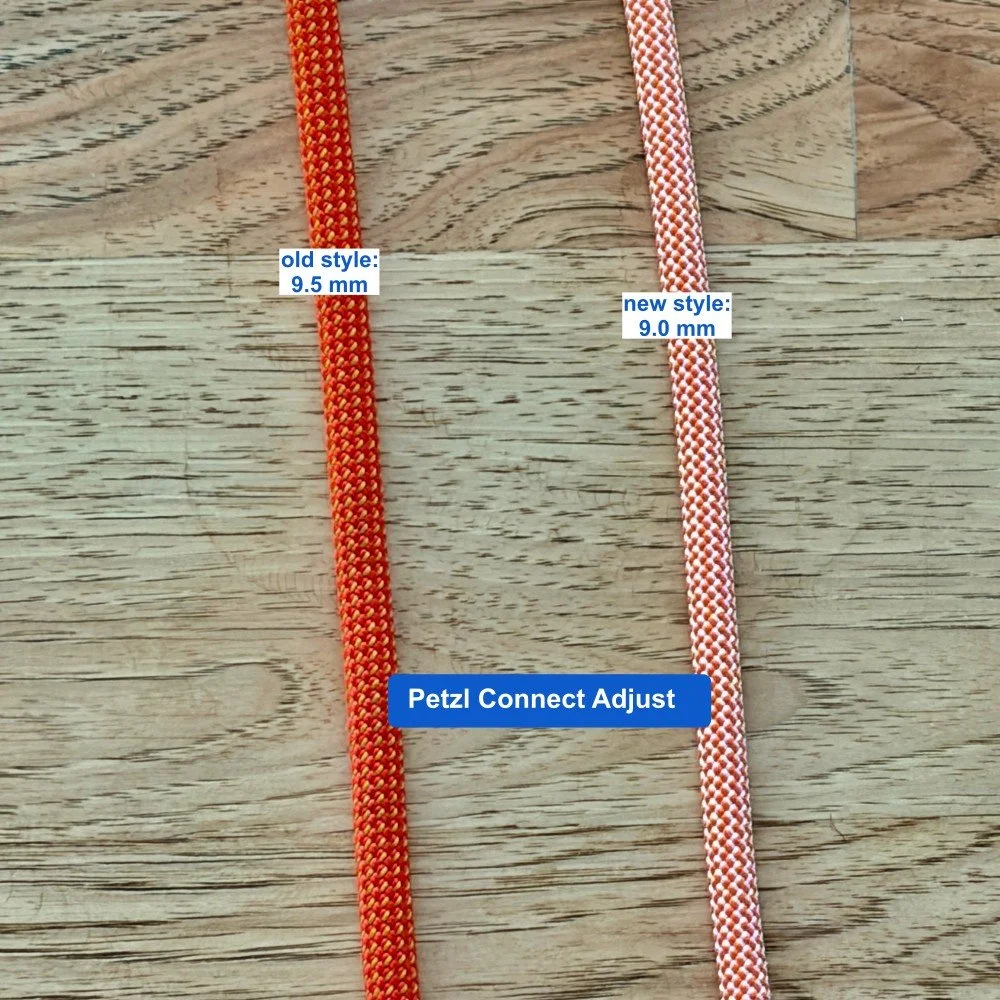
5 differences: old and new Petzl Connect Adjust
The Connect Adjust is the original dynamic rope adjustable personal lanyard / tether. Petzl recently came out with a new version; here’s the scoop on all the upgrades.
Premium Members can read the entire article here:
This article may contain affiliate links to HowNOT2. If you purchase through them, Alpinesavvy may earn a small commission at no extra cost to you. Your support helps me improve this website, the world’s largest collection of climbing tips.
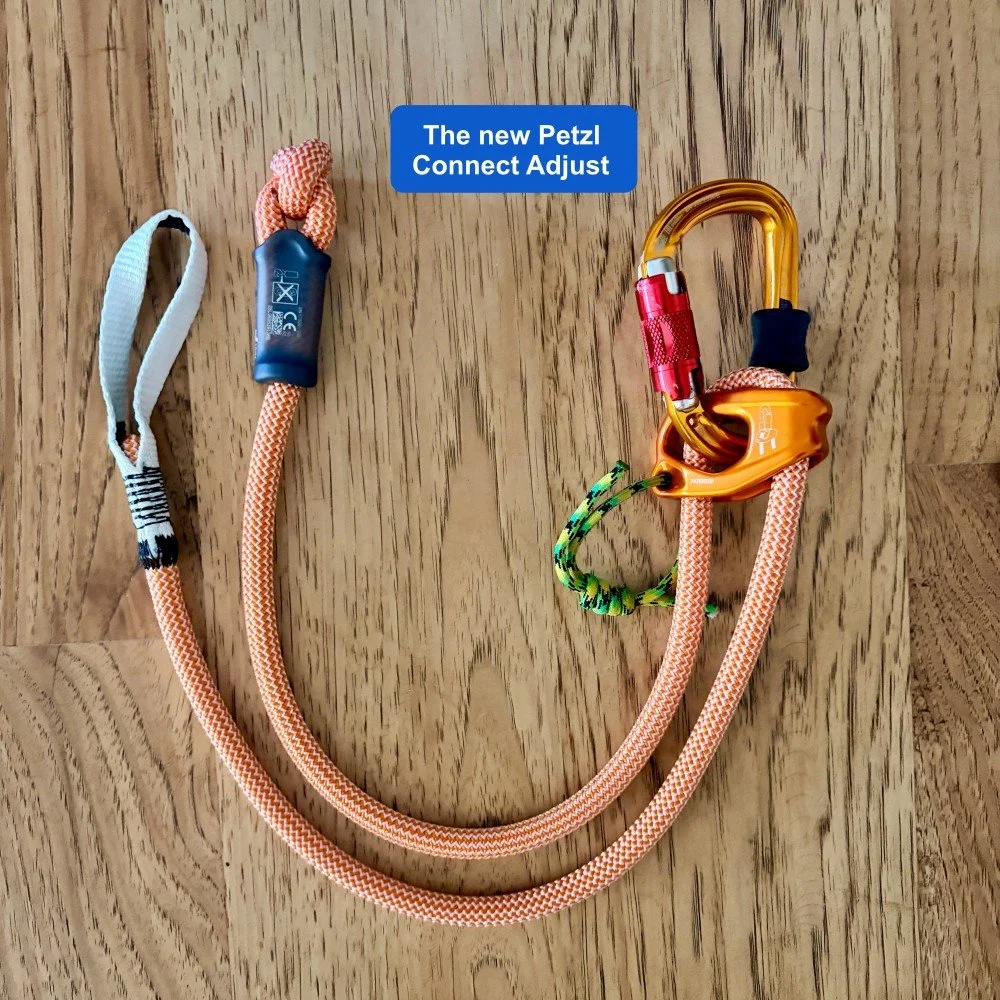
Petzl introduced the Connect Adjust tether / lanyard in 2015. It was an innovative product (and popular enough that most major manufacturers have since copied it.)
In 2025, Petzl introduced Connect Adjust 2.0, so let's check it out.
First off, why use a tether in the first place?
Whether it's DIY from a sling or a ready-made one like this, a tether is needed primarily when you need to clip yourself to something, and the rope is either under tension, you don’t have one, or you’re not tied into the end.
Here are a few reasons (off the top of my head,I'm sure I'm missing a few.)
Clipping an anchor when transitioning to setting up a top rope or a rappel - Yes, you can do this with other tools, but the Connect Adjust is simple, solid, stretchy, easily adjustable and distinctly different from anything else you're carrying. This can make it easier to use, especially for beginners.
Route setting and route development - Clipping yourself to ascenders, bolts, fixed lines, etc., while you place holds, drill holes, remove old bolts, etc.
Hangdogging a sport route - While you can chain together a few quick draws to rest on a bolt, it’s usually easier to clip in direct with a tether.
Lead rope solo (LRS) or top rope solo (TRS) - all kinds of scenarios where being able to securely clip yourself to something is helpful.
Aid climbing - The Petzl “Evolv Adjust” is like the Connect Adjust, except it's longer and it comes in a matched pair. This is the modern standard for an aid tether. It’s extremely handy for leading and following overhangs, roofs, traverses, redundant clipping to anchors, rope ascending, easing onto a delicate hook placement, and other big wall dark arts.
Search and rescue teams - All kinds of uses like securing yourself near the door of a helicopter, attaching yourself to a litter with a patient, etc. (or so I’m told; I don't do that kind of stuff. =^)
Climbing in moderate terrain in a larger group - You may be moving along a fixed rope with a friction hitch or two, sort of like a via ferrata. You need a tether to connect to the anchors and possibly to your friction hitches.
Skiing on a glacier - In the Alps, it's common practice to ski unroped, but have a tether attached to your harness and clipped to the top of a backpack strap. If you unfortunately fall into a crevasse, get wedged in it, and can’t access your harness, someone can hopefully drop a rope to you, you can clip it to the tether, and you get pulled out via that. Certainly hope you're never in this situation!
A lot of people like to poop on designated tethers / PAS’s like this, so here’s a word for them.
To be clear, I'm not saying it’s a required piece of gear. Many climbers get along fine using a 120 cm sling for the occasional multi pitch rappel, chaining together a couple of quick draws to clean an anchor, and other minimalist approaches.
However, consider this situation:
Say you're on a multipitch sport climbing route where you need to rappel to get back down. You must have a tether to descend. “Don't bring a Connect Adjust, it's a single use item”, they say.
Well, what kind of tether ARE you gonna use? Probably a 120 cm sling. Guess what? You’re sport climbing, remember? On the way up, that sling is a “single use item” that's not being used for anything. Just sitting there on your harness with a locking carabiner, not helping you at all.
You have to bring something to secure yourself to the anchors on the way down. Why not bring the tool that works the best?
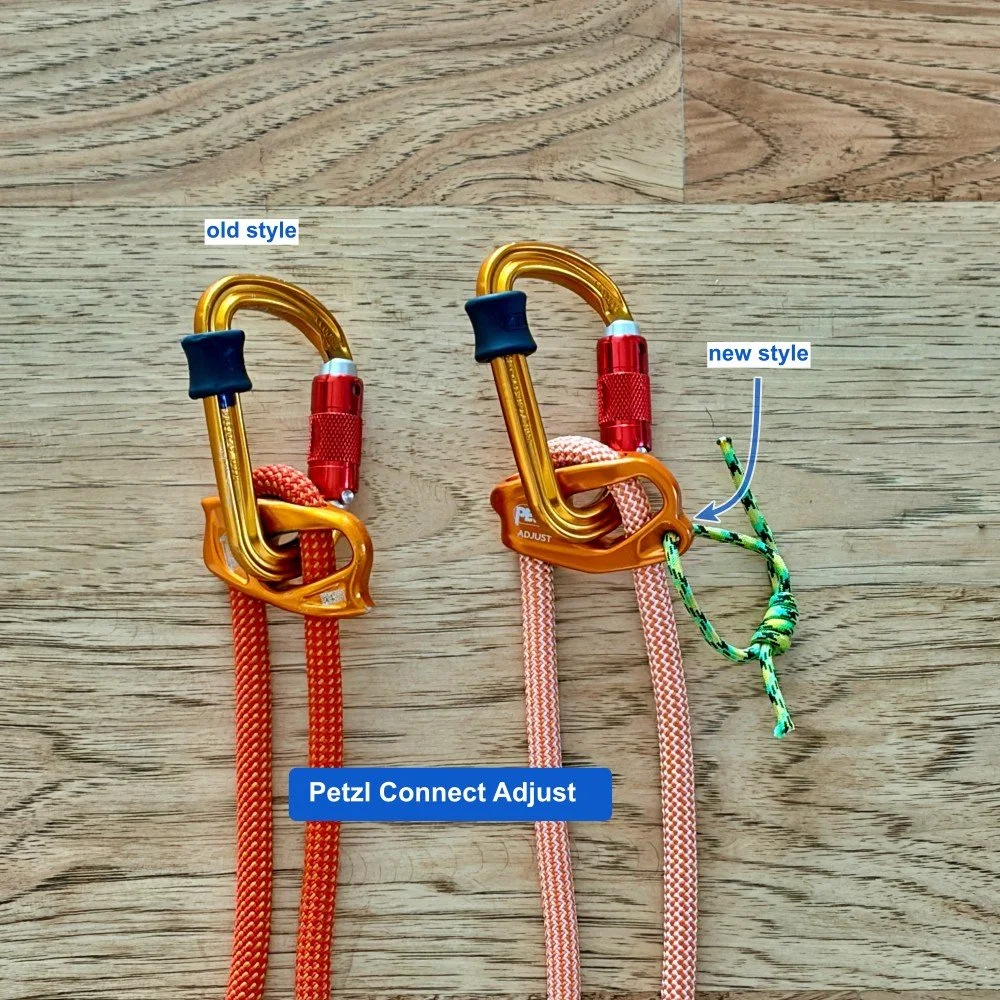
Main changes to the Connect Adjust 2.0:
Added a Dyneema sling for harness attachment, less bulk
Changed the stopper system in the end, more elegant and ergonomic
Went from 9.5 to 9.0 mm rope Petzl Volta, MUCH easier rope feeding
Small change of the angles in the metal part, so it's easier to feed the rope through
Added a “release hole”; if you want, you can tie some cord and carefully pull it so it's releasable under load
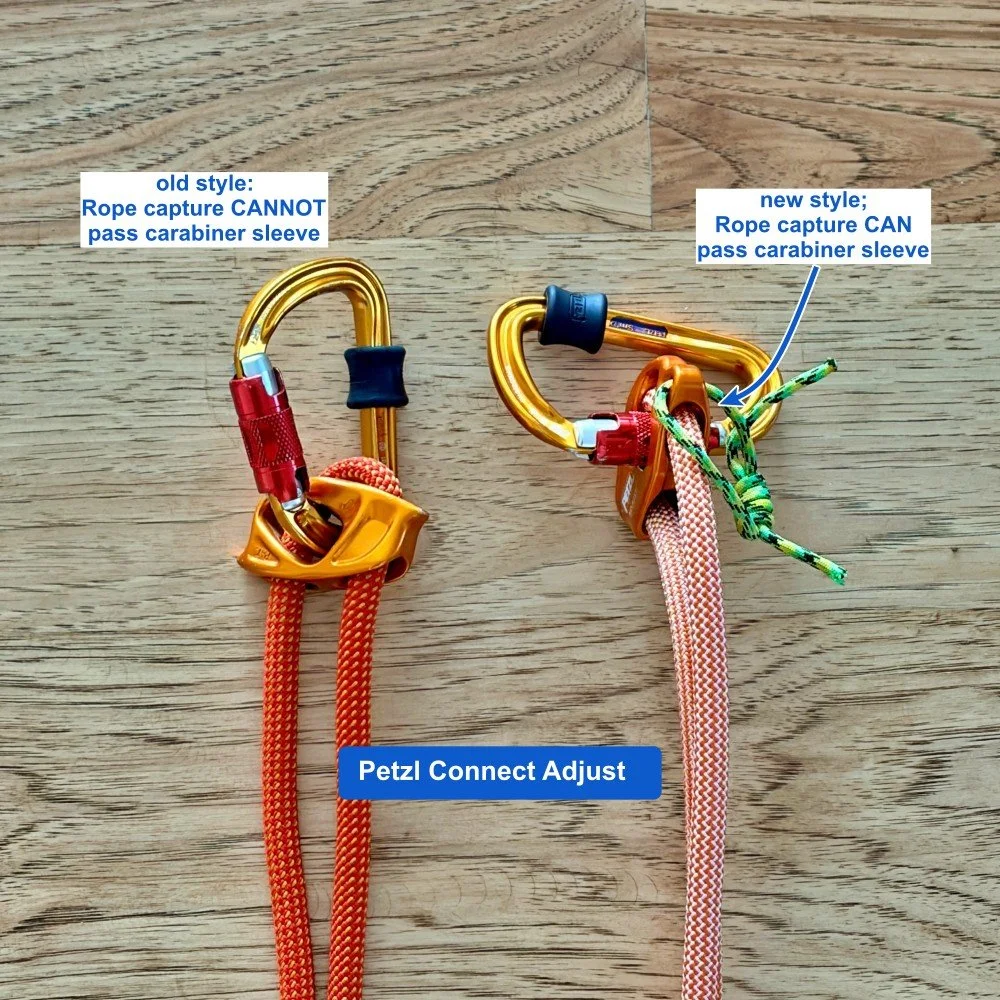
Don't know if this was intentional, but the barrel of the carabiner can pass through the metal part, whereas before that couldn’t happen (depending on the carabiner, more below.)
Old style: chunky but serviceable. New style: short bit of Dyneema webbing to connect with a girth hitch to your belay loop, which is lower profile and more compact.
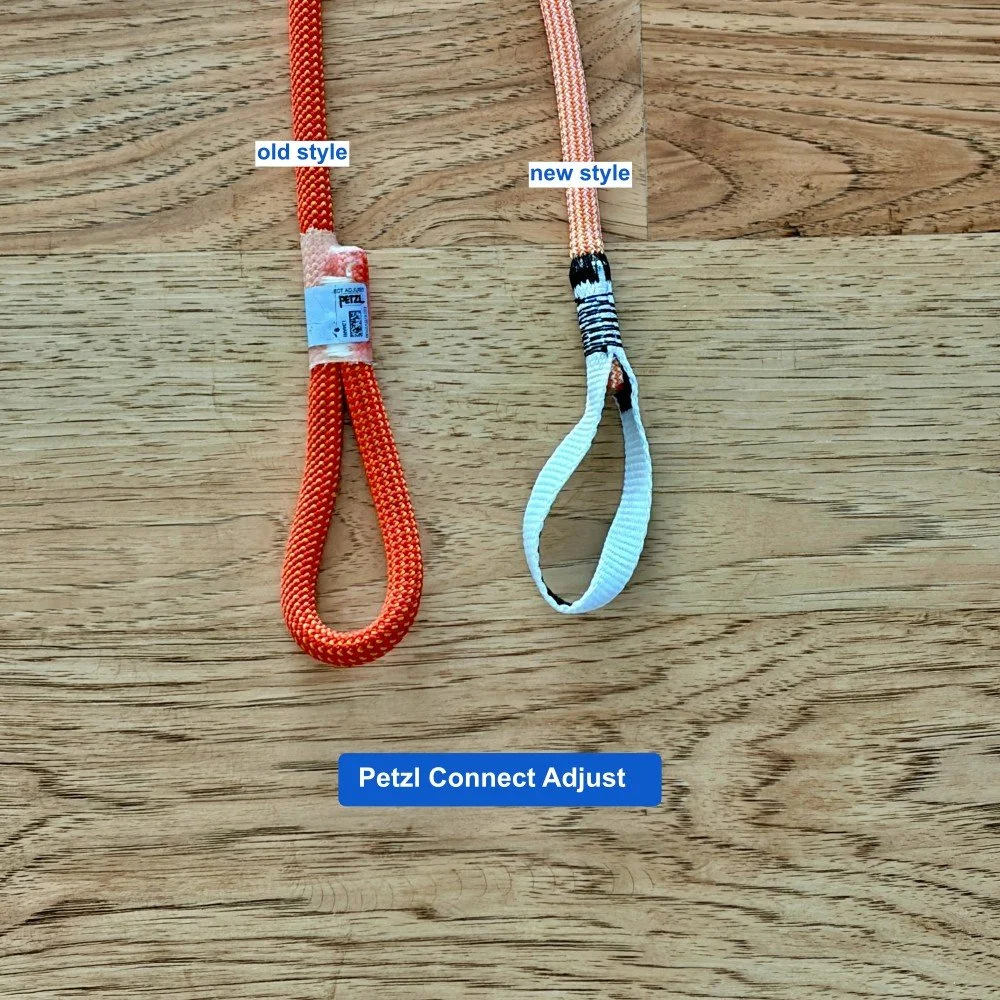
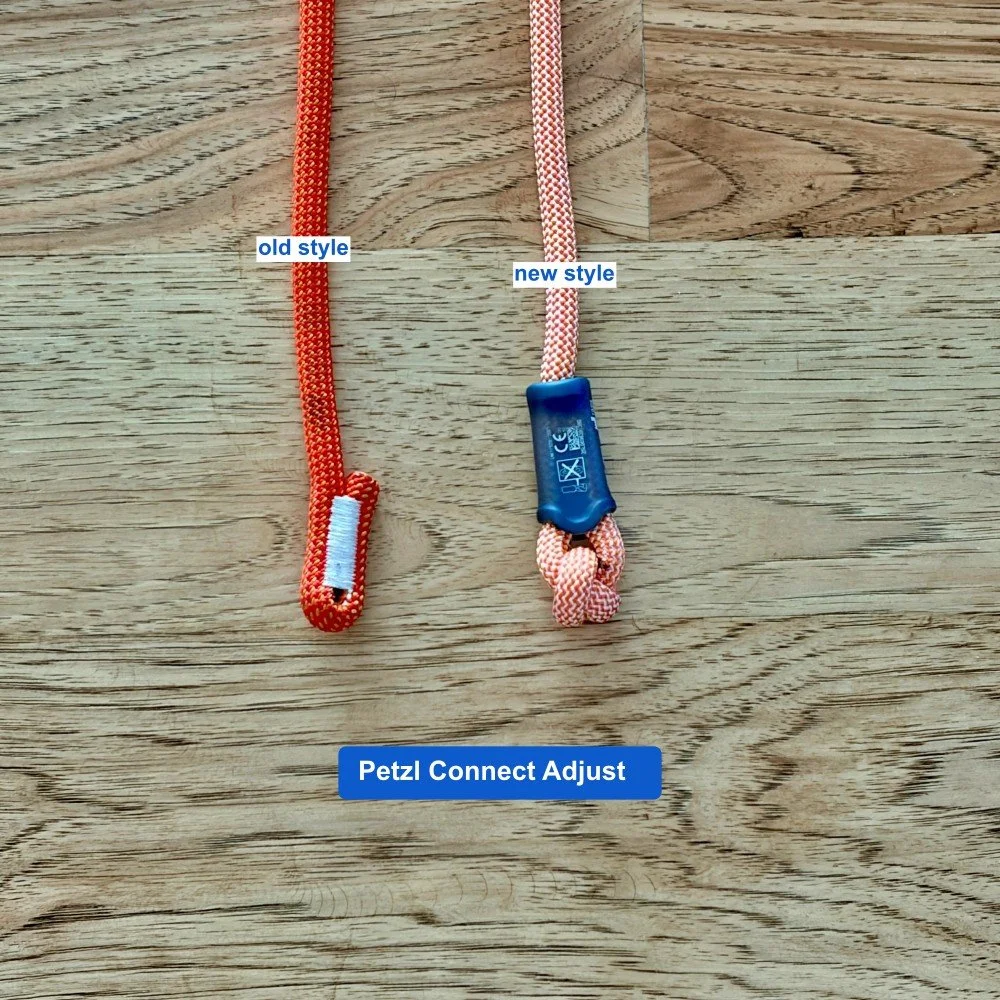
The older version had a functional, but not very attractive chunk of sewn rope as a stopper on the end. The new style has a better looking and slightly more ergonomic rope stopper.
Note that in both of these designs, it's impossible to clip a carabiner to the end. This is good, because you should never do that!
One of the biggest differences in ease-of-use is a slightly smaller diameter rope (Petzl Volta) in the new version: 9.0 mm vs. 9.5. Lots of people cut out the rope on version 1 and replacing it with various flavors of rope, from 8.5 to around 9. (I think Petzl got the hint.) You may not think that half a millimeter can make much difference, but it really does.
Another big change is the addition of a small hole in the new style, through which you can tie some cord. This allows you to release the tether when it's under full body weight, which you couldn’t do in version 1. This does take a bit of practice in a controlled environment, because it tends to go from fully locked up to fully unlocked very quickly, but it's doable.
Another change, that you can't really see it from the photo: the geometry of the aluminum part has been slightly changed to allow much easier feeding of the rope. Between this and the smaller diameter rope, the biggest headache with version 1.0 (hard to feed rope) is solved.
This last one is a head scratcher for me . . .
With the old version, it was impossible to pass the Connect Adjust over the locking sleeve of most carabiners. Combining this with the little rubber stopper thing (more than that below), it was impossible to cross load the device, and so it always was situated happily in the bottom of the carabiner. Seemed like a solid design, good job.
However, I was surprised to discover with version 2.0, you CAN pass the Connect Adjust onto and beyond the sleeve of many carabiners. This creates some potential for cross loading, removes the device from optimal position in the bottom of the carabiner, and in my mind seems kind of . . . wrong?
However, I'm sure the clever Petzl Design Gnomes, who are undoubtedly smarter than I am, did this for a reason. If you know why, please email me so I can be unconfused.
How do I attach the Connect Adjust to my harness?
What carabiner is best for the Connect Adjust?
What's the little rubber stopper thing that comes with the Connect Adjust?
Join my Premium Membership to read the rest of the article. Thanks for your support.
Premium Members can read the entire article here:
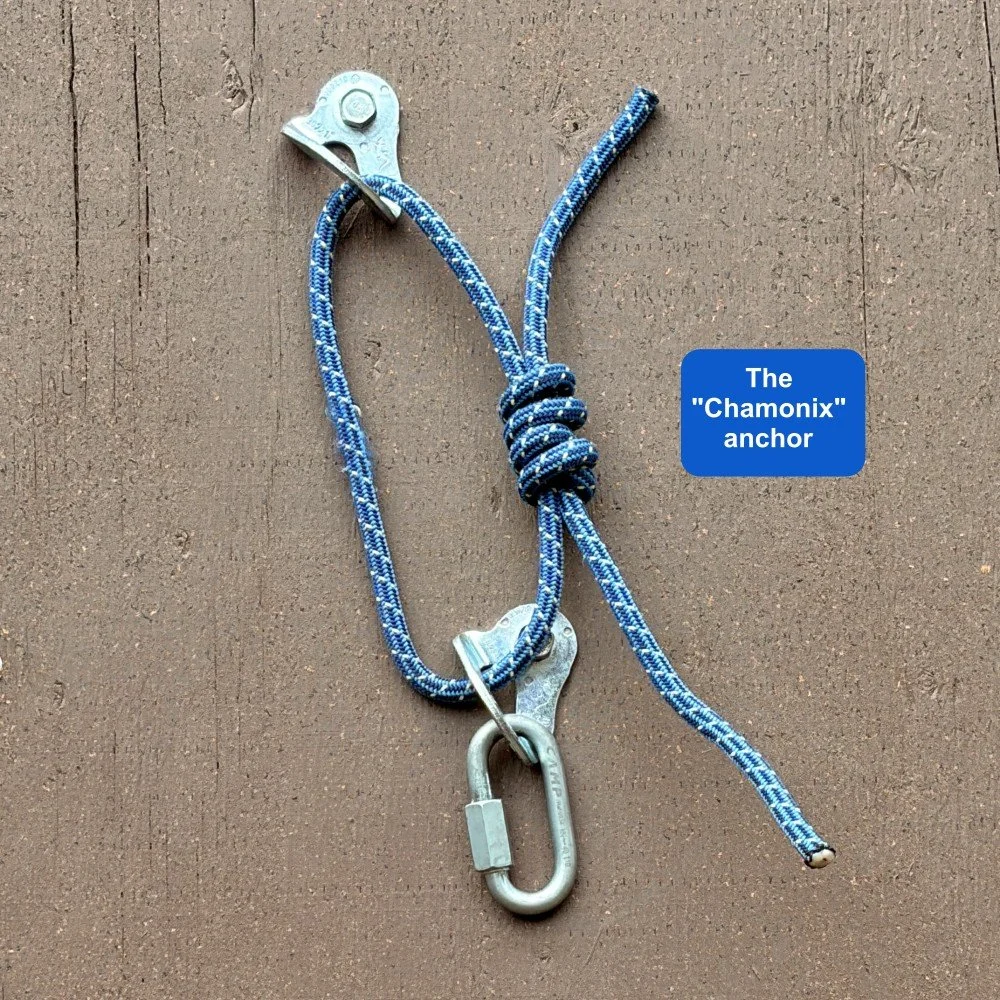
The “Chamonix” anchor
Here's a flavor of anchor you may find on alpine climbs in Europe: two vertical bolts connected with a piece of cord. Elegant minimalism, or super sketchy? Learn all about the “Chamonix anchor” here.
Premium Members can read the entire article here:
Here’s a flavor of series anchor that is apparently quite popular around Chamonix, and at some other European climbing areas. If you encounter one in the wild, it's good to know how to best use it.
(If you're new to vertical anchors, check out my detailed article here.)
The Chamonix anchor is two vertical bolts connected with a tied loop of cord. The bottom bolt has a quick link for rappelling. (Adding a second quicklink or ring to the bottom bolt that would hang perpendicular to the rock would give an easier pull of the rappel rope, but that’s a minor quibble.)
The cord and the top bolt back up the bottom bolt, in the highly unlikely event that the bottom bolt fails. The anchor is redundant, but not equalized.
What do you think? Sketchy as Donald Trump's tax returns, or elegant Euro anchor minimalism?
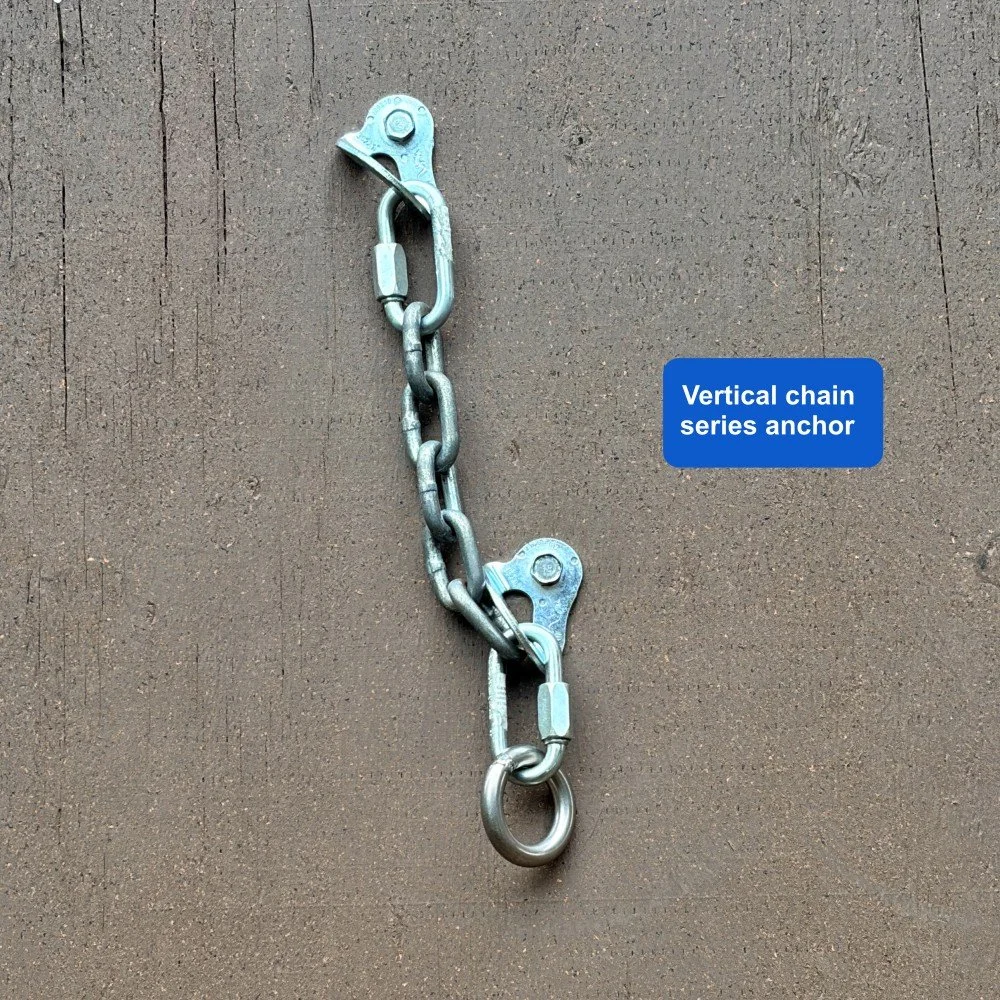
It's basically the same design as a vertical series chain anchor (below), but with cord connecting the bolts instead of chain. (In my opinion, this is the best anchor design for a multi pitch route.)
Is this chain anchor obviously stronger and longer lasting? Yes!
Is it also heavier, more expensive, and perhaps not as versatile? Also yes!
More on the pros and cons below.
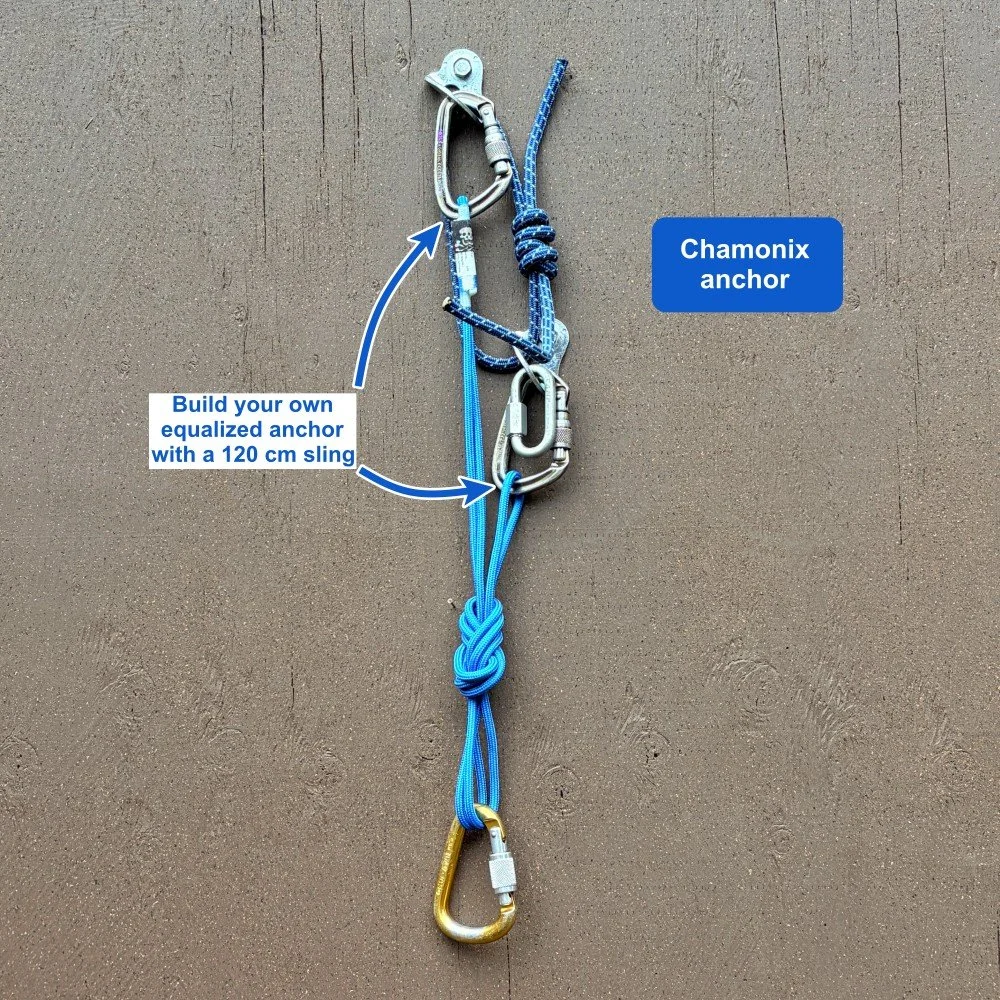
For a multipitch anchor when ascending, equalize the two bolts with a sling.
Would you want to use the Chamonix anchor in a high-use sport climbing area? No; better to use all metal hardware that will last longer.
Where might the Chamonix anchor be suitable?
In a more remote alpine area on routes that don’t get a lot of use.
Where you want to save weight and cost establishing a long multi pitch route.
Hopefully, where the local ethic is that you carry spare cord (and a knife) in the bottom of your pack and replace old ratty anchors as needed.
Keep in mind, there are probably thousands of anchors like this throughout the Alps. Are we hearing reports about them failing? I wonder if a failure of the bottom bolt AND the cord has ever actually happened in real life? I don't know. If you do, send me an email and tell me about it.
It's easy to say, “Always use metal anchor hardware” and never soft goods like this. However, learning from the incredibly wide range of anchors in the climbing world, there might be some cases when the Chamonix anchor makes sense.
On this website, I strive to share information and ideas, and not offer advice or (usually) share my opinion.
Chamonix anchor: Don’t clip the cord
One big potential problem: clipping the single loop of cord, and not building your own anchor or using the bottom quick link. That obviously is not redundant! If the cord is old and crusty, it could break under a modest load, and then you have a complete anchor failure, yikes!

Pros and cons of the Chamonix anchor. . .
Pros:
Low cost
1 meter of 8 mm cord, @ $2, AND one 8 mm quicklink @ $5, total about $7, VS
Four links of stainless steel chain, @ $8, AND two 8 mm stainless steel quick links, @ $5 each, total about $18
Cord is about 2.5x less expensive
Lightweight
40 grams for 1 meter of 8 mm cord, AND 75 grams for one 8 mm quicklink, total 115 grams, VS
190 grams for 15 cm of chain links, AND 150 grams for two 8 mm quick links, total 340 grams
Cord is about 3x lighter
Strong enough - provided the cord is newish and replaced as needed. (See strength test results below.) A good bolt should be good for at least 20 Kn+ each. The 8 mm quick link is rated to 30 kN. The weak link is clearly the cord.
Easier to place bolts in an ideal position in the rock, because you can adjust the length of the cord between them, as opposed to drilling in the spot that's dictated by the lengths of chain that you have with you.
Cons:
Not nearly as strong or long lasting as chain and quick links connecting the two bolts. Soft materials like cord, and especially webbing, can degrade quickly when exposed to the elements, especially sunlight.
Relies on climbers to carry cord with them to replace the old ratty stuff.
As mentioned above, not good to clip the cord, which some people are still gonna do.
Want to see the break test results (with video) for this anchor?
What are some simple ways to increase the strength and security of this anchor?
What about using a hanger with cord-friendly rounded edges?
How about an IFMGA Guide approved alternative to this, that uses no cord?
Join my Premium Membership to read the rest of the article. Thanks for your support.
Premium Members can read the entire article here:

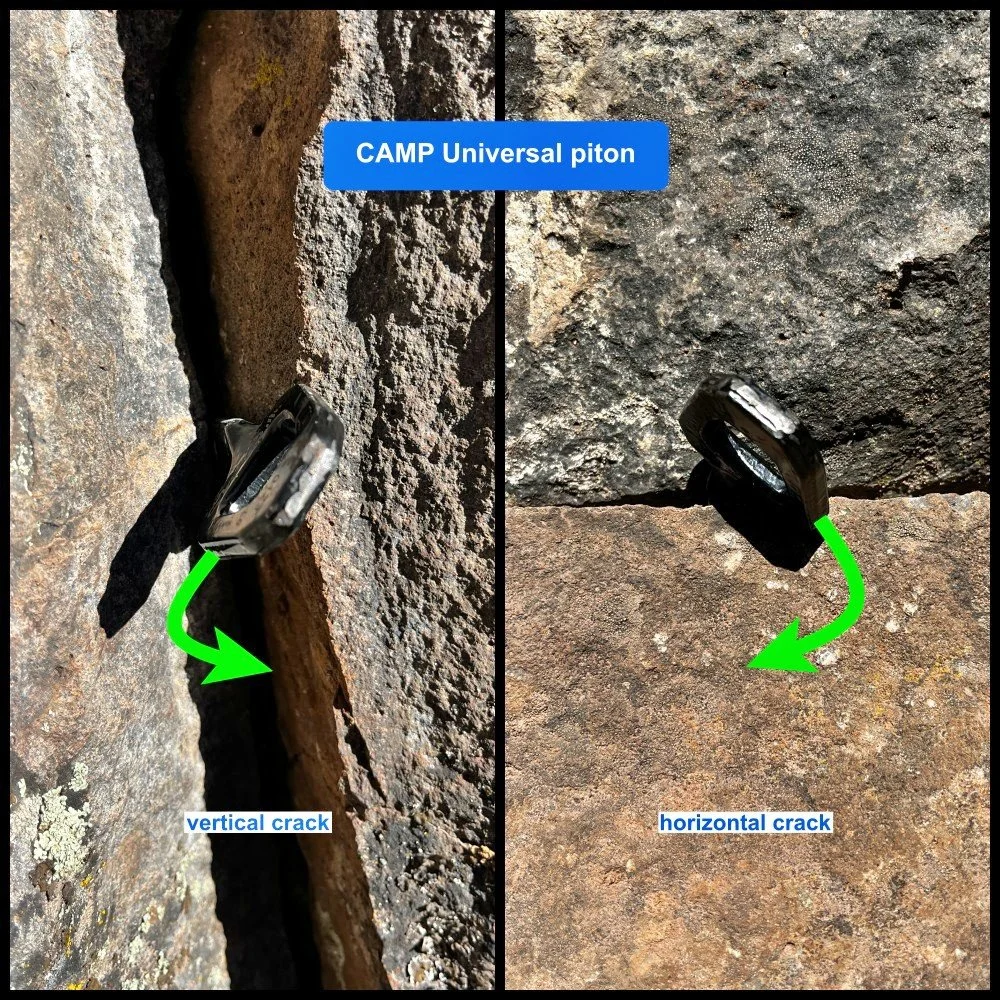
What’s a “Universal” piton?
A Universal piton has a sort of a Lost Arrow shape, but with a rounded eye that’s offset. This makes it easier to clip, allows it to cam for more secure placements in cracks, and can be a good problem solver when it comes to alpine rappel anchors.
Premium Members can read the entire article here:
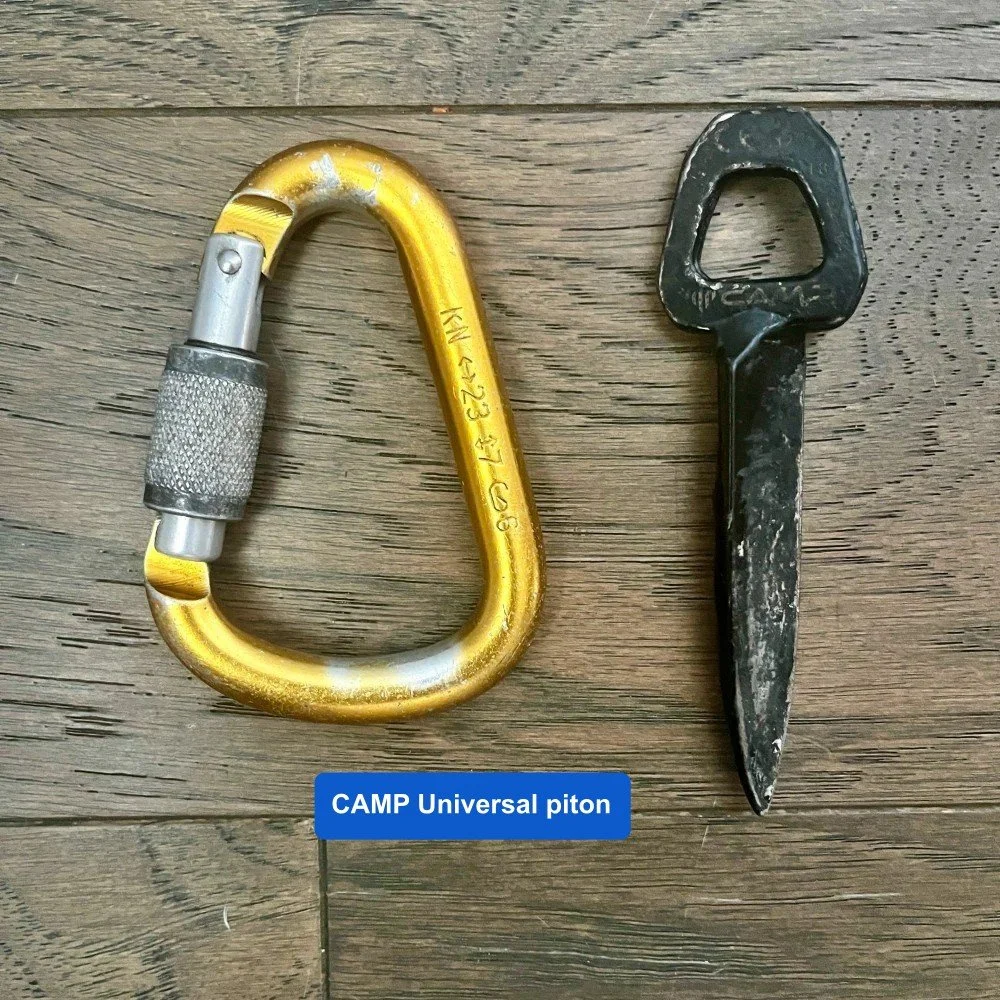
CAMP universal piton (with carabiner for size comparison)
I get it - hammerless / clean climbing started about 50 years ago. These days, pitons are used mostly on hard big walls.
However, for certain alpine climbing applications, especially making rappel anchors, sometimes a piton is just the ticket.
You’ll be pretty glad you have one if you're staring at a crack that's smaller than your smallest stopper!
The universal piton (like this one made by CAMP) is a clever design.
Similar in shape to a Lost Arrow piton, the blade is offset about 45 degrees from the head. This makes the piton rotate / cam into a (hopefully) more secure placement when loaded, whether it's a vertical or horizontal crack.
They come in hard steel (black) and softer steel (silver). The hard steel is better in most cases.
Universal pitons seem to be sort of a European thing. I don't think any American company (including the largest piton maker, Black Diamond) makes them.
You can get all different flavors of pitons, including the Universal, from HowNot2.
Because of the head is offset about 45 degrees from the blade, a universal piton rotates / cams into place when loaded in both a vertical and horizontal crack.
What are the downsides of universal pitons?
If you're doing hard big wall climbs, they don't replace standard pitons. (Get some beaks / Tomahawks instead.)
If you're placing them in a roof, or where the sides of the crack are at different depths (sort of like the left photo above) you may not be able to hammer it all the way in.
Some are made of soft metal, which may not hold up so well long-term.
They’re a bit heavy.
They’re a bit expensive, about $30 (spring 2026)
You need something to whack ‘em into place. (Don't have a hammer? You might get away with going caveman on it, with a baseball sized rock.)
Do you want to carry one on every climb? No. However, on a route where you need to maybe make rappel anchors, and especially if you have a hammer with you, you might want to consider it.
PS - don't leave it dangling on your harness at the rock gym . . .
Plus, whacking in pitons is just fun! (When you're practicing, be sure to do it in an area of rock where nobody is ever gonna climb.)
Because of the offset shape, a universal piton usually plays well with most shapes of carabiners, no matter how you clip it.
This makes it a bit easier to use than a more classic angle piton (below), where you usually want to clip it with the gate facing away from rather than toward the piton.
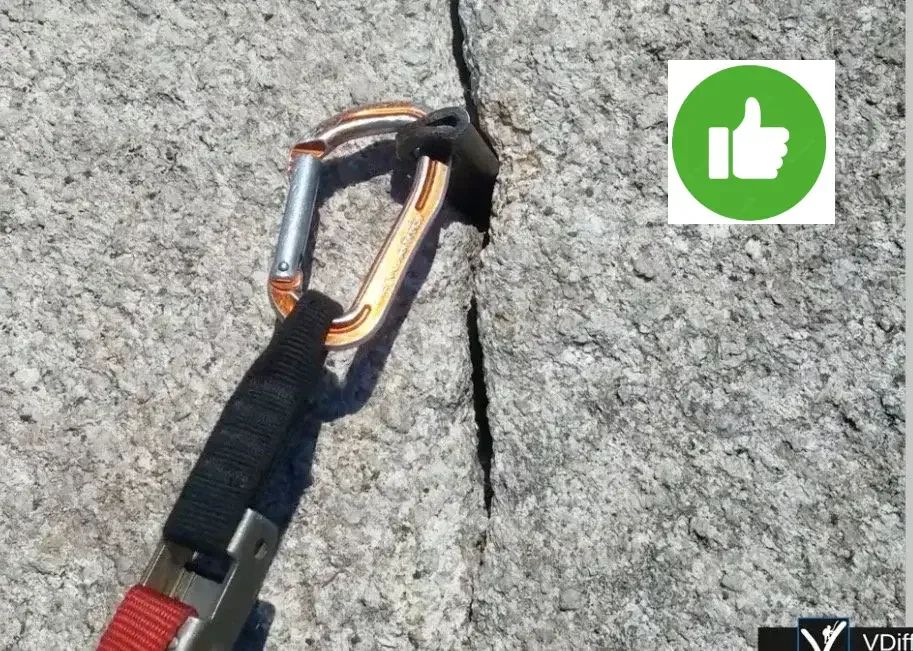
image: vDiff climbing, shared with permission
This is not a great way to clip an angle piton. The carabiner can get torqued and loaded in some strange ways; avoid this.
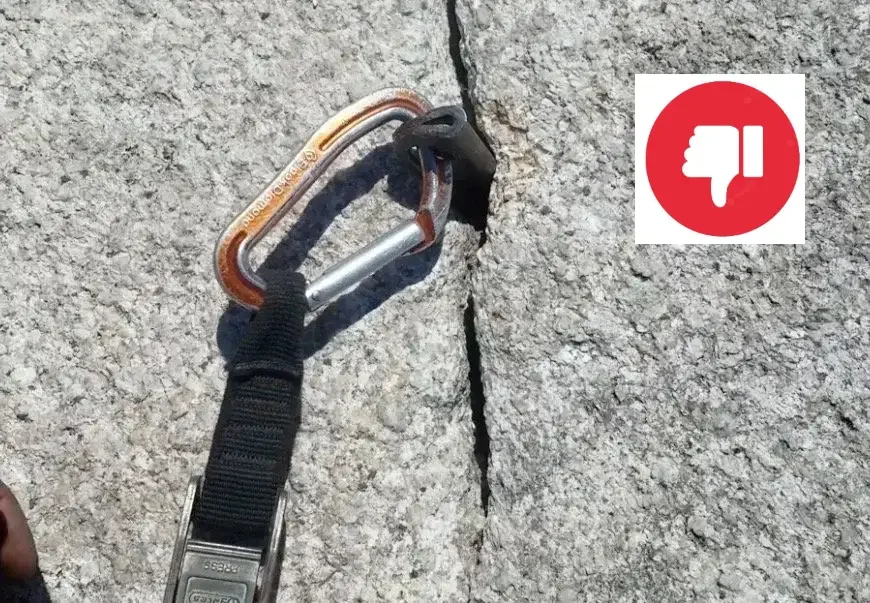
image: vDiff climbing, shared with permission
Want to see an example of using a universal piton for a rappel anchor?
What’s another size and style of piton that can be extra helpful for alpine climbing?
What are three different types of hammers that you can use to whack a piton?
Join my Premium Membership to read the rest of the article. Thanks for your support.
Premium Members can read the entire article here:
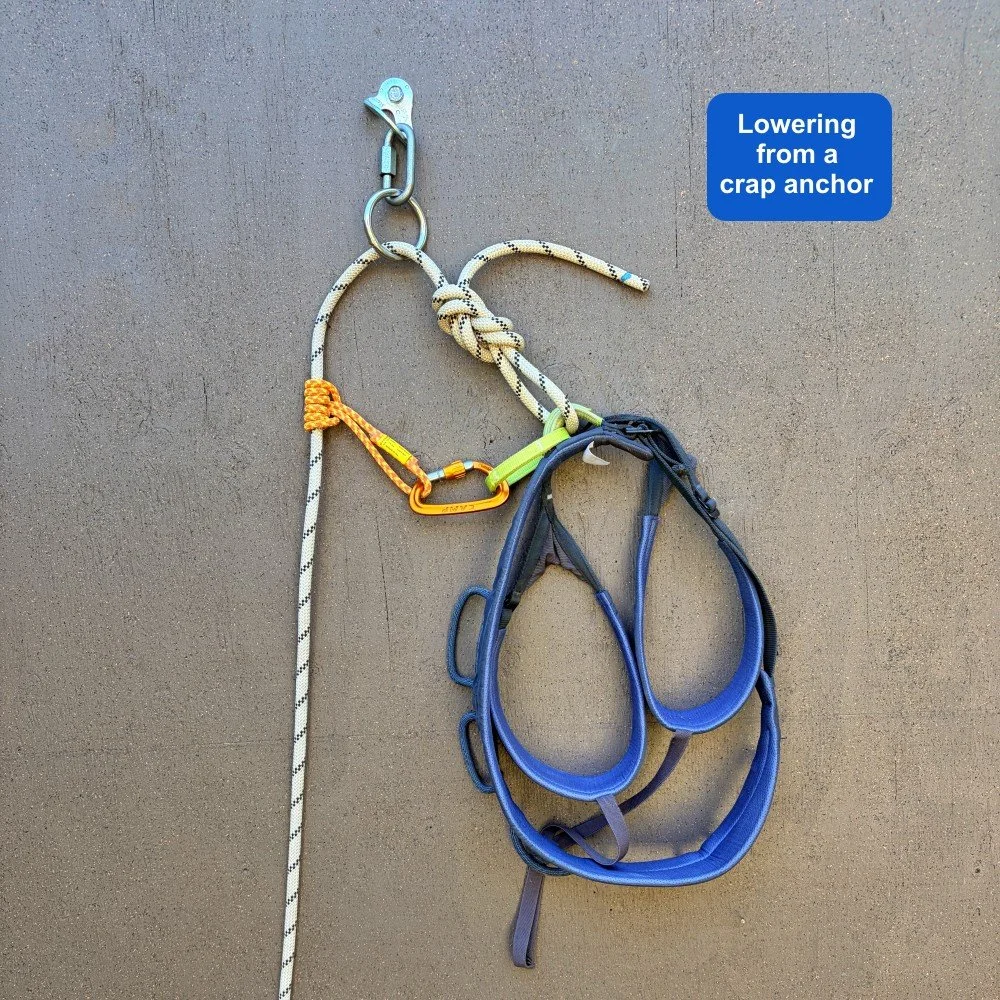
How can you safely lower from a crap anchor?
If you must lower off a suspicious anchor, putting a friction hitch on one strand of the rope MIGHT prevent a catastrophic fall if the top anchor were to fail. Here's the scoop on how to rig it, some of the potential problems, and a graphic video demonstration.
Premium Members can read the entire article here:
In spring 2026, there was a tragic and fatal accident in Kalymnos, Greece. Short version: a climber reached the top of a route, lowered from a two bolt anchor, both anchor bolts failed, and the climber took a long fall.
Pretty much every climber's worst nightmare, not being able to rely on redundant fixed hardware!
(Yes, the bolts were apparently weakened by the rust and corrosion at this coastal area, and in a perfect world all hardware near the ocean would be corrosion-proof titanium. But that doesn't always happen, and it’s a separate issue.)
Here’s a simple way to test a bolt, rather than just looking at it and hoping.
If you need to lower off an anchor (or a bolt mid-pitch) that looks extremely dodgy, what can you do to reduce your risk?
Here's one method that might, repeat MIGHT, work.
Rig the rope to lower from the anchor as normal.
Tie a friction hitch, probably a three wrap prusik with cord, to the strand of the rope that is going from the anchor down to your belayer.
Clip the friction hitch with a locker to your belay loop.
Call for “take and lower” from your partner below.
As you lower off the anchor, rest one hand above the friction hitch, and slide it down the rope strand. (Gloves are a good idea here, hint, hint.) Clean the gear as you’re lowered.
Now, if the anchor were to completely fail, you should only take a fall down to the next piece/bolt below you, because the prusik isolates the increasingly larger loop of rope that’s being created as you descend. One more reason to carry a prusik when you lead.
(If you did not have the friction hitch, and you have cleaned more than 1/3 of the route, and then the anchor fails, you would fall to the ground.)
Would a fall on this be terrifying? Yes!
Might the prusik melt and damage your rope? Possibly yes!
Are these better than the alternative? Yes!
What are some possible problems with this method?
This best works if you have gear placements below you. If there’s no gear below you, and the anchor fails on a single pitch, you will hit the ground.
If there's no gear below you on a multi pitch, you will take a factor 2 fall. If the anchor fails right after you load it, you'll take a very long factor 2. If it fails close to your partner down below, it will be a short factor 2. (See diagram below.) Either way, it's gonna suck.
You are relying on a thin (5 or 6 mm?) friction hitch cord to reliably grab onto the rope in a significant fall. Could it melt or damage the rope? Maybe.
You need to be guiding the friction hitch down the rope with your hand above the hitch pushing it down, rather than your hand grabbing onto the hitch, which may cause it to not grab the rope properly.
This method pretty much requires the anchors to be vertically in line with each other. If they're not, you’ll probably end up stuck on the rope between the anchor and the belayer. This can also increase the force on the top anchor because the rope is now being tensioned off to the side, which is not ideal.
Want to see a diagram that illustrates this problem of a diagonal route?
How about a video that shows this entire process, including what happens when the anchor fails?
Would a step-by-step diagram from Petzl showing this process, along with testing results, be interesting?
Join my Premium Membership to read the rest of the article.
Thanks for your support!
Climbing Tips: Do THIS, not THAT (Part 9)
Quick tips on best practices, with links to my detailed articles. This post covers: How to clip horizontal ring anchors, be nice to your cams, how to rap from a tree, a caution on the HollowBlock, and why to avoid the flat figure 8 bend.
Premium Members can read the entire article here:
In this article:
Horizontal ring anchor? Clip the rings
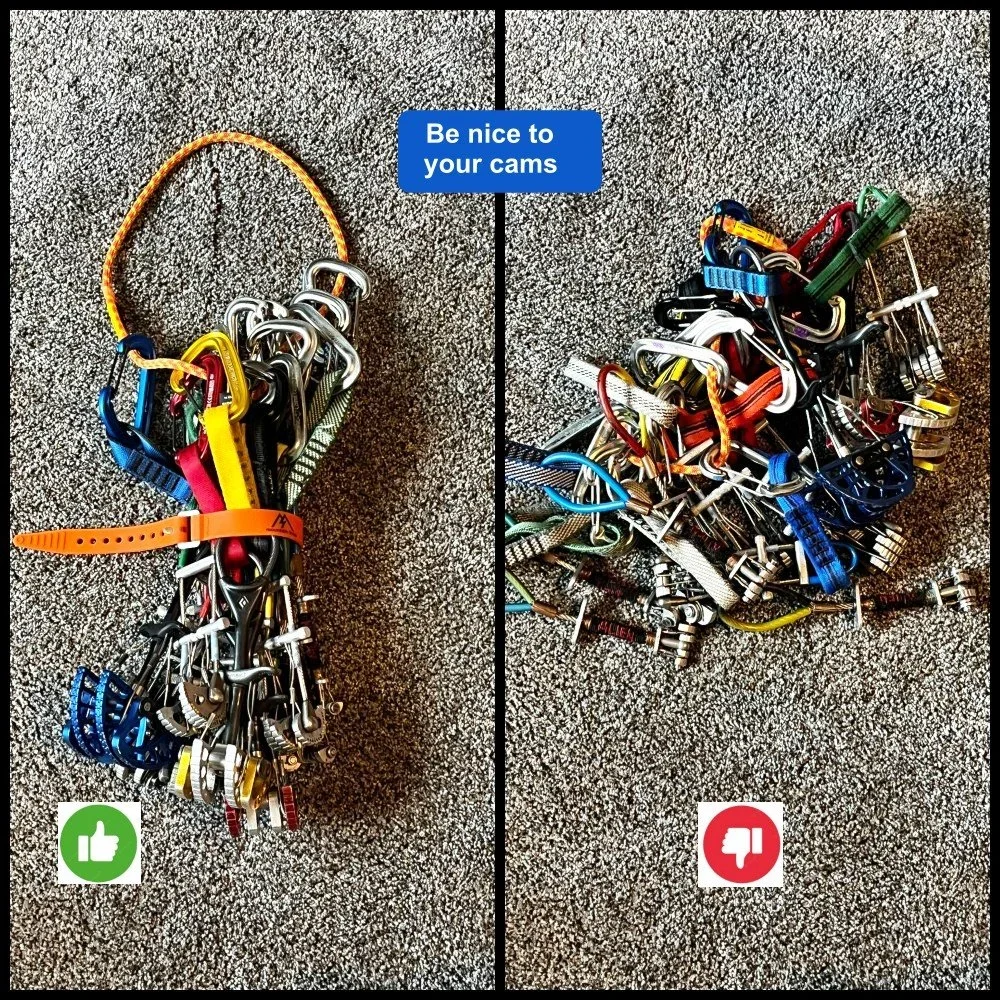
Treat your cams nicely - wrap with a sling or strap
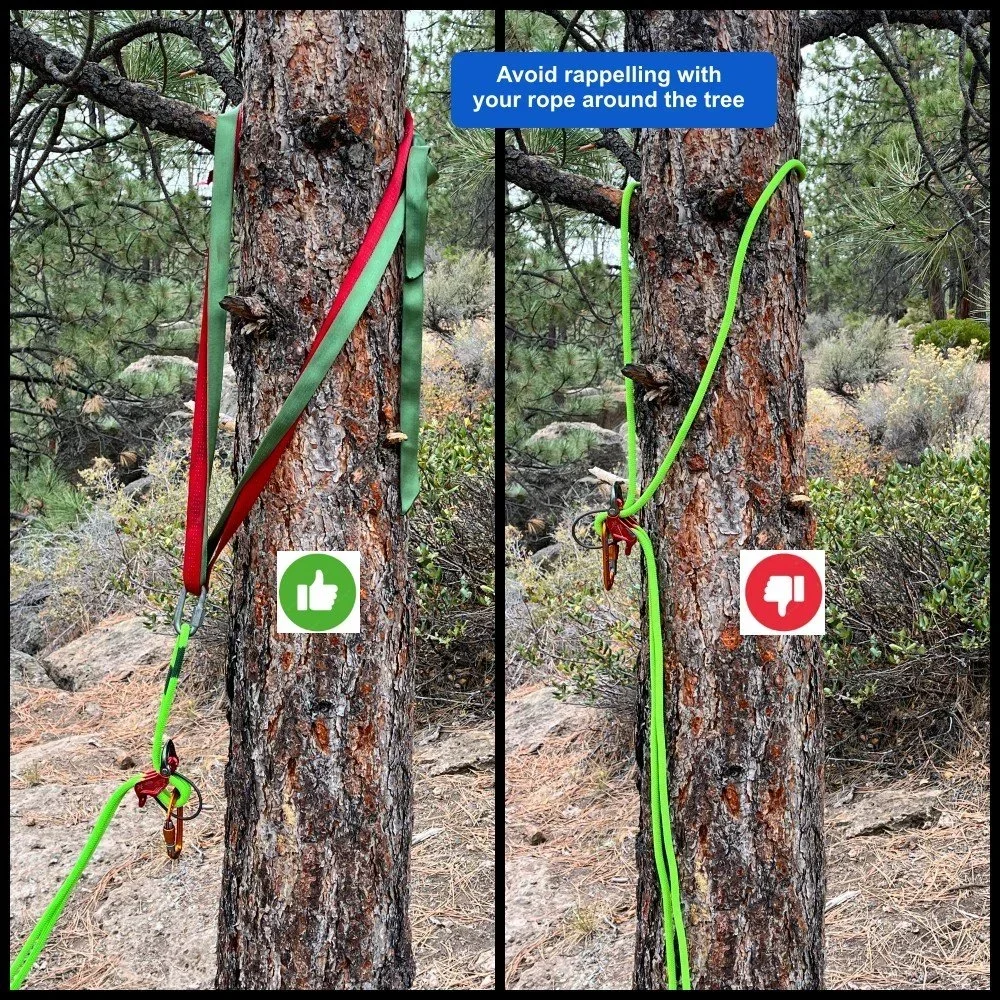
Tree rappels: Don’t rap directly from the tree
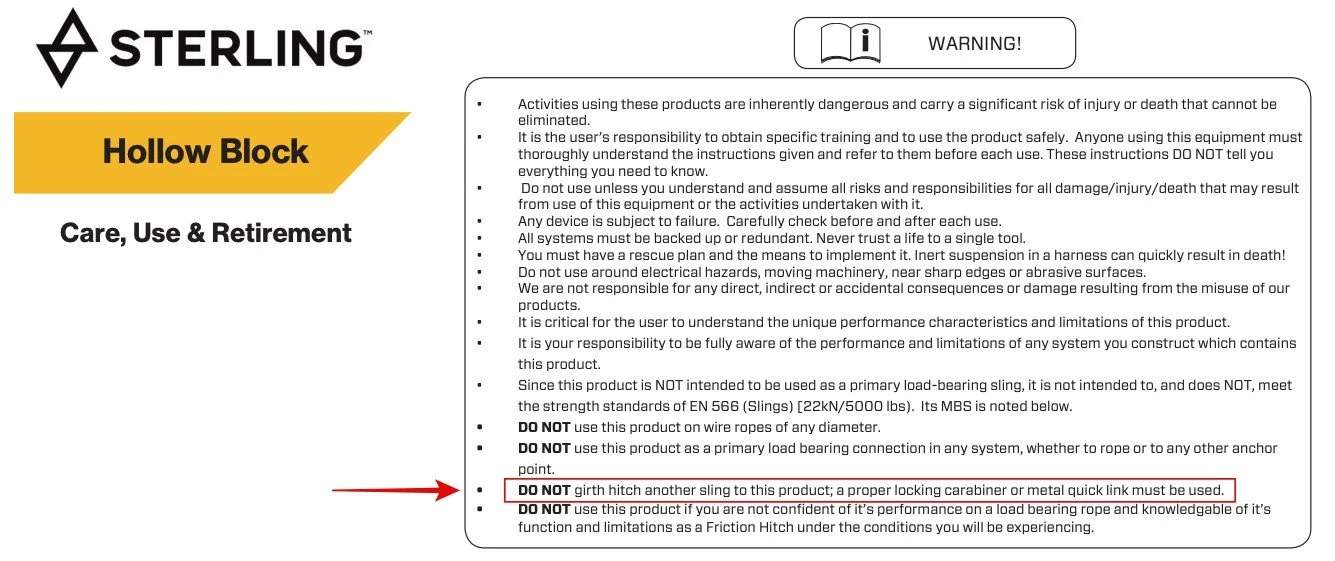
Avoid girth hitching a sling to a Sterling HollowBlock
Use the Flemish bend, not the flat figure 8 bend
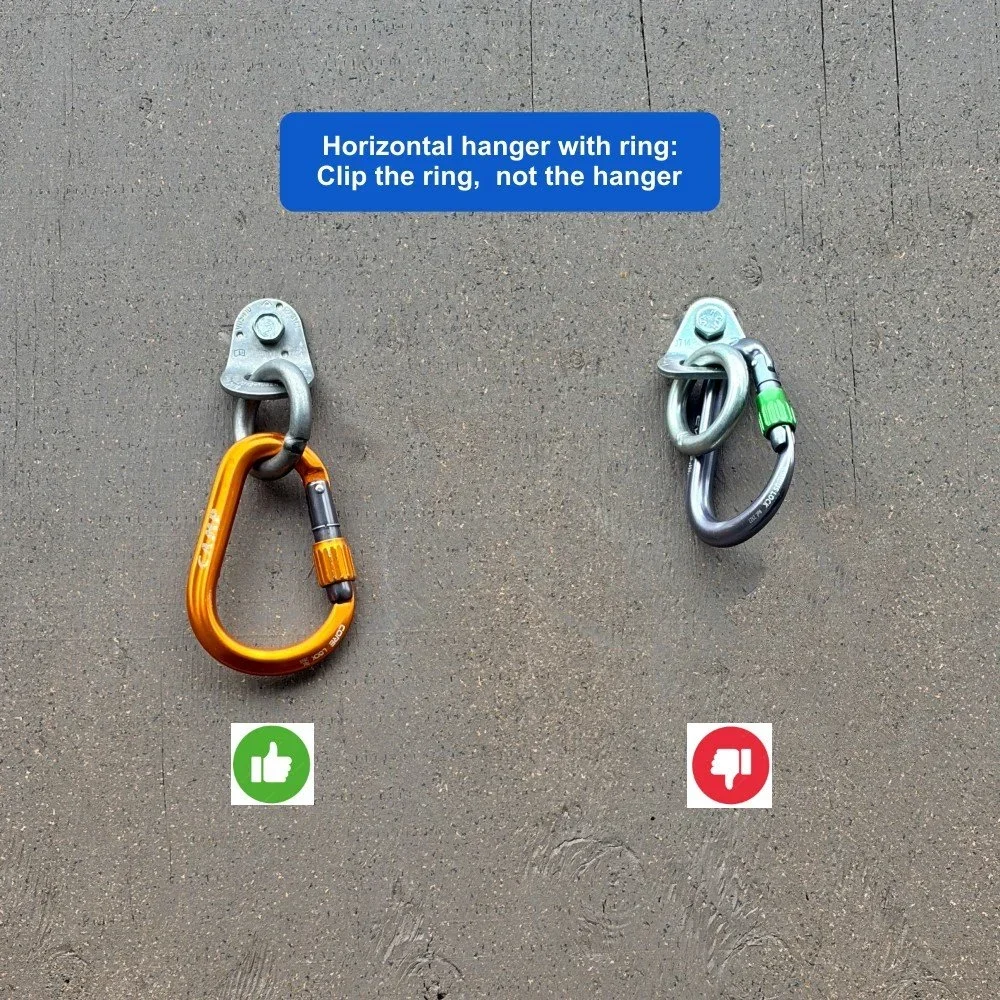
1 - Horizontal ring anchor? Clip the rings
The horizontal hanger with a welded ring is a nice minimalist approach to anchors, because the ring hangs perpendicular to the rock. This minimizes friction and rope twists when you pull your rope.
Apparently, there’s still debate as to where you should clip a horizontal ring anchor: the hanger, or the ring?
Clipping the ring is best practice. Why?
Clipping the ring is fast, convenient, and ensures your carabiner doesn't get twisted in some odd way.
The ring is absolutely strong enough. Typically these are 10 mm stainless steel; I've seen break testing on over 90 kn!
Your aluminum carabiners are never going to damage the much harder stainless steel ring. It's like using a plastic ice scraper to get snow off your car windshield; your windshield will never get scratched.
Clipping to the rings gives plenty of room above your carabiners for someone else who might be rappelling to use the anchor. If you clip the hanger, that often interferes with someone else who may need to rappel through you.
To be clear, if you do clip the hanger, and your carabiner is hanging properly without getting torqued in some weird way, there's nothing catastrophically wrong with it. Having said that, I want to point out that clipping the ring is considered best practice, and to counter the common objections.
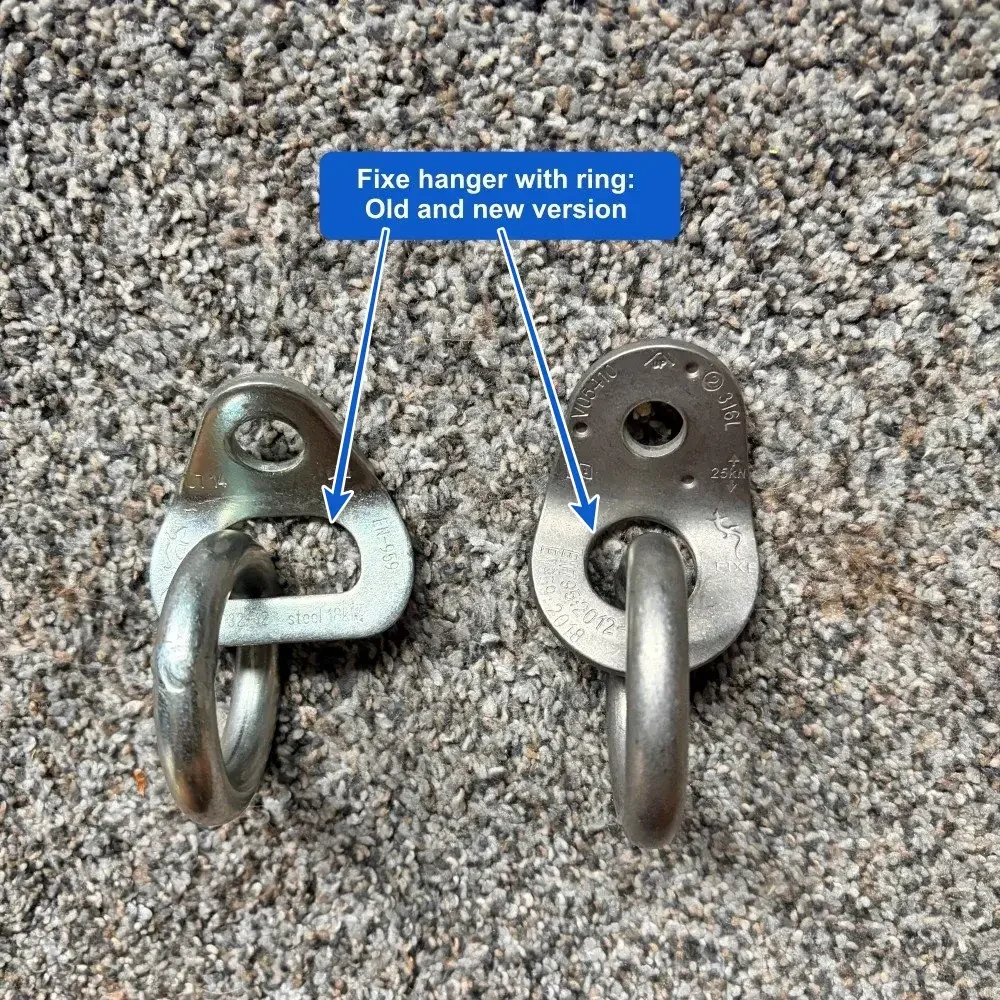
The new style hanger/ring from Fixe can’t even fit a big carabiner!
Fixe, the Spanish company who is the main manufacturer of this flavor of anchor, recently (2025?) changed the design.
The new design has a hanger that can't even fit a larger carabiner. So . . . There’s only one place to clip, and that's the ring!
The manufacturer designed their product to pretty much force you to clip to the ring. What does that tell you?
Check out the photo below. The new version is on the right. As you can see, there's barely room to clip a carabiner in the hanger. (Smaller ones fit, larger ones don't.)
Yes, I do buy all this hardware to nerd out on it and give you the scoop so you don't have to wonder . . .
2 - Treat your cams nicely - wrap with a sling or strap
When you put cams in your pack, clip them to a long-ish sling, let them all hang down together, and then wrap either the sling around them (or my preference when I remember it) a ski strap.
The trigger wires are delicate, and can be damaged or even broken if you casually toss all of your rack into your pack and then cram more stuff on top of it.
3 - Tree rappels: Don’t rap directly from the tree
When rappelling from a tree, it’s usually best to use use cord or webbing for an anchor, rather than rapping directly from the tree.
Reasons:
The friction from the tree bark can make it very hard to pull your rope!
Pulling your rope can damage the tree.
If it’s a conifer tree, you might get tree sap on your rope, no fun.
In some situations, such as if you don't have any anchoring material, and/or the tree has smooth bark, it can be acceptable to rappel straight off the tree. But generally, it's not best practice.
Want to learn a specific caution from Sterling about clipping their HollowBlock?
What are the potential problems of using a flat figure 8 to join two rope ends? What are some situations when you might want to use a Flemish bend?
Join my Premium Membership to read the rest of the article.
Thanks for your support!

Rope blocks 101
A rope block (aka Reepschnur), is a technique where you block one strand of your rappel rope to prevent it from running through the anchor. This lets you do a single strand rappel on the other side. Conceptually it's pretty simple. In reality there are some nuances, and definitely some ways to lethally screw it up. Learn them here.
Premium Members can read the entire article here:
Note - This post discusses techniques and methods used in vertical rope work. If you do them wrong, you could die. Always practice vertical rope techniques under the supervision of a qualified instructor, and ideally in a progression: from flat ground, to staircase, to vertical close to the ground before you ever try them in a real climbing situation.
This article was written with collaboration from Ben Wu, AMGA Certified Rock Guide. Connect with Ben at www.benwu.photography.
This is an updated version of a previous article on this topic.
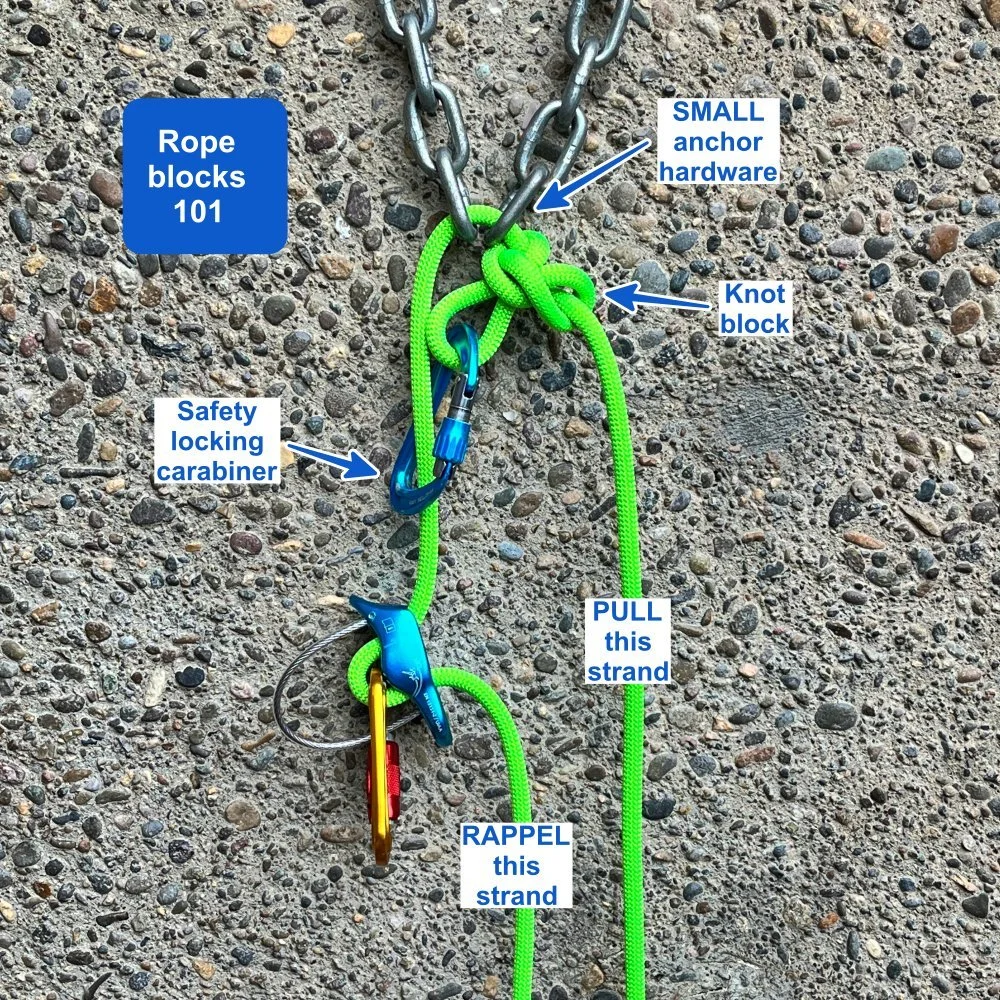
Rope block. Knot block. Carabiner block. Static block. Reepschnur.
They all mean pretty much the same thing: creating an obstruction on one strand of your rappel rope, that cannot be pulled through the anchor master point.
The rope can slide freely in ONE direction, but not in the other.
Doing this lets you rappel a single strand on the “fixed” strand of rope.
Main climbing application: it allows a full length retrievable single rope rappel; you carry less rope and weight.
To retrieve your rope, typically you use a lighter line such as a 6 mm pull cord (like the Petzl PURline) on the free running strand of rope.
Like everything in climbing, there are some definite pros and cons to this technique. If you’re considering using it, it's good to be aware of all of them. So let's get into it!
Conceptually, it's pretty simple. In practice:
There are some subtleties to doing it correctly.
There are some downsides to it even when you do it correctly.
If you screw it up, you could die or get your rope hopelessly stuck.
For these reasons, I consider it an advanced technique that you absolutely should practice with a qualified instructor. And, even when you’re confident with it, I feel it should generally not be part of your regular practice. It can definitely get you out of a jam in certain situations, but there are enough moving parts that I feel it's not a routine technique for most recreational climbing situations.
Here are articles on two closely related techniques that use rope blocks:
Not to dwell on the potential problems, but here are two reports of fatal accidents from rope blocks gone wrong:
First off, let's be clear on the Golden Rule of a rope block: it absolutely, positively cannot pull through the rappel hardware.
If you have not closed the system by attaching the pull side of the rope to the rappel side of the rope and the block pulls through the hardware, you will probably die.
If you have closed the system and the rope pulls through, your rope will probably be hopelessly stuck.
Take a close look at the anchor hardware and the diameter of your rope. If there is the slightest chance that you think the blocking knot could pull through the anchor hardware, then don’t use a knot block! (Consider a carabiner block instead, more on that below.)
There are really only a few times in recreational climbing when you might want to use a rope block.
You’re using a pull cord to do full length rappels. In this case, a rope block is pretty much mandatory. (Yes, there are some advanced ninja rope tricks like using a Stone hitch and a Fiddlestick to use a pull cord a different way, but we're not gonna get into that here.)
Your rope is too short to make the rappel. Lower your partner to the next station, make a rope block, and then extend” the “pull” side of the rope with whatever extra cordelette, slings, etc. until your DIY extension reaches the next anchor station.
There are two other situations where people often think they need a rope block, but there are other techniques you can use instead.
You damaged your rope and need to rappel. You rappel on the good half of the rope and use the damaged half of the rope with a knot block as a pull cord. To avoid doing this, you can do a counterbalanced rappel, read about it here.
If both partners have a Grigri, and you both need to rappel. It's pretty unlikely that both partners will have Grigris and not a tube device, but I suppose it could happen. You could use the counterbalanced rappel technique described just above. If one person has a Grigri and the other person has a tube style device, there are lots of other options for getting both people down without using a knot block, see some of them here and a photo example below.
Potential problems of a rope block (and pull cords)
The big one was already mentioned, but it's worth saying again: if the knot pulls through the hardware, the entire system fails and you die, or your rope gets stuck.
You’re adding an extra knot and carabiner to your system, which are two more things that can potentially get snagged when you're pulling your rope.
There are increased steps and complexity, which can increase the chances of making a mistake. This is especially true because for most people, this is a non-standard system that doesn’t get used regularly. See accident reports at the top of the page.
If you're using a lighter weight pull cord, if you pull your rope and it gets snagged after the end of the climbing rope is out of reach, you only have a pull cord in your hands to deal with the problem. Not good.
Maybe you forget what side to pull, whoops. It can be good practice to establish which side you block and which side you lower off of and do this pretty much all the time. For example. “L”=Left=Lower, and “R”=Right=Retrieve.
If you're doing multiple rappels, you can’t do the standard trick of feeding the pull strand through the bottom anchor and then pulling the rope. Why? Because you’re pulling the skinny cord, but the thick rope needs to be the one through the anchor. This means you have to re-rig the entire system at each rappel station, which takes additional time.
Yarding on a 6 mm rope can be rough on your hands. Consider adding a Tibloc or Micro Traxion on the pull cord to make the pulling easier. Gloves are recommended.
Pulling the rope can be significantly harder, because you don’t have a counterbalanced weight on the pulling strand to assist your pull.
You’re rapping on a single strand of rope, which might be uncomfortably fast. Be sure you know some ways to add friction to your rappel.
If you keep the safety carabiner clipped when you pull, it can add a significant amount of extra friction, making your rope pull more difficult. This can be especially true on a low angle slab.
If you keep the safety carabiner clipped when you pull, sometimes the ropes can more easily twist together, which can cause your ropes to get stuck.
If you keep the safety carabiner clipped when you pull, you've essentially created a closed loop that you then need to pull down. If the two sides of the rope making this loop happen to go on either side of some rock spike, boulder, shrub, ice blob, etc., the loop is going to get caught when you pull down your rope, causing your rope to get stuck. This is probably difficult to visualize, so check out the photo below. (Yes, it’s a flower pot, but I think you get the idea . . . =^)

Rope block backups, pros and cons . . .
It's good practice to backup a rope block by clipping the blocking knot onto the rappel strand with a locking carabiner. In the unlikely event of the block pulling through the hardware, this will save your life.
The backup stays in place for everyone except maybe the last person.
If the block is closely inspected after being fully loaded, and you are 150% sure that it cannot pull through the hardware, then the last person has the option of removing it. In many cases, this is a good idea.
Removing the block for the last person eliminates several of the problems mentioned above.
This is a call that the last person gets to make. (Like most everything in climbing, this is a subjective choice, and not a black and white rule.)

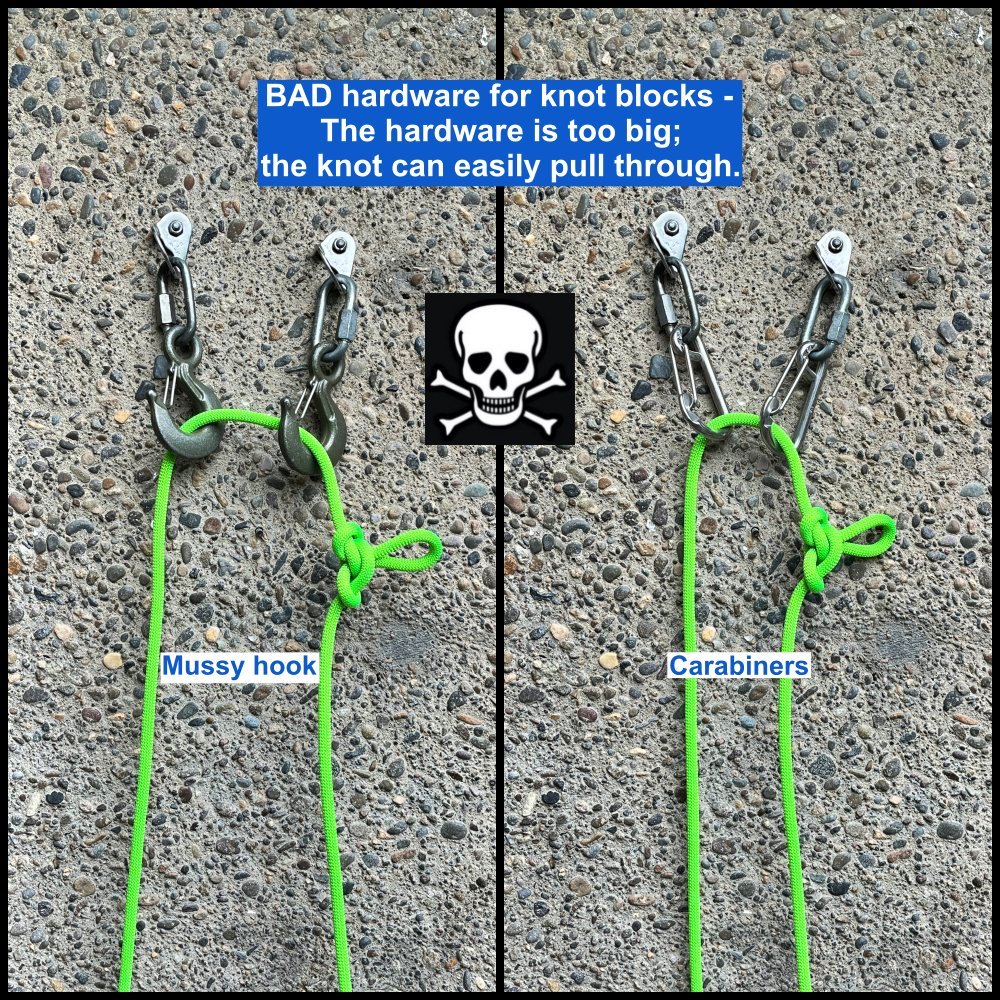
What’s the best anchor hardware for a rope block?
Small-medium size quick links, chains or small rappel rings are the most secure hardware for knot blocks. The openings are small and it's pretty much impossible for a blocking knot to be pulled through them.
Lots of people like to hate on carrying quick links, but this can be an outstanding time to use one. Keep in mind that a 5 mm, stainless steel, CE approved, 25 kN rated quicklink from CAMP costs about $6 and weighs just 22 grams. So weight, cost, and strength are not issues with carrying quick links, provided you get the right ones.

Some not-so-great hardware for a knot block would be a carabiner or Mussy hook. These have larger openings and greatly increase the chance of the knot pulling through. Remember, the knot will shrink as it’s loaded.
Nice diagram from the superb Petzl website. Small quicklink on the left, probably good. Large ring on the right, bad, the knot could pull through.

image: https://www.petzl.com/US/en/Sport/Multi-pitch-rappelling-with-a-single-rope?ProductName=PUR-LINE-6-mm
What about a carabiner block?
Will the blocking carabiner get damaged when I pull the rope?
What knot should I use for the block?
What about rapping with a Grigri, don't I have to use a block to do that?
Join my Premium Membership to read the rest of the article.
Thanks for your support!
There you have it: my thoughts on the pros and cons of rope blocks.
Under ideal circumstances with proper anchor hardware, they can work pretty well. But as you can see, there are a lot of subtleties to doing it correctly.
Once again: I consider this an advanced technique that I highly recommend you practice in a controlled environment with a qualified instructor before you ever try it in the wild. Choose wisely, my friends.
Can a “microline” eliminate stuck rappel ropes?
What if a spool of kite string could pretty much eliminate stuck rappel ropes? That's what you get with the microline. Learn all about it here.
Premium Members can read the entire article here:
Andy Kirkpatrick mentions the microline in his outstanding book “Down”, so credit to him.
I have a longer video showing this technique in the Alpinesavvy Premium Member expert videos collection. It was made by expert alpine climbers Priti and Jeff Wright. Connect with them on Instagram (Priti / Jeff) and their website, alpinevagabonds.com
Disclaimer: this is an advanced technique, suitable in certain niche applications. It’s NOT meant for everyday use. Practice it thoroughly in a controlled environment before you ever try it in the real world.
What’s the best thing you can see when rappelling? Your rope falling happily from the anchor above, without getting hung up!
What's the worst? Your rope getting stuck, blown off to the side, or some other potential catastrophe!
What if you could (pretty much) guarantee that your falling rappel rope would never get stuck? Imagine your rope magically guided into your hands, without getting hung up or blown off to the side?
The microline does that.
Here's how it works:
You rappel normally on two strands, either with one rope, or two ropes tied together.
When both partners are at the lower anchor, untie the stopper knot(s). Tape the microline to the end of the rope that will be pulled up and through the anchor above you.
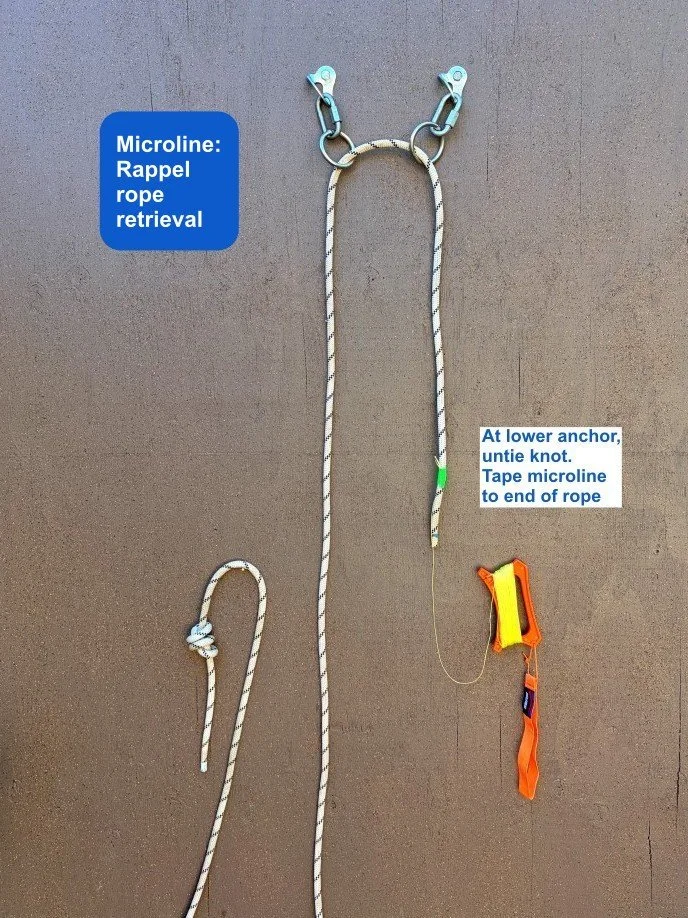
One partner pulls on the pull strand of the rope, while the other feeds out the microline. The rope and the line will pass through the anchor.

Now, instead of the rope free falling, it’s gently lowered down the rock face, by continuing to feed out the micro line.
Here's the key piece of gear for a microline - kite string winder.
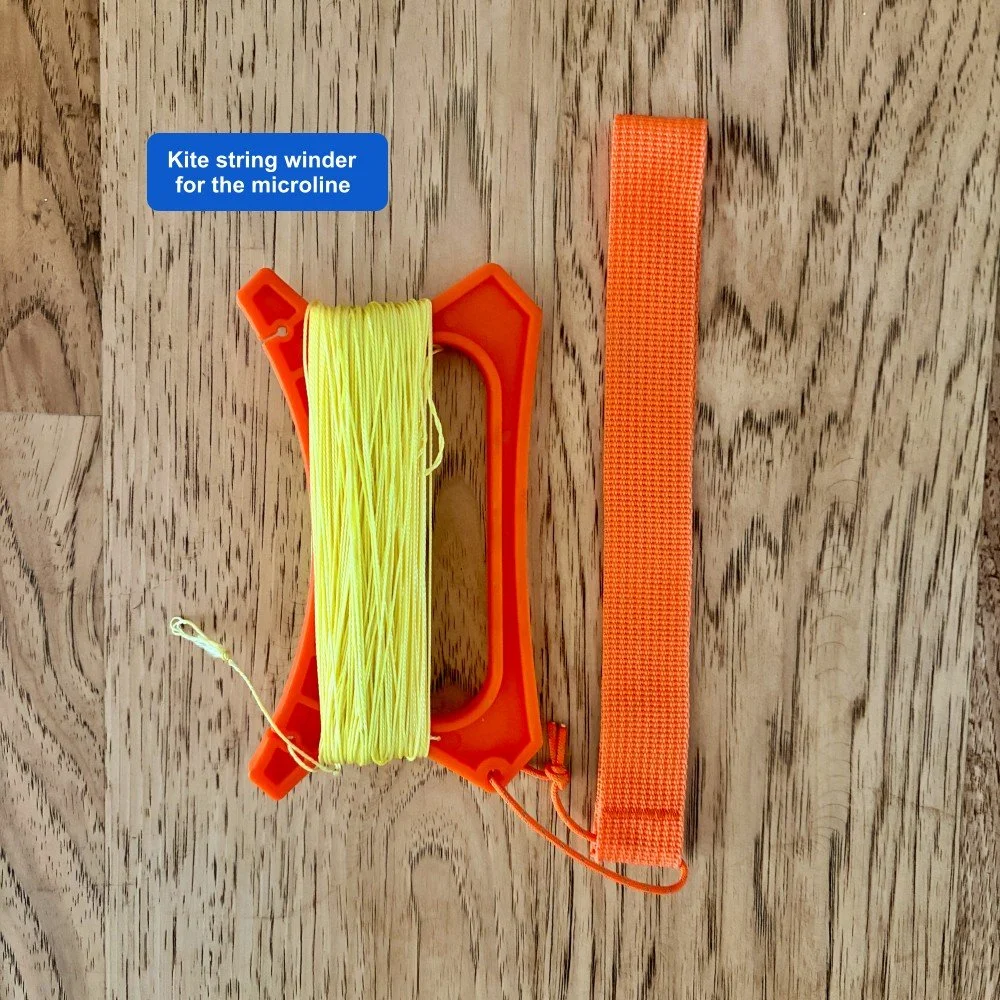
You need a spool of kite string that’s twice as long as your longest anticipated rappel. For example, a full length double rope rappel with 60 meter ropes requires 120 meters of microline.
(I've also heard of people using a fishing reel attached to a little stub of a fishing rod. I've never tried that; seems bulkier than the kite string, but potentially faster to wind up when you're done. Maybe good for single pitch cragging, but not for alpine climbing.)
Before you pull your rappel rope, attach the microline with a clove hitch near the end of the strand that’s going up. Secure the hitch with a wrap (or two) of tape, and leave a bit of tape folded to itself so you can remove it easily.
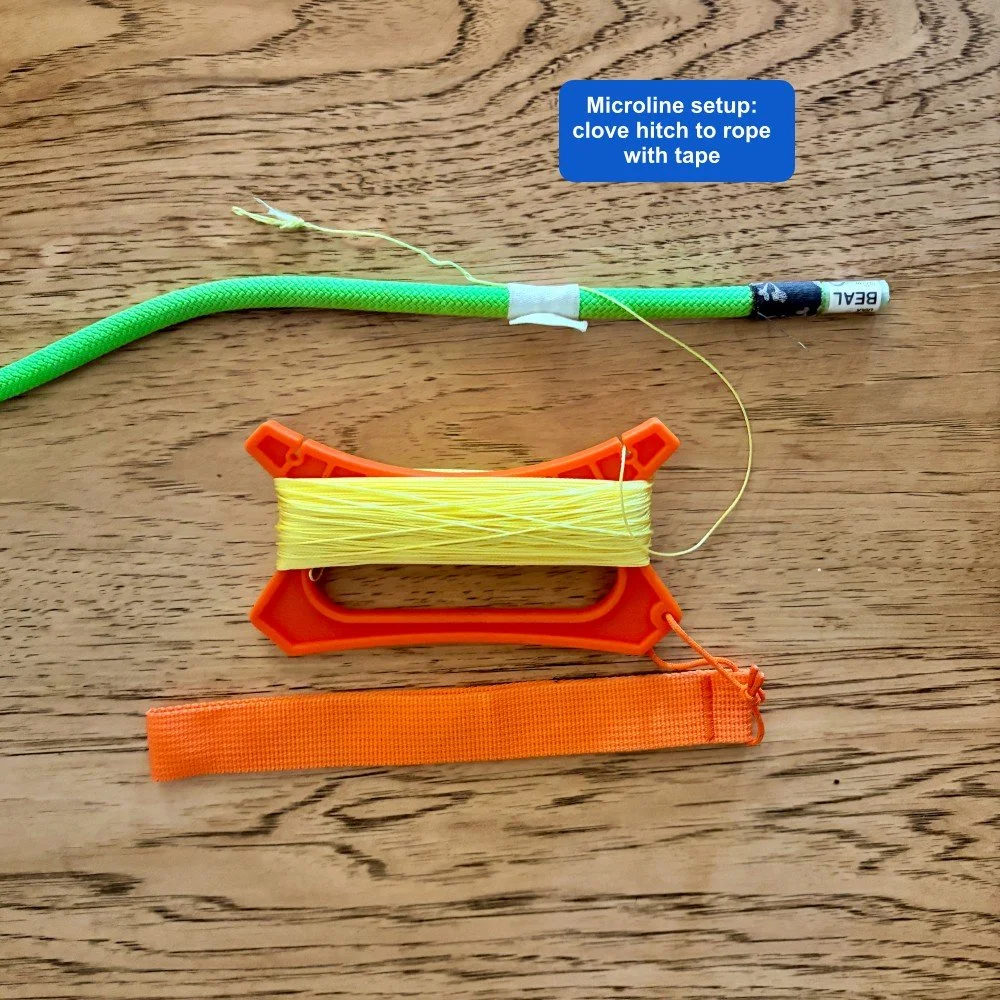
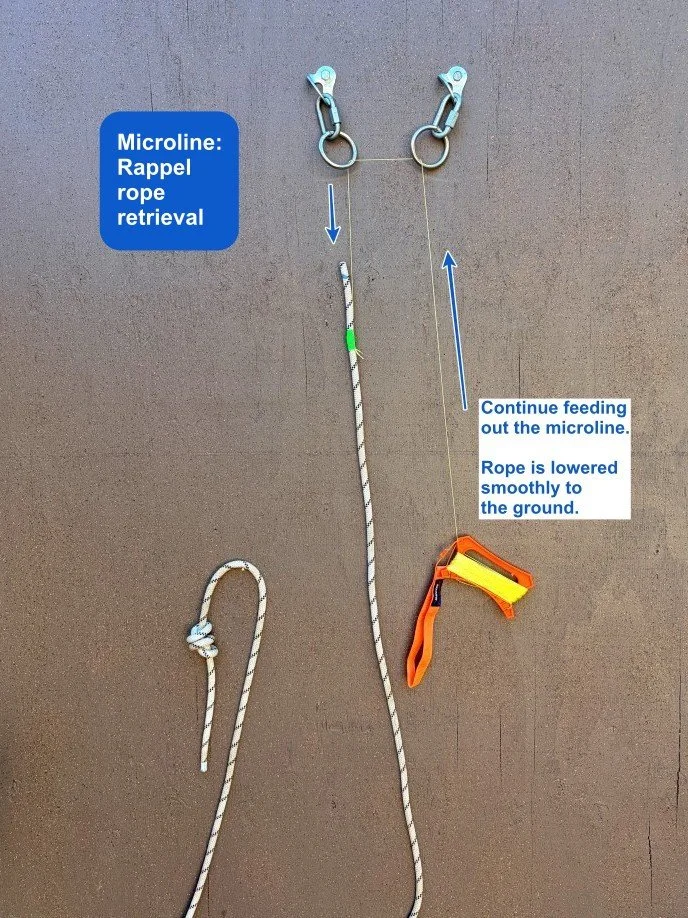
As you pull DOWN on the pull strand of your rappel rope, the microline feeds UP from the spool.
Having a small bit of tension on the microline prevents it from blowing around if it’s windy.
This is best done with two people; one slowly pulling the rappel rope, and the other one feeding out the microline. Don't pull the rappel rope too fast or you might break the microline. You can feed out the cord quite quickly by sort of waggling your hand back and forth.
As the end of your rope passes through the anchor, instead of free falling and potentially getting hung up or blown around . . . you keep feeding out the microline from below, which smoothly lowers your rope, slow and controlled, right back into your hands. YAY!
Remove the tape and clove hitch, and start winding the microline around your winder, pulling it back up to the anchor and down to you.
What are some rappelling situations where you might want to use a microline?
Want a link to where I bought my kite string?
How long does it take to wind up 120 m of line?
How much does it weigh?
How about a short video of the microline in action?
Join my Premium Membership to read the rest of the article.
Thanks for your support!
Break into a tight line - Ninja level #CraftyRopeTrick
“Breaking into a tight line” is not something most recreational climbers would ever have to do. However, it is a great exercise in clever problem solving, creative use of gear, and (my favorite) mechanical advantage. Here's one way to rig it. Give it a try, it's fun!
Premium Members can read the entire article here:
I first saw this on the Instagram of Vladislav Babikov, @babikov_vlad, an Israel based paramedic and rescue expert. Thanks Vlad!
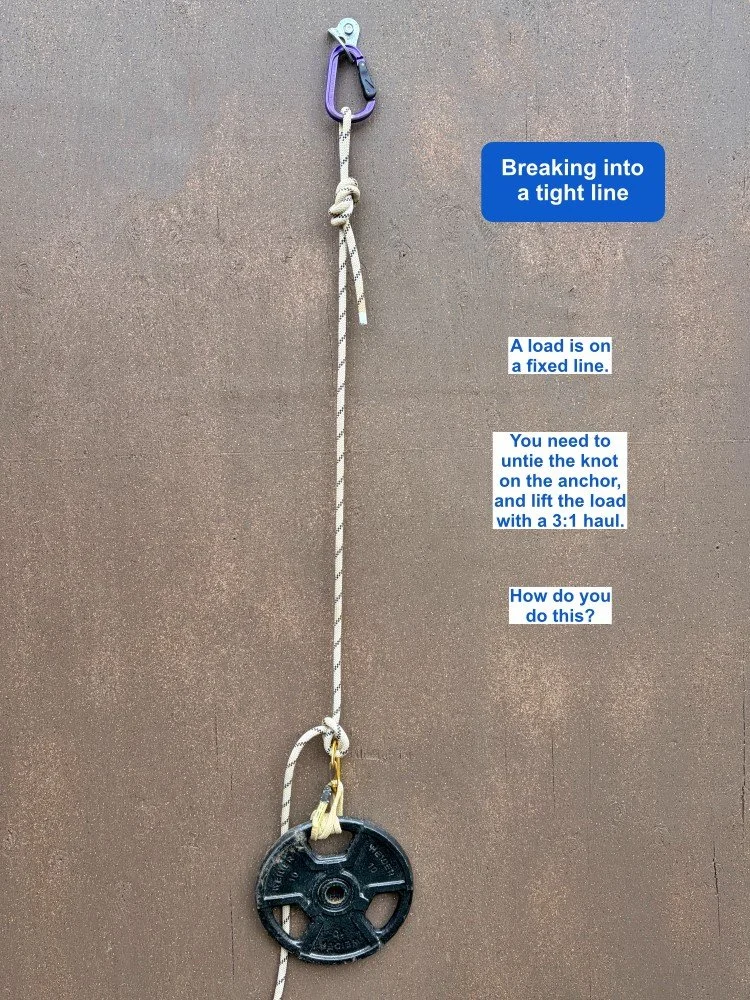
Scenario: someone (or something) is loading a rope that’s fixed on one end. The load is hanging in space and there's no way to create slack.
Your mission: free up the end of the rope so you can make a 3:1 hauling system and pull the load up toward you.
I'll start by saying this is not something that most recreational climbers should ever have to do. In most vertical rescue scenarios, you're better off lowering the load down instead of hauling it up.
This particular technique is more of a rigging, rope access, search and rescue kind of thing, and yes, climbers probably will not carry the gear used here.
Having said that . . . The gear head and mechanical advantage nerd in me LOVES learning and practicing this kind of stuff! It teaches lateral thinking and creative use of gear in unexpected situations, which is always a good thing.
So, even if you're sure you’ll never use something like this, give it a try. It's good for your noggin. =^)
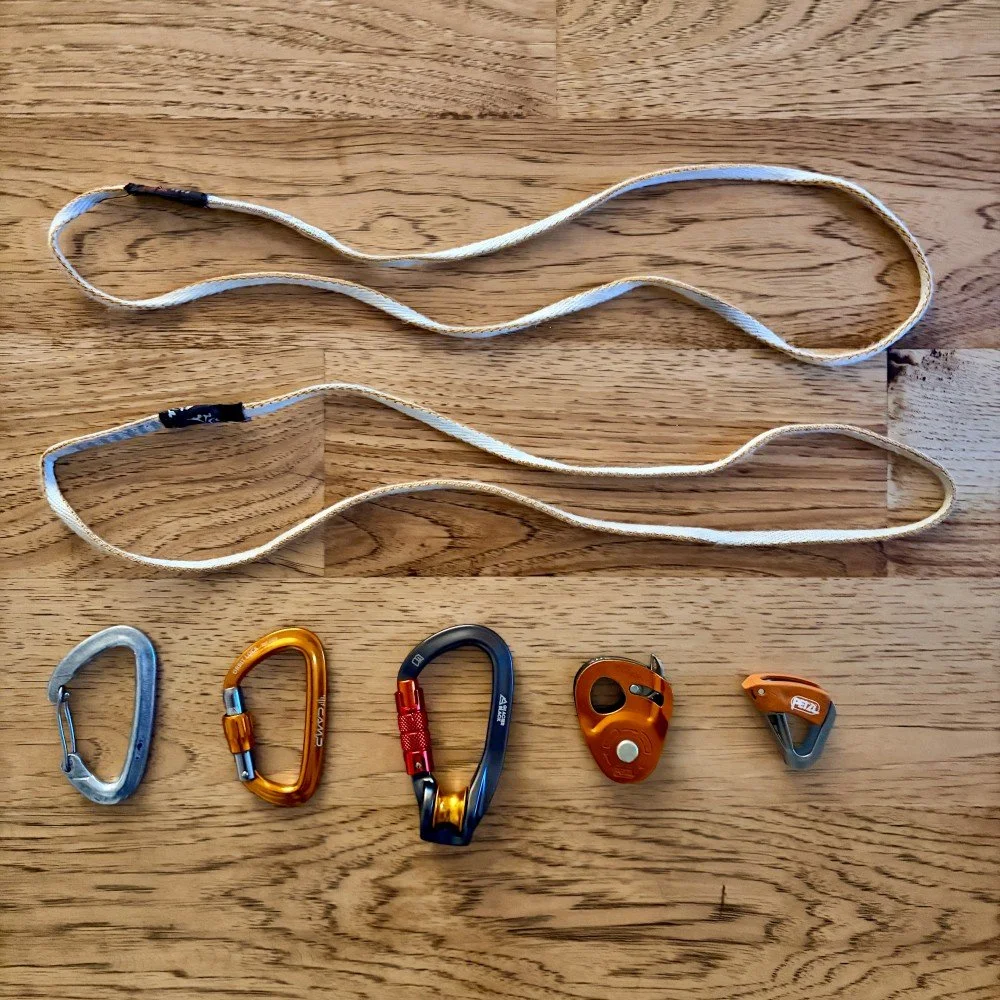
Gear used (you can improvise a bit . . . )
60 cm sling
a second sling, 60 or 120 cm
1 standard carabiner (medium/large)
1 locking carabiner
Petzl Rollclip or similar device (could substitute carabiner & pulley)
Petzl Micro Traxion pulley
Petzl Tibloc (could substitute prusik)
Step by step:
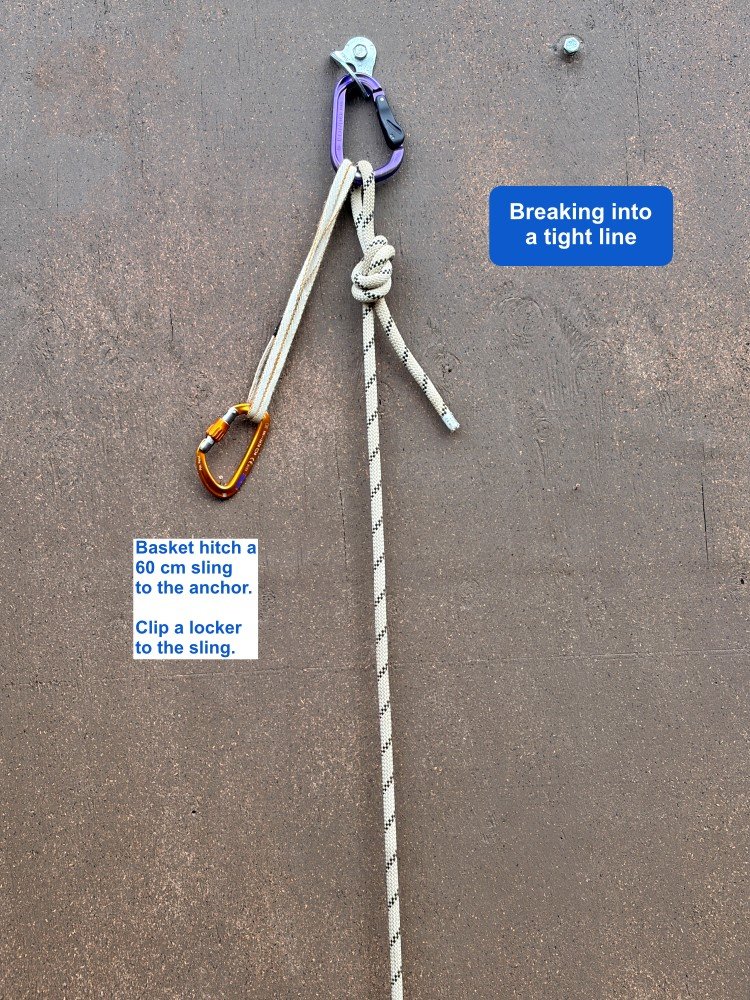
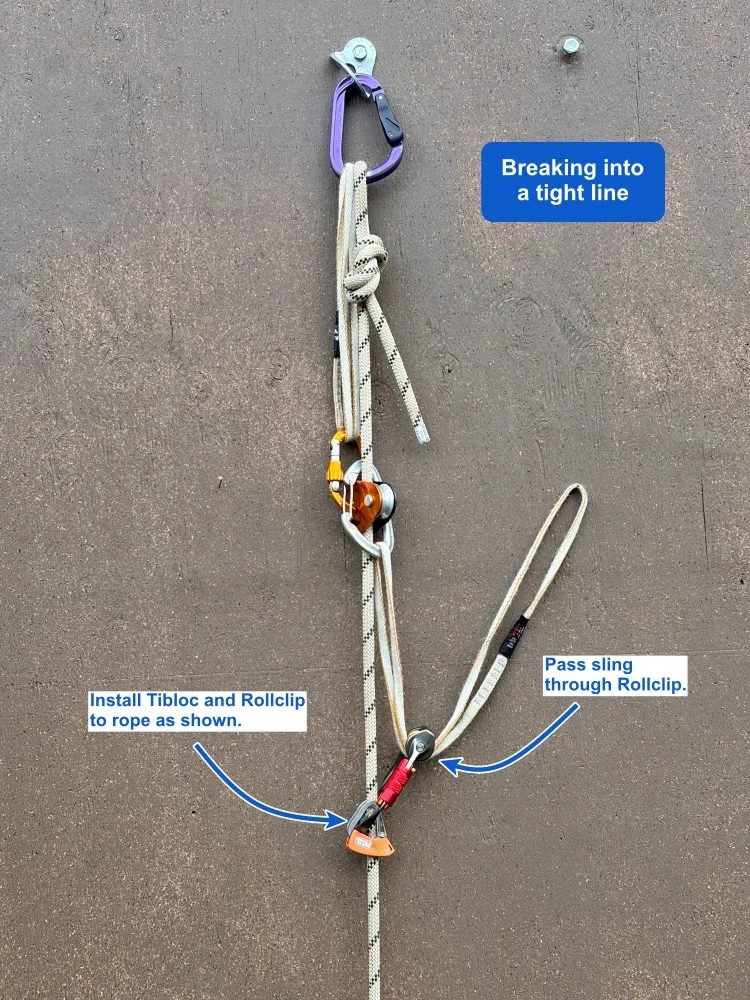
Basket hitch a 60 cm sling through the anchor master point. Clip a locker to the sling.
Install the Traxion pulley on the rope, teeth facing up away from the load.
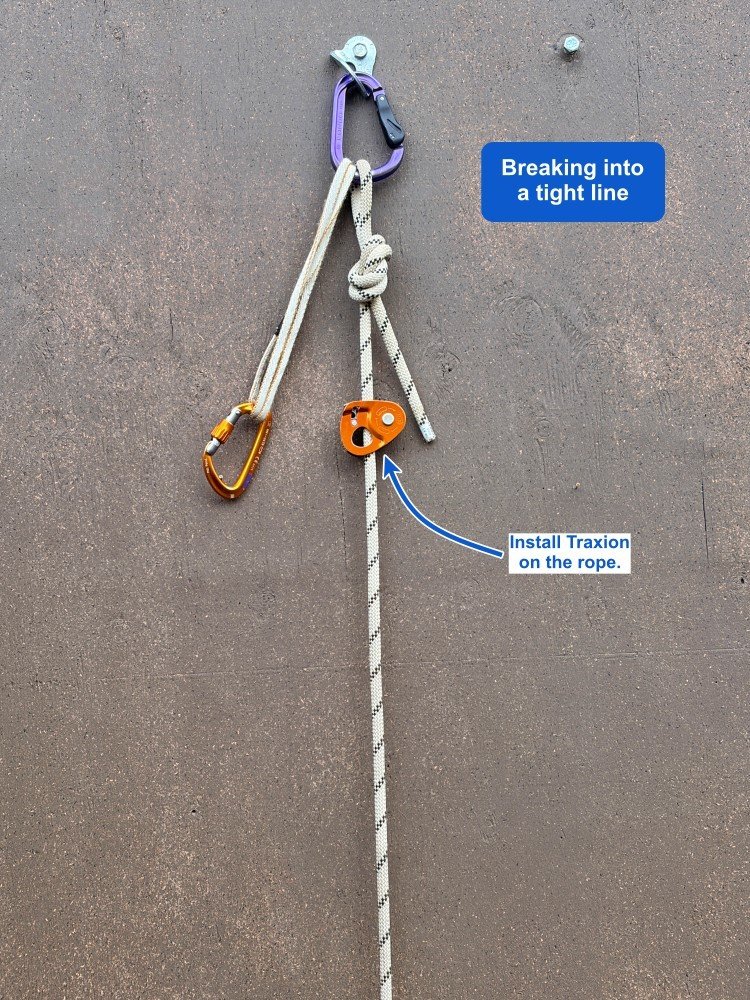
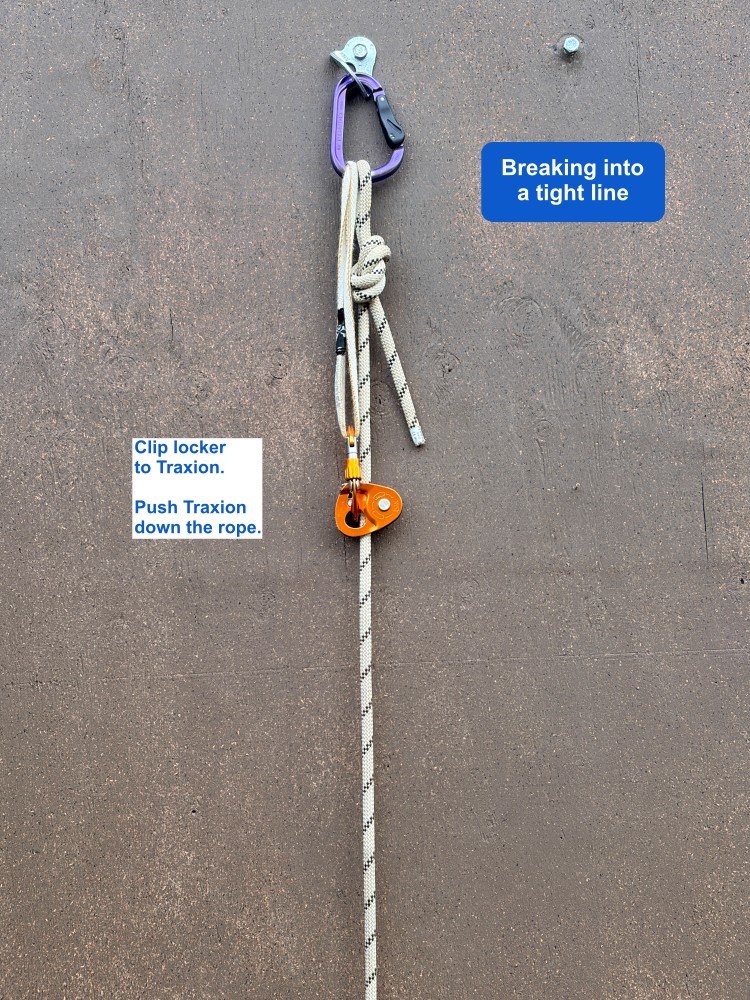
Clip the sling with locker to the Traxion. Push the Traxion down toward the load as far as it will go.
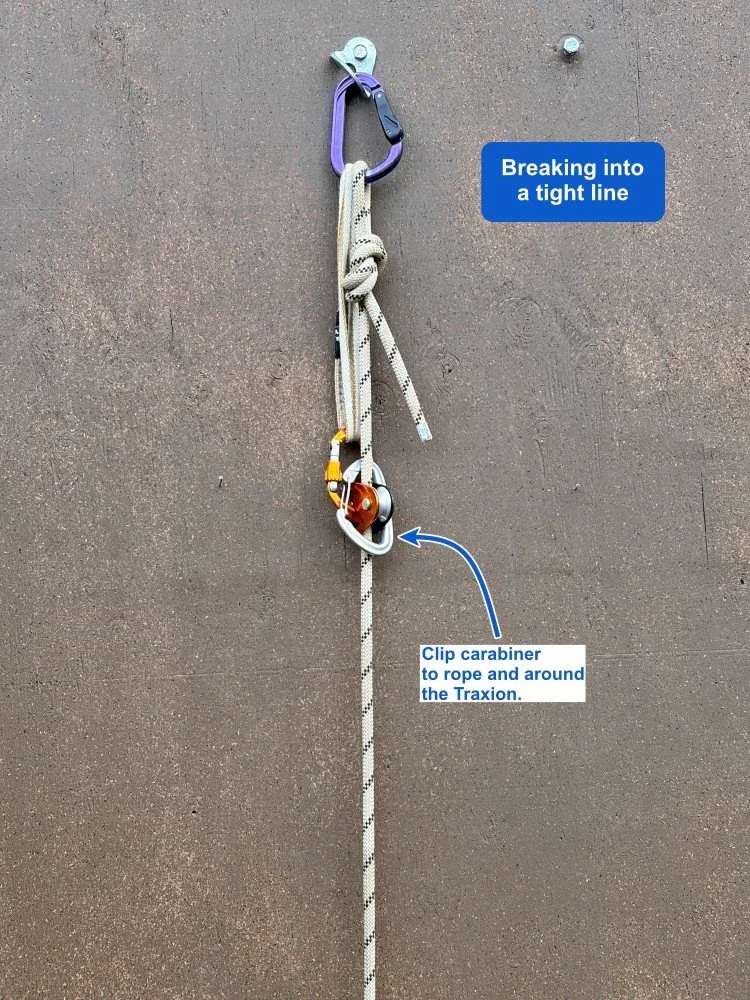
Clip a carabiner to the rope above the Traxion. The sides of this carabiner should be on the outside plates of the Traxion.
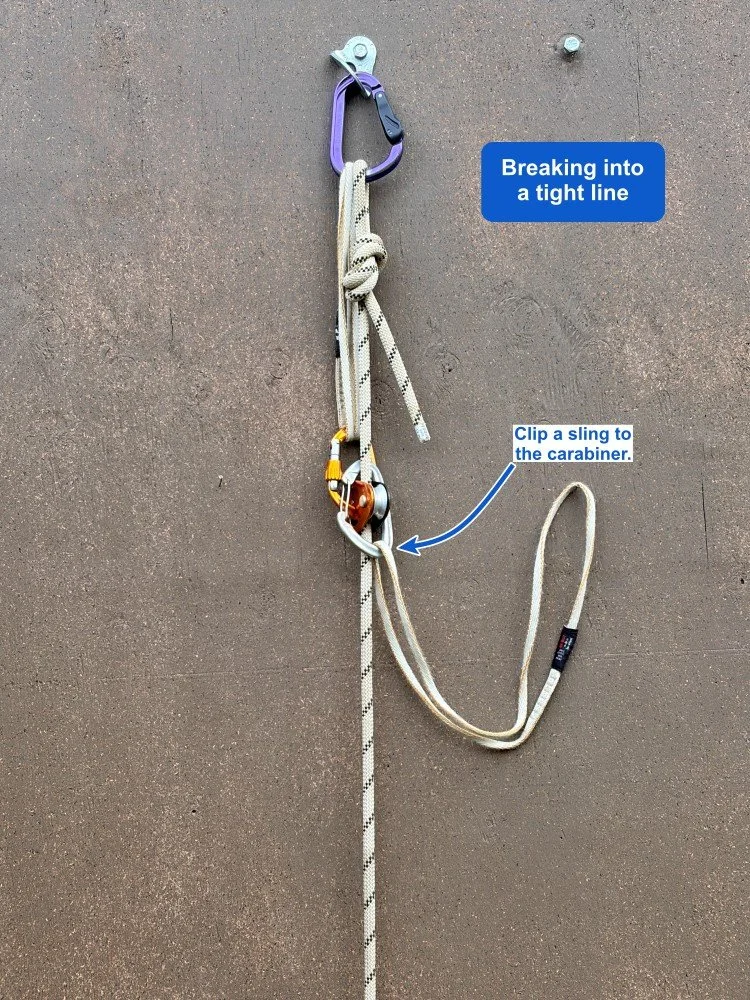
Clip the second sling to this carabiner. This could be any length sling, or an open / untied cordelette.
Put the Tibloc on the rope, top of the Tibloc facing down. Clip the Rollclip to the Tibloc. Pass the end of the sling through the Rollclip.
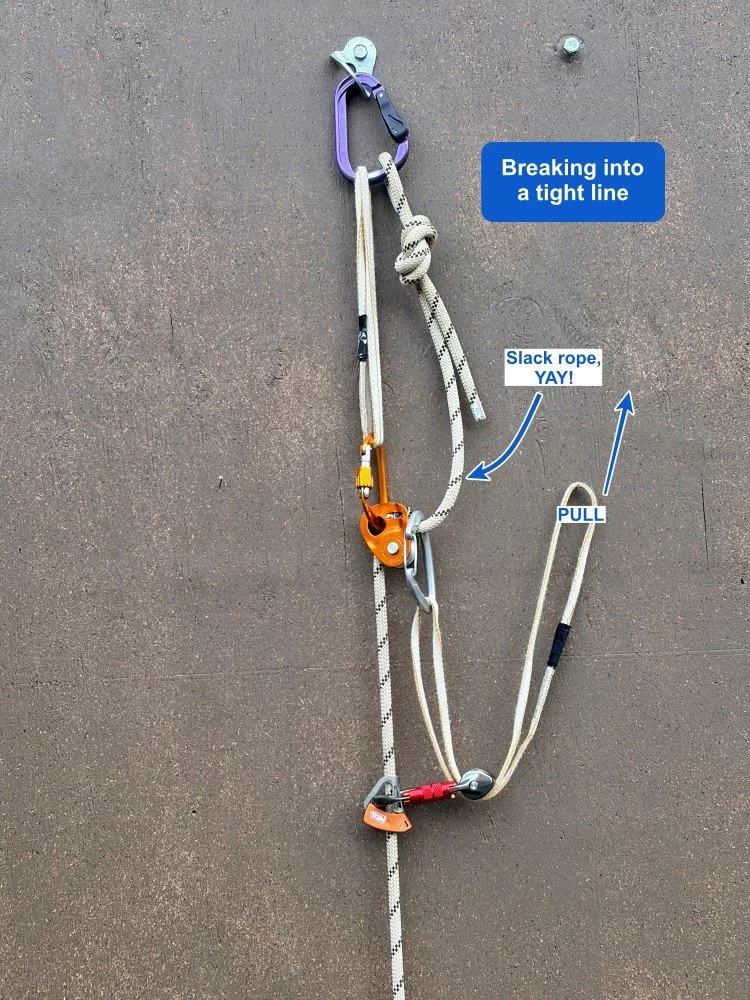
Start pulling up on the sling, with (I think) a 2:1 mechanical advantage.
Here's where the magic happens: the carabiner clipped above the Traxion pulls the rope down toward the load, which creates slack in the rope between the Traxion and the knot.
This will look like rope sorcery the first few times you try it, it's pretty cool.
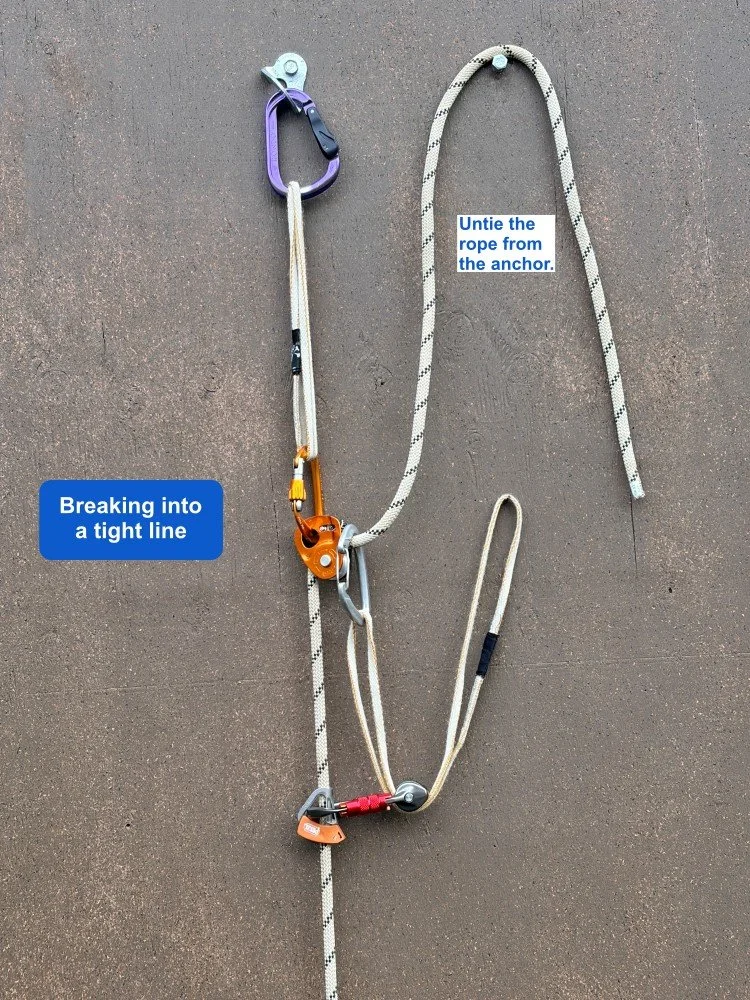
Untie the end of the rope from the anchor.
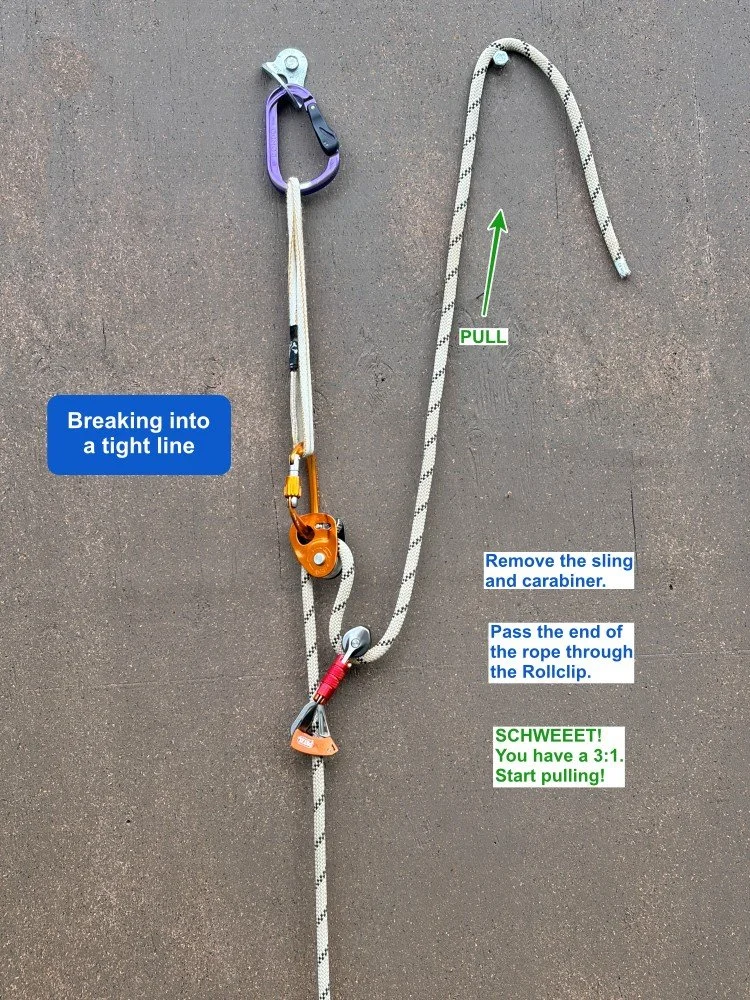
Remove the non-locking carabiner and the second sling. (When you do this, be careful not to let go of the Tibloc, because it'll probably slide down the rope and may go out of reach, whoops!)
Take the end of the rope and pass it through the Rollclip.
Voila, now you have a 3:1 Z pull. Start pulling up to lift your load. Reset the Tibloc / tractor as necessary. If you want to use your body weight to pull down instead of up, you can redirect your pulling strand by clipping it through the anchor, then you're pulling down, with the cost of adding some additional friction.
Finally: Give yourself a high five because you just learned a very cool new #CraftyRopeTrick. =^)
Want to see my video demo how to do this, start to finish?
Join my Premium Membership to read the rest of the article.
Thanks for your support!
How strong is it?- KNOTS (Part 1)
The latest in a series about strength of gear, anchors and knots. How strong is a basket hitched sling? What about friction hitches? Is it safe to girth hitch a Dyneema sling to your belay loop? Are you gonna die if you tie in with a sloppy figure 8? Answers are all here!
Premium Members can read the entire article here:
This section of my website is where I satisfy some of my curiosities (and hopefully some of yours) about the actual breaking strength of anchors, gear, and knots.
If you're new to this part of my website , I suggest you start at the overview page, and then bounce back here.
What's on this page?
How strong is a Dyneema sling girth hitched to a belay loop?
How strong is a poorly dressed figure 8 knot?
How strong are friction hitches?
How strong is a basket hitch in Dyneema?
How strong is a stopper knot / barrel knot as a rappel safety?
How strong is a figure 8 knot in climbing rope, tied end to end?
How strong is a “shoelace wrap” as a tree anchor?
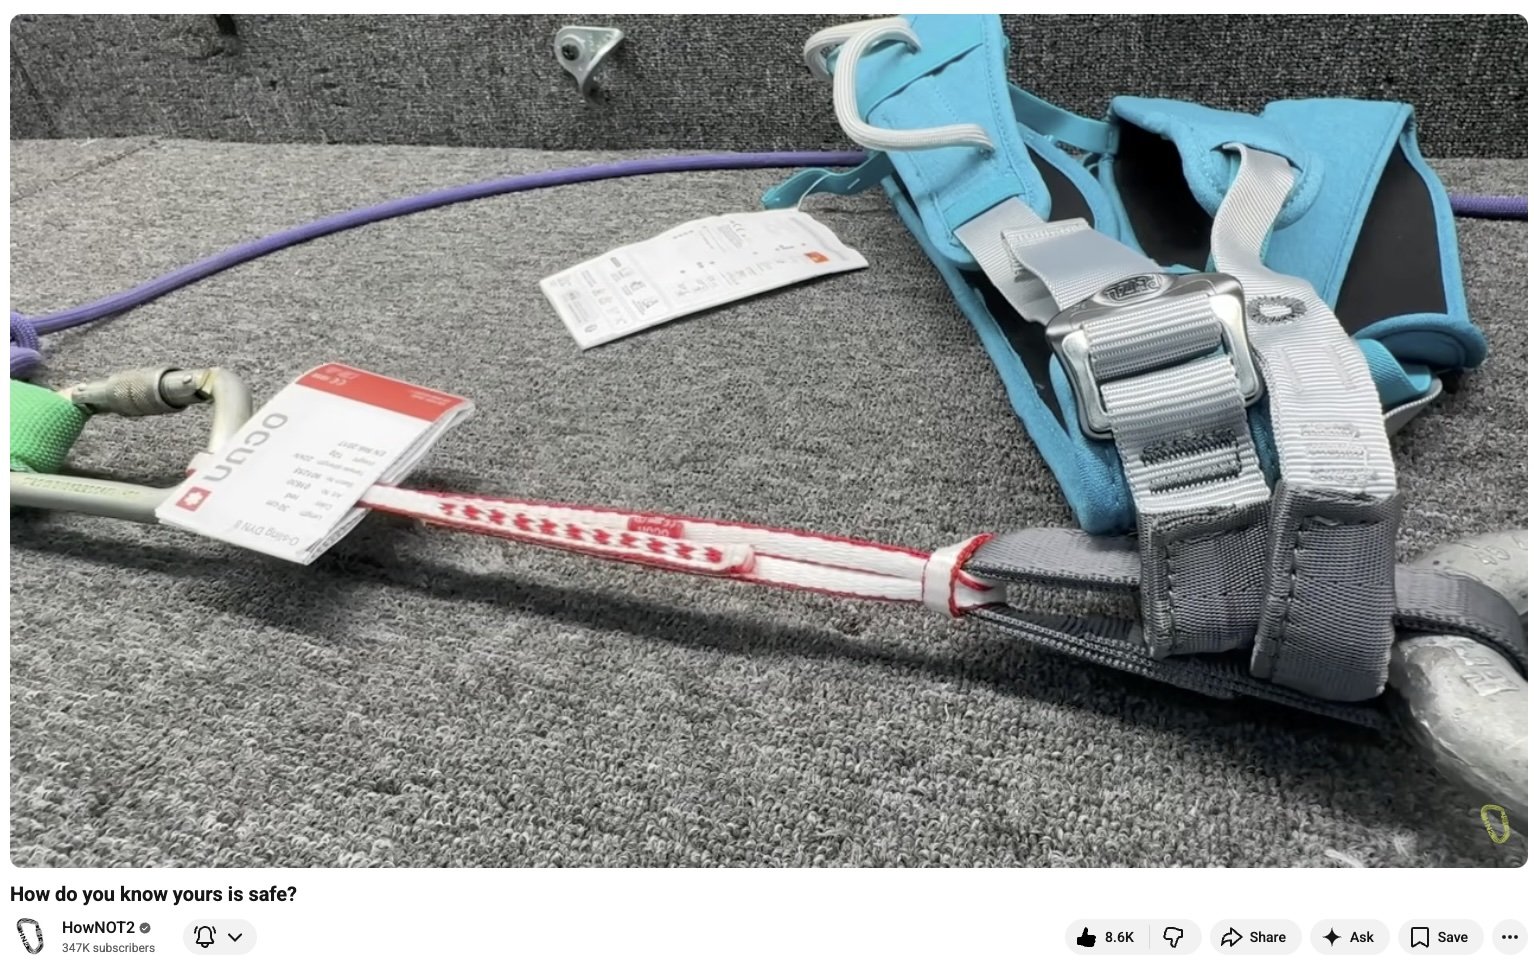
1 - How strong is a Dyneema sling girth hitched to a belay loop?
More than 13 kN.
Source / testing: YouTube, How do you know yours is safe? (about 12:40)
This is a pretty standard way that many people attach a personal tether to their harness. Lots of people freak out about this, often citing the Todd Skinner accident. Is it dangerous? The belay loop broke at 13+! The sling was fine!
Takeaway:
Avoid permanently girth hitching a sling or tether to your loop. Remove it when you're done for the day so you can reattach it to a slightly different spot next time.
Inspect your harness regularly and retire it when it shows any significant wear.
2 - How strong is a poorly dressed figure 8 knot?
About 12.4 kN (properly dressed, about 12.7 kN)
Source / testing: YouTube, Is your figure 8 knot going to kill you? (about 2:52)
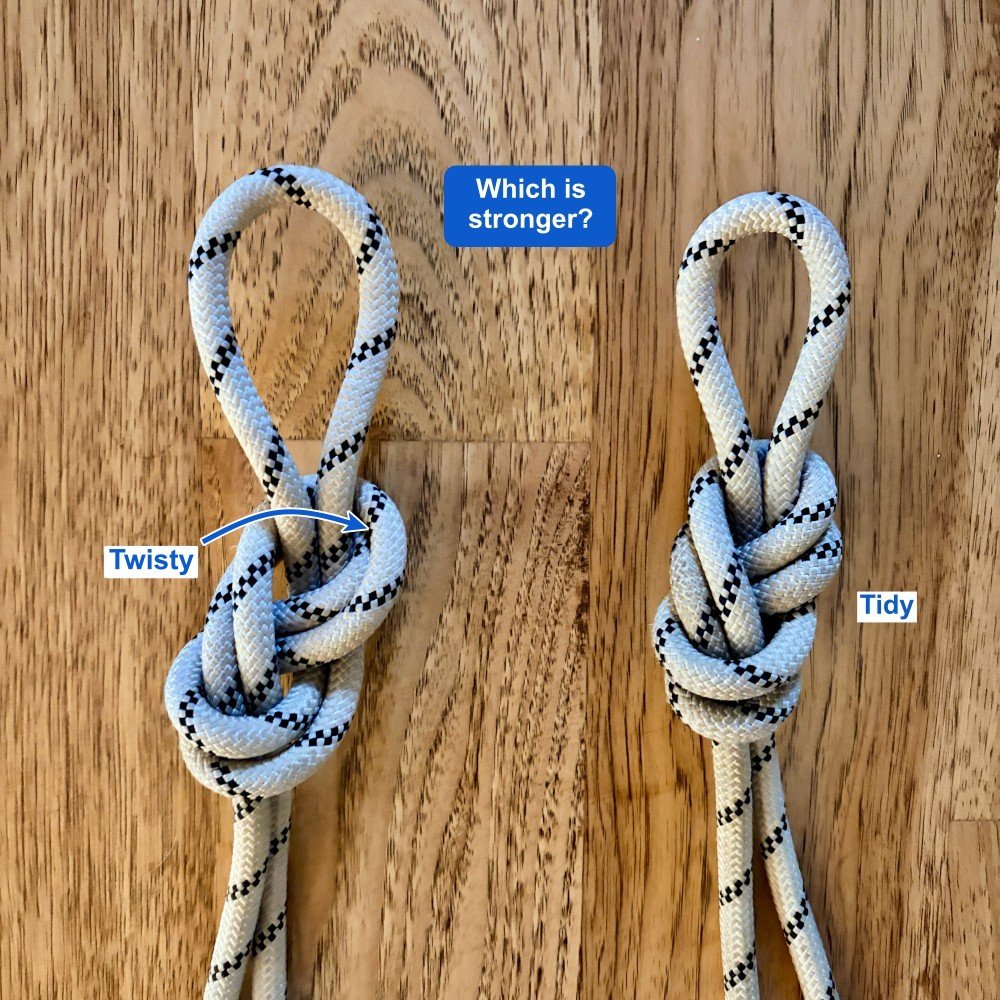
Climbers often obsess with tying the perfect figure 8 knot, one that doesn't have any crosses or twists in it. Giving proper attention to your knots is a good thing, but it turns out but having a figure 8 with the strands crossed is just about as strong as one that’s tied perfectly.
With a figure 8, there are other more important things to pay attention to, such as:
The size of the loop (about fist sized, not much bigger)
Having an adequate tail of about 6 inches / 15 cm
Snugging down the knot by pulling hard on each of the four strands, one at a time, so it's a tight, cylindrical shape, not loose and flat. AKA, “Dress it and stress it.”
These are the things that can cause you problems. Having said that, I still encourage you to learn how to tie it right.
Why is it important for knots to be tied and dressed properly?
Easier to check
Usually easier to untie
Less likely to loosen up unexpectedly
Less likely to roll
May be stronger (but not always, as we see here)

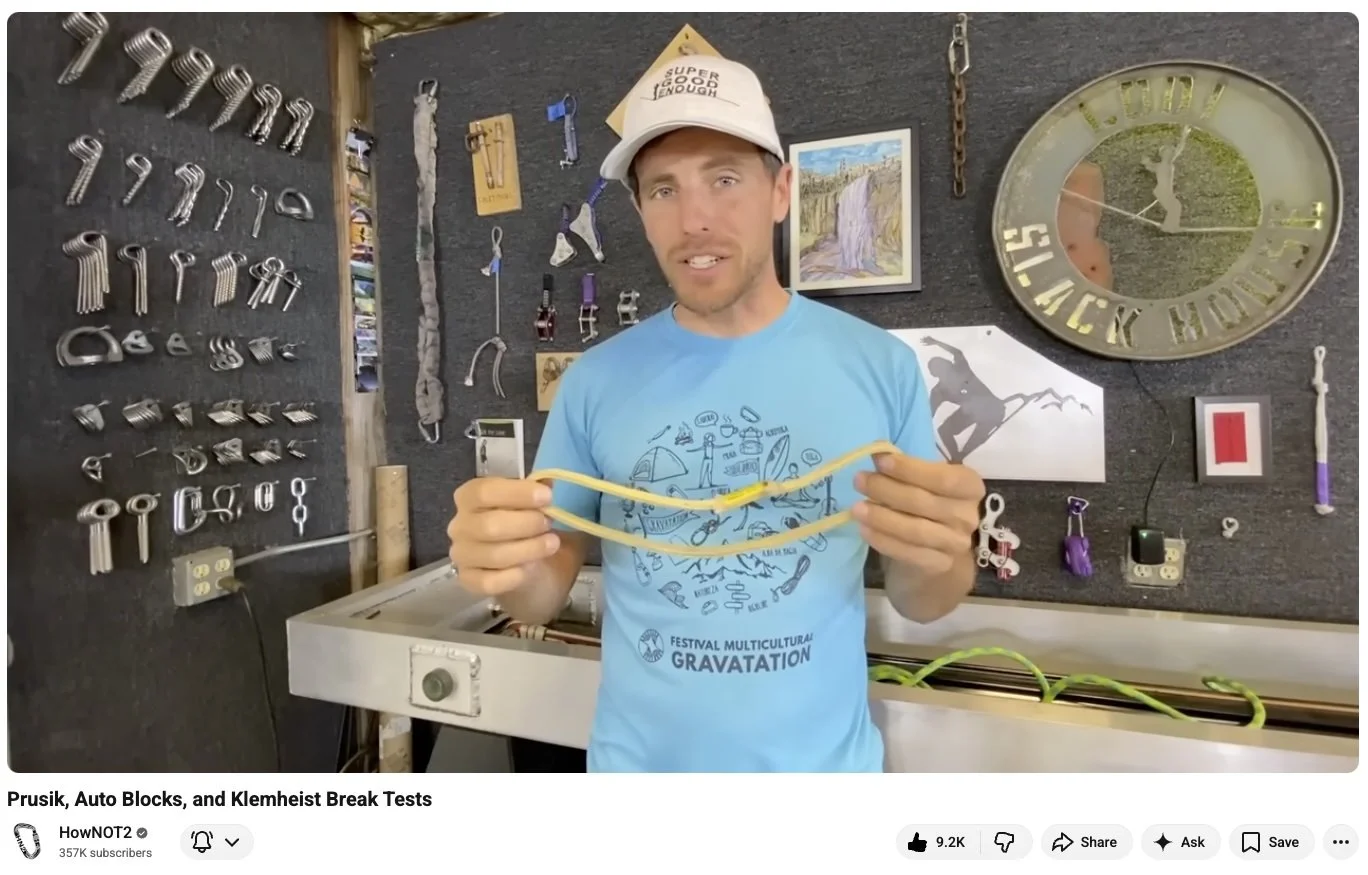
3 - How strong are friction hitches?
Varies a lot, see below.
Source / testing: YouTube, Prusik, Auto Blocks, and Klemheist Break Tests
There are LOTS of variables in this, such as diameter of the rope, how new or slippery the sheath is compared to an old fuzzy rope, the material and type of friction hitch you’re using, etc.
Having said that, here’s some real world testing from HowNOT2. (The test results below are from the caption of this video, shared with permission.)
5MM ACCESSORY CORD
Prusik 8.16 kN and 5.36 kN
Klemheist 7 kN-ish Slips and locked off and broke at 11.62 kN
Auto Block: 3 wraps - 0.36 kN Slips / 4 wraps - 3.62 kN Slips
7MM ACCESSORY CORD
Prusik 7.9 kN and 5.18 kN
Klemheist 3.3 kN Slips
Auto Block: 4 wraps - 0.8 kN Slips
HOLLOW BLOCK 14KN MBS
Prusik 5.84 kN
Auto Block: 3 wraps - 0.42 kN Slips / 4 wraps - 1.38 kN Slips
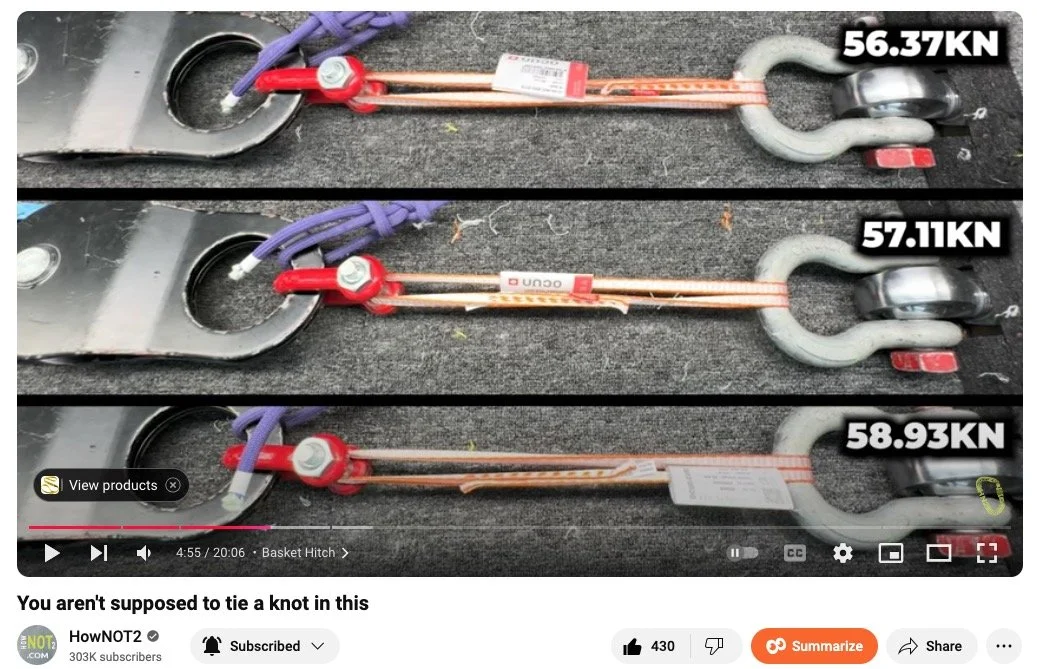
4 - How strong is a basket hitch in Dyneema?
About 56 kN
Source / testing: YouTube, You aren't supposed to tie a knot in this (about 2:18)
A basket hitch typically doubles the strength of the material you're using, because it divides the load four different strands rather than two.
This is normally overkill in recreational climbing, where you're never gonna see much of a load passed around 9 kN in any situation.
But if you need to rig something with absolutely maximum strength, it's good to keep in mind how you can increase the strength of your soft goods by making a basket hitch.
Here's a link to my longer article on this.
Sewn Dyneema sling rated 22 kN, end to end pull, broke about 28 kN.
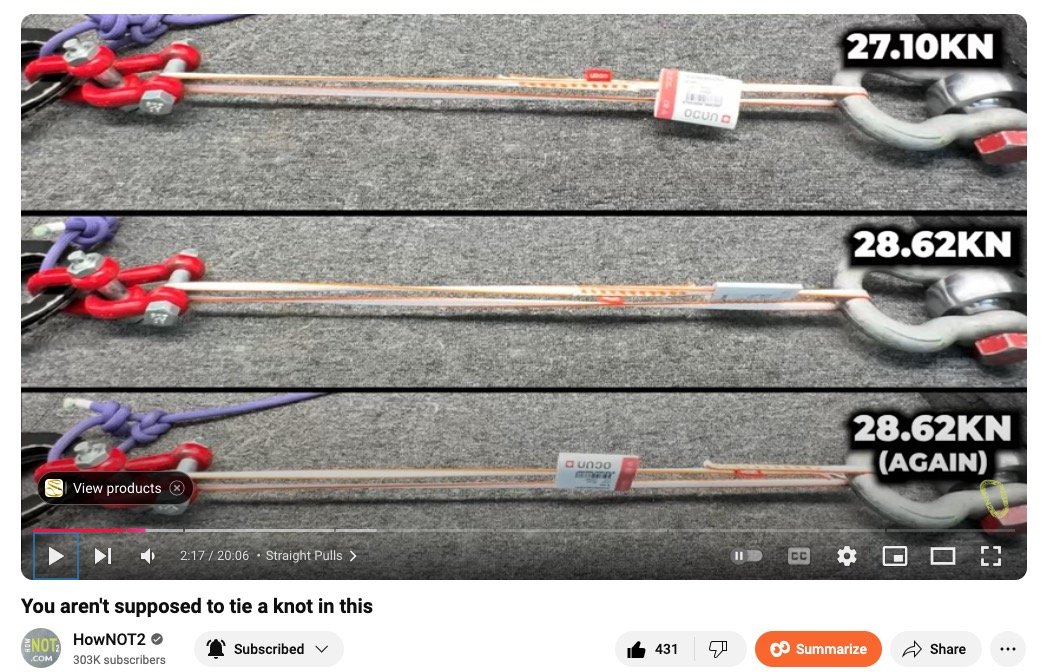
Same sling, rigged with a basket hitch, broke about 56 kN, about double!
How strong is a stopper knot / barrel knot as a rappel safety / backup?
If you tie two figure 8s in climbing rope and pull it end to end, where does it break?
How strong is a “shoelace” knot tied around a tree? (Instagram lost their mind when this was first posted . . .)
Join my Premium Membership to read the rest of the article.
Thanks for your support!

Two ways to follow a runout traverse
Sometimes following a difficult traverse can be just as scary for the second as it was for the leader. Here are two methods you can use to reduce risk for the second: the lower out and the back rope.
Premium Members can read the entire article here:
Note - This post discusses ADVANCED techniques and methods used in vertical rope work. If you do them wrong, you could die. Always practice vertical rope techniques under the supervision of a qualified instructor, and ideally in a progression: from flat ground, to vertical close to the ground before you ever try them in a real climbing situation.
This tip and the diagrams comes from Vdiff Climbing. Vdiff offers high-quality online climbing courses with lots of tips and clever drawings like this, recommended! Diagrams are shared here with permission.
So, this is leading a traverse, not following one, but the potential problem is about the same . . .
Follow Caiocomix for more great comix like this!
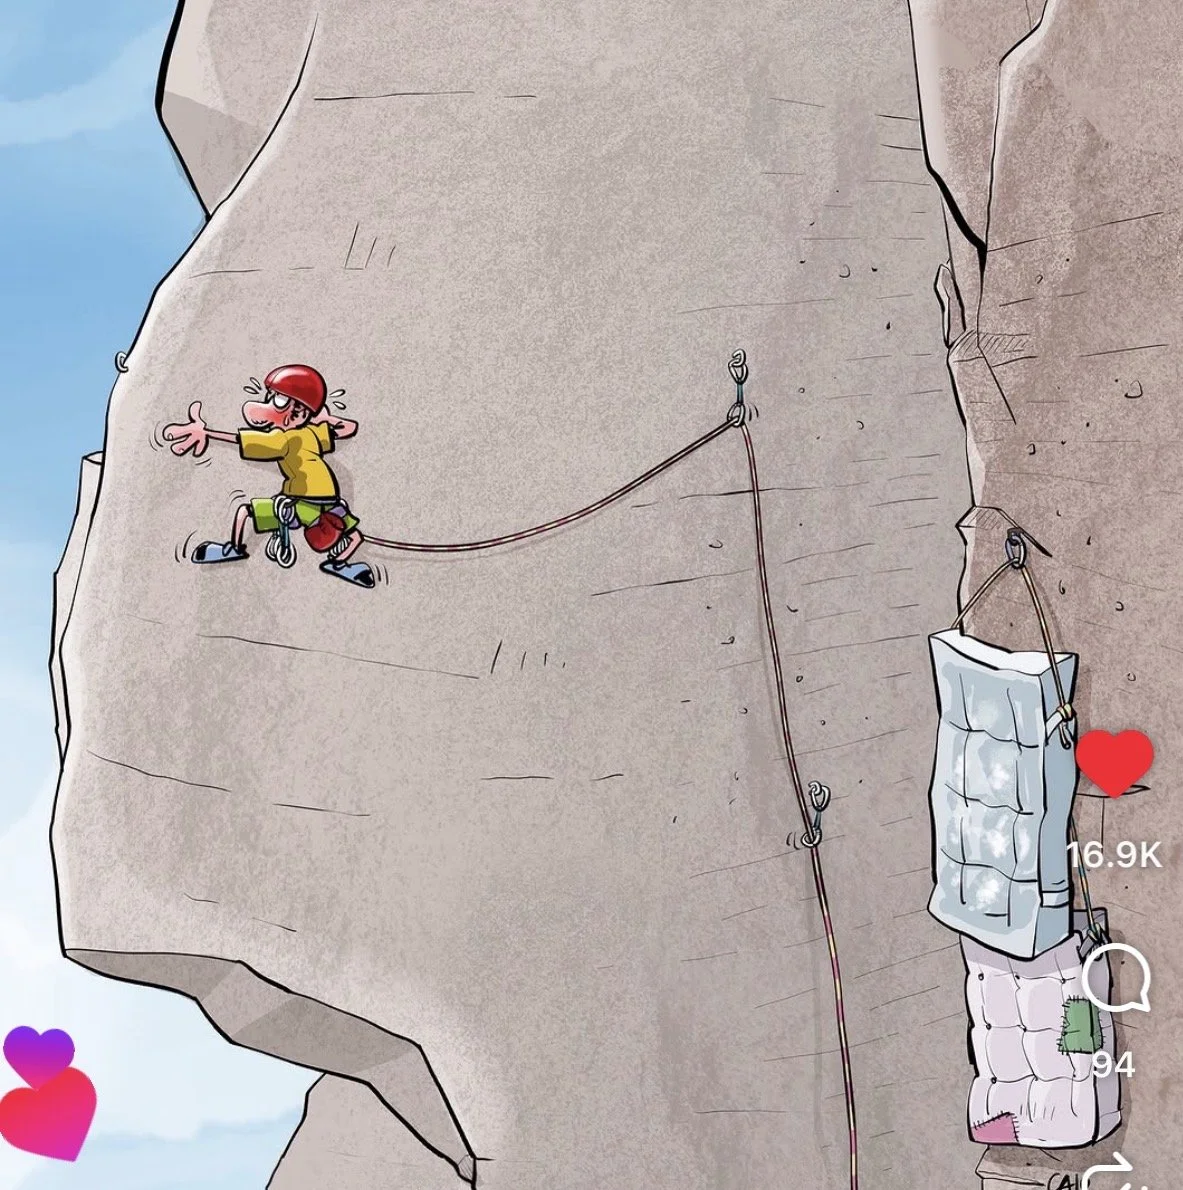
image: caiocomix
Hopefully, you won't find yourself seconding a long, tricky traverse very often. If you do, this #CraftyRopeTrick could reduce your risk.
If you take a fall on a very runout or unprotectable traverse, you'll probably have a very scary pendulum fall. This might be just as bad, or maybe even worse, for the follower rather than the leader.
To make things happier for the follower, you could use one of two techniques:
lower out
back roping
Let's have a look at each one.
Method 1 - the lower out
This is typically used by big wall climbers ascending a fixed rope; this is a modification of that technique. If you only have one rope, you'll need to do the lower out.
To do this, you need a lot of extra rope - at least three times the distance between the last piece of gear and your partner. You do NOT want to run out of rope halfway through this maneuver, so definitely test it in a controlled environment before you try it for real!
Here's how to set up a lower out.
1 - When you reach the last gear placement the leader made, clip to it with a tether. Be sure this piece is solid and that it can take a downward and sideways pull. If it’s questionable, back it up and try to equalize it with another piece. (You’ll leave this gear behind, so give it a kiss goodbye. =^)
2 - Attach a Grigri to the rope as shown in the close-up.
By using a Grigri to lower yourself out, this can dramatically reduce the consequences of a fall, if your lower out price were to fail. If that happened, the Grigri should lock, stopping you from falling to the end of the rope. You will still have a pendulum swing, but much less if you lowered off simply being tied into the rope end.
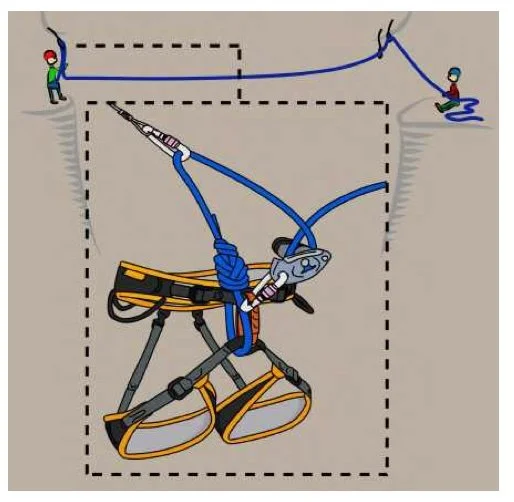
image: Vdiff Climbing
3 - Tell your partner that you’re ready to lower. Unclip your tether, and weight your Grigri. As your partner feeds rope to you, you pull the handle on your Grigri and slowly lower yourself out from the protection.
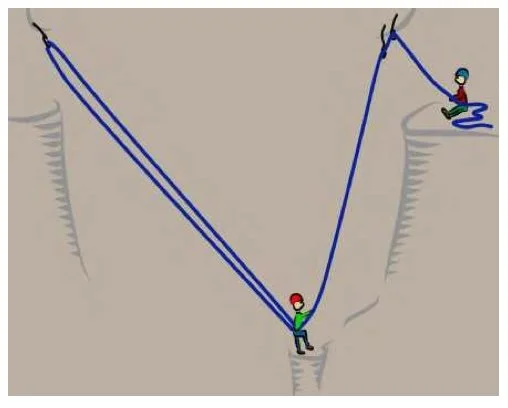
image: Vdiff Climbing
You will come to a stop pretty much underneath the last piece of gear that the leader placed. Tie a backup knot on the other side of your Grigri and clip it to your belay loop.
Untie your original tie in knot, and be SURE you untied the figure 8! Pull the rope through the protection as shown.
If the terrain above you is climbable, climb up to your leader on belay . If it's not, have them fix the rope and you ascend the fixed rope. Here's one way to do that.
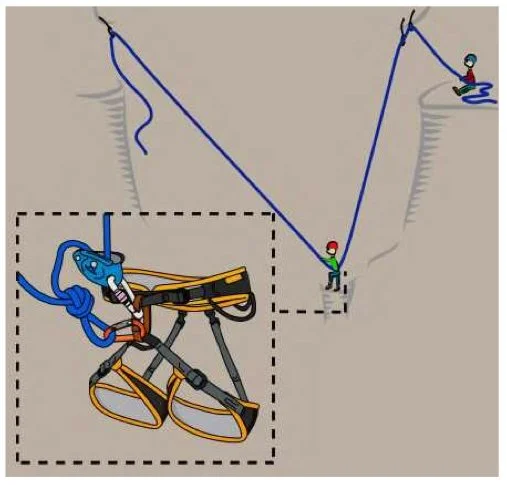
image: Vdiff Climbing
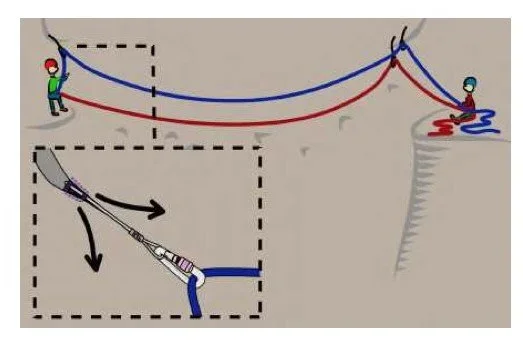
Method 2 - back roping
You can use the backroping method if you have two ropes.
You will need at least twice as much rope as the distance between the leader and the second. Be sure you have this extra rope available before you ever think about rigging this.
Here's how to set up a back rope.
1 - The second needs to be tied to both ropes. The second clips one of the ropes to a solid piece of gear, which can take a downward and sideways pull. (You’ll leave this gear behind, so give it a kiss goodbye. =^)
What are the additional two steps of correctly rigging a back rope?
What advantaged does this have over the lower out method described above?
Join my Premium Membership to read the rest of the article.
Thanks for your support!

All about friction hitches - Part 2
Let's take a deep dive into the hitch cord, something that deserves to be on your harness. If DIY, how long a cord and what diameter? If factory made, what are the options? What about spliced instead of sewn? Are eye to eye hitch cords helpful for climbers? Answers are all here.
Premium Members can read the entire article here:
I'll start with a story that a student shared with me awhile back in a self rescue class.
This person, climbing second, was traversing on a multi pitch route. They took a fall, swung into overhanging terrain, and found themselves hanging in space about 5 meters below the last bolt. All they needed to do was ascend the rope and keep on climbing. They had a cordelette and various slings, but didn’t know how to rig them as friction hitches to climb the rope. (There was too much friction in the rope for the leader to haul them up; plus the leader didn’t know how.)
This turned into a call to the local search and rescue team, and this unfortunate person had to wait almost 4 hours to get rescued, hanging there in their harness! Ouch!
A little knowledge of improvised friction hitches, and how to use them to ascend a fixed rope, would've solved the issue.
The humble friction hitch cord. Inexpensive, lightweight, and pretty much infinitely useful when it comes to #CraftyRopeTricks and self-rescue stuff.
Let's have a closer look at the hitch cord, the Swiss Army knife problem-solver of climbing gear.
Is a “hitch cord” the same as a “prusik loop”?
Terminology: I'm using the more general and accurate term of hitch cord. Why?
You can tie several different knots with a hitch cord, like an autoblock and Klemheist, not only a prusik.
It doesn't have to be a loop, it can be “eye to eye", with a small loop on each end. (More on that below.)
How do you make your own friction hitch loop?
To tie your own, a good starting point is 120 centimeters / 48 inches of 6 mm cord.
I’ve experimented a lot with the length. 106 cm / 42 inches (when tied) gives about the smallest usable loop. 120 cm gives you more wiggle room. Having a little extra length in your hitch cord is usually fine, but having one that's too short can be a problem. I suggest starting with 120 cm, tie different hitches on different diameter ropes (single and double strand) and then trim it down a bit if you want.
A common mistake is making a hitch cord that's too long. You only need it long enough to tie an effective hitch onto whatever diameter rope(s) you're using, and enough space to clip a carabiner. When you first cut the cord, it's probably gonna look too long. That double fisherman's knot, with nice long tails, takes up a lot more cord than you might think.
6 mm is a good diameter. It's small enough to be grabby on small diameter ropes, but big enough to inspire confidence when you're hanging from it way off the ground.
When you're done tying it, you want a loop that measures about 30-38 cm / 12-15 inches when you stretch it out. (The photo below shows a slightly smaller loop.)
Have the climb shop use their hot knife to seal the ends. If that's not an option, tape the cord where you want to cut it, slice it carefully with a sharp knife, and then put a few dabs of superglue on the end to seal it up. Here's my longer article on how to neatly cut a rope.
Different manufacturers make cord of various softness / stiffness. Cord that’s softer tends to work better for friction hitches, so if you have a choice, go for that.
Tie into a loop with a double fisherman's knot that's properly dressed, and really snug down the knot with tails of at least 5 cm / 2”. After you get the length dialed, you can get this knot wet and crank it tight by bouncing on it, because you're never going to untie it.
Test your rigging systems
It's good to have a go-to setup, especially for a rappel autoblock, that you use all the time. Test different flavors of hitch loops with the rope that you use most often, both double strand and single strand, to see, which works the best. This could be especially important with smaller diameter rope.
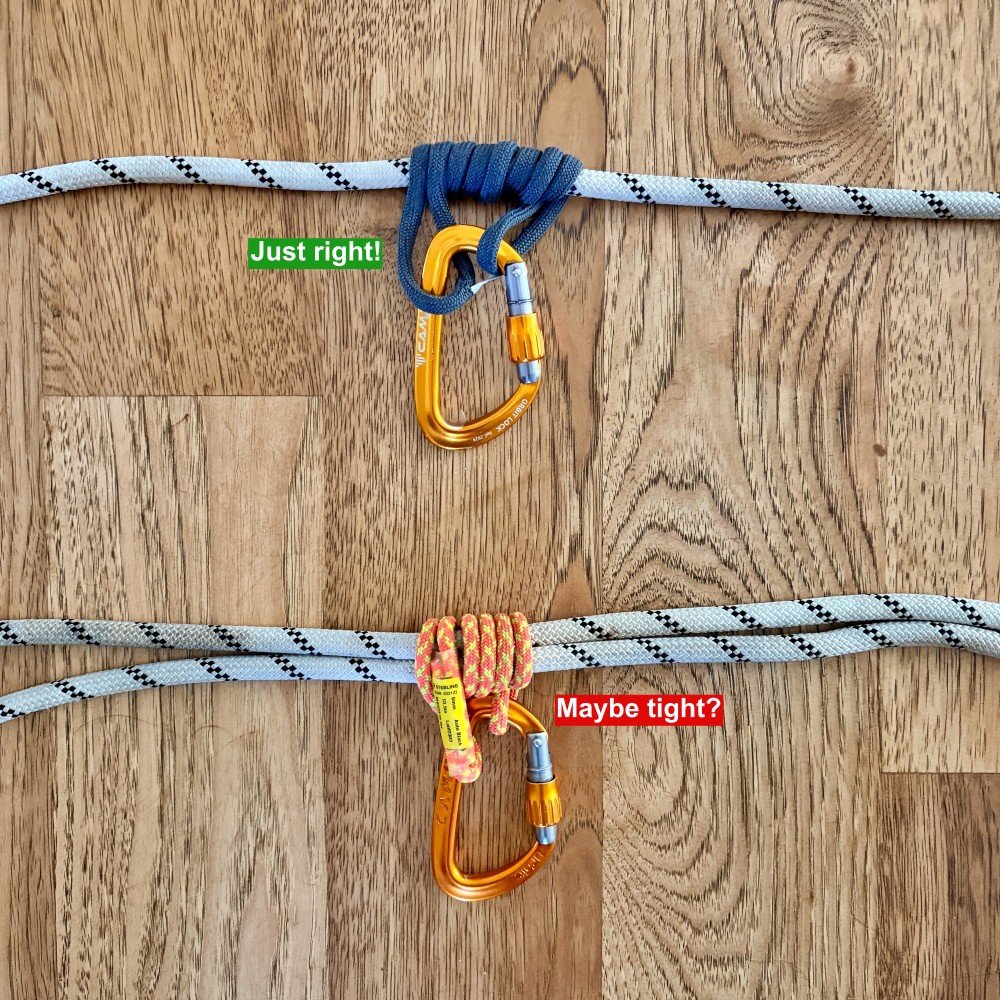
You don't want to find out in the middle of a rappel that your hitch cord has too much or not enough friction. Figure this out ahead of time in a controlled environment. Maybe start on a staircase, and then move to something vertical close to the ground.
For example, in the photo below, the auto block hitch on the single strand of 10 mm rope looks great. However, the hitch cord on the double strand is just barely big enough.
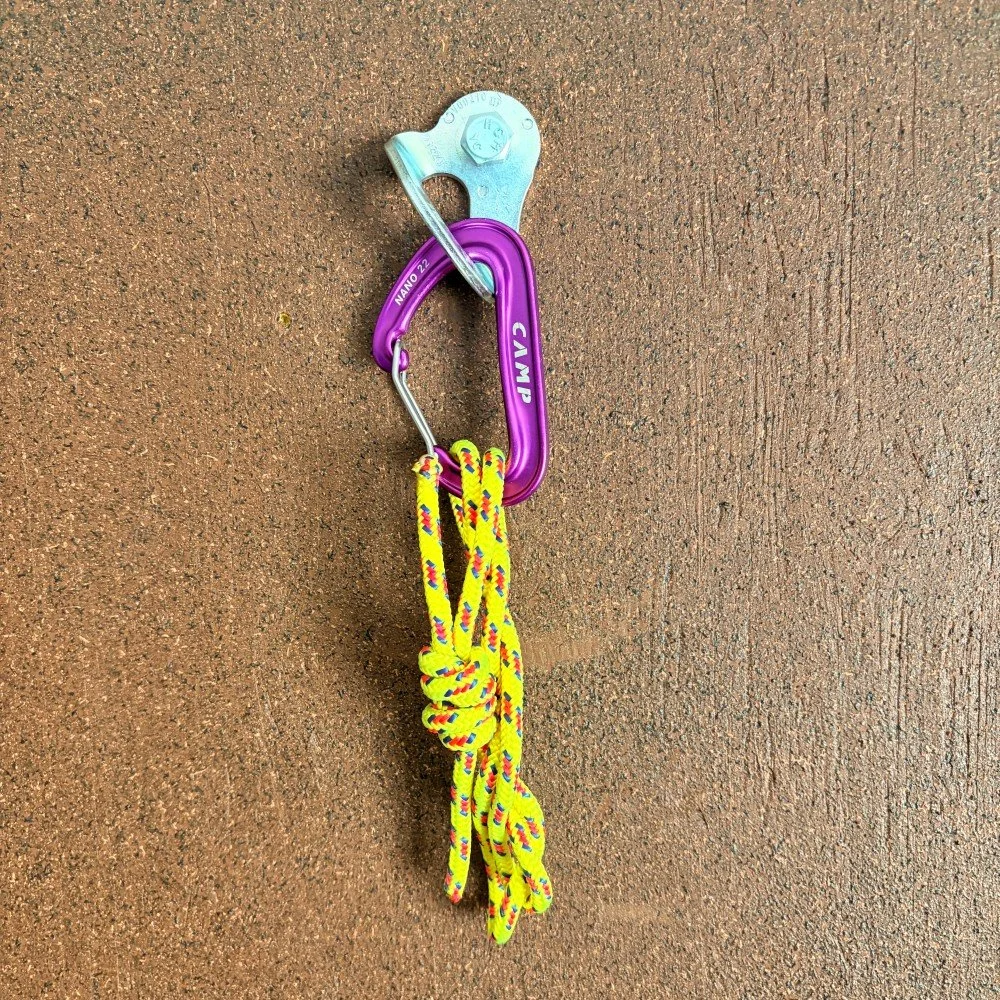
How do you rack it? Do the twist
My favorite way: “do the twist”. Hold the loop by both hands, put a few twists in it, then clip it with a carabiner. The cord sort of does a little double helix thing, gives itself a hug, and makes a neat bundle for your harness. No need for fancy macramé projects. The twist is fast, simple, and works with cordage of any length.
How strong is that DIY hitch loop?
Great question. Our friends at HowNOT2 have these specs on their website. Sterling 6 mm accessory cord, tied into a loop with a double fisherman's knot, is around 14 kN.

Can I use a Dyneema sling to tie a friction hitch?
Yes, you can, but cord is usually better. Cord is typically more “grabby”, so you might have to make a few more wraps if you use Dyneema. But hey, if you're in some unexpected situation and you need a friction hitch, like the one described at the top of this article, then go for it.
It's best practice to NOT use a Dyneema sling as a third hand / rappel backup. Because Dyneema has a relatively low melting point, the heat generated from a fast rappel could potentially damage the sling.

Autoblock tip: add a twist
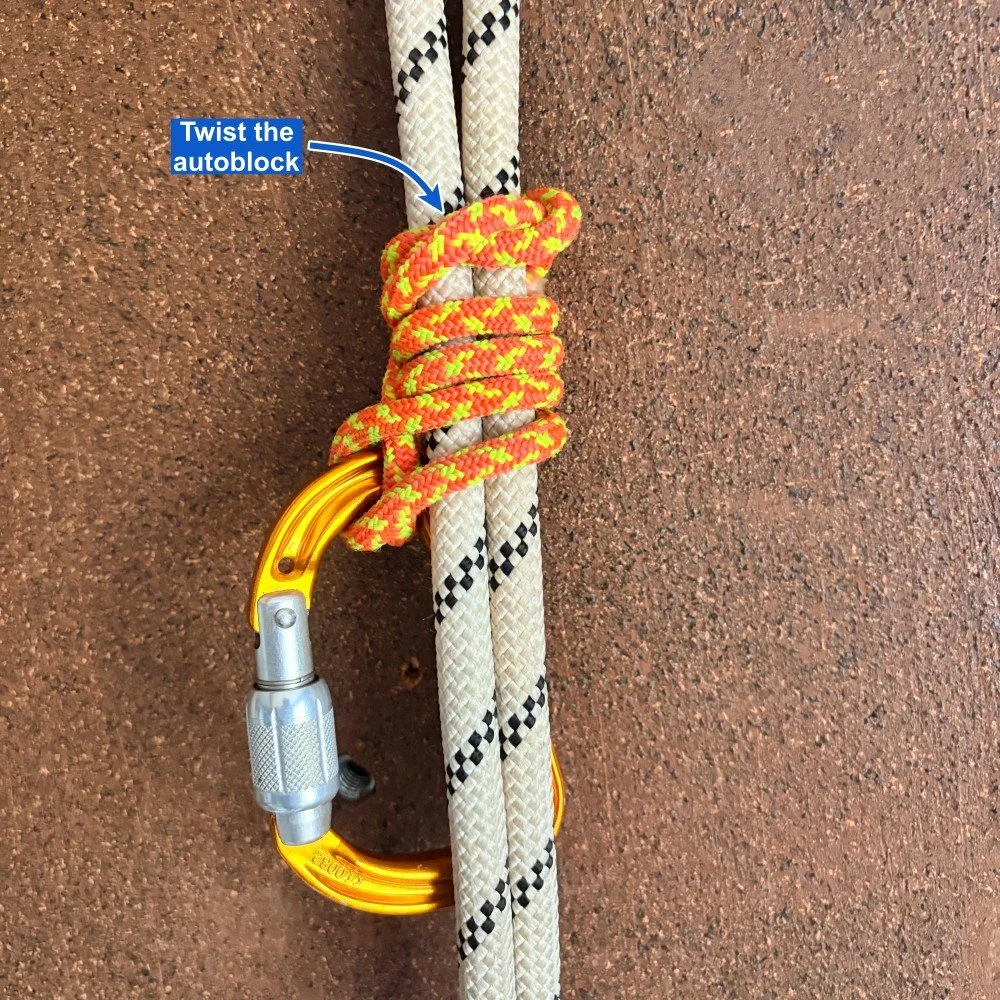
Sometimes, your autoblock rappel backup might be too “grabby” with three wraps, or not grabby enough if you only use two wraps. Here's a trick that can help.
Instead of making the third wrap, instead twist the auto block sling a couple of times before you clip it to the carabiner. This effectively constricts the hitch onto the rope, which can often give you just the right amount of friction for a smooth rappel.
Here’s a bonus article on this topic (usually only available for my premium members) with a video from an IFMGA guide showing how it's done.
What about factory made hitch loops?
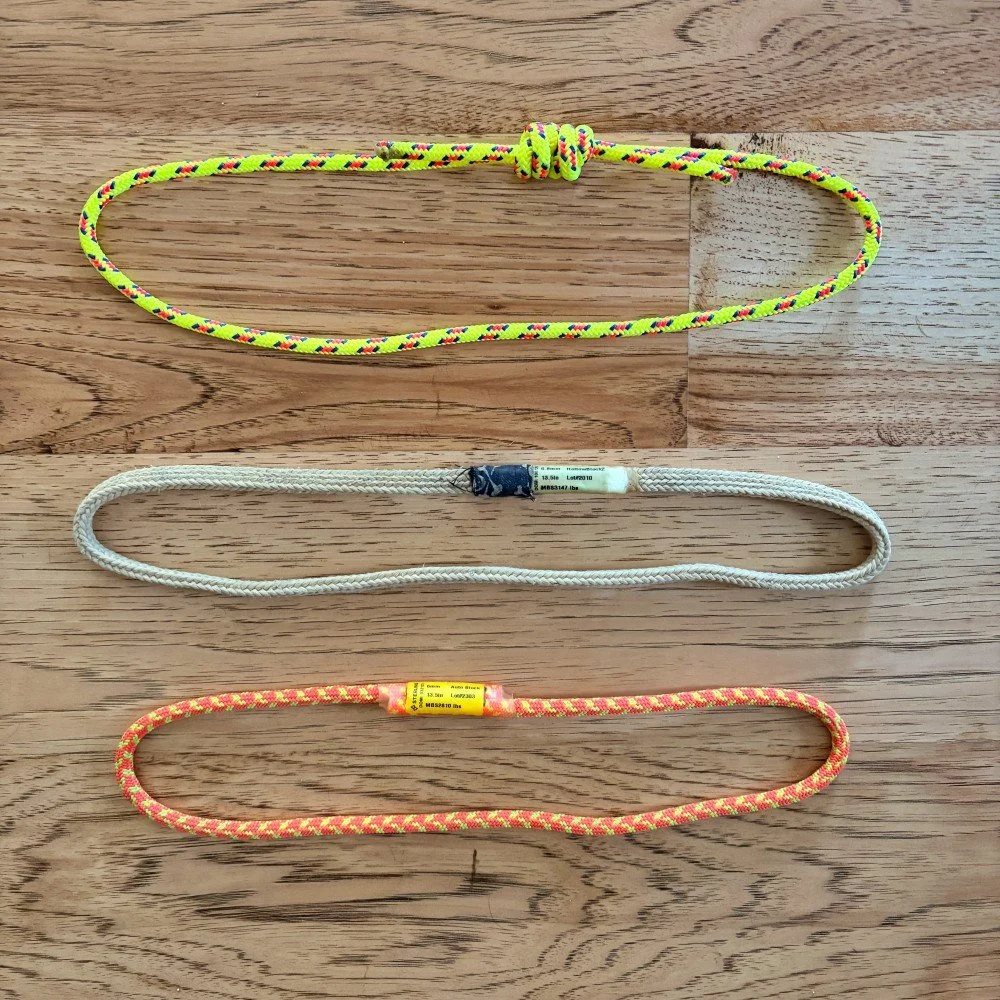
Most rope manufacturers offer some version of a sewn hitch loop. These are usually sewn, so they're a little less bulky and slightly easier to tie friction hitches. They're also more expensive than the DIY version.
When you're out with friends who have different flavors of these, give them a try and see what you think. Below are some that I have.

What about spliced hitch cords?
Zartman Rigging make some very interesting spliced soft goods for climbing, among them two flavors of hitch cord. One is a loop, the other is eye to eye.
Because of the splicing, there's no stitching. That makes it easier to tie a friction hitch.
Dyneema core with a Technora / Aramid sheath
UIAA rated to 24 kN
Very interesting products! Check out the Zartman Rigging catalog here.
Here's a link to my more detailed article about Zartman products.

More on the Sterling HollowBlock . . .
A common factory sewn hitch loop is the Sterling HollowBlock. This is made of Aramid/Kevlar, grabs quite predictably on ropes of various sizes, and is a popular choice as third hand back up for rappelling.
Because it doesn’t have a sheath, dirt/sand/gunk can get inside the cord and compromise its strength. As with all small diameter cord, replace if it starts looking the slightest bit worn out.
Here's a nice article from Sterling about when to retire a HollowBlock.
The current iteration of the HollowBlock is version 2, which Sterling says is made out of a stronger material. Get version 2.
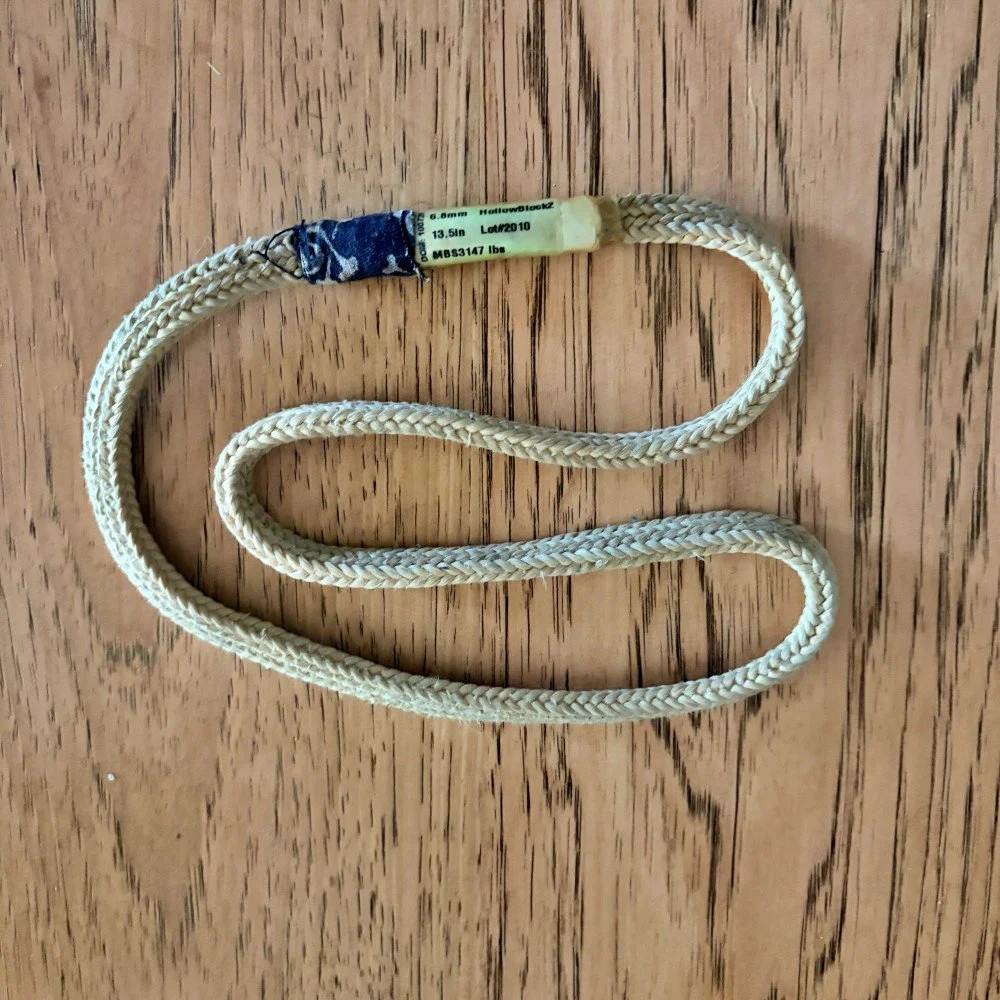
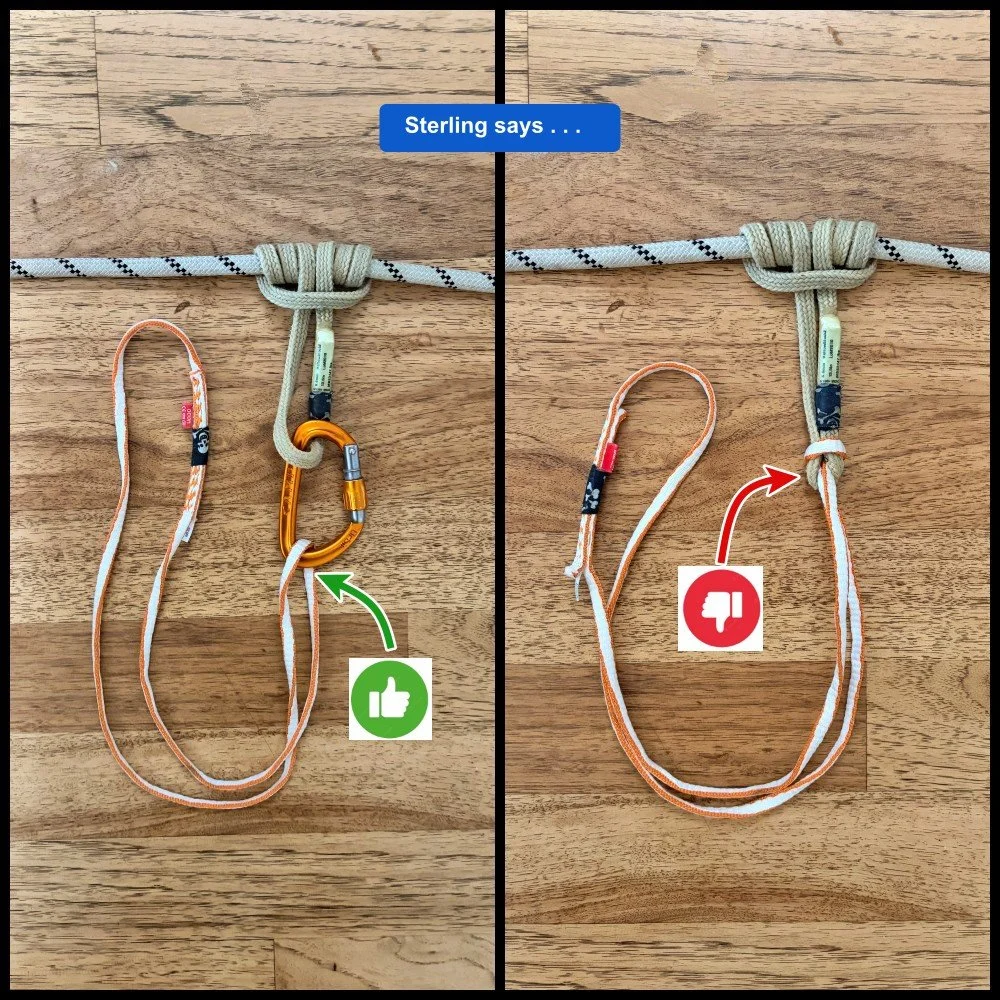
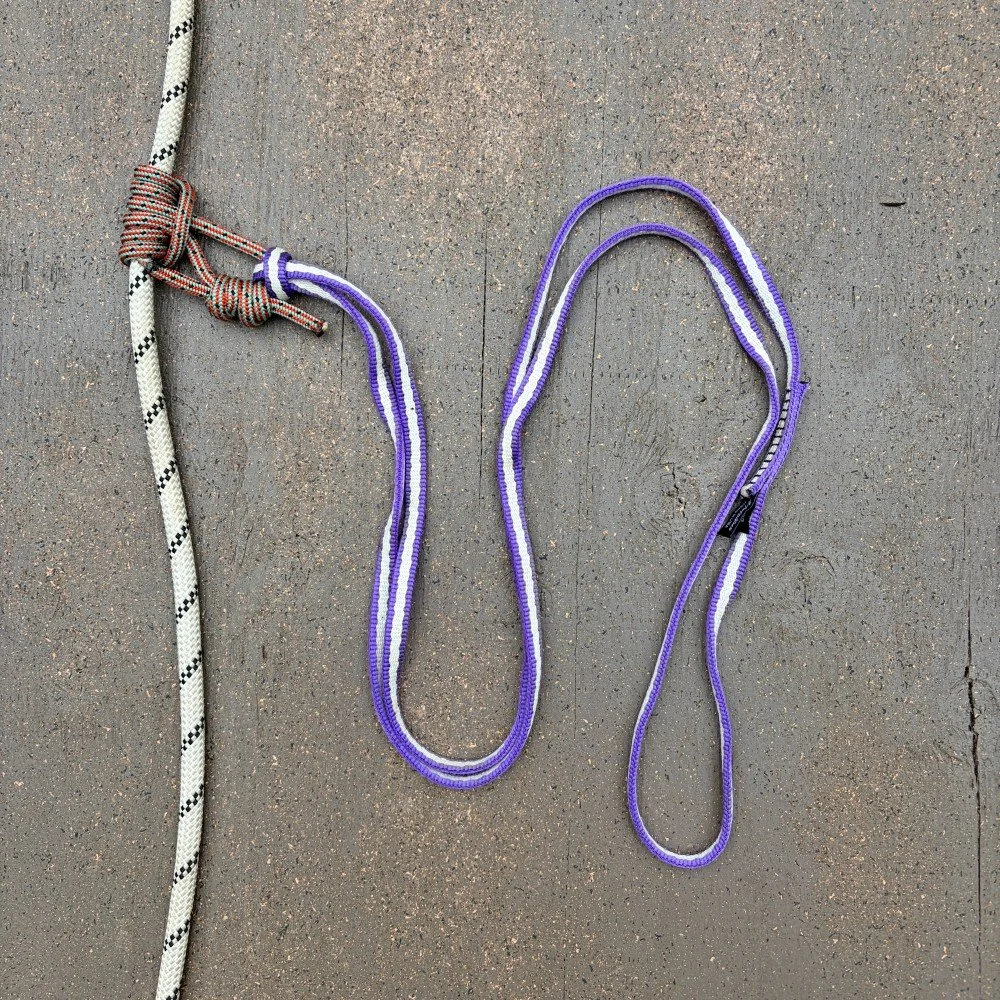
HollowBlock caution: no girth hitching
Sterling says on their website to avoid girth hitching another sling directly onto the HollowBlock. Instead, they recommend a carabiner to connect the slings.
I don't know if this notice is from the legal department or from the engineering department, but I wanted to pass it along.
(Personally, I've girth hitched slings directly on a HollowBlock for rope ascending practice quite a bit and haven't seen any damage; your mileage may vary.)
What about wet or icy ropes?
Friction hitches are usually less grabby if your rope is wet or iced up. Take additional wraps with the hitch around the rope to increase friction. This is a case when having a slightly longer friction hitch to make that extra wrap can be helpful. Test before use!
What about carrying a “waist” prusik and a “foot” prusik in case I need to ascend a rope?
Don't bother. Those are pretty much single use pieces of gear, and it's very old school to carry those. Instead, improvise with the gear you have.
With a short hitch loop attached to longer slings or cord, you can make just about any rope ascending system you need. Here's a link to my article on this.
Here’s a short hitch loop, with a 120 cm sling girth hitched to it. This becomes the “foot prusik” for ascending a rope.
What about an attachment for your waist? Attach a 60 cm sling to another short friction hitch loop.
Here‘s a long 6 mm cordelette, tied with a Klemheist hitch to the rope. An overhand knot is tied close to the hitch, giving a convenient clipping point. A long cord can make a hitch loop of any length you need, nice!
Taking the above example a step further, you can pass the cord through your harness, tie an overhand knot to connect yourself, and then clip the carabiner for hauling or other rescue operations to the short loop close to the friction hitch. This can be helpful for crevasse rescue; I cover more about this technique in this article.
(Related tip: when you're on a glacier, you generally don't need to have your friction hitch(s) already on the rope. Keep them at the ready on your harness, and add them to the rope if you need to.)
Here’s a nice diagram from Ortovox showing this method.
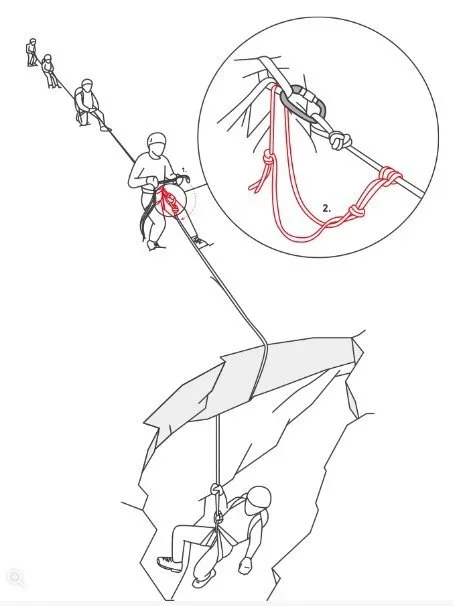
image: https://www.ortovox.com/uk/safety-academy-lab-ice/chapter-3/rescuing-a-companion
What type of hitch cord works on skinny 6 mm rope?
Usually, the diameter of the hitch cord needs to be at least a couple of millimeters smaller than the diameter of the rope it's going on. This makes it challenging to use hitch cords on 6 mm ropes like the Petzl RADline.
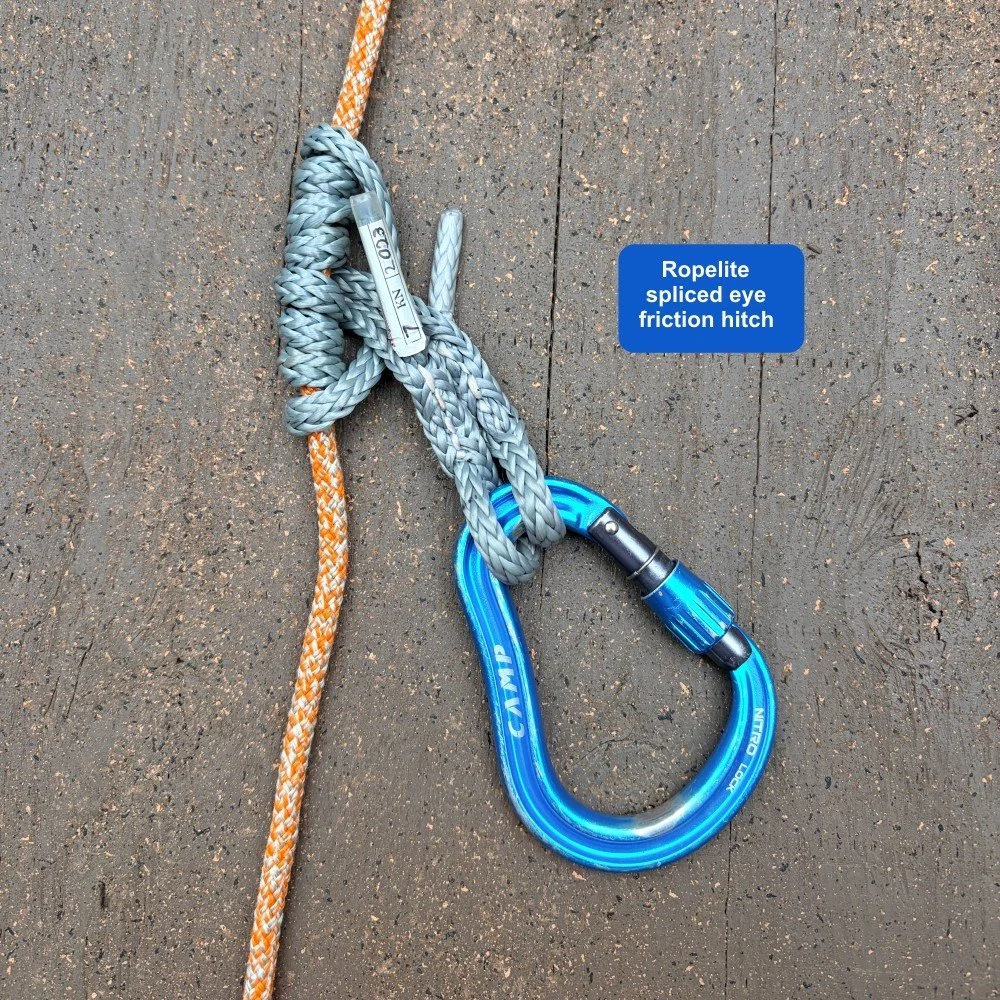
Here's what I have that works well; a spliced polyester 5 mm cord from Ropelite. Even though it's just 1 mm smaller than RADline, a four wrap prusik holds my bodyweight on a single strand.
Ropelite makes some other similar products from Vectran and Technora, as well as other creative, lightweight cordage. Check them out on my “Innovative Gear” page.
Does it matter where the bartack / stitching goes?
What about “eye to eye” hitch cords?
What’s a (small) caution on the Beal Jammy?
Join my Premium Membership to read the rest of the article.
Thanks for your support!

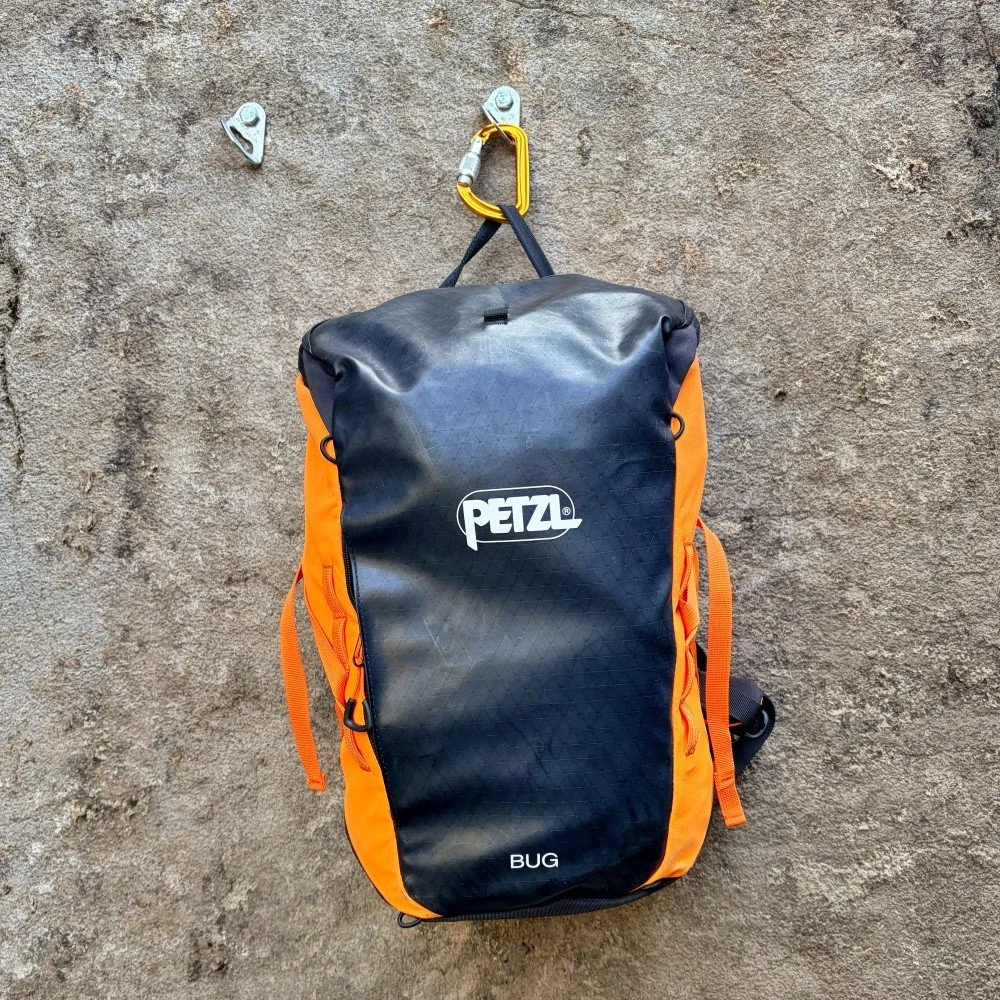
The Petzl Bug multipitch rock pack (newest version)
Looking for a small, durable pack specifically designed for multi-pitch rock climbing? You‘ve found it with the redesigned Petzl Bug. Here’s a full review.
Premium Members can read the entire article here:
Full disclosure: Petzl sent me this pack for free. That in no way biases my review; I think it's great and I want to tell you about it. There are no ads, affiliate marketing links, or paid product promotions on Alpinesavvy. In the rare cases when I get free products like this, I’ll always let you know.
The button below links to my favorite climbing goodie store, HowNOT2. I provide it as a convenience; I make $0.00 if you buy from them.
My first time on El Capitan was a test run of the Nose up to Sickle Ledge. Among various other minor mishaps that day, the Yosemite granite managed to grind a silver dollar sized hole in the side of my favorite alpine climbing pack, because I didn't have a proper haul bag.
The Petzl Bug would've been a much better choice!
While Petzl makes packs for caving, canyoneering, and industrial / rope access, this is their only offering for climbing; specifically, multipitch rock climbing.
That gets my attention. I've had a few different versions of small climbing packs over the years, notably, the Black Diamond Bullet. Up until now, the Bullet was fine. I now like the Bug a lot better.
The Bug has gone through several iterations over the years. This latest version, at 18 liters and 665 gram / 1.5 pounds, has a few understated features specifically for multi pitch rock climbing. It’s also versatile enough to kick around town as a commuter / student pack, if that's your thing. It comes in several colors; I like the classic black and orange.
My first impression out of the box: “Dang, this is a solid, well designed workhorse!”, and not “This is so featherweight, I wonder if it can handle being a mini haul bag?”
Here’s what I like about the Bug.
General features:
Sturdy and smooth zippers
Nice fit
Two well-placed zippered interior pockets
Sliding adjustable sternum strap
Large front panel pocket
Sits high on your body
Padded back panel and shoulder straps
Water bladder sleeve in the back panel
Climbing features:
Durable exterior
Sturdy haul loop
Easy access when clipped to the anchor
Helmet pouch
Daisy chain loops and compression straps on the side
Shoulder strap clip loops
Removable waist belt
Rope compression strap
(Disclaimer: The photos below will make it wildly obvious that I’m not a product photographer, but I gave it my best shot.)
Sturdy and smooth zippers
Probably the most common failure point in all outdoor gear is crap zippers. Not a problem with this pack. The exterior zippers are beefy, and they have sturdy pull tabs so you're never fumbling to open anything.
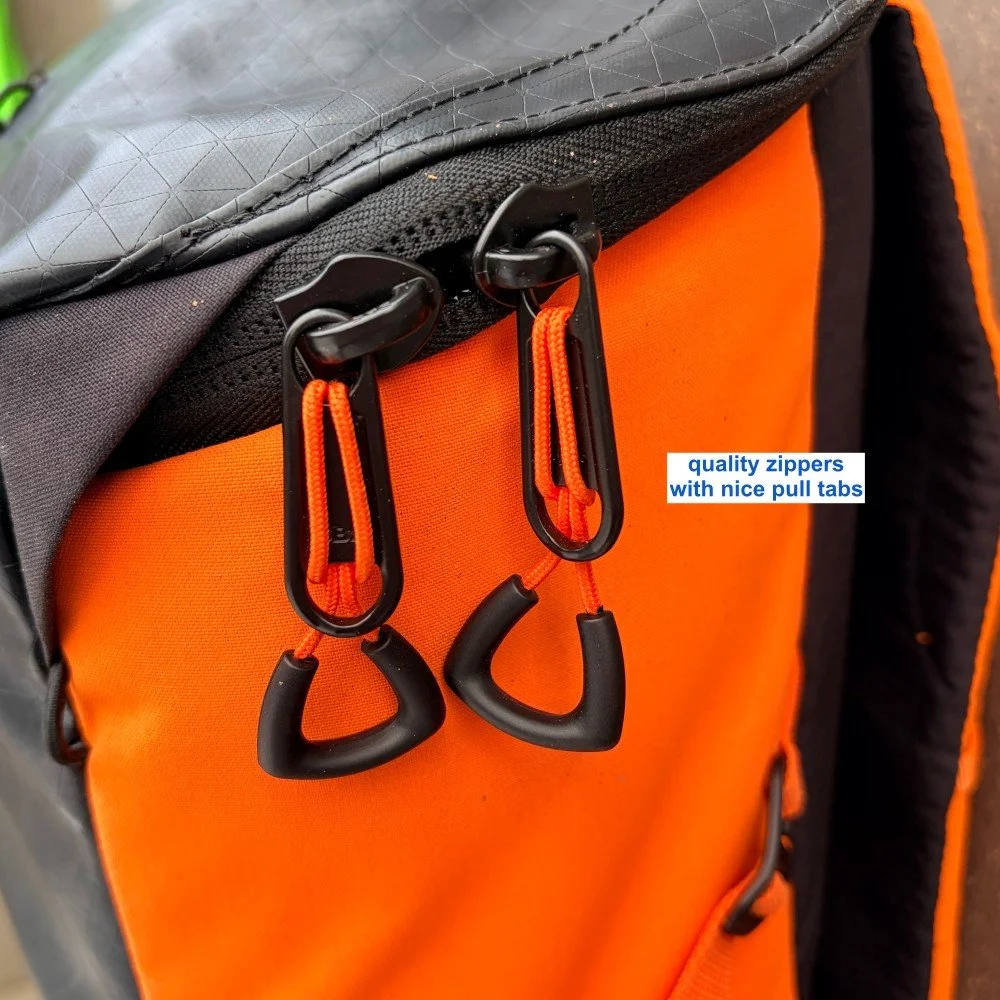
Nice fit
It's rectangular-ish. The stiffer fabric holds its shape well when empty, which makes it easy to load up. The back panel is about 16 inches / 40 cm. The shoulder straps have a lot of fabric, so I think this pack would fit a fairly wide height range of folks.
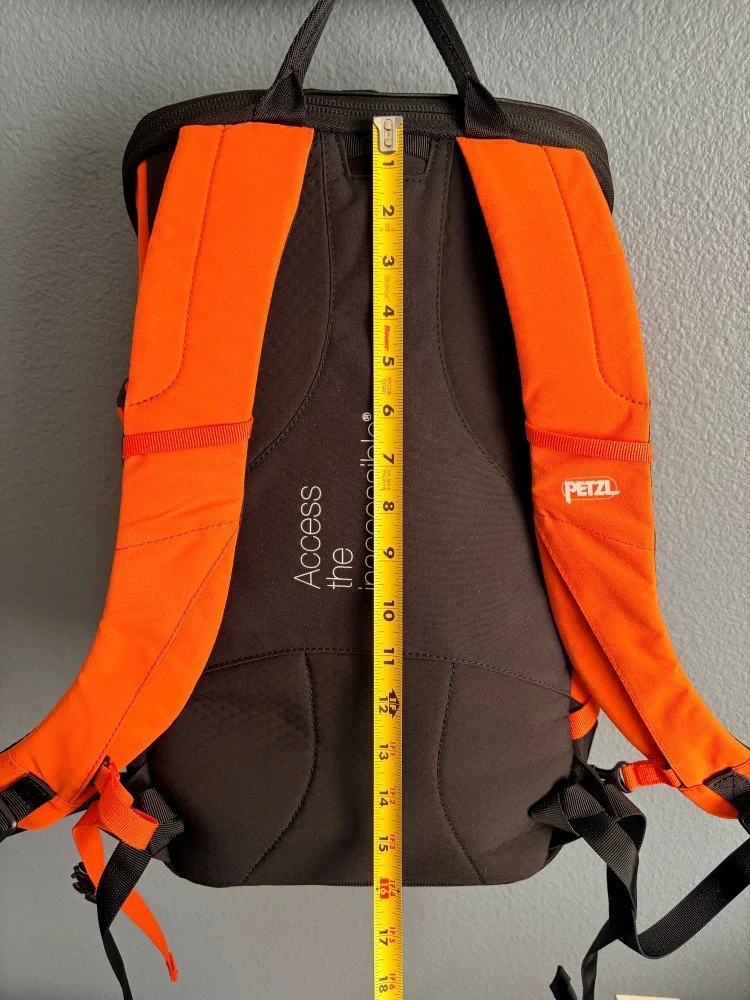
Two well-placed zippered interior pockets
One of them has a key clip. These pockets are nicely tucked away in the main body of the pack and not attached to the lid, where you can easily drop things if you forget to zip it closed. (Not a problem in a commuter pack, but potentially a Big Problem on a cliff.)
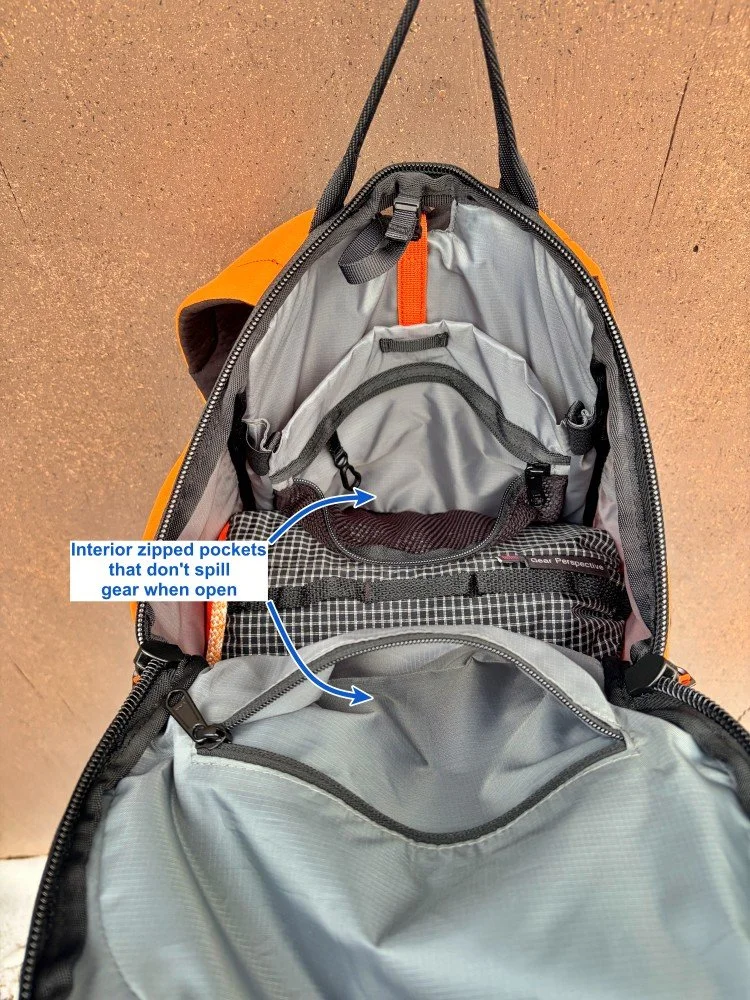
Sliding adjustable sternum strap
Each sternum strap is clipped to a little plastic bit that slides on a rail in the pack strap, giving you about 5 inches / 12 cm of up and down adjustability. Especially for a small pack, this can give a more comfortable fit.
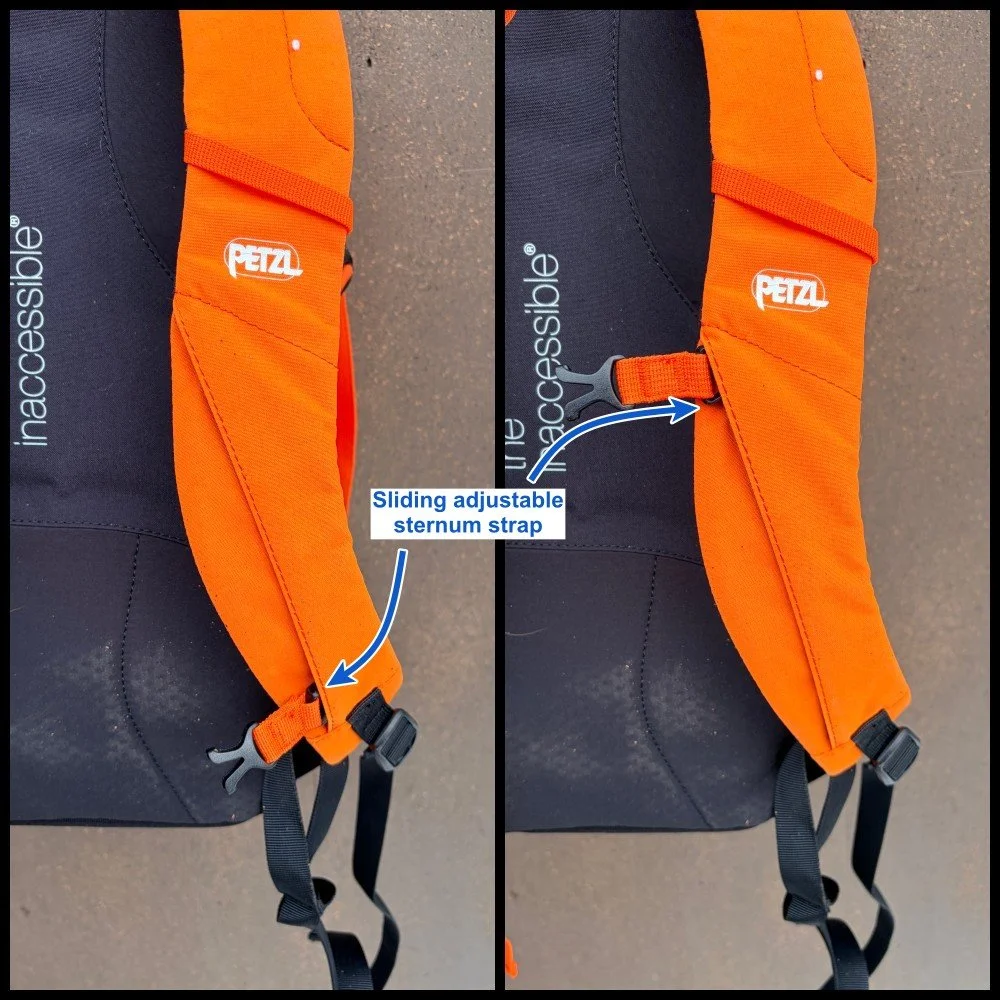
Large front panel pocket
When your pack is all buttoned up, especially with a rope on top so you can't open the main compartment, a pocket like this gives quick access to smaller items. (It opens vertically, so be sure and zip it back up.)
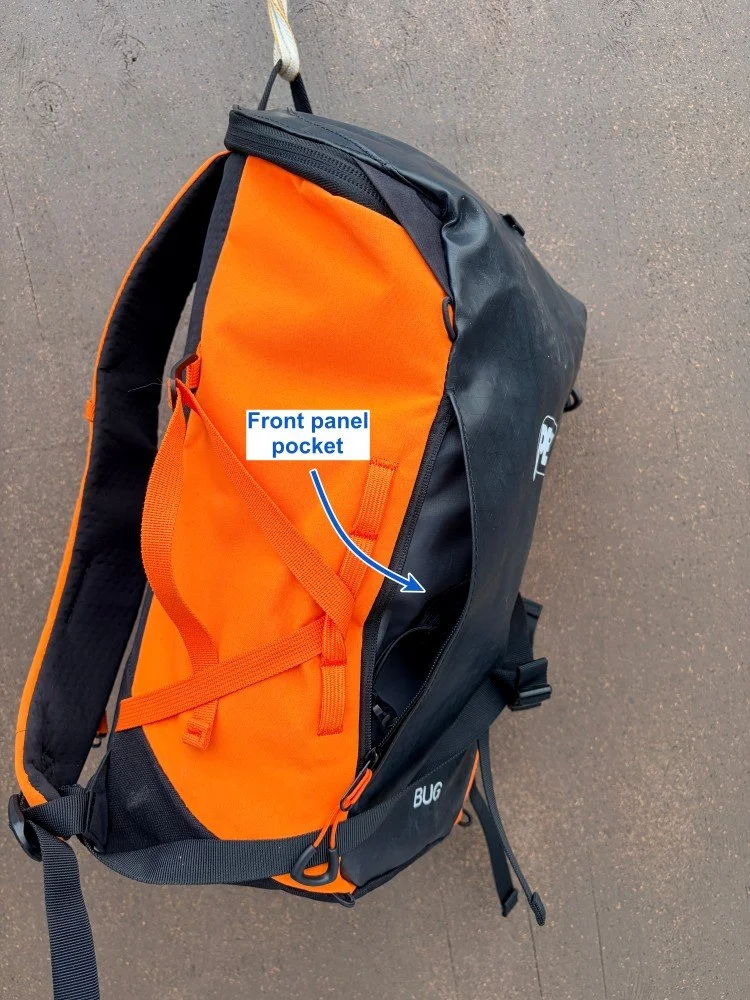
Sits high on your body
This pack doesn’t have waist belt gear loops. You want a pack like this riding fairly high so you can access your harness gear loops.
Padded back panel and shoulder straps
Yes, this adds a touch extra weight, but it also keeps your climbing hardware from poking you in the back and definitely adds comfort on the hike in. A good trade-off, if you ask me.
Water bladder / reservoir sleeve in the back panel
The large water bladder sleeve has a small clip loop at the top. This loop keeps your half empty water bladder from slipping down inside your pack, which can be annoying. There's an exterior hole for your bladder tube.
I'm generally not a fan of water bladders for cold weather alpine climbing. However, for warmer rock climbing, they can be handy. This sleeve fits my 3 liter reservoir.
This well-padded bladder sleeve is also a good spot for a guidebook, so it doesn’t get crunched in the main part of your pack.
If this is your urban pack, an laptop or iPad also fit fits nicely in the bladder sleeve.
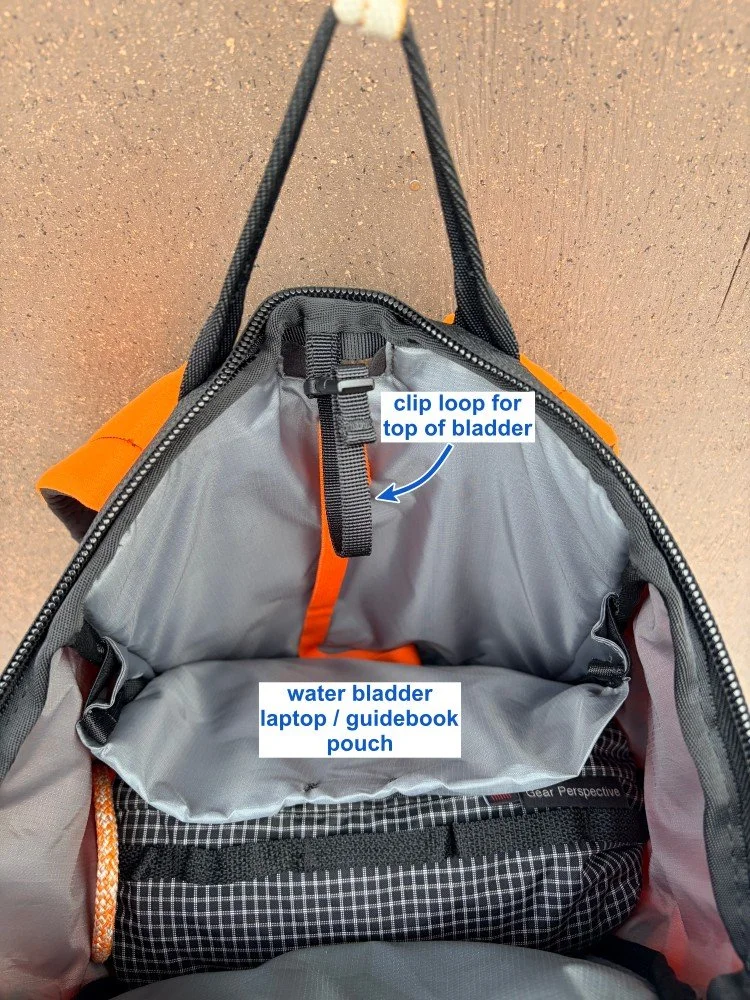
Now, let's look at some of the climbing specific features of the Petzl Bug.
Durable exterior
The first thing you notice: the extra stout, rubbery material on the top and front panel. It feels like an industrial tarp, or almost a truck inner tube. I've seen similar reinforcement on canyoneering packs, where gear really gets beat up. This is great for long-term durability when dragging your pack up a cliff. It also might offer a fair bit of waterproofing (which you hopefully wouldn’t often need on a rock climb.) It’s both a distinctive look and very practical.

Sturdy haul loop
Nice to see on a pack designed for multi pitch rock climbing. This haul point is burly enough so I'm comfortable clipping only to this loop and not using the shoulder strap as a backup.
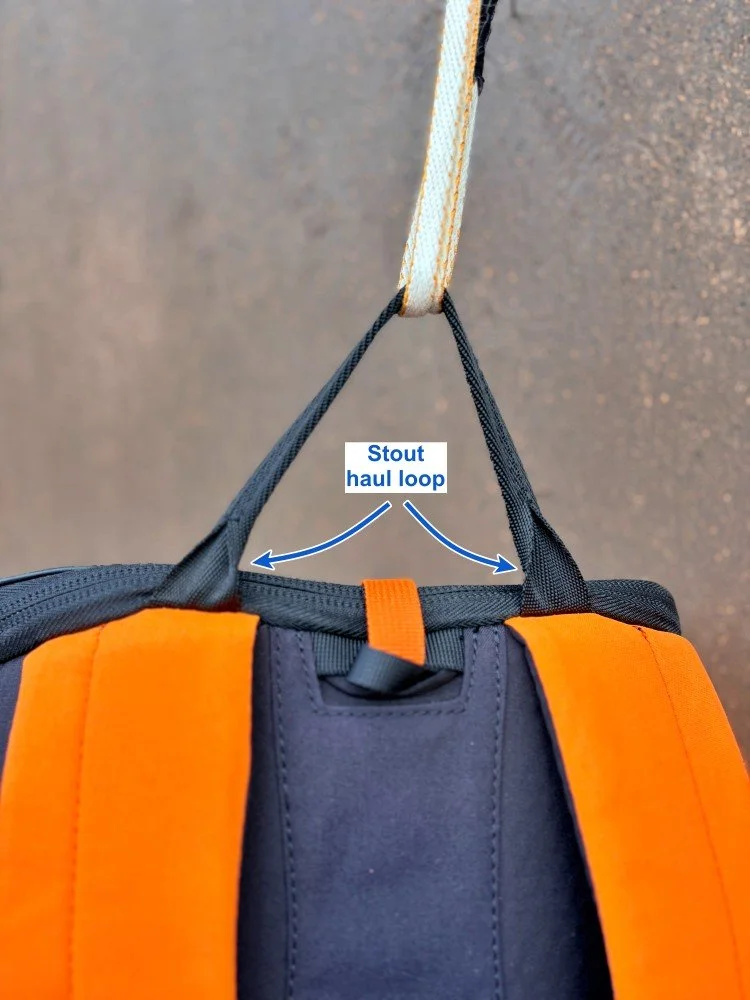
Easy access when clipped to the anchor
Related to the haul loop design: the Bug hangs nicely when you clip the haul loop to an anchor. The 3/4 zip clamshell top opens away from the haul loop, so you can access everything in the main body while the Bug is clipped in.
The clamshell top means you can never unzip the bag down the sides and have important things fall out, pretty key for a climbing pack.
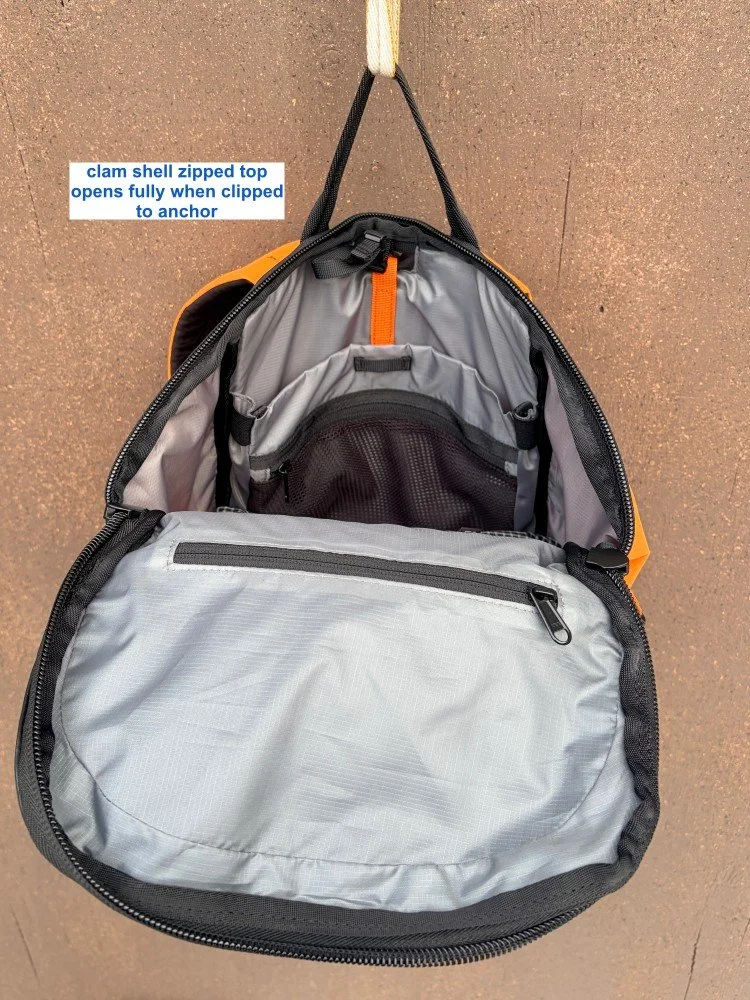
Helmet pouch
You're not gonna fit your helmet into an 18 liter pack, so this is pretty important. I’m not a fan of having my helmet bouncing around on the outside of my pack on the hike in, so this pouch is pretty nice. It's easy to add or remove the pouch as needed.
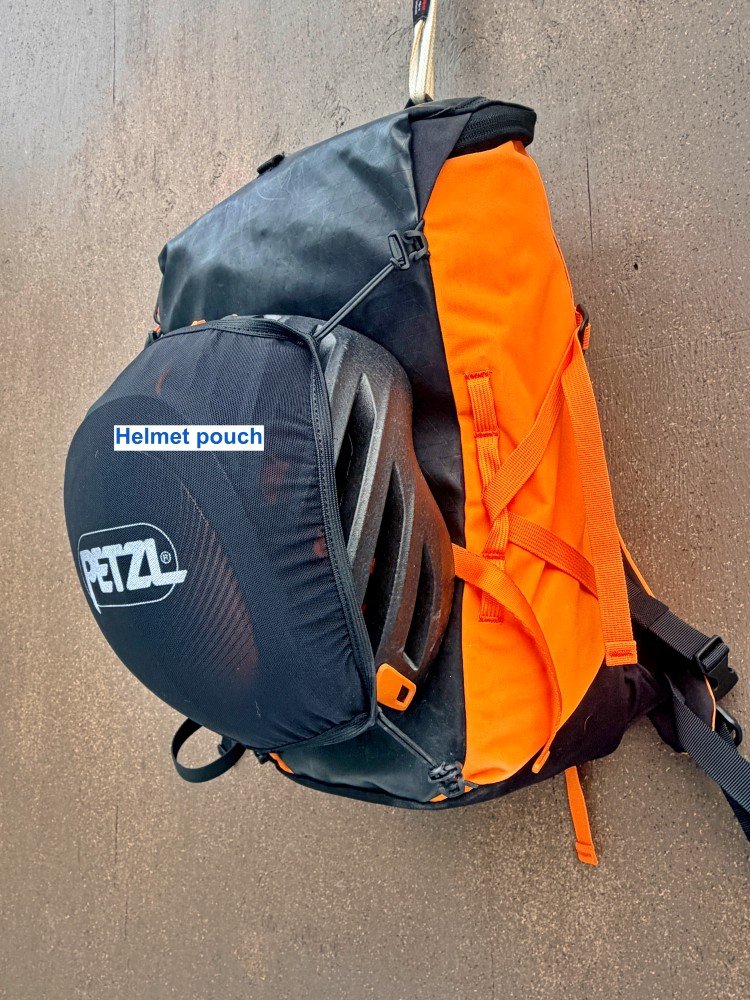
Daisy chain loops and compression straps on the side
The side compression straps are long enough so you can strap down a rope so it behaves better on the outside of your pack. The top of the compression straps can be unclipped from the body of the pack, which makes it easier to put the strap around your butterflied rope. Combining the side straps with the main rope strap on the top, the Bug carries a rope better than any other small pack I've used.
The sewn daisy loops work for clipping pretty much anything else on the outside of your pack, like your smelly shoes or a messy chalk bag.
If you don't have much stuff, you can crank down the compression straps to make the pack even smaller.
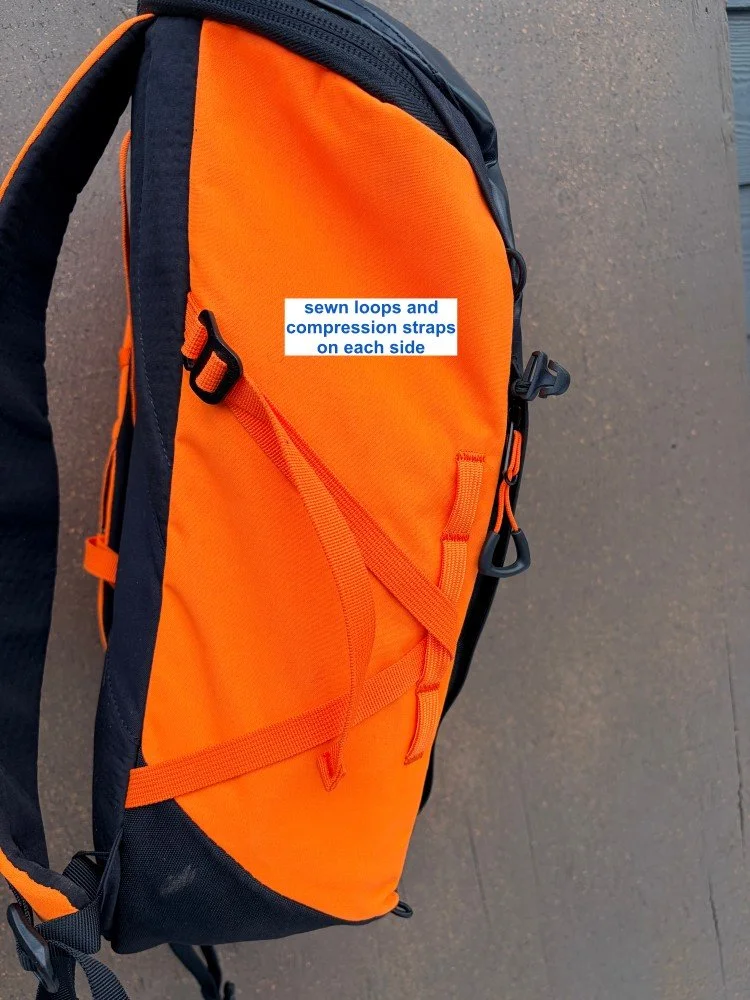
Shoulder strap clip loops
A small loop of cord or webbing on the shoulder strap gives a convenient place to rack gear as you’re cleaning, maybe keep your nut tool handy, or keep the next few pieces of gear you think you'll need on lead in a quick-to-grab spot.
I've added gear loops to my other alpine packs, see this article. I don't have to on the Bug; there's one on each shoulder strap.
It’s also a handy spot to clip a two-way radio, if that's your thing.
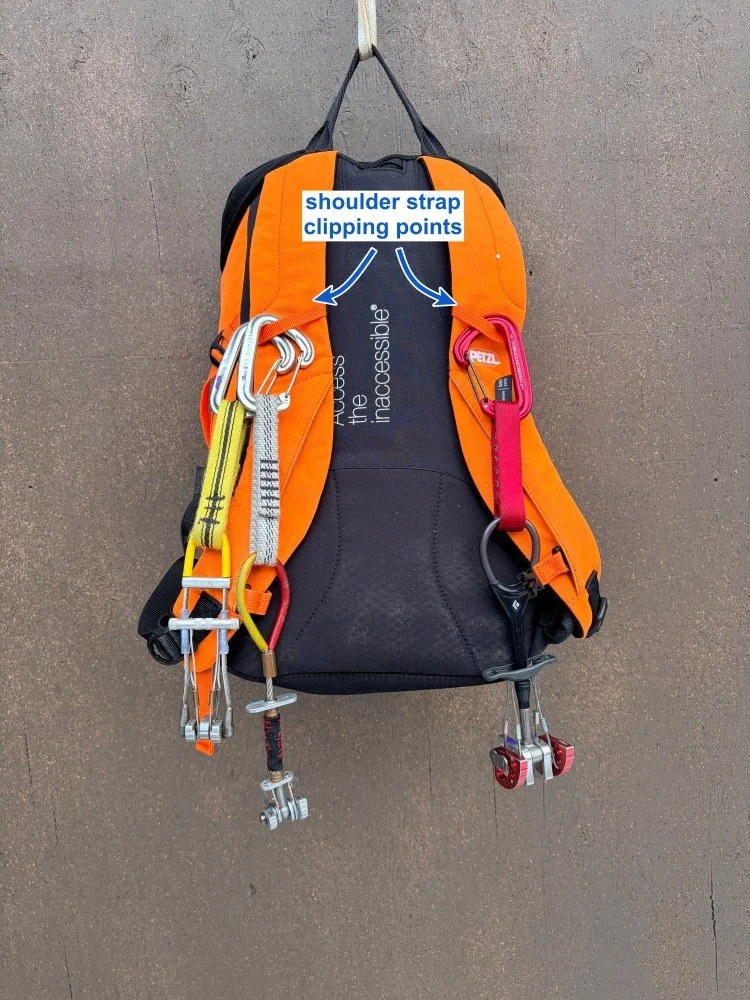
Removable waist belt
The waist belt straps are girth hitched, so you can easily take them off for a more streamlined haul.
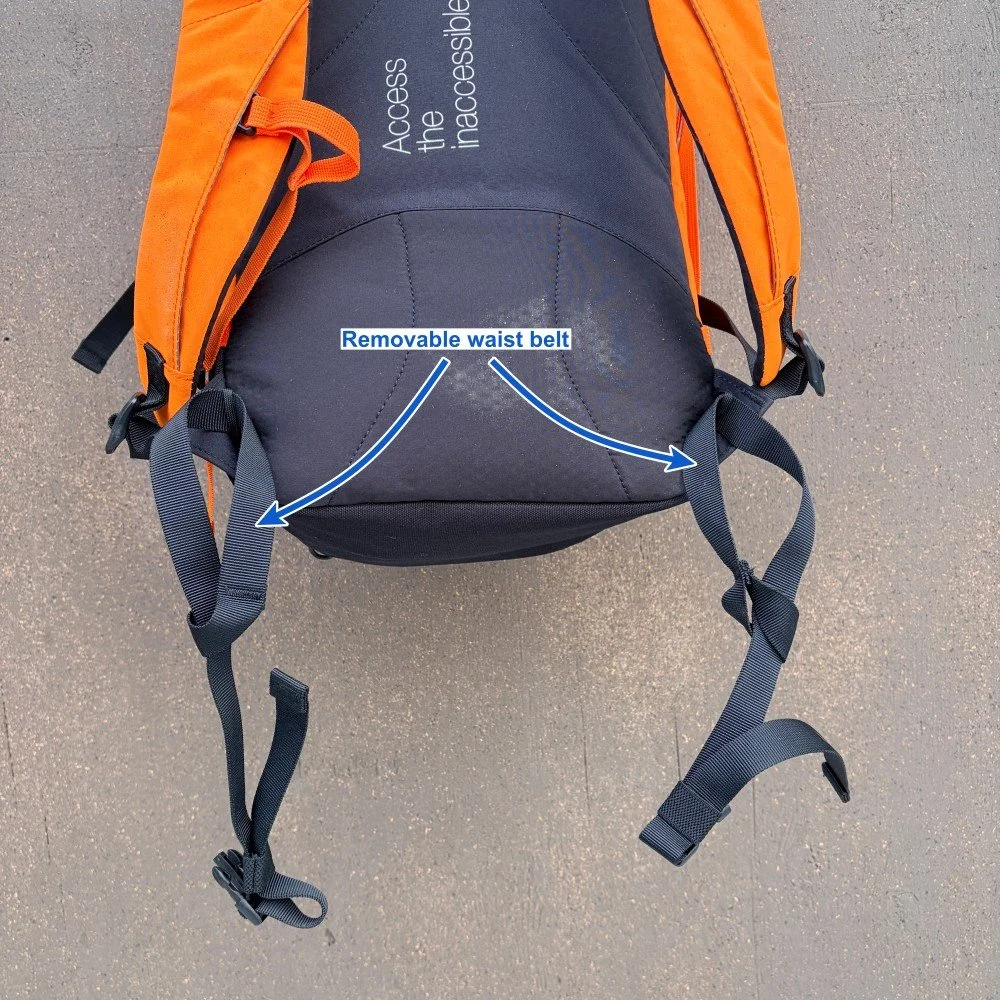
What's the clever design feature with the rope compression strap?
How well does the rope carry system work?
What type of climbing is the bug pack NOT suitable for?
Want to see a photo of everything I can fit into it?
Join my Premium Membership to read the rest of the article.
Thanks for your support!
High tech climbing cordage from Zartman Rigging
To improve gear, makers keep pushing for lighter and stronger. Zartman Rigging takes this another step, with their high tech spliced, not sewn, soft goods made for climbers. Here's an overview.
Premium Members can read the entire article here:
Full disclosure: Zartman Rigging sent me some goodies for free. That in no way biases my review; they are great products and I want to tell you about them. There are no ads, affiliate marketing links, or paid product promotions on Alpinesavvy. In the rare cases when I get free products like this, I’ll always let you know.
A few of the specialized spliced goods from Zartman Rigging.
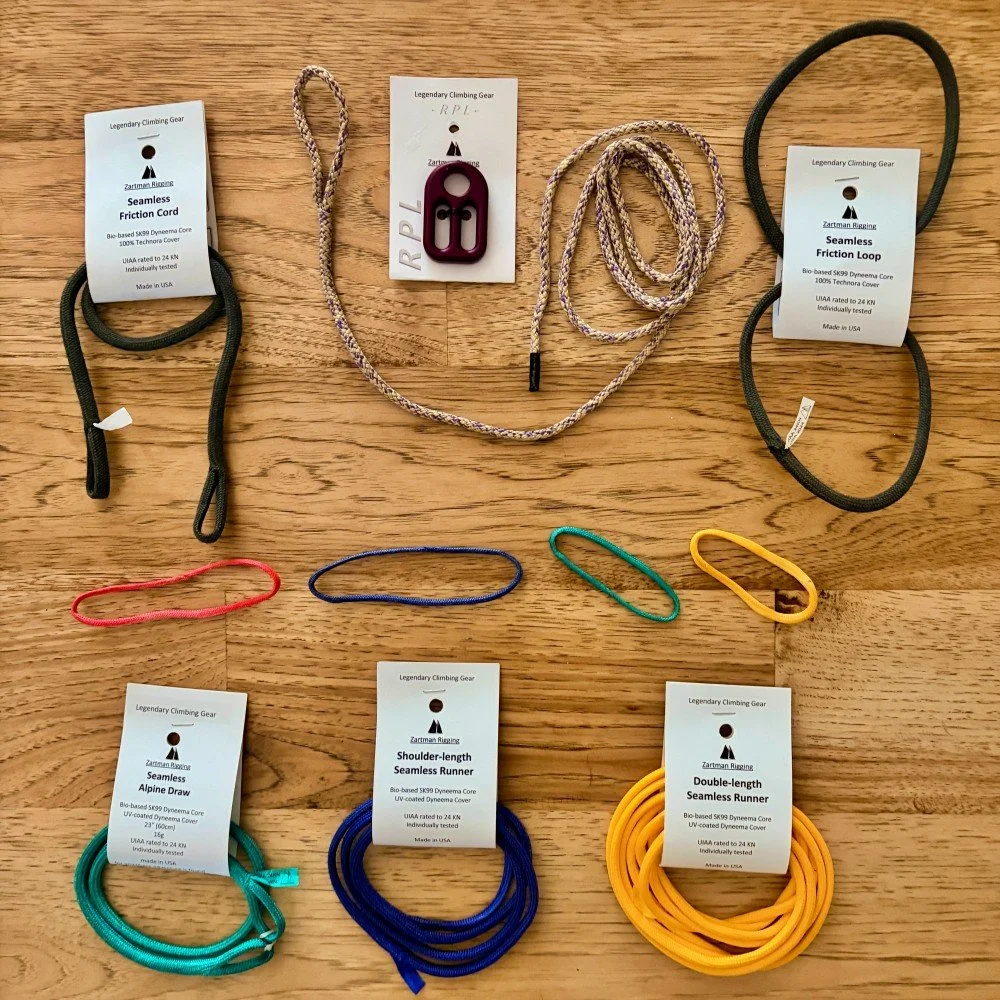
Zartman Rigging - website and PDF catalog
Ben Zartman, based in Rhode Island, is a sailor, climber, and expert one-man-band producer of made in USA, high-tech spliced cordage.
“Splicing”, if you're new to the term, is the permanent method of joining rope ends or forming loops by interweaving strands of the rope. While spliced ropes and cords have been used in the boating world for literally centuries, they’re relatively new to climbing.
The main advantage of splicing is that you can make a loop, or an eye loop on the end of a length of cord, without any sewing / bar tacks. This makes a strong, light, and less bulky product, and also lets you use very thin cordage that would be impossible to sew.
Here’s Ben’s more technical description of his methods.
Something I find impressive about Ben’s products is that many of them are UIAA rated, which for a small manufacturer is a fairly expensive and time-consuming process. Ben took this extra step to give users confidence in the tested strength of his products.
How strong? UIAA rated 24 kN!
And yeah, I’ll be honest, a confidence boost when weighting material that looks like parachute cord may be needed!
Yes, it may cost more than your standard sewn Dyneema sling. However, if you're looking for about the lightest possible weight, and the lowest bulk soft goods, it's pretty hard to beat this.
It's not all soft goods. Ben also sells the RPL (“rappel”, get it?) a cool micro belay plate designed for ultra skinny 6 mm ropes.
Let's have a closer look at some of the Zartman Rigging goodies.
Let's start with something familiar to all climbers, single and double length loops.
These loops have a spliced Dyneema core, with an additional Dyneema sheath which protects against abrasion and UV light. These Zartman loops, which are 60 and 120 cm respectively, are about 30% lighter than the standard sewn slings of the same length. They also come in lengths of 20 and 180 cm.
These were the first UIAA certified slings (24 kN) to eliminate sewn seams.
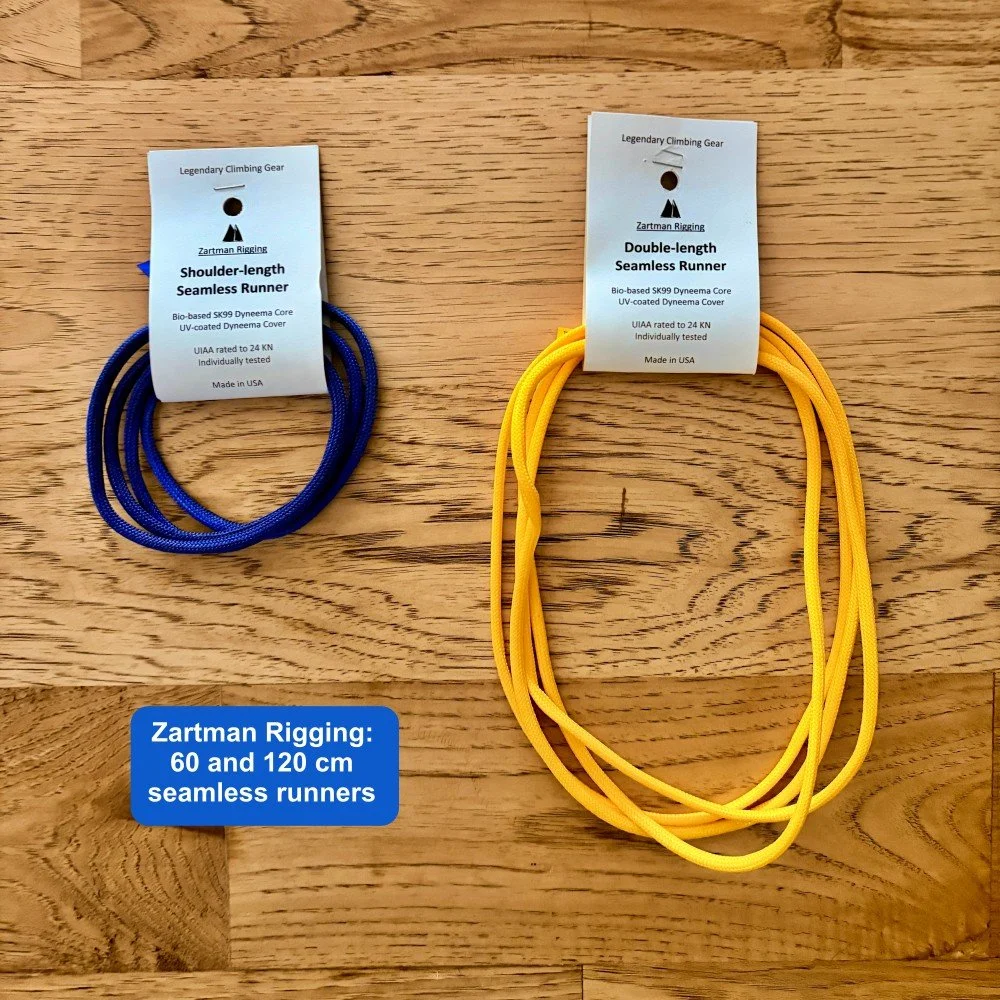
Seamless alpine draw
This is made of similar material as the loops, but with a spliced eye on each end. This is 60 cm when extended, and is a featherweight 16 grams. You can clip it end to end to extend a placement, or shorten it up basket hitch style. UIAA rated 24 kN.
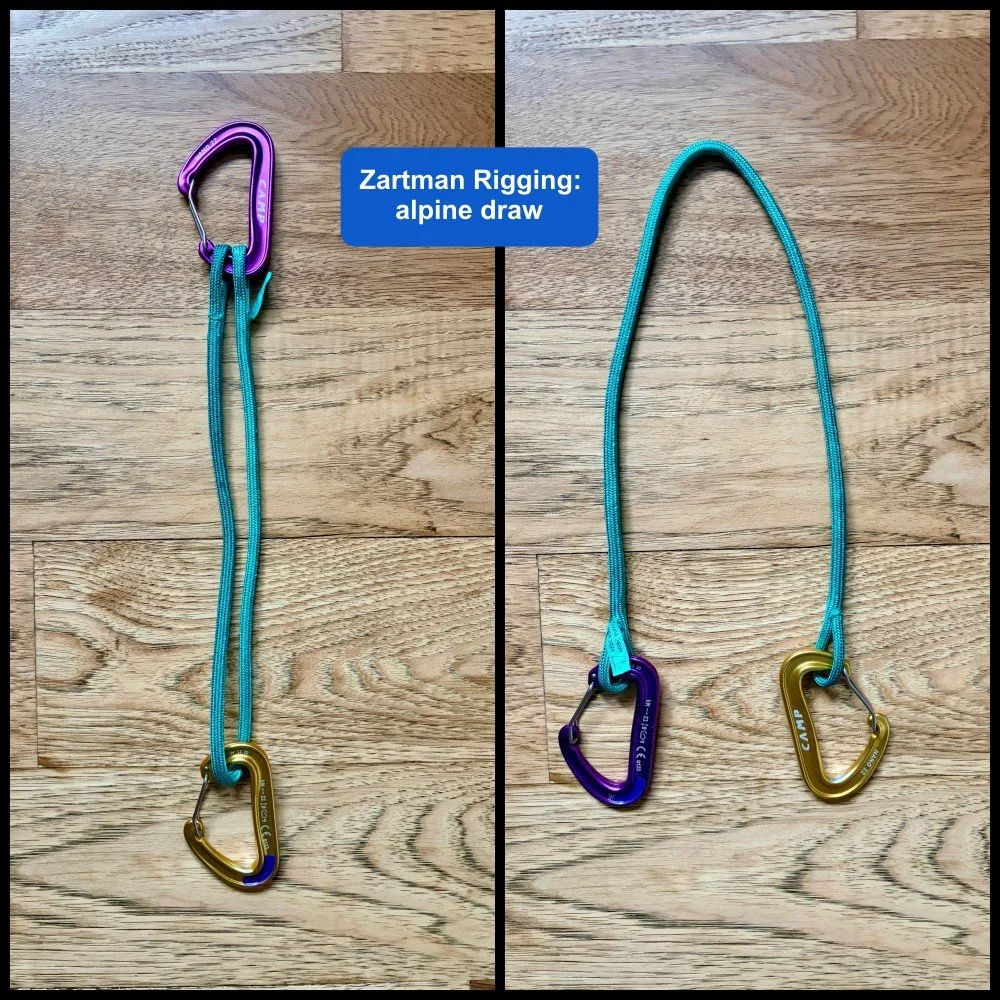
Here's a close-up of those spliced eyes, pretty cool!

Friction hitch cords: loops and eye to eye
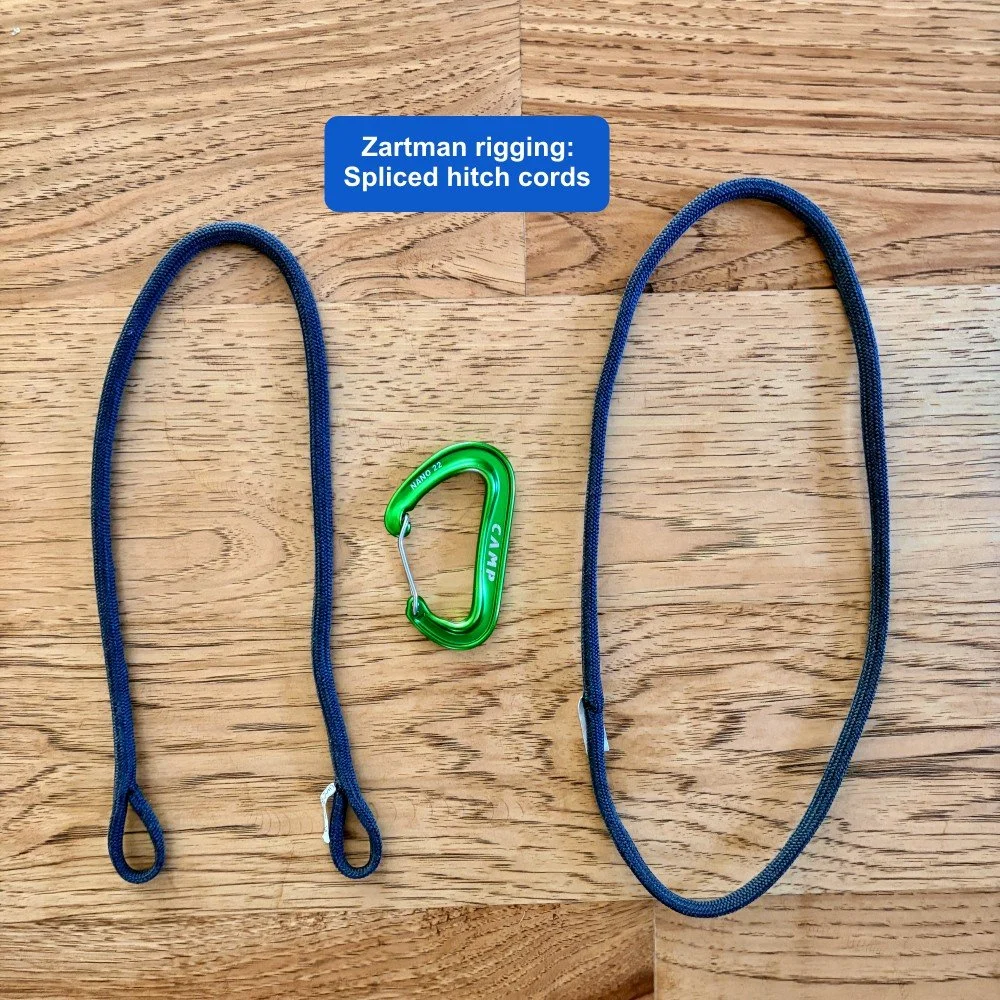
Carabiner for size comparison . . .
This is where the lack of a sewn connecting point really shines. Keeping the knot or the sewing out of the way when you're tying a friction hitch is always a bit of a hassle. Not a problem with these spliced cords. These are quite a bit thicker than the slings mentioned above.
Normally, you wouldn’t use a Dyneema sling as a rappelling autoblock, because the standard slings are not especially heat resistant. Ben uses a Technora (aka Kevlar) sheath over the Dyneema core, which makes these cords extra durable and heat resistant. Rappel backup, no problem. “Grabbiness” on the rope is excellent. UIAA rated 24 Kn.
I think my Sterling Hollowblock just got replaced . . .
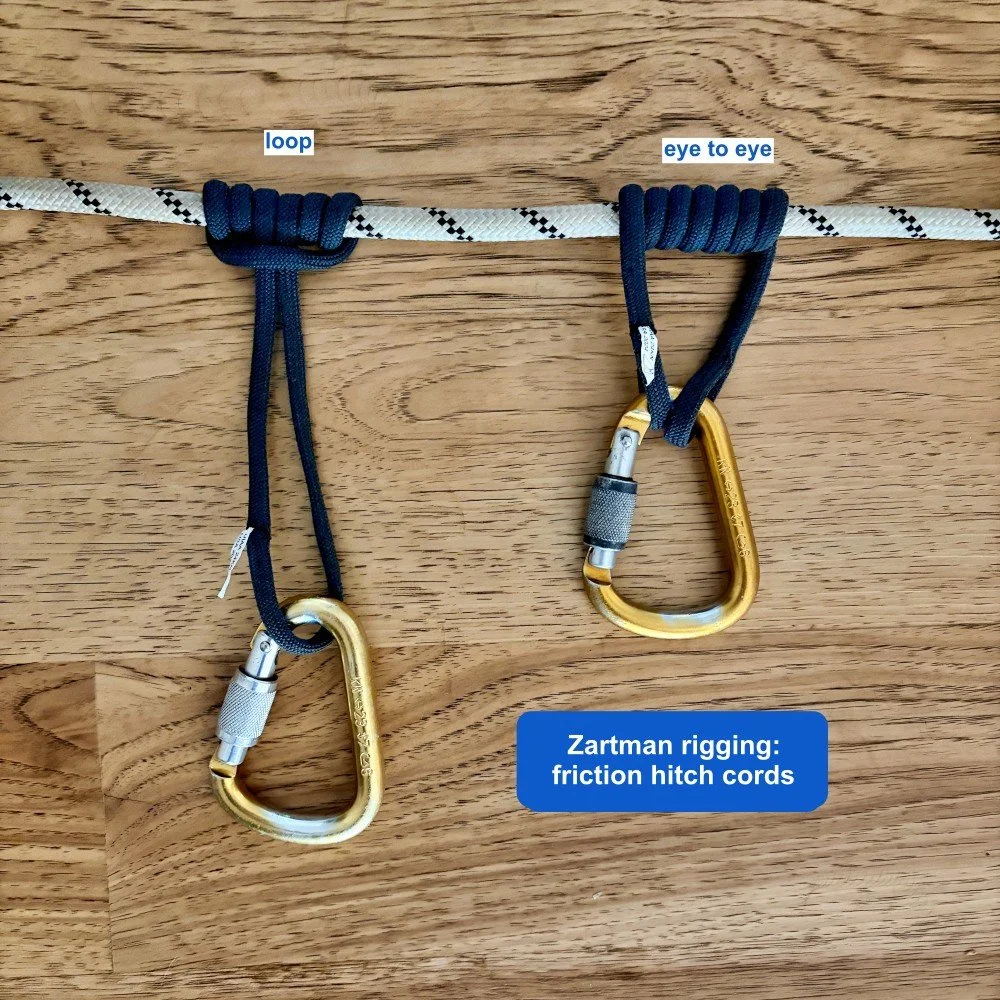
Micro loops
These loops, which come in two sizes, are very short spliced Dyneema loops that have a specialized application that may only be appreciated by aid climbers: they are perfect for girth hitching hooks. These loops break around 9 kN, and weigh a ridiculous 2.5 grams.
Attaching thick cord or webbing to hooks has always been a hassle. Up until now, the best option was to get loops custom sewn on your hooks from Skot’s Wall Gear.
Here's a before/after of two of my hooks: chunky cord and webbing on the left, micro loop on the other.
The shorter Micro loop (yellow in photo) works fine for a hook with one hole, like my cam hook.
The slightly longer “Mega” Micro loop (red in photo) fits hooks with two holes, such as the Black Diamond Cliffhanger on the right. The longer Micro loop can also be used to tie off a piton, or basket hitch to the eye of a piton, where a carabiner might sit at a bad angle.
Slight correction to photo below: on the far right, the hook with the red loop should have the loop on the other side of the hook. Doing this helps press it down and into the rock when it's loaded. Mea culpa . . .
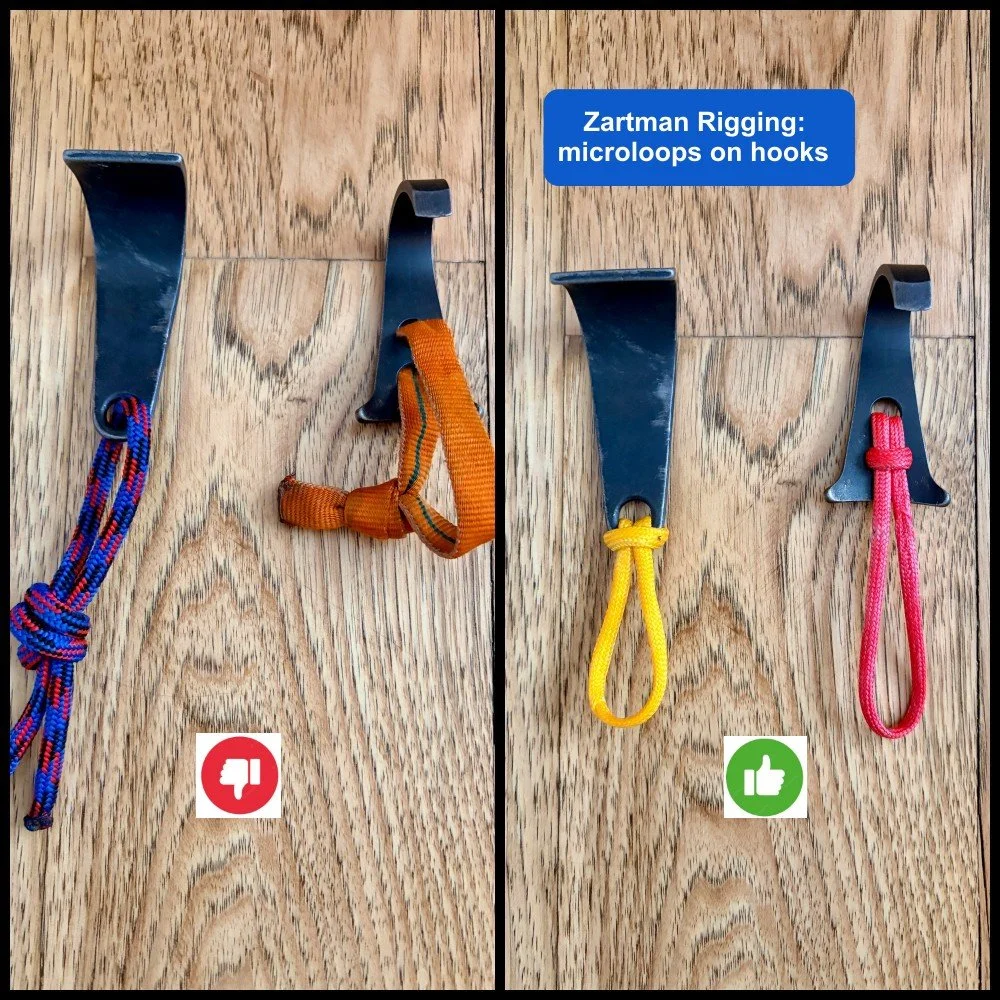
The RPL micro friction plate
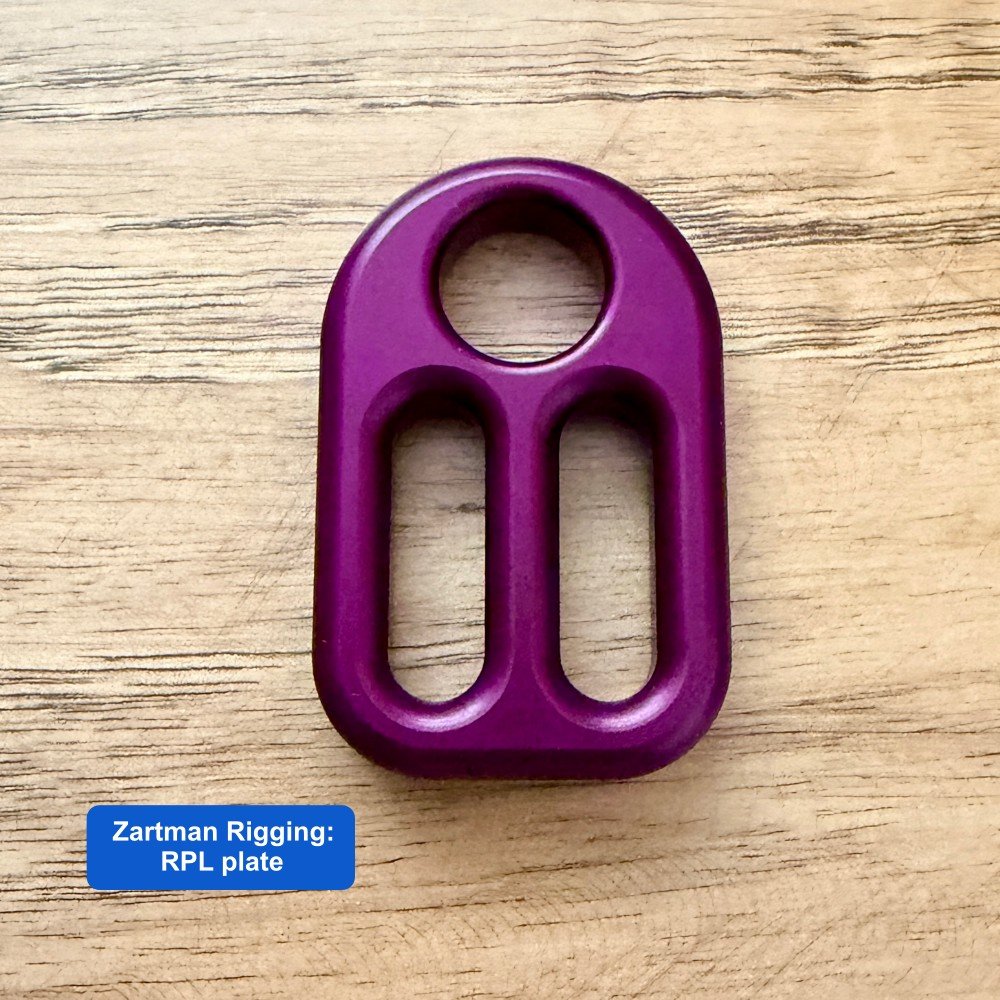
Rappelling and belaying on 6 mm ropes has become more of a thing in recent years. This is the only “metal” offering from Zartman Rigging, and it's designed for exactly this flavor of skinny cord. It has four separate functions:
rappelling on single or double strand 6 mm rope
personal adjustable tether / PAS, sort of like a much slimmer Kong Slyde
belaying in guide mode (behaves like the Kong Gigi)
rope ascending (I didn't try this)
Want to see my results about using the RPL on 6 mm cord?
Does the RPL work on a single strand of 6 mm?
How about Ben’s new offering that turns the RPL into a sweet adjustable, personal tether / PAS?
Join my Premium Membership to read the rest of the article.
Thanks for your support!

All about friction hitches - Part 1
The humble friction hitch: probably the lowest cost, lightest weight, and most useful thing you could have on your harness for creative rigging and self rescue. Learn about 'em here.
Premium Members can read the entire article here:
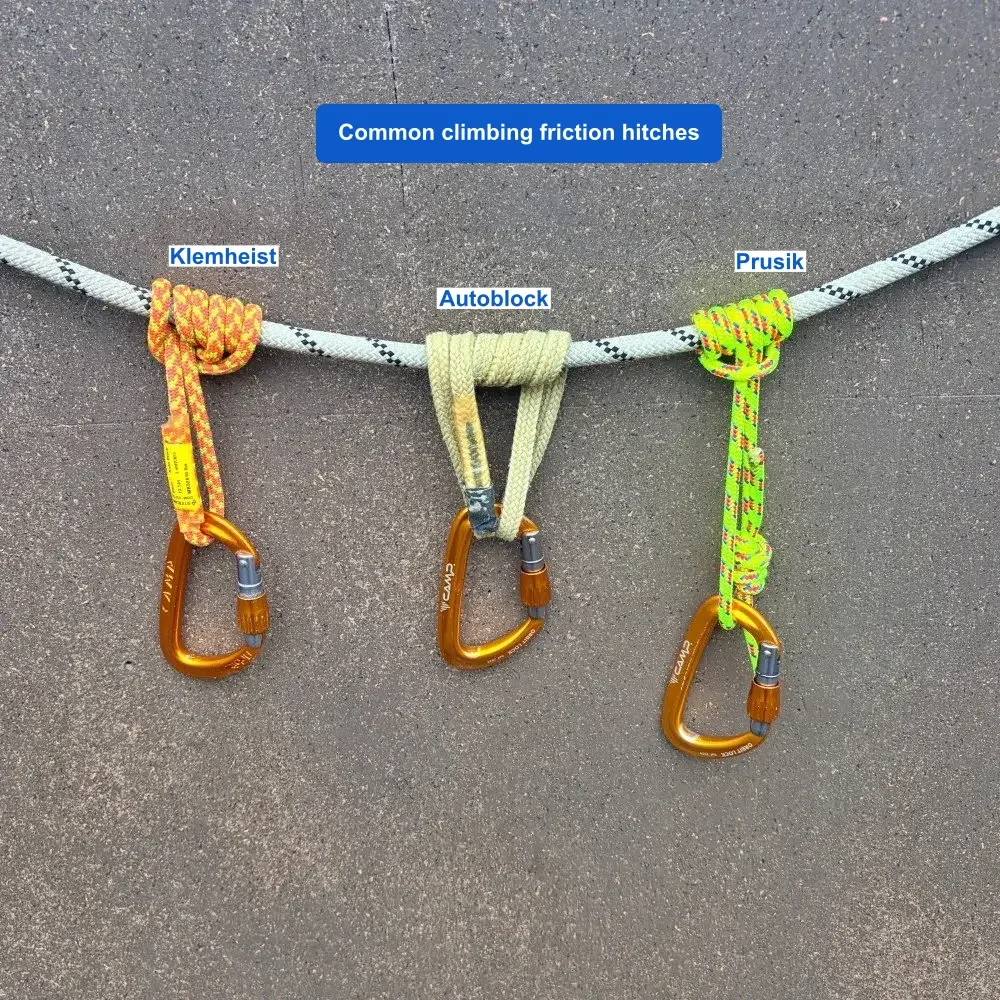
The humble friction hitch loop. Inexpensive, lightweight, and pretty much infinitely useful when it comes to #CraftyRopeTricks and self-rescue stuff.
(Something I've noticed over the years: the more experienced the climber, the more likely they're gonna have a hitch loop or two on their harness. Unless you're in the gym; then you look like a dork.)
Let's have a closer look at friction hitches (Part 1) and hitch loops (Part 2, coming soon), the Swiss Army knife problem-solver of climbing gear.
What is a friction hitch, and how is it used?
A friction hitch is a type of knot that is usually tied with a short loop of cord, which from now on I’ll call a “hitch cord”.
When a friction hitch is tied onto a larger diameter rope, the hitch grabs the rope when it's weighted, and can slide when unweighted. You can tie a friction hitch on a single strand of rope, or on two strands.
This makes it helpful for many common climbing techniques, such as:
Ascending a fixed rope
Backing up a lower
Backing up a rappel
Rope grab (and progress capture) in mechanical advantage hauling systems
Safety on a fixed line when you're near a cliff top or crevasse edge
Can I clip my grandma to one friction hitch?
Short answer, no. A single loop of skinny cord should not be your only safety connection in any part of your climbing system, and that includes a friction hitch.
A hitch cord holding a human sized load should always be backed up in some way.
Typically, this backup is:
An additional rope grab or friction hitch
A backup knot
Below left: the load is held only by the friction hitch, and there's no backup. Not good.
Below right: if the friction hitch slips or fails, the load is caught by the backup knot clipped to the blue carabiner. Much better. As you pull more rope through your haul system, you can add additional backup knot(s).

Is a friction hitch the same as a prusik?
“Prusik” is one of the more confusing terms in climbing, because it's a verb, an adjective, a noun, and even a proper noun! It’s named after Karl Prusik, the Austrian mountaineer (and yes, Nazi) credited with its invention. (For this article, I'm using the more precise terms “friction hitch” and “hitch loop”.)
Short version: a prusik is a type of friction hitch, but not all friction hitches are prusiks. Without being too fussy about definitions, be aware that “prusik” is used casually by climbers to mean lots of different things:
“I'm going to prusik up that rope.” (verb)
“Did you bring your prusik loop?” (adjective)
“Good thing I brought my prusik” (noun)
How “grabby” does it need to be?
Sometimes grabby is good, other times not so good. This is why it's good to have a few different friction hitches in your toolbox, so you can use the right one for the task.
Sometimes you want a friction hitch that grabs tight and is hard to loosen up, like for a tractor on a mechanical advantage hauling system. For that application, a three wrap prusik or a klemheist with a lot of wraps might work best.
Other times you want to hitch that slides easily, like when you want to ascend a rope, or as a rappel backup. In that situation, an autoblock or a klemheist with less wraps could be a good choice.
A caution on the autoblock . . .
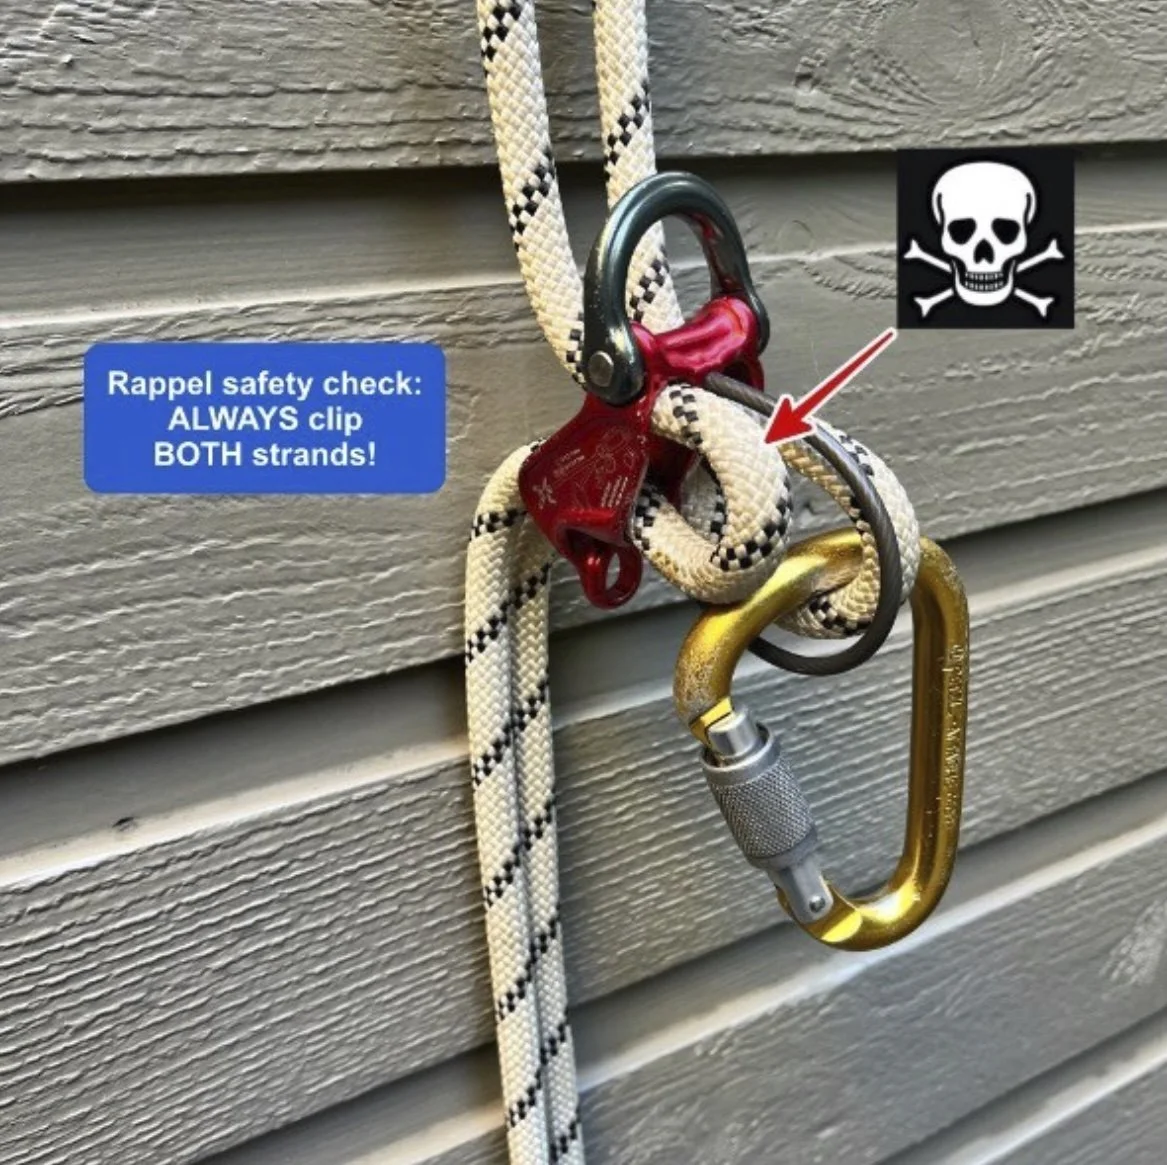
This is a quite common and potentially lethal mistake: clipping one, but not both, rope strands into your rappel carabiner.
Lots of people, myself included for a long time, thought that if you have an autoblock properly tied below your device, the autoblock would grab both rope strands (and keep you from dying) if you made this mistake.
Well, guess what, I was wrong!
If you tie your autoblock, but then clip only ONE strand as shown above, and then load the rope, the autoblock does NOT grab the rope as you might expect.
Instead, you start sliding down like the autoblock is almost not there! I tested this on fat ropes and skinny ropes, and with several different varieties of hitch cords. Pretty much the same outcome every time. It’s easy to test. Give it a try yourself.
(If you were to use the old school method of putting your friction hitch ABOVE your device, then it DOES catch you if you make this mistake. However, that comes with its own host of problems, it's an outdated technique in most situations, and I don't recommend it.)
The best way to reduce rigging errors like this: weight the rope with your tether still attached to the anchor before you commit to it.
Autoblocks are good practice for many reasons, but they don’t solve the problem of only clipping one strand. Do your partner safety checks as standard procedure. Don't be complacent, no matter how many rappels you've done in your life.
What are the main types of friction hitches?
There are MANY different friction hitches! Riggers, arborists and other rope pros have a quiver of exotically named and specialized hitches, often made with an eye to eye hitch cord (more on that below).
Climbers, on the other hand, usually don't carry this type of gear, and need to rely on a bit of improv with slings and cordage they are hopefully already carrying.
There are three common friction hitches in climbing:
autoblock
prusik
Klemheist
Autoblock
Has a few names: aka “French prusik” and “third hand”.
Has a fairly low level of grabbiness.
Most common use: rappel or lowering backup, hence the name “third hand.”
Can usually be released when it’s loaded.
Can be loaded in either direction.
Typically tied with cord (or a HollowBlock), not webbing.
You can use as many wraps around the rope as needed until the autoblock properly grabs. (As a rappel back up, three wraps are commonly used.)
Tip on using the autoblock as a rappel backup: Best practice is to have your hand on the rope just above the autoblock when rappelling, not putting your entire hand / fist around the auto block.
One more autoblock tip: sometimes two wraps is too loose, and three wraps is too grabby. Start with two wraps, and then twist the hitch cord a few times before you clip it to your carabiner. This can add some extra tension to the knot, which might be the fine-tuning that you need. (Here's an Instagram video from IFMGA Guide Ian Nicholson that shows how to do it.)
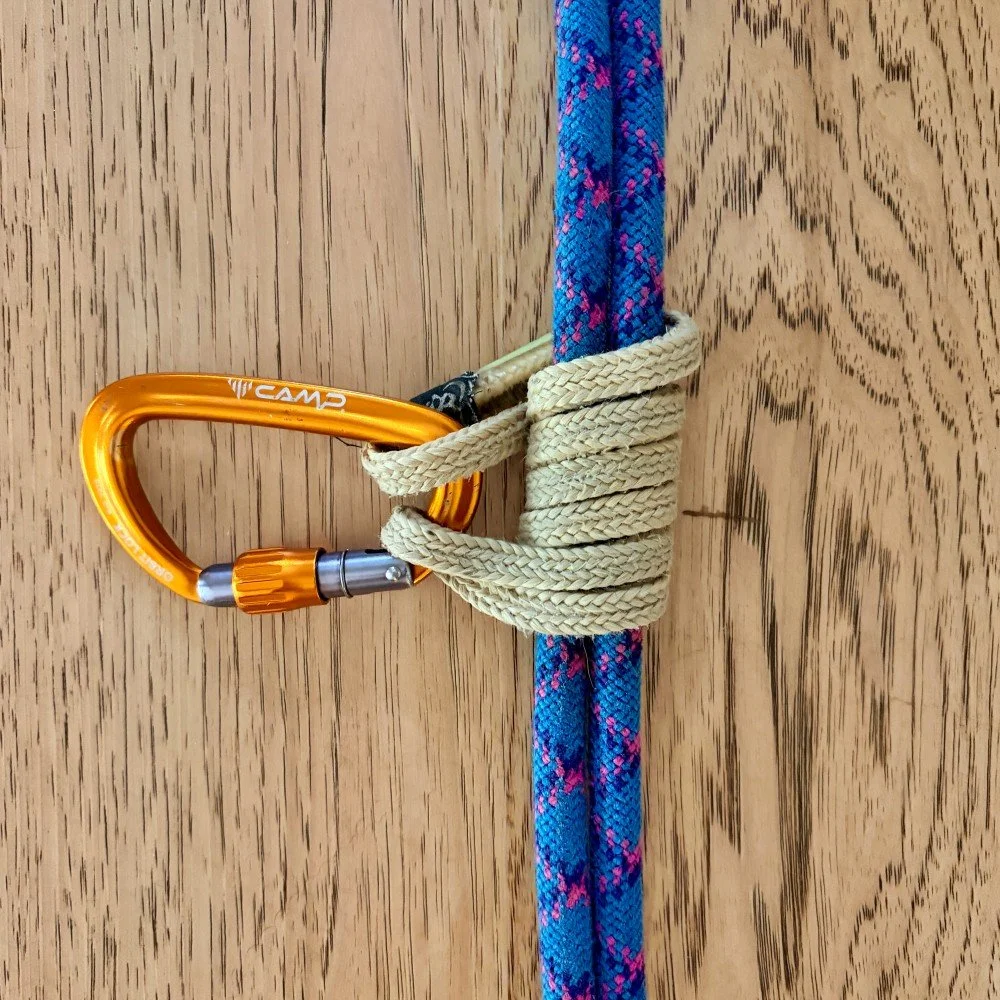
Prusik
The “grabbiest” of the three common hitches.
Typical use: “tractor” or progress capture in a mechanical advantage hauling system and ascending a fixed rope.
Needs to be dressed perfectly to work correctly, so it's a little finicky.
Usually takes longer to tie, and is harder to tie with gloves or cold hands.
Typically tied with three wraps around the rope, but can use two or four wraps.
Can be loaded in either direction.
Needs to be tied with cord, not webbing.
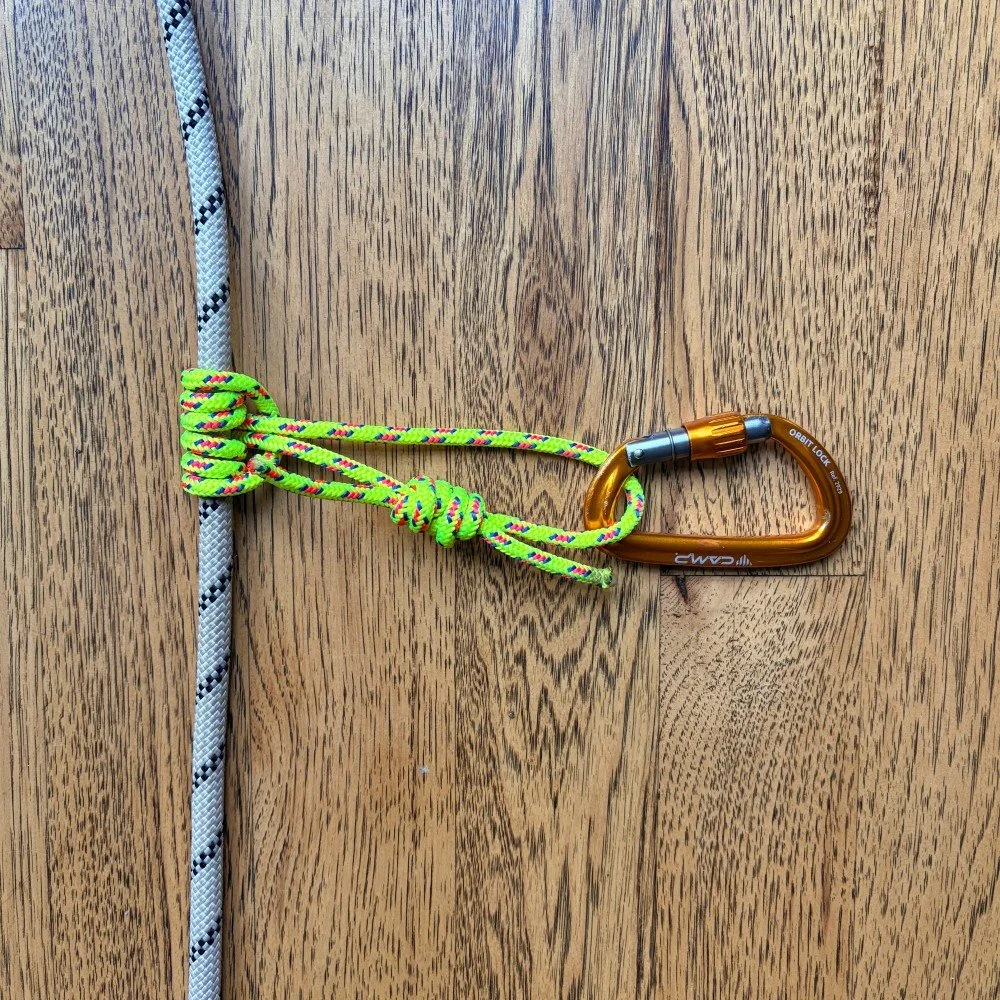
Klemheist
Has a medium level of grabbiness.
Can be tied with either cord or webbing.
Can add or removes wraps adjust the grabbiness.
Generally works best when loaded in one direction.
Works without being perfectly tidy / dressed, which is nice when you need to do it fast and maybe have gloves on.
The Klemheist is a good choice when you’re tying it with something very long, like a cordelette. It's faster to tie because you don't need to pass the ends through the knot with every wrap, only once at the end.
You can tie a Klemheist hitch with a sling/webbing or cord.
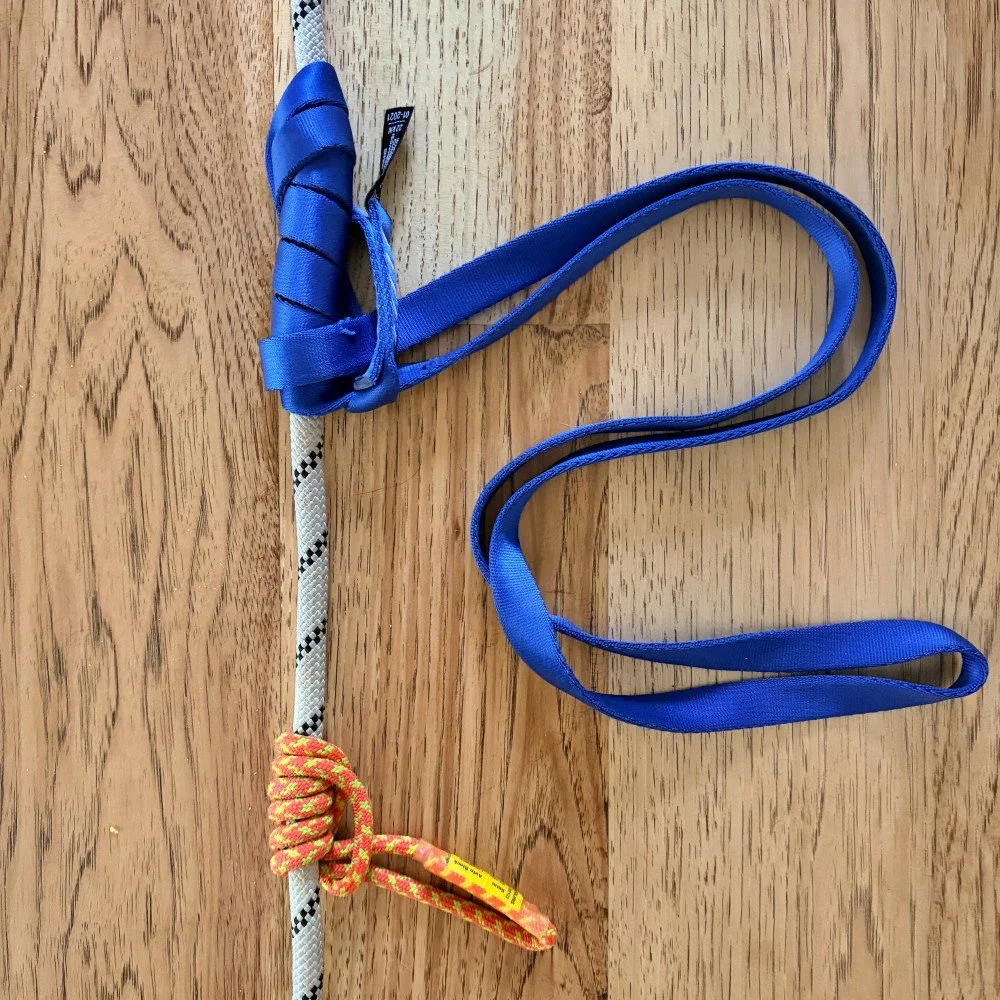
Here’s a Klemheist hitch tied with a 60 cm Dyneema sling. Lots of wraps, very grabby!
Note: because Dyneema has a relatively low melting point, it's not a good idea to use a Dyneema sling for any sort of a rappel backup. A fast rappel could potentially damage the sling.
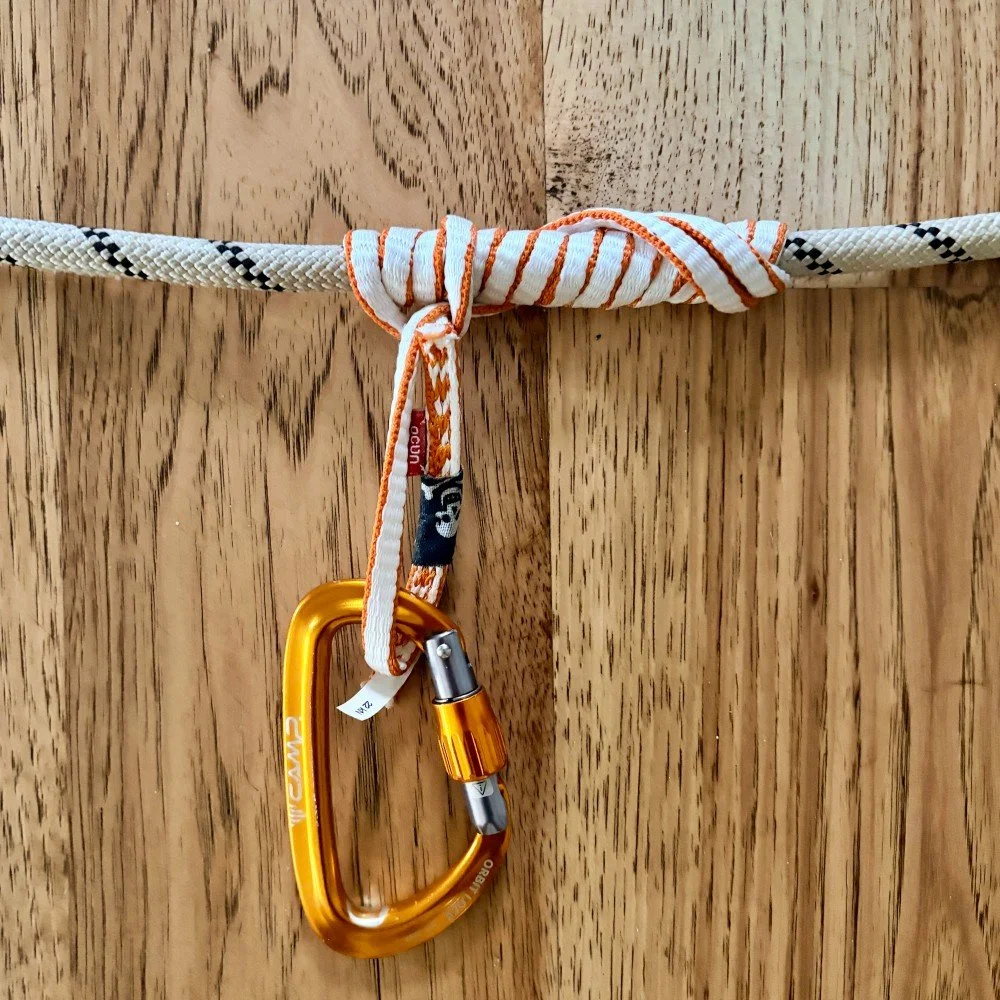
How do you tie a “cowboy” Klemheist (with a video demo)?
Does it matter where the bartack / stitching goes on a friction hitch?
What's the real world force where these hitches start to slip or break (with video of the testing?
Join my Premium Membership to read the rest of the article.
Thanks for your support!
Canister stoves for climbing
For most climbers, canister stoves are the modern standard for boiling water and melting snow. Here are some pro tips on: maximizing performance in the cold, figuring how much fuel is left in the can, a great way to make a hanging stove, and how to keep your stove from killing you.
Premium Members can read the entire article here:
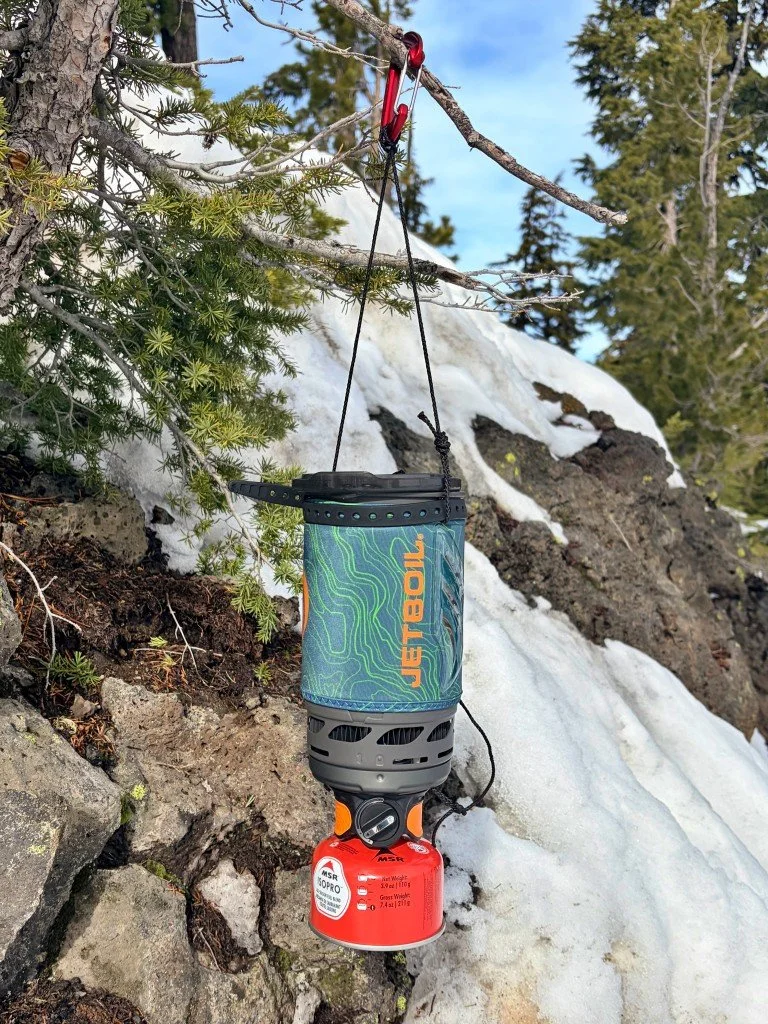
Unless you're on a long and cold expedition like Denali, or to a part of the world where fuel cartridges are hard to find, canister stoves like the Jetboil and MSR Reactor / Windburner are the standard for mountaineering.
Here’s some assorted #CraftyStoveTricks:
General tips (and cautions)
Melting snow with a canister stove
How much fuel is left in the can?
Hanging stove safety tips
A great way to make a hanging stove
Cold weather performance boost
General tips and cautions . . .
Generally, it's best if you only use your stove to boil water. If you’re going to actually cook food in it, be sure it’s completely clean before you use it to melt snow . . . or the following might happen:
from Andy Kirkpatrick:
“A great story to illustrate this point was Colin Haley's solo of Mount Hunter. Being very thirsty and dehydrated, with little gas left, he stuffed his Jetboil stove with snow and just cranked it up and waited for it to boil. Unbeknownst to Colin, the remnants of his last meal in the pan just turned to carbon, creating a foul-tasting and undrinkable slushy, meaning he was not only out of gas and water but also had a mouth full of foul poison.”
Jetboils don't work too well in the wind. MSR Reactor / Windburner stoves do. If you think you'll be using your stove a lot in more exposed areas, the MSR stoves are the way to go. (The Reactor is the snow-melting blast furnace. The Windburner is for lighter duty.)
On that note, be VERY careful with a windscreen and a canister stove. The stove can overheat, melt, maybe even explode. Fortunately that’s never happened to me, but I've heard a few stories! If you do use a windscreen, keep it back away from the stove, at least 4 or 5 inches. Or leave it partially open with the screen side facing the wind so the stove doesn't overheat.
Be VERY careful about using any stove in any enclosed are, like a snow cave or zipped up tent! Carbon monoxide is a silent killer. Always have adequate ventilation, and don't go to sleep while the stove is running.
The built-in piezo igniters are handy . . . when they work. Always carry a backup way to light your stove; at least a lighter. Some sort of sparking device works when it's wet, cold, at high altitude, and never runs out of fuel. (Check out the photo below, even MSR sells their own branded fire steel.)
Melting snow with a canister stove
Most important: start with a small amount of actual water in the bottom of the pot, bring it to a near boil, and then introduce snow/ice slowly. Doing this prevents scorching the pot or even damaging your stove.
Go slow. When you’re starting without much water in the pot, keep the heat down low. If you crank it too fast, you'll evaporate, not melt.
Look for snow or ice with higher water density than fluffy surface snow. If you can find actual ice, try to smash it up a bit before you put it into the pot.
Consider melting snow during the warmer part of the day, rather than at night when it's colder.
To get clean snow, collect it far away from a well-used camp. A stuff sack can work well to transport it back to your tent.
It's nice to have a small cup to scoop snow into the pot. Be careful with some plastic cups; they can break in the cold.
Keep the lid on loosely. If you set it tight, excess pressure or steam can cause problems.
Your pot can get top heavy with a lot of water in it. It can be a bit safer to use a hanging system when you're melting snow, see below.
Better yet, look for any source of melt water. If there's a rock outcrop nearby with snow above it, and you have moderate temperatures, you can probably find some sort of trickle running down the rock. Use that first.
Here's one way to “harvest” water trickles, from IFMGA Guide Ian Nicholson. @washingtonalpineguide
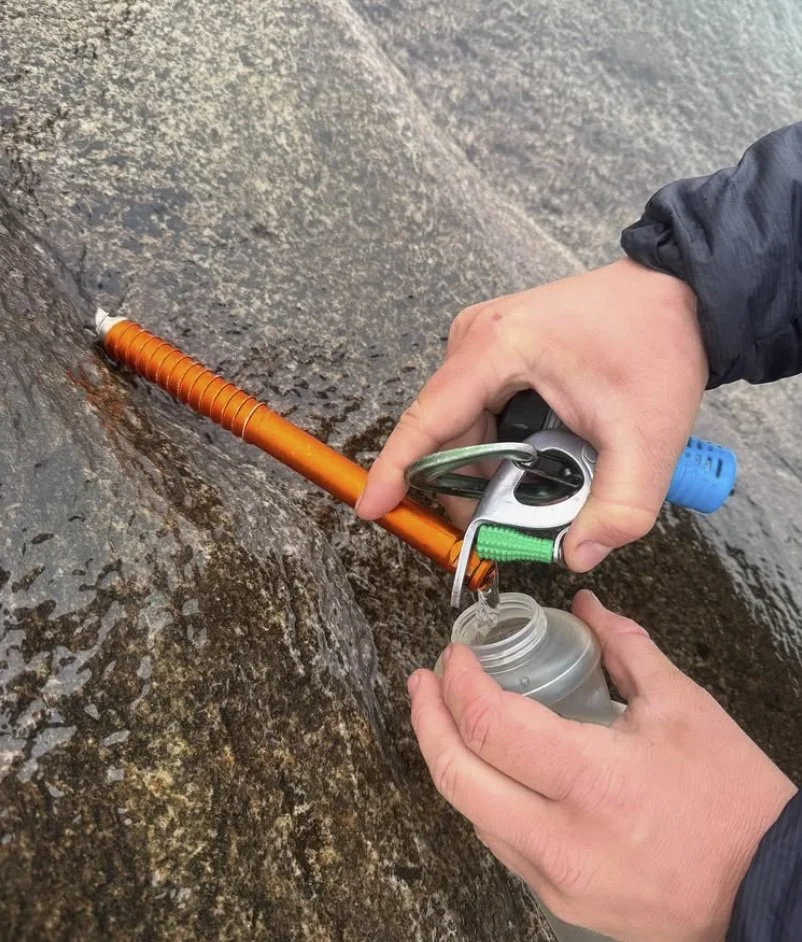
image: @washingtonalpineguide https://www.instagram.com/p/DNlPznJOW_M/
How much fuel is left in the can?
Probably the single biggest annoyance with canister stoves is never quite knowing how much gas is left. Here is a clever trick that's straight from the MSR stove product manager.
“The canisters will float upright when placed in water, and the water line will vary depending on how much fuel is remaining in the canister. If you float a full canister and then float an empty canister, you can measure those water lines and mark them on your new canisters, then re-measure after the canister has been partially used. If the water line is halfway between the ‘full’ water line and the ’empty’ water line, the canister is half full.” Source
MSR cannisters conveniently have “Full” and “Empty” lines on the outside of their can, thanks MSR!
If you want to do a little math and have a scale handy, you can weigh the canister, and subtract the weight from the gross weight of 211 grams. That should give you an estimate of how much fuel remains.,
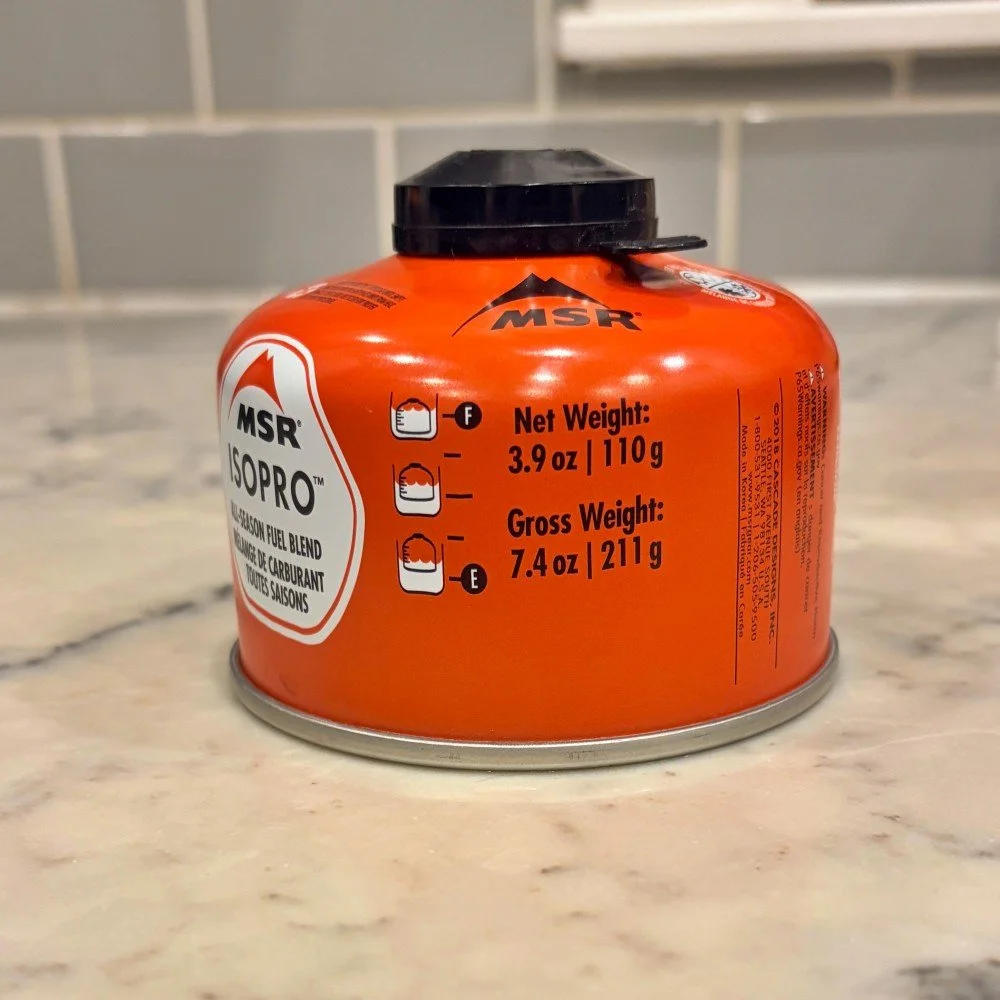
For other fuel canisters that don't have full and empty marked, you can put some tape on the can.
For cans I've tested, empty is about halfway down the side.
Want to learn some safety tips for using a hanging stove on a portaledge?
How about a great way to make a DIY hanging stove?
What's a safe and effective way to boost your stove output when it's cold?
Join my Premium Membership to read the rest of the article.
Thanks for your support!
“Long link” chains for fixed anchors
“Long link” chain is about what it sounds like; the links are quite a bit longer than standard. They have a few benefits over normal chain links; learn ‘em here.
Premium Members can read the entire article here:
A “long link” chain is about what it sounds like: the individual links are longer than a standard chain.
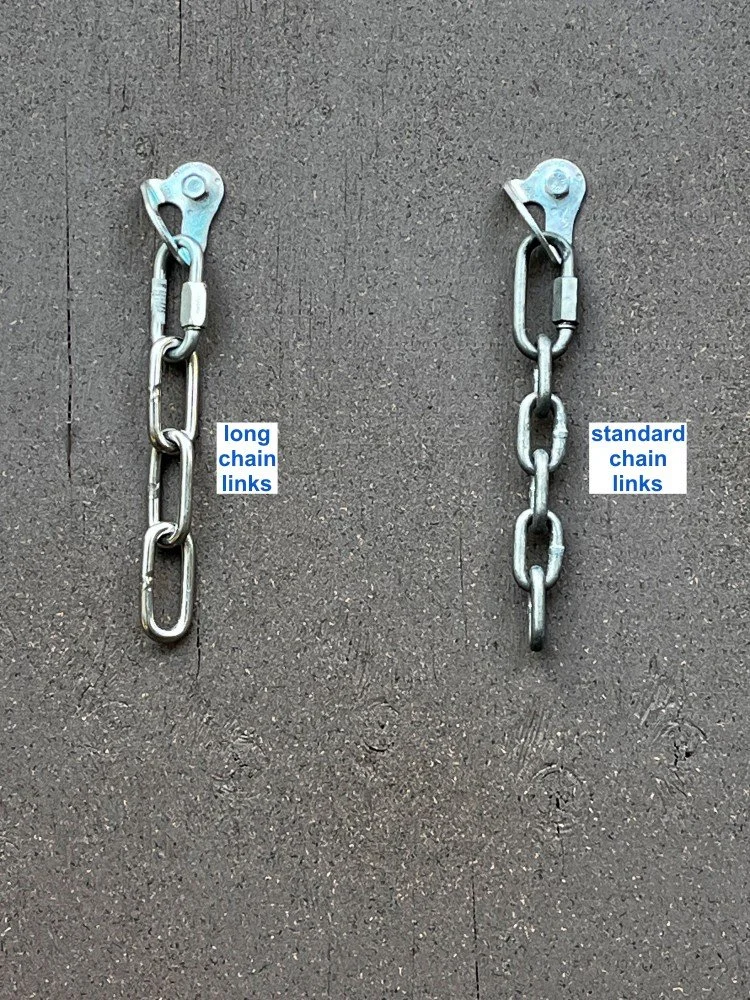
Why is this helpful? Because you can clip most any size carabiner (or multiple carabiners) into a link much more easily.
Usually you want to clip the bottom link or the hangers so you don't torque your carabiner in some strange way, but having the option to easily clip any link in the chain can be handy.
This can be especially true in big wall climbing, where you often need multiple full strength clipping points for all your extra crap.
Another plus: (a bit) less expensive. Three links are less metal and I'm guessing fewer steps to manufacture, so it’s slightly lower cost than five links.
So, route developers, how about using long link chain more?
How much does long link chain cost?
Where can I buy it?
How many big chunky carabiners can fit in one link?
What's a part of the world where you can see anchors with REALLY long links?
Join my Premium Membership to read the rest of the article.
Thanks for your support!
Trees for climbing anchors: Part 4, Multipitch
Trees can be great for multi pitch anchors. Learn a few simple rigging techniques that are fast, simple, and strong, along with a few extra tricks.
Premium Members can read the entire article here:
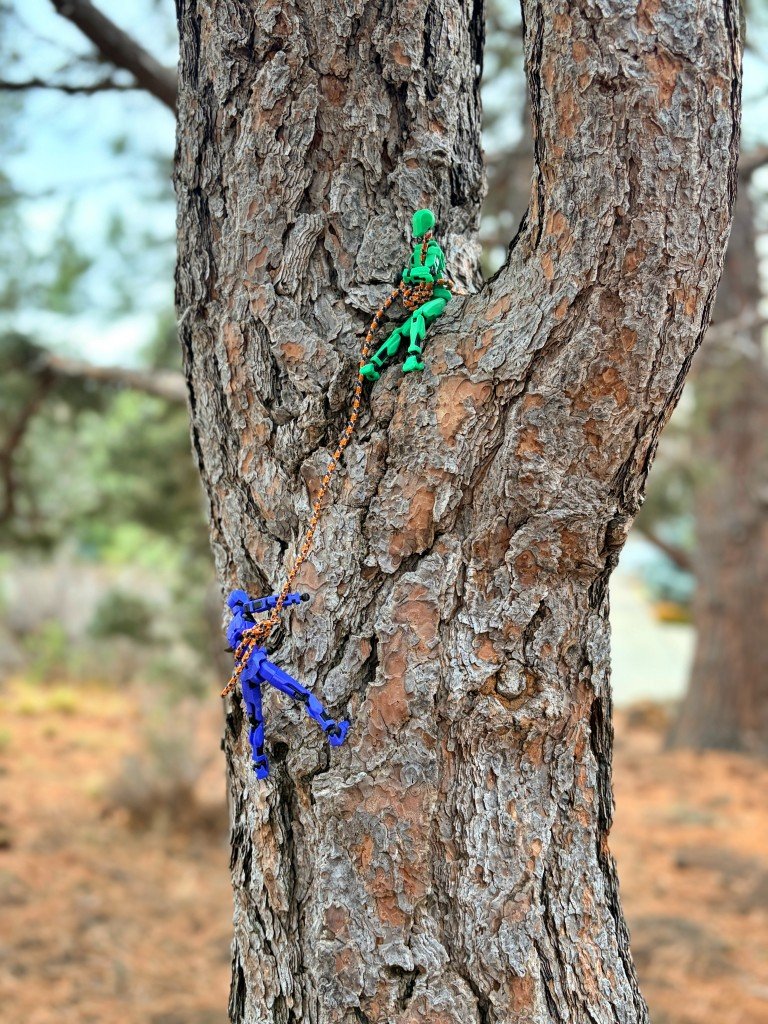
Trees can be some of the best climbing anchors, whether it's for top rope, rappel, or multipitch.
This is a big topic, so I'm tackling it in four different parts:
Let's get to it.
Keep rigging simple when possible
A 240 cm sling or about 3 meters of 6-7 mm cord are very helpful for building tree anchors. Here's a simple way you can rig it.
If there’s a decent size live branch at a convenient height, pass the sling above the branch to hold it in place. This assumes that the tree has a large enough diameter so you can safely put your sling at around head height. If you have any doubts, attach the sling near the tree base to reduce leverage.
Basket hitch the sling or tied loop of cord around the tree. If you have a sturdy and live branch, pass the cord over the top of the branch to hold it in place.
Tie a bight knot for a redundant master point. If you're short on cord, you can make it a girth hitch master point.
Done! This anchor is fast to build, simple, strong, redundant, equalized, no extension, all that good anchor acronym stuff. =^)
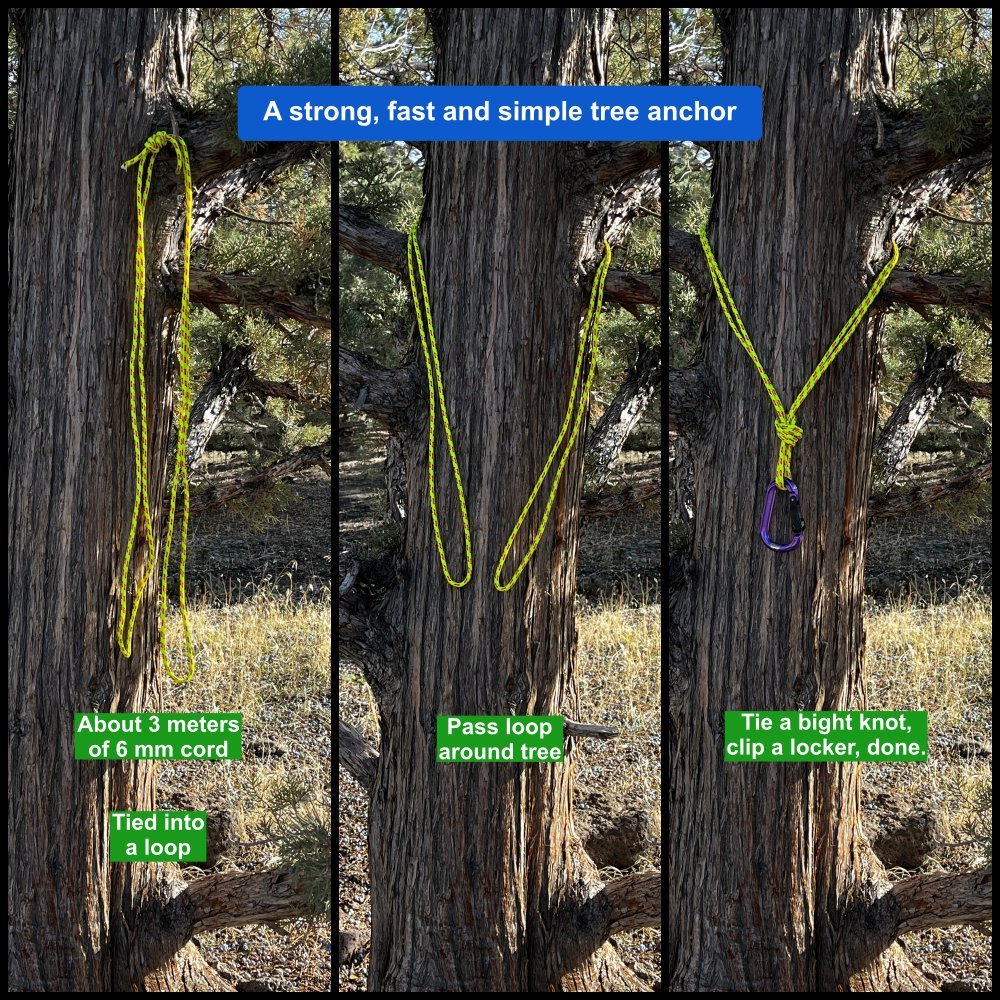
Ways to attach a sling so it doesn't slide down the tree
If there's no branches, attach a cordelette or 240 cm sling as shown below. The extra wrap should keep it nicely in place.
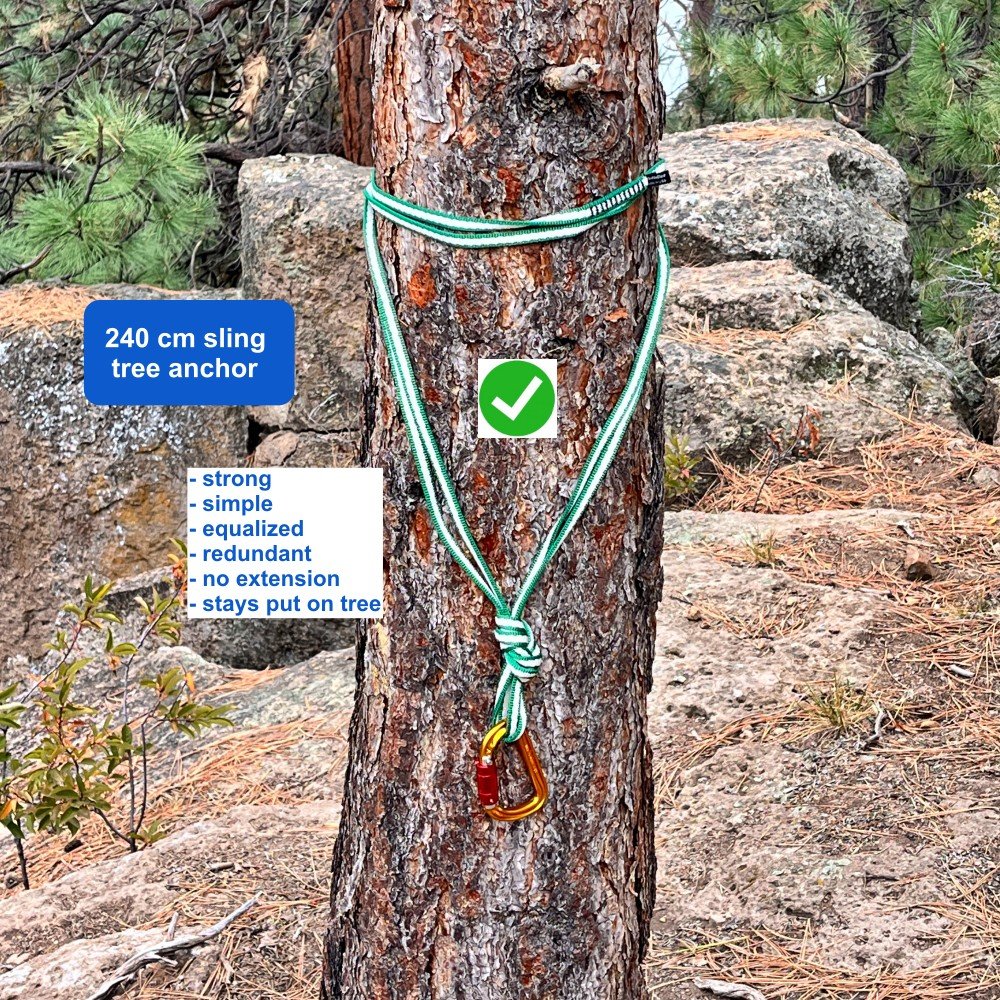
Here's a short video of me tying an anchor like this.
If you have a 120 cm sling and a smaller tree, you can make a “shoelace wrap” anchor.
Start with the sewn part of your sling on the front of the tree.
Make a basket hitch, and bring the sling arms to the front of the tree.
Wrap the ends a couple of times around each other to hold it in place. (That's the “shoelace wrap” part).
If you have enough cord left, tie a girth hitch master point to make the entire thing redundant.
If you don't have enough cord, simply clip both ends of the sling with a locking carabiner.
Photo: “shoelace wrap” with redundant girth hitch master point.
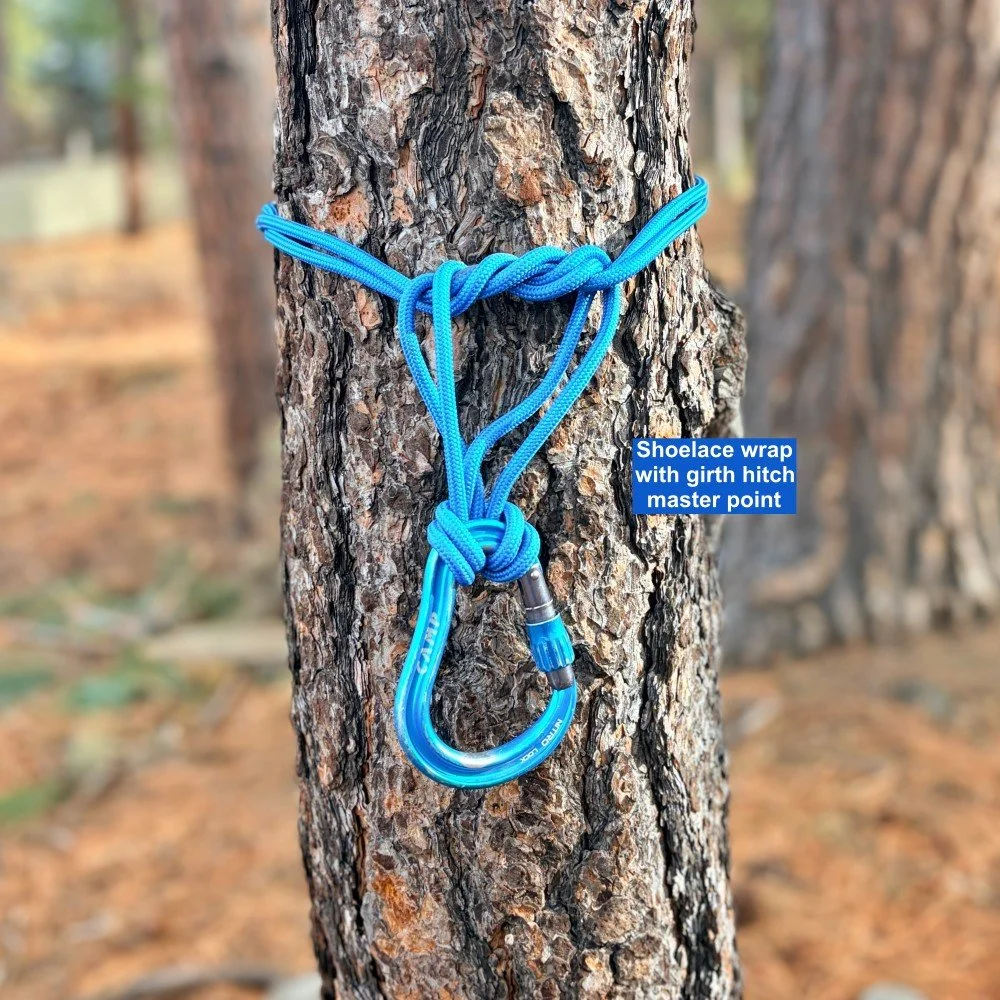
Photo: “shoelace wrap” with basket hitch (not redundant)
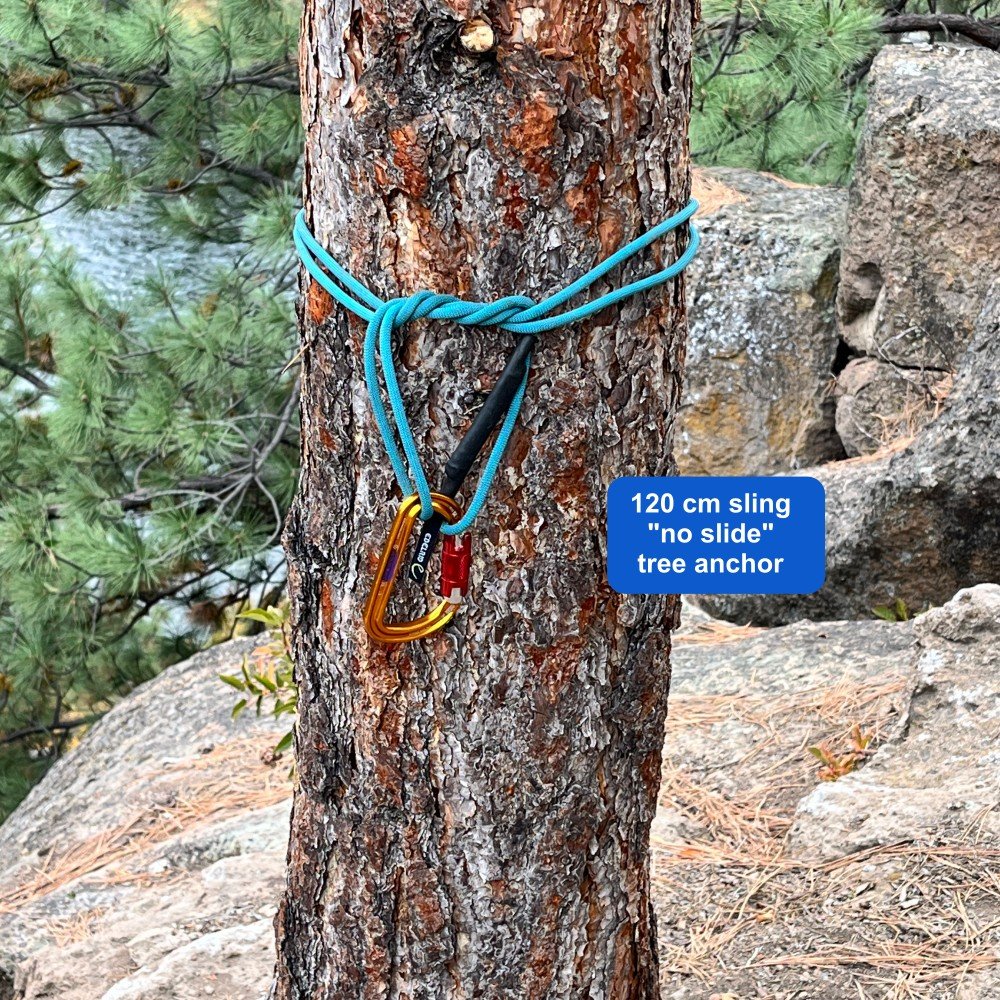
I first saw this “shoelace wrap ” method from IFMGA guide Dale Remsberg on Instagram. Dale caught a LOT of crap from when he posted this, with comments along the lines of “that's not redundant, you're multiplying the load because of the bad angle, you're gonna die, blah, blah, blah.”
Well, guess what, Dale is right and the haters are wrong. Yes it's redundant and yes, it's plenty strong. How do I know?
I tested it with Ryan Jenks from HowNOT2.com;
It broke at 16 kN!
Then we cut one strand, and it broke about 8 kN. #SuperGoodEnough!
Here's a short video of me demonstrating this flavor of anchor.
For multi pitch tree anchors, the leader is tied into the end of the rope, so you need to use rigging methods that don’t require the end of the rope.
Method 1: Make an anchor on the tree, clip to it, belay from backside of anchor point.
Got a long sling or cordelette? This is probably the easiest method.
Pass a long (240 cm) sling or cordelette around a tree.
Tie it off to make a master point.
With your rope, tie a clove hitch or a bight knot and clip it to your master point, with enough rope so you can stand at a convenient spot. This length can be a short or as long as you need.
If you make your connection with a bit more rope than you actually need, you can take up the slack by clove hitching to your harness, or tying an overhand knot to take up the extra rope.
Tie a butterfly knot on the backside of your connection to the tree. Belay your partner from that butterfly.
Advantages to this method: if your partner takes a fall and loads the rope, it doesn't pull your strand down, only the belay strand. Also, there's no chance of getting tree sap on your rope.
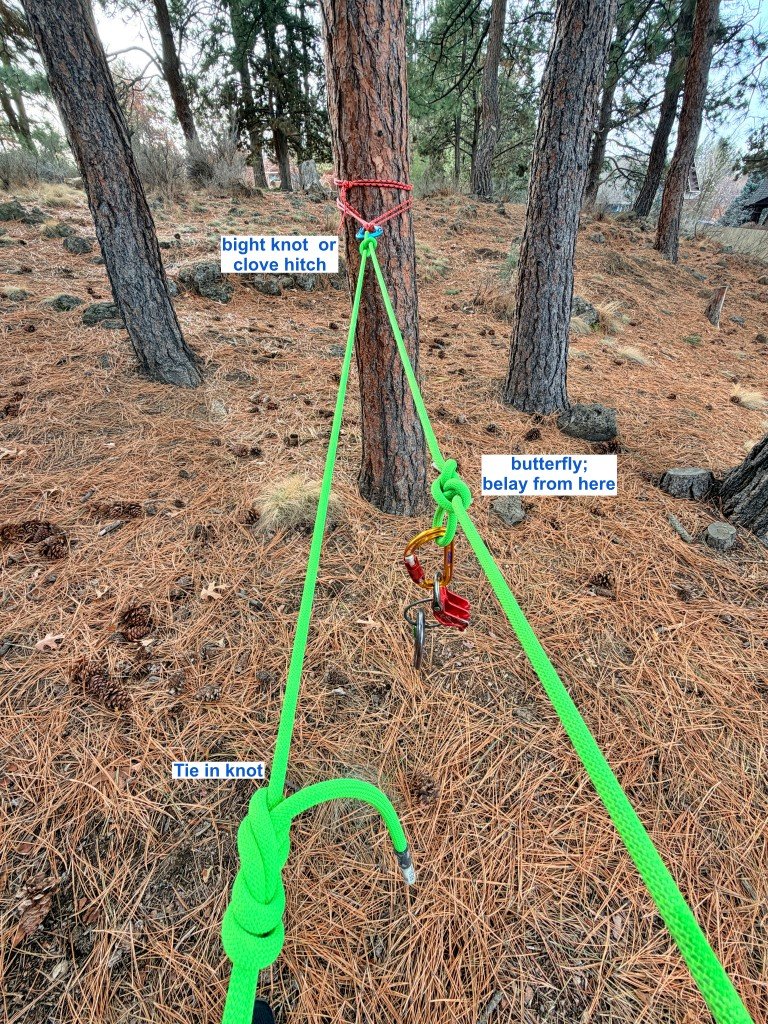
Method 2: Walk around the tree, tie a BHK in both strands, belay from BHK
This method works well if 1) you can walk around the tree, and 2) you don't have a long sling or cordelette.
Downsides to this method: 1) The rope can slide down to the base of the tree, so anticipate this. 2) If your partner falls or needs a take, it loads the strand you’re tied to, so this might be more comfortable if you're sitting on a ledge. 3) Chance of getting tree sap on your rope, yuck.
Walk around the tree, then walk to where you want to belay from. This could be right next to the tree, or it could be some distance away.
Pull up about 2 meters of rope, and tie a BHK (Big Honkin’ Knot; / 2 strand butterfly or overhand) in both strands. The BHK both secures your position, and gives you a convenient spot to belay from. I'm a fan of the 2 strand butterfly, because it's easier to untie after it's been loaded.
Belay your partner up from the BHK knot.
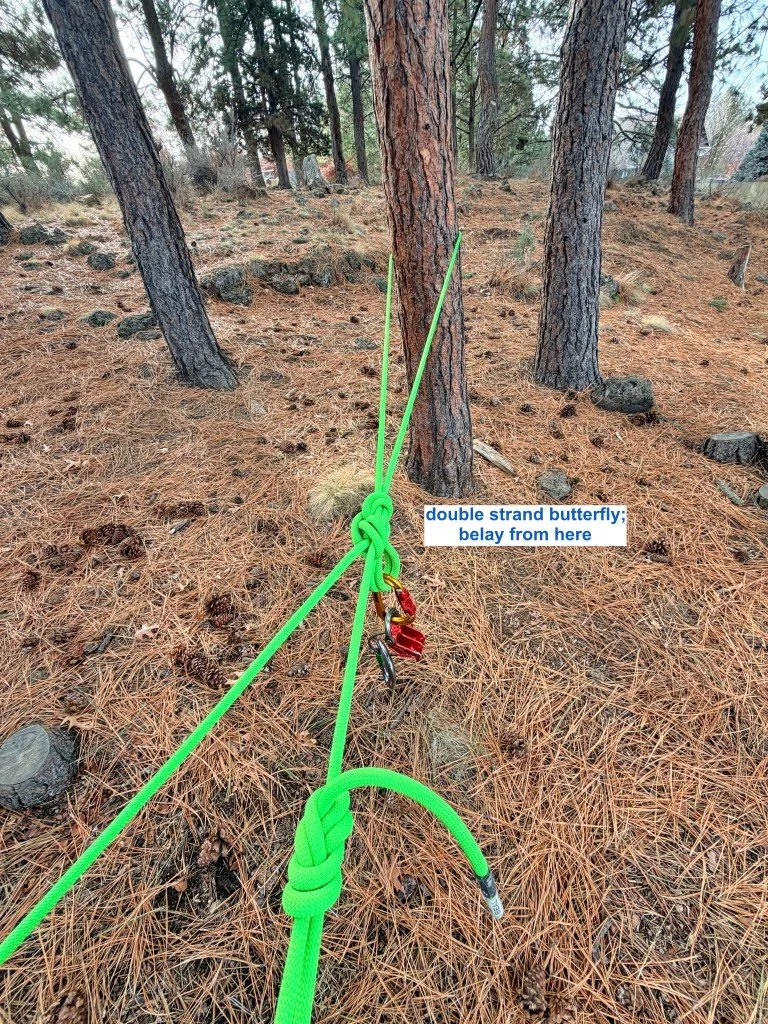
What's a tree anchor “elevator”?
How is the shelf on a tree anchor different than a shelf on a bolt anchor?
What's my take on the Connecticut tree hitch?