

Alpine Tips
Climbing Tips: Do THIS, not THAT (Part 9)
Quick tips on best practices, with links to my detailed articles. This post covers: How to clip horizontal ring anchors, be nice to your cams, how to rap from a tree, a caution on the HollowBlock, and why to avoid the flat figure 8 bend.

Premium Members can read the entire article here:
In this article:
Horizontal ring anchor? Clip the rings
Treat your cams nicely - wrap with a sling or strap
Tree rappels: Don’t rap directly from the tree
Avoid girth hitching a sling to a Sterling HollowBlock
Use the Flemish bend, not the flat figure 8 bend
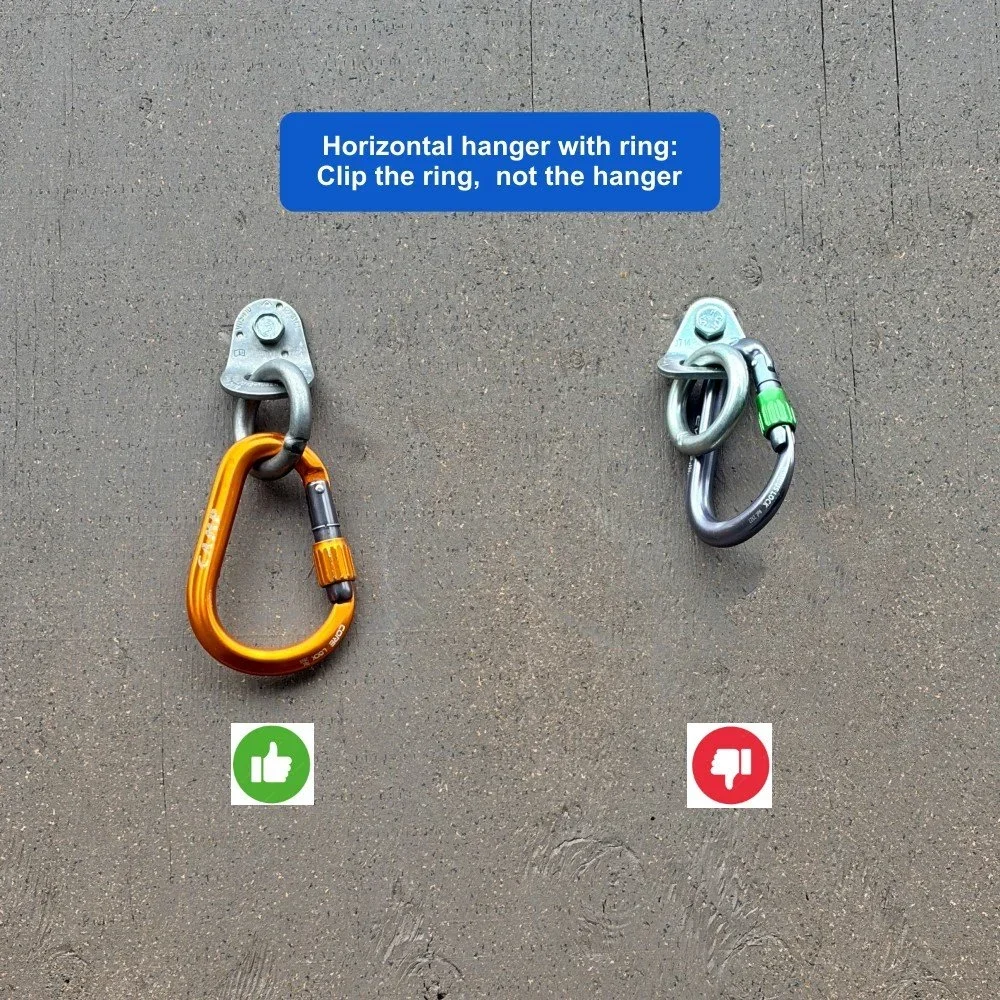
1 - Horizontal ring anchor? Clip the rings
The horizontal hanger with a welded ring is a nice minimalist approach to anchors, because the ring hangs perpendicular to the rock. This minimizes friction and rope twists when you pull your rope.
Apparently, there’s still debate as to where you should clip a horizontal ring anchor: the hanger, or the ring?
Clipping the ring is best practice. Why?
Clipping the ring is fast, convenient, and ensures your carabiner doesn't get twisted in some odd way.
The ring is absolutely strong enough. Typically these are 10 mm stainless steel; I've seen break testing on over 90 kn!
Your aluminum carabiners are never going to damage the much harder stainless steel ring. It's like using a plastic ice scraper to get snow off your car windshield; your windshield will never get scratched.
Clipping to the rings gives plenty of room above your carabiners for someone else who might be rappelling to use the anchor. If you clip the hanger, that often interferes with someone else who may need to rappel through you.
To be clear, if you do clip the hanger, and your carabiner is hanging properly without getting torqued in some weird way, there's nothing catastrophically wrong with it. Having said that, I want to point out that clipping the ring is considered best practice, and to counter the common objections.
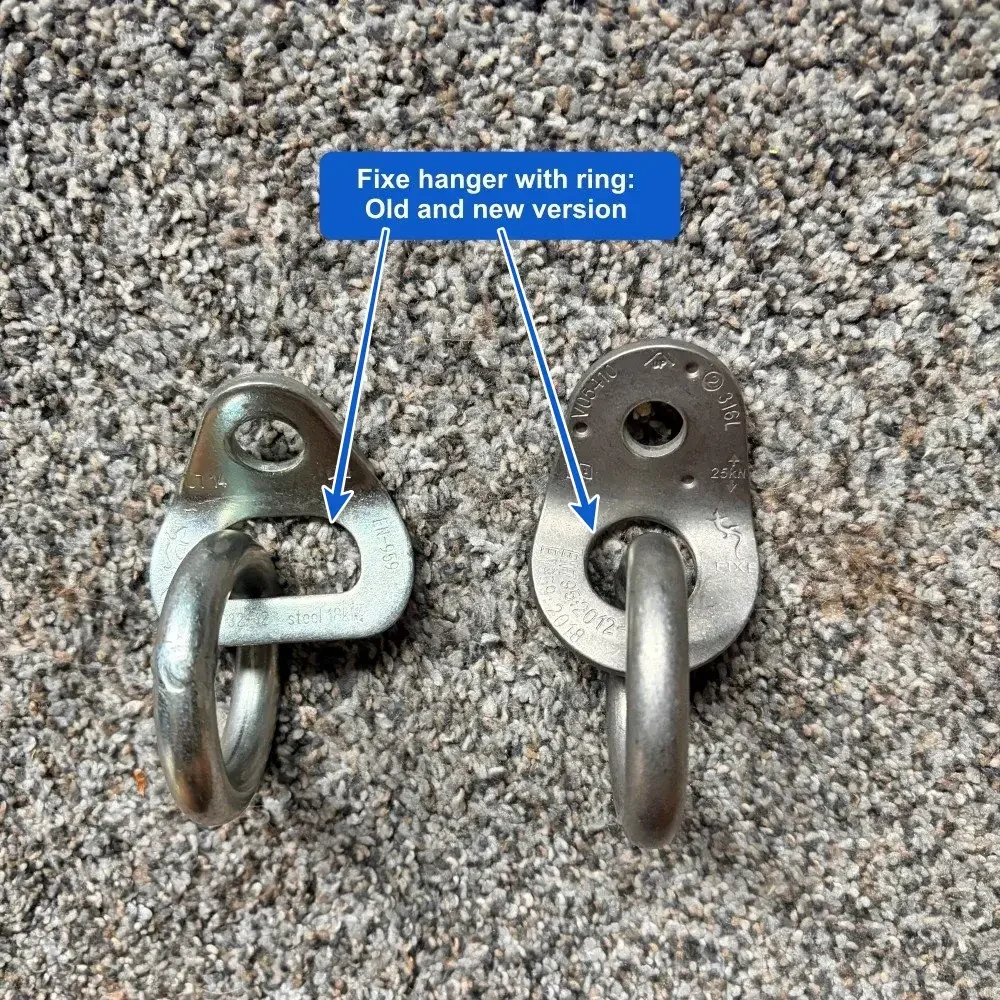
The new style hanger/ring from Fixe can’t even fit a big carabiner!
Fixe, the Spanish company who is the main manufacturer of this flavor of anchor, recently (2025?) changed the design.
The new design has a hanger that can't even fit a larger carabiner. So . . . There’s only one place to clip, and that's the ring!
The manufacturer designed their product to pretty much force you to clip to the ring. What does that tell you?
Check out the photo below. The new version is on the right. As you can see, there's barely room to clip a carabiner in the hanger. (Smaller ones fit, larger ones don't.)
Yes, I do buy all this hardware to nerd out on it and give you the scoop so you don't have to wonder . . .
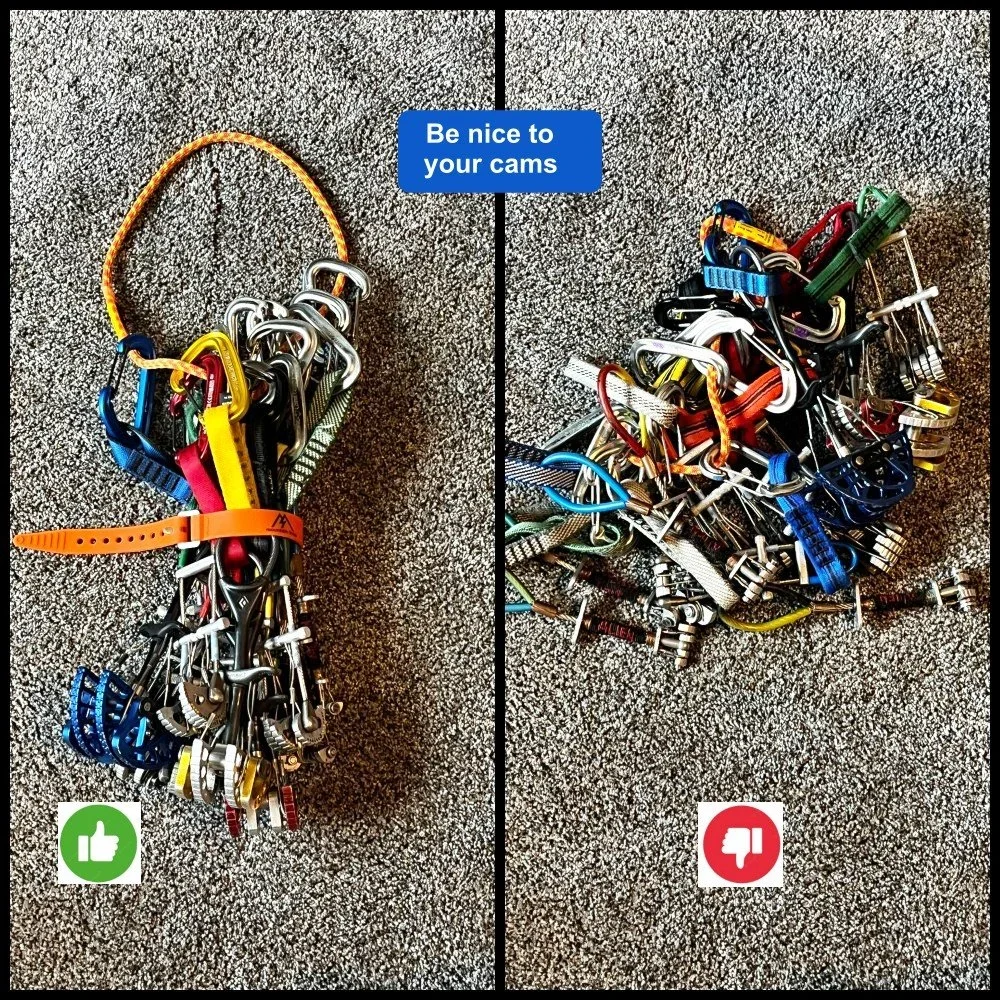
2 - Treat your cams nicely - wrap with a sling or strap
When you put cams in your pack, clip them to a long-ish sling, let them all hang down together, and then wrap either the sling around them (or my preference when I remember it) a ski strap.
The trigger wires are delicate, and can be damaged or even broken if you casually toss all of your rack into your pack and then cram more stuff on top of it.
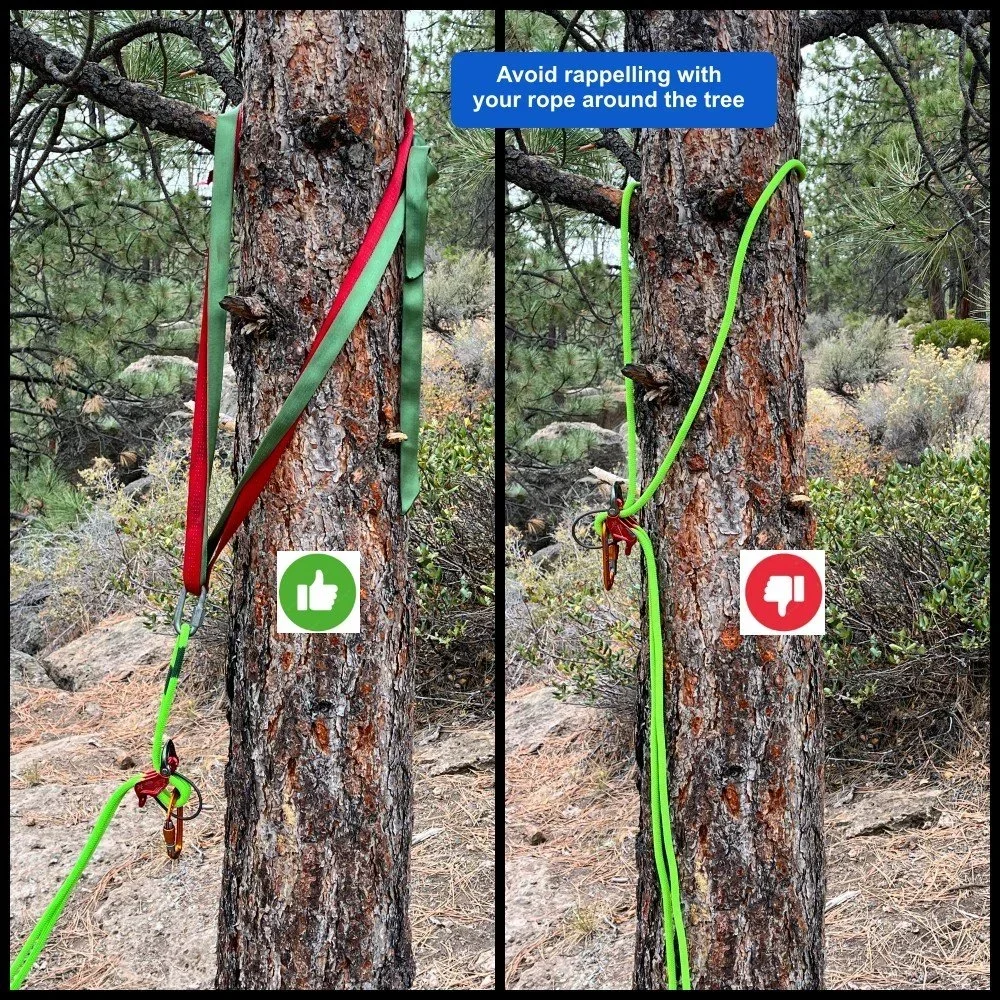
3 - Tree rappels: Don’t rap directly from the tree
When rappelling from a tree, it’s usually best to use use cord or webbing for an anchor, rather than rapping directly from the tree.
Reasons:
The friction from the tree bark can make it very hard to pull your rope!
Pulling your rope can damage the tree.
If it’s a conifer tree, you might get tree sap on your rope, no fun.
In some situations, such as if you don't have any anchoring material, and/or the tree has smooth bark, it can be acceptable to rappel straight off the tree. But generally, it's not best practice.
Want to learn a specific caution from Sterling about clipping their HollowBlock?
What are the potential problems of using a flat figure 8 to join two rope ends? What are some situations when you might want to use a Flemish bend?
Join my Premium Membership to read the rest of the article.
Thanks for your support!


Climbing Tips: Do THIS, not THAT (Part 8)
Five more quick tips on best practices. In this article, why you should: remove rope twists before pulling your rappel rope; warm up your phone before you try to charge it; keep Velcro away from Dyneema slings, do NOT use these ways to tie a tagline to your main rappel rope, and use one type of latitude longitude coordinates to describe any point in the backcountry.
Premium Members can read the entire article here:
In this article:
Remove twists before pulling your rappel rope
Warm up your cold phone before you try charging it
Keep Dyneema slings and velcro shoes separated
Tying your tagline to your rappel rope
Use decimal degree coordinates to describe any backcountry location
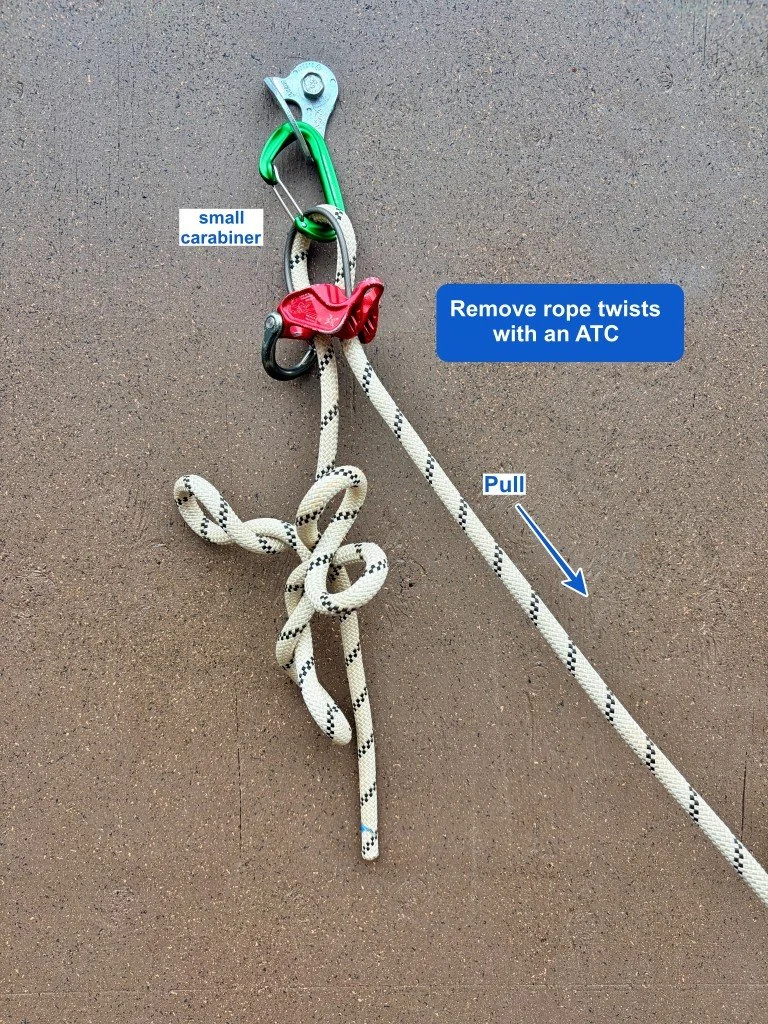
1 - Remove twists before pulling your rappel rope
If your rope has some evil pigtails in it, it's really important to get those out as best you can before you pull your rappel rope!
If you don't, those twists can start to spiral around each other as you pull your rope, which can cause it to get absolutely stuck.
Here's a photo of a rappel rope getting stuck because of twists in the rope; don't let this happen to you!
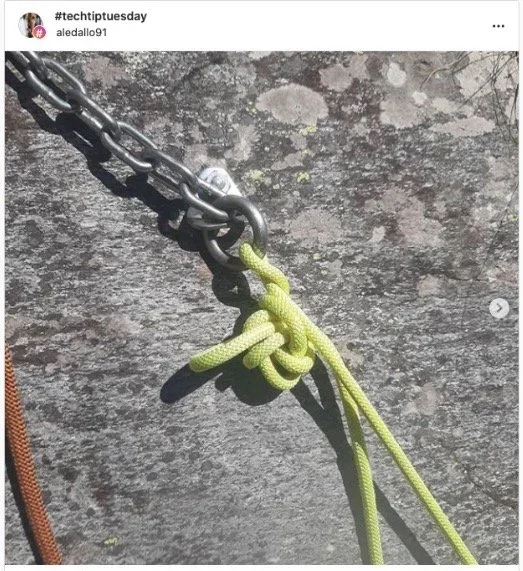
image: @aledallo91, shared with permission
2 -Warm up your cold phone before you try charging it
Phones are kind of like people - they don't much like below 30 and above 90 degrees fahrenheit, and do best around 65,. Cold weather not only decreases battery life and messes with phone sensors, it can cause your phone to completely shut down; the phone is programmed to do this as a sort of “survival instinct.” This situation is temporary. Once the battery warms back up, it returns to normal performance.
Important: Don't charge a cold “dead” phone. Doing this can permanently damage your phone battery. Rewarm the phone before you try to charge it. This might be under your armpit of an inside pocket. Once the battery warms up, it should show the proper charge and you might be happily surprised.
Or, as I heard it once described, “a phone battery isn't dead until it's warm and dead.” =^)
Keep your phone (and auxiliary battery) warm. Best choice is usually an inside pocket close to your skin. If your base layers don't have a large secure pocket, considering having one custom sewn.
You DO have a powerbank / portable charger and an appropriate charging cable, right? That's pretty much mandatory gear these days.
The “battery percentage” may be wrong. Ever had your phone battery say 50% left on a cold day, and then a few minutes later it’s seemingly dead? It's probably not completely dead; the cold is confusing the phone hardware. Rewarm it in an inside pocket (or armpit), and it’ll probably come back to life.
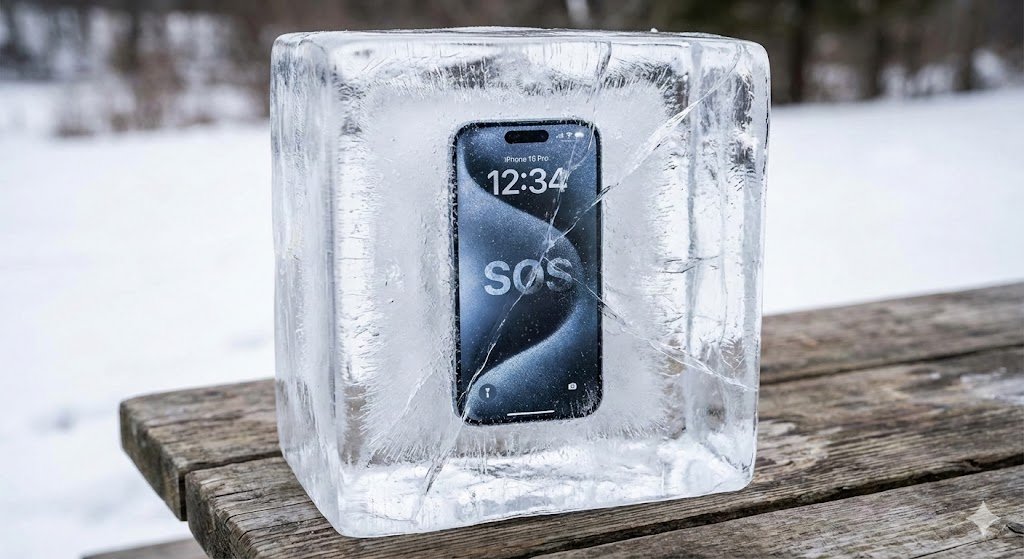
More AI image fakery, intended to deceive the public, steal from artists, and probably take over the world at some point.
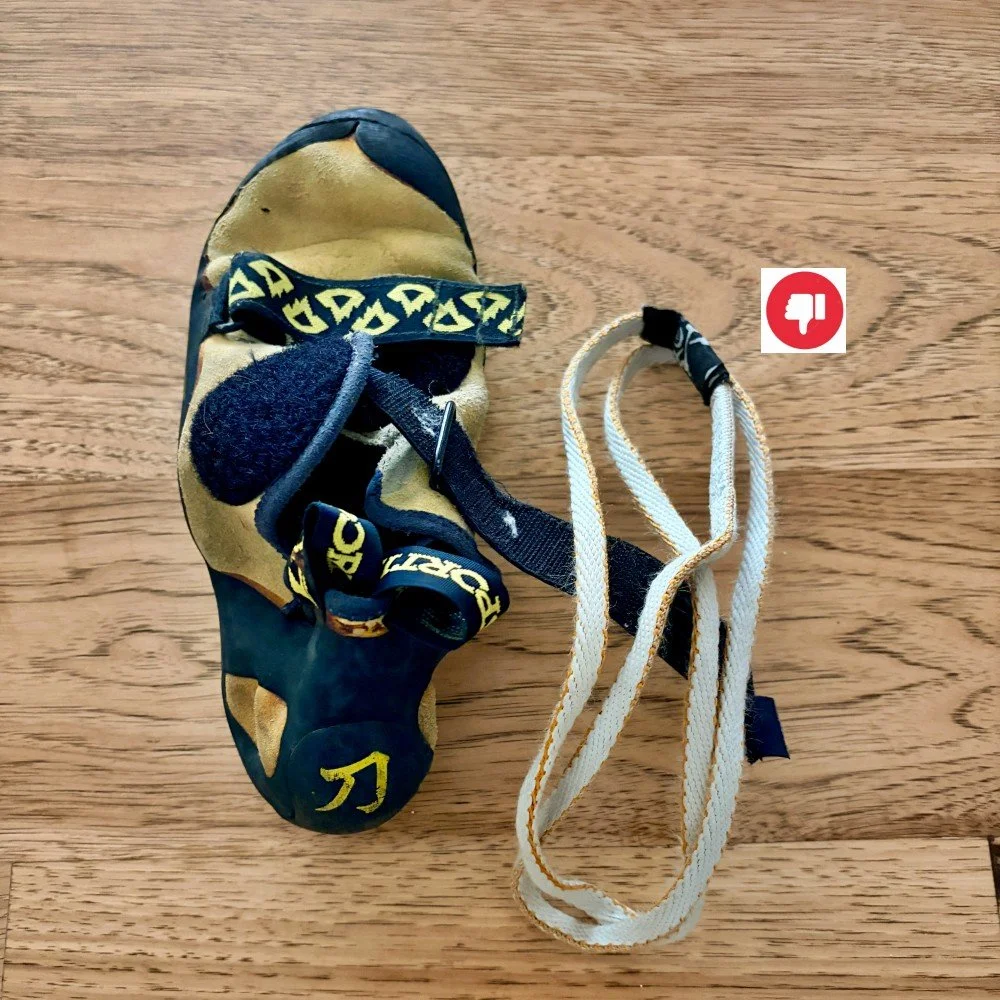
3 - Keep Dyneema slings and velcro shoes separated
The Velcro on rock shoes loves to grab onto Dyneema slings, making the slings fuzzy. (This is not a safety issue, more of a minor annoyance.)
Try to store slings and shoes away from each other. Or at least, fasten the velcro on your shoes when you put ‘em in your pack.
There are several incorrect ways to tie your tagline to your rappel rope. Do you know which ones to avoid, and why they can be a problem?
Latitude longitude coordinates are a great way to describe a precise point in the backcountry. There are three different formats of lat-long coordinates; which is the best? How can you use free mapping software to find ‘em? (Bonus: secret superb Oregon campsite location shared as an example. =^)
Join my Premium Membership to read the rest of the article.
Thanks for your support!

Climbing Tips: Do THIS, not THAT (Part 7)
Five more quick tips on best practices. In this article: Best place to put your pulley in a hauling system, how to rack pickets, why it's good to have waypoints rather than just a track on your GPS, minimizing cluster at big wall anchors, and why it's good to stand away from the cliff when you pull your rappel rope.

Premium Members can read the entire article here:
In this article:
Mechanical advantage hauling: where to put the pulley?
How to (and how not to) rack pickets
GPS tracks: better with waypoints
Big wall anchors: use “links”
Pulling a rappel rope: step back from the cliff
1 - Mechanical advantage hauling: where to put the pulley?
I only have one pulley. Where should I put it to get the most efficient pull?
Excellent question! We often have to improvise with limited equipment, and the location of the pulley can make a difference in the efficiency of your hauling system.
You should use your “good” pulley on the position that’s closest to your pulling force (a.k.a, your hands).
A simple explanation, in the words of rigging expert Richard Delaney: "...the best place is closest to where the effort is applied, as this preserves maximum effort moving into the system rather than wasting it at the first bend."
Or, to say it another way, any inefficiency at the first pulley is compounded throughout the system, so you want your most efficient pulley closest to the pulling force (that’s you).

A lot of folks think the pulley always should go on the moving part of the load to gain easiest pull, but this is not always true. Below, in the 2:1 with a redirect, the pulley should go on the anchor (tree). Again, it’s because the anchor is closest to where you’re actually pulling on the rope.

2 - How to (and how not to) rack pickets
What beginning snow climber has not cursed the clanking cowbells and the strangle, tangle and dangle of pickets, hanging from ill-placed runners around your neck and shoulder, threatening to trip you up at each step!
Here’s a better way to rack pickets. You can carry 6 pickets like this, with them (more or less) out of the way yet still easily accessible.
Think of this method as the least of all evils. Pickets are still a drag to carry, no matter how you do it, but this way sucks the least.
Assuming a mid clipped picket, girth hitch a sling to the middle hole. (Yes, this is plenty strong, about 11 kN. I tested it.

Wrap the sling around the picket and then clip a carabiner to the hole next to the middle one.

Now, clip that carabiner to your harness gear loop or to your backpack strap. The picket should hang down vertically, pretty much out of your way.
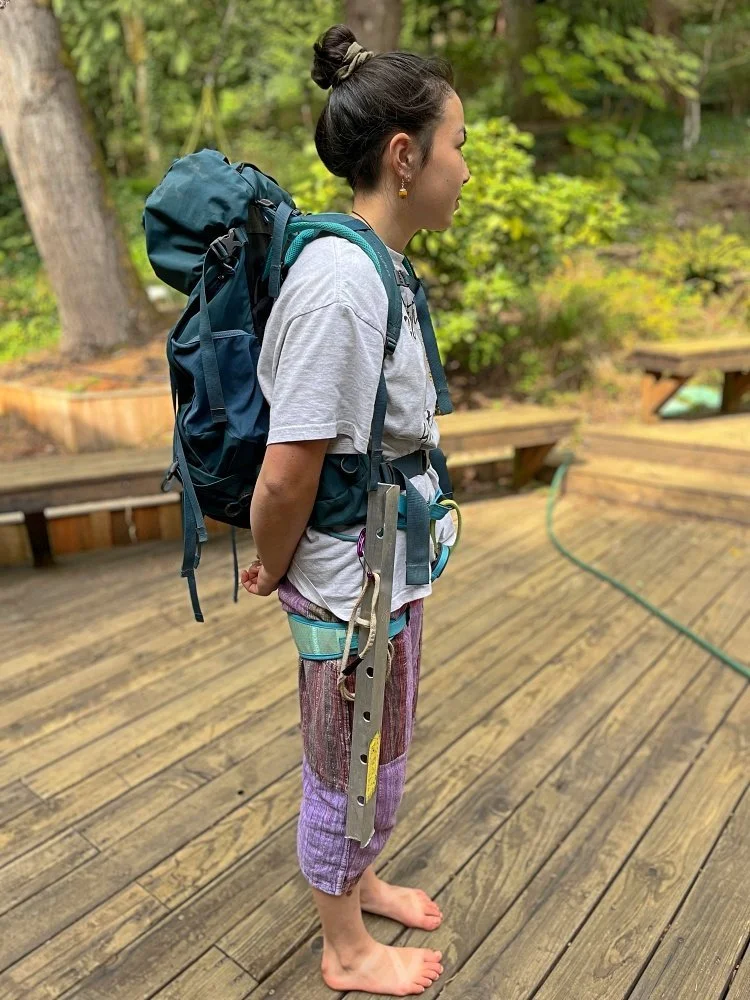
Finally, this is what you don't wanna look like. Pretty self-explanatory and unfortunately very common for climbers.
(I know this well because that's about what I looked like on a few of my early trips, when I was at the back of the rope team cleaning all the gear. =^)

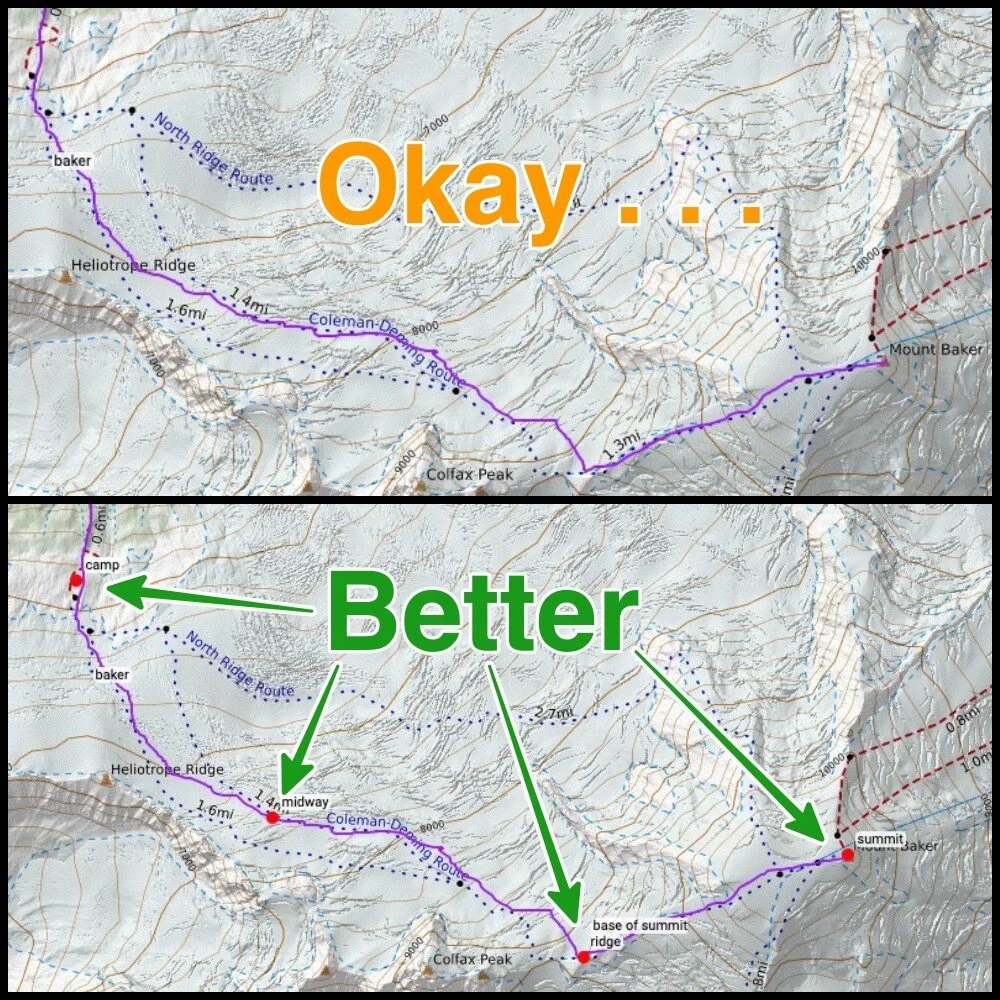
A GPS track file can be a great help in the backcountry to help you stay on route. What’s even better? A track file with waypoints added.
Why? Because a GPS device (usually a phone app like CalTopo) can tell you distance and bearing between waypoints. This lets you break your trip down into a series of segments from one waypoint to another.
Use the “Guide Me” (or similar) function on your GPS to see the distance and bearing to the next waypoint. Then, set that bearing on your compass (if needed) to get you started in the right direction, put your phone in your pocket to help save battery, and shift your attention “heads up” to the landscape around you, and away from your screen.
Compare this with a track without waypoints. Here, you don't have any distance and bearing between points, just a line on your screen. In more complicated terrain, or with low visibility, you may need to check your GPS every few minutes to see that you haven’t wandered too far left or right from the track. This runs down your battery, leads to “heads down” travel, and decreases your situational awareness by shifting your focus to your screen, and not the terrain.
What's one of the simplest things you can do to minimize a frustrating (and maybe dangerous) cluster at a big wall anchor?
When you're pulling your rappel rope, why is it often helpful to stand farther away from the cliff?
Join my Premium Membership to read the rest of the article.
Thanks for your support!

Climbing Tips: Do This, Not That (Part 6)
Five bite sized, quick tips of best practices. In this post: 1) “boosting” a low anchor, 2) rope pull tip for a traversing rappel, 3) how a redirect increases anchor loading, 4) why you don't need an overhand knot on a tied loop anchor, and 5) how to set up a lower with a Grigri.

Premium Members can read the entire article here:
In this article:
Boost that low anchor with a pack
Traversing rappel? Pull to that side
Redirects increase anchor load when hauling
Tied webbing on a tree - skip the overhand knot
Grigri lower: Redirect the brake strand
1 - Got a low anchor? “Boost” it with a backpack
Got an anchor that’s pretty much flat on the ground? Ugh, that's not a very ergonomic position to belay from.
(A preposition is a bad thing to end a sentence with. =^)
Quick way to improve it: take a backpack and put it under the master point. This can add a bit of “lift” so you can more comfortably manage the belay.

2 - Traversing rappel? Pull to that side
If the anchor below you is off to one side, say the right, try to rig your rope so the “pull” strand is in that direction.
If you don't, the ropes can cross at the anchor and create a lot of extra friction.
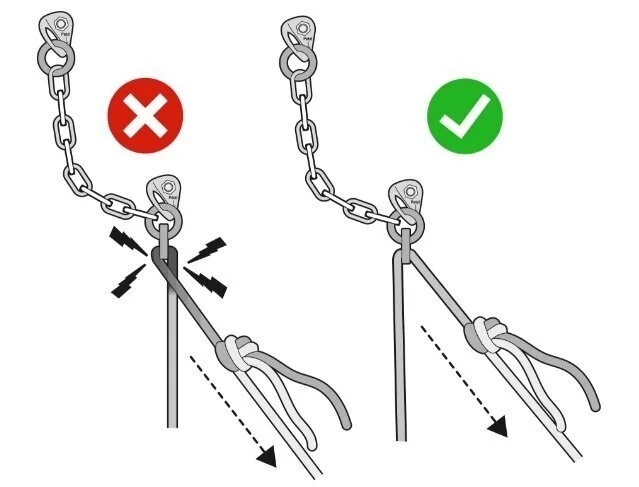
image: From the book “down”, by Andy Kirkpatrick. Used with permission. andy-kirkpatrick.com
3 - Hauling systems: Redirects increase load on the anchor
Sometimes, redirecting your pull through the anchor with a hauling system can be convenient or ergonomic.
However, keep in mind that a redirect increases the force applied to the anchor.
If you have an anchor that you're not very thrilled about, like maybe a vertical picket in snow, this could be important.
In the diagram below, we have a 100 kg load with a 2:1 mechanical advantage haul system.
On the left: no redirect. When hauling, about 0.5x the pulling force goes onto the anchor.
On the right, redirect. When hauling, about 1.5x the pulling force goes onto the anchor. That’s a big difference!
This diagram was made with some cool software called vRigger. Learn more about it at this article.
(In the diagram on the right, you can ignore the green prusik that's randomly attached to the rope. That should be clipped to the red carabiner at the top, sorry about that.)

If you tie a strand of cord or webbing around a tree for an anchor, why can you skip a masterpoint knot?
Why is redirecting the brake strand a critical step if you're lowering someone with a Grigri?
Join my Premium Membership to read the rest of the article.
Thanks for your support!


Climbing Tips: Do This, Not That (Part 5)
Five more quick tips on best practices. This post covers: 1) When to untie your rappel stopper knot, 2) the proper direction for a Grigri when belaying from the anchor, 3) how not to carry your satcom device, 4) how to shorten a sewn loop daisy chain, and 5) why to keep your anchor low on a tree.

Premium Members can read the entire article here:
In this article:
First rappeller to the ground - untie the stopper knots
Grigri direct belay from anchor - handle away from the rock
Carry your satcom device securely stowed away, not on your pack strap
Shorten your PAS or sewn pocket daisy chain the correct way
Tree anchors - Keep the slings low
1 - First rappeller to the ground - untie the stopper knots
Once you’re on the ground, if there's plenty of extra rope on the ground, there’s no reason to have a stopper knots in the rope.
So here's a task for the first person down: untie them.
This completely eliminates the very common problem of the final person reaching the ground, with some relief and maybe distraction, somebody starts pulling the rope, and . . . you see the knot rising above you, maybe out of reach, and you instantly have a Big Problem.
(Ask me how I know about this, I've done it a couple of times!)
If the first person down removes the knots, this will never happen.
If there's just a little bit of extra rope on the ground, you can untie the stopper knots and then tie the ends of the rope together in an overhand. This keeps your partner from rapping off the ends of the rope in the highly unlikely event that the rope is moving through their device at different speeds, potentially lifting one end of the ground. It also makes a closed loop, so you can't pull up one strand of the rope out of reach.

2 -Grigri direct belay from anchor - handle away from the rock
When belaying up your partner directly off the anchor with a Grigri, try to rig it so the Grigri handle is away from the rock.
If the Grigri handle is against the rock, it might prevent the cam from properly engaging. It also might be harder to grab the handle if you need to lower your partner.
(Most of the time your Grigri will probably be free-hanging in space and not rubbing against the rock, but this is still something to watch for.)
You may need to add an extra short sling or locking carabiner to do this, depending on the anchor configuration.

Here's an attention-grabbing caution from the Petzl website.

image: petzl.com
3 - Carry your satcom device securely stowed away, not on your pack strap
If you carry a satellite communication device, put it securely in your backpack or maybe a well zippered pocket.
Don't carry it jangling around on your packstrap.
You wouldn't carry your phone bouncing around on your backpack strap attached with only a carabiner. Why would you do it with your satcom device?
Security is more important than accessibility.
I have a detailed article that talks about the pros and cons of different ways to carry your satcom, device; check the link above.

Wanna learn the correct way to shorten your daisy chain?
What are the pros and cons of having an anchor down low near the ground when you're using a tree?
Join my Premium Membership to read the rest of the article.
Thanks for your support!


Climbing Tips: Do This, Not That (Part 4)
Five more quick tips on best practices, with links to my detailed articles. This post covers: 1) rappel anchor backups, 2) route hardware bolting tips (stainless steel!), 3) using “rack pack” carabiners, 4) a crafty Klemheist hitch variation, and 5) how to rack an adjustable tether so it won’t trip you up.
Premium Members can read the entire article here:
In this article:
Backup that single strand rappel anchor
Use modern hardware when maintaining or establishing a route
Use color coded “rack pack” carabiners for your cams
Klemheist ver 2.0: stitching IN the knot
Rack your Connect Adjust with a slipknot
1 - Backup that single strand rappel anchor
At some point in your climbing adventures, you’ll probably come across a rappel anchor like what's in the photo below on the right.
Do you want to rely ONLY on a single strand of skinny cord in any part of your climbing system? I didn't think so. So don't settle for that in a rappel anchor.
If you find an anchor like this, you can back it up by simply tying another piece through the existing ring / quicklink.
This is one more good reason to carry some spare 6 mm cord. It's useful for all kinds of things. For a stout tree like this, you need about 2 meters of cord for each strand.
(For the redundancy police, who may be concerned about that single point, non redundant rappel ring, don't worry about it. It's rated to 30+ kN and it’s never gonna break.)

2 - Use modern hardware when maintaining or establishing a route
I volunteer for the High Desert Climber’s Alliance, my Local Climbing Organization (LCO) in central Oregon, and assist with their bolt replacement projects at Smith Rock State Park.
The photo below shows some side-by-side hardware from a recent project: we pulled the old crusty expansion bolt and hanger on the right, and replaced it one of these beautiful stainless steel glue ins on the left.
Use stainless steel in just about every outdoor environment. (The exception might be titanium in a coastal area.) Stainless steel corrodes much more slowly. This applies to the “internal” hardware that’s in the rock, as well as the “external” hardware, like hangers, quicklinks, rings, and chains.
The old argument of “galvanized (non-stainless) is cheaper and/or easier to buy” doesn’t apply anymore. Online stores such as HowNOT2 offer a huge variety of top quality bolting supplies, and they buy in such quantity that the stainless steel hardware is about the same price as galvanized. (HowNOT2 basically sells it at their wholesale cost.)
HowNOT2 also has a great selection and prices on the best epoxies for glue in bolts, which are insanely strong and will usually last much longer than expansion bolts. In many cases, glue ins are preferable.
Finally, if you want a deep dive into anything to do with installing bolts, check out the latest edition of the Bolting Bible, also by HowNOT2. It's the most comprehensive resource available on the topic, and it's completely free.

3 - Use color coded “rack pack” carabiners for your cams
For decades, I racked my cams on whatever small wire gate carabiners I could scrounge up. There's certainly nothing wrong with this, and it works fine.
However, now that most cam manufacturers (generally) make similar colors in similar sizes, it satisfies some strange OCD compulsion of mine to match the racking carabiners with the color of the sling.
My gear rack feels more grown up! =^)
This also has a more practical application: you can glance down and more quickly grab the correct size off of your harness.
The cost is pretty much the same, so why not get the color-matched carabiners?

How can you tie a Klemheist hitch to easily ascend a rope?
How about a trick to easily shorten your Connect Adjust?
Join my Premium Membership to read the rest of the article.
Thanks for your support!

Climbing Tips: Do This, Not That (Part 3)
Quick tips on best practices, with links to my detailed articles. This post covers: anchor shelf on a tree, “casting” (not throwing) a rappel rope, block leading tip, proper tails on flat overhand knots, and a caution on girth hitched rappel rings. (Premium Members can read all of ‘em.)

Premium Members can read the entire article here:
In this article:
Cast, don’t throw, your rappel rope
Block leading - don’t “trap” the leader
Caution with girth hitched rappel rings
Flat overhand bend - tail about 30 cm
Cordelette on a tree: the “shelf” is different
1 - Cast, don’t throw, your rappel rope
Try to avoid tossing one big coil of a rappel rope and hoping it's going to pay out smoothly down the cliff face. Most of the time it won't.
Think of casting a fishing line. There's a weight (lure) on the end. The line is carefully spooled on the reel. The weight is cast over the water, and the line smoothly follows it from the reel. No snags, no snarls.
“Casting” rappel ropes uses the same concept. Create a weight with one end of the rope, and flake the rest of the rope carefully. Toss only the weighted end, which should carry down the rest of the rope. Only toss one strand of rope at a time.
Doing this might take a little more time initially, but it is usually a good investment because it saves you from declustering the ropes later on.

2 - Block leading - don’t “trap” the leader
Block leading refers to the practice of one leader leading several pitches in a row. If you do, this, be sure that the leader attaches to the anchor in a way that allows them to easily get out of it.
In the left photo, the leader clove hitched themselves to the master point carabiner, and then added the Grigri between the clove and the gate. This “traps” the clove hitch, making it pretty much impossible for them to get out of the anchor to lead the next pitch!
A better choice is shown on the right. Here the leader is connected to the master point carabiner with a carabiner and a clove hitch. Now the leader can easily unclip and continue with the next pitch.

3 - Caution with girth hitched rappel rings
If you come across a girth hitched rappel ring, be very careful how you clip it.
If you clip it on the BOTTOM of the ring, it's safe.
If you clip on the TOP of the ring, when you weight the ring it's gonna completely detach from the cord/sling and Yer Gonna Die (YGD)!!!
There was a recent serious accident in the North Cascades related to this exact issue. (Link in my article) \
Please do not set up anchors like this. If you find one in the wild, be careful.

I recommend avoiding any sort of girth hitching a ring around a sling like this. The more standard methods shown in the photo below are more secure and easier to check.
When rigged like this, you can clip a tether to any point on the metal connection and you're gonna be safe.

Why is about 30 cm the ideal length of tail for a flat overhand bend?
When you put a cordelette around a tree and you want to use the shelf, how is that different than a two point anchor?
Join my Premium Membership to read the whole article.
Thanks for your support!


Climbing Tips: Do This, Not That (Part 2)
A series of quick tips on best practices, with links to my detailed articles. This post covers: quad anchor tips, pre threading your haul pulley, the twist-free Munter rappel, how to cut webbing, and a caution on ‘open” slings. (Premium Members can read all of ‘em.)
Premium Members can read the entire article here:
In this article:
Quad anchor - keep the knots low
Pre-thread the haul pulley
The (mostly) twist-free Munter hitch rappel
Cut webbing at a 45 degree angle
Don't put rubber bands or tape on an “open" sling
1 - Quad anchor - keep the knots low
With a quad anchor, if you’re using a cordelette or longer sewn sling like a 180 cm or 240 cm, it's good practice to tie the knots low down as shown. This will give perfect equalization, but minimizes extension if one arm of the anchor fails.

2 -The (mostly) twist-free Munter hitch rappel
Rappelling on a Munter hitch usually makes evil pigtails/twists in your rope. This can be a serious problem when you pull your rope, because the twists can get caught at the anchor.

However, if you flip your rope back over the carabiner like the photo below, this greatly reduces the rope twists.

3-Don't put rubber bands or tape on an “open" sling
Almost all quickdraws have some sort of a little rubber band thing on the bottom carabiner. This makes it easier to clip.
Some people think that doing the same thing on a “open” sling or alpine quickdraw might also be a good idea. Don’t do this!
If you clip that bottom carabiner back onto the sling, it can configure itself so the entire load is resting only on the rubber band and not on the sling! Yes, there have been two accidents that I know about caused by this.
It's a little hard to describe, but if you play around with it, you can figure it out.

The same applies to a personal tether. Do not put tape or a rubber band on a sling that you use for your tether. If you want to make it a bit easier to clip, use a girth hitch, or maybe better a clove hitch, to hold the carabiner in place.

How can you set up your haul system faster, and never drop the rope or your progress capture pulley?
Why can it be helpful to cut tubular webbing at a 45° angle instead of a 90° angle?
Join my Premium Membership to read the whole article.
Thanks for your support!


Climbing Tips: Do This, Not That (Part 1)
A series of quick tips on best practices, with links to my detailed articles. This post covers: anchor hooks, extending a quickdraw, using a rebelay to protect a fixed rope, “alpine equalization” with cams, and how anchor hardware can twist your rope. (Premium Members can read all of ‘em.)

Premium Members can read the entire article here:
In this article:
Anchor hooks: gates facing out
How to extend a quickdraw
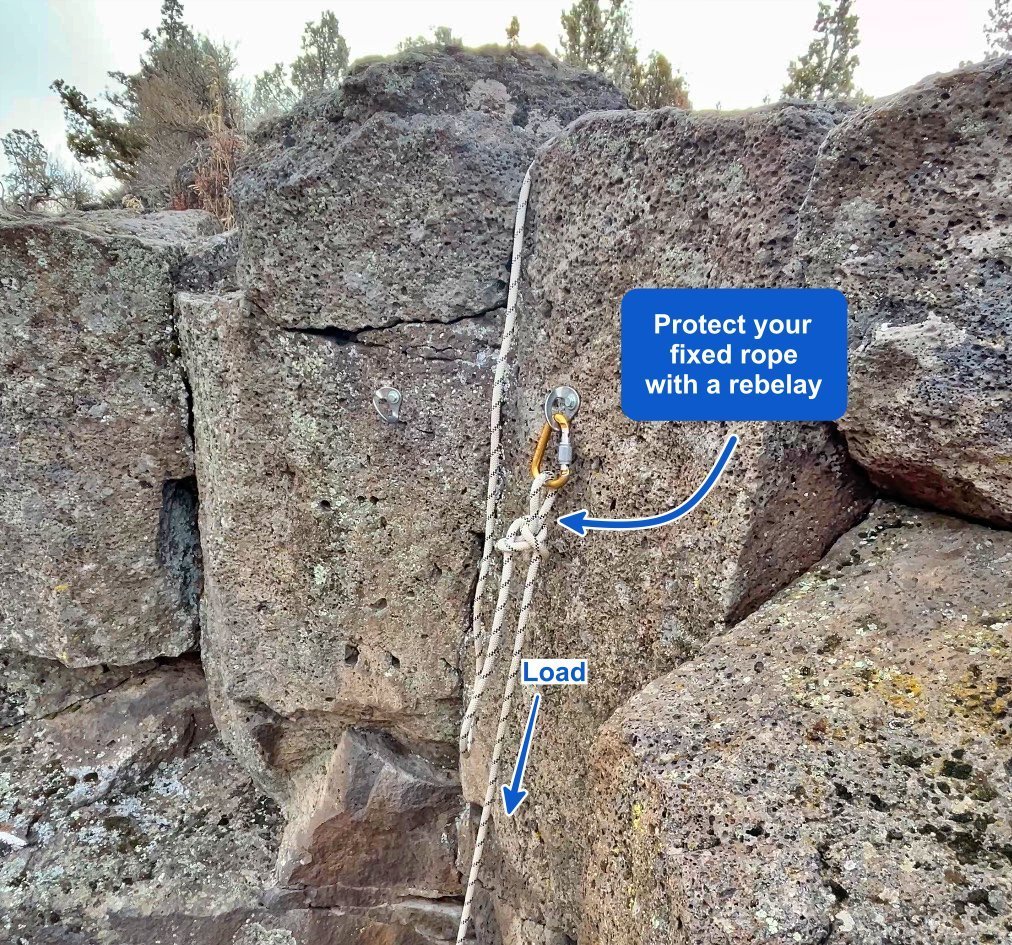
Protect a fixed rope with a rebelay
“Alpine Equalization" Don't clip the thumb loop
Anchor induced rope twisting
1 - Anchor hooks: gates facing out
In a typical anchor with carabiners, it's usually good practice to place them opposite and opposed. However, with anchor hooks (aka Mussy hooks), it's typically best to have them both facing OUT, away from the rock.

Why is this?
The American Safe Climbing Association has installed thousands of these anchors throughout the US. They recommend gates out. Click the article link above to read the longer reasons; here’s the short version:
“Anchor hooks are placed with gates out for a couple reasons. If opposed the inward facing hook tends to gouge into the rock and scar it up, along with orienting strangely to wear much faster on the nose or even get pushed into the bottom of the wiregate. If they are extended with chains to lay flat and opposed the rope gets pinched behind the hooks and wears unnecessarily/grooves the rock.“
2 - How to extend a quickdraw
A steep or reachy sport route may require extended quickdraws.
It's good practice to extend them as shown in the photo below. Of these two, the quick link is more secure. Or you could have a locking carabiner in the middle (left photo) to add further security.

The methods shown below are not so great. In the left, the carabiners could be twisted and unclipped in a fall. On the right, the rope can rub over the top of the dog bone, not good.

3 - Protect a fixed rope with a rebelay
If a fixed rope is running over an edge, it's quite easy to damage the rope, especially with a larger load.
An easy way to fix this: a rebelay. To make a rebelay, make another anchor point (by placing gear or clipping a bolt) below the edge that's being loaded. Pull up a bit of slack, tie a bight knot, and clip that bight to the lower anchor. Now, when the rope is loaded, no force goes to the section of rope over the edge.
For “alpine equalization”, where should you clip the cam?
What anchor rigging can cause rope twisting, and hoe can you fix it?
