
Foot haul your pack on a multi-pitch

Premium Members can read the entire article here:
This tip was inspired by a YouTube video (link below) by Brent Barghahn, professional climber and founder of Avant Climbing Innovations. Connect with Brent at his website and Instagram, @avant_climbing_innovations
Hauling isn’t just for big wallers. Even on a modest multi pitch, it might be better to haul your pack than climb with it on your back.
Need to haul a backpack on a multi pitch (with food, water, headlamp, some extra clothing layers, maybe some approach shoes for the walk off?)
How about on a big wall, bringing up a tagline to do a “mini haul” with all the stuff you first need at the anchor, before you start the real haul with the heavy bags?
Setting new routes, and want to haul up your bolting equipment?
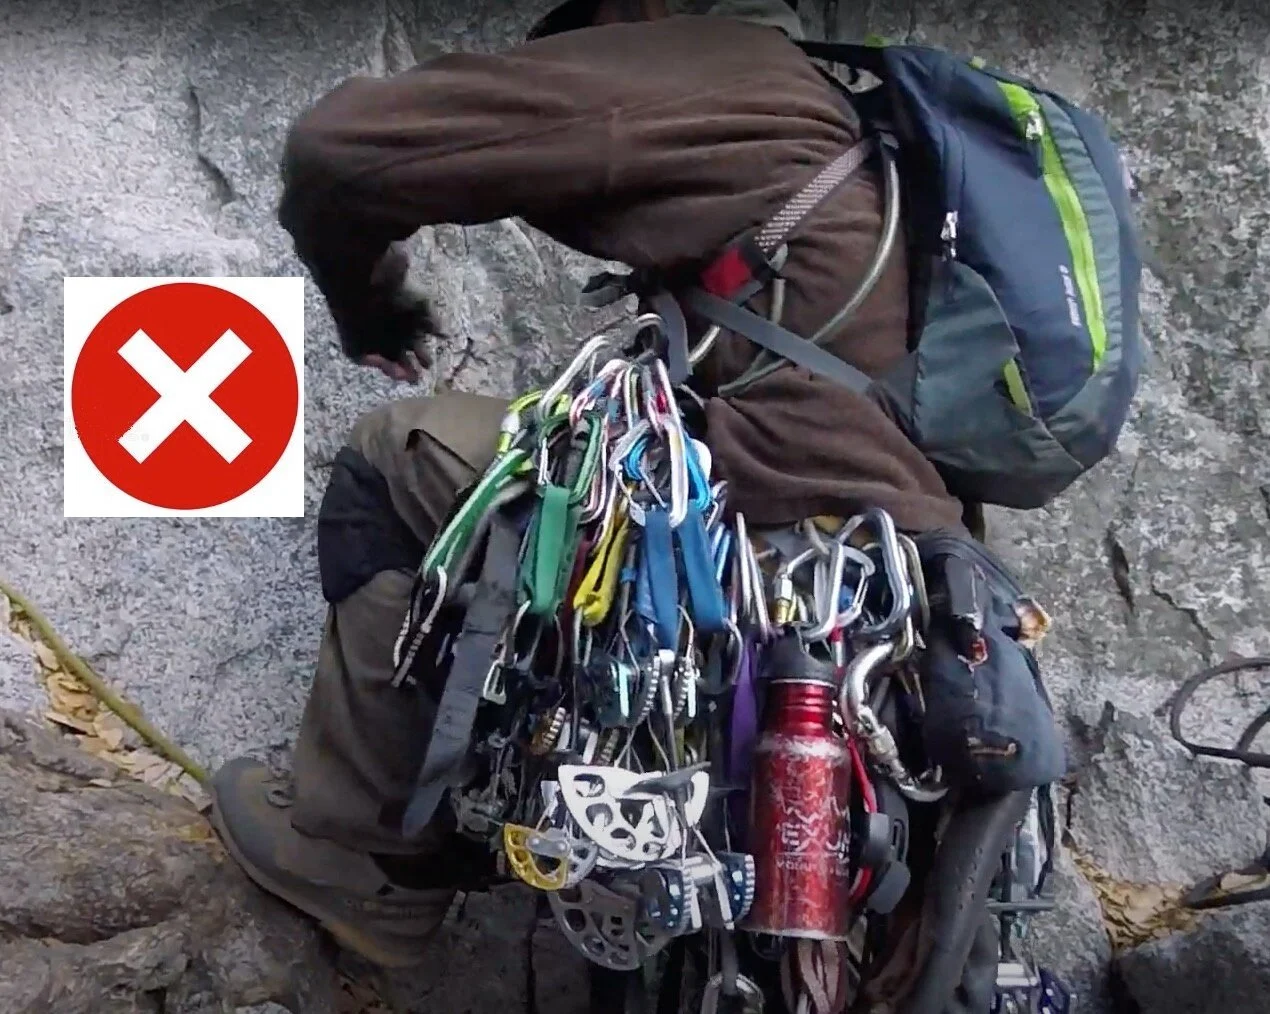
The traditional way to bring up a small load is for your suffering second to carry it all in a backpack. Not so fun for them, ‘cause carrying a backpack sucks when the climbing is hard! It also sucks to climb with all that extra stuff (shoes, water, jacket, etc.) jangling off your harness.
Don’t be this guy . . .
With modern gear such as the Petzl Micro Traxion and Petzl PURline (6 mm static rope designed for hauling), it's now a lot more feasible to efficiently haul a moderate (30 lbs. / 15 kg) load.
With a modest load like this, you don't need any fancy mechanical advantage rigging. A 1:1 is going to work fine. With a 1:1:
To lift a 15 kg load, you need to pull down with that same 15 kg of force (plus a bit more to overcome friction).
If you pull 1 meter of rope through your haul system, the load moves up 1 meter.
Progress capture required
If your pack is very light, you might pull it up hand over hand, but this usually isn’t the best choice. For most loads, you'll need some way to grab the rope to hold your bag in place when you want to take a break or adjust your stance. There are various ways to do this, the best being a progress capture pulley such as the Petzl Traxion.
But yeah, those suckers are expensive! Here are some alternatives: the Garda hitch and a Petzl Tibloc.
Garda hitch: Pros: no extra gear required, just two standard carabiners. Cons: works best with modest loads, because of the BIG evil friction from the hitch. If you do use this, you can minimize friction by pulling up on the load with one arm, and then pulling the slack rope down with your other hand.
Petzl Tibloc: Pros: lightweight, multipurpose tool you may already have with you. Many folks think of this only as an ascender, but it also works as a progress capture for hauling. Cons: it's easy to set up incorrectly (check my detailed Tibloc article on this for the right way to do it) and it also adds a fair bit of friction because you're pulling the load over a low efficiency carabiner instead of using a pulley.
Haul from a high point
At a bolted anchor, usually it's best to haul off of the bolt rather than the anchor master point (which you’re probably attached to). There are a few reasons for this.
If you're on a ledge, having your hauling point as high as possible can minimize friction of the rope running over rock.
A high hauling point can give you a longer “lifting” stroke with your leg, which is more efficient.
A well placed bolt is good for 20+ kN, an absolutely strung enough for you to bring up a modest backpack. No need to haul from an equalized masterpoint if you have good bolts.
Haul with your feet, not your hands
When hauling, it's almost always better to use your feet / body weight to lift the load, rather than your hands and arms, which you're probably trying to preserve for the next lead.
There are MANY ways to rig a 1:1 haul. Here's one that's fairly simple, works great, and uses minimal gear.
Gear you need for a foot haul:
Two progress capture pulleys (PCP), such as a Petzl Micro Traxion (or a Tibloc)
A few extra carabiners
60 cm (single length) sling
Rigging the 1:1 foot haul (Climber omitted for clarity)
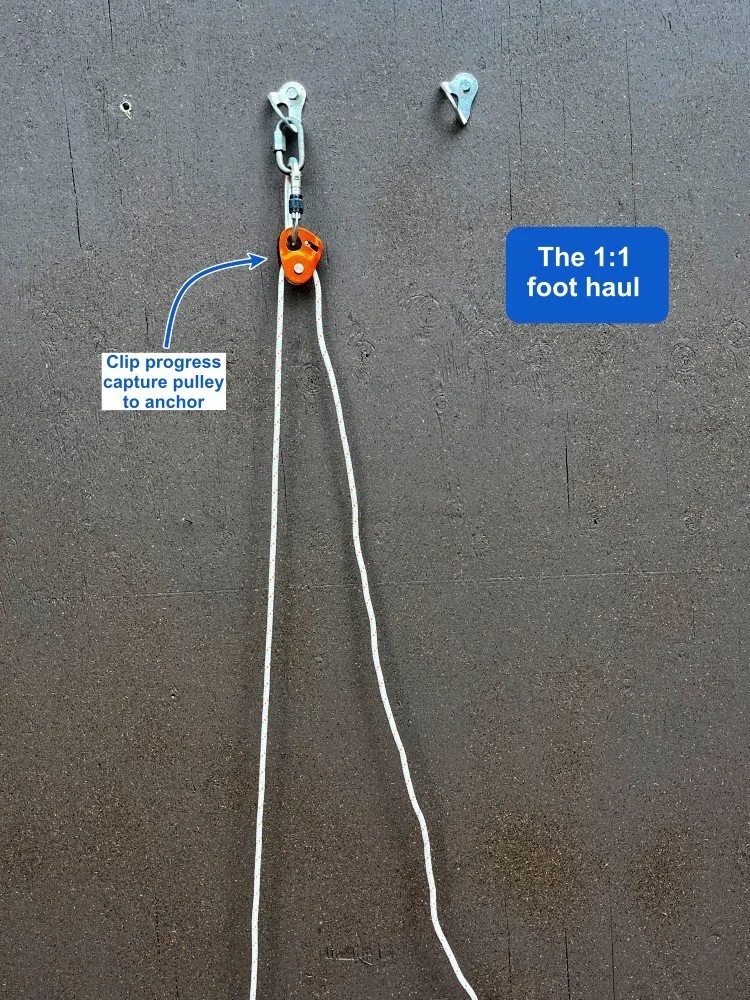
1) Clip your progress capture pulley (and haul rope) to a high point on the anchor. Directly onto a solid bolt is fine. Pull up all of the slack. Yell down to your partner to release the bag from the lower anchor.
(Note: if you carry your PCP already preloaded with the haul rope, it can speed up setting up your haul, and minimize the chance of you dropping the PCP. I cover that in this article.
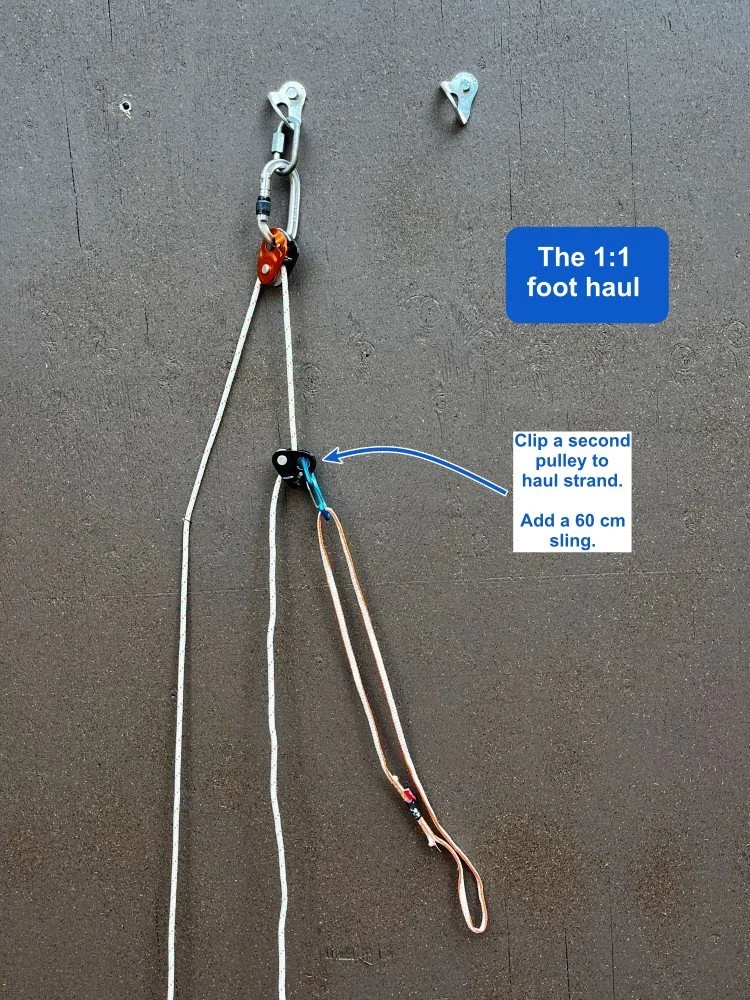
2) Install your second PCP (or Tibloc) to the haul strand. Check to see that it’s rigged ”teeth to tail”, so it pulls correctly. (It’s easy to rig this wrong; I seem to do it a lot.)
Clip a 60 cm sling onto this second PCP.
This is the point where most people would start hauling, by stepping down in the sling clipped to the black PCP. This can work, but there's a simple improvement that makes it much more ergonomic and comfortable.
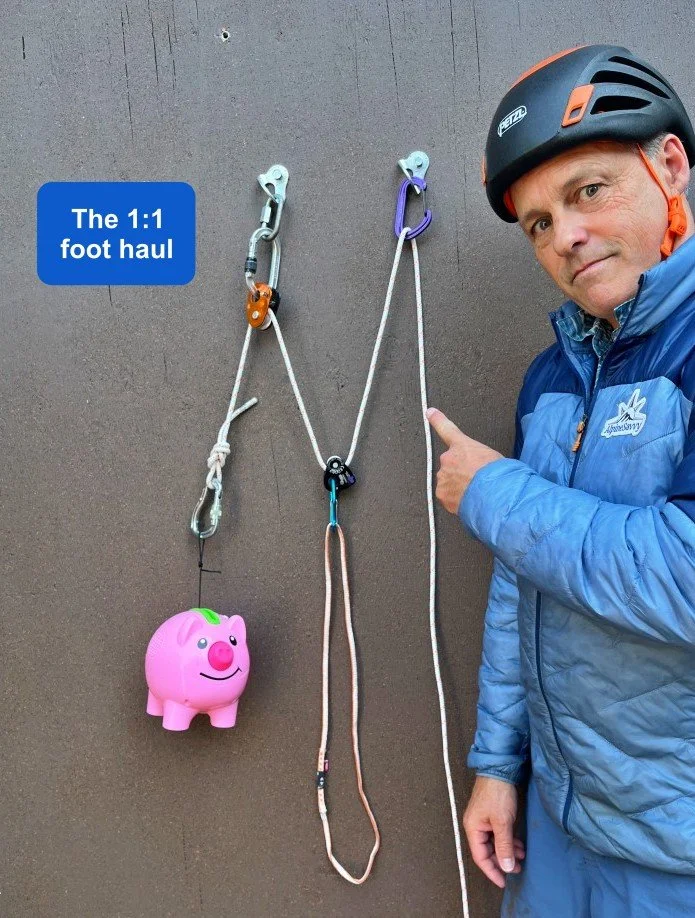
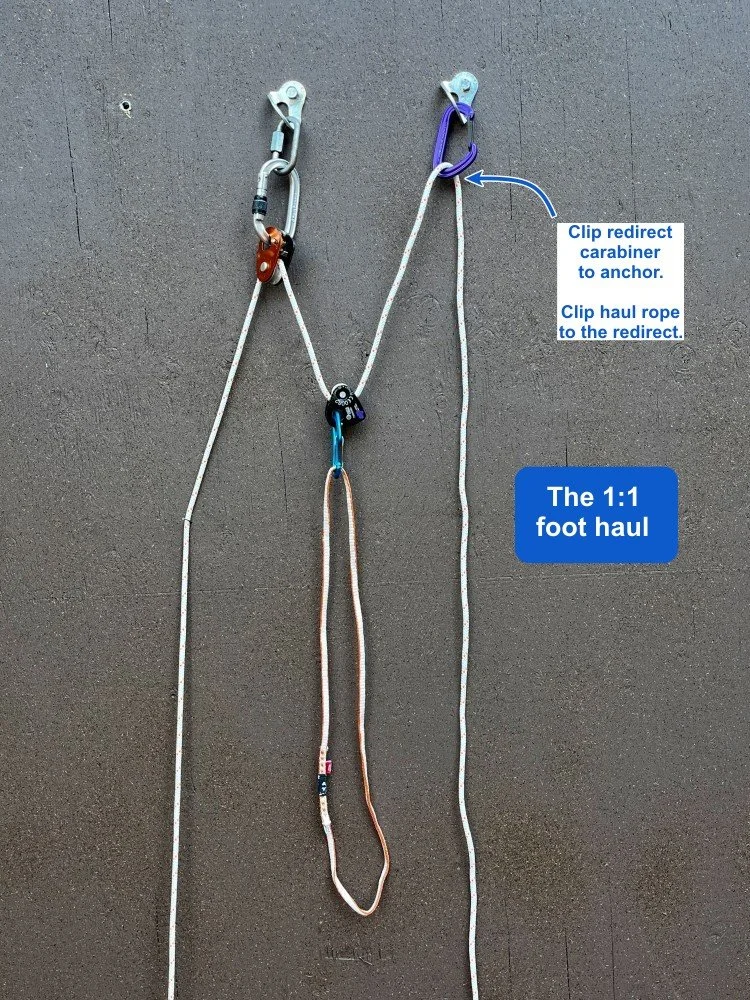
3) Clip a redirect carabiner (purple) to some part of the anchor, and clip the pulling strand of the haul rope through the redirect.
Time to haul! Step down in your foot loop. The load should lift. Unweight your leg, and pull down on the redirected haul strand to take in the slack. The PCP will “climb” the rope and reset up towards the anchor. Repeat. Switch feet if you get tired.
Note that zero load is going onto your tired arms! Your legs are doing the work, as they should. Work smart, not hard!
(For clarity, I clipped the redirect carabiner to a second bolt for this photo. But it can be on the same bolt as your primary progress capture. Photo of that is below.)
Instead of the purple carabiner, if you have a DMM Revolver carabiner with a small pulley in it, that can make your system a bit more efficient.
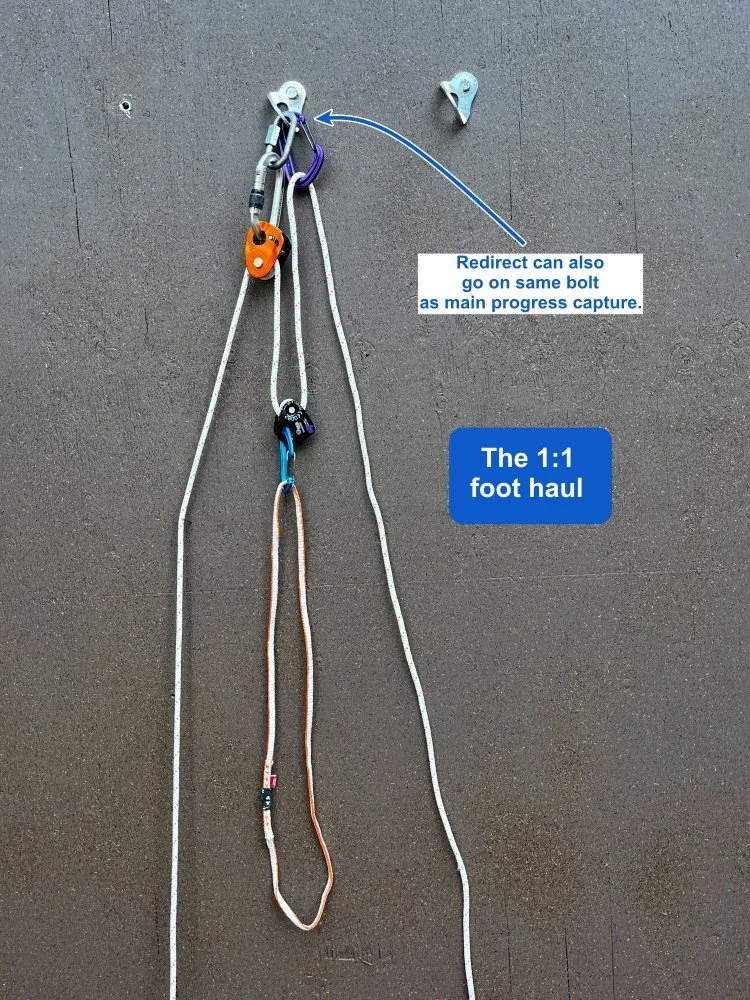
Variation: Same system, except now we have the redirect (purple) on the same bolt as the primary progress capture.
How do you manage the extra haul rope?
How can you set this up with Tibloc instead of a second PCP?
Want to to see a video of how to set it up from start to finish?
How about a video of a way to 1:1 haul a load that weighs more than you do?
