Alpine Tips
Crevasse rescue: the drop loop 6:1
Want to learn a simple, minimal gear, high mechanical advantage rigging that's great for crevasse rescue? Look no further than the drop loop 6:1. Here’s how to set it up.
Premium Members can read the entire article here:
Do you want an efficient, simple and minimal gear mechanical advantage rigging system to pull your buddy out of a crevasse (or maybe your car out of the ditch?
Look no further than the drop loop 6:1.
Let's learn how to rig it.
Gear you need for the drop loop 6:1:
A fair bit of extra rope you can use for the rescue. This could be the rope that you were tied in with when walking on the glacier, or an extra rescue rope that’s in your pack
Some sort of friction hitch, or rope grabber like a Petzl Tibloc
Some sort of progress capture system at the anchor, ideally a progress capture pulley like the Petzl Traxion
A few spare carabiners, two of them locking
A pulley if you have it (optional)
Notes . .
To keep the rigging easier to see, I’m not showing the original rope that might be attached to the unfortunate person in the crevasse. In this example, let's assume a team of two people skiing on a glacier unroped, and one of them falls in. Each skier is carrying a 30 meter rescue rope, so the person on top has all the gear to do the rescue.
One other benefit of this system: you’re dropping a new rescue loop to your victim. So, if the original rope they fell in on has brake knots in it, or is deeply entrenched in the lip of the crevasse, it doesn't matter.
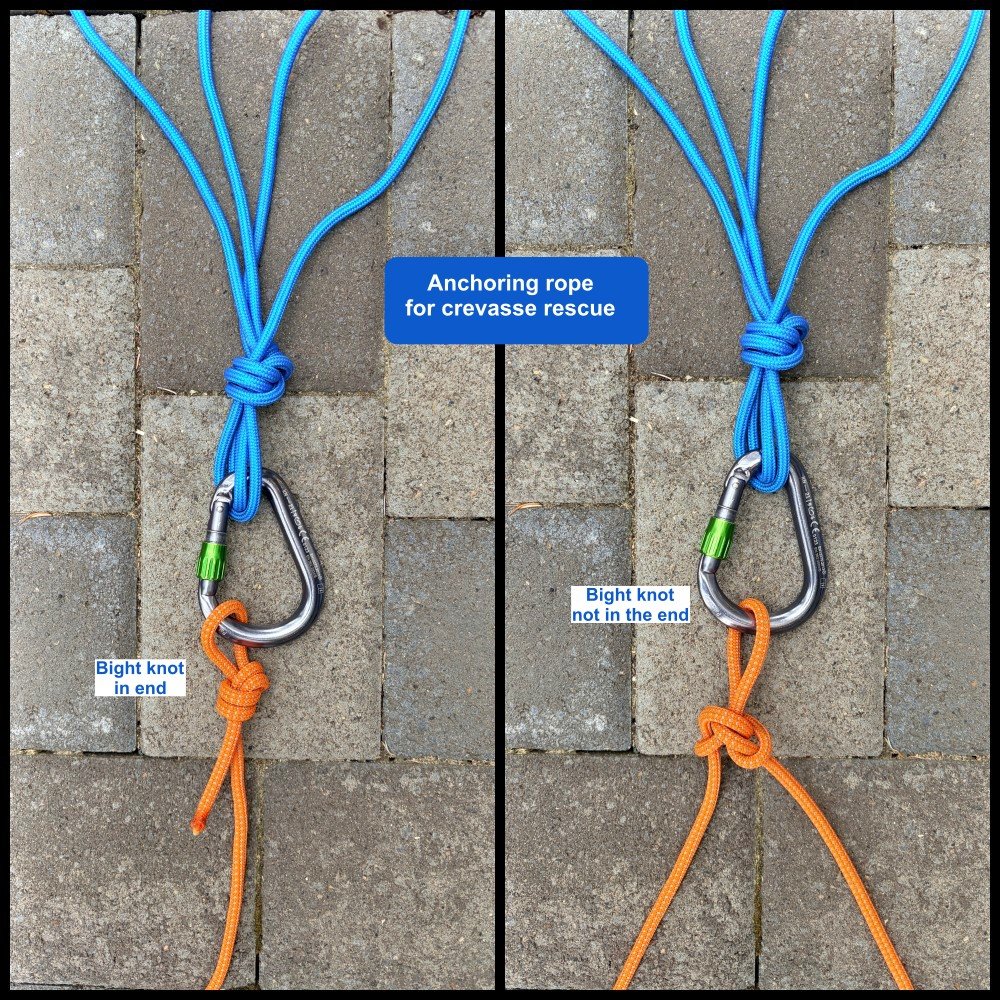
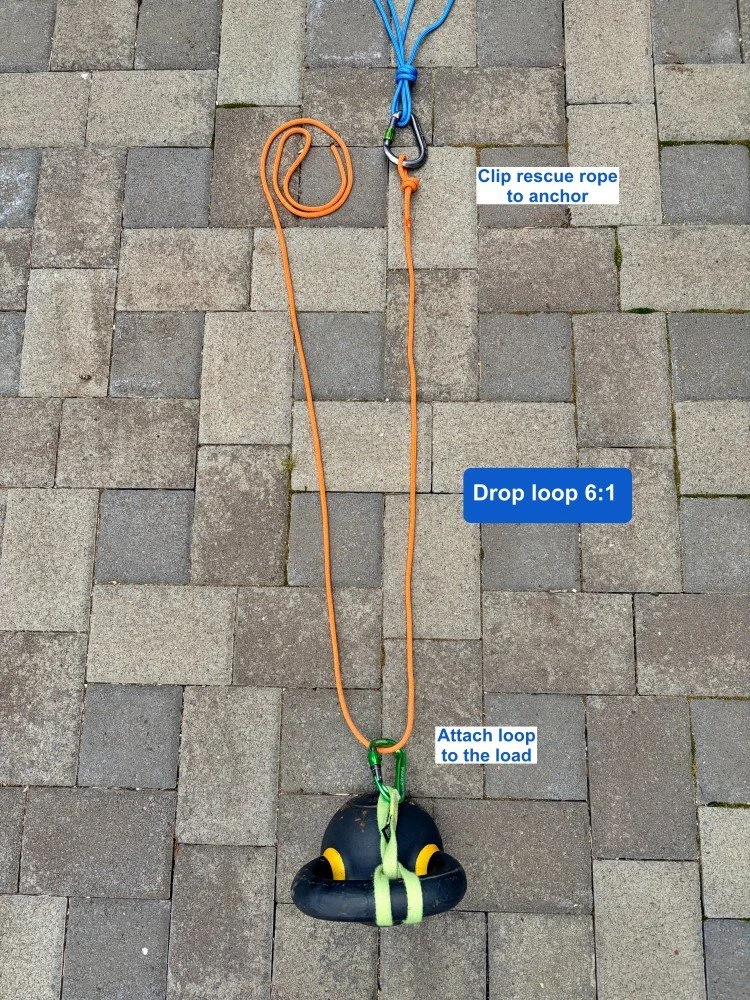
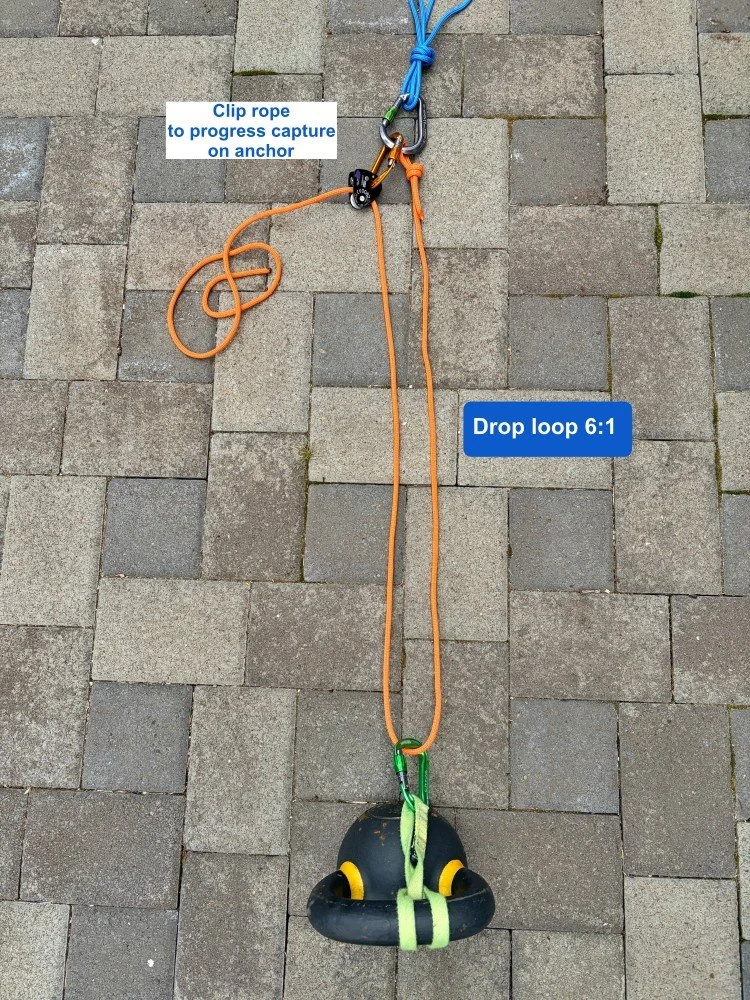
Step 1: Build a solid anchor, and attach the rope to the master point. This could be the end of the rope, as I'm showing in this example, or a bight knot that the person on top was clipped to.
Step 2: Clip a locking carabiner to the rope, and lower it down to the person in the crevasse. Instruct them to clip the locker to their belay loop.
This is the “drop loop” portion of the anchor. If you have an extra pulley, you could put one here to reduce friction a bit.
For this to work as shown, you need to have a bit more than twice the amount of rope available to drop this loop to your partner. If you don't have that, you need to get resourceful with some other methods, such as the drop end 3:1 or the simplified drop loop 2:1.
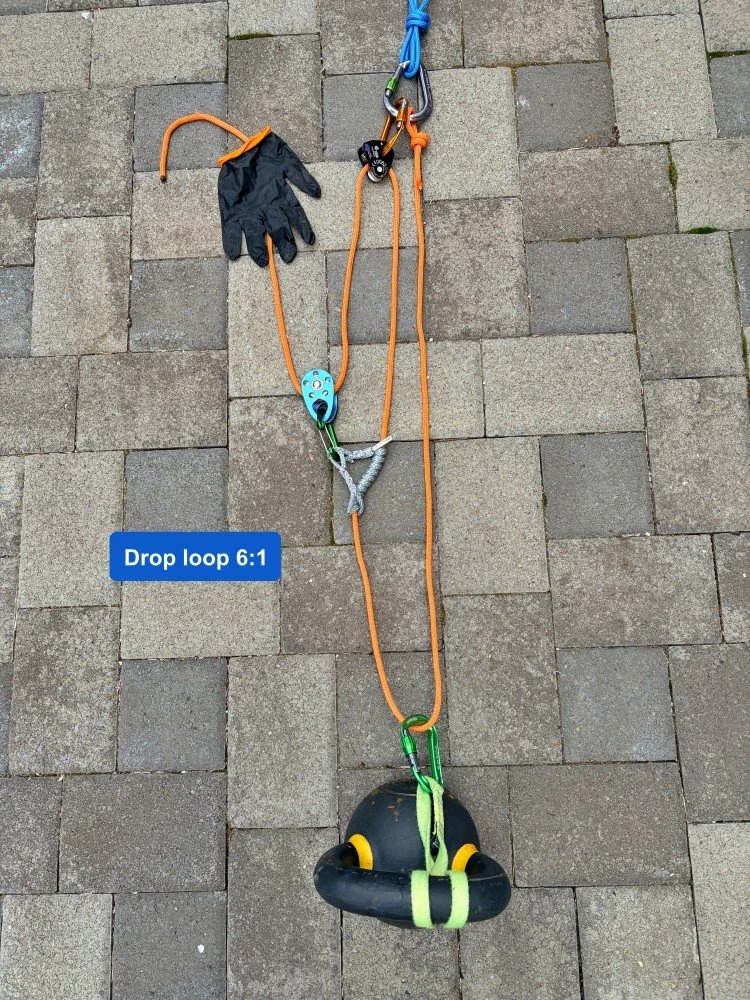
Step 3 - Pass the other side of the loop that you dropped through some sort of progress capture on your anchor. A progress capture pulley (here, I’m using a Petzl Nano Traxion) is the easiest. You can also use some other options like a friction hitch on a carabiner; here's an article about different ways to do progress capture.
You now have a 2:1 mechanical advantage system, with the progress capture on the anchor.
If you have more than one rescuer, you might start pulling on this to see if you can move the load. (With hauling systems, it's usually best to use the lowest mechanical advantage that gets the job done, so try this first.)
In our case, let's assume that the you can’t pull up your buddy, so we need to add more boost to our system.
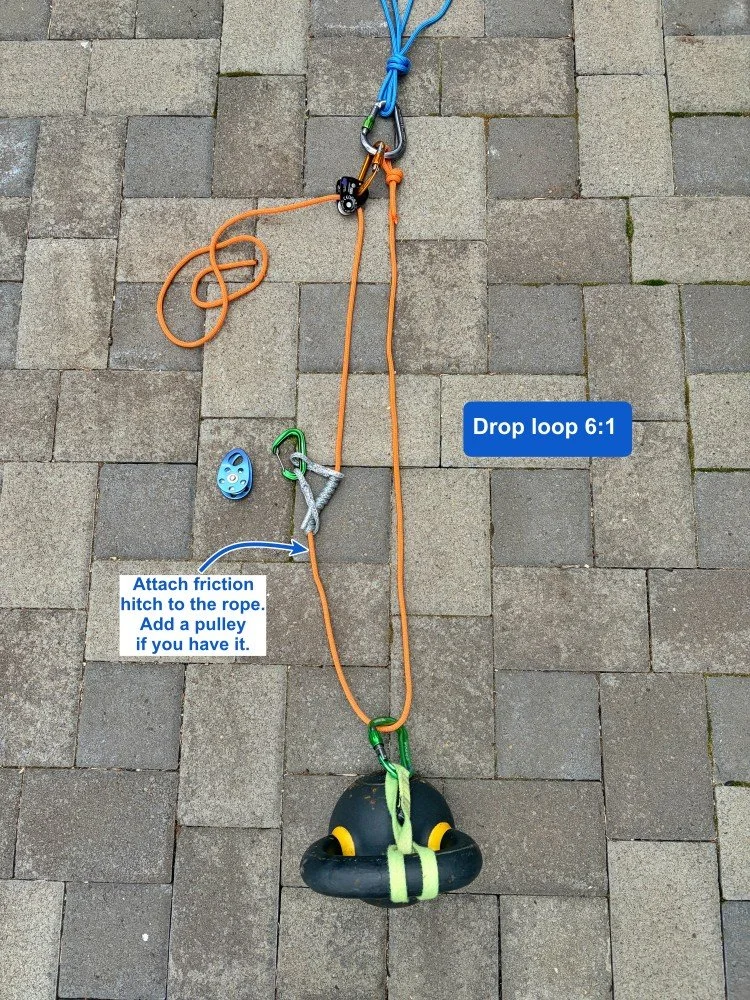
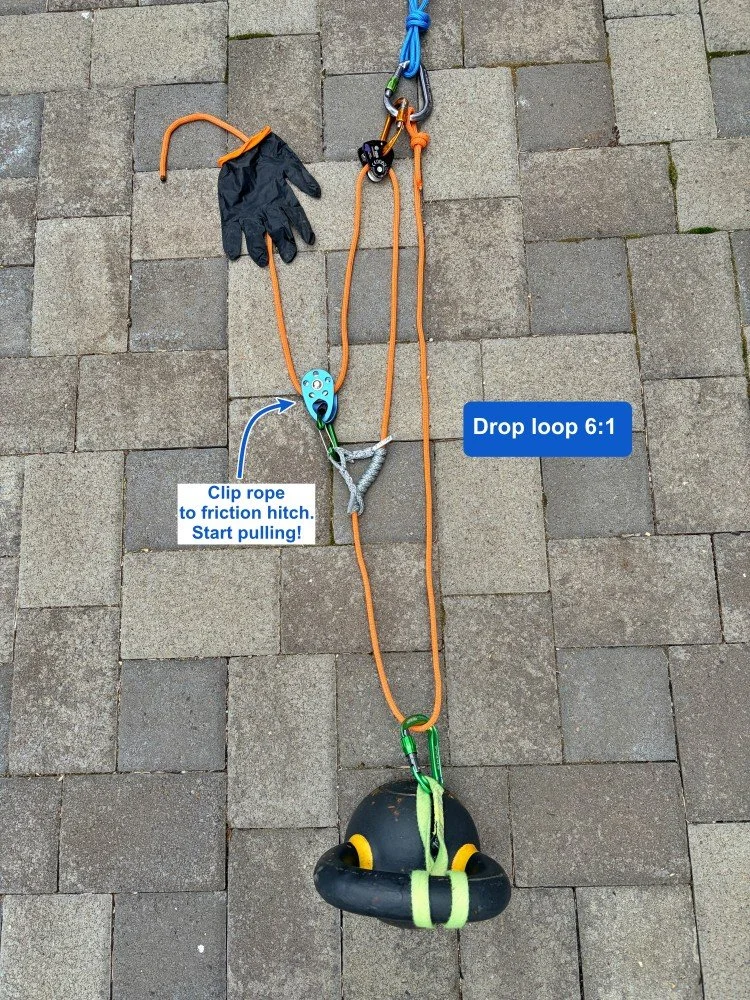
Step 4 - Tie a friction hitch to the side of the drop loop that’s coming up from your partner to the progress capture. Clip a pulley (if you have one) to the friction hitch. Clip the tail end of the rope to the carabiner / pulley on the friction hitch.
Give yourself a high five! You just built a 3:1 system on top of a 2:1 system, giving you a 6:1.
If you pull 6 meters of rope through your hauling system, your load will move 1 meter.
This is a compound pulley system.
What's the real world mechanical advantage of this rigging?
Wanna see a video of me going through the “T method” with this exact anchor to show the mechanical advantage?
Join my Premium Membership to read the rest of the article.
Thanks for your support!
Two ways to rig a 2:1 “C” haul
The 2:1 haul is a fundamental system in rope rescue. If you use a progress capture pulley, there are two places you can put it: on the load, and on the anchor. There are pros and cons to each; learn ‘em here.
Premium Members can read the entire article here:
A 2:1 haul is a fundamental mechanical advantage system for climbing self rescue.
To move your load 1 meter, you must pull 2 meters of rope through the system.
In a (theoretically frictionless) world, you could lift a 100 kg load by applying about 50 kg of pulling force.
It's called a “C” because if you turn your head sideways, it kind of looks like the letter. =^)
It's common to rig this for crevasse rescue by using a progress capture pulley (PCP), such as the Petzl Micro Traxion.
With a 2:1 haul: the progress capture can go in one of two places:
On the load
On the anchor
Here are the two different setups.
1 - Progress capture on the LOAD
2 - Progress capture on the ANCHOR
What are the forces on the anchor for each of these systems?
If you do have a redirect like in the second photo, what’s something you can do to reduce the load on the anchor?
For crevasse rescue, what are pros and cons of these two methods? (My opinion: I prefer to keep it on the anchor.)
Join my Premium Membership to learn all this in the complete article.
Thanks for your support!
Hauling systems: boost your 3:1 to a 5:1
Do you have a 3:1 hauling system set up, and need a little extra pulling power? Here's a simple way to turn it into a 5:1 with minimal extra gear.
Premium Members can read the entire article here:
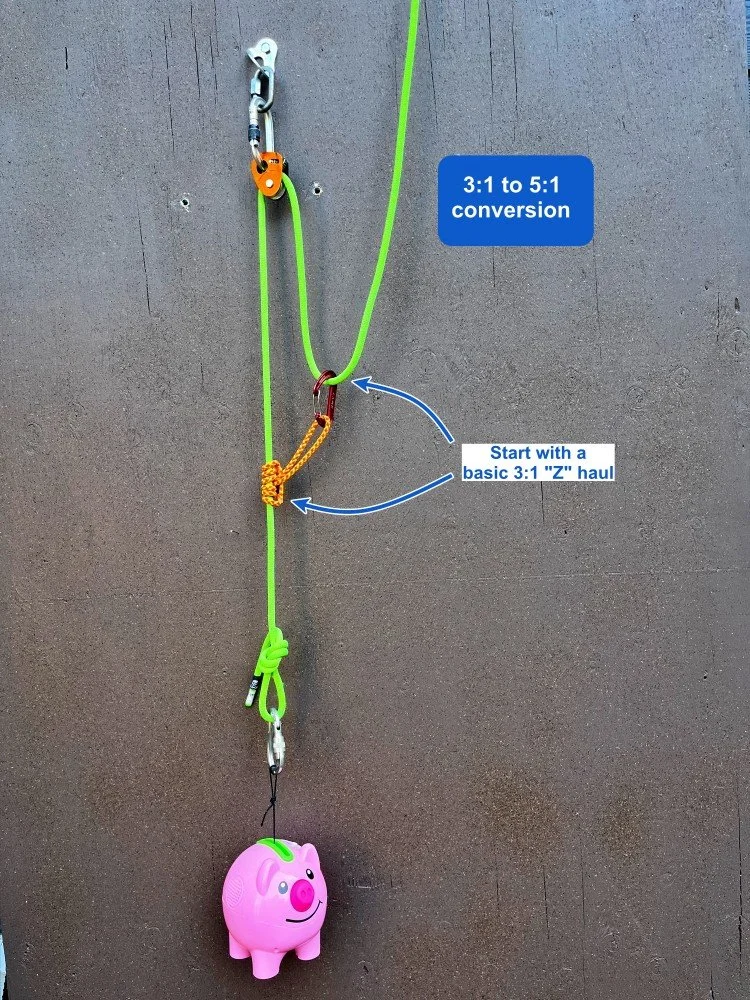
If you have a basic 3:1 mechanical advantage “Z drag” set up, and need some extra pulling power, here’s a slick way to convert it into a 5:1 system.
Advantages:
Easy to convert from an existing 3:1 system
May allow a small person to haul up a relatively large / heavy person
Requires minimal extra equipment (only 2 spare carabiners and a cordelette)
There's no change of direction at the anchor, so your pulling efficiency is increased
Easy reset
Because there are two different lines in the system, you could distribute this load across two different anchors.
Don’t have a long sling or a cordelette? You could also use the other end of the climbing rope.
Here’s how to convert a 3:1 to a 5:1.
Start with a standard 3:1 “Z” haul.
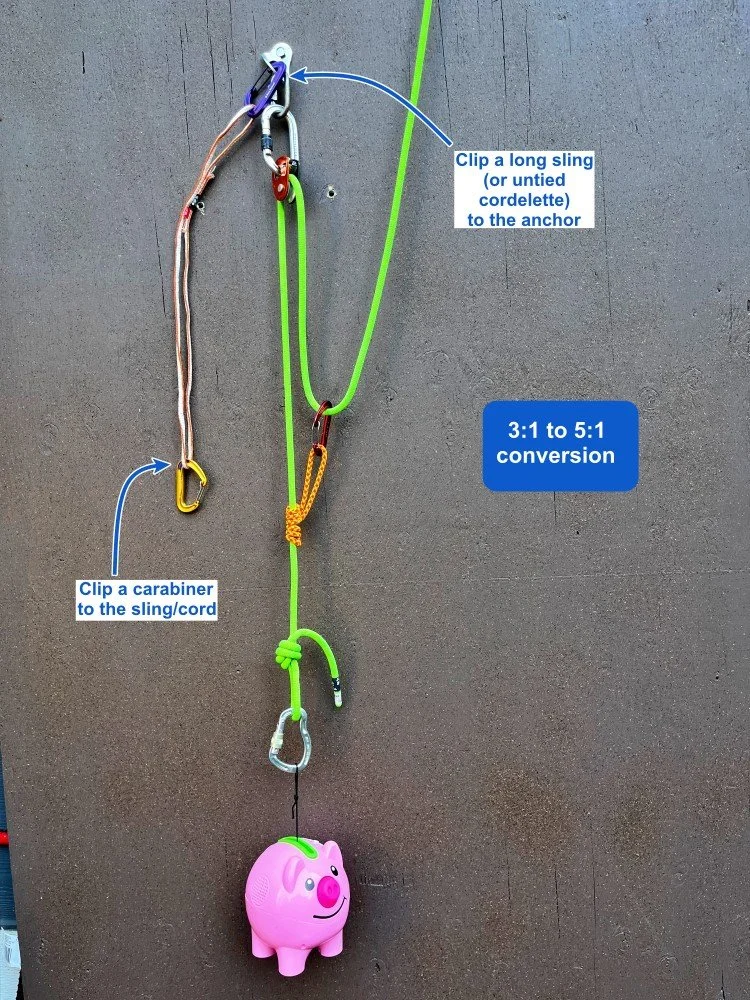
Clip a sling to the anchor. Clip a carabiner into the other end of the sling.
(If you're doing a crevasse rescue, using an untied (aka “open”) cordelette works better. Photo of that rigging is below.)
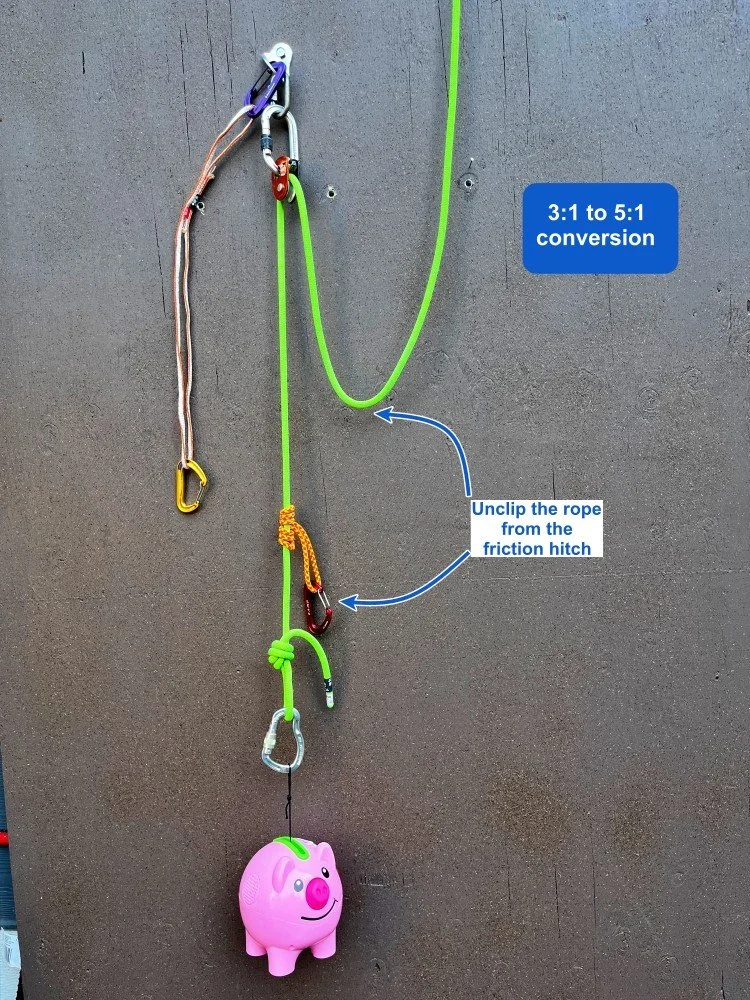
Unclip the rope from the carabiner on the friction hitch.
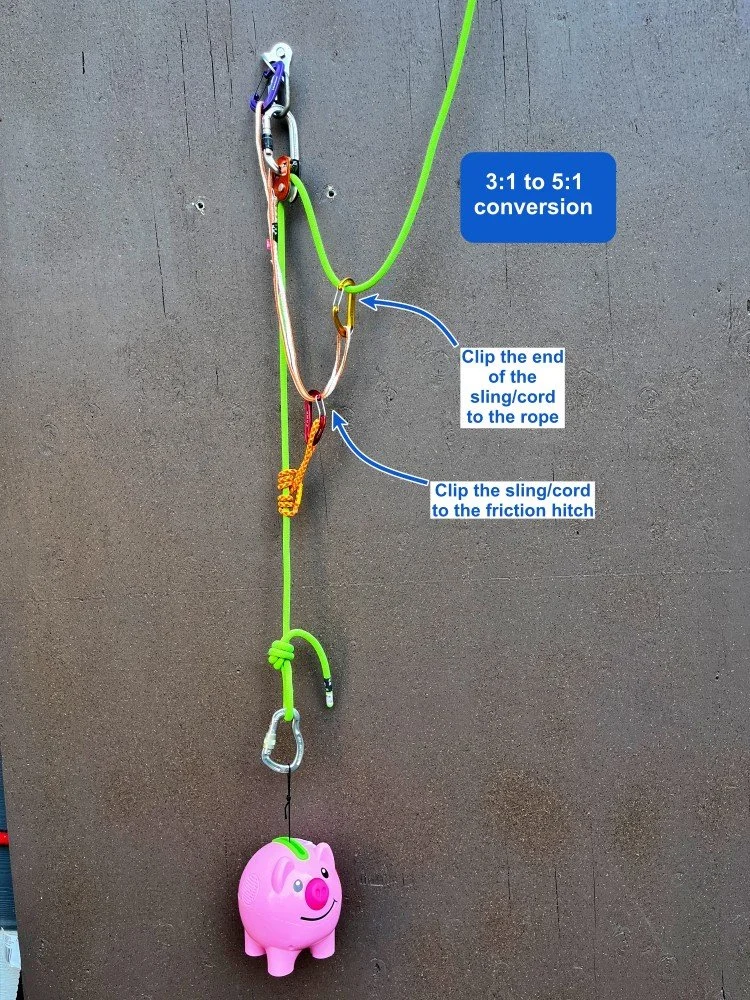
Clip your sling to the friction hitch.
Clip the rope to the carabiner on the end of the sling.
Start hauling!
You made a 5:1 system. Schweeeet, give yourself a high five!
For every 5 meters of rope you pull through the system, your load moves 1 meter.
In a theoretical frictionless world, you could move a 100 kg load with about 20 kg of pulling power. In the real world, your actual efficiency is probably about 3.5 to 1, but that should be enough to pull your buddy out of the crevasse.
You can increase your efficiency a bunch by having a pulley at each change of direction rather than a carabiner.
Both carabiners/pulleys are moving the same direction (toward the anchor) when you're pulling, so you don't need to reset the tractor as often.
Definitely practice with this a few times in a controlled environment. It may look simple when you're reading it here, but it can cause some brain lock when you're trying to do it under some real world pressure.
Want to see an photo and video of how to set this up with a cordelette for crevasse rescue?
How can you apply the “T method” to show that this actually is a 5:1?
How about another way to set up a 5:1: with a distinct disadvantage to the method shown here?
Join my Premium Membership to read the rest of the article.
Thanks for your support!
Using the “T method” to calculate mechanical advantage
It's easy to get crosseyed looking at a pulley system and trying to figure out the mechanical advantage. Fortunately, there's an easy way to calculate it, requiring the math skills of a third grader. (Yes, you can do this.) Let’s learn the “T method.”
Premium Members can read the entire article here:
For climbers, mechanical advantage (MA) systems are used in self rescue, and in big wall climbing to lift heavy haul bags. They're also helpful for getting your truck out of the ditch, pullings stumps in your garden, hoisting sails on a boat, building pyramids, and other useful life applications.
Even if you have a basic understanding of how they work, some of the more esoteric ones make most folks (like me) get cross-eyed counting all the strands and trying to figure out the MA!
Fortunately, there is a pretty straightforward way to figure out the theoretical MA of any system, using math that you learned in the third grade: The T method.
The method assigns a T (Tension) value to each rope segment. You add up the tensions at various points in the system to determine the overall mechanical advantage.
It's particularly useful for more complicated systems beyond a basic 2:1 and 3:1.
Here’s how the T method works.
Start with “1”. Begin with a value of 1 “tension” at the point where you pull on the rope. Think of tension as how much force you (and maybe your pals) are pulling on the haul strand.
Follow the tension. Trace the tension through each pulley and other components of the system.
Adding the tensions:
At each pulley (aka change of direction), the tension on the rope entering and exiting the pulley is EQUAL.
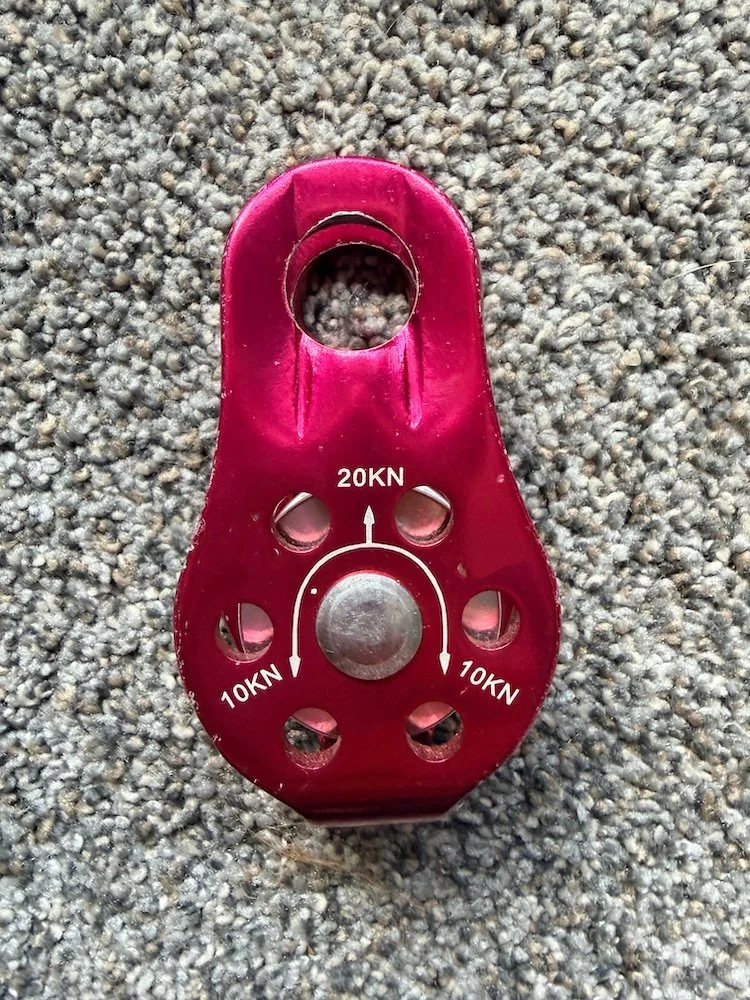
At the pulley “eye” (aka, the thing the pulley is clipped to) the tension is the SUM of the tension on the rope entering and exiting the pulley. For example, if 1 tension enters the pulley, then 2 tensions are applied to whatever the pulley is clipped to. If 2 tensions enter the pulley, then 4 tensions get applied to the pulley clipping point. (See pulley photo below.)
When tensions join (e.g., at a prusik hitch), you ADD the values.
Mechanical advantage:
The final tension value at the load is the mechanical advantage of the system.
Check out those numbers printed on the pulley.
If you have a force of “X” on one side of the pulley, you have that same force of “X” coming out of the other side.
In the hole of the pulley, where it's clipped to something, you have “2X” the force that's being applied. That's pretty much the core idea of the T method.
Does this sound a bit dry and complicated? That's how I felt when I first heard of it.
But, after you try it a few times, it's quite simple. If you're even slightly a mechanical advantage nerd like I am, it's actually kind of fun!
Let's look at some examples of a 2:1, 3:1, and a 6:1.
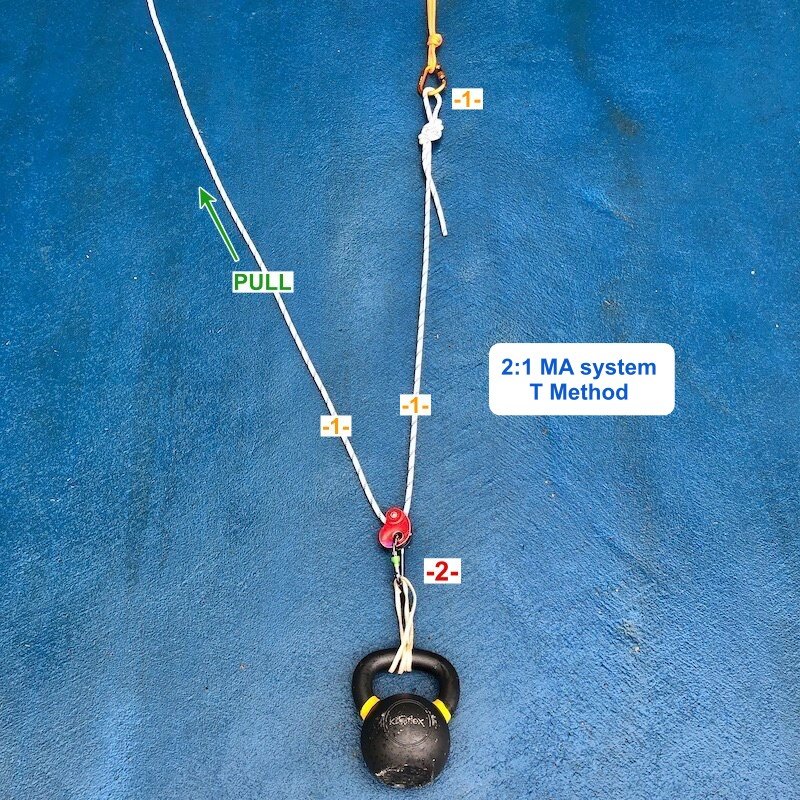
Let's start with the easiest system, a 2:1 (aka the “C pull”)
To move the load 1 meter, you need to pull 2 meters of rope through the system.
In a theoretical frictionless world, you could lift a 100 kg load by pulling with about 50 kg of force.
(Note: in this example, the progress capture pulley is attached to the load, not the anchor.)
Begin with an input of 1, you pulling on the rope.
That input force of 1 is doubled to 2 when it changes direction at the red progress capture pulley. That gets applied to the load.
The input force of 1 comes out the other side of the red pulley, remaining at 1, and then goes onto the anchor.
Summary of a 2:1 MA system:
2 units of tension go to the load.
When you’re pulling, 1 unit of tension goes to the anchor.
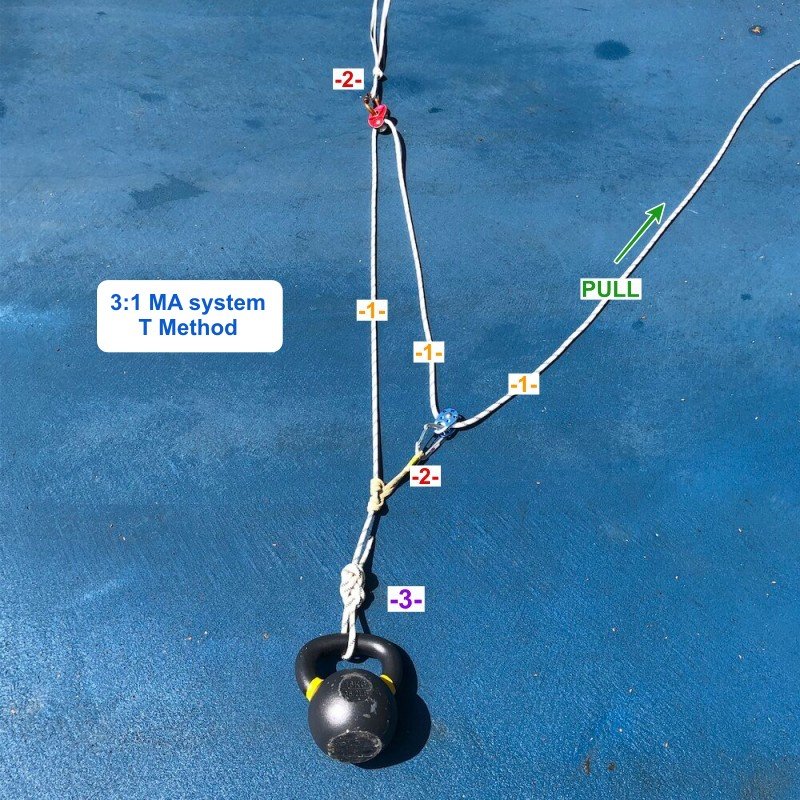
Got that? Good, let’s look at a 3:1 system (aka the “Z pull”)
To move the load 1 meter, you need to pull 3 meters of rope through the system.
In a theoretical frictionless world, you could lift a 100 kg load by pulling with about 33 kg of force.
Begin with an input of 1, you pulling on the rope.
That input force of 1 is doubled to 2 when it changes direction at the blue pulley. That gets applied to the prusik that the pulley is clipped to.
The input force of 1 comes out the other side of the blue pulley remaining at 1. That travels to the red progress capture pulley on the anchor, where it's doubled to 2.
The input force of 1 continues at the left side of the red pulley down toward the load. Here it says “hello!” to the yellow prusik, which has a force of 2.
We add these together to get 3, the force applied to the load.
Summary of a 3:1:
3 units of tension go to the load.
When you’re pulling, 2 units of tension go to the anchor.
OK, you got all that? Sweet! Let's step it up to a 6:1.
In this example, we’ll start with a 3:1 Z drag, and then make a 2:1 C pull (with a separate cord) on top of it. This rigging is also known as a “C on a Z”.
To move the load 1 meter, you need to pull 6 meters of rope through the system.
In a theoretical frictionless world, you could lift a 100 kg load by pulling with about 17 kg of force.
How want to learn how to apply the T method to figure out a 6:1?
What's the difference between theoretical and real world MA?
How can real world MA improve by using pulleys in different places?
How about a link to a great YouTube video that describes the T method in even more detail than this?
Join my Premium Membership to read the rest of the article.
Thanks for your support.
Load transfer: The stirrup hoist
Do you have a big load that you need to move a short distance? Here's one crafty way to do it: the stirrup hoist. This may not be the most efficient method, but it's quick and simple.
Premium Members can read the entire article here:
This is part of a series of articles that cover methods to move a large load a short distance, typically to unweight an anchor.
In some unusual climbing situations, you may need to lift a very large load a very small distance.
Maybe on a big wall, where you rigged your bags old school style (sheesh, use a docking cord, will ya!?) and you need to lift them a tiny bit to unclip the carabiner.
Maybe in a rescue scenario, when you have an unconscious person hanging off of a loaded anchor, and you need to lift them just enough to unclip them.
In either case, it's often better to use your bodyweight to try to do the lifting rather than your muscles. Work smart, not hard!
Don't make a habit out of this. It's almost always better to use some sort of releasable knot or hitch to anchor your load when you can. But for those cases when you didn't do that for some reason, the stirrup hoist might come in handy!
Here's a way to set that up, called the stirrup hoist.
This is not the most efficient method, but it's pretty fast and uses minimal gear, so it's a good one to have in the toolbox.
You might want to try this first and see if it solves your problem, before you try more elaborate systems, such as the alpine block and tackle, or the 2:1 redirected haul.
Clip a long sling onto the load. Slippery Dyneema would be a good choice, to minimize friction.
Pass the sling through a carabiner on the anchor, and let the sling hang down below the anchor. If you happen to have a pulley, run the sling through that to minimize friction. (In the photo below, I’m not using a pulley.)
Step into this “stirrup”. Your body weight, along with lifting the load with your arms, should hopefully be enough to move it up a bit to solve your problem.
To give a little extra boost, you might try bouncing on the sling ,which will apply more force to the load than your static body weight.

