
Alpine Tips

Big wall water tips
For big wall climbing, water is the heaviest, and arguably most important, thing you can bring. Here are some solid tips for how much to bring, the best type of bottle, little-known material for a keeper cord, the frugal climber’s electrolyte mix, and even how to make a mini fridge in your haul bag.

Water on a big wall: How much to bring, and how best to store it?
It's the heaviest thing in your haul bag, so you don’t wanna take too much, but you definitely don’t want to run out either.
Good rule of thumb for quantity: 3-4 liters per person per day. You typically drink more lower down where it's warmer and the loads are heavier and less as you get higher up.
Start with sturdy bottles, with a secure lid, and a flared “collar” on top. The time-tested two liter pop bottle is a good choice for most of your water; plus, the round 2 liter bottles fit your round haul bag better. Bottles designed to hold carbonation are usually built stronger than a standard drinking water bottle. The collar, that’s just below the bottom of the cap, gives a secure place for your keeper cord. Bring some smaller one liter bottles to fill in gaps at the bottom of your bag. One liter bottles from Aquafina, holding non-carbonated water, are excellent.
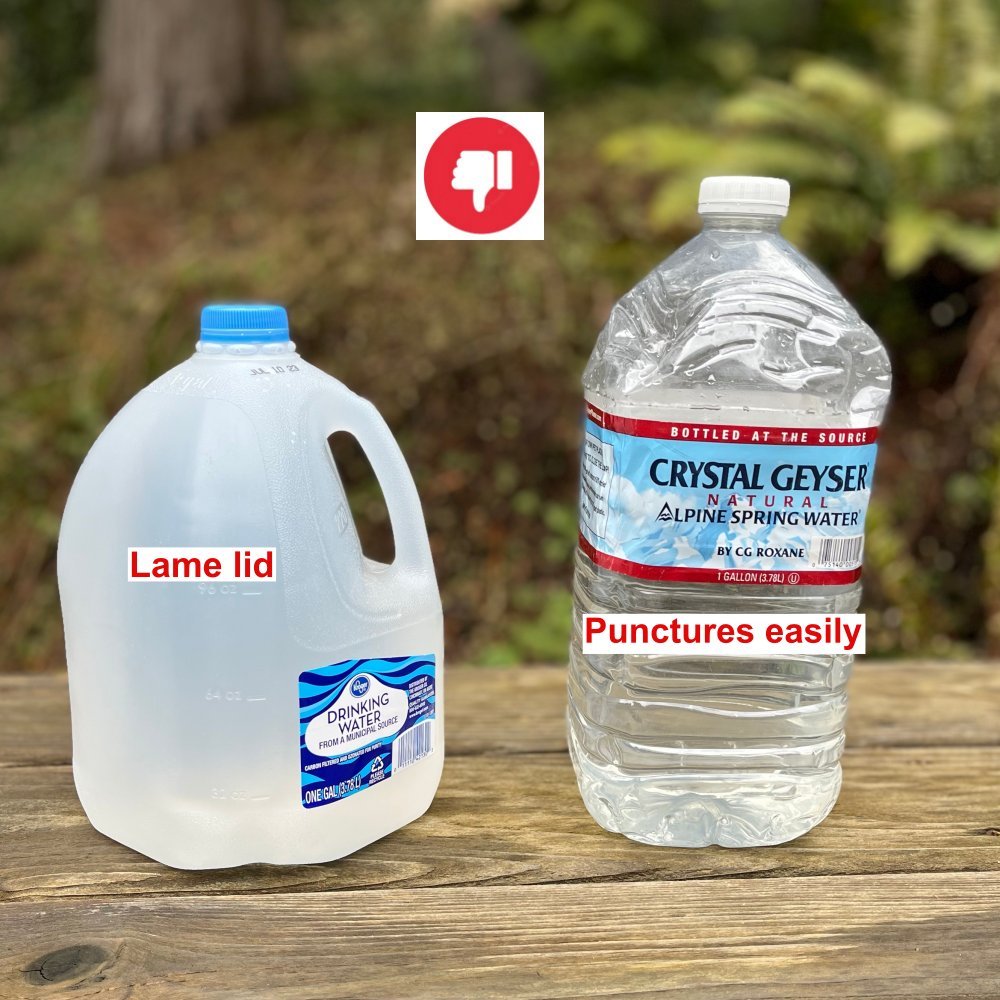
Some people have luck with 1 gallon Crystal Geyser bottles, but I've had those leak on me. I prefer one and two liter pop bottles.
You do NOT need to put duct tape on the entire bottle, or use a “full-strength” sling.
Don't take a lousy, thin bottle, and try to reinforce it with tape. It's better to take an already solid drink bottle and don't use any tape on it.
Everything needs a clip in loop on a wall, including water bottles. While 3 mm cord is popular, I prefer thick twine called bank line. It’s super strong (300+ pounds!) inexpensive, and holds knots very well, see photo. I use about 24 inches of bank line per bottle. Tie one for every bottle; bank line is cheap.
Make sure your clip in loops are solid! If a loop fails the bottle will fall, and could seriously hurt or even kill someone. Use a constrictor hitch, which is similar to a clove, but more secure. (Check out the video at the bottom of the page to learn how to tie it, very cool knot.) Make sure that knot stays solid with a couple of wraps of hockey tape. Tie the string ends together with an overhand, good to go.
Speaking of hockey tape, it’s great! Think of it as heavy-duty athletic tape, that has superb stick-ability even when cold, wet, sweaty, etc. A few wraps of hockey tape around the neck of the bottle secures the clip-in loop. Taping your knot is fast and cheap insurance. Just don’t waste your time and tape covering the entire bottle. Bring a roll of hockey tape with you on the wall, it’s helpful for other things.
Water jugs to avoid . . .
Do NOT use those 1 gallon jugs with a built-in handle as shown below. The handle looks tempting, but the tops suck and will come off. You absolutely want something that has a solid threaded top.
Some people like the 1 gallon Crystal Geyser bottles, but the plastic is flimsy and I've had them puncture on me. The plastic in carbonated pop bottles is much stronger.
A few other tips . . .
Remove any labels from your bottles, and that little plastic ring around the neck, which can sometimes interfere with tying your clip in loop.
On day one, if you drink a lot of water before you leave the ground, you might be able to start with slightly less, like .75 gallons.
Try to really squeeze the full bottles into the bottom of your haul bag. Doing this fully spreads out the sides of the bag, making it lots easier to pack the rest of your stuff.
An insulated wide-neck Thermos bottle lets you keep real ice cubes for a day or so, which can be very handy for that well-earned end-of-the-day beverage. Totally optional, but nice.
If it's hot, an umbrella for shade and a plant mister bottle to spray yourself off at the belay can help you stay cool and drink less.
A few squeezes of lime or lemon juice can help cut the big wall cottonmouth. No need to be gourmet here, the little plastic bottles of citrus juice from the grocery store work fine. A big squeeze of lime/lemon juice, a few sugar cubes, and some salt is the Frugal Climber’s sports drink.
If you have access to a freezer, freeze most of your water bottles if it’s going to be hot. Having ice cold water on a multi-day hot weather big wall is priceless. Don’t freeze everything solid or you’ll be thirsty on day 1. Freeze some bottles all the way for the latter part of your climb and some other bottles halfway for the first day. Don't fill them all the way to the top before you put them in the freezer or they will probably crack, duh. Be sure and top off all frozen bottles with liquid water before you start (it's easy to forget to do this, ask me how I know.)
If you have a preferred powdered electrolyte/sport drink mix, add this to the bottles on on the ground, especially if you’re going to freeze your water.
Tip I learned from hownot2.com and the Big Wall Bible (haven't tried this but it sounds brilliant): if you're not taking a ridiculous amount of water, you can put frozen bottles around the perimeter of your haul bag, which will leave a small area on the bottom in the middle that is essentially a refrigerator. You can use this to keep perishable food cold, like something really yummy you can eat on the first night.
Remember to pull out enough water for the day each morning and keep it accessible in your day bag or wall bucket. You don't want to be diving into the bottom of your pigs during the day to replenish water, or for any other reason, for that matter.
If you’re bailing, pour out or bring down your water. Yes, in some areas, it's a sort of tradition to leave water behind for other people. But it's garbage, it could fall off and hurt somebody, and it detracts from a wilderness experience. If you were backpacking, you wouldn't leave a water bottle on the side of the trail, would you? So please, don't leave water bottles on route if you're bailing. (This is a direct request from a Yosemite climbing ranger.)
Reuse your bottles. When they're empty step on them till they squish flat, and then screw on the lid. To re-inflate for the next wall blow them up by lung power, seal the lid and then gently roll them around. The dented parts should expand. (At the very least, offer them to somebody else at Camp 4.)
Water for the leader . . . There's basically three options: carry some, don't carry any, or haul some up later on a tag line. If it's not too hot and you're moving pretty fast, have a drink before you start your pitch and hopefully you won't need much more. If you do need water on your lead, you're already carrying a huge load of gear so don't take a bigger bottle than you need to. Have a small bottle, like 500 ml max, for the leader. If you're using a tagline to bring up more gear or anchor materials, you can use this to bring up water mid-pitch.
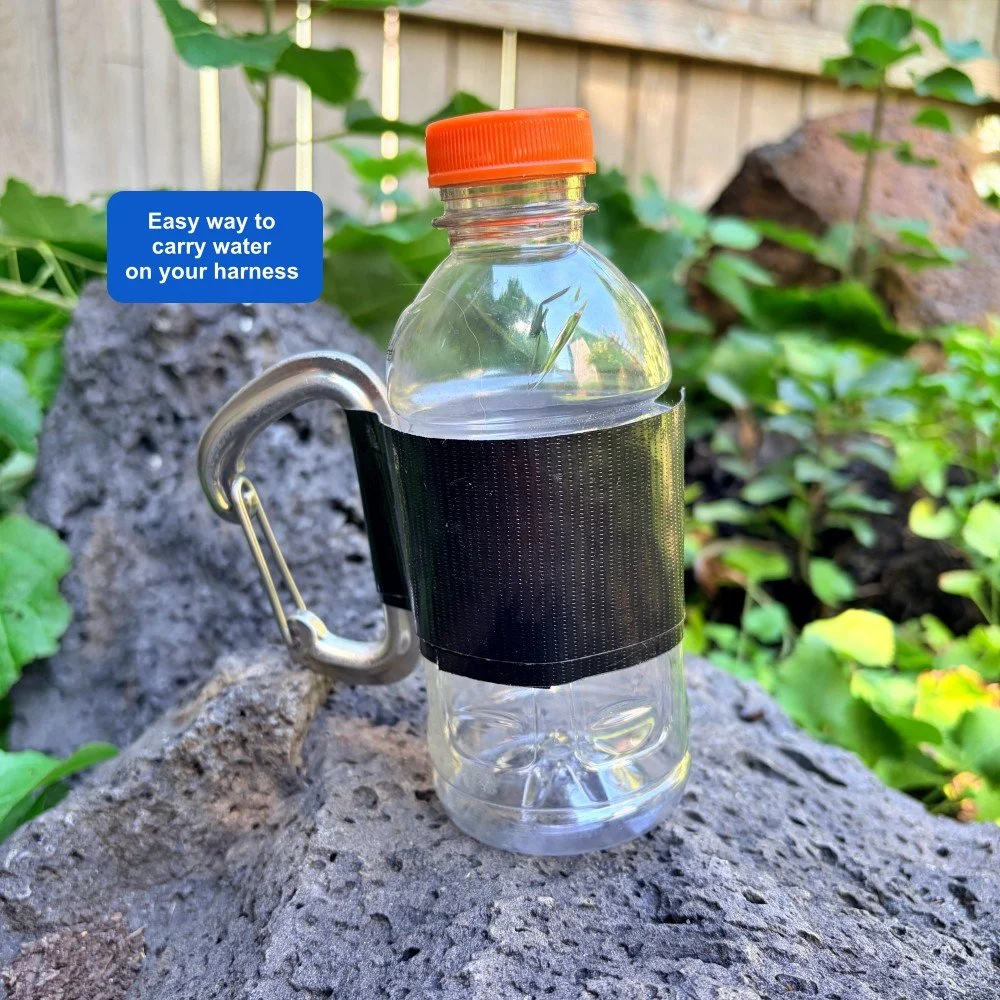
If you want to carry a bottle on your harness, this is a good way to do it.
Here’s a nice short video on how to tie the constrictor hitch. This is perfect for attaching a keeper cord to water bottles. Sometimes embedded Instagram videos like this don't work. If you can't see this, go to the original Instagram link.

The far end haul, explained
The far end haul is a #CraftyRopeTrick that sets up a redirected 2:1 mechanical advantage haul that happens at the load end of the rope, not at the anchor end of the rope. The far end haul is used in big wall climbing, and can be handy for self rescue. Plus, it's just plain fun to set up to see how it works!
The far end haul haul for big wall applications is generally attributed to Chongo, a legendary Yosemite dirtbag who was famous for extended vertical camping trips on El Capitan with ridiculously large loads.

This far end haul might at first seem like some kind of sorcery.
Usually, hauling happens from the top end of the rope next to the anchor. However, with the far end haul, you to lift your load with a theoretical 2:1 mechanical advantage (MA) by pulling on the “far end” of the rope next to the load, rather than from the primary anchor.
Having a Petzl Traxion (or similar progress capture pulley) on the load lets you set this up . This load can be you, or another person pack, haul bag etc.
This rig can be useful for big wall soloing / hauling. If you’re hauling your bag from the top, and it gets stuck, you can rap down to it, lift up a little bit by setting up a 2:1 MA with an ascender and a pulley, and free the bags.
I learned from a caver that this is also called a “traveling haul”, used in rescue to raise someone up a large drop. (Yikes, sure hope I never have to do that!)
It also has some self-rescue applications, and can be really helpful for moving your bags around at the anchor, see video below.
To rig the far end 2:1, clip an ascender (or a prusik if you’re short on gear) on the loaded strand of the haul rope, clip a carabiner with a pulley onto the ascender, and pull down on this redirect. Your bodyweight should lift the bags with this theoretical 2:1 MA and the micro traxion will “climb” up the rope and capture your pulling progress, sweet!
In the photo above, I'm using a handled ascender. You could use any kind of ascender here like a Tibloc, a second Micro Traxion, Ropeman, etc. The pulley is optional, but definitely helps increase your efficiency.
Note the real mechanical advantage you will have in the real world when you try this. Below are pull test results with a 10 lb weight from another Alpinesavvy post, mechanical advantage in the real world. You can see that about the best you can do with the far end haul pulley is 1.3 to 1. And if you don’t have a pulley, you probably shouldn't even bother putting the redirect through a carabiner, as the mechanical advantage falls below 1:1. (Note, DMM Revolver carabiners don’t really do anything to reduce friction over a regular carabiner, avoid using those.)

But, even if you’re not soloing, it has a few advantages.
The far end haul can minimize rope abrasion, because the haul rope doesn’t move.
If you have to haul from a point or over a ledge with a LOT of rope friction, you can instead far end haul and have zero friction.
You can easily move the bags around at the anchor; more below.
Here’s a video by wall ace Mark Hudon who shows how to move a loaded bag from one anchor to another with minimal effort. Rather ingenious, no?

Haul bag rigging 101
There are lots of different approaches for rigging your big wall haul bags. Some old school methods still work pretty well, but there are a few more modern approaches that might make things a lot easier.
Thanks to big wall ace Quinn Hatfield @sprint_chef for the “connect two bags with quick links” tip near the bottom of this page.
A few words on hauling, from big wall expert Andy Kirkpatrick:
“Hauling is potentially one of the most dangerous aspects of big wall climbing. This translates to ultra-caution in all parts of your hauling system and interaction with bags, haul lines, docking cords, and pulleys. If you rush and make a mistake, drop a load or have it shift where it's not wanted, you could easily kill someone or yourself. I try and teach climbers to view their bags as dangerous creatures, like a great white shark, rhino, or raptor that is in their charge. The ability to keep them calm and under your control comes down to paranoia, foresight, and heavy respect for the damage they can do.”
There are MANY different ways to set up your bags for hauling. While some traditional methods have served big wall climbers fairly well for a long time, there are some more modern approaches that may make your life a lot easier. Try these different systems, and see what works well for you!
A more traditional / old school hauling setup looks something like this:
Cut off plastic bottle as a knot protector (lifted up here for the photo, in practice you slide the bottle down over the knot)
No swivel
End of haul rope tied directly to master hauling carabiner
Carabiner connects the short strap to the master point carabiner
Bag clipped to anchor with a sewn pocket daisy chain

old school haul setup
Let's look at a few potential issues with this set up.
Nothing really wrong with the plastic bottle. (Sidenote, big wall expert Andy Kirkpatrick suggests using an oil funnel from a car parts store instead of a plastic bottle. The oil funnel has a long, tapered neck that can allow it to slide past obstructions more easily. I haven't tried it but it sounds sensible.)
No swivel. A swivel is somewhat optional and costs a bit, but can definitely save your bags from twisting your rope.
End of rope tied directly to master carabiner. Again, nothing really wrong with this, but if you need to lower out your bags you're going to need an entirely separate rope to do so.
That red carabiner connecting the short haul bag strap to the master carabiner? That can be a BIG hassle with a heavy bag when the master haul carabiner is loaded, because you have to pretty much lift the weight of the bag and have one hand free every time you want to clip or unclip. There are much better ways to attach these two straps.
Finally, that evil sewn pocket daisy chain! That sucker can be very difficult to unclip, especially if the pitch above is traversing. Much better practice is to use a releasable docking cord, more on that below.
Here’s a more modern way to rig your haul bag.
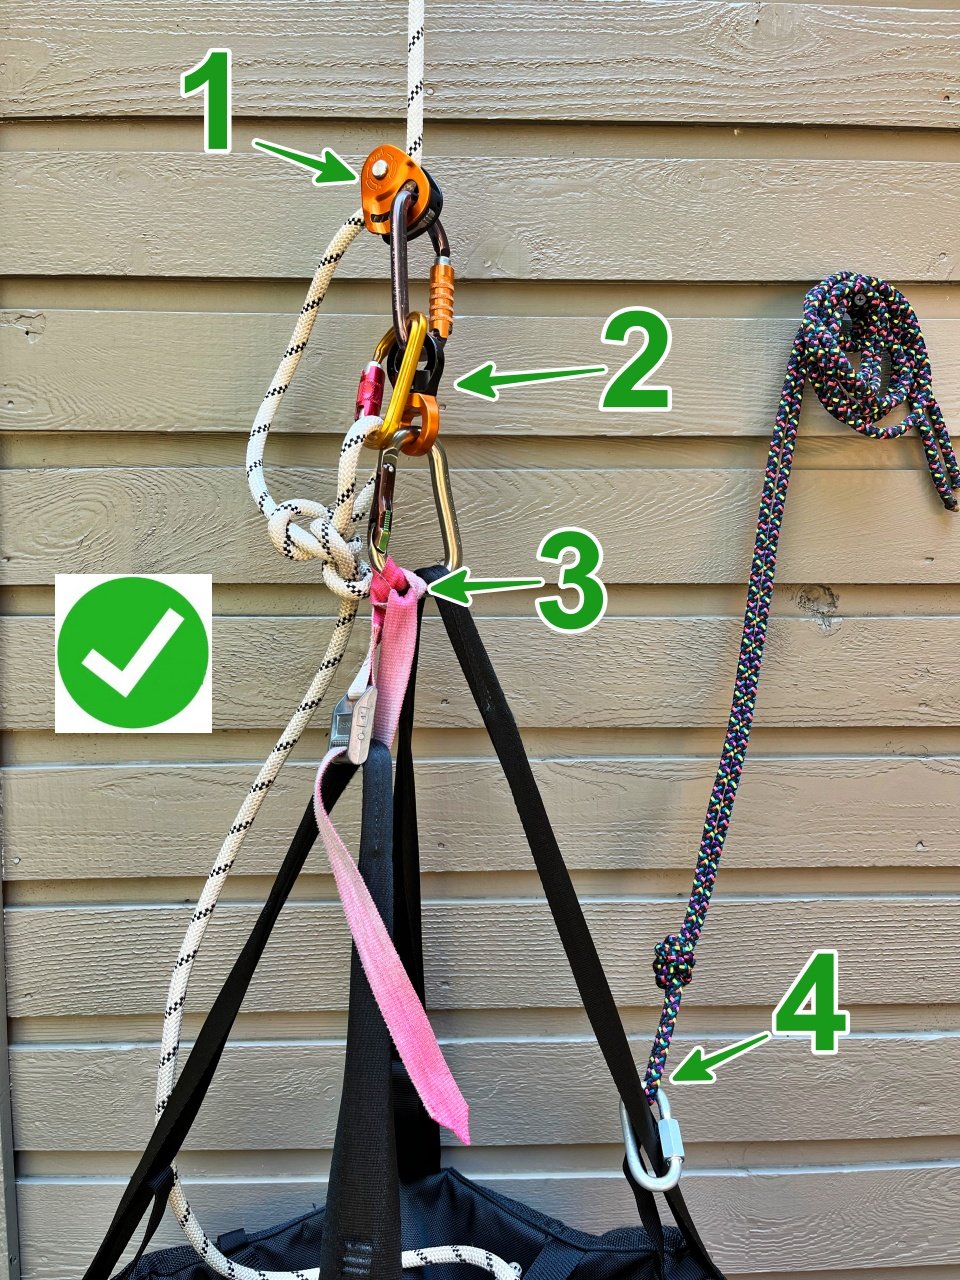
A progress capture pulley such as a Petzl Traxion is attached to the haul bag, not a bight knot. Yes, you haul directly from the pulley. No, it doesn't damage the rope. The pulley gives you a lot more flexibility. You can lift up on the bags with a 2:1 mechanical advantage to transfer them from one anchor point to another, you can use the extra haul rope as a lower out line, you can do a “far end haul” with a 2:1 mechanical advantage if needed, and you don’t need the inverted plastic bottle as a knot protector, because there’s no knot. This is a good place for a triple action carabiner. Yes, the Traxion is expensive.
A swivel goes between the Traxion pulley and the master carabiner. Way less twisting of your rope.
A cam strap connect the long strap and the short straps. This means you never have to lift the full weight of the bags to clip and unclip the carabiner. Clove hitch the cam strap (a 3 footer /1 meter) to the haul point carabiner so you can’t drop the strap. Good place for a triple action (or here, a Magnetron) HMS carabiner. (Side note on the cam strap: After I took this photo, I found out that skotswallgear now makes a very nice 3 foot long cam strap for exactly this purpose, and that's what I'd recommend. Check it out here, scroll to the bottom of his store to see it.
A docking cord attaches the bag to the anchor, not a daisy chain. The docking cord is typically a doubled length of 7 or 8mm cord (about 15 feet / 5 meters) that's attached to the long strap of your bag. With this you tie some sort of releasable hitch onto the anchor, and that holds the weight of your bag. You can release the bag when this hitch is fully loaded, which is a HUGE improvement over hanging your bag from a sling or daisy chain. (Attaching the docking cord to the long strap rather than the hauling carabiner means that when the bag is docked, everything else is slack).
Here's one more tip on where to tie your docking cord (which I unfortunately learned after I shot all these photos). Most haul bags have some sturdy sewn tabs around the opening. If your tie your docking cord to one of these tabs, and around one of the straps, this lets you dock the bag higher up on the anchor, which often makes accessing the bag more convenient.
Tip: Clip a bight knot to back up the Traxion ABOVE the swivel
Just below the Traxion, tie a backup knot (here a butterfly) and clip it with a locker to the carabiner attached to the Traxion. This backs up the Traxion, and gives you a knot you can use to lower out. You can loosely stack all the rest of the unused rope in the top of the bag, or let it hang free.
If the Traxion cam were to open up on some rock nubbin when you're hauling, this backup knot prevents you from losing your haul bag.
Note: It's important to clip this bight knot ABOVE the swivel, and not below it. If you clip the bight anywhere below the swivel, there's a good chance when your bag twists, all of your extra haul rope is going to get twisted around the bag also, no bueno.
Check out the photo below of the correct (left) and incorrect way (right) to do this.

What about two bags?
There are LOADS of different ways to rig two haul bags. The basic concepts (that’ve worked for me) are:
Most folks like the bags side-by-side, but some prefer a smaller bag hanging below the primary bag. Try both and see what works for you.
It’s good to be able to spread the bags laterally if you need to wrestle them around.
You don't want them hanging too far down, so you have to reach uncomfortably low from the anchor. (This is not so important during the day at intermediate anchors, more so at the bivy.)
All connection points need to be unquestionably strong.
You need to able to unclip and separate the bags from one another if needed.
A docking cord connects the bags to the anchor. You can have a separate docking cord on each bag (as we do here) or go with with one single docking cord from the master haul carabiner.
Here’s one way to set it up. From the top down:
Haul rope running through Traxion progress capture pulley, backup knot below traxion, knot clipped with a locker above the swivel
Triple action locking carabiner
Swivel
2 pairs of quick links in swivel. The quick links are unquestionably strong, and give a nice lateral spread to each bag at the belay. (Thanks to Quinn Hatfield for this quicklinks tip.)
HMS locking carabiner attached to long strap on each bag. (Feel free to tape the gates closed if you want to be 110% sure they’ll never open.)
Docking cord attached with quicklink to each bag
On left bag, a 3 foot long camstrap (red)
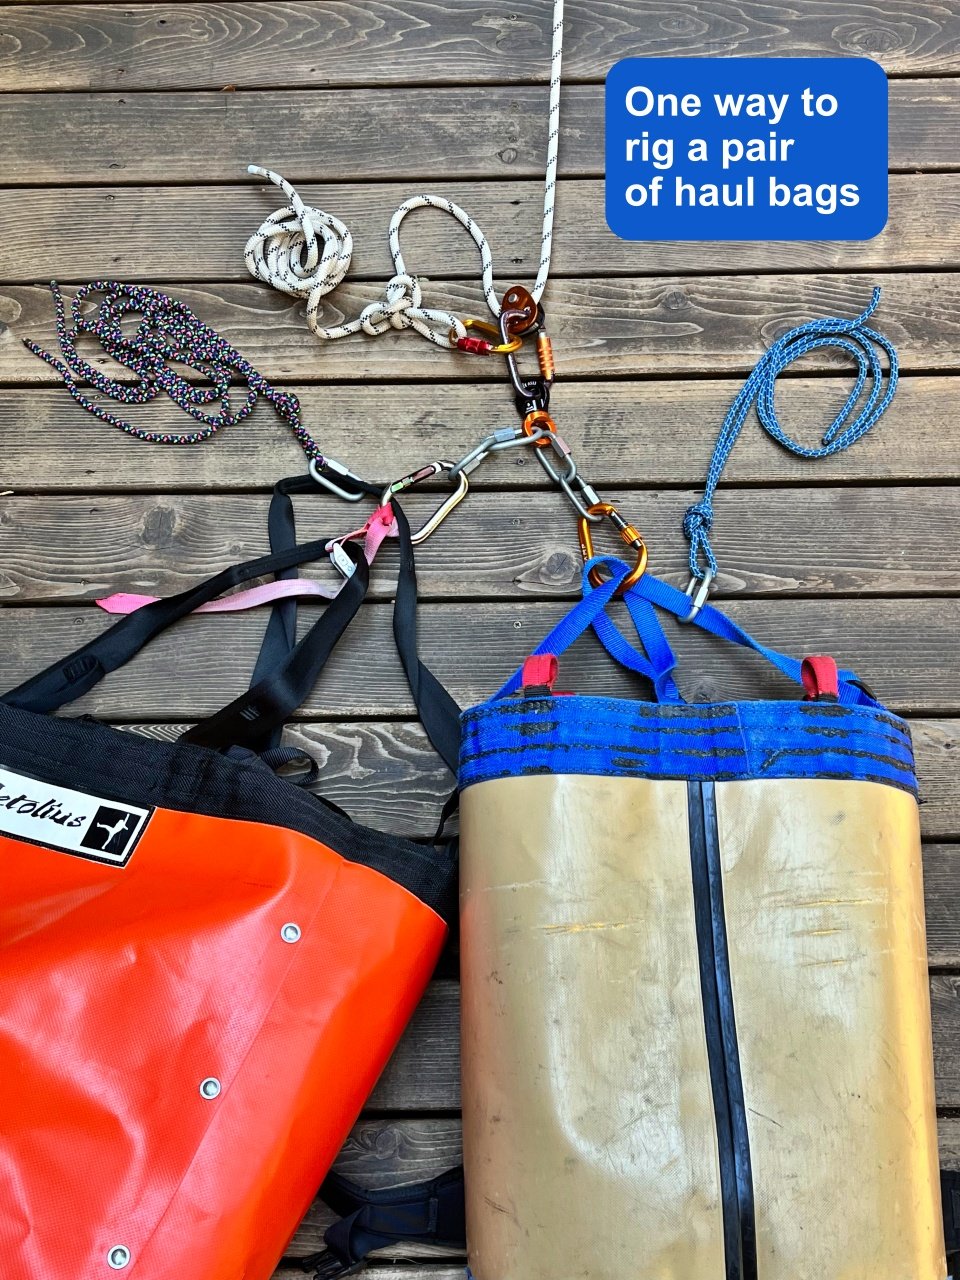
Here's a close-up:

Here's a fancier way to set it up, from big wall expert Skot’s Wall Gear. Here, Skot is using a pair of gold rappel rings along with a combination swivel and locking carabiner (appears to be the Director Swivel Boss) from DMM. This makes a more compact set up, with zero chance cross loading the rings.
EDIT - An Alpinesavvy reader told me that many swivels made by DMM have been recalled. Do a web search for “DMM swivel recall” for more info on this.

photo: @skotfromthedock, https://www.instagram.com/p/C2nmw-By0-3/
Other hardware for haulbag rigging . . .
There are cool swivels that allows you to open one side. This creates some interesting options; for example you could maybe cut up a PAS tether to get small sewn loops of Dyneema or maybe a pair of quickdraw dogbones, and use these instead of the quick links. I haven’t tried these but looks like they could work.
Here’s a photo: the Petzl Micro swivel and DMM Focus swivel.


Petzl makes a nifty product called the Ring Open. This is a rigging ring that you can open (with a tiny Allen screw, I think), letting you attach a fixed loop. I don't have one of these, but it could be a cool option for setting up your haul bag system.
Like I said at the start, there are many, many different ways to do this. Start with the basic principles, and find a system that works for you.

Director Swivel Boss from DMM. This is the carabiner shown Skot’s photo just above. With this, you can use inexpensive rappel rings instead of the more expensive Petzl Ring Open.
Note that this device may be subject to a DMM recall. Do a web search to find out if yours is potentially a problem.

The far end haul
Having a Traxion on the load also lets you set up what’s called a “far end haul”, which at first seems like some sort of sorcery. Here's a detailed article and a couple of how to videos on this technique.

Haul bag straps: connect ‘em with a cam strap
Big wall haul bags usually come with a long strap and a short strap. You haul from the long strap, and need to hoist up the short strap to level and close the bag. It's that hoisting up that's the hard part! Make this a lot easier - replace the traditional carabiner with a cam strap.
Big wall haul bags usually have a long strap and a short strap. The haul rope is connected to the long strap. The short strap is connected / clipped in some way to the long strap. In theory, this allows you to access your bag with all the weight hanging on the long strap, by unclipping the short strap.
The traditional way to do this is with a second carabiner, as shown on the left.
Looks nice in theory, but in reality this is often a serious hassle. If the weight of the bag is loading the master point carabiner, to clip and unclip that red carabiner on the short strap, you may need to hoist the entire weight of the bag, and have a hand free to work the carabiner. With a moderate bag this may not be a problem, but with a full load it can be very awkward and unnecessarily strenuous. Imagine doing this with a 100+ pound / 50+ kg bag, no thanks!
A better method is shown on the right, using a cam strap. Let’s learn how that works!

Instead of that pesky carabiner, use a cam strap to close your bag.
Get a 3 foot cam strap. You can get a two pack of 3 footers for about $15, here's a link for REI. (This is NOT an affiliate marketing link, I simply offer it for your convenience.) Or get a 4 foot and cut it to size.
Tie a clove hitch in the cam strap, and clip it to the haul point carabiner. The clove keeps the cam strap secure so you don’t drop it. Try to keep the buckle close to the carabiner.
Run the cam strap through the short haul bag strap, then back up through the cam buckle.
Now, simply pull down on the cam strap with your bodyweight. Nice, you've created a little 2:1 mechanical advantage. This hoists up the short strap and secures your bag, nice and level.
The cam strap is releasable under tension, making opening the bag just as easy. No more strenuous pig wrestling to unclip that short strap carabiner, schweeeet!
Sidenote: if you’re thoughtful about gear packing, you should hopefully not be diving in and out of your main haul bag during the day. In the morning, try to pull out everything you need for the day, and put it in a smaller day bag or a wall bucket that you use for things like snacks, water, sunscreen, wind shell, etc.
Here’s a more elegant way to do it, with this cool cam strap design from skotswallgear.com. Skot sews a small loop right next to the buckle, so you can clip it to the carabiner rather than using a clove hitch. Note that the strap then passes through the carabiner as shown on the left photo, and then down and through the lower bag strap. (At least that's how I think you're supposed to use it. :-)
Skot was nice enough to send me one for review, thanks!
Skot makes lots of well-crafted big wall gear, like the famous Alfifi, lightweight and easily adjustable tethers/daisys, rope bags, custom webbing for hooks, and more. Check out his website to see it all.

If you use a docking cord that’s tied to the long strap rather than clipped to the master point carabiner, this means that both straps should have no tension on them after the bag has been docked at the anchor. This allows easy access to your bag, regardless of what system you use to close the top. Lots more on docking cords at this article.

Finally, here's a short video showing how it works.

Try the "T-Step" to stand tall in your aiders
Getting into your second step on your aid ladder on steep terrain can be a strenuous and awkward hassle with the traditional fifi hook. Instead, try the “T-step” method to stand easily in your second step with no fifi.
Note: This method is generally attributed to Ron Olevsky, aka “Piton Ron”, a big wall pioneer who has put up many classic aid routes in Zion National Park. I think Ron’s technique is slightly different than the one shown here, but it's the same general idea.
When leading an aid pitch, it's generally most efficient to stand as high in your aid ladders as you can. (As they say, everything looks better from the next higher step.) But dang, especially on steep rock, it's not quite as easy as it sounds!
If you’re using a traditional fifi hook and trying to stand in your second aider step, on vertical or overhanging rock, you need to maintain a delicate yet strenuous balance of opposing forces.
Your feet are pressing DOWN in your aiders, and your upper body straining UP against the inverted fifi. This often makes your harness creep towards your ankles, not good.
If the fifi sling is even a bit too long, it puts your center of gravity farther out from the wall, which forces you to maintain a lot more core tension to stand upright, and often the unwelcome sensation that you’re about to topple over backwards.
If you release tension on the fifi for a moment, it could just fall away from the placement that you're standing on, which really makes things exciting.
Does that sound uncomfortable and not very fun? You’re correct!
When aiding in the traditional manner, this is about what it feels like when you're in the top or second ladder steps . (Drawing credit, from the amazingly talented Mike Clelland.)

image: Mike Clelland, Climbing magazine
Modern tools such as the Alfifi, which is basically a fifi hook welded onto an adjustable tether, can make this process a bit easier, but it still is generally pretty awkward. Overall, standing in your second step in steep terrain is not easy nor intuitive for most people.
Here’s an simple but seldom used way to comfortably stand in the second step of your aiders, on vertical rock to overhanging rock, without any sort of a fifi, that eliminates just about all of these problems - the “T-step”.
The effectiveness of this has to do with a few variables such as your height, your shoe size, what kind of aider ladders you’re using, the steepness of the rock, etc. For me, using Yates or Aideer ladders, with a size 10 shoe, and standing about 5’ 9”, I can stand easily in the second step on vertical or slightly past vertical. Your mileage may vary, give it a try and see what it feels like.
Here's how to do the T step.
1 - Place some gear, clip a single aid ladder to the gear, and stand in the second step with either foot; for this example, your left. Remember to aid climb like you free climb; use your hands in the crack or rock features to step up; don’t just pull on your aiders or gear.
2 - Point the toes of the foot that's not standing in the ladder, here your right, 90° away from the foot that's standing in the ladder. Then, slide your right foot over your left foot. The arch of your right foot should be about over the toes of your left foot, making a shape like the letter “T”. (T-step, get it?) The aid ladder should be between your right calf and left shin. You might have to put your left knee against the wall for a moment and bend your left knee backwards for a moment to make room for your other foot to slide in. Doing this creates a sort of lever that keeps you from toppling over backwards.
3 - Now, you should be able to stand comfortably in your second step, largely being held in place by the muscle of your right calf. You do NOT need a fifi hook, your pelvis is in very close to the rock so you have a good center of gravity and better reach, and you should not feel any strain on your abdominal muscles. Overall, you should be fairly relaxed and comfortable. This is a bit tricky to describe in words, but once you try it you'll intuitively get it. It really feels like a bit of magic the first time you do it!
Doing this, I’m easily able to reach about 5 feet between gear placements.
Stand tall and gain a lot of reach, no tricky three-way balancing and messing with adjustable daisy chains or fifis, and you don't feel like you've done 100 sit ups after you finish leading a pitch. What's not to like?
It might sound odd reading about it, but give it a try. Once you learn how to do this you might get rid of that fifi hook for almost everything.
As with most things in climbing it's a better show than a tell. Watch the video above a few times to see how it works.

Cool new portaledge: the High Mountain Gear “Taco”
For a multi day big wall climb, you're probably going to need a portaledge. Here's an innovative new option which is lightweight, very compact, easy to set up, and quite inexpensive. Check out the High Mountain Gear Taco, handmade in Seattle WA.
Most photos, shared with permission, are from AMGA Certified Rock Guides Lani Chapko and Sam Boyce, theclimbingguides.com. Connect with them for guided trips and clinics, including big wall instruction. Instagram: @the_climbing_school, Lani: @goatsonropes, Sam: @chossdiaries
Alpinesavvy was provided with a free sample of the Taco ledge for review. This in no way affected my opinion and review. I only recommend stuff I think is great. Whenever I get a review product like this, I'll always tell you about it up front.
Want to get a Taco Ledge? Use the discount code ALPINESAVVY10 to get 10% off your order from High Mountain Gear.
This is not an affiliate marketing link and I do not financially benefit from this deal. I extend this discount as a perk for my readers.
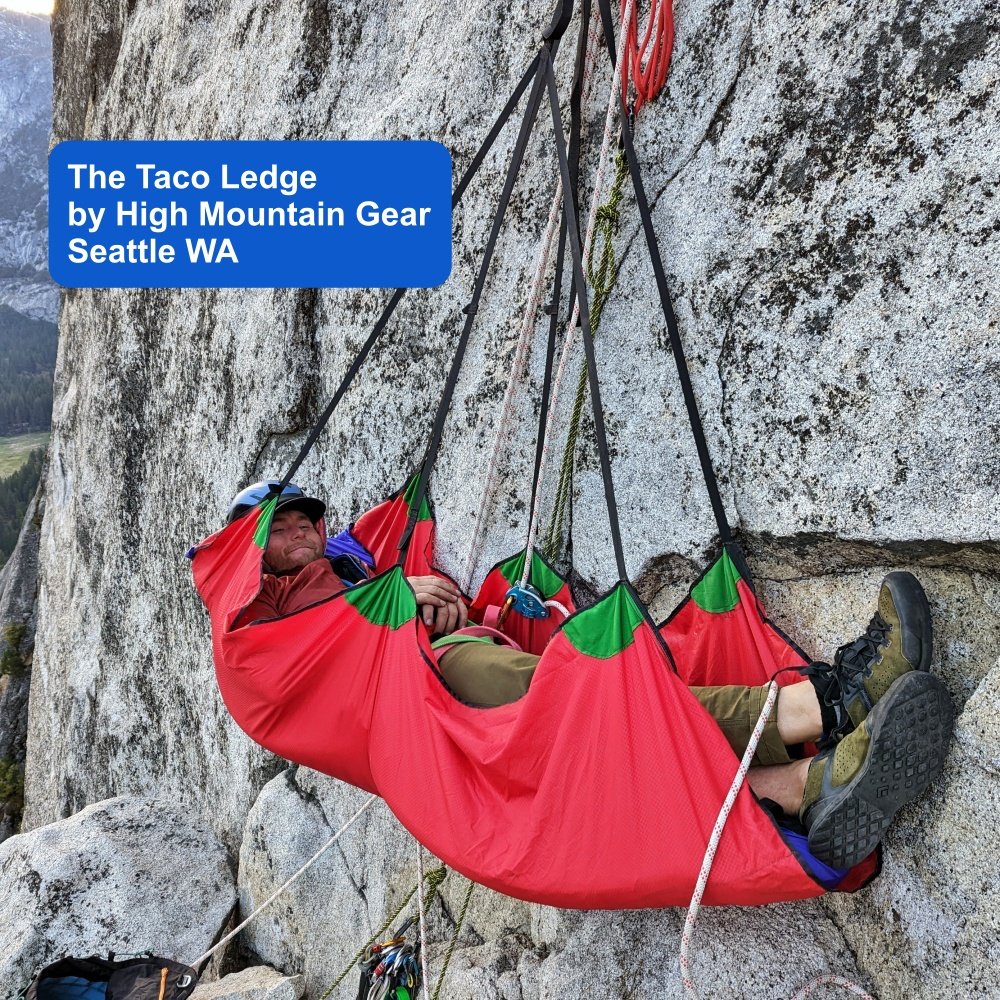
There's no experience in climbing quite like sleeping in a portaledge. After a long day of upward struggle, inching up cracks the width of Donnie Trump’s pinky finger, wrestling both the haul bag and your mental demons, you’ve reached the bivy. Time to set up the ledge, kick back with bare feet and a well-earned tasty beverage, watch the afternoon light fade to evening, and hear the Doppler “swhoosh” of the swallows streaking by. It’s a sublime experience you’ll remember for a lifetime.
For big wall vertical camping, you’re going to probably need a portaledge. Yep, they are solid and comfortable, but you pay a high price in cost, weight, bulk, and (usually) set up hassle.
Here’s an intriguing alternative that addresses all of these issues: the Taco inflatable hammock. It’s made in Seattle by climber and sewing ace Kyle Willis and High Mountain Gear.
It’s a single point hammock matched with an inflatable sleeping pad. The pad adds a lot more rigidity and comfort than a plain hammock, creating a ledge that’s inexpensive, ridiculously lightweight, very compact, reasonably comfy, and super easy to set up.
Cost: $299
Weight: 1 lb 13 oz / 822 grams
Size: 76" x 49"
Packed size: without a pad it packs into a cylinder about 5" diameter by 10" tall (not much bigger than a Nalgene water bottle!)
Pad dimensions: 18"-26" wide and up to 78" long. (Pad is NOT included in the price.)
It’s an intriguing option for certain big wall applications where you want to minimize your load and save money to spend on . . . I dunno, maybe a few more Totem cams?
Now, if a weight under 1 kg is not already light enough for you, Kyle is working on a new model made from Dyneema fabric that comes in close to a ridiculous 1 pound for the ledge alone. Yes, this version will be more expensive, but if shaving grams is important to you, it’s an option.


You can rig the Taco not only as a horizontal ledge to sleep in, but also as a reclining lounge chair. If you're looking at a multi hour belay session, it's hard to get much more plush than this. The Taco is so compact and easy to set up, that you might even want to keep it in the day bag and use it at every belay as a chair, if you're doing long pitches.

One big advantage of the Taco ledge is the ease of setup and breakdown. As anyone who’s tried to set up a ledge in the dark and has been tempted to reach for the wall hammer to persuade that last aluminum bar into position knows, this is a significant benefit.
You insert your sleeping pad and adjust the straps that secure it on the ground before liftoff. The pad stays inserted for the whole climb. On the wall, setting it up is pretty much clipping the Taco to one good suspension point (it needs about 5 feet of hang) and inflating the pad. To break it down, simply open up the air valve, roll it up, fold the sides inward, and put it in a stuff sack. This literally takes just a few minutes.
The base model comes at a very reasonable price of $299 (pad not included) as I write this in Oct 2024. A couple of highly recommended add-ons are a zipper storage pocket (perfect for big wall beverages, headlamp, etc.) and a stuff sack.
Note that nothing on the Taco is rated to be a safety connection. Always stay clipped in with a real tether/rope to a real anchor. (A tip I learned from big wall expert Mark Hudon: take a completely separate short length of rope, about 6 meters of 8mm rope, just for tying yourself in and moving around the bivy.)
Learn more: Check out this in-depth article from theclimbingguides.com with several videos covering installing the pad, hanging the Taco, and setting it up in lounge chair mode.
Below: Taco time on El Capitan. Photo by big wall ace Kevin DeWeese, @failfalling

image: Kevin DeWeese, https://www.instagram.com/p/CdOQBL6rWUu/
Pro tip from Kevin: Twist a carabiner in one of the straps to shorten it a bit if you need to even out the ledge; see photo below.

FAQ . . .
What's the best application for the Taco? Probably longer routes that may have a fair amount of natural ledges, but you still need to spend a few nights out and want to travel light, have easier (or zero) hauling, and hopefully climb in predictable dry weather. Think the nose on El Capitan, NW Face of Half Dome, and classic routes in Zion like Prodigal Sun or Spaceshot. If you're planning a climb longer than a few days, or in questionable weather, you probably want to go with a more traditional portaledge with a dedicated rain fly.
Is it like the G7 Pod ledge? The G7 Pod is another innovative design. That ledge is fully inflatable with no metal frame. Like the Taco, the G7 is lightweight, compact, and is fast to set up. It also appears more durable, and has an optional rainfly. I’ve never tried it, but it looks plush and has great reviews. It’s also $685 (with a rainfly an additional $375). The Taco is $240.
Tell me about the pad. A proper pad, which is NOT included, is critical to the functioning of the Taco. Without a pad, it’s an uncomfortable single point hammock, like big wallers suffered with 40 years ago (see photo below). The optimal pad is 72 inches with horizontal baffles, like the Thermarest Uber Neo Air. Field testing shows a pad with a grid works okay, and a pad with vertical air baffles does not work very well, “taco-ing” your shoulders, which is what we’re trying to avoid. A pad that’s tapered toward the feet and is wider at the shoulders seems to work better than a rectangular pad.
Can I get a double? No. Get two Tacos and stack them vertically.
What about a rainfly? YES! Check out the Gordito rain fly from High Mountain Gear, made specifically for a Taco Ledge.
Schweeet! Where do I get one?
Use the discount code ALPINESAVVY10 to get 10% off!
The hammock concept on big walls has been around for a very long time. Check out this classic photo from 1964 with Tom Frost, Royal Robbins, and Yvon Chouinard on the FA of North America Wall, El Capitan. Nope, that is most definitely not a comfortable way to spend the night. Photo credit, Tom Frost
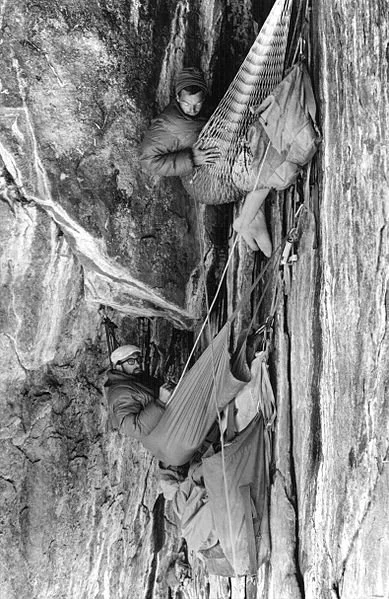
image: Tom Frost, https://commons.wikimedia.org/wiki/File:Tom_Frost_-_Tenement_flat_-_1964.jpg

Aid climbing: rig for seconding
Having designated carabiners for your ladders and tethers, and having your tethers set to the correct length, is key to efficient ascending and cleaning on a big wall. Here's how to set it up, some specific gear recommendations, and pros and cons of alternative methods.
Having simple, repeatable, and easy to check systems for different components of aid climbing is critical. Your setup for seconding and cleaning is definitely in this category. When you're jugging thousands of vertical feet and and cleaning hundreds of placements, you really want to have this dialed.
Once you have it set up right:
Your tethers are set at the perfect length for efficient ascending
You use designated carabiners on your ladders and tethers, so you’re never patting down your harness looking for a spare carabiner
Transitions (between leading, clipping to anchors, hauling, and cleaning) are faster with minimal futzing around
First off, let's look at an ascender modification.
Most handled ascenders (except the newer Petzl ones) have two holes near the bottom, one large one small.
Add a small (5mm) stainless steel quicklink to the small hole. Crank it tight with pliers. Now you have a designated clipping point for your ladder, which goes on a snapgate carabiner. This not a mandatory mod, and many climbers do just fine without it, but I find it’s quite convenient. Here's an article with the whole scoop.
The main benefit to this is that it lets you more options to easily separate your ascender and ladder if you ever need to. Examples: Cleaning a traverse, when it might be convenient to clip the ladder to the next piece of gear and stand on it, to unweight the piece of gear you need to clean. Or, when you arrive at the anchor and you want to clip your tether directly to a bolt but you're still standing on the ladder, separation like this lets you do it.
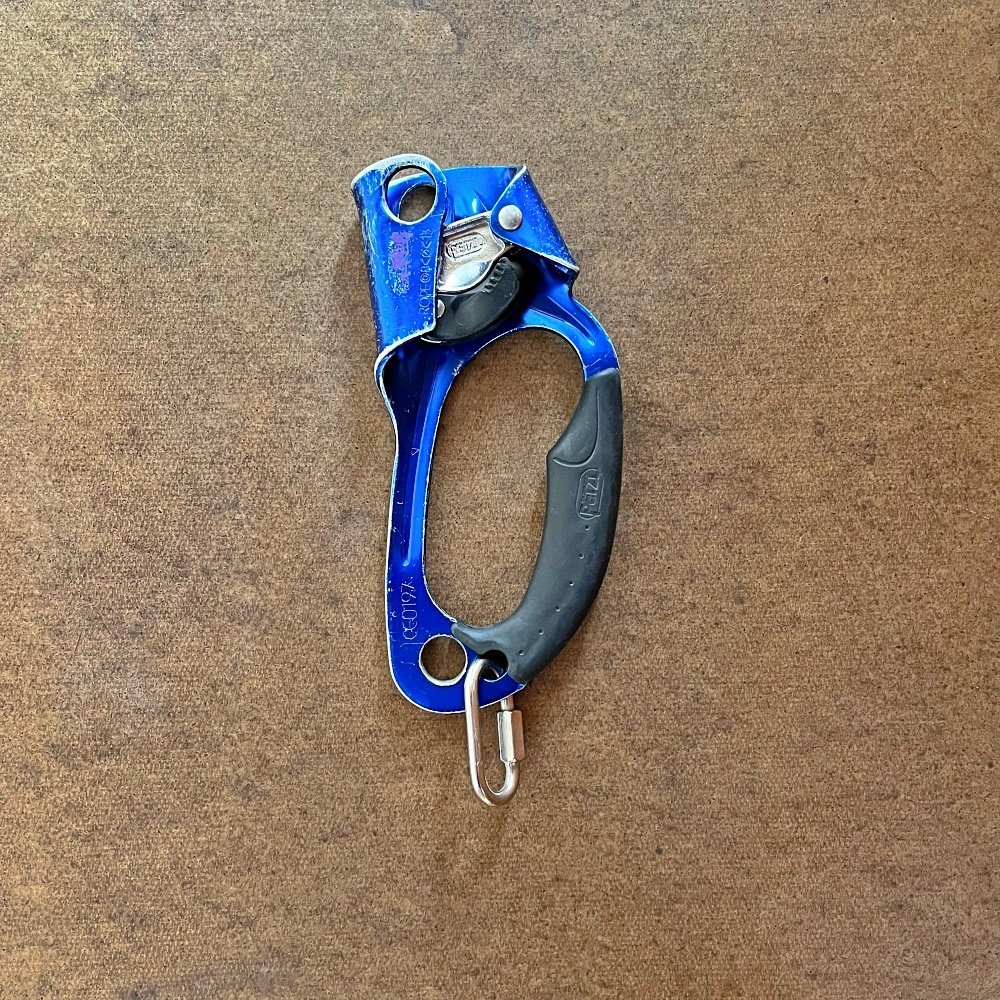
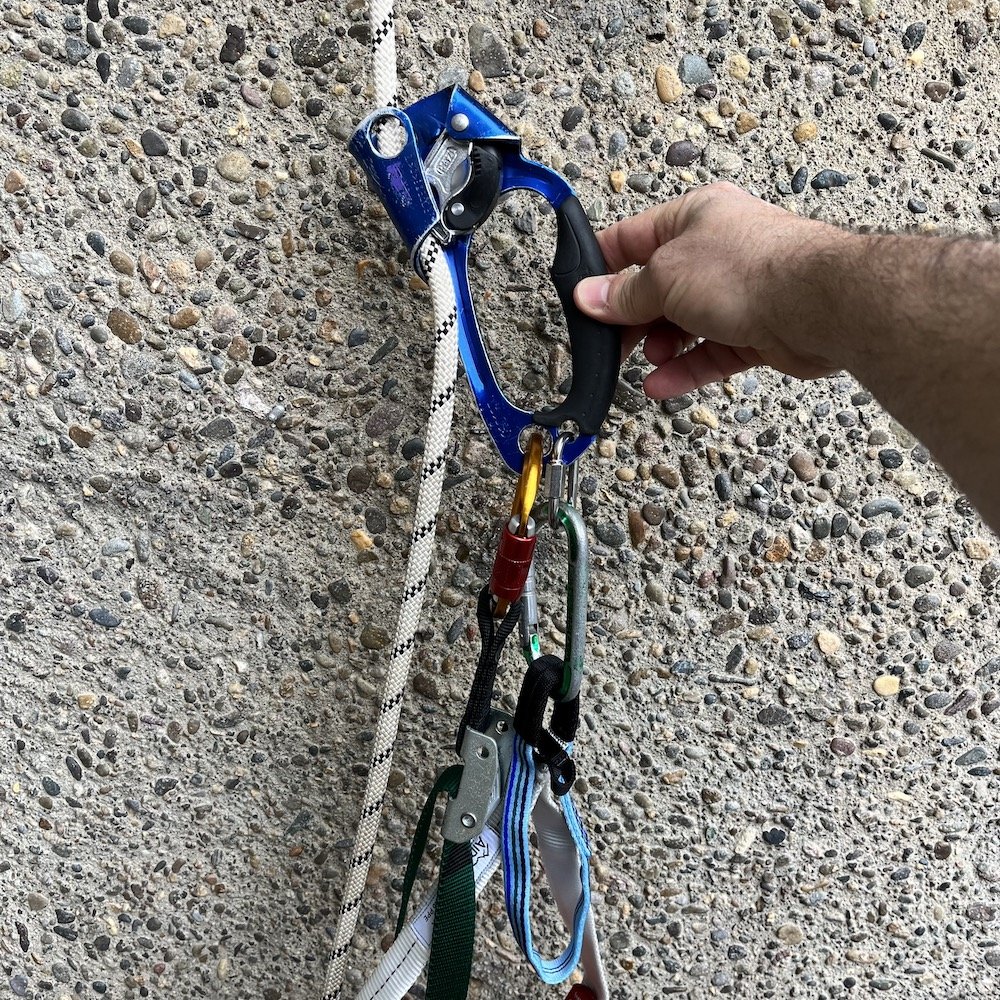
Close up of the business end. The quicklink makes a convenient place to clip your ladder that's entirely separate from your tether.
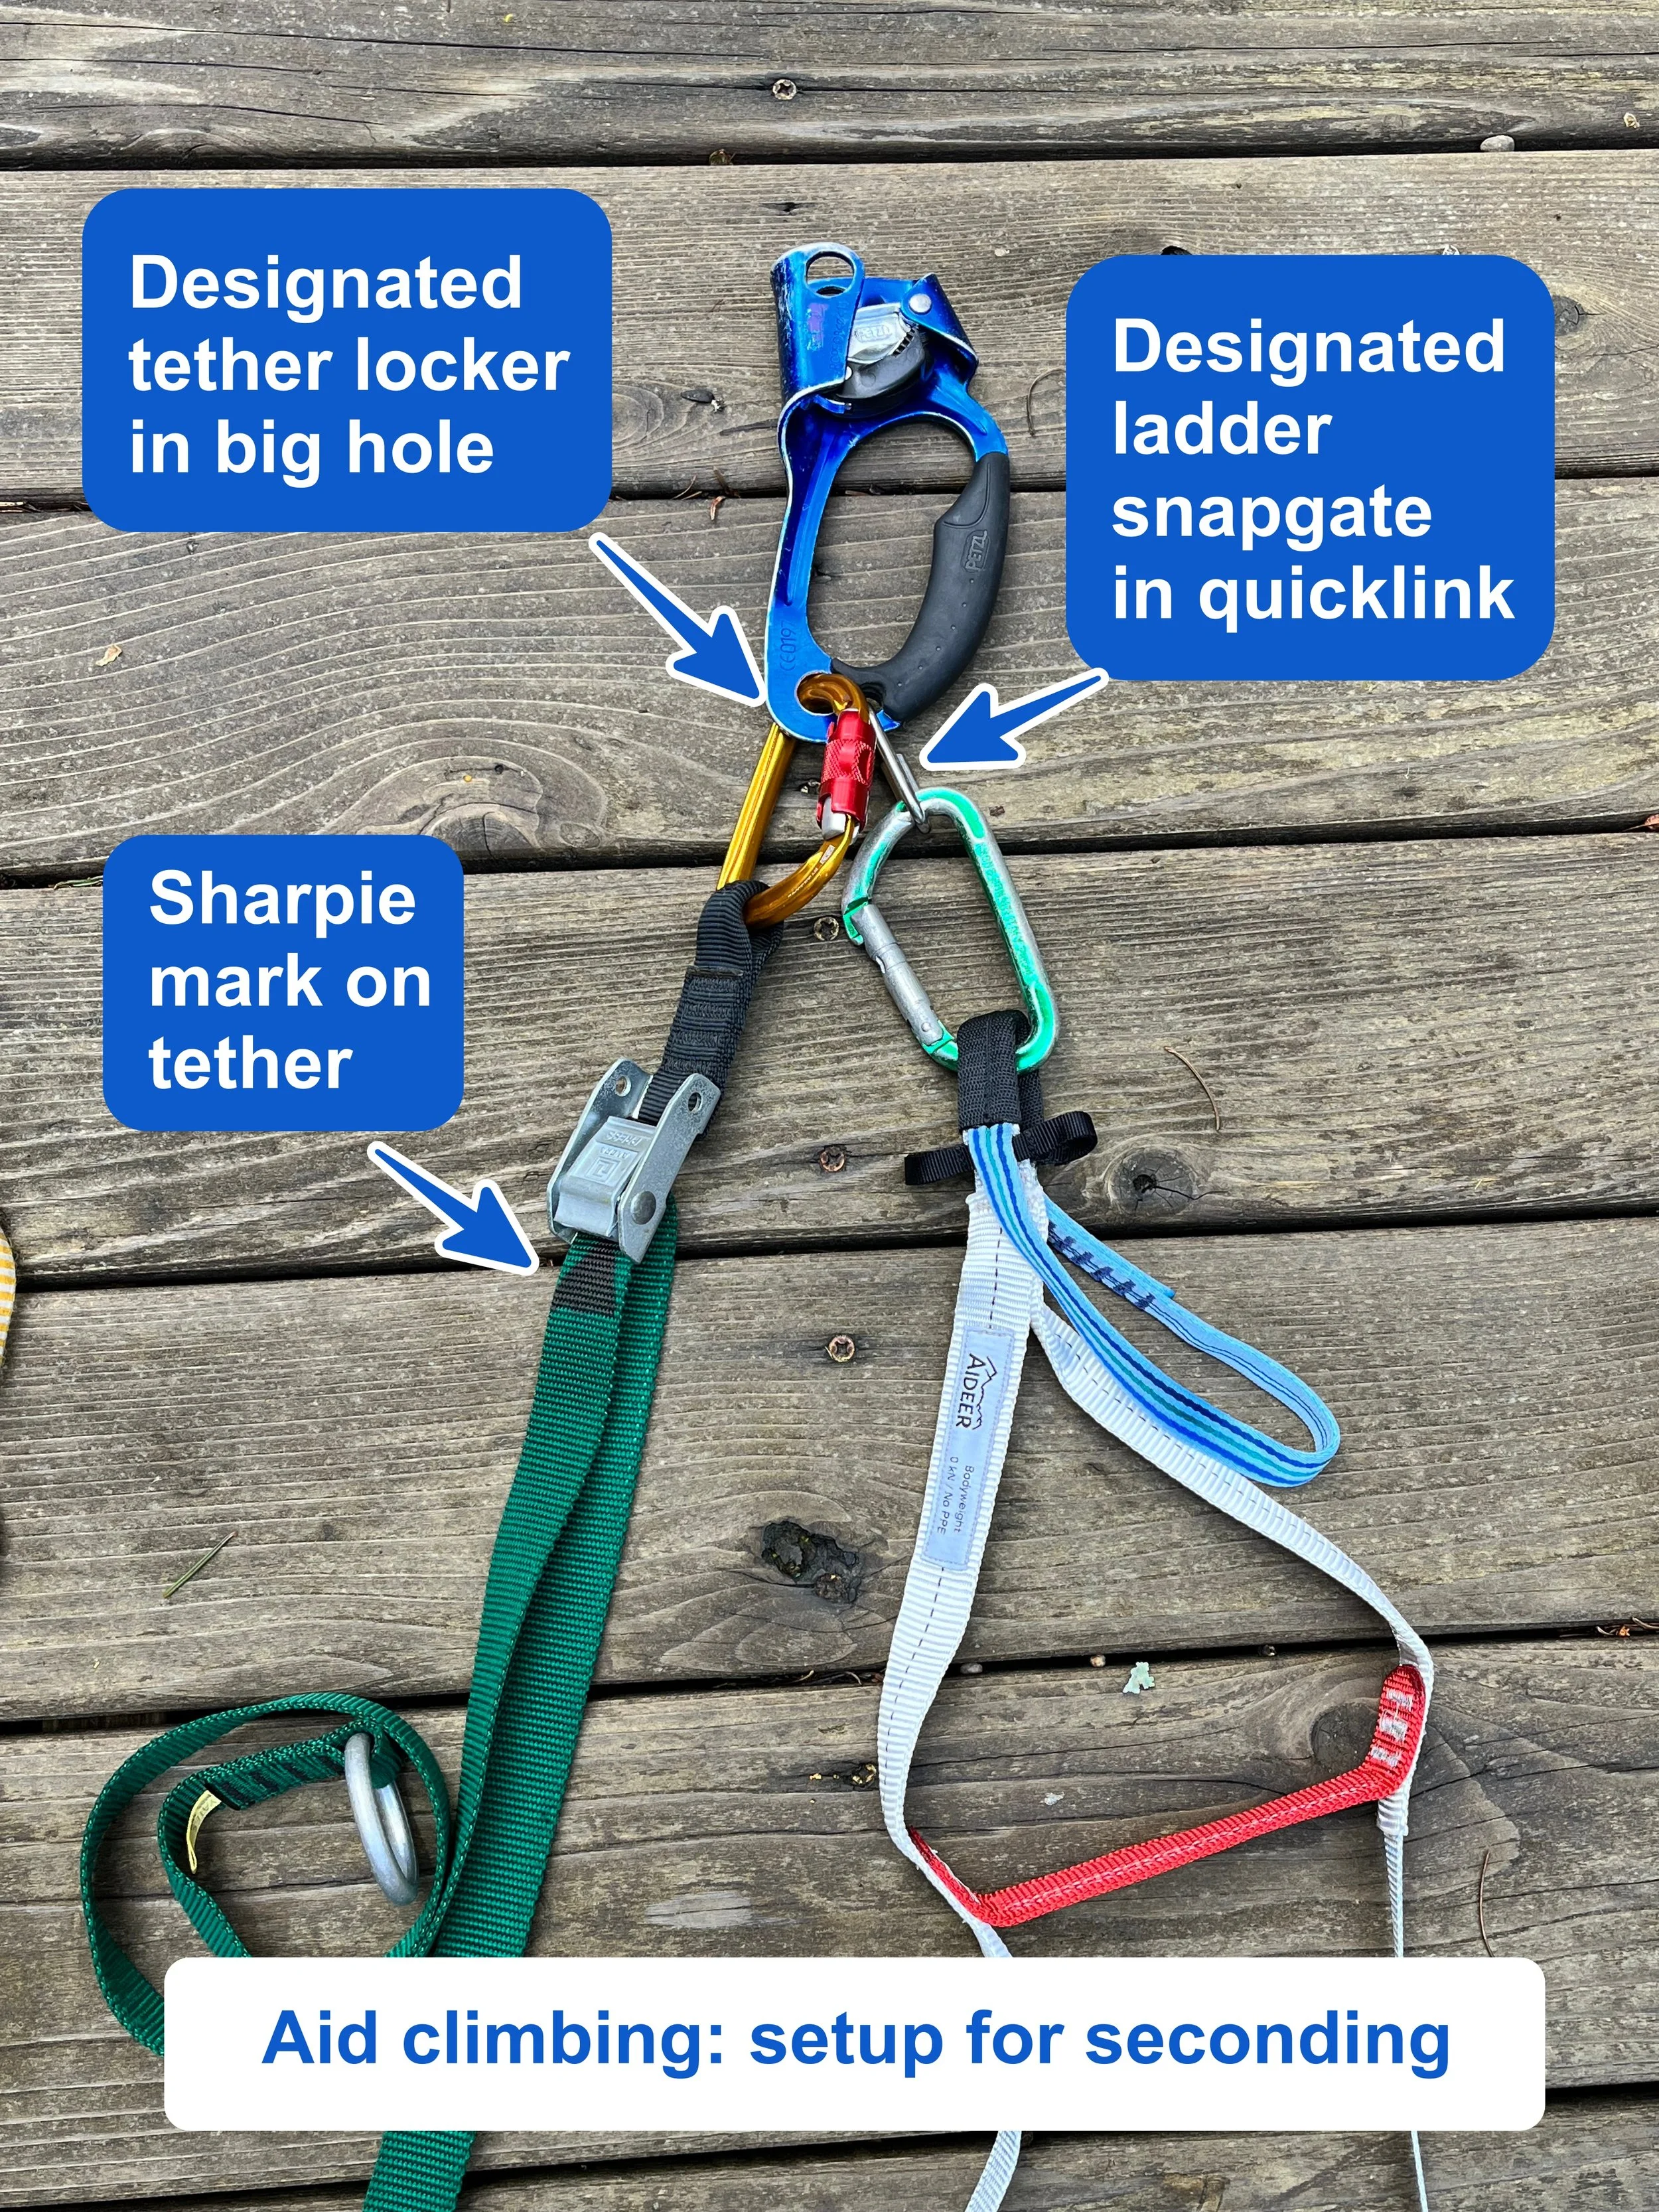
Here’s how it looks on the rope.
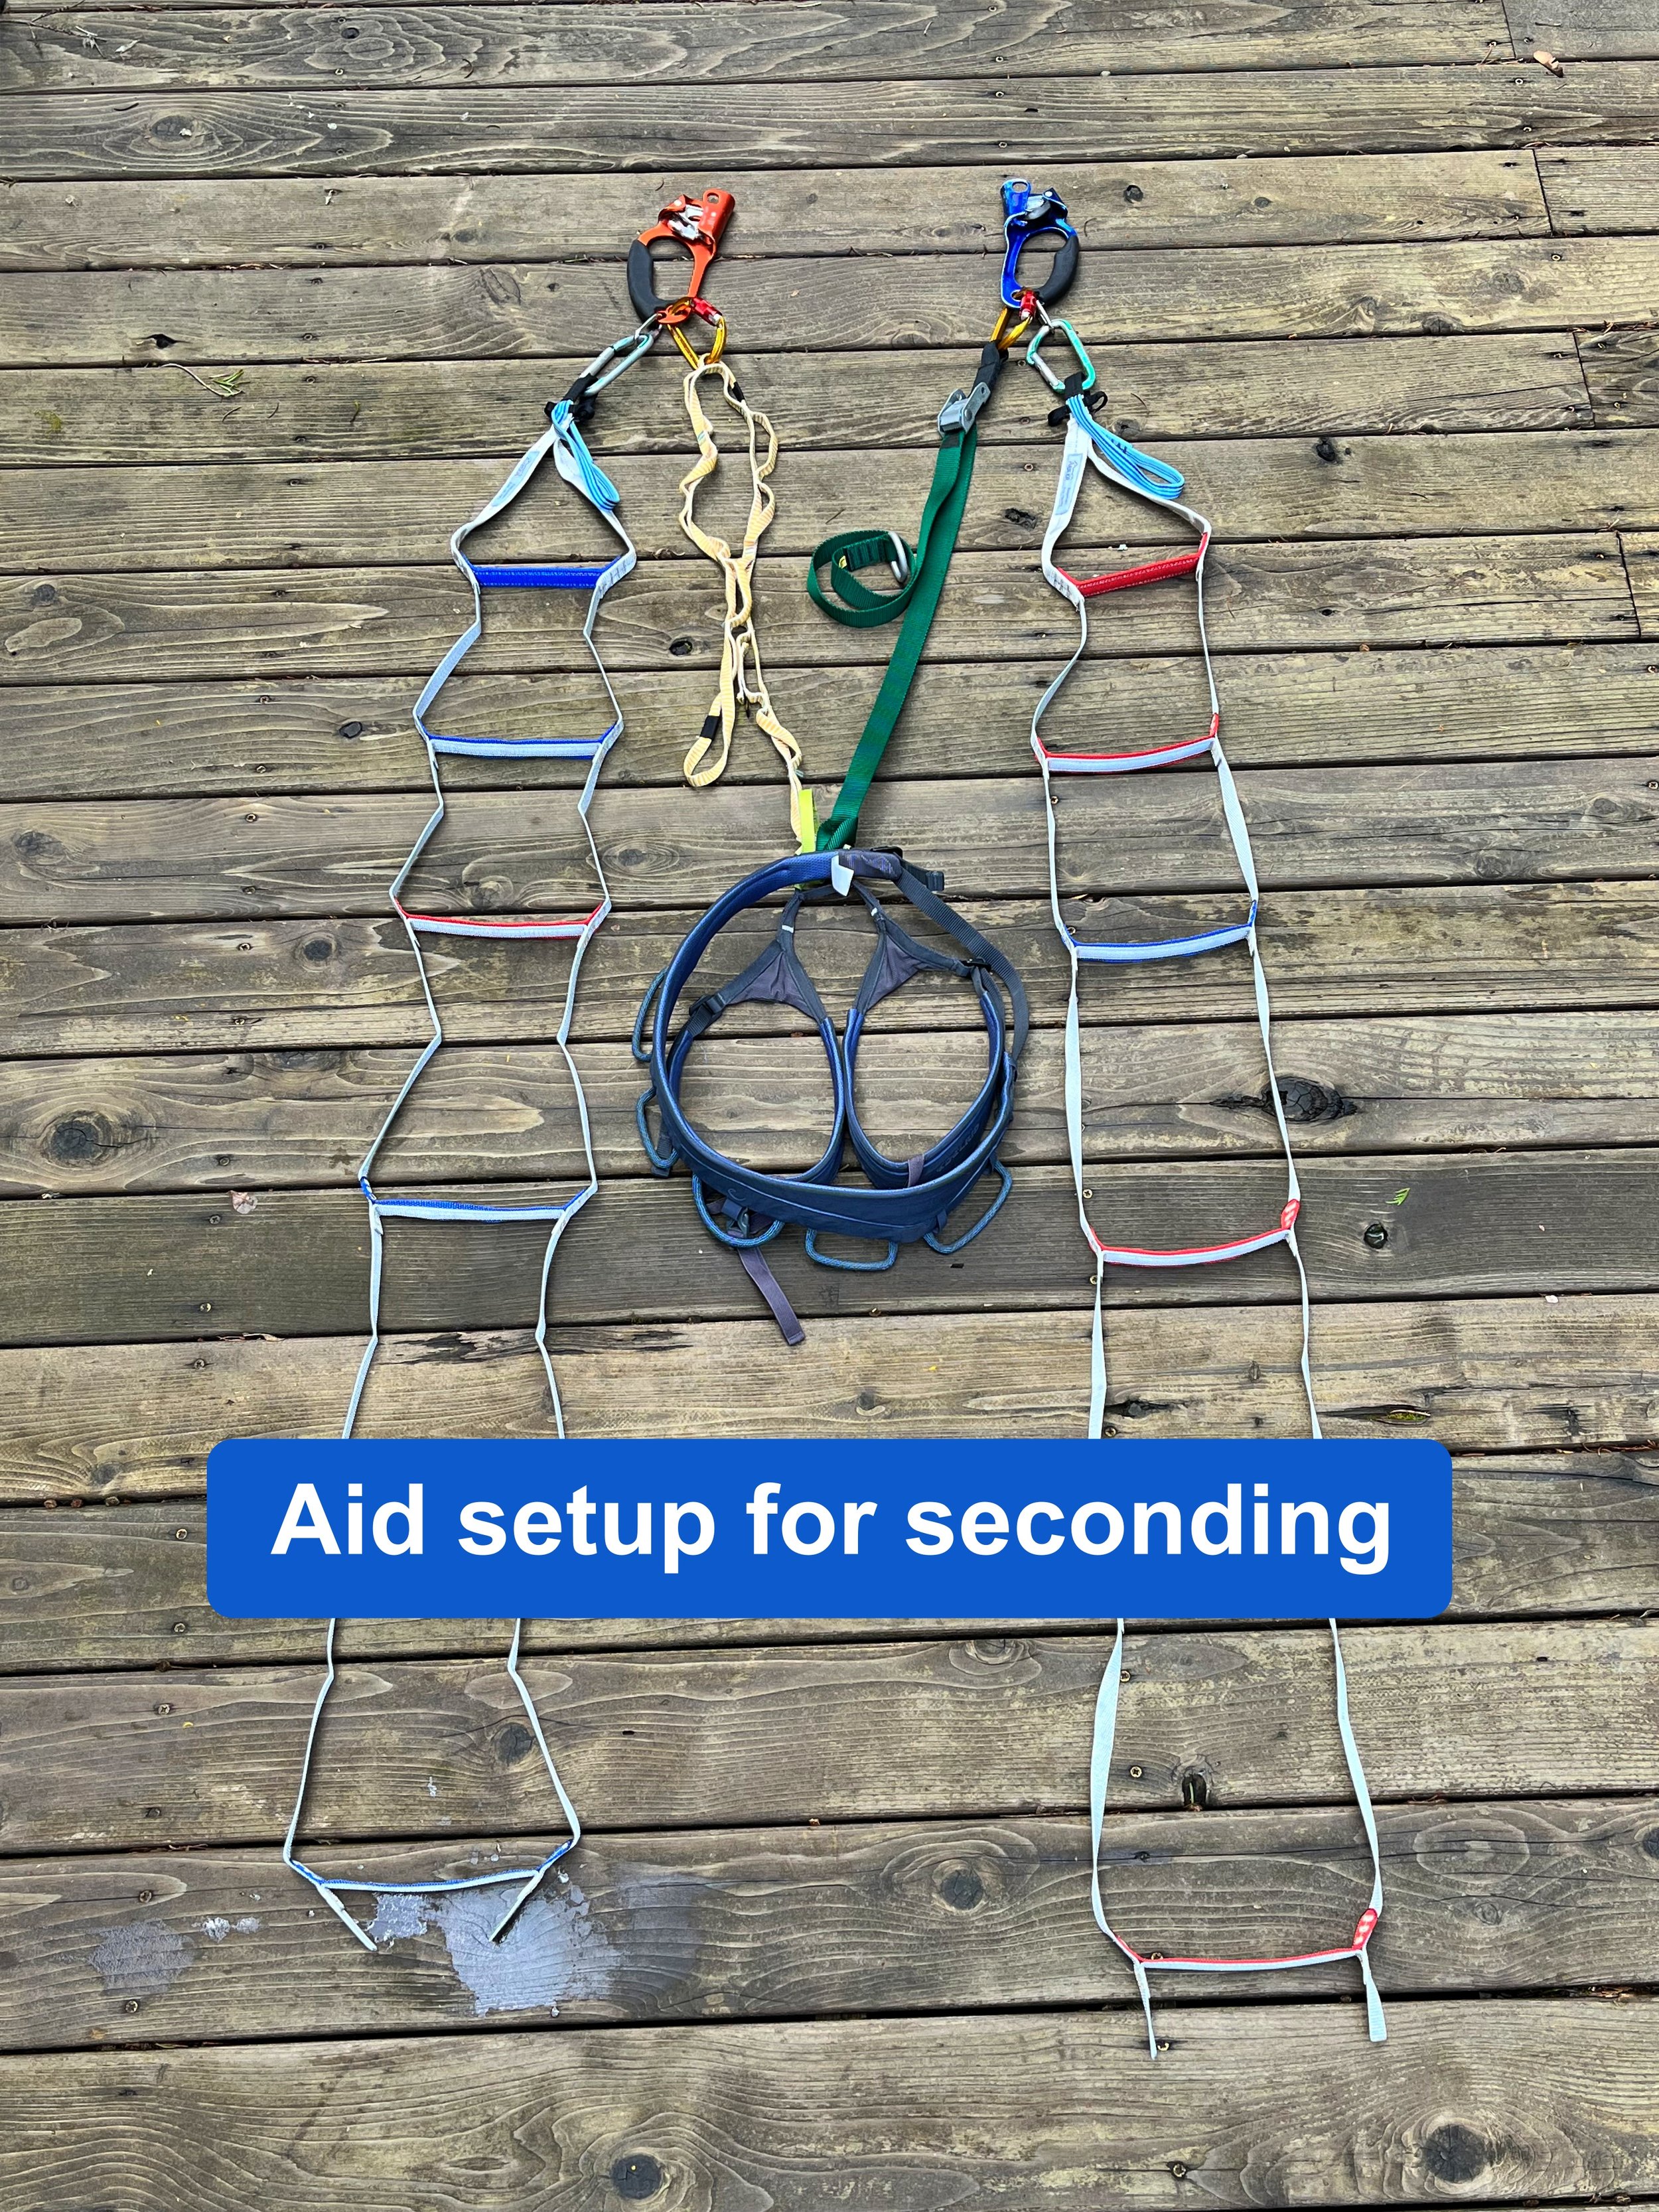
Let's look at one good way to set up for cleaning. There are variations on this, but here’s what works for me. Experiment and see if it works for you too.
We’ll first look at the classic two ascenders and two ladders. This works best on lower angled rock up to about vertical, with the route not traversing too much. It does take a little practice so you don’t look like a marionette having a seizure.
There are other setups that can be more helpful if the rock is very steep, or if the pitch is traversing a bit. We’ll look at those at the bottom of the page.
Cleaning Tip: One simple way to keep things reasonably organized when you’re cleaning: get two 60 cm slings, and put one over each shoulder. Clip cams and wires to one side, clip slings and carabiners to the other. At the anchor, you can remove each sling, attach it to something solid and start re-racking on the larger, more comfy primary leading gear harness.
The whole shebang:
Tethers are girth hitched to the tie in points of your harness. The belay loop is fine as well
Both tethers are set at the correct length for efficient jumaring (more on that below)
Designated lead/ladder carabiner is clipped to the quicklink
Designated tether carabiner is clipped to the large hole on the ascender. Locker is mandatory
Ready to clean!
Tether length for seconding
When leading, you have your tether at full extension, because you need to reach high. However, when seconding, it’s critical that the tethers be shortened up to the correct length. If your tether is too short, you’ll make short, choppy, inefficient movements up the rope. If your tether is too long, you can’t reach the handle of the ascender from the rest position, and you’ll have to do some ab-busting contortions to reach it. Here’s an article on how to rig that correctly.
There’s a sweet spot in the middle, and here’s how to find it: With your tether girth hitched to your harness, clip the carabiner and an ascender to the end. Pull on the adjusting strap (or clip a daisy pocket) until the bottom of the ascender carabiner is at your eyebrows. Most people find this to be just about the perfect length.

Set this same length on BOTH tethers - I long thought that you only needed to adjust the length of your top / upper tether, typically your dominant hand (for me the right). However, big wall expert Mark Hudon convinced me otherwise. Mark’s reasoning: while the bottom tether length doesn’t matter if your pitch is straight up or leaning to the right, what about when the pitch traverses to the left? In that case, it’s usually easier to lead with your left ascender, in which case the left tether needs to be the correct length also. So, Mark‘s point is to set both tethers to the same correct length, and you’re good to go in any situation.
Once you get this length dialed, mark the it on your tethers with tape or Sharpie pen so you can set it correctly first time. I like hockey tape for the sewn loop tether: sticky, strong, and cheap.

Gear you need for cleaning (and leading):
2 ladders
2 tethers
2 designated tether locking carabiners
2 designated non-locking leading carabiners
Ladders
Most climbers prefer more symmetrical style ladders rather than those with alternating steps on either side. Good ladders are made by Yates, Fish Gear, and Metolius. My new favorite ladders, featured here, are made by Aideer Big Wall Gear from Sweden. They are top quality, durable in the right places, and very lightweight.
(And let’s not call them “etriers” anymore, okay? That's the French word for “stirrup”, and yes, I had to look that up. =^)
Tethers
Tethers is go by many names - lanyard, daisy chain, leash. I'm going to use the term tether to stay consistent.
The long time standard tether was the sewn pocket daisy chain, but these are considered a bit old school. (I’m using one in the photos to show how it looks, but I use a pair of adjustables.) Yates or Aideer make nice ones with flat webbing. Another option is or something like the dual-tether Petzl Evolv Adjust, that uses rope or cord rather then webbing. There are pros and cons to each style, and we’re not going to into them here.
Andy Kirkpatrick has a great article on tethers, which you can read here.
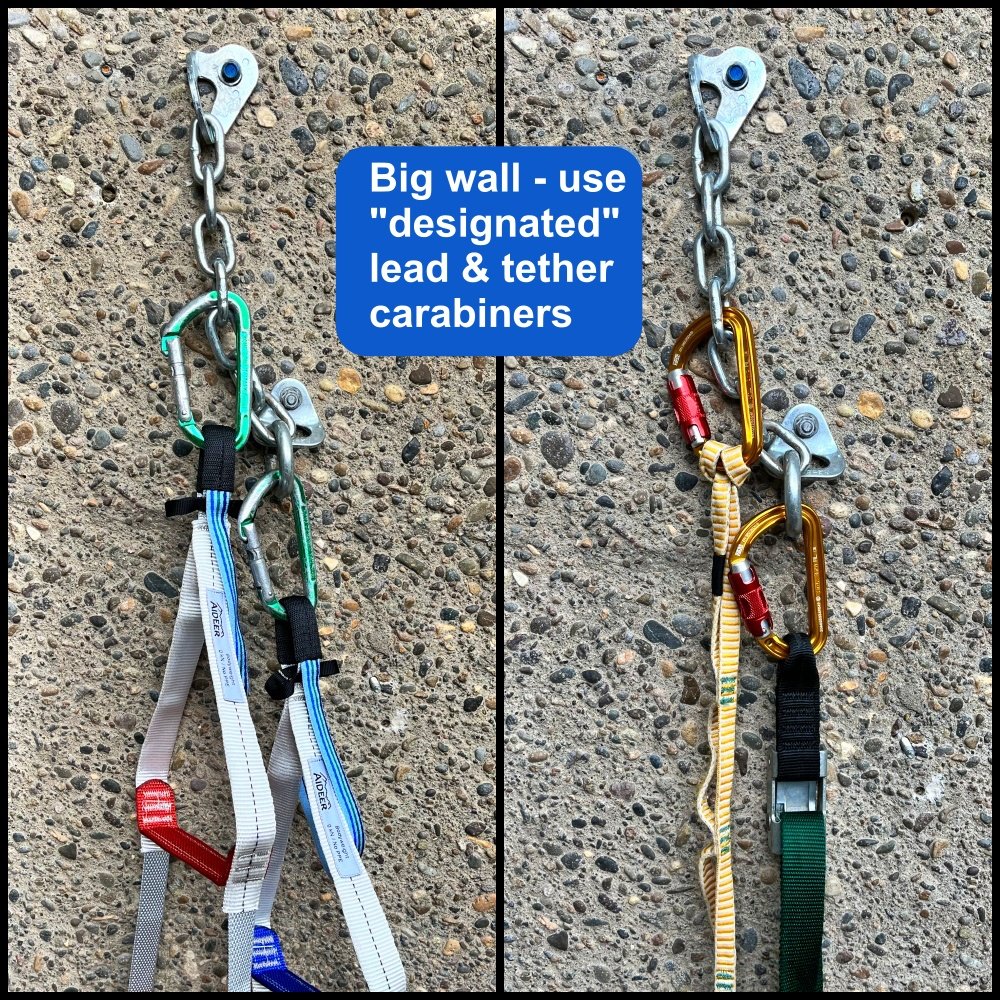
Designated ladder/lead (non-locking) and tether (locking) carabiners
“Designated” means just that. These carabiners stay permanently attached to the top of your ladders and tethers, and you never pirate ‘em for anything else. Ideally, these are a matched pair, and a distinct model and color from any other carabiners you have.
Here's an article that takes a closer look at what type of carabiner you might want for each purpose.
Here's a video clip showing AMGA Rock Guide Chris Lile with flawless jumar technique on El Capitan.
Notice when ascending the rope, his hands barely come above his head. Easy and relaxed, pretty much like walking up a staircase.(Connect with Chris on Instagram, @lile.chris. Video by AMGA Rock Guide Adam Fleming, @adam.fleming.guides, video shared with permission.
Steep rock variation: ladder only on lower ascender
Big wall expert Chris McNamara recommends only having a ladder on the lower ascender for steep rock. If your jugging technique is less than perfect (like most of us) you may like this too. Check his video below to see the set up.
Travsering pitch variation: one ascender, one ladder, and a Grigri
For cleaning a traverse, it's can be extremely helpful to be able to do a mini lower out and release tension on the rope. Cleaning with a Grigri lets you do this. Here’s an article on that.
Here’s an action video.

Aid Climbing: rig for leading
Having a simple, versatile system for rigging your ladders and tethers is good practice for efficient big wall leading. One good approach: use designated carabiners, one pair for leading and one pair for your tethers. Here's one way to set it up, and some specific gear recommendations.
Having simple, repeatable, and easy to check systems for different components of aid climbing is critical. Your setup for leading is definitely in this category. You'll be repeating the same motion literally hundreds of times on your route, so attention to detail matters!
Once you have it set up correctly:
It’s just about impossible to drop your aid ladders
You use designated carabiners for these important connections, so you’re never patting down your harness looking for a spare carabiner
Transitions (between leading, clipping to anchors, hauling, and cleaning) are faster with minimal futzing around
Let’s look at one good way to get rigged for leading, then get into the gear you need.
Clip a designated lead carabiner to the top of your ladder, gate facing away from you.
Clip your designated tether carabiner to the top of your ladder, in the same place as your lead carabiner.
Done!
There are several ways you can set this up. I’m sharing my personal preference. Try some variations and see what works for you.

The whole shebang:
Tethers are girth hitched to the tie in points of the harness. The belay loop is fine as well.
Tethers are at full extension, so you can reach high placements. (Here, for variety, I'm showing an adjustable tether on the right and a sewn pocket daisy chain on the left. Pros and cons to both. Typically you’d have a matched pair of whatever you prefer.)
Designated lead carabiner is clipped to the top of the ladder.
Designated tether carabiner is also clipped to the top of the ladder.
Fifi hook or adjustable fifi would typically be used, not shown here for clarity.
Ready to lead!

Gear you need:
2 ladders
2 tethers
2 designated tether locking carabiners
2 designated non-locking leading carabiners
Ladders
Most climbers prefer more symmetrical style ladders rather than those with alternating steps on either side. Good ladders are made by Yates, Fish Gear, and Metolius. My new favorite ladders, featured here, are made by Aideer Big Wall Gear from Sweden. They are top quality, durable in the right places, and very lightweight.
(And let’s not call them “etriers” anymore, okay? That's the French word for “stirrup”, and yes, I had to look that up. =^)
Tethers - Pros and Cons (do you even need one for leading?
Tethers is go by many names - lanyard, daisy chain, leash. I'm going to use the term tether to stay consistent.
Some hotshot aid climbers will say, “Don't use a tether on easy aid, it’s faster and easier without it, just be careful and don't drop your ladder.” Well, that might be fine if you have a few dozen big wall pitches under your belt, but for the rest of us, using a tether is standard practice for a reason. When leading, it keeps you from dropping your ladders. An adjustable tether is VERY helpful leading a traverse or roof, or easing onto a hook. When cleaning, it's mandatory safety gear that connects you to your ascender. When you're starting out, I highly recommend using tethers for leading. Once you have enough experience to hopefully not fumble your gear, you can decide if you need them or not.
On the other side, a tether adds weight, cluster, can make you climb lazy if you rest on it too much, and adds time, as you need to extend the adjustable one before the next move. Learn with one, remove it later if you like. Oh, and do bring an extra ladder in case you do drop one. =^)
The long time standard tether was the sewn pocket daisy chain, but these are considered a bit old school. (Benefits: they are lightweight, which can make a difference, especially when ascending.) I’m using one in the photos to show how it looks, but I use a pair of adjustables. Yates or Aideer make nice ones with flat webbing. Another option is or something like the dual-tether Petzl Evolv Adjust, that uses rope or cord rather then webbing. There are pros and cons to each style, and we’re not going deep into that topic here.
Andy Kirkpatrick has a great article on tethers, which you can read here.
Designated lead (non-locking) and tether (locking) carabiners
“Designated” means just that. These carabiners stay permanently attached to the top of your ladders and tethers, and you never pirate ‘em for anything else. Ideally, these are a matched pair, and a distinct model and color from any other carabiners you have.
Designated LEAD non-locking carabiners: Good choices for the are a solid (not wire) gate, narrow key lock nose (so you can slide it into webbing that might be under tension), fairly large size, and a distinct color. The classic Black Diamond ovals work well, and if you like a bent gate, the Petzl Spirit. You’re going to be clipping these lead carabiners into every single piece of gear you place on the wall, so get ready for them to get beat up and retire them when necessary. I still use ancient Kong carabiners that I keep for posterity as they’ve been on a lot of adventures. Note the green color, easy to find at a glance on a busy harness. Here’s a longer article on lead aid climbing carabiners.
Designated TETHER locking carabiners: The lockers let you attach yourself to different components of the anchor, sometimes for hauling, and to clip to your ascenders when cleaning. You don’t need an HMS belay style carabiner here. A standard ”D” locker is fine. Some people like screw gates, some people prefer twist lock. The Edelrid Strike Slider locking carabiner is popular too; it has a low profile and easy-to-use locking mechanism. Here I’m using the Petzl Sm’D, a twistlock.
Try a few and see what works for you. Again, a distinct color is helpful.
Let's look at other rigging options and some pros & cons.
How about skipping the tether locker, and simply clip your tether directly to the lead carabiner?

This might seem like the simplest way to rig it, you do save a little weight, and many people use this setup. But for me it has a few problems. Namely, those transitions, like when you arrive at the anchor and want to clip in with your tethers, you need a locker for that and that means you need to find a spare one on your harness. Plus you need to remove the tether from the lead carabiner, hard when you’re loading it. Or you’re seconding, getting ready to leave the anchor, and you need a locker to clip into your ascenders.
I find it simpler and faster to go with the designated tether carabiner. Try both to try and see what works for you!
If you do try this, set it up as shown above, with the tether on the spine side of the carabiner so it doesn't mess with the gate.
Here's another approach. The tether locker is clipped directly to the lead carabiner, and not into the top of the ladder. This works okay most of the time.
But depending on the shape of your lead carabiner, you may find your tether carabiner, when loaded, starts to grind down on top of the ladder, putting a little more wear and tear on it. By clipping both carabiners to the very top hole of the ladder, you avoid this.


Improv aid climbing - the one ladder method
Do you have a few moves of aid climbing required, but have minimal gear? Here’s a technique that can get you through a tricky part.
Credit for this general method goes to big wall ace Andy Kirkpatrick. It's outlined in his book “Higher Education” and also in a blog article, “Gorilla Aid”. Credit for the improv aid ladder goes to Fabio Elli, from the Alpine Aid chapter of his book, “Hooking Up”.
While the classic two ladder, two tether set up is going to be more efficient for multiple aid pitches, sometimes you may need to improvise with minimal gear. Here’s one way to do it, and it can be surprisingly fast once you get the movement dialed in. (Not to mention, this is gear you already have and it’s less expensive than buying a pair of ladders and adjustable tethers.) You can make the tether and ladder in a couple of minutes.
If you have an actual aid ladder (like my favorites from Aideer) and an adjustable tether, this same process still works.
Gear you need:
Two 120 cm slings
One 60 cm sling
Three carabiners
One quickdraw
From this gear, you make:
A tether, made from a 120 cm sling and a carabiner
A ladder, made from a 120 cm sling, a 60 cm sling and a carabiner
A “fifi”, made from a quickdraw
1 - Make a tether (aka daisy)
The purpose of the tether is to 1) test placements if needed, and 2) hold your weight when you move the ladder to a higher gear placement.
Take a 120 cm sling. Put the sewn bar tacks in about the middle. Tie two overhand knots in the sling, each one about 10 inches / 25 cm away from the ends.
Girth hitch this sling to your belay loop. (Yes, belay loop is fine, but use your tie in points if you prefer.)
Clip a carabiner to the end of the tether.
The length of this tether is pretty important. You want the tether at least as long as your arm at full extension; if you place gear at maximum reach, you need to be able to clip it with your tether. For me, about 5’10” / 170 cm, a 120 cm sling on the belay loop is about right. If you’re taller, basket hitch another 60 cm sling to it, or add a quickdraw.
If you happen to have an adjustable tether that’s long enough, this is a great time to use it. (My Petzl Connect Adjust is too short, my DIY adjustable tether made with some 8.5 mm rope and a Kong Slyde is perfect.)
2 - Make a ladder (See article here)
Take a 120 cm sling. Nylon is nicer to your feet if you have it. Move the stitching to the bottom.
Tie an overhand knot in about the middle.
Pull down some sling material to make an offset step, and tie a second overhand knot at the top end, making a very small loop.
Girth hitch a single length 60 cm runner into the top of the double runner. Try to keep the bar tacks on the bottom as shown. Tie another overhand knot as before, pulling extra slingage on one one side to make an offset step. Clip a carabiner to the top. Schweeeet, you have a 3 step aid ladder. Give yourself a hi-five.

3 - Fifi quickdraw / carabiner
Aid climbers usually have a designated fifi hook, which lets you clip to pretty much anything and hang on it for an instant rest. You’re improvising, so you probably don’t. Simply clip a quickdraw to your belay loop or top tie in point.
Schweeeet, you’re set up and ready to climb.

The sequence below may sound a bit involved written out, but once you do it a few times you'll get it dialed.
Step by step:
Reach up high and place gear. If it’s a stopper, add a quick draw. If it’s a cam, keep the racking carabiner on the cam. (For this example, let’s assume it’s a stopper with a quick draw.)
Clip your tether to the bottom carabiner on the quick draw.
Shift your weight to the tether. If the gear is questionable, you can give it a little bounce test with the tether. If it’s a solid placement, don’t bother.
Clip your ladder to the top carabiner on the quick draw.
Time to climb the ladder. Tips: Remember you just bounce tested the piece you’re hanging on, right? So trust it and don’t dink around second-guessing your placement. It may be tempting to take one or two steps up and then fifi into your tether. Try to avoid this. After you get your foot in the bottom rung, try to rock your foot underneath your butt and stand up. This is not an exercise in one arm pull-ups, use your legs as much as you can. Feel free to grab your tether, or the quick draw, to help with your balance. That’s not cheating, it’s aid climbing.
Climb the ladder until you can clip your fifi into the stopper wire (probably your second ladder step.) Lean back and weight your fifi.
Clip your lead rope to the bottom of the quickdraw.
Look up, make another gear placement as high as you can, and clip a quickdraw to this higher placement.
Unclip the tether and clip this into the bottom carabiner on the new quickdraw. Give it a little bounce test it’s it’s questionable.
Climb the ladder below until you can’t go any higher.
Unclip your fifi from the lower placement and clip to the upper quickdraw (or tether if needed). Rest on your tether.
Remove ladder from bottom quickdraw and clip it to to the top carabiner of the upper quickdraw.
Climb the ladder until you can clip your fifi to the stopper wire on the top piece.
Repeat!
Notes . . .
The three components of your system, tether, ladder, and fifi, are (ideally) clipped to three different components of the gear: tether to the bottom of the quickdraw, ladder to the top of the quickdraw, and fifi to the stopper cable. Keeping at least the tether and the ladder clipped to two different points means that everything is (in theory) not weighted/pinched by anything else and easy to remove. It may not always work out this way, but it's something to try for.
With most cams, you also have three places to clip: the racking carabiner, the sling, and the thumb loop. If it’s a bolt, clip a draw to it as the first move.
Think of most things you do in aid climbing as a “movement sandwich.“ That’s a movement or exertion, in between two periods of rest. Rest > move > rest. Resting: at most any point, you can sit back on either your tether, or clip your fifi carabiner into something and sit back on that. If you find yourself getting tired or your arms getting pumped, you’re probably doing something wrong.
So, next time you're on a trad climb and realize you're in a bit over your head, pull this out of your bag of tricks.

Aideer climbing big wall gear - handmade in Sweden
Aideer big wall gear, made in Sweden, carries on the tradition of a one-man shop making high-quality climbing gear, with impeccable attention to design and sewing, with fair prices and fast shipping. If you want to gear up for a big wall adventure, Aideer is a fine place to start.
One of the most iconic legends in big wall climbing is Yvon Chouinard, hand crafting pitons in his metal shop and selling them to other climbers in the early days of Yosemite. The spirit of creativity and craftsmanship still lives on with various small scale manufacturers.
Here's one to check out: Sweden’s Olle Hjort of Aideer Climbing big wall gear. Olle sews high quality, well designed, and yes, colorful gear for your next big wall adventure. Olle was kind enough to send me a pair of ladders and adjustable fifi for review, and they are schweeeeet! (In the rare cases I’m offered gear for a review like this, I’ll always tell you about it upfront.)
Connect with Olle on Instagram (preferred), email, or website.

Currently, Aideer offers the following products:
ladders (let’s not call them “etriers” - French for “stirrup” - anymore, okay?)
Russian aiders (VERY cool, more on those below)
adjustable tether/daisy
adjustable fifi
big wall gear sling
prototyping a portaledge (currently being tested in Patagonia, production should start soon.)
Olle has a website, but he prefers that people contact him for current pricing and order through his Instagram. You can customize length and colors of many products, message him for details.
Prices are in Swedish kronor (SEK). (As I write this in winter 2022, the exchange rate is about 10 SEK to 1 USD.) Pricing on his gear is very competitive. Shipping costs to USA are 200 SEK (about $20 USD) for 1 kg, say a pair of Aideers and an Adjustable Fifi.
Aideer ladders
Let's check out those ladders, a key piece of big wall gear. I’ve used the Yates ladders for pretty much forever, and been quite happy with them. However, while they are certainly durable, the Yates ladders always felt a little clunky. The first thing I noticed when I picked up the Aideer ladders: these things are LIGHT! I got out the scale and discovered they are literally HALF of the weight of my Yates ladders, 221 grams compared to 443, wowzer!
Lightweight does not mean less durable. The Aideer ladders trim some weight in clever places, like using a strip of fiberglass to stiffen the top step. They are reinforced with 1 inch tubular webbing around the top of triangle, which is going to take the most beating, and the quality of the sewing is impeccable.
My Yates ladders seem to easily get a twist in the bottom step or two, a minor rock in my shoe to deal with. The few times I've been out testing the Aideer ladders, they never seem to get a twist.
In terms of dimensions, they are pretty comparable to the Yates: six steps, with the third step down being a different color to remind you to get in ASAP. Speaking of colors, you might be able to ask for something custom. I didn't, and Olle sent me ladders with red white and blue, three of my favorite colors. =^)
The Aider ladders do not have an elastic band under the 4th and 5th steps like the Yates, which some climbers (like big wall ace Kevin DeWeese @failfalling) find convenient for leg hauling. (Olle said you can add a thin bit of elastic cord yourself if you want this feature.) Kevin also mentioned to me that the narrow steps of the Aideer are slightly more tiring for the arch of your foot on very long routes. He writes: “All in all, my Aideers are my go-to for “in-a-day" and pushes, and my Yates speed walls are my go-to for vertical camping trips.”
Overall, I’m super happy with these ladders. If you're looking to get started aid climbing I think you’ll love them too.
Photo below, Aideer ladder on top, Yates ladder on the bottom. The Yates weigh twice as much!
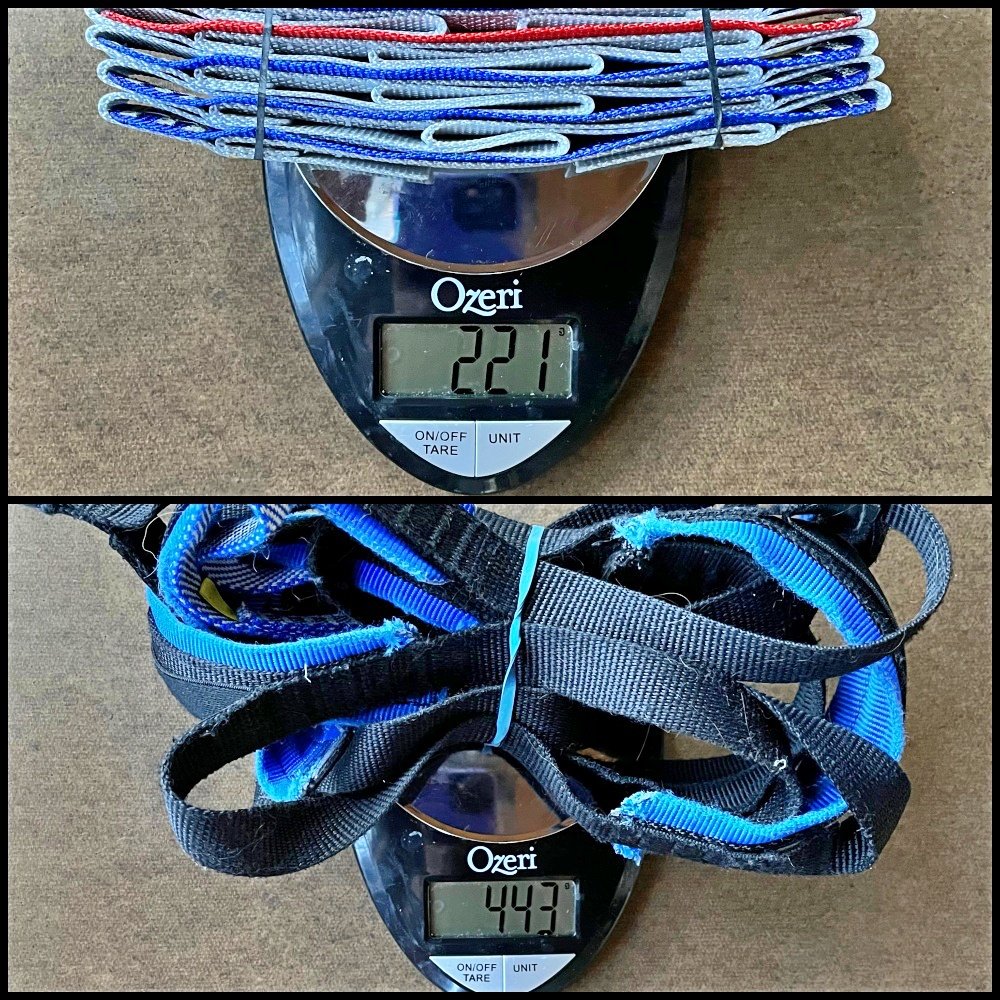
The Aideer ladders. Simple, clean, functional.

Russian aiders
Let's talk about those Aideer Russian aiders! This is sort of a mythical piece of big wall gear, rumored to exist and be amazing, but seldom seen in the wild. There are some small companies in the former Soviet bloc who are making these, but they are still rare. Trango made them for a while, but not anymore.
Russian aiders are a completely different method of aid climbing than the more traditional ladder style.

How do Russian aiders work? You have a hook attached with webbing straps to the inside of each leg, about knee height. There is a foot stirrup attached to the knee webbing strap. After you place gear, you clip a “tree” to the gear, which is thin webbing with some metal rings sewn every foot or so. You step up by inserting the hook into the metal rings. The main advantage: you can step a lot higher and be in better balance then you can in normal aid ladders.
Full disclaimer: I don’t own these Russian aiders and have never tried them, but apparently they are pretty sweet on steep to overhanging rock, and not so great on lower angle terrain. Are they going to be ‘da bomb for you on your next big wall? Might want to buy a pair from Aideer and find out!
As we like to say around here, it's a better show than a tell. Here’s a video that shows Olle using them. (Yes, he gave me the video file and I posted it on my YouTube channel.)
Notice how high he is in the steps when he's done; the bolt is pretty much at knee level. Also, no fifi hook required. Standing this tall in a normal ladder on steep rock would be just about impossible.
You may be wondering, as I did: “Sounds good on lead, but what about the second? How do they clean? If you try to jumar with this set up, doesn’t your foot lift out of the hook?”
It's a little complicated to explain in writing, but just know that there are various attachment points on the knee strap where you can clip a carabiner (rather than a hook) into the aid tree, to give you a secure connection point when you’re jumaring. Another option is that the cleaner/second can use a dedicated foot loop.
Here’s a long and detailed discussion of Russian aiders on Supertopo, by the always loquacious Pete Zabrok. Check out his terrific book on aid climbing, “Hooking Up”, highly recommended!
Here's a nice YouTube review of the Aideer aid ladders and the Russian aiders from Yann Camus of Bliss Climbing.
Let's check out some more Aideer gear.
(All photos are from Aideer Climbing @aideerclimbing, used with permission)
Adjustable tether/daisy
These are similar to the popular Yates tethers, but have a few improvements: smaller diameter Dyneema sling at both ends, and a smoother roller cam buckle. (The Aider webbing is also thinner and a little more slippery, which honestly I'm not sure is an improvement or not.)
Adjustable tethers like this are extremely handy for aid climbing, because they let you release tension on the buckle even when it's under a full load, which can solve all kinds of big-wally type problems. Bonus: they let you perfectly adjust the height of your portaledge.
If you do use an adjustable tether, try to avoid the time-sucking habit of hauling yourself upwards when you don't need to on easier terrain. Try to keep them at full extension whenever you can, and only use the adjustable feature when things get spicy - like steep/awkward, easing onto a hook placement, and leading and cleaning a roof.
(Note, these are not rated for PPE use, and are for bodyweight only.)

Adjustable fifi hook
Similar to the popular Allfifi made by Skots Wall Gear. Skot welds the hook onto the buckle, while this one has a short sewn webbing connection. Which one’s better? I don't know, try ‘em both and tell me what you think! =^)
The trick to using an adjustable fifi is to pull yourself up and adjust your position on the gear, and not use hoist yourself on your adjustable tether. (Or, if you're bold, you can lead climb without tethers at all, just be sure not to drop that ladder!)
Like the adjustable tether, note the thinner Dyneema cord at the end, which makes it less bulky when you girth hitch it to your harness. (Also not rated for PPE use, and are for bodyweight only.)

Big wall gear sling
Custom sewn, double gear sling with 1” chest webbing and Austri Alpin D-ring COBRA Pro Style quick release buckle. You can specify the length, placement and style of gear loops that you want, so this is probably more suitable for someone who's already done some aid climbing and knows what they like. (Not rated as PPE.)
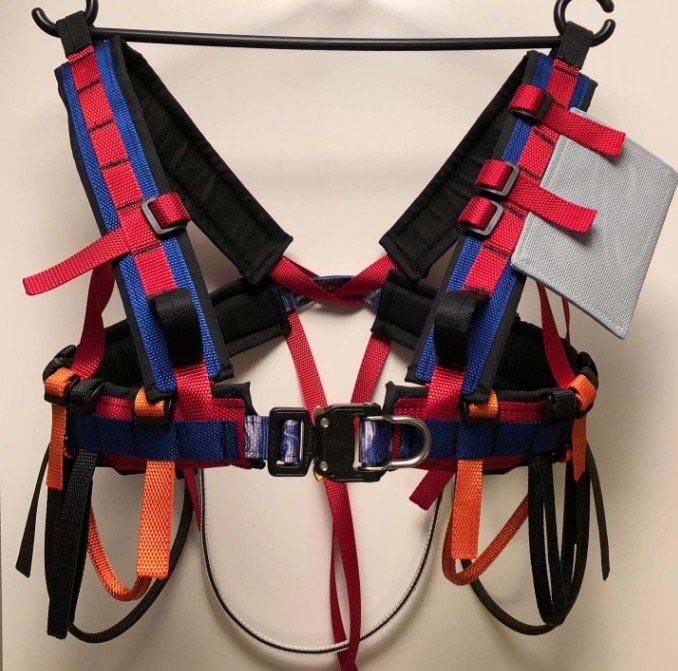
Finally, here's a prototype of the Aideer portaledge, based on the increasingly popular open-source D4 portaledge design by John Middendorf.
No, that clear plastic is not the actual fly, it's to determine the correct dimensions.
Yes, that’s the narrow side of the ledge against the wall, 90 degrees different how a typical portaledge is set up.
Yes, making your own portaledge is a very ambitious project!


Big wall anchors: have "links"
A classic beginner mistake at a big wall anchor: clipping several ropes or slings into a master carabiner, and then realizing something that’s loaded prevents something else from being untied or removed. Major cluster! (I know it's an easy mistake to make because I used to do it a lot!) Here's a simple way to avoid it.

Here’s a classic beginner mistake when making a big wall anchor. (How do I know this? My partner and I manage to do it multiple times on our first wall!)
You clove hitch the rope into the anchor, and then clip something else into the carabiner closer to the gate; let's say there's a 100 kg haul bag on the purple sling. (Sidenote, best practice is to use a docking cord for your haul bag rather than a static sling.)
So far so good . . . except when you need to untie that clove hitch. Good luck unclipping that past the loaded sling. I remember having to actually untie the end of the rope to decluster something similar to the left photo. You do NOT want to be doing this! It's frustrating and a big time waster.
It's also dangerous. Having several things loaded on the master carabiner, and then having to open that carabiner to remove one of them, is risky. Keep that gate closed whenever possible!
A solution: try to rig anchors more like the photo on the right. Avoid tying hitches and clipping slings directly into the master point carabiner, and instead add a “link” (usually a locking carabiner) to everything clipped to the master point.
Short on locking carabiners? Of course you are, that always happens on a big wall. Try a cheapskate locker; a standard carabiner with some athletic tape wrapped around the gate.
Adding “links” makes it much easier to unclip things when another part of the anchor is under load. Pretty simple concept, right? But, it's very easy to screw up, because the anchor is busy, you’re mentally a bit stressed, and you have large static loads like haul bags.
A related big wall anchor concept is known as “last in, first out”. To put it another way, the last thing that gets clipped to a master point should be the first thing that gets unclipped when you're breaking down the anchor.
(The same concept can also apply to a standard anchor, but it's usually not as important to follow. Real live humans can see the problem, clip into another part of the anchor while something gets declustered for a moment, and then re-clip. Much different and easier to solve than the dead weight of a haul bag.)
Here's another great option for a big wall masterpoint: the Grivel Vlad. It's a combination locking carabiner and rigging plate. Here's a detailed article about this cool piece of gear.


Pre-thread the haul pulley
If you have your haul rope already threaded in your progress capture pulley, you can rig your big wall anchors a bit faster, and pretty much eliminate the chance of dropping either the haul rope or the pulley.
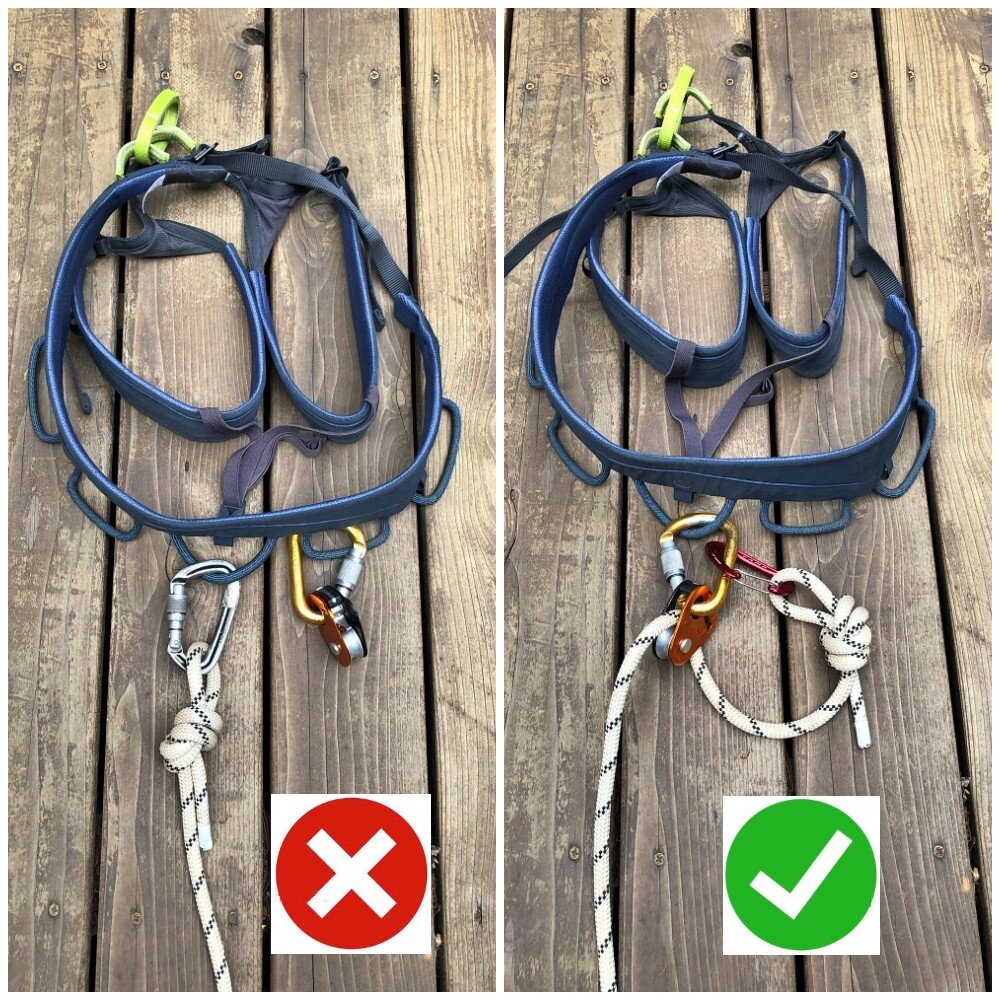
For any kind of serious hauling, big wall climbers use a progress capture pulley (aka “PCP”), such as the excellent Petzl Micro Traxion. The little puppy is expensive and extremely important, so it’s critical to never drop it!
If you pre-thread the haul rope through the pulley, it’s faster to set up and you’re much less likely to drop either the pulley or the rope. (This may seem like a small detail, but attention to little things like this adds up, reduces cluster, and collectively can make your big wall climb a lot smoother.)
Some climbers like to use a tag line system that involves pulling everything you need at the new anchor up on one thin (5 or 6 mm) cord after they finish the pitch. This approach has pros and cons; climbing with less weight good, takes a bit longer to set up the anchor and haul, not so good.
A more traditional approach is the leader climbing with the haul rope and the PCP attached to their harness. This tip is for them.
A note on the harness and gear loop . . .
Typically on a big wall, you'll have a more burly harness then the one shown here, with a designated hauling loop. The harness I’ve used on my big walls has been retired and I haven't replaced it, so I used my current one (Edelrid Sendero, which I love) for the photo.
Personally, I'm fine with using a standard gear loop for the tiny load of a rope like this, but you may want something stronger. Think of it this way: if you're comfortable putting $500 worth of cams onto a single gear loop and not worrying about it breaking and losing your cams forever, then why are you concerned about the haul rope, which would probably just drop down to your partner at the lower anchor?
If you have a harness like this one without a full strength haul loop, you could girth hitch a 30 cm sling around your entire waist loop and use that instead.
Check out the photo above.
On the left is the old-school technique: just clip the gear to your harness. This increases the chances of dropping the rope or the PCP, plus you have to put the rope into the pulley at every anchor. It hasn't happened to me, but I have seen a dropped haul rope, whoops!
(Notice on the left photo, the pulley is clipped to one of the side gear loops. This at least makes it less likely you’ll fumble or drop it, rather than using the rear gear loop.)
On the right, the haul rope is pre-threaded through the PCP. Engage the cam in the PCP. Tie a bight knot with a small loop into the end of the rope, clip it with a non-locking carabiner, and clip that carabiner into the PCP locking carabiner. You should never have to remove the haul rope from the pulley for your entire climb.
To pair with the Micro Traxion, Petzl recommends using an oval locking carabiner (which can be a bit hard to find) or a standard HMS carabiner. Here we’re going with the classic Petzl Attache. (A locking “D” carabiner can work with a PCP, but it's not ideal.)
When you reach the anchor, clip the non locking carabiner with the haul rope somewhere on the anchor. Ideally, you clip it on the side where the leader will start the next pitch, so it's all ready to go and easy to grab (and remember). Sweet, now you can't drop the haul rope.
Only THEN do you (carefully) unclip the locker and PCP from your harness and clip them to the hauling point. Schweet, just about impossible to drop the haul rope or the PCP. Plus, the rope is already threaded and you can start hauling sooner. Being that one of the first tasks of the leader is to set up the haul fast and pull the bags a few meters off of the lower anchor so your second can break it down and get started, this is a good thing.
Minor safety note: after you clip the PCP to the anchor, remember to engage the cam on the pulley BEFORE you start pulling up rope. Reason: if your overeager partner below were to release the bags too early, their weight would come onto the cammed pulley. If you did not engage the cam and pulled up a bunch of slack, you could potentially have a free-falling haul bag put a huge shock load onto your anchor, big problem!
What's a good way to make a big wall anchor? Excellent question! We cover it in detail at this article.

Aiding - Clip gear as high as you can
Aid climbing, they say, is a game of inches. When leading, you can get extra reach out of each placement if you try to clip your aider as high on the gear as possible. With a cam, this usually means the thumb loop.
When leading on aid, standard practice to get maximum reach is to try to clip gear as high as you can.
Let's start with a bolt. Typically, you clip your ladder directly to the bolt is shown below on the right, as this gives you maximum reach. If you clip a quickdraw first, and then clip your ladder to the top carabiner of the quick draw, you're losing a few inches. Pretty much all modern both hangers have enough room for two carabiners, that's why this works.
Sometimes you may have strange hangers that can only accommodate one carabiner, or maybe you're leading a roof where it makes more sense to clip the quick draw first, but those situations are pretty rare.

When you place a cam, you usually (depending on cam design) have three different options of where to clip it:
the racking carabiner
the sling
the wire loop
The wire loop is generally best for aiding, because it gives you the highest reach. (Note that some cams, such as the Metolius Master cam, don’t have a wire loop.)
Note that clipping the wire loop decreases the rated strength of the cam by about 1-2 kN, due to the sharper angle. But, it's just for your body weight and not for taking a fall, so in this case it's fine.
Let's look at these three clipping options in the photo below.
Left: Aid ladder clipped to the racking carabiner of the cam. Not ideal, you're losing about 8 inches of reach. Clip it higher if you can.
Center: Aid ladder clipped to the sling. Slight improvement, but let's see if we can get a little higher.
Right: Aid ladder clipped directly into the wire loop. This gives you the most reach, and is usually the best option.

While most modern cams are designed with wire loops that can handle your body weight and even maybe a bounce test without getting too abused, older ones (below) may not. Repeated aid climbing can damage the cable housing and potentially kink the cable a bit. Newer style cams with more robust thumb loops generally don't have this problem. Here's a photo of my beloved old orange Metolius that’s not in the best condition. =^(


Organize the big wall bivy with a sewn daisy
The humble sewn daisy chain is a great way to hang pretty much anything and decluster your big wall bivy.
This tip is from the excellent book, “Hooking Up: The Ultimate Big Wall and Aid Climbing Manual”, by Pete Zabrok and Fabio Elli. 500+ pages of great instruction and photos, highly recommended for big wall climbers.
You need LOTS of places to clip gear at a big wall bivy. One simple approach: an old school sewn pocket daisy chain, strung between the anchor components, is a great way to help tame the cluster.
And, if you add a glove, it's a handy place to keep from spilling your can of . . . prune juice.


Big wall anchors: a middle ground
A big wall anchor does not have to be a 25 carabiner engineering project, nor modern minimalist. There's a broad middle ground that gives you redundancy for your hauling system, is fast to set up, sufficiently strong, and has no knots to untie. Let's look at a few ways to set this up.
A few words on hauling, from the excellent big wall climbing book, “Higher Education”, by Andy Kirkpatrick (Buy it here):
“Hauling is potentially one of the most dangerous aspects of big wall climbing. This translates to ultra-caution in all parts of your hauling system and interaction with bags, haul lines, docking cords, and pulleys. If you rush and make a mistake, drop a load or have it shift where it's not wanted, you could easily kill someone or yourself. I try and teach climbers to view their bags as dangerous creatures, like a great white shark, rhino, or raptor that is in their charge. The ability to keep them calm and under your control comes down to paranoia, foresight, and heavy respect for the damage they can do.”
Big wall anchors can take many different forms. Let’s see some examples.
Old school hardman sketchy
A caption here could be: “I’m so happy to still be alive after jugging this rope connected to a few RURPs strung together by clove hitches . . . (Photo by Dave Diegelman, climber, Dale Bard, Sea of Dreams, El Capitan, 1978)
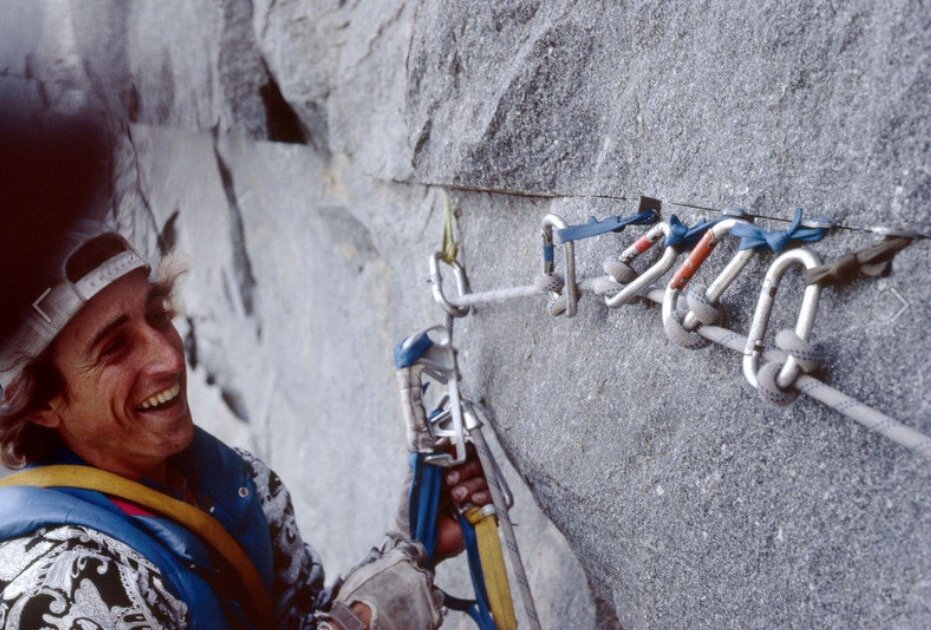
Photo by Dave Diegelman, climber, Dale Bard, Sea of Dreams, El Capitan, 1978
Modern minimalist
“Build your anchor with the rope, and haul from one bolt” anchor. (Purple and red cords are docking tethers for the haul bag.) Photo: Mark Hudon
Some big wall experts will tell you that it's fine to haul off of one bolt. Well, it probably is fine in bulletproof Yosemite granite, on a well-travelled route with newish 3/8” inch bolts on every anchor. But not everybody climbs with such sweet anchors, do they? How about a sandstone wall in Utah, where are the anchors are often older and in much softer rock? Maybe not!
Do you want your pet velociraptor tied to just one bolt, when including another one takes just a few seconds and a couple of extra pieces of gear? (Remember, never let anyone else dictate your level of comfort or safety, no matter what their credentials might be.)
The photo below shows making the with anchor with the lead rope. This can work if you are thoughtful and organized with your belay set up (aka experienced), but it can be a frustrating time suck if you start making rookie mistakes like clipping a heavy load over the top of the lead rope (ask me how I know this . . .) If this works for you, great, but if you're getting started in big wall climbing, having some sort of equalized masterpoint(s) and not using the lead rope to make the anchor, might be a better approach.
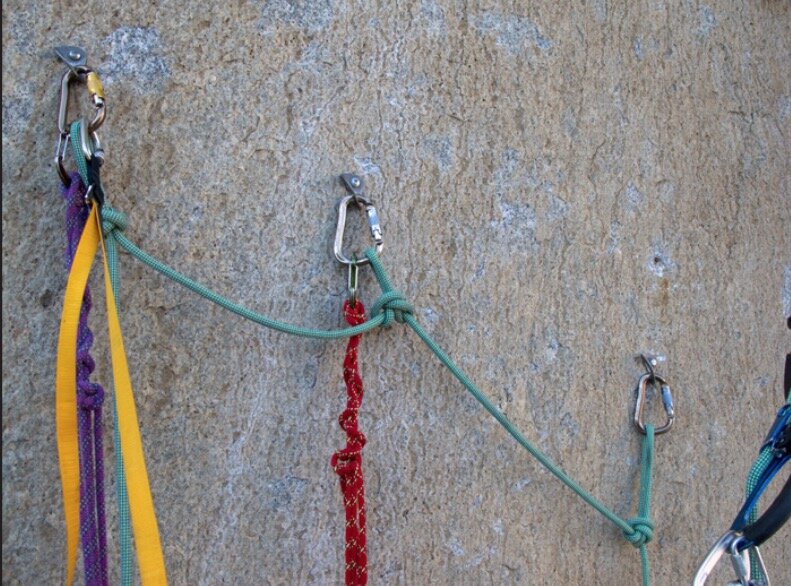
photo: mark Hudon, hudonpanos,com
Classic overbuilt
Quite possibly one of the best climbing illustrations ever, by the always amazing Mike Clelland, from (I think) Climbing magazine. Redundancy, definitely. 24+ carabiners and an engineering project, also definitely. Probably overbuilt for most people, but still a great drawing.

image credit: Mike Clelland
Ideally, big wall anchors have the following qualities:
Adequate strength - Adequate strength means strong enough for the intended loads, and not overbuilt. It also means adequate enough not to give you the slightest hesitation or stress about whether the anchor is going to hold.
Simplicity - A tangled rat’s nest of slings and rope is confusing and potentially unsafe, because it’s not easy to see what can safely be unclipped and what cannot.
Consistency - Ideally, you and your partner have the same system that you agree on and that you’re able to use at pretty much every anchor. The gear to do this is already packaged up in two identical “anchor kits”. One of these is in use at the current anchor, and the other is either on the leader’s harness or on the zip line ready to send up to them when they finish the pitch. A classic beginner mistake is to build a random anchor with whatever gear can be scavenged from your depleted rack after you’ve led your pitch. Please don't do this.
Zero to minimal knots - Tying knots, as in a cordelette style anchor, takes more time, energy, cursing and hassle to untie when you’re breaking down the anchor. Try to avoid knots in your anchor whenever possible.
Sketchy old school, modern minimalist, and classic overbuilt are not your only options. There’s a large middle ground, where your anchor can be strong enough, with a fast set up and easy break down, yet still have redundancy for your hauling point to keep your rhino under control.
For this example, let's assume:
Tina the Tiger led the last pitch and built the anchor.
A typical big wall trade route anchor of three horizontal bolts.
A hanging belay with no friction-inducing ledge. (If you do have the haul rope running over a ledge, then having your haul point as high as possible will help minimize evil friction.)
The hauling load is shared between two points; no hauling from a single bolt without a backup. (Of course you CAN choose to haul from one bolt; we’re not in this example.)
Tina fixed the lead rope (green) for her second to the right bolt with a butterfly knot, and backed it up with a clove to the middle bolt. You probably don't need an equalized master point to fix the rope for your second, because it’s holding pretty much just their body weight. Back up the rope, yes. Equalize it to a master point, probably not.
Tina’s partner is coming up on the right, so she set up the hauling point on the opposite side, in this case the left. Don't make your partner climb over the haul bags if you don't have to. (Note: if the next pitch traverses to say the right, you usually want to set up the haul on the right, so you can lower out the bags without them smacking into you.)
Certain parts of a real life anchor are omitted for clarity, such as rope bags, the leader’s daisies, etc.
Generally speaking, having the haul point higher is better, because it can give you a more efficient pulling stroke and can minimize friction from any ledges that the rope might be rubbing on. The longer the runners you’re using, the lower the hauling point will be. Keep this in mind when setting up your anchor.
Method 1 - Haul from one bolt, and back it up with a sling to an adjacent bolt
Let's start with the one bolt method, but give it a little more security with a back up sling. Most of the time, try to make this your go-to. Reason: it keeps your hauling point high, which is often better ergonomically, and can minimize evil friction if the haul rope is running over any rock edges.
You have one bolt that looks totally bomber, and it's nice and high. Schweeet! Simply back this up with a sling to a neighbor bolt. In the highly unlikely event the left bolt fails, you're backed up by the middle bolt. (This tip is from the outstanding big wall instruction book “Hooking Up” by Pete Zabrok and Fabio Elli, highly recommended.)

Method 2 - Two single runners
This is a simple yet often overlooked technique that can work great if the bolts are more or less level. Strong, redundant, distributed load, fast set up, and zero knots to untie when you're done. If you need to shorten a runner a little bit to better distribute the load, you can add some twists or make a few wraps around a carabiner, as we cover in this tip here.

Method 3 - Metolius PAS (or similar sewn loop tether, NOT a daisy chain with bar tacked pockets)
This also offers bomber strength, a quick set up, decent load distribution, and with the extra bonus of lots of places to clip things to full strength loops when you need to. It’s extremely handy to have multiple clipping points like this.

Metolius makes a longer version of the PAS called an “Anchor Chain”, which could be a good option if the bolts are a bit farther apart, or if you need a few more places to clip things. (Each sewn loop is rated 22 kN.)

Metolius Anchor Chain, image: Metolius.com
Method 4 - Quad anchor from 180 cm sling
You can make a quad anchor out of a 180 cm sling and keep the knots in it permanently tied. (Yes, a 180 cm sling is a little hard to find. Try a Google search for “Mammut Contact” or “Petzl Pur’Anneau”. ) Again, this gives a fast set up and good equalization, and offers several different places to clip in stuff.

Method 5 - Girth (or clove) hitch at the master point
This might look like a cordelette that would be a hassle to untie, but check out the master point: it's tied with a girth hitch. This makes it easy to untie even after it's been severely loaded. Yes, a girth hitch is fine to use at the master point, we cover it in depth here. You could use a clove hitch also, which we cover in this Tip.

Each of these systems offers quick set up, zero knots to struggle with, just a few extra pieces of gear, and redundancy and load distribution at the hauling point. For those not ready to embrace anchor minimalism, these methods offer a good compromise.

How to lead a roof on aid, by Petzl
Aid climbing through a roof can be insanely awkward and strenuous . . . or, pretty straightforward if you have the proper gear and technique. Check out these great diagrams from Petzl on how to do it, and learn some ways to practice before you get on the real stone.
Aid leading through a roof can be incredibly strenuous and awkward . . . or, if you have an adjustable tether, it can be pretty straightforward.
The always amazing Petzl website has a nice sequence of diagrams of how to do this. They show it using their nifty Petzl “Evolv Adjust” adjustable tether designed for aid climbing, but any sort of adjustable tether, such as the popular Yates, will work.
In fact, you may find the Yates tether actually works a little better, because it's easy to release under tension, while the Petzl one is not, at least for me.
If you're a beginner aid climber and your route has any sort of a roof on it (such as the famous “Kor Roof” pitch on the South Face of Washington Column in Yosemite), studying the sequence below will be extremely helpful, hint hint!
Practice! If you're in Yosemite, before you head up the wall take a training lap or three on the LeConte Boulder, which has a nice practice bolt ladder on it. If you don't have any real rock, get resourceful: hang some slings from the underside of an outdoor staircase/fire escape, a stout tree limb, or something similar. Please, do yourself (and any teams that might be stuck behind you) a big favor, and get this critical skill dialed before you try it on a real route.
The link to the Petzl website showing these drawings is here. But, if this page disappears, I screen grabbed the diagrams and put them below. (Dear Petzl graphic design department: You’re amazing! If you want to pick up a little freelance work on the weekends, please give me a call.)
All images below are by Petzl.com
Notes: Lanyard to A is cinched in tight. Feet can give some opposing tension to make the clip to B. The first thing clipped to B is a quick draw. Your lanyard and aider get clipped to the top carabiner of the quick draw.

image: https://www.petzl.com/INT/en/Sport/Aid-climbing-progression
Using your nifty adjustable tether, put some tension on B. (This is about the time when you'll want to kiss the person who invented adjustable tethers . . .)

image: https://www.petzl.com/INT/en/Sport/Aid-climbing-progression
This can be the tricky part. You need to release your weight from the adjustable tether off A, and slowly lower yourself out to hang beneath B. Having an adjustable tether that can release in a controlled way while under tension makes this process a LOT easier! Note in the diagram below, the climber is pulling toward A with their left hand, to create a little slack so they can do a little lower out with the tether.

image: https://www.petzl.com/INT/en/Sport/Aid-climbing-progression
Walk up the ladder hanging from B, and use your adjustable lanyard to hoist yourself up close to B. Then clip the rope to the bottom of the quickdraw. Repeat this sequence as needed to clear the roof.

image: https://www.petzl.com/INT/en/Sport/Aid-climbing-progression

Big wall beverage holder
Here's a way to repurpose some gear at your big wall bivy so you’ll never spill that precious can of . . . prune juice.
This tip come from big wall ace Pete Zabrok and his excellent new book “Hooking Up - The Ultimate Big Wall and Aid Climbing Manual”. Highly recommended for aspiring aid climbers!
One of the more vexing questions for big wall climbers is, “Where da heck do I put my beverage?! The last thing you want at your bivy is spilling that precious can of . . . prune juice, but there is a serious lack of flat spots to put it. (An extra chalk bag, of course without chalk, also works well with this.)
Fortunately, resourceful big wallers came up with a crafty solution.


El Capitan "Gigapixel Climbing Routes"
This amazing photo project stitches together more than 2,000 images into one single, super high resolution photo of El Capitan. Add onto this redlining of routes and over 2,000 more photos of a climbing team going up the nose, and you have some serious rock climber eye candy.

This made the rounds in Yosemite circles a few months back, but it’s such an amazing photo project that it deserves a wider audience.
The photography wizards Eric Hanson of Blueplanet VR and Greg Downing of HyperAcuity created an extremely high resolution, zoomable image of El Capitan, complete with red lining of routes and a climbing team in action on the Nose. You just need to see this, click the button below, zoom in, and be amazed.
The technical details of how this photo was created go something like this: a high definition camera took about 2,000 images of El Capitan, and then the images were stitched together to make one single super high res image.
Then, all the climbing routes were drawn on the photo.
And to top it off, another 2,000 or so photos were taken of two climbers on a one day climb of the Nose route, and these were added to the photo.
You don’t have to have ambitions of El Capitan to appreciate the technical expertise, creativity, and beauty of this project.
And, if you do want to climb El Cap, this could be a terrific planning and route finding resource.
(For example, you can see in this photo exactly how far down you need to lower down of the Boot Flake to properly execute the famous King Swing on the Nose :-)


Two clever ways to transition from aid to free climbing
When aid climbing, the transition from your nice comfy aider steps into free climbing a few 5.6 moves can be surprisingly terrifying. After you know these two clever tips from big wall expert Chris McNamara, it's a LOT easier.
The transition from aid climbing to free climbing can range from slightly awkward to semi-terrifying, but with the right techniques it doesn't have to be.
I REALLY wish I knew about these techniques on my first couple of walls!
Fortunately big wall expert Chris McNamara made a great YouTube video showing how it’s done.
There are two methods shown here.
Method #1: clip a sling and stand in it. This works well when you have a few moves of free climbing followed by more aid.
Method #2: clip the rope to your ladder, and leave your ladder behind. This may be a better choice if you have free climbing with no more aiding, such as when you’re approaching an anchor.
Aid to free transition #1 - Use a sling as a ladder
Place a piece as high as you can.
Clip a 120 cm / double sling to the gear, clip a carabiner to the sling, and clip your lead rope into this carabiner.
Key move: step into the bottom of the double sling. The sling effectively becomes a ladder step.
Reach down, unclip your previous ladder, roll it up to get it out of the way and clip it to your harness.
Stand up in the sling and start free climbing.
Aid to free transition #2 - Use a ladder as a sling
Place a piece as high as you can.
Clip ladder to the gear.
Clip a carabiner onto the ladder pretty much anywhere, and clip the lead rope into that as protection.
Step up in your ladder, start free climbing, and simply leave the ladder behind. This is easier if you don’t use a tether on your ladder.
You can reach down and remove your lower ladder before you do this if you want to, or simply leave that one behind as well.
Check out both these transition methods from big wall ace Chris McNamara.

Andy Kirkpatrick - Tips on staying alive on a big wall
British big wall expert Andy Kirkpatrick has some battle-tested advice for staying relatively comfortable on a big wall, even when the weather goes sideways. These tips are from his excellent book, “Higher Education” - highly recommended reading!
British hardman Andy Kirkpatrick has not only climbed El Capitan more than 30 times, he’s also climbed remote big wall expedition routes in some extremely cold and harsh conditions all over the world. He knows a LOT about staying warm and coming back in one piece.
Most of the tips below are from his excellent big wall book, “Higher Education”, definitely recommended reading if you want to climb the big stuff.

image: “Higher Education” book cover, by Andy Kirkpatrick
Some solid big wall / aid tips from Andy:
This is hopefully painfully obvious, but always bring a rain fly for your portaledge, no matter how cheerful the forecast.
Always try to stay dry, or at least as dry as you can. “You will always be wet in a storm, but there’s a difference between damp and warm, and soaking and shivering.”
If you’re already warm and dry, do everything you can to stay that way. That means, don’t leave your nice dry portaledge to go out in the rain and fix a pitch. If you’re leading and starting to get wet, really think through whether you should be pushing on in the storm, or retreating back to your dry ledge.
Even in summer conditions, bring clothing like you’re on a winter alpine route. When you’re hauling 100 kg of gear, and you’ve got a 170 liter haul bag, bringing some extra warm gear that you already own is really not that big a deal.
What kind of warm gear? Synthetic sleeping bag, (never down) with a minimum rating of 20 Fahrenheit. Long underwear, top and bottom, at least one pair of warm socks for sleeping, fleece top, Das Parka type synthetic belay jacket, balaclava, gloves.
Use a bivy sack over your sleeping bag, in addition to the fly on your ledge.
Do everything you can to keep your sleeping bag dry. It's your largest piece of warm “clothing” and last line of defense. If all of your clothes are truly wet, consider wrapping the sleeping bag inside of a bivy sack over you like a blanket rather than you being inside the bag.
Avoid getting into a dry sleeping bag with wet clothes. Change into dry clothes first, or take off all your clothes and get into your bag.
Bring a small sponge to mop up water and condensation.
If you know a storm is coming in, make sure you have everything you need in or accessible to your ledge, so you don’t have to go out in the storm and burrow through your haul bag.