

Alpine Tips

Carry an ice screw for crevasse rescue
If you fall into a crevasse, having an ice screw lets you unweight the rope, making life a lot easier for your partners on top trying to get you out. If you have two screws, you could even aid climb your way out. Some minimalist glacier harnesses even have elastic tabs designed for carrying screws.

When you're on a glacier climb with a moderate to high risk of a crevasse fall, consider carrying an ice screw.
If you do fall into a crevasse, you can hopefully sink the ice screw and clip yourself to it. This can take your body weight off the rope, which will make life a LOT easier for your partner(s) on top to set up a hauling system, or allow them a bit of slack in the rope so they can put some sort of padding under the rope at the lip of the crevasse. If you have a second ice screw (which maybe your partner on top can lower down to you) you could even aid climb your way out of the crevasse.
The more obvious use is anchor building up top. You'll want a longer screw (16 cm minimum) to be sure you get good purchase in the glacial ice, which is often not the best quality.
For the weight conscious, it's hard to beat the Petzl Laser Speed Light ice screw (photo above). They have steel teeth, an aluminum tube, and are about 40% lighter than a similar steel screw.
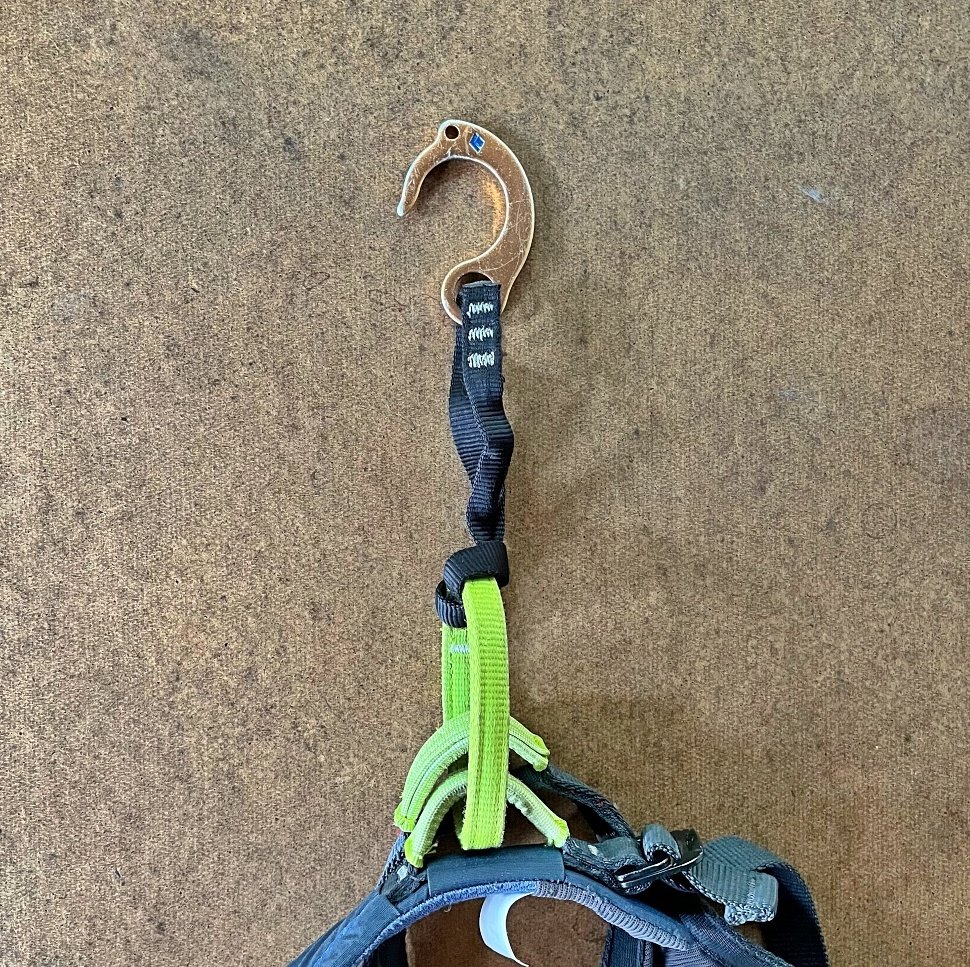
Here’s a photo of my better side in my Petzl “Tour” harness, a super lightweight harness designed for ski mountaineering and alpine climbing. Notice on each leg loop, there are two elastic tabs designed for holding an ice screw. Even on a minimalist harness like this, Petzl thought it was worthwhile to have a place to tuck away not one, but two, ice screws. It's not for ice climbing, it's for crevasse rescue.
(And no, that’s not a sexy lightweight aluminum screw as mentioned above, but you get the idea.)

This tip is mentioned in the book "The Mountain Guide Manual", by Marc Chauvin and Rob Coppolillo. It’s an excellent resource for more advanced technique, check it out!


Protect a descent with “downleading”
Here's how to protect the last person downclimbing a route from taking a big fall.

diagram: Andy kirkpatrick from his great book, “Down”, shared with permission
Scenario: Your team needs to descend a tricky section (steep snow / low 5th / 4th class rock). The most skilled climber on the team feels confident they can downclimb it . . . but they’d feel better with some sort of backup.
A #CraftyRopeTrick sometimes called “downleading”, or “belayed downclimbing” can be used to protect the last climber in this situation.
Build a solid anchor. Cams are fine, because you're not leaving them behind.
Give all the remaining protection (cams, nuts, ice screws, pickets) to the second to last person going down.
Tie one end of the rope to the anchor, and toss down the other end.
Then, all but the last 2 climbers descend the fixed rope, by rappelling the single line or by downclimbing protected by a friction hitch.
Here's what happens next.
The second to last climber places protection (snow or rock) as they descend, and then clips the rope to the pro. These placements should be below any tricky moves, not above.
The last person, typically a more skilled climber, unties the fixed rope, then ties the rope into their harness. (Be careful, don't drop it!)
A climber at the bottom puts the top/last climber on belay.
The top climber then downclimbs the pitch, cleaning gear as they come to it, just as if they were “seconding” a route. The gear prevents the last climber from a big fall should they come off. The last climber ideally climbs below each piece of gear before they clean it, to reduce the length of any possible fall.

Rappel tip - Getting the knot past an obstacle
Use this Crafty Rope Trick (CRT) to move your knot past any crack or crevice near the rap anchor that might snag your knot. Practice it at home before use in the wild!
Note - This post discusses techniques and methods used in vertical rope work. If you do them wrong, you could die. Always practice vertical rope techniques under the supervision of a qualified instructor, and ideally in a progression: from flat ground, to staircase, to vertical close to the ground before you ever try them in a real climbing situation.
Scenario: You’re the last person rappelling on two ropes tied together, and you’re worried about the knot getting stuck on a ledge or crack near the anchor.
(In the Portland Oregon area, the rappel off of Rooster Rock in the Columbia River Gorge has a notorious knot-eating crack at the top, and is a great place to use this technique.)
Try this #CraftyRopeTrick to move the knot past the obstacle.
Move the knot as close as you can to the ledge, obstacle or crack you’re concerned about.
Girth hitch a two foot single sling above the knot, clip the other end to your belay loop with an extra carabiner (not the big locker to which your rap device is attached), and begin to rappel.
The knot will move along with you as you rap down. Once the knot is past any ledges or cracks where it might hang up, unweight the rope for a moment, unclip the sling from your harness, remove it from the rope, and continue your rap to the bottom.
This may be a little hard to visualize when you first read it, but try it once or twice and it’ll make sense.
A few notes and cautions:
1) Practice this in a safe place! A staircase is a fine place to learn. It’s a little unnerving to see one side of the rope NOT sliding through your rap device, and the other strand sliding through twice as fast!
2) Doing this will cause one end of the rope to rise, so be sure both ends of the rope touch the ground or reach the next rap station with room to spare. Follow the best practice of always having a closed rope system; usually a stopper knot in the ends of your rappel rope, or the ends tied together. The first person down has the task of managing the rope ends. On a multi pitch rappel, a good way to do this is threading one rope end through the lower anchor and then tying the ends together to be sure the rope strands stay connected to the lower anchor.
3) This method is trickier on a free hanging rappel, as this makes it harder to unweight the rope to unclip the sling. If you see that the first few feet of your rappel is completely free hanging, then you want to add a load releasable hitch, such as a Mariner’s knot, or maybe a Purcell prusik (which can extend under load) to the system so you can release it under tension.
4) Be sure to use a single length / 60 cm sling. Using a longer sling will probably cause the knot to be out of reach when you want to remove it from the rope.
5) Only do this when you have a metal-to-rope (carabiner, rap ring, chain, or quicklink) connection at your anchor. This technique causes the rope to slide through the anchor under load. This is something you NEVER want to do with a webbing connection, even if it's only for a short distance.
6) Hopefully this is obvious, but this maneuver only needs to be done by the LAST person coming down the rope.
7) This method works even of you have a third hand / autoblock on the rope. If you don't have an auto block, you can probably simply grab the tails of the rope with your non-brake hand and pull them along with you as you descend to move the knot down. No sling needed.
8) Oh, and please practice this a few times on a staircase at first, willya?
1 - Rig for normal double rope rappel.

2 - Girth hitch a single length / 60 cm sling above the knot connecting the ropes.

3 - Clip the sling to your belay loop. (Note: in the photo below it’s clipped to the belay carabiner; the belay loop is better.)
Now as you rappel, the knot will move along with you. When the knot is past the obstacle, unclip the sling from your harness, remove the girth hitch, and continue your rappel.


DIY - Add gear loops to your pack for alpine climbing
Can’t reach your harness gear loops with a pack on? Solution: Add a small loop of stiff cord onto your pack straps as a convenient place to clip gear.

On alpine rock routes, you’re probably wearing a pack. Even on longer one day routes from basecamp, at least one pack (maybe carried by the second) is usually needed for water, munchies, shoes for the walk off, and maybe a cap or windbreaker. But one of the Big Hassles with wearing a pack is that the pack waist belt can interfere with accessing the gear loops on your harness.
Counter this by adding two loops of parachute cord and tubing onto your shoulder straps.
These shoulder strap gear loops are a super handy place to keep some rock pro, a few extra carabiners and a nut tool, without fighting to get at the gear on your climbing harness hidden by your waist belt. Also, when cleaning a pitch as a second, it’s a fast and easy-to-reach place to clip gear. Of course you're not going to keep your entire rack for a long pitch on these gear loops, but more like a handful of pieces you anticipate needing between one good stance and the next.
(Some climbers may rack snow pickets and ice screws here as well. But, keep in mind what this sharp flying metal in close proximity to your face might do to you if you take a fall. Not my first choice . . . )
Here's how to do it.
Supplies:
12 inches of 3/8 inch plastic tubing (internal diameter - “ID” of 1/4 inch, get this at any well-stocked hardware store)
About 32 inches of parachute cord
2 zip ties (optional)
knife/scissors
lighter
Cut the tubing and cord in half, so you have two 6” pieces of tubing and two 16” pieces of parachute cord.
Patiently push the parachute cord through the tubing. Note, do NOT burn the ends of the cord before you do this, otherwise it won't fit through the tube. Ask me how I know this . . .

Bring the ends of the tubing together, and tie an overhand knot in the parachute cord around your pack strap, as close to the tube ends as you can. This should make the tube into a nice oval shape, and give you an inch or so of tail in the parachute cord.
Now you can burn the ends of the parachute cord to seal them. Do this outside or in a well ventilated area, use a candle or cigarette lighter, and have a small bowl of water to dunk the ends in once they are burning a bit.

This next step is optional, but nice to do if you have zip ties. Take two zip ties, and secure the tails of each loop of para-cord to your backpack strap. This helps keep the gear loops vertically aligned so they don't flop around. Trim off the zip tie after you’ve cinched it tight. (Below left, untrimmed zip tie, on the right, trimmed zip tie.) (Note that the zip ties are not loadbearing at all, they're there to keep the loop oriented up and down.)

Ready for action.


Learn the "V clove" anchor
Trying to build a three piece rock anchor with just one double runner? The “V clove” anchor is a Crafty Rope Trick (CRT) that will let you do this. Slick!
I first saw this clever technique from a video posted by Josh Beckner, an IFMGA certified mountain guide. A link to his video is below. Thanks Josh! Connect with Josh and the School for International Expedition Training.
When building a three piece gear anchor, many climbers will automatically reach for the cordelette. However, if all you have is a double length / 120 cm sling, and if your gear is pretty close together, here are a couple of ways to rig it.
One way is using a girth hitch at the master point, covered here.
Or, try the “V clove” anchor.
Will you use the V Clove very often? Maybe not. But for more advanced climbers, it’s a fine trick to add to the toolbox.
Note: if you have one gear placement that's noticeably better than the other two, it’s best to make that placement the one that gets clipped, not one of the two placements with the clove hitches. Doing this can slightly improve theload distribution, because the additional strand of sling can mean a slight increase in load going to this piece. (In the example below, that would be the placement on the right.)
Here’s how to do it.
Place 3 pieces of solid gear.
Clove hitch a double length / 120 cm sling to the left piece, with the stitching close to the clove hitch.

Add a second clove hitch to the middle carabiner. Try to get the stitching between these two clove hitches to keep it out of the way.

Next, clip the sling to the right carabiner.

Clip a master point locking carabiner to the two strands that are hanging down.

Tie an overhand knot, you’re done.

Check out the video below for full instructions, starting at 3:00.
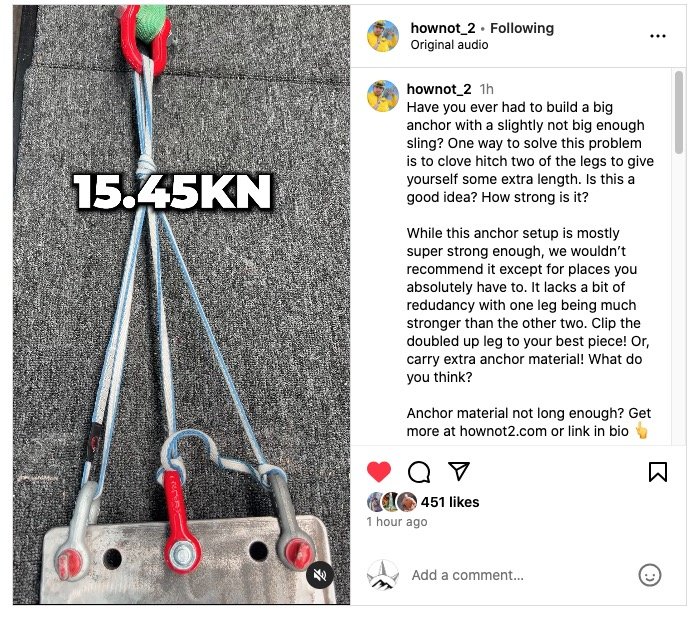
How strong it it?
Ryan Jenks from HowNOT2.com tested this anchor. With a Dyneema sling, it broke around 15 kN.
While not as strong as some other methods, given that the maximum possible force in recreational climbing is around 8-ish kN, this anchor is definitely strong enough, IMHO.
Here is a link to his YouTube short video showing the testing.
Below is a screen grab.

Sport climbing tip - use a quickdraw for a “fifi hook” rest
Working on dialing the moves on a sport climbing project, and don't care how many takes you have? Give your belayer and the rope a break by clipping directly to each bolt for a rest.

You’re working a sport route at the upper end of your leading ability. You are practicing dialing all the moves, and don't care how many takes you need from your patient belayer. Here's a simple tip to give your rope and belayer a break.
Start your climb with a quickdraw clipped to your belay loop.
When you make it to the next bolt where you need a break, clip a draw, clip your lead rope, then clip the belay loop draw into the draw on the bolt.
Clip to whatever carabiner is convenient. Top or bottom, it doesn’t matter.
You can now take a full rest while hanging on your own draw, shaking out your arms, and scoping the next few moves.
This is known in some circles as “clipping in direct.” Other folks call it a “dog draw”, because you’re “hangdogging” the route.
(Bonus Tip - fingers pointed up, not down, is the Better Way to shake out. With your fingers pointed up, gravity helps the blood flow faster away from your pumped out forearms.)
This is essentially using the quickdraw clipped to your belay loop as a fifi hook, a device used by big wall climbers to clip in and hang whenever they need a break.
You of course remain on belay the entire time. But because you never called for a take, your belayer is not holding your weight on the rope, giving them a rest as well. Most important, you’re not losing your hard-won gain up the rock due to the rope stretch. It also gives the rope a chance to relax.
Some people might be concerned that chaining quickdraws together like this might cause some nicks/burrs that might damage the rope. This is theoretically possible, but I've never noticed a problem with it. Your mileage may vary.
When you're ready to climb again, unclip your “fifi” carabiner, let it hang again from your belay loop, work the next few moves until you get to the next bolt, and repeat as necessary.
Here's the classic big wall fifi hook. (Yeah, I know it needs a release loop in that top hole . . .) If you have one of these, you can certainly use it instead of a quickdraw. Slightly easier to take out.

Learn the "SWAMP" anchor
Need to build a quick 2 piece anchor and all you have left is a shoulder length sling? The SWAMP anchor is your new best friend! Learn it here.

I first saw this anchor in action at Smith Rock in central Oregon about 15 years ago. I was in the “mouth” on Monkey Face, belaying my partner on the airy aid pitch. While waiting, a Canadian guide popped up from another route, and set up this anchor in about 15 seconds to fix the rope for his partner. “DANG”, I said, “That’s pretty slick, I've never seen an anchor built like that before.” He said it was common practice in Canada and the UK, where he had lived for a while.
I'm sure this rig has some different names of different parts of the world, but in the US it’s known as a “SWAMP” anchor, which stands for “Shelf Without A Master Point.” (I think this name is kind of lame, but I don't have anything better. If you know it by a different name, please tell me.)
The SWAMP anchor is simply an overhand knot tied in about the middle of a sling. Each end of the sling gets clipped to an anchor / bolt, and a master point locker gets clipped to the two loops made by the knot.
Fast to make, simple, minimal gear, decent load distribution, no extension, and completely redundant, pretty sweet!
Downsides: 1) no shelf (but those are a bit overrated, IMHO) and 2) might be a bit hard to untie after loading, depending on the sling material. (Some folks seem concerned about lack of redundancy if one leg were to be cut and then a heavy load applied to the other leg. In a recreational climbing scenario I think this is extremely unlikely to happen, but in other anchor applications it might be a concern.)
Tying a standard cordelette style rig with a 60 cm sling usually doesn’t work, because the knot and loop take up too much of the sling material.
A girth hitch master point solves pretty much the same issue and is easier to untie. Try them both and see which one you like better.
As seen in the video, this is only used on a 2 piece anchor.
It’s completely redundant and non-extending, but like all statically equalized systems, does not do so well in the load distribution / equalization department. However, if you have a well defined direction of pull, and all you've got to build your anchor is one shoulder length sling, this can be a good #CraftyRopeTrick to have in the toolkit.
Let's address one common objection right off the bat: how strong is this? Yes you are completely reliant on that one knot holding. Good news: #SuperGoodEnough!
I tested this configuration with Ryan Jenks / HowNot2.com in spring 2023, and the results are below. About 20 kN in Dyneema, and about 28 kN in nylon. Being that your rope is going to break around 16 or 18, I think 20 is just fine.

Here’s a nice video posted by Josh Beckner, an IFMGA certified guide, covering just about all aspects of building 2 piece anchors. The SWAMP is demonstrated starting at 11:10.
And, here’s a photo sequence showing how it’s done.
Clip a single runner to one bolt or gear placement.

Tie an overhand knot in about the middle of the sling.

Clip the sling to the second bolt or gear placement.

FInally, clip in the master point carabiner and rotate the knot upwards a bit so it doesn’t abrade on the rock. Done!

You can also tie it with a double length / 120 cm sling. Can we call this the “Double SWAMP?”
Double over the sling, tie an overhand knot, clip one loop to each bolt.


DIY - A Better Way to carry your cleaning tool
Your nut cleaning tool Is a crucial bit of climbing gear that you never want to drop. Here is a little DIY project that will ensure it always stays attached to you.
Your nut cleaning tool is a vital bit of gear, and you don’t ever want to drop it. Most climbers typically tie a few feet of string/cord to their cleaning tool, allowing one end of the cord to be always clipped to their harness. The main problem with this method is that the extra cord constantly tangles with all the other goodies on your harness gear loops.
Note - it’s a fine idea is everyone on the team has a cleaning tool, leader included.
I tried a modification of this, with the short loop of bungee cord. That was working pretty well until I was cleaning a stopper at eye level, let go of my cleaning tool, and almost lost my eye as the little bastard shot past my head from the rebound of the elastic. Bad idea!
Here's a hybrid system, that keeps the tool always attached to you, has a little stretch bungee type system to let you extend and retract the tool, but not enough stretch to take out an eye.
With about $3 worth of hardware and 10 minutes, you can craft a Better Way. This system lets you fully extend the nut tool to clean a placement, yet stays neatly out of the way when not in use. It’s a good rainy day project. (You can likely figure it out from the photo alone, but here’s some directions anyway.)
What you need:
A single mini “keychain” carabiner, ideally one rated to carry a decent load. Kong makes what they call an "Mini D accessory carabiner", rated to I think 600 kg.
About one foot (unstretched) telephone cord - remember those? I got mine at Goodwill for $0.50, or get it new online
Two aluminum double sleeve swages from the bulk rope/wire section of a decent hardware store. Bring the phone cord to be sure you get the right size swage
Wire cutters and sturdy pliers, Vise Grips, or bench vise
To make it:
With wire cutters, snip off the phone jacks from the ends of the phone cord.
Pass about 2 inches of the cord through one sleeve of the swage.
Run one end of the phone cord through the nut tool. (Do not pass the cord through the butt end of the nut tool, as the cord will get mangled when you have to smack the tool with a rock or hammer to remove a really stubborn placement.) Note the Black Diamond nut tool in the photo, which has a very handy bottle opener on the butt end.
Run the free end of the cord back through the second sleeve on the swage.
Clamp hard on the swage with your vise, pliers or vise grips, mashing the swage together around the phone cord.
Repeat on the other end of the phone cord with the carabiner. I wrapped some athletic tape around the phone cord/carabiner connection, to be sure the loop never can come off the carabiner.
When on your harness, the butt end of the tool is clipped to the carabiner, keeping it well out of the way.
That’s it, and happy cleaning! That next welded tri cam you find will be your wall booty.


"Lost in the Gorge" - a cautionary tale
This account of a lost person (shared with her permission) is instructive at many levels. As you read it, make some mental notes about her good decisions and perhaps not so good decisions. Could this happen to just about anyone? Answer, yes.
This story is an account of a lost person in the Columbia River Gorge, Oregon. It was originally printed in the November 2014 Mazamas bulletin.
It’s shared here with the permission of the author, who wants as many people as possible to learn from her experience and hopefully avoid a similar one.
Pam did many things right, and a few things not-so-right. As you read this, make a short list of what you think these things might be.
Probably the single most important thing she did right was to be able to determine her latitude longitude coordinates from her phone, and transmit that information to 911. This is a vital skill for any backcountry traveler, yet many people who carry a smartphone with complete GPS capabilities don't know how to do this. We cover various techniques in this tip here.
Lost in the Gorge
by Pam Monheimer
I admit it; I was the woman lost in the Columbia River Gorge on January 29, 2014. I had been trained in mountaineering, avalanche basics, CPR and Mountaineering First Aid (MFA). At first I was embarrassed and horrified that my friends and my Mazama acquaintances would learn of my debacle.
When I was finally located, rescued, been transported out and, at 11 pm, arrived at the Sheriff’s van to be debriefed, I was sick to see that the Angel’s Rest parking lot was packed to capacity with rescue teams, ambulances, police cars, and, of course, the four news channel crews. I caused a lot of people a lot of trouble and worry. I am sorry. I am grateful to those who helped rescue me, and to the Mazamas for providing me the mountaineering training that kept me alive. I want to tell my story as I think I can help fellow hikers and perhaps save a life, especially with colder, wetter weather and shorter days upon us. As I’ve been told more than once, “nobody plans on getting lost.” Not even on a short hike.
In the past 18 months I have hiked over 2800 miles, climbed atop and skied numerous mountain peaks in the Cascades and Olympics. I have hiked and climbed the entire Haute Route in France and Switzerland. Getting lost for me in the Gorge is like getting lost in my own backyard. I know it like the back of my hand. When I drive Highways 84 and 35, I can name all the mountains, hills, waterfalls and trails to myself. The Columbia River Gorge is in my DNA.
I frequently hike with friends and, as we travel at different paces, it is not unusual for us to split up with plans to meet at a designated place and time. I was hiking with my friend, William, a world-class runner and climber with whom I often hike both the Gorge and Mt Hood. It was 34 degrees with a light rain falling. We had a few hours to spend hiking in the Gorge. We started out together in the late morning in a remote area a few miles behind Angel’s Rest. We were in a place I’ve hiked a more than a dozen times before. William and my vizsla puppy, Tüz, went running ahead, and we planned to meet back at my car at 2:30 p.m. I was listening to a book on my iPhone and was so engrossed I didn’t realize how much time had passed. When I noted the time, I realized I needed to quickly head back. I cut through the woods, off trail with my compass in hand to get back to the main trail that would take me back to my car.
After 20 minutes I still hadn’t found any trail. I thought I was in a totally unfamiliar area, didn’t recognize any surroundings and was among fallen trees, deep brush, and on a very steep slope. The light rain had turned heavier and it was becoming quite breezy. I was worried, I knew I couldn’t be very far from a trail, but I was scared enough with the changing conditions that I called 911 then quickly lost the connection, as cell service was iffy at best in the area. I called twice more and finally made contact with the Multnomah County Sheriff, as my call had been answered by Clackamas County Emergency. I explained that I was in Multnomah County.
After describing my location, I emailed and texted my exact coordinates from my GPS at 2:39 p.m. The sheriff assured me help was nearby telling me, “they had found my car, William, and Tüz, and that the whole world was coming to help find me.”
The most important thing I did after that emergency call was to stay put, a very important Mazama lesson. Search and Rescue had my exact location. I paced and did jumping jacks to stay warm. In another text the sheriff asked me how much battery time was left on my phone now; 25 percent, yikes, it was over 50 percent just a few minutes earlier. Once my situation hit the news, friends and family called, texted and sent Facebook messages. By 3:15 p.m. my phone was dead.
The breeze had blown into the famous Gorge gusts. Luckily, I was wearing the correct clothing and boots for the day. I had a waterproof jacket, pants and Gore-Tex lined hiking boots. I was also wearing a down sweater underneath. All that was fine for the first few hours, but now it was 4:30 p.m. and I was soaked, shivering and darkness was settling in. How long could my rescue take? Rescue had had my coordinates for over two hours.
I went into survival mode. I dug a hole for shelter next to a large downed tree with my gloved hands, filling it with leaves, small branches, pine needles and anything else my filthy, frozen hands could carry. I then attempted to build a cover made from larger branches to try to shield myself from the rain and wind until rescue arrived. For a few desperate brief moments I considered making a run for the trail in the remaining daylight. Had I done so, I fear there might have been a less fortunate ending to my adventure. It was odd to be alone in the ebony forest with only the sound of the wind and rain. I had no fear of being alone, I had passed survival training.
As I lay in my dugout in the pitch black, no moon powerful enough to shine through the awful inky, rainy, gloom, I realized I did not have my “10 Essentials” that should be taken on every hike. BCEP and the Mazamas had drilled into my head over the past year that those essentials should always be in my pack. Just a week earlier I was sitting on the summit of Mount St Helens with my larger backpack filled with these 10 Essentials. I didn’t think that it was necessary to repack my smaller pack for a few short hours of hiking, but then again, I hadn’t planned on getting lost either. Thus I had no headlamp, no extra clothing or waterproof matches, or any other useful tool that might help me remain safer and warmer until help arrived. All I had was my small daypack with a slowly decreasing amount of water and a lone protein bar.
Eventually I had to stop the jumping jacks and pacing, which had kept my muscles moving. The darkness and uneven terrain could prove treacherous. I lay down in fetal position in my wet, muddy hole to try and stay warm. I hugged the earth for warmth. My teeth were chattering so hard I had to put a cloth between my teeth and by now I also had a raging headache. After a while I realized I couldn’t move my curled legs or arms, they were both totally cramped. My mind was playing games, I didn’t know if I was awake or asleep. So this was hypothermia, I thought.
It had been five hours since I realized I had become lost and placed my 911 calls. Where was the cavalry? I thought something had gone wrong, perhaps the GPS coordinates had been incorrect, there had been a landslide, or worse a change in plan with daytime rescue. I needed to stay alive until morning so I could get myself out in the daylight. Then I had the realization that I might not make it. I was too cold to cry. I thought about my family and my friends. All the small stuff I wasted time and worry on. All the things I never did or said. I truly thought this would be where I died. By 7:40 p.m. I was so darn miserable but something inside me refused to give up. It took all my strength, balance and my huge pain threshold to stand up, as I knew I had to move if I were to stay alive. I jumped in place and screamed “I am not going to die here!”
In the distance I saw faint light. I remembered my GPS watch had a backlight. I flashed it as I jumped. I was screaming help and hello to no avail, as the storm was too loud, and flashing my light. A few minutes later the faint light came closer. I waved my light frantically and the rescuers waved theirs back. It took over 30 minutes for the five-man search and rescue team to reach me. I learned there were four teams that had started out at different points looking for me as well as a sheriff’s “quick response team” comprised of two runners who were out looking for me. It was the quick response team that found William and Tüz. They ran nearly 15 miles looking for me and as I later learned, they came within 1.5 city blocks of where I was calling for help.
My rescuers went into action, following the same protocols I had learned in Mountaineering First Aid. I was so relieved and grateful to this group who saved me. They carried the largest packs I’d ever seen. They offered me blankets, dry clothes, water, food, etc. I was too cold and shivering so hard I couldn’t fathom changing clothes; they persisted and then wrapped me in the blankets. They then had to study maps to figure the safest way out. We went through thick brush, fallen trees and down a steep slope and we still had to walk a few miles to one of the two vans that had made it to the fallen tree a mile from the start of the trail. One of the vans then got stuck in the mud, which added more than an additional hour to my evening.
I used the time to get to know this quality group of volunteers who had braved the elements to find me. Some were still in high school. I learned that they had to pay for their own gear and have made it a personal goal to support Portland Mountain Rescue with an annual donation.
William and I went back a few days later with the sun shining, a layer of fresh snow dusting the trail, and a GPS unit with my coordinates plugged in to see where I had gone wrong and “get back up on that horse right away.” I was fearful of going off trail again and didn’t want one scary incident to ruin my love of exploring.
It was bizarre to see the shelter I had built myself, and understand that I had done the right thing by staying put, as the terrain was steep with lots of fallen trees. I’ve learned to carry orange trail tape for when I want to explore new areas and mark turns, and I always bring my 10 Essentials. I have a set of those important, potentially life-saving items in every backpack I own. I never leave home without them.

How to make a backcountry 911 call
When reporting a wilderness emergency to 911, take a few minutes and gather some critical information before you make the call.
This tip was written with expert advice from Steve Rollins, a long time member of Portland Mountain Rescue
Write down key information BEFORE you make the call.
State your location first.
If your battery is low and/or you have a poor cell signal, texting key info to your trusted contacts might be better.
You, someone in your group, or someone you come across, has a serious injury in the backcountry.
You're fortunate enough to have cell phone service, or possibly can text with a satellite communication (satcom) device such as a Zoleo or Garmin InReach. (In this example we’re talking about using a phone primarily, but the pretty much same advice applies to using a satcom device. This article is also geared toward the United States; different countries of course have different emergency response systems.)
Note: Calling 911 is usually the first choice. If you’re using a satellite communication device that can only text, be aware that many 911 call centers, as of this writing in 2018, CANNOT receive text messages. If you have a satcom device that can only text, it's better to text your in-town emergency contact person, and have them forward the information to 911. But using a phone to directly call 911, if possible, is always the first choice.

As of July 2023. Source: Access SOS
However… if you have a weak battery and weak to minimal cell signal, sending a text to a trusted contact or 911 might be a better choice than a voice call. You might get lucky and 911 gets your text, but more likely your contact people will get it and transmit the information.
Before you grab your phone and dial 911 in a panic (or text your at-home emergency contact person), take a few deep breaths, get a pencil and paper, and write down some important information that Search and Rescue (SAR) will probably need. Note that 911 will probably not ask you for all of this information; you’ll need to volunteer some of it.
Keep a pencil stub and a few small sheets of tyvek paper, free from a cut up repurposed Priority Mail envelope, in your first aid kit for this very purpose.
If you have a few different people on your team, do a phone inventory before you make the call. See who has the strongest cell signal and battery level. Different cell phone carriers can have different signal strength in the mountains. You don’t have to use your own phone if a better battery and a stronger signal comes from someone else.
Be patient. The 911 operator is used to dealing with urban emergencies and may not initially understand that you are calling from the backcountry. They also are probably not familiar with things like UTM coordinates nor things like “I’m at the Hogsback on Mt Hood.” Be patient. Don’t get frustrated. They want to help you. Explain your situation, have them repeat back everything, and tell them to transmit the information to county SAR; more on that below.
One more tip - If you call 911, you are most likely going to initiate a rescue. Do not call 911 for a “We’re okay, but running late” type of call. That is a non-emergency, and should go to your contact person in town, not 911.
If your phone is cold or you have a weak signal, try to transmit the most critical information first. That's going to be 1) your location and a 2) description of the accident. If your phone cuts out in the middle of the call, hopefully you had time to share the important stuff first.
A boiled down way to think of it is this: Transmit the “where, who, what” information, ideally in that order. Where, general location, route, exact GPS coordinates if you have them. Who, your name and call back number. What, describe the accident, number of patients, and overall seriousness.
Tell the 911 operator, “I am calling from a wilderness location and I do NOT have a street address.” (This hopefully gives them a heads-up that this isn’t a standard urban 911 call.)
Tell the 911 operator, “I’m going to give you some information that you normally do not need or ask for. I want you to relay ALL of it to county Search and Rescue.” (911 call centers have a protocol for urban emergencies that they usually follow, and this gives them notification that they need to record more than usual.)
Exact location of the accident. If you're at a well-known spot like a trail head, campground, or climbing route, start with that. If not, provide GPS coordinates. Try to use latitude longitude decimal degree format. Example: 45.1234, -122.1234. Providing coordinates in another format, such as latitude longitude degrees, minutes, seconds or UTM, is acceptable, but many 911 call centers may not be familiar with this format, so use decimal degree format if possible to reduce the chance of error. (It’s easiest to transmit decimal degree coordinates by voice, because they don’t have tricky extra things like zones, eastings, northings, single quotes, double quotes, and degree symbols.) It's best to start off with your location. If your phone battery dies or drops cell coverage during the call, at least 911 knows where you are.
Side note: You should always know how to get your coordinates from your phone, here's a tip how to do this. Having a phone app designed to do this is a fine idea, like my favorite “My GPS Coordinates” for the iPhone.
If you’re giving UTM coordinates, tell the operator, “I'm going to give you coordinates of our current position. You may not be familiar with them, but write them down exactly as I say, repeat them back to me when I'm done, and pass them onto SAR.” Once SAR gets the coordinates, they will know what to do with them, no matter what format they are in. But if you have a choice, decimal degree format is better.
A verbal description of terrain, map location, or climbing route. “We are at the base of the Hogsback on Mt. Hood”. The 911 operator will probably not know what this means, but SAR will. Give this in addition to your GPS coordinates. If the coordinates get messed up somehow, the verbal description is a backup.
The caller’s name and phone number, and your call back number, or perhaps two. If it’s not your phone, write these number(s) down before you call.
List of injuries, most serious first.
Patient name, age and gender.
The time of the accident.
The local weather conditions.
Number of people in your group.
Your plan for treatment. Stay put and wait for help, or maybe start moving to a specific location. Generally, once SAR knows where you are, even if you’re mobile, they want you to stay put.
A request for what form of help you think you need, such as litter, sled or helicopter. Note that the decision for this is not yours to make, it's up to the SAR team. If you have a very serious injury and think you need a helicopter, you can make this known, but it's no guarantee you're going to get one.
What county you’re in, if known. SAR is typically coordinated by the county sheriff. If you make a 911 call from a wilderness location, depending on the cell towers you reach, the 911 call might go to a county that’s not the one you’re in. The operator may transfer you to the correct county, let them make this decision.
Patient’s emergency contact person and phone number.
Ask the 911 operator to REPEAT this information back to you.
More info . . .
Here's what will probably happen after you make the 911 call. The 911 call center will forward your information to the county sheriff search and rescue (SAR) coordinator. If you’re in a mountain environment, that SAR coordinator will probably contact the local mountain rescue team; hopefully there’s one in your area.
Either the SAR coordinator and/or the mountain rescue team may call or text you directly for additional information. After your initial 911 call, keep your phone warm in an inside pocket, available and charged. Don’t tie up your phone or use battery by texting or calling anyone else right after you make the initial call. SAR may want to know patient vital signs, weather conditions, altitude, wind direction and speed, and approximate snow conditions. This can dictate what equipment they need to bring and how to reach you most effectively. This may sound obvious, but if you get a call from a number you don't recognize, answer it! It may be SAR calling you.
Regarding battery life, a detailed text message uses a small amount of data compared to a voice message, and can transmit using a much weaker signal. If you have a weak cell signal, a text might make it out when a voice call will not. Compose a text to some trusted contacts. Don't use images or attachments. When you’ve composed your text, turn off airplane mode, hit send, and hope that your message gets out. Check after about five minutes to see if your text went out. If you didn't, moving to a higher location with less tree cover might help you get a better signal. Remember to turn airplane mode back on after you send it to save battery.
Consider monitoring your phone on the hour for 10 minutes to save phone battery; eg 11:00 to 11:10. (Hopefully you brought an auxiliary phone battery and a charging cable, the 11th essential.)
Avoid non-crucial texting and stay off social media. Sometimes easier said than done. There's been cases of someone trying to carefully conserve their phone battery, but turned their phone on and discovered loads of text messages and social media messages from concerned friends, which killed their battery. If you do get a pile of texts, try to not respond to them and save your battery for communication with rescue teams.
Giving your correct coordinates is extremely important. Write them down. Take time to get it right. Newer smartphones can access a greater number of satellites, such as the European Union and Russian satellite constellations, in addition to the United States satellites. This generally can give you a faster lock and more accurate position. This can become more important if you are in a deeper canyon or under heavy tree cover. So, if someone in your group has a newer phone, you might want to use theirs. Good news for climbers, being high up on the side of a mountain is going to give you about the best possible satellite reception. Again, try to give coordinates in latitude longitude, decimal degree format.
Be aware that a rescue can take a L O N G time. (At least that’s what it seems like when you’re waiting for one.) This is not the French Alps, when the Chamonix rescue helicopter can be on the scene in 20 minutes. There may be many people and resources that need to be mobilized. Sit tight and get comfortable, you're probably going to be there for a long time. So that means after you've stabilized your patient, you need to focus on making them and everyone else as warm and comfortable as possible. This may mean putting insulating pads, sleeping bags and warm clothing underneath the injured person, putting other clothing along their sides, and possibly wrapping them up mummy style in a tent or tarp, if you have one.

Faster rappelling with a group - fix each strand
Rappelling with a group , especially with newer climbers, can take a L O N G time. Here’s a Crafty Rope Trick (CRT) to cut that time almost in half.
Note - This post discusses techniques and methods used in vertical rope work. If you do them wrong, you could die. Always practice vertical rope techniques under the supervision of a qualified instructor, and ideally in a progression: from flat ground, to staircase, to vertical close to the ground before you ever try them in a real climbing situation.
Sometimes, a well moving climbing team can come to a screeching halt when making a rappel (or a few of them.) The logistics of setting up and completing a rap seems to gobble up the clock like no other part of climbing, especially if you have a group of newer climbers. Add to this approaching darkness or a building storm, and reasons to rap quickly can become even more pressing.
The next time you’re stuck in a crowd at a rap station, try this trick:
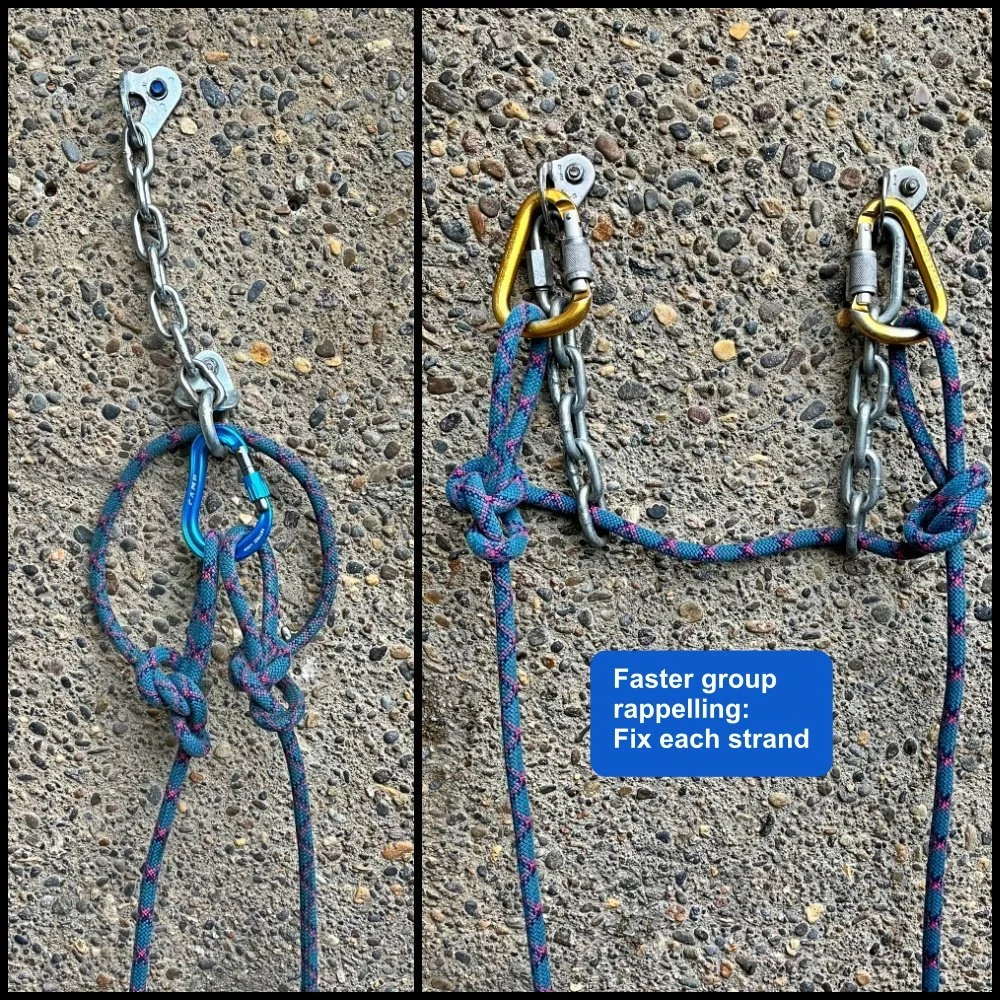
Feed the rope through the rap anchor as for a normal rap.
If the anchor has a single master point, clip a locking carabiner to the masterpoint. If the anchor is twin chains, clip a locking carabiner to each bolt hanger.
Tie a butterfly knot in each strand. Clip the butterfly loops to the carabiner(s).
You now have two fixed single lines, allowing one climber to rappel while another is rigging their rope. (I call this being in the "on deck circle" like in baseball.) The second person should be ready to rappel the moment the climber ahead of them is on the ground or at the next anchor.
This can really speed up your downward progress, because there's no downtime waiting for anyone to rig. Someone should be moving down the rope at all times.
The last climber unties the butterfly loops (which are used because they are fairly easy to untie even after being loaded), cleans the carabiner(s), and raps normally.
Note: Be sure that all climbers are comfortable rapping on a single strand of rope. If the rap rope is free hanging, and/or the rope is skinny or wet, climbers may descend faster than they are used to. If this happens, climbers can use various techniques for adding friction to a rappel - read about a few methods at this tip.
There are lots of different ways you can fix two strands of the rope. Here are two more.
The methods shown above are visually easy to check, and use knots and anchor components that are clear and obvious.
However, there are certainly a few other options.
You could tie a double strand bight knot, which effectively blocks both strands of the rope as well. Here's a double strand butterfly. (A figure 8 or an overhand would also work, but they are a bit harder to untie after being loaded.)

Another option is the Stone hitch. This is commonly used in canyoneering, not so much in climbing, but it is a rather simple and elegant way to isolate two strands of rope. Here's an entire article on this knot. Definitely practice this with a qualified instructor before you use it for real!

Another way to expedite a rappel - the “pre-rig” with an extension

Another approach to expediting a group rappel is to have everyone use an extended rappel, and do what's called a “pre-rig”. This means that everyone in your group has their rappel device on a shoulder length runner, and they are all attached to the rope at one time. By extending the rappel, the climbers waiting at the top will not be yanked around when the rope is under tension.
Doing this expedites the rappel, because the moment the first person gets to the ground or the next anchor and creates a little slack in the rope, the next person can immediately head down. This is the same idea as the fixed single strands Illustrated above, but allows each person to rap on double strands of rope, which gives a little more friction and is probably more comfortable for beginners. Having a pre-rig speeds up the entire process, because once again there should be someone moving down the rope pretty much constantly.
The number of people in your party, and the size of the ledge around the rappel anchor will dictate the method you use. Lots of people, and maybe a small stance? Use The “fix separate strands” method mentioned at the top. Small team, and perhaps a larger ledge around the anchor? Then use the pre-rig method described here.

Using an existing rope to set up a top rope
Use this rock gym employee trick to set up your next outdoor top rope, as long as someone else is climbing there already.

Here’s a #CraftyRopeTrick for the local crag - use someone else’s rope to set up your toprope.
Scenario: you’re waiting at the base of a popular route at for the previous party to finish their climb. While you’re keen to try the pitch, it’s rated at the upper end of your comfort level for leading, and you’d really prefer to climb it on top rope.
Here’s how you can use the rope from the previous team to set up your top rope.
Before the previous team has pulled the rope through the anchors, ask them if you can do the following trick.
Pull out your roll of athletic tape (which should be in every rock climber’s backpack), and tape one end of your rope directly to one end of the other team’s rope that’s running up and then down through the anchor.
This connects the end of your rope butted up to the other, with no knot that would otherwise get caught in the anchor.
Tape it generously and tight, with 3-4 inches of tape on either side where the rope ends butt up against each other.
Now, the previous climbing team can pull their rope through the anchor. If all goes well, it also pulls your rope up, through the anchor, and down to the ground. Remove the tape from the two ropes, and you’re all set up to top rope. Slick!
I first saw this trick in a rock gym, when the course setter was replacing a worn out rope. I thought he was going to have to climb the route and thread the new rope through the anchors, but nope, he stayed on the ground the entire time and use the old rope to pull the new one through the chains. Very clever!
Etiquette note: After the first person on your team gets to the top, it’s generally best if they make an anchor with their own gear and rerig the rope to run through it. This way, you’re not toproping directly through the fixed anchors and thus putting unnecessary wear on this gear. (This practice can change according to the climbing area and the type of hardware in use, so ask the locals if you’re unsure.)
1 - Place the rope ends butted up together. Try to get the rope ends lined exactly, so there's no little bump in the final tape wrap that could get hung up.

2 - Start wrapping athletic tape around the ropes, 3-4 inches from the end.

3 - Keep wrapping, overlapping the tape edges, and giving a few extra wraps where the rope ends meet.
(Yes, I swapped the ropes left/right for this photo, but I bet you can follow along . . .)

4 - Give a few squeezes to the tape when you're done. Leave a cm of tape of so left over and fold it back so you can easily unwrap it. The final length of tape should be about a hand span, or 6 inches.

5 - Done! Now, when you pull one rope, in this case green . . .

. . .the taped ends should pass through the chains . . .

and all through! Keep pulling green, and then you're ready to toprope on blue.


Use a tagline
Your big wall lead rack is pretty darn heavy, and it's going to be stupidly heavy if you take every single thing you need on a long, hard pitch. Instead, just take a light tagline, and pull up gear as you need it.
Imagine you're leading a long pitch on a big wall. The anchors are in sight, phew, you’re almost done, and suddenly . . . the Bad Climbing Fairy suddenly clips a 20 pound / 10 kg weight onto your harness! Would you want to climb with an unnecessary 20 pounds on you? Well, that's going to be the approximate weight of your haul rope plus everything you need at the upper anchor hanging on you near the end of a pitch. Leading a long aid pitch is strenuous! Don’t make it even harder by carrying more than you need.
This is even more important if you are doing some free climbing.
Rarely do you need to start a pitch carrying a load like this! Send out that heavy gear up on the tagline later as you need it.

There’s a fair bit of gear that the leader will need when they arrive at the next anchor. This typically includes:
An anchor kit (at a minimum 4-5 locking carabiners, possibly a mini quad or PAS to make an equalized hauling anchor)
The hauling kit, either a 1:1 or 2:1, typically a locking carabiner, progress capturing pulley, and an ascender, for a bare-bones 1:1
The haul rope, which if it’s a 10 mm 70 meter long static rope will weigh around 5 kg / 10+ lbs (about 70 grams per meter)
Maybe a rope bag to put the haul rope in
Maybe a windbreaker, water, and snacks
Instead of schlepping all this gear on the back of your harness, instead climb the pitch trailing just a lightweight tagline. This is typically 60 m of 5 or 6 mm cord. At the lower anchor, this can feed out of a small designated stuff sack. When the leader gets to the next anchor, they pull up the tag line, which is attached to a small bag with all the needed hauling gear inside.
Note: the team needs to be extra careful with this tag line, otherwise it's going to be an unmanageable mess. It’s best to put it in its own designated rope bag.
High Mountain Gear and Gear Perspective both make excellent small rope bags that are perfect for your haul line.
The leader can carry a second small rope bag to store the tag line as thay reel it in.


The belayer must be sure this “tag gear bag” is ready to get hauled, unobstructed, and has everything inside it that the leader needs.
The medium Fish Beef Bag is a good choice to hold all the tag gear.

http://www.fishproducts.com/pics/beefbags.jpeg
The tag line can also be used to haul up any gear as needed when leading the pitch, such as that number 4 Camalot you might need up high.
If the leader needs gear sent up and they are more than 30 meters up and have a 60 meter tag line, their partner can use the haul rope to extend the tag line, and then can retrieve the tagline back down.
Note: It is super important that the leader not drop the tagline! At the upper anchor, good practice is to pull up some slack, tie it off somewhere safe, and only then unclip the locking carabiner connecting it to your harness, which is probably on the back of your harness and easy to fumble.
Using a tagline can dramatically lower the weight you’re carrying as a leader and free up some precious room on your harness. The one small downside is that it takes slightly more time to set up your “real” hauling system, but the effort you save is usually worth the extra time.
Keep in mind you don't need a fancy Dyneema core expensive tagline such as the Petzl PURline.
This 65 m, 6 mm static cord from Black Diamond would be a good choice.


The "bunny ears" cordelette
Move over, old school cordelette-tied-in-one-huge-loop. Carrying a cordelette that’s “open”, or untied, can be more versatile. If you tie a small loop in each end, also known as “bunny ears”, you can reach placements that are farther apart, carry a shorter amount of cord, and rig an alpine block and tackle.
A standard cordelette is about 6 meters of 7mm cord, tied into one giant loop typically with a more or less permanent double fisherman's knot.
There are other ways to rig it. One is the bunny ears cordelette.
You may not want to carry this with the loops permanently tied, because after a while they're probably going to stay that way. Instead, you can carry it in an “open” configuration, meaning not tied at all. If you're in a situation where the bunny ears could be useful, take a second or two and tie them.
Take the same 6 meters of cord, but rather than tying it in a loop, instead tie a small loop in each end (figure 8 on a bight or overhand; figure 8 is easier to untie). By small, we’re talking an inch or so in diameter, as you only need to clip a carabiner with it. Be sure and dress the knot well and leave a good long tail of 3-4 inches.

So, what's so cool about the bunny ears system? Mostly, it's more versatile.
You can wrap the entire cord around a giant tree or boulder, or thread one end under and around a big boulder or chockstone. (It's best practice to not use a single strand of cord around a rock; better to double it up.)
No annoying knot getting in the way.
You can use it to make an “alpine block and tackle”, as shown in this Tip.
You can use it to connect three pieces of gear that are really far apart, by a clipping one “ear” to each of the outside pieces.
Because the “ears” give you a greater reach, you can use a cord length that’s a few feet shorter. This results in a lighter and less bulky piece of kit to carry with you. (But, first try it with the full 6 meters, and then cut it down later if you think you need to.)
How strong is it?
From my strength ratings page, we see that 7 mm cord is rated about 13 kN, while 6 mm cord is rated to only about 7.5 kN.
Using the rule of thumb that a knot decreases the strength of the cord by about 50%, that tells us the arms of a 7 mm bunny ears should be about 7KN, which should be fine.
For a long time, I thought that doing this with 6 mm standard cord would be a bad idea, because a single strand with a knot with only be rated around 4 kN.
However, I tested this with my buddy Ryan Jenks from howNOT.com, and guess what? 6 mm cord set up just like below broke around 15 kN! For me, that is #SuperGoodEnough. Here's a link to the video if you want to see the testing.
If you used some stronger cord with a Dyneema or Kevlar core like Sterling VT-X (15 kN), or Sterling Powercord (19 kN), then your bunny ears cordelette would be even stronger.

Below, the “bunny ears are used to clip three pieces of gear that are quite far apart. (And yes, anchor critics, the angle between the left and center strand is a little wider than is ideal . . .)
(and yes, there’s no “shelf” if you rig it this way, but the shelf is an optional part of an anchor. Want to tie in to the master point yourself and belay your second from the master point? No problem, shelf not needed.)

You can use it to connect three pieces of gear that are fairly close together, by clipping both ears to one piece. This gives you about the same “size” you’d have if you tied it in the traditional “one huge loop” style.

And, with some clever rigging, you can even connect two bolts that are side-by-side at chest level in a standard sport anchor configuration. In this case, the two ears are clipped to the left bolt, and the remaining strand is passed through the carabiner on the right bolt, doubling the cord and halving the distance.
This makes a tidy, compact anchor with two adjacent bolts. even with a huge long cordelette.

You know that Murphy's Law of using a cordelette, that the dang double fisherman’s knot always ends up right where you’re trying to tie the master point? That little hassle is gone with this system. (And yeah, I know you can mitigate that by clove hitching the knot next to your highest gear placement.)
On longer alpine climbs, bringing a cordelette gives you a ready-made source of material for rappel anchors. With the bunny ears rig, the small loop knots are usually fairly easy to untie, giving you more rap anchor material. When you tie a cordelette in a permanent fisherman’s knot, that sucker is going to get welded shut after a few climbs, and is just about impossible to untie unless you use needle nose pliers.
So . . . it works for anchors spread far, medium and close together, and easier to untie to cut up for rap anchors. What's not to like?
PS - Don't take my word for it, it's on the Petzl website.

image: https://www.petzl.com/CA/en/Sport/Installing-an-equalized-belay-station

Emergency fire starter - bicycle inner tube
This emergency firestarter is free, very lightweight, completely waterproof, and gives you a nice steady burn for at least five minutes. Oh, and be sure to stay upwind.
A bicycle inner tube cut about 1 inch wide works great for a firestarter.
Free
Can’t soak up water
Weighs close to nothing
Packs small
Burns great for a few minutes, enough to catch damp tinder
Only problem is that it stinks, so stay upwind. Yes, it’s toxic and nasty, but it’s for emergency purposes only, not as a regular go-to fire starter. Punctured tubes are free for the asking at any bike shop.
Wrap two “rubberbands” around a lighter so you always have your flame source and firestarter together.
Wheel style lighters don’t work when wet. One solution: Cut a small bit of plastic bag, put it over the business end of the lighter, and then secure it in place with one of your rubber bands.
If you're looking for a great fire starter for everyday use, you can read about one here.


A better, and silent, way to signal “off rappel”
Here’s a silent and effective way to tell your partner you’re off rappel.
Rather than yelling up “off rappel”, which may or may not be heard if it’s a windy day or you’re out of sight, try this instead:
when the rappeler is safe on the ground or at the next anchor and off rappel, she grabs a strand of the rope with each hand, and pulls the strands back and forth in large arm motions, several times.
This does two things.
It silently signals the remaining climbers that they can begin their rap set up.
It ensures that the ropes can pull freely. If the ropes are crossed, or hung up or in someway making the rope pull difficult, this can hopefully be remedied by the next climber down.
This tip is originally from Topher Donahue via Climbing magazine

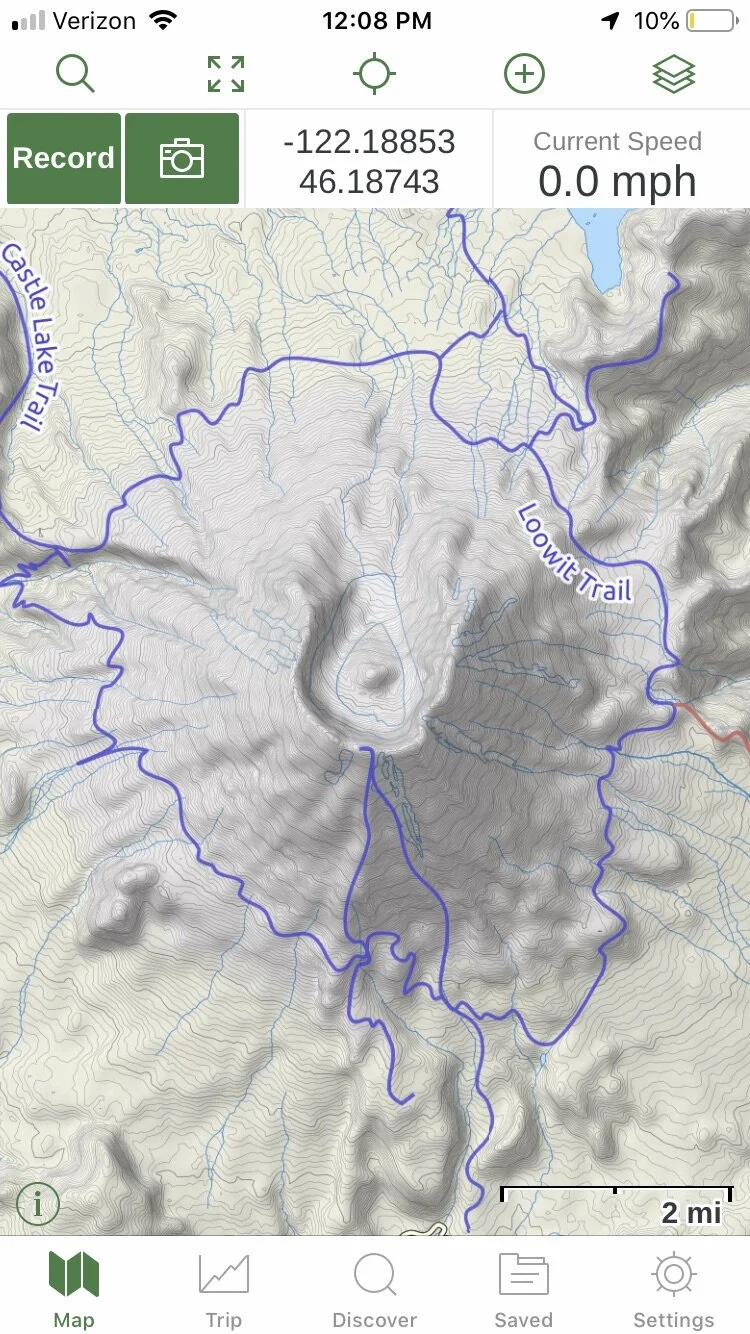
What are the most useful Gaia GPS map layers?
Gaia GPS has an astounding number of map layers for you to choose from. Here's a short list of my personal favorites.
Gaia GPS, one of the best available smart phone apps for wilderness navigation, has an amazing bounty of map layers. It's easy to get a little overwhelmed and wonder which ones might be best for a particular activity.
If you're fairly new to Gaia, you may want to check out layers listed below. No doubt you’ll come up with your own favorites over time, but these will be a great start.
(Note, some of these might be only available with a Premium subscription.)
Driving urban areas and paved roads: MapBox Streets HD
Major roads are clearly delineated, easy to read at a glance while you’re driving, pretty good points of interest. Nice road network, but no elevations. Minor roads can be a little hard to see.

Bike riding, some trail hiking, and driving obscure backroads: Open Cycle
Small roads have the same line weight as bigger ones, so it’s easy to see when you’re at a tiny junction. Open source maps means map features are likely going to be more accurate than other sources. Note the bicycle path in the valley floor in blue, but also all of the hiking trails are shown, in red dashes. Contours and shaded relief are shown, but no elevations. (The resolution of my screen grab below for some reason looks a little fuzzy, it’s quite a bit better in real life.)
Satellite view: Satellite with labels
Gaia GPS has several different satellite layers, and “Satellite with label” is my favorite. It seems to have the clearest imagery, especially when you zoom way in, and having roads labeled is a big help. (They recently have added a hydrology layer, which shows every little tiny stream at a certain zoom level, which is kind of distracting.)

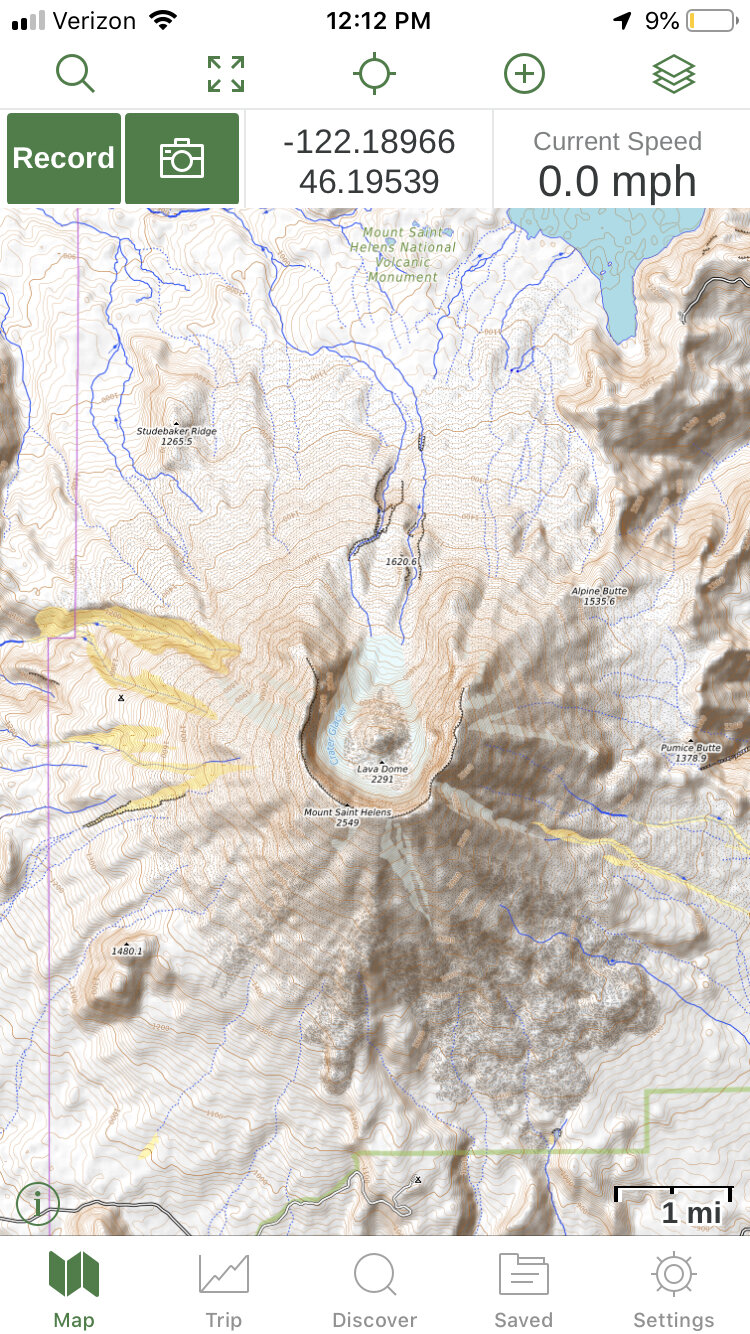
Backcountry hiking and climbing: Outdoors and Open Topo
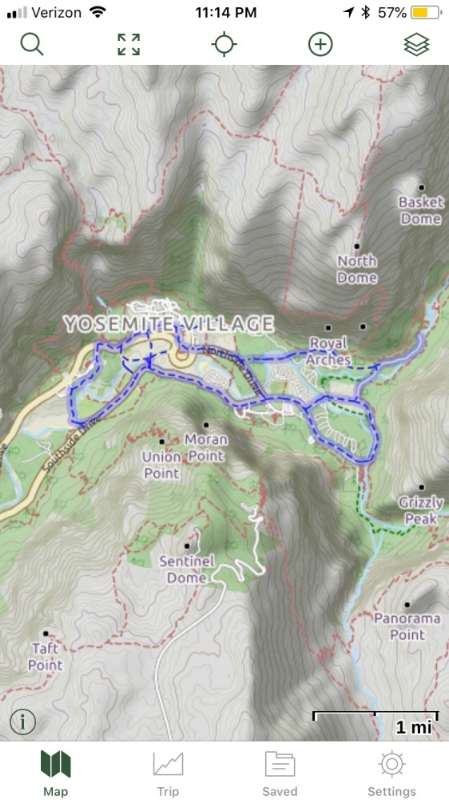
The rather boringly titled “Outdoors” layer is a worldwide topo map based on Open Street Map, that has labeled hiking trails, ski runs, and mountain peaks, as well as shaded relief and easy to read contour lines. (You can see the same layer in Caltopo where it’s called “TF Outdoors”.)
Note the easy to see and well labeled hiking trails, even when you're zoomed pretty far out.
The Open Topo layer has great shaded relief, shows some general terrain such as forest, rock, and snow, has lots of streams and drainages (sometimes too many, IMHO), contours and elevation (in meters). It does have trails, but they are a little harder to see and use need to be zoomed in pretty close.
Open Topo is no longer part of Gaia GPS, so you need to add it as a custom layer (which, like most things in life, is easy once you know how.) Learn to add Open Topo as a custom Gaia map layer here.

Carry a first aid book on your phone
Sure, you've probably taken a first aid class at some point. But if you're lucky, you've never had to use it. Why not back up your hands on training by having a complete first aid book on your phone?
Your climbing partner just took a fall on lead when they were crack climbing, and managed to dislocate their shoulder. You're a two-day hike in, and if you can get that shoulder back into place, things are going to get better in a hurry. But dang, that first aid class you took a few years ago has faded to a distant memory, and you can't even remember if they covered shoulder reduction in the first place!
Yikes, what do you do?
One smart way to augment your hands-on first aid training is to have a wilderness first aid ebook on your phone. As a "virtual book" it weighs nothing, last forever, and could literally be a lifesaver someday in the backcountry.
Of course, having access to a first aid book in no way replaces taking a proper class, but this can be a good backup to refresh your knowledge.
Here's a great option, the Wilderness Medicine Handbook Digital Edition. It’s from the excellent website wildmedcenter.com. This company also has a great online store, where you can purchase small quantity and high-quality supplies for your backcountry first aid kit which are often quite hard to find.

image: https://www.wildmedcenter.com/digital-wilderness-medicine-handbook-v60.html
Here are a two more options. Click each image for a link to Amazon. (These are NOT affiliate marketing links and I make no money if you click through, I’m simply providing them as a convenience.)


The Kiwi coil – shorten the rope on varied terrain
When your rope team is transitioning between glacier travel, pitched climbing and easy terrain, you probably don’t want the rope at full length, especially for the easy parts. Solution: the Kiwi coil.

Image: https://youtu.be/PD6jYQobGXU
Taking in coils of rope to shorten the distance between you and others on your rope team, (aka the Kiwi Coil, apparently named after the New Zealand guides who invented it) is a very useful but often misunderstood and underutilized technique. Often, quickly shortening your rope, tying it off, and then walking just a few feet away from others on your rope team is faster, safer, and a more efficient way to move in alpine terrain than keeping your rope team stretched out.
Consider this scenario:
You and your two pals are on the Disappointment Cleaver route on Mt. Rainier.
From your high camp at Camp Muir, you first cross a glacier for about 15 minutes.
Then go up a rock/scree spur for about 20 minutes.
Then another 30 minute glacier crossing.
Then get on the rock/scree of the Cleaver for an hour or so, then back again on to glacial ice, . . . you get the picture.
Of course, you need to be roped up with proper distance between partners on the glacier. But when you get to the rock sections and don’t need a rope for safety, what you do? You have three choices: 1) completely untie and store the rope, 2) continue walking with 40 or so feet of rope between you, and 3) shorten the rope and tie it off.
Plans one and two both have drawbacks.
Completely untying, coiling and storing the rope can take a lot of time, if you need to do it repeatedly on a longer route.
Continuing to walk on easy terrain with 40 feet of rope stretched between you is a Big Hassle, as the rope will constantly get caught on small outcrops of rock or snow, and possibly cause rockfall on you or others.
A better technique is to take in coils of rope until you are just a few meters away from your partner, then securely tying the rope off. After a bit of practice, you’ll be able to do it in a minute or so without even stopping. When you again find yourself on terrain where you need a full rope length between you, dropping the coils and stretching out the rope takes just a few seconds.
Note: Tying off coils of rope like this may not be the best choice for glacier travel. It can work, but with an extra step: tying a bight knot in the rope heading to your partner and clipping that to your belay loop. This does a couple of things. 1) makes it easier to arrest a fall from your teammate without you being yanked onto your face, and makes it easier to transfer the load onto a rescue anchor, because you can easily unclip from the rope coils.
For glacier travel, a more common method is for the end climbers to take in about 30 feet / 10 meters of rope, clip into a fig 8 or butterfly loop, and then simply stash the extra rope in or on their packs.
While the technique is simple, it is rather hard to describe in words. (But I’ll try:)
Take in coils around your neck
Take a bight of rope about 1 meter long
Pass the bight through your tie in loop and the coiled rope loops
Tie off the bight with an overhand knot on the load strand of the rope
Cinch the knot tight against the coils
Clear as mud, right? Fortunately, here’s a great instructional video from the excellent American Mountain Guide Association (AMGA) video series, featuring IFMGA Certified Guide Emilie Drinkwater of Cloudsplitter Mountain Guides.

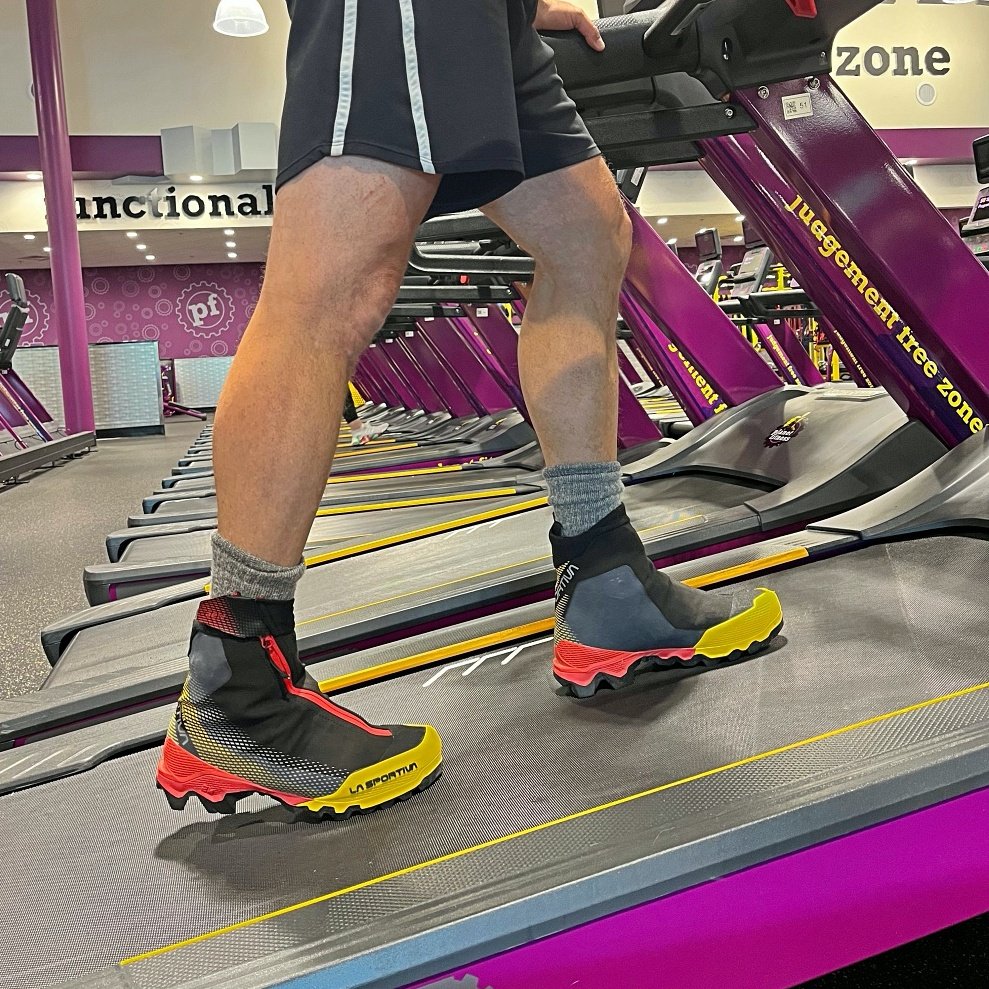
Test boots for a good fit - gym treadmill
It’s tricky to give boots an adequate test drive before you buy them. You can't take them outside on a muddy hike and then expect to return them if you don't like them. Solution: treadmill at a gym. If they fit, great, keep them. If they don't, they should be in pristine returnable condition.
When you buy a pair of hiking or climbing boots, you want make sure the fit is exactly right. Strolling around on the carpet at the outdoor store is not going to help much.
But, you also can’t go tromping around outside and expect to bring the boots back if they don’t fit.
So . . . you need a way to give them a decent test drive, while keeping them in pristine condition.
A great way to check for a good fit (and break them in a bit if you decide to keep them) is to wear them on a treadmill at a gym. Use the thicker socks you’d normally wear with them, and for about 15 minutes keep the treadmill flat. Then gradually increase the angle of the treadmill, which will quickly tell about the fit in the blister-prone heel! Wearing a pack with 20-30 lbs is a further refinement. Go for at least 30 minutes.
Sure, you’re going to get a few strange looks from other people in the gym, but that’s part of the fun.
If they fit, keep them. If you think you can do better, no worries, take ‘em back.
No gym membership? Most gyms offer a free one day guest pass.