
Adding friction to a rappel
Note - This post discusses techniques and methods used in vertical rope work. If you do them wrong, you could die. Always practice vertical rope techniques under the supervision of a qualified instructor, and ideally in a progression: from flat ground, to staircase, to vertical close to the ground before you ever try them in a real climbing situation.
This is an updated version of a previous article on this topic.
Sure, on a bluebird day, standard rappel practice is probably going to work fine. However, some rappel situations, like any one or combination of these, can make adding some friction a fine idea.
a single strand
wet/icy rope
skinny rope
cold hands
no gloves
forgot your third hand friction hitch backup
wearing a heavy pack or dangling a haulbag
a rescue where you have the weight of 2 climbers on the rappel rope
dark
an icy, slippery slab
a knuckle scraping overhang
not sure where the next anchors are, need to go slowly and look around
Rappels under Less Than Ideal conditions are often safer and easier when you add extra friction to the rap to better control your descent speed. This can be especially true for beginners, who most of the time are happy to go down a little more slowly under greater control.
Yes, there are lots of variables here, such as diameter of your rope, whether it's new and slippery, or old and crusty, one rope strand or two, the size and shape of your carabiners, what kind of rappel device you’re using, etc.
Note, using these techniques does not replace using a third hand backup autoblock.
Note: It is critically important that you always use a rappel device that is properly sized for your rope.
This is especially true if you are using twin or half ropes. Many accidents have happened when people have started to slide uncontrollably when they had a skinny rope in a rappel device designed for something larger. The techniques below do not replace having the correct rappel device to begin with.
(If you prefer to rappel with a third hand backup / autoblock, which is the modern standard, be aware that some of the older techniques you may read about don't work too well with an autoblock.)
Here are a few easy ways to add friction to a rappel.
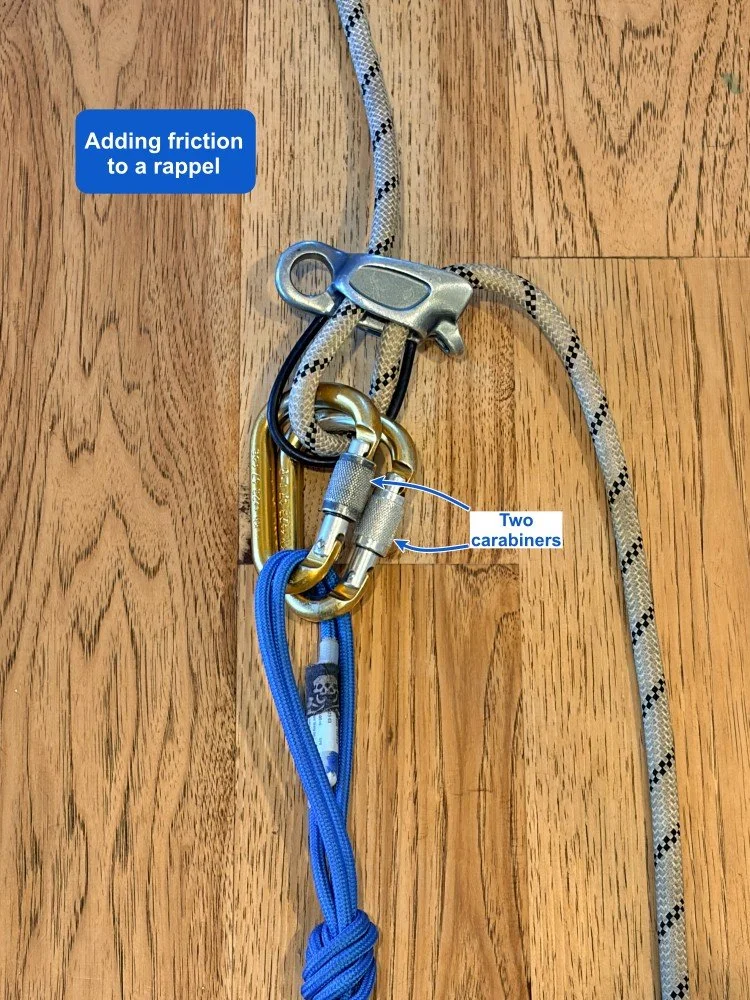
1 - Use TWO carabiners and clip the rope through both.
The extra friction of the second carabiner slows your descent. This may be counterintuitive, as it seems that the sharper angle made by a single carabiner would slow the rope more. This second carabiner doesn’t necessarily need to be locking, and it doesn’t have to be clipped to your belay loop.
The effectiveness of this can vary a lot. One study I saw showed this only increases friction by about 6%. Another says about 300%, so who knows? Try it on a staircase with your normal set up and see what works for you.
Bonus tip - if you find yourself having to belay on a skinny rope with a belay device that's not quite rated for it, you can use this same “double belay carabiner” trick to add a bit more friction. (Ideally, you should never find yourself in this situation . . .)
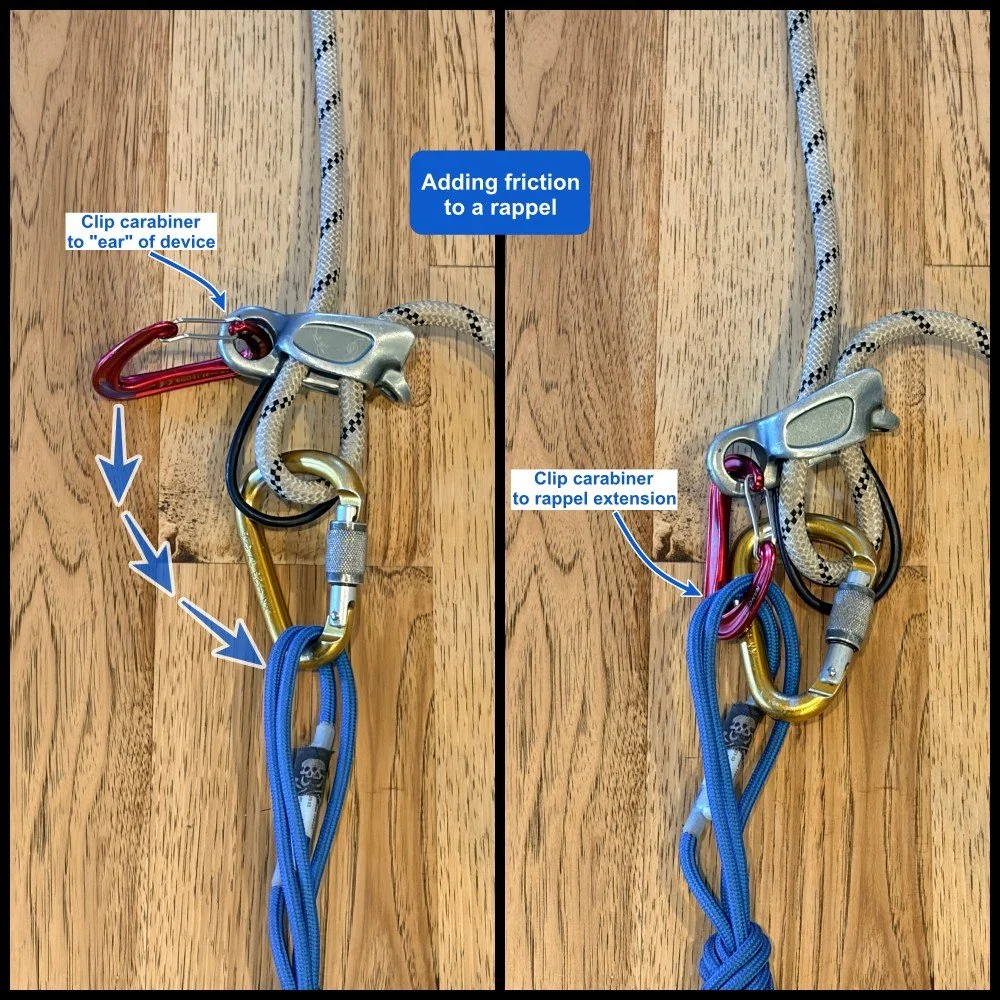
2 - Clip a spare carabiner to your device’s “ear”, then to the belay loop.
If you have a plaquette style belay device such as a Reverso or ATC Guide, try this: feed the rope as for a normal rappel. Clip a spare carabiner (non locker is fine) through the “ear” of the device, then clip that carabiner to your rappel extension (or belay loop). Doing this changes the braking angle of the device, increasing friction.
Note: The effectiveness of this has a lot to do with the rope diameter, how slippery the sheath is, and the size of the carabiners you’re using. This might be the perfect solution, it may only give a tiny bit of increased friction at all, or it may completely lock up your device. Definitely practice this one on a staircase first!
Note, if you’re rappelling from a sling with an extended rappel, can you clip this ear back to your belay loop, you will immediately lock up your device and be in ascending mode. Which at times can be super helpful! Learn more at this article.
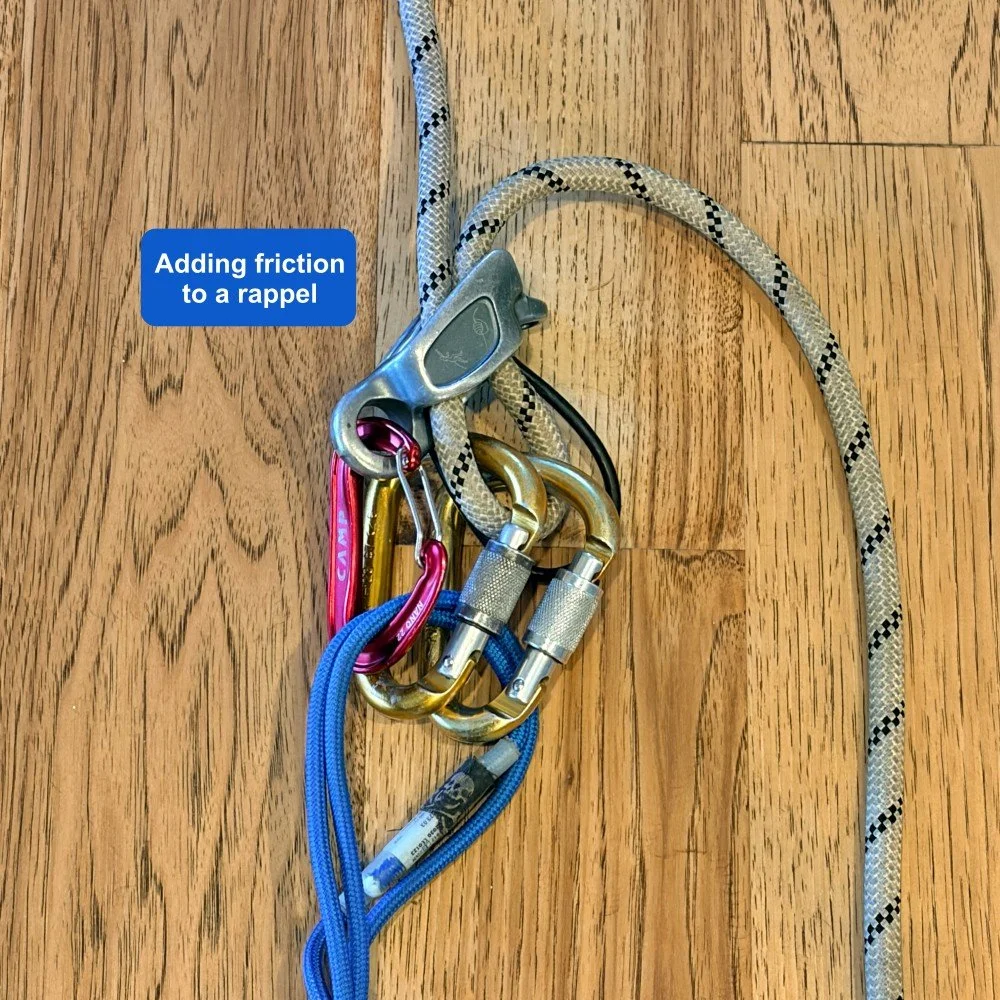
3 - Hybrid method, do both!
You can combine each of the previous two methods. 1) Use two carabiners on the rope, and 2) clip a spare carabiner to the ear of the device, then back to your extension. If this is too much friction, unclip the device on the ear. If you need more friction lower down on the repel when you have less rope, weight, stand on something for a moment and clip that red carabiner back onto your extension.`
Here's a nice YouTube video from our friends at HowNOT2 showing a few of these techniques, featuring IFMGA Guide Ian Nicholson. (Ian is using extra skinny 6 mm cord, but the same techniques apply.
4) “Rappel Z” with an extended rappel
This is pretty hard to describe in words, so check out the diagram below.
Note that you need to attach the autoblock to the leg loop, and it might also add an unnecessary extra amount of friction and cluster. As always, practice in a controlled situation, like a staircase, before you use it for real.

image: “Self Rescue”, by David Fasulo, illustration by Mike CLelland