
Transformers! Your ATC belay device is also an ascender

Premium Members can read the entire article here:
Note - This post discusses techniques and methods used in vertical rope work. If you do them wrong, you could die. Always practice vertical rope techniques under the supervision of an experienced climber, and ideally in a progression: from flat ground, to staircase, to vertical close to the ground before you ever try them in a real climbing situation.
This is an updated version of a previous article on this topic.
First off, a few disclaimers and cautionary notes . . .
Using a belay device in this manner is not explicitly approved by any manufacturer, as far as I know. Alpinesavvy offers ideas and information, not advice. Use this at your own risk. Instruction from a qualified professional is highly recommended when learning any new belay technique.
This technique can FAIL if you use a skinny rope and a large belay device!
I was easily able to put this into failure mode with a single strand rappel using an old style Black Diamond ATC Guide, and an 8 mm rope. Under even a small load, the rope strands can become inverted. This causes them to either jam together and you can't move the rope at all, or even worse, the strands become reversed, and you will fall / slide under load. Be sure and test this in a controlled environment with your preferred rope and belay device before you ever try it for real!
This is why you should NEVER use a Reverso style device like this to rope solo!
If using a skinny rope, be extra careful. Matching your ropes to the proper size belay device is always important, especially in this case. Consider using a device such as the Black Diamond ATC Alpine Guide, specifically made for smaller diameter ropes. You’ve been warned, be careful.
A primary rule of rope ascending: always be connected to the rope by two points. These examples show a single point of connection. The second point can be a backup knot below the device, or a tether of some kind from your harness to a friction hitch above you, that you might be using for your foot.
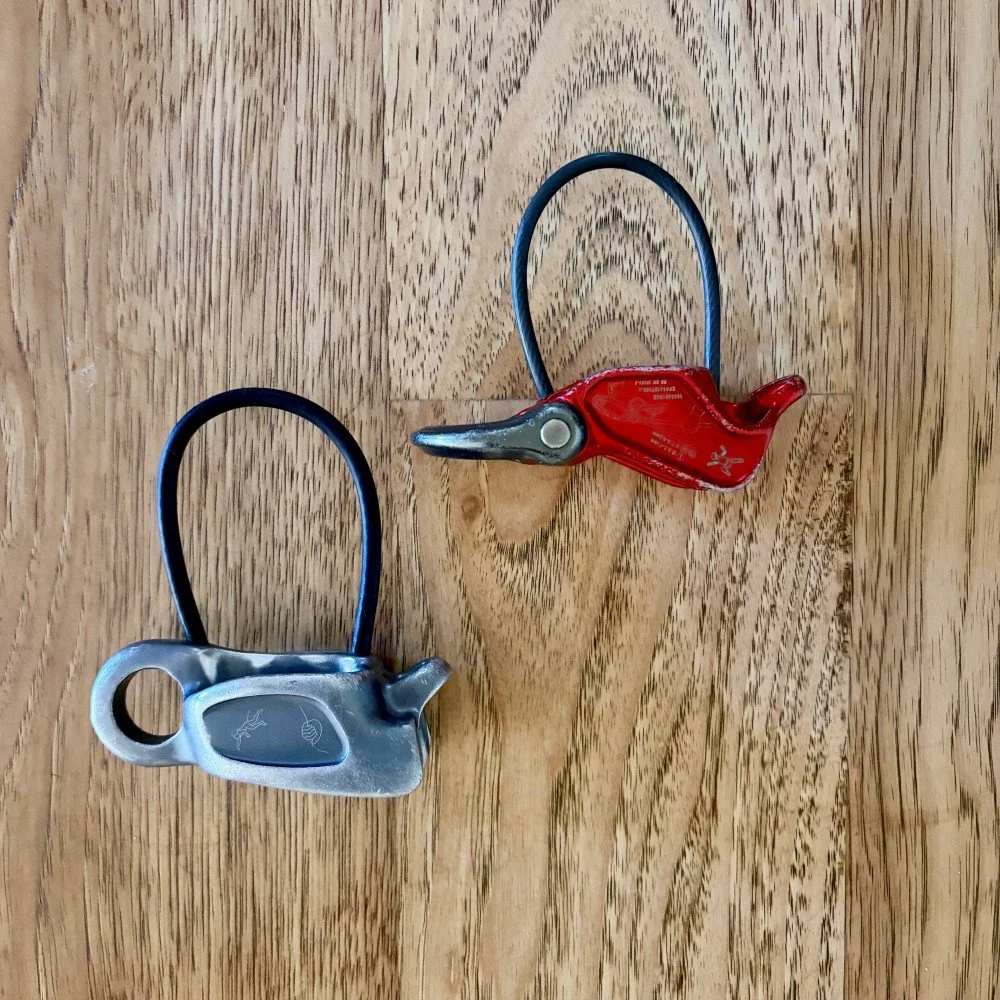
Guide plate (aka “plaquette”) belay devices, such as the DMM Pivot, Black Diamond ATC Guide and Petzl Reverso, are standard gear. The auto locking feature when belaying your second directly off the anchor has another nifty capability: rope ascender.
You don’t want to use this for multi pitching rope ascending, like on a big wall climb, because it adds extra friction and it’s not quite as secure as a dedicated ascending system. But, for improvised rope climbing, such as in a rescue scenario, or if you find you need to ascend a rappel rope for some reason, this is a pretty cool trick.
A few notes . . .
Doing this is usually faster than the old school method of ascending a rope with two prusik loops.
The effectiveness of this system, and the ease that you can ascend, greatly depends on the type of belay device you are using, the rope diameter, how old/stiff the rope sheath is, and other variables. Generally, if you have a newer smaller diameter rope with a smoother sheath, this is going to be easier. If you have a newer style belay device made for smaller diameter ropes, and and try this with a crusty, stiff-sheath 10mm rope, you will have a L O T of friction and hassle pulling the rope through the device.
Practice, practice, practice in a controlled environment before you ever try this in the real world.
If you’re on lower angle terrain, you might just be able to step up on the rock and pull slack through your device. If it's steeper, you'll probably need to rig some kind of a step for your foot, which I cover in this tip.
There are two possible scenarios for this:
Starting from a ledge, flat ground or otherwise secure stance
When you’re already on rappel
Let's look at each one.
Method 1 - Rigging to ascend from a ledge or flat ground
Let’s start with the easiest set up, and assume you’re on the ground or a ledge and have a rope you need to climb. This rope can be a single strand or a double strand. (Hopefully this is obvious, but this rope needs to be fixed in some way at the top anchor, either directly tied, or looped through an anchor point like a standard rappel. )
You rig your belay device just like you would to belay up your follower directly off the anchor, and clip the “anchor” carabiner to your belay loop. One locking carabiner goes in the “ear”, which you would clip to the anchor master point (here, the green one), and one locking carabiner blocking the rope the rope (here, the yellow one), goes to your belay loop.
Note: this system works a bit better if the rope blocking carabiner is round metal stock, rather than some weight shaving I-beam type construction. The rope slides more easily and there’s a bit less friction on the rounded metal. If you have one, use it, if you don’t, no biggie.
Standard set up, just like you would for a direct belay from the anchor (green carabiner would clip to masterpoint, yellow carabiner blocks the rope, the strand to the “climber”, here the anchor, is always on the top.)
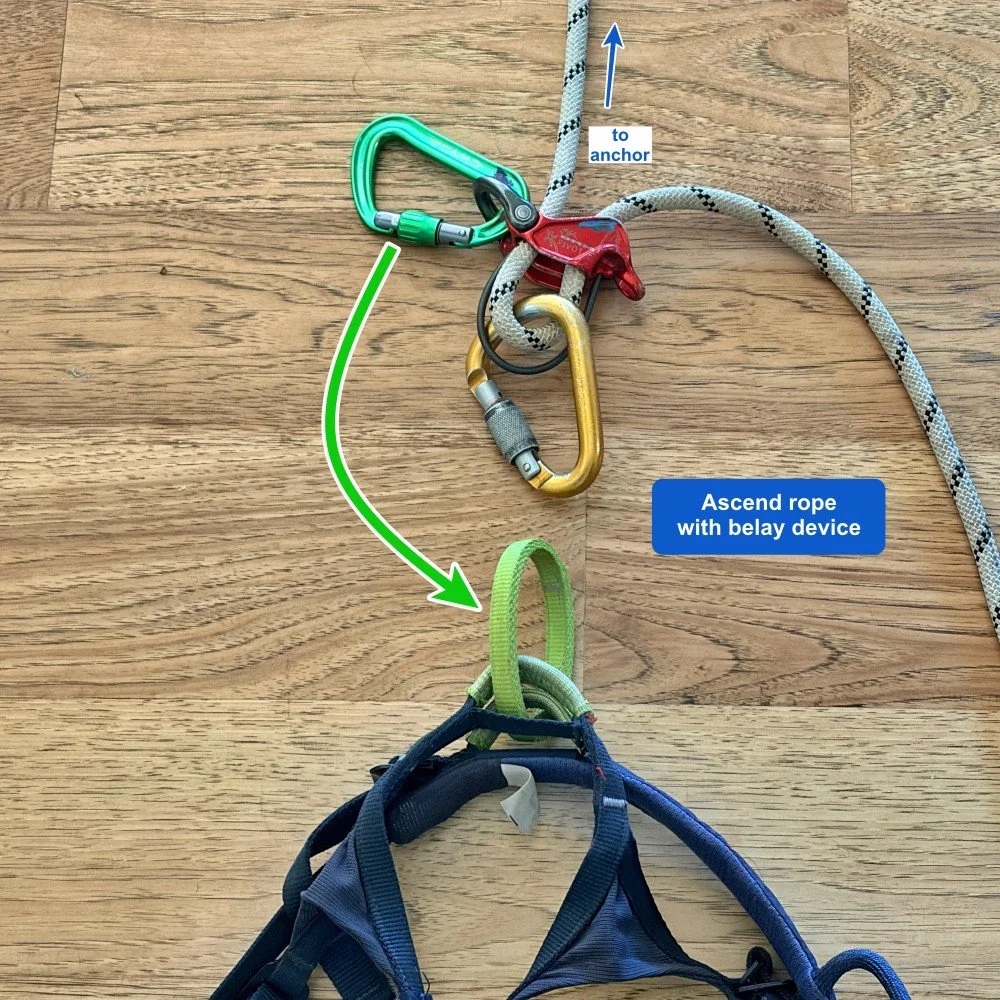
Now, clip the green carabiner to your belay loop. If you sit back in your harness, the rope should lock off.
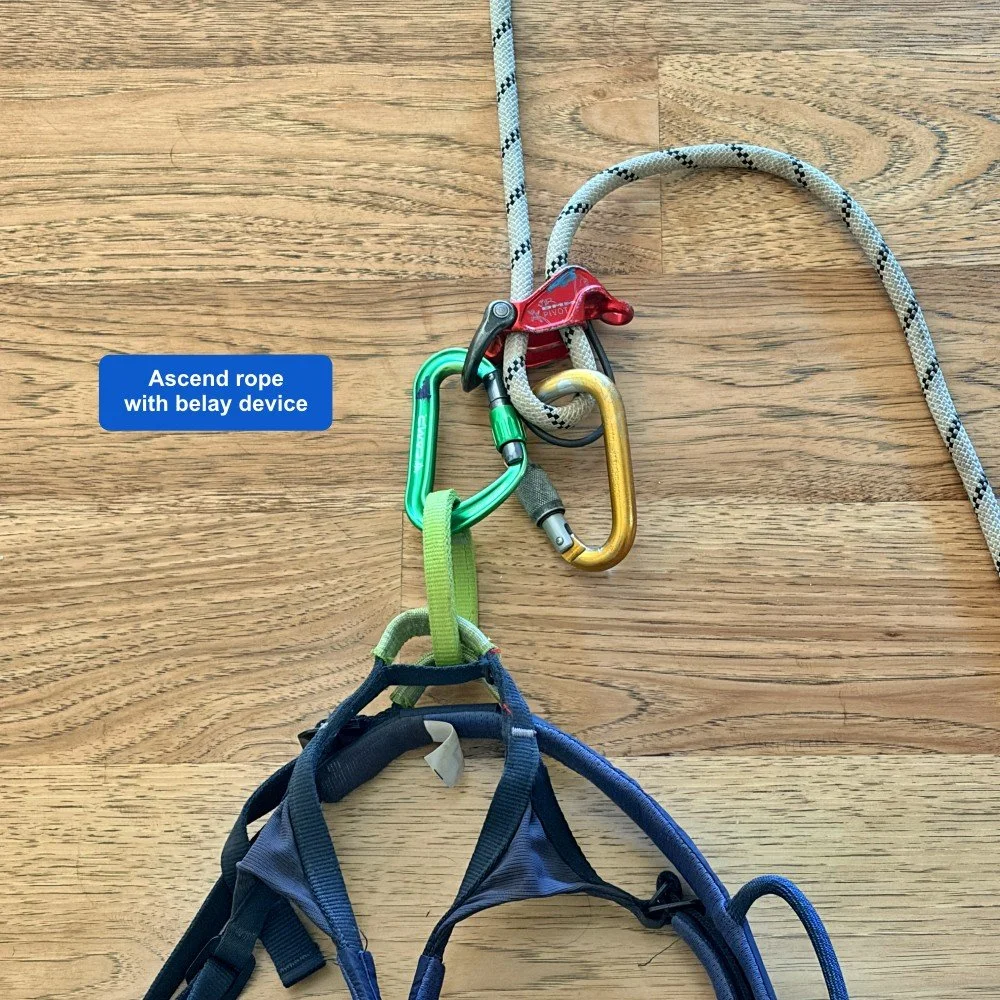
Method 2 - Rigging to ascend while on rappel
Hopefully this won’t happen very often, but sometimes when rappelling, you need to go back up the rope. Maybe you missed the anchors, or maybe the rope got stuck above you, and you were careless and went below it without untangling the mess. Whatever, it doesn’t really matter, you were rapping down and now you need to climb up. Here’s how to do it.
There’s two different ways this can be rigged. It depends on whether you’re rappelling from an extended rappel or from your belay loop . An extended rappel is easier and safer; lots more on extended rappels at this Tip.
Let’s look at each one.
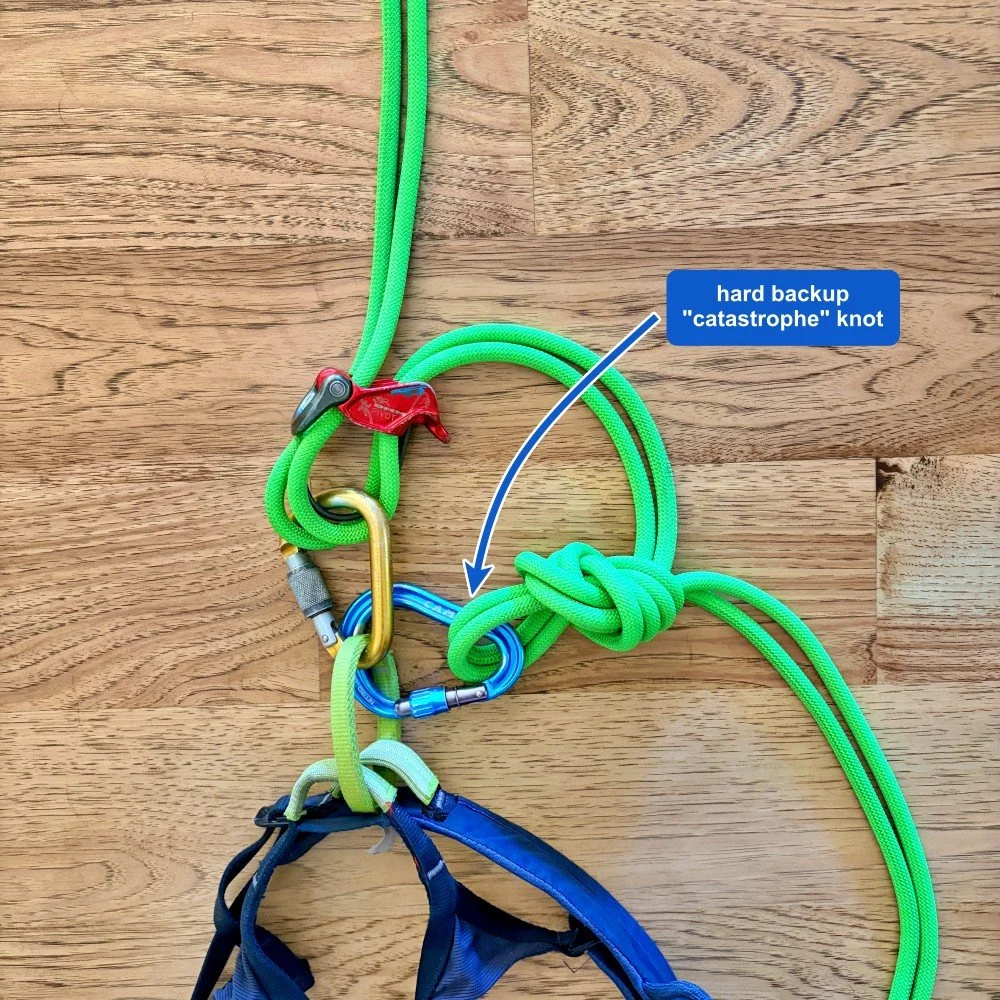
First off, when you’re doing any shenanigans like this way off the deck, tie a hard backup “aka “catastrophe knot”) in the rope below you.
This is an overhand on a bight in both strands, clipped to your belay loop. This is insurance; if you screw up any part of the next couple steps, you’re not going to fall to the ground. So do this first.
If you were rapping with an autoblock, going hands-free to do this is easy. If not, use the old-school #CraftyRopeTrick of wrapping the rope a few times around your leg to go hands free.
“Catastrophe knot” - Overhand on a bight in both strands, clipped to your belay loop with a locker.
Note: Both these methods require you unweight your rappel device for a moment. Hopefully you can find some kind of a stance where you can temporarily unweight the rope. If you can’t do this, you’ll have to get creative. Add a short prusik plus a foot loop and standing in it, or use the #CraftyRopeTrick of wrapping a few loops of rope around your foot and standing up, temporarily unweighting your rappel device.
Note: For clarity, the catastrophe knot backup is not shown in the following photos.
A - Rappelling from an extended rappel and transitioning to rope ascending (easier and lower risk method)
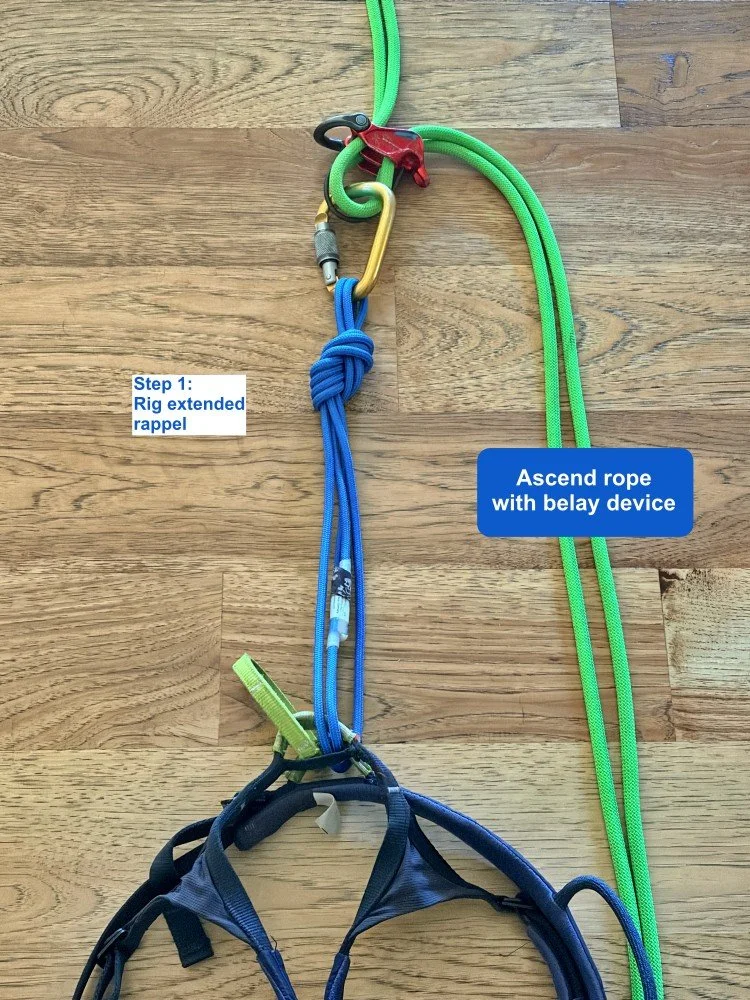
An extended rappel makes this method safer, because you don’t need to unclip your rappel carabiner as described below in method B. When you do this for the first time, you might actually amaze yourself, because it’s so fast and easy, it almost seems like a magic trick.
The extended rappel rigging shown below, with a basket hitched 120 cm sling, is one of various ways to do it. The extended rappel is covered in depth here.
(For clarity, this photo doesn’t show an autoblock backup below the rappel device. If you only have a short way to ascend, you can leave it on. For a longer climb back up the rope, it's probably better to take it off, as shown in the video below. )
1 - Rig an extended rappel (The method shown below, a basket hitched 120 cm sling, is one of many ways you could do it.)
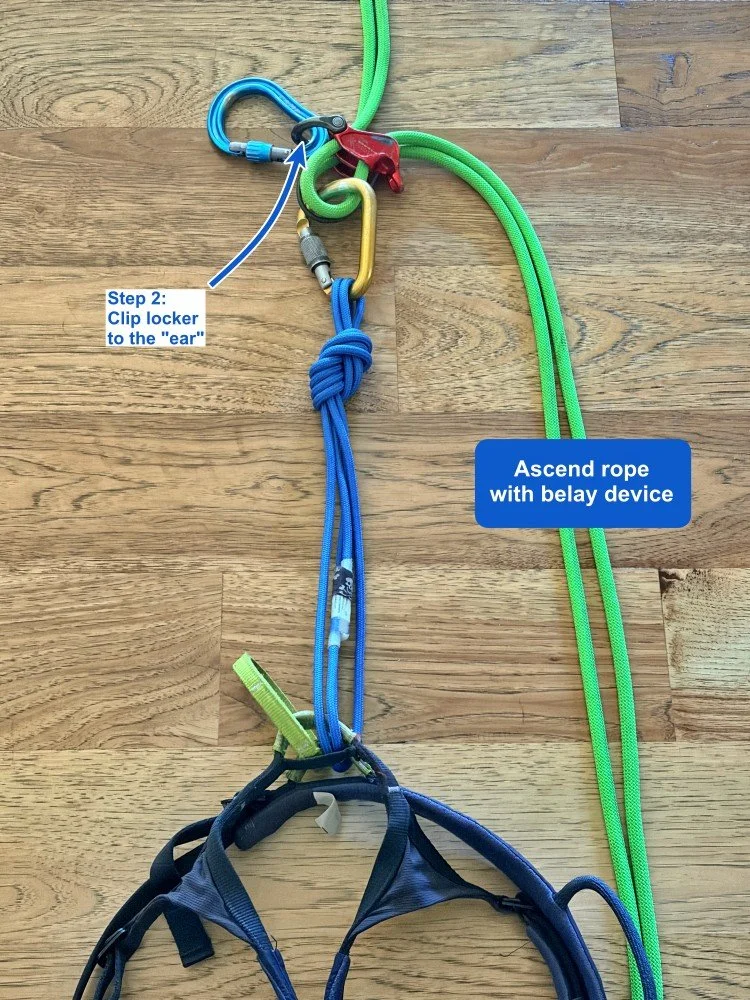
Step 2: Clip a locking carabiner into the “ear” on your rappel device.
Step 3: Unweight your device using one of the methods mentioned above, and clip the locker on the “ear” to your belay loop. Note the gold carabiner and blue rap extension sling stay attached the whole time.
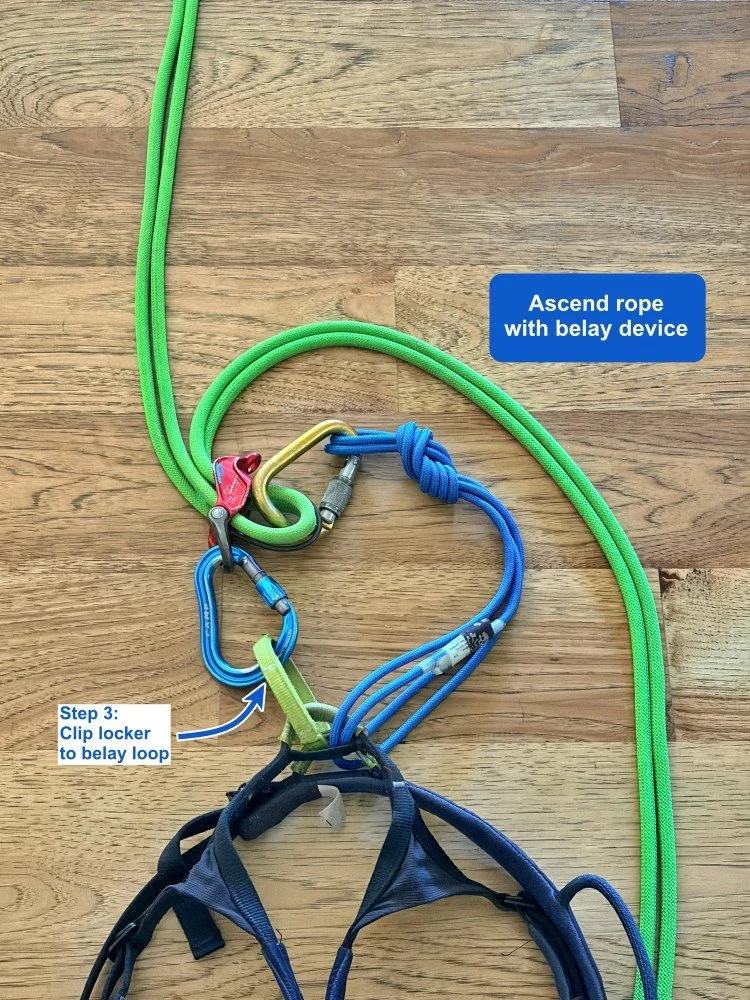
Schweeeeeet, you’re ready to ascend!
Your extension gives you enough slack for the blocking carabiner to properly work. Nice! One more reason to use an extended rappel.
Bonus: one more cool thing about this method: if you want to transition back to rappel, simply unclip the blue carabiner from your belay loop and you’re back into rappelling position.
Want to see a nice tutorial video on how rig this AND ascend the rope?
How about the trick to doing this on rappel when you don't have an extension. and why you need to be really careful?