

Alpine Tips

The most common rookie aid cleaning mistake
The most common mistake when cleaning an aid pitch is to jam your top ascender into the carabiner. Here's a rule of thumb to avoid it.
Probably the classic beginner cleaning mistake when using ascenders on a big wall is not pay attention to what’s above you, jam your top ascender up tight against a carabiner or knot . . . and get hopelessly stuck. Your ascender needs to move a tiny bit forward for the cam to disengage, and if you slam it up hard against a carabiner with the rope stretched tight under your body weight, this is not gonna happen. (This becomes even more of a problem if the rope is heading off on a bit of a traverse. I learned this the hard way on my first big wall.)
A good rule of thumb: always stop your ascender about the width of a fist, or say 4 or so inches, away from a carabiner or knot. This will ensure you always have enough room to back it down or remove it.
Here’s the WRONG way. The ascender is jammed up tight against the carabiner, making it near impossible to move it up, down, or remove it from the rope.
(Note - climber, harness, daisy chain etc. not shown for clarity.)

Here’s the CORRECT way. The ascender is stopped about 3-4 inches below the carabiner. This gives you room to move the ascender up, down, or remove it from the rope and reattach it above the carabiner you need to clean, a common cleaning tactic on traverses like this.


Rappelling on ropes of 2 different diameters
Rappelling on ropes with two different diameters can cause the rope ends to be uneven, which could be a problem if you have a full length rappel. Here’s how to fix this.
You’ve finished a long multi pitch climb, using a single 10 mm rope. From the top, you need to make some double rope rappels to get down.
You partner carried a lightweight 8.5mm rope in her pack, and you now need to use it to make your long rappels. (You chose not to climb with double ropes, because the route was pretty much straight up, and you decided with your partner that the extra hassle/cluster factor of double ropes was not worth it.)
Before you head down the lines, you want to be mindful of a few things.
When rappelling on ropes of two different diameters, the skinny rope is going to slip through your belay device a little faster than the fat rope, which means the ends of the rope may not stay together.
This happens because there is more friction on the fat rope side, therefore the fat rope has the potential to move with you a bit more as you are descending.
This leads to the possibility that the end of the skinny rope can lift off of the next anchor point, potentially leaving you with rope ends that are uneven. If you’re doing a full rope length rappel, this could be a problem.
(The degree to which this happens depends on a a few things, such as what kind of rappel device you’re using, or how slippery or grippy the rope sheath actually is.)
There’s a few ways to keep this from happening. One is to always put the knot connecting your two rap ropes on the “skinny rope side” of the anchor. That way, if the thick rope starts to migrate, the knot will hopefully be stopped by the anchor master point, and keep the ends of the rope at the same length.
It helps if the master point of the rap anchor is a quicklink or some other small diameter hole, rather than a carabiner, which might allow the knot to migrate through it, making the rope pull difficult if not impossible.
Here's a little pneumonic to help you remember a way to mitigate this: PS, or "Pull Skinny.”
That means when you're finished with your rappel, you always pull the skinny rope, which is the side with the knot.
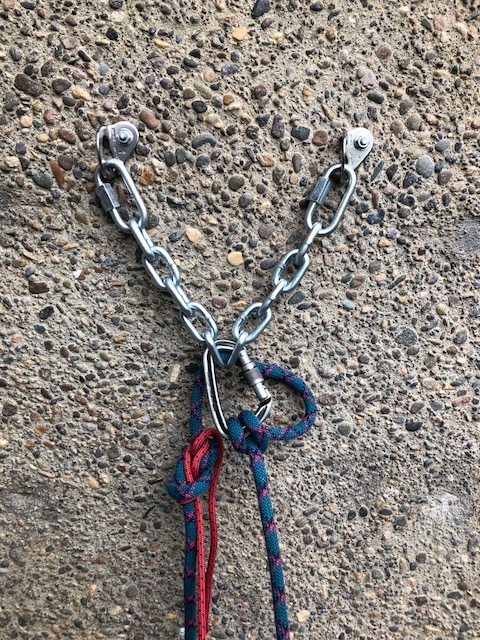
CORRECT set up. The knot is on the skinny red rope side of the anchor. If the knot migrates, it'll stop at the chain link. "Pull Skinny", or "PS", means pull the red skinny rope to retrieve it.
(Note that the red rope is a 6mm pull cord, used here to easily see that it's a smaller diameter.)

INCORRECT set up. As the larger diameter blue rope migrates, it'll pull the knot downwards.

Another way to mitigate this is simply clove hitch the thicker rope to the anchor, have the first climber rappel on the single strand of the fat rope, and then have the first rappeller tie off both strands at the lower anchor to ensure both rope ends stay at the lower anchor. See photo below.

Tactics for the 4am pee
Every mountaineer has faced that 4 AM decision: Stay in my bag until my eyeballs get yellow, or leave my warm tent, go outside and take a pee? Fortunately, there’s a middle ground.
Altitude, cold, and maybe Diamox can all cause you to urinate more frequently when in the mountains. Snow camping, at night, and stormy weather are all complicating factors, especially at the same time. Stay in your warm sleeping bag and try to hold it, or step outside into the gale to take a pee? It's a tough question all mountaineers face.
Fortunately, there’s a fairly easy solution.
While it’s mandatory gear for a big expedition, a dedicated pee bottle probably won’t be carried on a shorter trip. Solution: a 1 gallon Ziploc freezer bag.

Lightweight, takes up no room in your pack, and can give you relief when you need it most. Yes, 1 gallon is probably more than you need, but you can share the bag with your tent mate. (Word has it that ladies find a bag easier to use than a pee bottle.) Put the bag in the tent vestibule after use in case the closure is not as strong as you thought.
Bonus - The same 1 gallon Ziploc freezer bags also work great as buried snow anchors for your tent. So, you might as well bring a few!
Related tip: If you’re on a longer expedition and you have a designated pee bottle, it will smell pretty ripe after a few days, especially when you open it in the tent. For a pee jug odor preventor, before you settle in for the night, put 2 iodine tablets (the same as for water purification) into the empty pee jug. The iodine kills the bacteria that cause the odor.
Below is one good option for expeditions: The Nalgene 48 ounce flexible Cantene.


Bank line - the best cord you've never heard of
Want a strong and lighter weight alternative to paracord for backcountry cordage? Check out bank line.
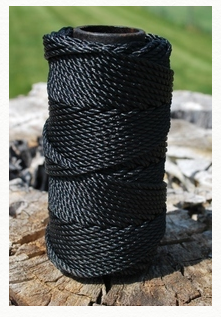
Bank line is a black nylon cord/twine that is similar to tennis court netting. It’s exceptionally strong, UV resistant, and inexpensive.
It does pretty much everything paracord can do, but in a smaller diameter, so it's a lot lighter and takes up less room.
The name comes from trotline fishing (from the “bank” of a waterway, hence the name) for catfish or similar critters, where you toss out a strong main line baited with multiple hooks, and return hours later to check your line.
Bank line comes in a variety of diameters and strengths. The larger the number, the stronger the cord. Keep in mind what you want to use it for. If you're tying tie in loops on big wall gear, I'd go for the #12 cord. If you want to use it to build some kind of bushcraft shelter, you want something stronger.
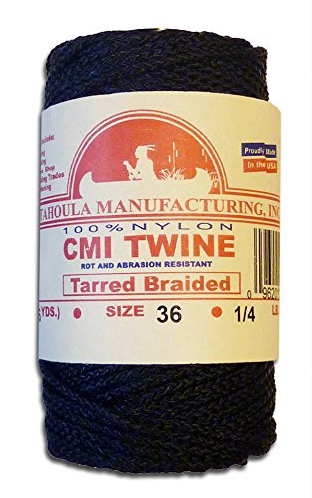
Yes, the Amazon website where you buy this is pretty confusing. They sell different sized spools with apparently different weights, but it's a little hard to find how much length of cord is on each spool. I use these two numbers as a general guideline. I have a spool of each and they work great. You can get some other weights if you like.
#36 bank line has a breaking strength of about 320 pounds.
#12 bank line has a breaking strength of around 100 pounds, and is accordingly thinner and even lighter.
Popular in the survivalist / bushcraft world, bank line can be immensely handy around the house, garage, shop, or campsite.
Think lashing most anything, tent or tarp guy lines, clothesline, trellis for the garden, hanging a food bag, primitive shelter construction . . .
On a big wall, everything needs a way to be clipped in. Bank cord is perfect for making small clip in loops for most anything, and is less expensive than the bulk 2 or 3 mm cord normally used.
Bank cord is “tarred”, which is about what it sounds like. The cord has a thin layer of sticky tar-stuff. This helps knots to be more secure, makes the cord water resistant, and also resistant fraying at the ends when you cut it.
It has a mild petroleum-like smell, which goes away shortly after you open the bag. The stickiness is not annoying at all. It doesn’t come off on your fingers, just has a mild tacky feel to it. It's a little bit stiff when you first use it, but it loosens up a lot over time.
Get the goods at the Amazon link below. (Reminder I have no affiliate links on my website. I get zero money if you order from the links below. I include them as a convenience to you.)

Cut webbing at a 45 degree angle
Cut your webbing at a 45 degree angle; it’s easier to tie rethreaded knots.
Webbing is typically cut with a 90 degree, “square” cut. But there’s no real reason to do this.
Instead, cut your webbing at a 45° angle. This gives you a bit of a pointy end, making easier to tie any sort of a rewoven knot, like a water knot or a double fisherman’s.
Making this angled cut is a lot easier at a climbing store that has one of those nifty hot knife tools. Just ask them to do it for you, even if they give you a funny look.
If you don't have a climbing store with a hot knife, you can do it at home. Put the webbing on a piece of scrap wood. Get a cheap utility blade (or hold a razor blade in pliers) and heat it up over a gas stove for about 15 seconds. Make your cut. The hot blade should cauterize the wedding just like the climbing store knife.
(Don’t use a good quality knife for this, because you're probably gonna get some melted webbing gunk on it that will be quite hard to remove. Ask me how I know this . . .)
Lacking this, you can always use a good pair of scissors. After you make the cut, burn the ends in a flame of some kind for a few seconds, and then give the ends a quick squeeze with needle nose pliers to press the melted ends together.
Below - 90 degree “normal” cut on left, 45 degree cut on right.


Need a rope bag? Go to Ikea
For tagging a lot of routes in one day at the crag, rope bags and tarps are great to keep your rope tangle free and clean. Your Swedish big box store has probably the cheapest piece of climbing gear you're ever going to buy.
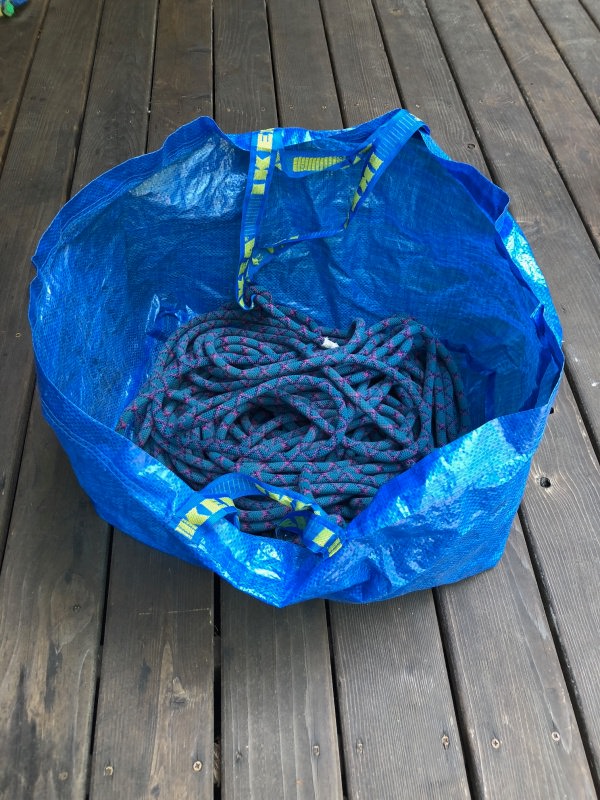
If you’re planning on getting in a lot of routes in one day at the crag, using a rope bag is a great idea. There’s no need to continuously coil and uncoil your rope between routes, just flake it into the bag and it’s ready to go, feeding out perfectly and (mostly) kept out of the dust.
There are a lot of fancy and a bit expensive rope bags ad tarps out there, but the $1, big, blue, sturdy plastic bag from IKEA works great. It’s big enough to easily hold a 70 meter rope, has stout handles, and has a huge wide opening so you can quickly stack your rope.
Bonus: just that touch of dirtbag to give you a few style points.
A tip on closing the system: for a top rope session, rather than tying a knot in the end of the rope, you could clip it onto a pack or your rope bag. This will pretty much ensure that you will never accidentally pull up the night out of reach when you pull your rope.

For a big wall rope bag, you need something stronger. Solution: Tape two smaller bags together. I like the ones from Trader Joe's. Put one inside the other, Gorilla tape the handles together to form a single clip in point, and then seal the two top edges together with Gorilla tape.
(This “double bag” trick is from the excellent big wall climbing book, “Hooking Up”, by Pete Zabrok and Fabio Elli, highly recommended for a big wall climbers.)
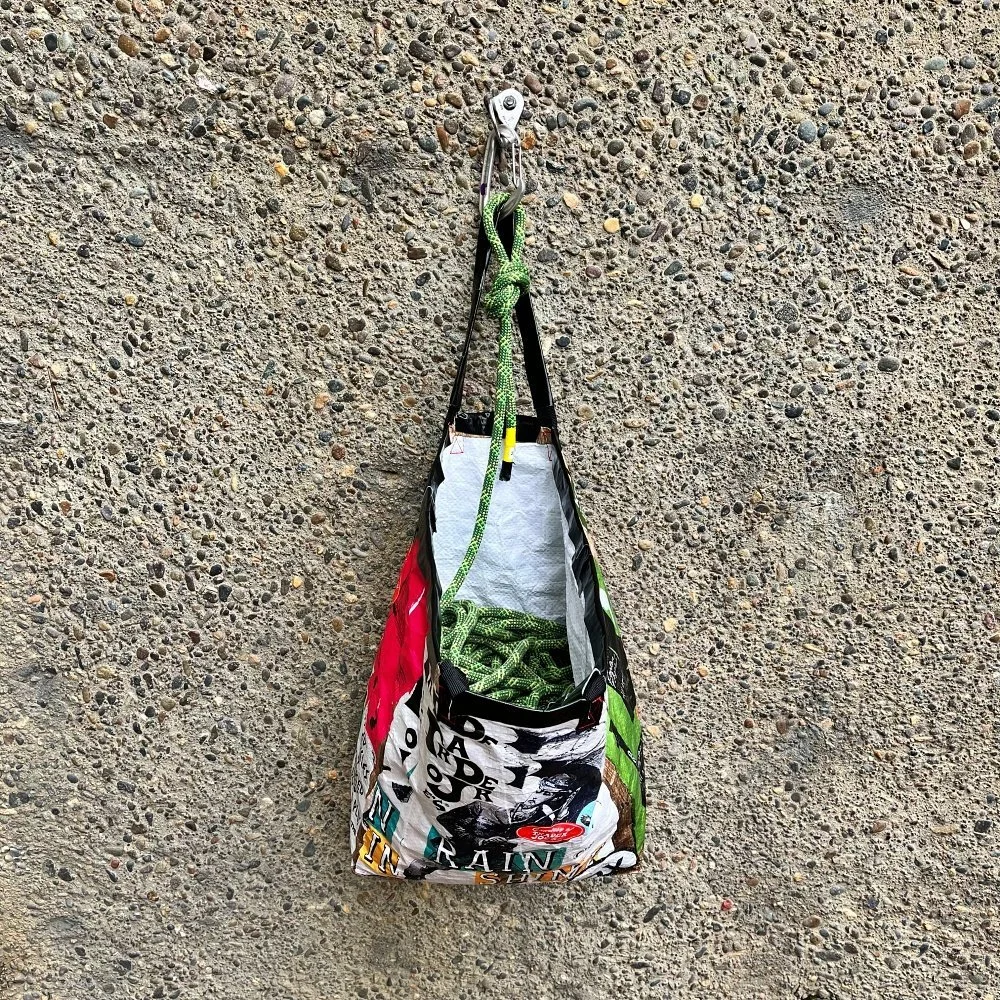

Try a static rope for glacier travel
Are you climbing on a moderate glacier, such as a standard route on many Pacific NW volcanoes, without any actual lead climbing? Consider a static rope.
Are you climbing a low to moderately angled glacier? You need a rope for crevasse rescue only, but not for catching any real leader falls, and you don’t want to carry any more weight or length than you have to.
Consider a static rope. If your only purpose of the rope is for crevasse rescue, then you don’t need the dynamic qualities of a typical lead climbing rope. In fact, the extra stretch in a dynamic rope (especially the skinny ones) will result in a longer fall and will add unwanted stretch to any raising system you may need to build. Conversely, the static rope can give a harder yank on the people up top if the rope management is a little sloppy, with extra slack, so keep that in mind.
These ropes can be up to 40% lighter than a similar length of 8 mm dynamic half rope, typically used in glacier travel by many climbers. (Approx 25 grams per meter compared to about 40 grams per meter.)
Of course, you need to take some measures to add extra friction when rappelling, such as using a device designed for skinny ropes such as the ATC Alpine Guide, adding two carabiners to your belay loop, or maybe even putting both strands of the rappel rope through the SAME hole in your rappel device. As always, practice with these in a controlled environment before you have to do it for real on the mountain.
Several companies offer dry treated, small diameter, ultralight static ropes specifically designed for crevasse rescue.
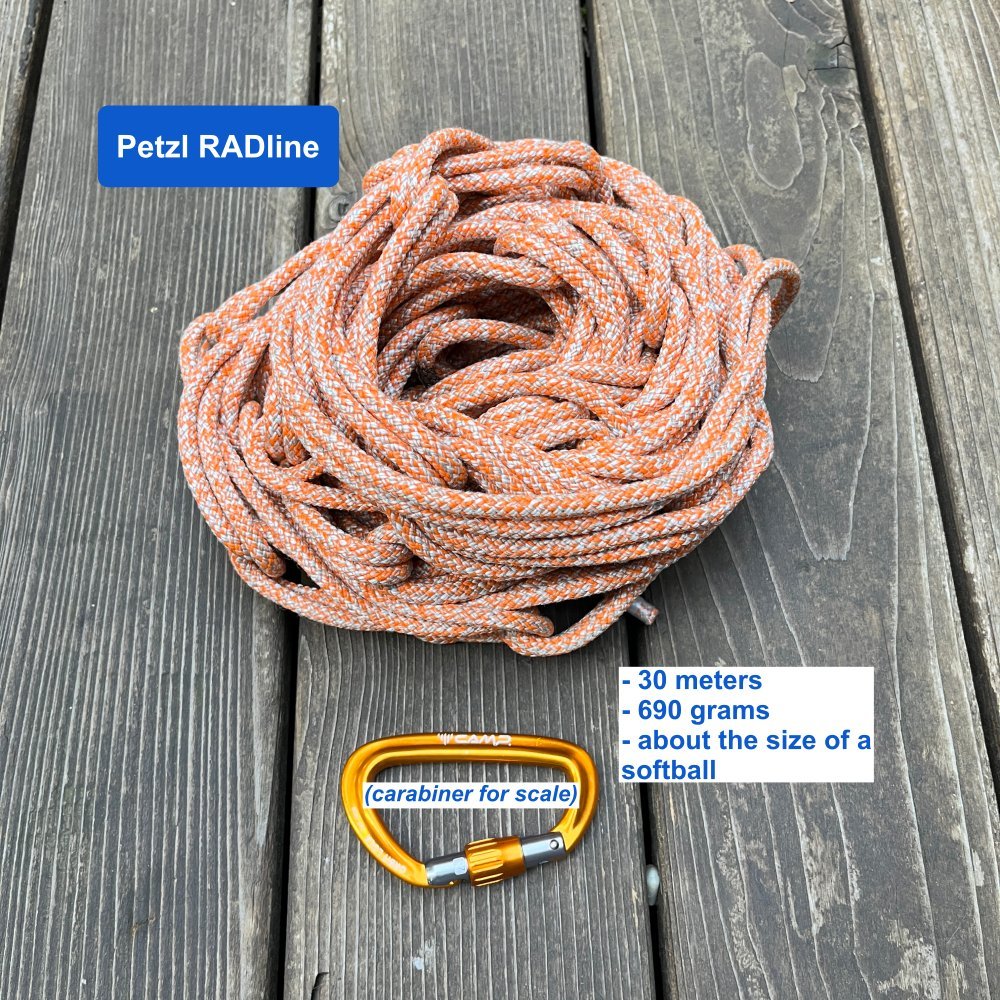
The Petzl RAD system, an complete kit designed specifically for crevasse rescue, uses very low stretch 6mm static rope. (“RAD” stands for “Rescue And Descent”, for you acronym people.)
The Petzl RADline can be purchased separate from the above mentioned system. I have a long article about this rope, read it here.
Mammut makes a 6mm dry treated Glacier Cord, also a static rope designed for crevasse rescue. This rope has a middle mark and comes with a nice storage bag, which can be used for a clean toss when you need to rappel.
These ropes (usually) play nicely with tiny ascenders and progress capturing pulleys, such as the Petzl Tibloc, Petzl Micro Traxion and the Edelrid Spoc, tools which can simplify the crevasse rescue process.
These specialized ropes typically have a Dyneema core, giving them minimal stretch, light weight, and nice strength, typically about 14 kN. Another benefit is that they absorbs basically zero water, making them lightweight when dragging through snow.
Be careful with your friction knots. You may need use triple wrap prusiks made from skinny 5 mm cord to be sure your friction knots hold on the narrow diameter line.
Read some great gear reviews for these ropes, and a lot more gear, at Black Sheep Adventure Sports.
Here's a quote on this topic from “The Mountain Guide Manual” by Marc Chauvin and Rob Coppolillo (pg 243):
“Because of all the dynamic aspects to a crevasse fall - climbers sliding on the snow surface and the rope and bending over and cutting into the lip - it is becoming acceptable to use static rope.
In fact, Petzl has conducted tests that suggested the spring/rebound nature of a dynamic rope actually makes it more difficult to stop a fall.” If you want to get into the test results, here’s a link to the Petzel website which discusses them.
Here’s a bit of Youtube chat about the topic with another pro guide:

This tip is mentioned "The Mountain Guide Manual" by Marc Chauvin and Rob Coppolillo, and "The Mountaineering Handbook" by Craig Connally.
(This is not an affiliate marketing link, I am offering you these links as a convenience to you and because these books are great.)


Color code your slings
When buying runners, try keep all your single runners one color, and all your double runners another color. This lets you grab the right one with just a quick glance at your harness.
This is an old trick, but a good one:
Make all of the slings of the same length the same color. This lets you glance at your harness and grab the right length of runner that you need.
For example, try to make all of your single (60 cm) slings the same color, like yellow, and all of your double (120 cm) slings a different color, say blue.
Fortunately, manufacturers have gotten on board with this, and now the common color for 60 cm slings seems to be yellow or orange.
(Keep in mind you can shorten a double or connect two singles together to extend them if needed.)
Finally, sport climbing quickdraws aren’t used so much in alpine climbing, so you might want to save those for the bolted routes.
Here's a related tip: the 4:1 ratio
A general rule of thumb for a moderately meandering alpine pitch is to have about a 4 to 1 ratio of single slings to double slings.
So, maybe eight 60 cm slings, and two 120 cm slings. Of course, the length of the pitch and how much it wanders around has a bearing what you carry.
One double 120 cm sling in blue, and four single 60 cm slings in yellow.
Start with this “4:1” short to long sling ratio and you should be good for most routes.


Never drop your phone again
Hesitant to use your phone to take that great photo because you're worried you might drop it with cold fumble fingers? Here's the solution - a phone lanyard.
Sure, we all like to take photos when out on a good adventure. But we also need to keep our phone secure.
One friend, on a recent canyoneering trip, managed to drop his (fortunately waterproof) new iPhone in a muddy pool about 8 feet deep. He took more than 20 minutes of diving down in zero visibility water and feeling around for his phone to retrieve it.
A week or so later, another guy I know managed to drop his phone on a rock climb while taking a photo of his buddy. That phone was gone forever.
Solution: use a phone lanyard.
You can girth hitch it to your belt loop, backpack strap, or wear it around your neck.
There’s a lot of different models out there, but here's one that I have that works great. It’s about $10. I got it online.
(I've seen some marketed recently as more sturdy, or outdoorsy, or whatever. They're all pretty much the same simple design, I say ignore the marketing.)

This has stretchy, rubber-band-like, one size fits all silicone straps go around any existing case you have on your phone. The straps then clip to a thin nylon loop that you can wear around your neck or clip to your pack.
These silicone straps might look a little flimsy, but I have a similar system used with a phone handlebar mount on my mountain bike, and my phone has never fallen off on any trail ride.
It’s probably going to get a few chuckles from your outdoor pals. (But hey, they may drop their phones, and you never will, so who gets the last laugh, right?)

Know how to find your coordinates from your phone
Need to contact 911 when you're in the backcountry? Better have a way to tell them where you are. Learn several ways to get your latitude longitude coordinates from your phone.
I'll be blunt and say this up front: I firmly believe that every backcountry traveller who has a smartphone should know how to find their latitude longitude coordinates and be able to transmit them to 911 (or an emergency contact person) if necessary.

If you ski in avalanche terrain, you have an obligation to learn about avalanche avoidance. If you climb on glaciers, you have an obligation to know about crevasse rescue. Same thing with hiking in the woods: knowing how to find your coordinates from your phone should be a basic qualification of being a responsible backcountry traveler.
It's not just for contacting 911. You can use a coordinate sharing app to text or email an emergency contact person at home. Sometimes in the backcountry with limited cell coverage, you might be able to send a text but not have a reliable voice connection. Many 911 call centers cannot receive text messages, so in that case your best option would be to text your situation and coordinates to a friend in town, and have them contact 911.
Also, I've heard from some people, “Why should I bother using an app like this, 911 uses some technical magic to figure out my phone location anyway.” Well, that can often be true if you're in a city, with lots of cell phone towers and perhaps even Wi-Fi. But, out in the woods with maybe one bar of coverage, some of that magic cell tower triangulation is not going to work too well. Also, doing that can require you to keep your phone on for a longer time, which could be an issue if you have a low battery and need to conserve it. Overall, it's better to be proactive and learn to get your coordinates yourself.
(This article is geared toward iPhone users, because that's what I have. You Android folks, I'm sure you can follow along.)
Note: It’s best to give your coordinates to 911 in latitude longitude, decimal degree format.
Example: 45.1234, -122.1234
This is the more modern, computer-friendly way to specify your latitude and longitude. It's also a lot easier to say over the phone than trying to describe hieroglyphic-like symbols for degree, minutes, and seconds.
If you tell tell your coordinates in another format, such as latitude longitude, degrees, minutes, seconds (example: 45 32’ 13”, -121 56’ 28”) or UTM coordinates (example , 10T 519984 5035478) Search and Rescue (SAR) can figure it out once they get it. However, it’ll be faster and minimize any translation errors by giving your coordinates in decimal degrees, the easiest possible manner. The decimal degree format is also one that every 911 operator should be familiar with, which should further minimize any source of confusion.
Let's cover a few simple ways to find your coordinates on your phone.
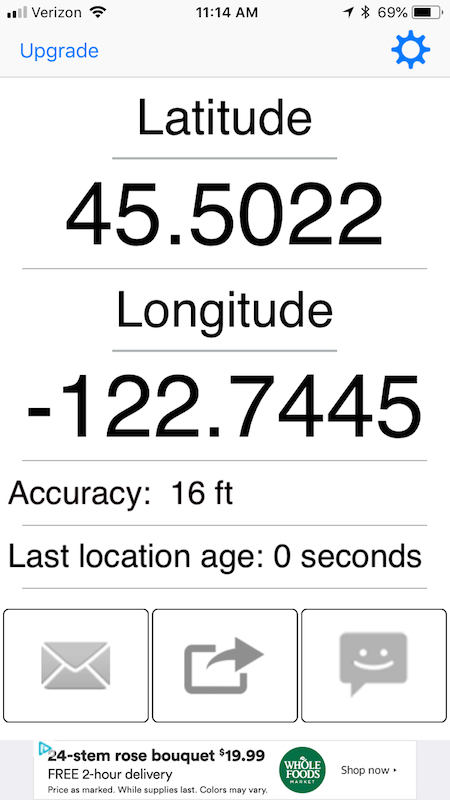
1 - A “show my coordinates” type app (Note, these two are for the iPhone)
One option is to use an app whose main purpose is simply to show your coordinates.
Here’s one I like that’s free and pretty idiotproof - “My GPS Coordinates”. It shows your coordinates in a huge font, and less you text or email those, along with a message.
Tip - You can set the coordinate precision to “low”, or four decimal places, which is your position accurate to about 50 feet. (I feel this makes it easier to transmit your position with enough precision to get you found, but not any extra numbers that could potentially cause confusion or be transcribed incorrectly.)
Here's a screen grab:
Another one I like is called “UTM Position Mailer”. It was free for a long time, now it's $2. It does one thing, and it does it pretty darn well - tells you your exact position in UTM coordinates, latitude longitude decimal degrees, and allows you to send an email or a text with this location information automatically inserted.
If you're calling 911, keep in mind that many 911 operators may not be familiar with UTM coordinates. The better choice is to use latitude longitude decimal degree format, which is universally understood by everybody.

Android folks, try searching in the Google app store for “GPS location”. There are all kinds of free apps. Here’s a free Android app called “My GPS Location”. Shows your location and lets you email or text it.

2 - Dedicated GPS app
I’m a big fan of Gaia GPS. if you have that on your phone and know the basics of how to use it, there’s various ways that you can find your location from the app. Here’s a screen grab with one example.

3 - The iPhone compass app
A quite serviceable compass is built into the iPhone operating system. What a lot of folks don't know or realize is that on the bottom of the compass screen, it tells you your latitude and longitude coordinates and elevation. (Yes, the format of the coordinates is degrees, minutes, and seconds, rather than the more generally useful decimal degrees, but that's certainly better than nothing.) Dear Apple, if you’re reading this, please change the format of your coordinates. :-)
Note that you have to have Location Services turned on for your compass to have this visible. Tap Settings > Privacy > Location Services > Compass, and “Allow Location Access” while using the app.
If you do a long touch on the coordinates at the bottom of the screen, a little “copy” box should pop up, copying the coordinates to the clipboard. You can then paste these into an email or text.
Example of the iPhone compass screen, with lat long coordinates and elevation.

4 - Google Maps
It's not very obvious, but if you know where to tap, you can see the coordinates of your location in Google maps. Tap to copy that and paste in a text. Bonus, it's in the preferred decimal degree format. For the iPhone:
Open the Google maps app. Tap the “black triangle in a circle” icon to zoom to your location.
Long touch on your location. This should open a tab at the bottom of the screen.
Scroll up. You should see the latitude longitude coordinates of that position, looking something like this: (45.1234567, -122.1234567).
Long touch the coordinates, tap copy and then paste into an email or text.


Find the correct declination for anywhere
Want to instantly see the correct declination for anywhere on earth? One click on this Google map gives you the answer. (Forget about entering your zip code or latitude longitude coordinates on those other clunky websites.)
Short answer: magnetic-declination.com. This brings up a Google map of the world, and one click gives you a pop-up box with the correct declination.
Long answer: Magnetic declination changes depending on where you are on the earth. It also changes in the same position over time, because the magnetic poles are moving.
Here’s a map showing how magnetic north has changed over the last 150 years or so.

image: geology.utah.gov
And here's a little chart showing how declination has changed in the Portland Oregon area over the last century or so. If you bought a map that was printed around 1980, the declination would be incorrect for the current day.

Below is a world map of declination. (Red lines = east declination, Blue lines = west declination, Green lines = zero declination). (The lines look so whacky because cartographers are trying to represent the 3D curved magnetic flux lines of the earth on a flat 2D surface)
Zero declination or close to it, is in the central USA, northern Africa, India, China, and most of central Europe. Here, your compass pretty much points to magnetic north AND true north, lucky you.
The closer you get to the magnetic poles, the crazier the declination. You can see why polar explorers have an extra challenge - compasses basically don’t work.
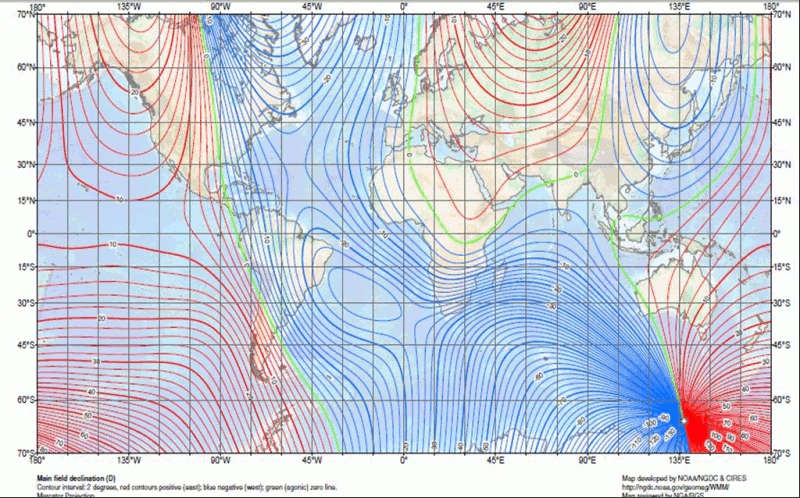
source: geokov.com
So . . . I just want to set my compass declination to my local area- how do I do that?
Your map may not help. As you can see from the top image, declination has changed fast in the last 2 decades. A value that might be printed on the margin of a map may well be out of date, especially if the map is more than 10 or 20 years old.
Good news: it's easy to find the current and correct declination for any place on earth.
Just go to:
magnetic-declination.com
This brings up a Google map of the world, and one click gives you a pop-up box with the correct declination.

It's fun to click around in places that have some pretty crazy declination, such as New Zealand and up in northern Alaska and Canada.
Click around south of Australia in Antarctica, and see why compasses are often useless for polar explorers - near the northern and southern magnetic poles, compasses start doing some pretty crazy things!
Note:
“positive” declination = east declination, such as in Oregon
“negative” declination = west declination, such as in Vermont
If you want to learn more about declination, what it is, how to deal with this, and when you do and do not need to care about it, check out this Youtube video from the Columbia River Orienteering Club.

Rappel hardware pros and cons
It's best practice to run your rappel through some sort of metal connection to the anchor. There’s three common options for this; learn the pros and cons of each one.
You can set up a rappel (but NEVER a toprope!) by running your rope directly through the webbing. But, it's usually preferable to have some sort of metal connection to the rope, which gives a much easier rope pull and does zero friction damage to the anchor slings.
Keep in mind that the maximum force possible on a rappel anchor it is only about 2 Kn, so the hardware does not have to be especially burly, But it sure can give you more confidence if it is! (See lots more climbing gear strength ratings at this link.)
This usually means one of three things: a quicklink, a rappel ring, or a carabiner. Let's have a look at the pros and cons of each one.

1 - Quicklink
A quicklink (aka “maillon”) is a single link of metal chain that has a threaded sleeve, which can be opened and closed. They come in various diameters. Use the smallish ones (5mm) if you choose to take one on an remote alpine climb, and maybe a 10 mm big fat one if you're being a good Samaritan and replacing anchors at your local crag. The 8mm are a good in-between size for general use. They can be made with a zinc plating (for indoor use) or stainless steel. Please use stainless steel hardware for outside anchors!
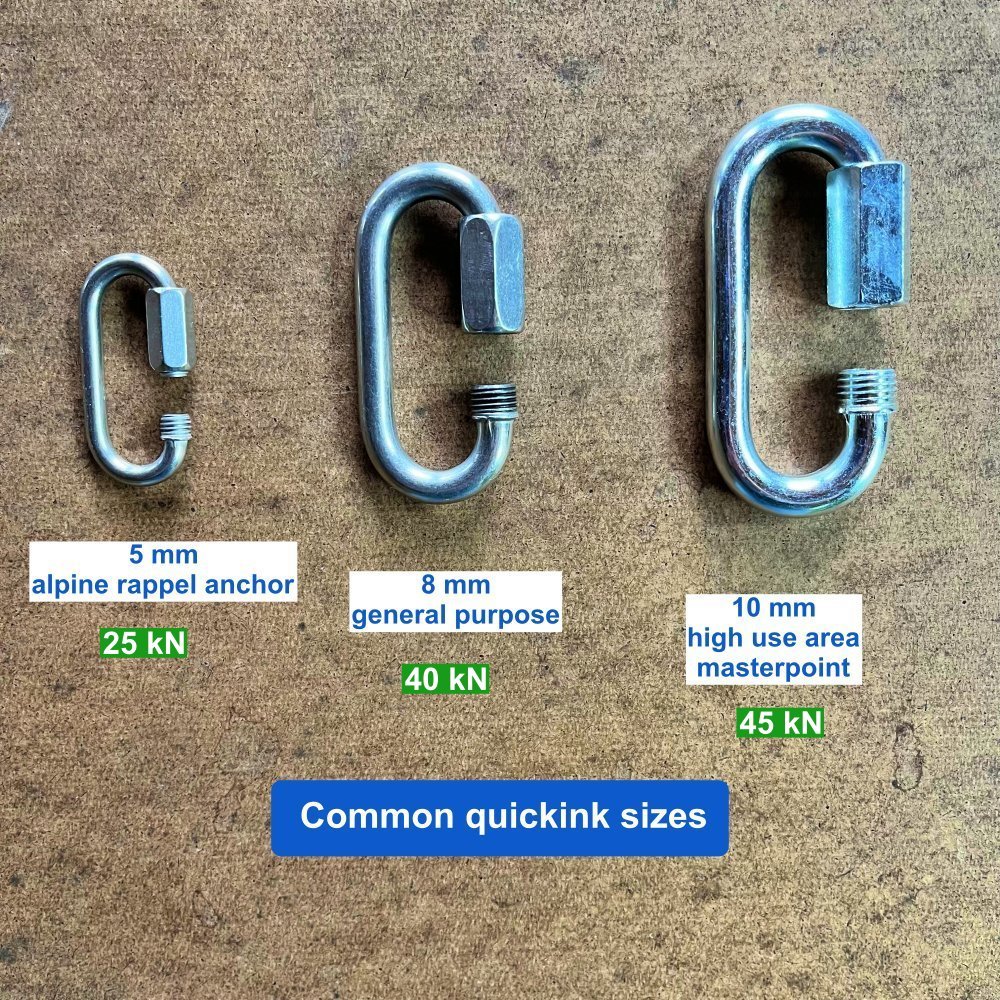
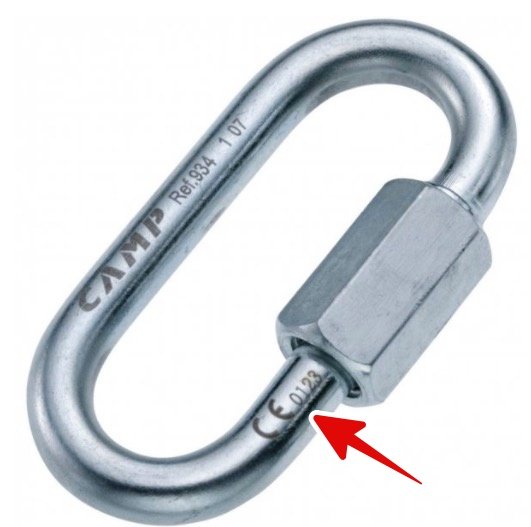
Note: When possible, use quick links that are CE rated for climbing. The Italian company CAMP sells them and they are inexpensive, insanely strong, and come in 5 mm, 8 mm, and 10 mm. We have a whole article on that here. This is a better option than random hardware store quick links of questionable lineage.
Note: It's best practice to close the sleeve of the quick link by screwing it down toward the ground. This means that gravity is helping keep the sleeve closed. A little pneumonic to help remember this is: “Screw down, so you don't screw up.” If you have a quicklink that you want to fix it more permanently, give it an extra turn with a pair of pliers; a multi-tool is your friend. And if you really want to secure it, add a few drops of thread lock.
If you’re doing Crafty Rope Tricks like rappelling with a knot block, then the very small diameter opening may make the quick link your preferred option because it can block the knot. This is an advanced maneuver that requires some specialized knots and training, beyond the scope of what I want to explain here. If you're curious about this type of rope trickery, see this YouTube video, “StaticBlocks - setting the rope length.”
It's probably not worth carrying a quick link as a “just in case” piece of gear on your harness on every climb. It's heavy, single use, and if you need an emergency rappel anchor, a carabiner usually works just fine.
Sidenote: if you’re retreating from a sport climbing route, please don't use a quick link to lower from. They are much harder to clean for the next person up. Try a carabiner instead.
A lightweight option is an aluminum quick link. These currently come in at 7 and 10 mm sizes. The 7 mm is not officially rated, but sources that say they break around 12 kN. Not anywhere close to the 40+kN of a steel 8 mm, but certainly adequate for a rappel anchor.
The 7 mm one weighs only 18 grams, which is dramatically lighter than the almost 80 grams of an 8 mm steel link.
These can be a bit hard to find online, but my buddy Ryan at howNOT2.com usually has them in stock; here's a link.

Pros:
Handy when you want to pass the quick link around several existing slings on an alpine anchor
Small narrow opening, which prevents the knot on a double rope rappel or knot block from ever passing through it
Inexpensive
Insanely strong; the 8 mm CE rated CAMP quicklink is rated to 40 kN!
Cons:
Most are hardware store varieties not rated for climbing, probably made in a random machine shop in China
Somewhat heavy, single purpose piece of gear
2 - Rappel rings
A rappel ring is a round, smooth ring, made of aluminum or steel. All are plenty strong and inexpensive. Again, like the quicklink, rings are something that you probably don’t need on every alpine climb. If you anticipate doing multiple rappels on a seldom climbed route, and weight is not a huge concern, you might want to bring a couple.
Pros:
Properly engineered for climbing and rigging, a single ring is plenty strong
Cons:
Can’t pass the ring around several slings on an existing anchor (Although you can girth hitch a rap ring around a sling, see this tip). Note that this girth hitch technique is more than a little sketchy!
Again, a single purpose piece of gear
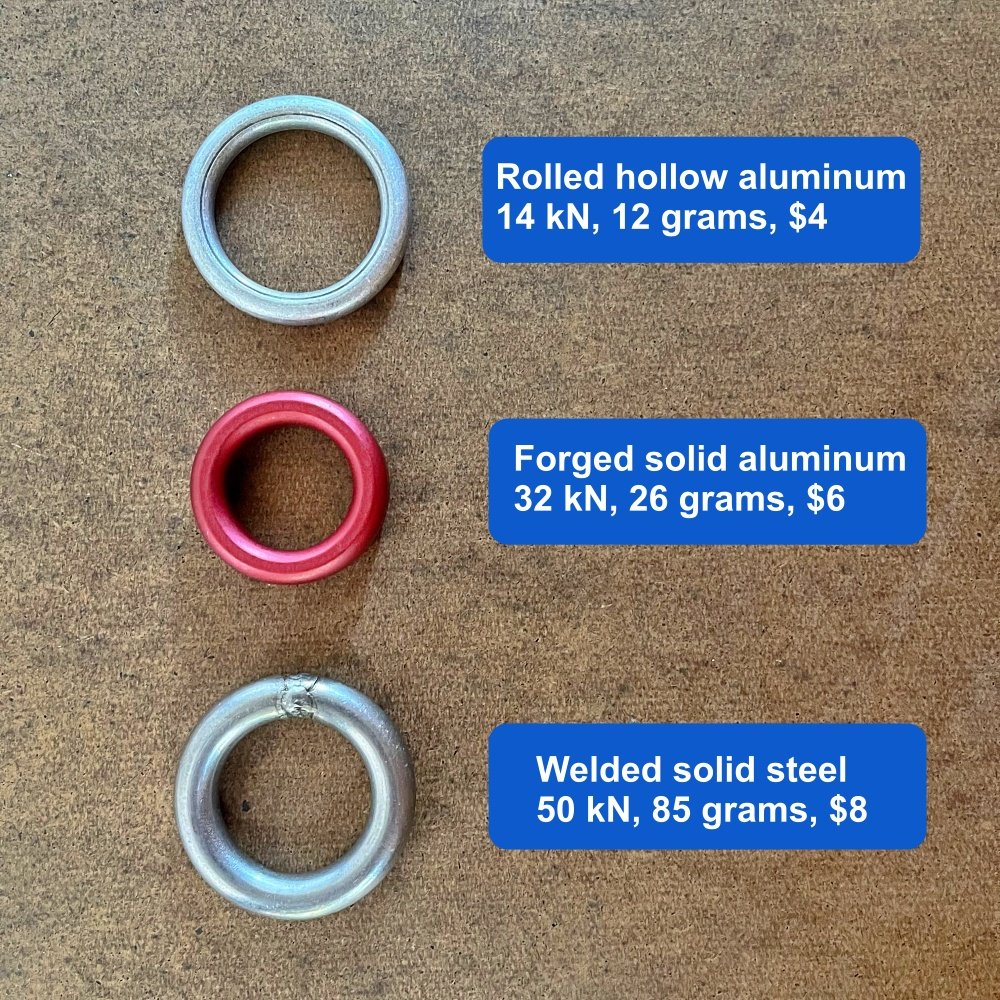
Rolled aluminum ring
These are made of rolled metal, as you can see from that thin line in the middle. They are hollow, and (per Andy Kirkpatrick) are only about one millimeter (!), which does not fill me with a great deal of confidence. However, when new, they are rated at 14 kN, even if they do not give me a warm fuzzy feeling if rapping from just one of them. If you find them in the wild, consider replacing them if you have something better. Or at least double them up. Try to use these only for rappelling and not lowering, that will help them last much longer.
Best use: retreat anchors, or on remote alpine raps that are not going to get much traffic and not on common routes. Apparently they’re also good for hanging hammocks. =^)
Yikes! This is what you don't want to find at a rappel station, and why hollow aluminum rings don’t belong on busy routes. These were removed from a popular route in Yosemite. Don’t be a cheapskate. Replace time bombs like this whenever possible. Ryan Jenks at HowNot2.com tested a worn out ring like this, and it broke at 1.5 kN! Death trap! Photo: shared by AMGA Certified Rock Guide Kevin Heinrich, used with permission, @kevhamrich

Photo: Kevin Heinrich, @kevhamrich
Forged aluminum ring
These are solid aluminum all the way through, unlike the hollow ring above. Plus, they come in cool anodized colors. =^) They are insanely strong, and cost just a dollar or two more than the rolled aluminum ones shown above. I would call these modern standard, and if you're considering aluminum rings, these are the way to go. This one is from SMC, they make some excellent gear. Cheap, strong, and light, I love it!
Best use: rappel master point in moderate use alpine routes, still not great to lower on. Just like a quicklink, you’re fine rapping off one of these.
Welded steel ring
Made by Fixe and other companies. Ridiculously strong. HowNot2.com tested two of these; one broke at 90 kN and the other at 47 kN.
Best use is in popular sport climbing areas (okay to lower from) not for distant alpine routes. Still fairly inexpensive, around $7-$8.
Rappel ring break test results from HowNottohighline

image: https://www.instagram.com/p/CmKFzXmvIqp/?hl=en
3 - Carabiner
Leaving a carabiner behind will tear at the soul of the frugal dirtbag climber, but come on, it's only about five bucks, relax. Remember all those clunker cheapo carabiners you probably got when you first started climbing? If you’re planning an alpine route where you anticipate lots of rappels, bring a couple of those along as a “leaver carabiner” and slowly dispose of them.
While a single carabiner generally fine to rappel off of, many people will prefer the extra security and use two regular carabiners with gates opposite and reversed. Or leaving a locking carabiner. Or, you can always use my favorite method: take one snapgate carabiner and tape the gate shut, making a cheapskate locker.
Pros:
You always have it with you
Multi purpose price of gear
Easy to clip to multiple webbing strands on an alpine anchor
Cons:
A bit more expensive than the other options
The wide gate might cause the knot connecting your rappel ropes to migrate through it, making pulling the rope more difficult. Knot blocks may not work. Be cautious with skinny double rope rappels
A single standard carabiner with the gate not taped is not the safest setup. Better to use a locker, two with gates opposite and reversed, or tape the gate shut
The cheapskate locker. A few wraps of tape completely secures the gate, and gives you peace of mind for a rappel. Leaving a little extra tape folded over makes it easy to remove.

So . . . Where does that leave us? It really comes down to personal preference. Each one of these is plenty strong, relatively inexpensive, and will give you a smooth rope pull. Personally, I dislike carrying special use pieces of gear that I may or may not use, so I usually use a “cheapskate locker” carabiner taped closed for a standard rappel. I’ll sometimes bring a quicklink if I anticipate a knot block or some other Crafty Rope Trick may be needed.

Ode to a Pink Tricam
Whether you love it or hate it, everyone seems to have some strong opinion of the “pinkie”, the size 0.5 Tri-cam from Camp! Some are even inspired to write a poem about it.
Ode to pink tricam poem, a classic and worth remembering!
I don't remember where I first heard this, but it's certainly good enough to share. Personally, I love the little buggers. No climb is complete until you sink the pink!
Ode to a Pink Tricam
Oh Pink's the one I love to place
when I'm alone way up in space
on some exposed and airy face.
They sink where other gear won't go.
When all you've got is manky pro,
This tricam saves your butt from woe.
But it's often hard to get them out;
They make your second moan and shout
And wave his nut tool 'round about
But that's why you're the one on lead
Your problems are a different breed
As long as someone does the deed…
"Oh quit your whimpering," you rumble,
"And get it out or there'll be trouble"
"Get to work now, on the double!"
Although it sometimes takes a while,
They do come out with vim and guile,
(or chiselling and curses vile.)
Pink will do what all the rest.
Won't do when they're put to the test.
Oh pink tricams are just the best!
-- Charles "Pinky" Danforth


How to attach a rappel ring to a sewn sling
It might first appear like a bit of rope sorcery - How can you attach a rappel ring to a sewn runner? Each one of them is a closed loop! Read and learn, young Jedi.
Post update: This is NOT a recommended method! It’s easy for the ring to come off the webbing and for the anchor to fail.
It's mentioned because it might be one of your only options, or you might come across an existing rappel anchor with a ring attached like this. You should be aware how it got that way, and the potential for it to become easily detached.
Try this yourself, see how easy it is for it to come undone.
So, although I've kept the original post below, I no longer think it is such a nifty trick. I’ll stick with leaving a carabiner behind, or second choice, a quick link.

My partner and I were heading down the West Ridge of Forbidden Peak in the Washington Cascades.
A series of rappel anchors in various states of disrepair were leading us steadily back to our camp.
When we got to one rat’s nest of several ancient but serviceable slings around a boulder, my partner looked at it with a critical eye and said, “Hey, let’s take a sec to beef up this anchor. I’m going to add a rappel ring to the best looking one of these slings.”
I paused. “Don't you need some webbing too, so you can thread it through the ring and add the webbing to the anchor?”
He looked at me like I had rocks in my head and said, “DUH, no! I’m just going to add the ring to the webbing that's already there.”
I looked back at him, even more confused. “How are you going to do that!” I demanded. “The ring is welded shut, the webbing is tied shut, and you’ll never untie it without pliers!”
He looked back at me, and shook his head with a little laugh. “Watch and learn, young Jedi, I'm about to show you a little trick,” he said.
The anchor looked something like this . . .

source: summitpost.org/nice-rappel-anchor/906562
Now, if you already know this little move, you'll probably be laughing at me. (That's OK, I can handle it.)
A little backstory. I’ve never been much of a fan of carrying rappel rings for alpine climbing. Sure, a rap ring gives you a nice smooth pull with less chance of the rope end hanging up.
But, for alpine climbing on an established route, where you’ll often find a tangle of pre-existing slings, I used to think carrying a rap ring was silly, because you couldn’t thread it through the slings that were already in place.
Given that situation, my usual choice was to take the oldest looking carabiner on my rack, clip it to every strand of the webbing, then close the carabiner gate with some tape to make a “cheapskate locker”.
Or, I’d occasionally carry a quick link, a threaded link of chain that can be opened, attached around multiple strands of webbing, and then closed up. But, this is a rather heavy and single use piece of gear, so I’d usually sacrifice a carabiner.
I learned a 3rd option that day on Forbidden, when I saw this little trick for the first time. It almost looked like a magic trick when my partner showed it to me, because I had it so firmly in my little head that a closed circle ring could not be threaded through a closed circle loop of webbing.
Well, technically it’s NOT threaded through the webbing, but attached via a simple girth hitch. This attaches the ring in a couple of seconds to a closed loop.
(Yes, I know some anchor engi-nerds are having a minor freak out right now and screaming “don’t you know girth hitching a sling decreases its strength by 30%”, blah blah blah. 11/16” webbing is rated to about 13 Kn, and the maximum possible force on a rappel is about 2 Kn, so I’m not worried about this in the slightest.)
And where did I get those numbers? From the climbing gear strength ratings post, which you can read right here.
UPDATE: Strong note of caution: Easy ON also means easy OFF!
If it takes you a second to attach this with a girth hitch, it's also going to take a mere second of inattention for this to potentially come off, or worse yet, come halfway off, without you noticing it.
After I first published this post, I got an email from a climbing friend. He told me a scary story about setting up a rappel on this exact situation, with a girth hitched rap ring. While he was getting rigged up, the runner got a little cockeyed. He was a moment away from leaning back on the ring when he realized it was completely unattached to the webbing, YIKES!
Here's another accident report from Cutthroat Peak in the North Cascades of Washington in April 2024. Suspected cause is girth hitched rappel ring. Here's the accident report.
Yes, best practice is to load test the masterpoint with a tether backup in place before you commit to it. But sometimes with darkness, stress, distractions, whatever, that doesn't always happen.
Here are three much more secure options for alpine rappel hardware: the cheapskate locker, a.k.a. taped gate carabiner, a quicklink, and a rappel ring that’s actually tied through the cord, instead of being girth hitched.
When properly placed, it’s impossible for the hardware to come off of the cord.

So, after all that, if you still want to girth hitch a ring onto cord or webbing, here's how to do it.
Closed loop of webbing and rappel ring.

Pass a loop of webbing through the ring.

Tuck the webbing loop behind the ring.

Pull it tight. Done, and ready to rap. Be SURE and double check this before you go.
Be sure and run your rope or clip yourself through the BOTTOM part of the ring and not the top!
If you don't like the looks of it, don't be a cheapskate, trade it for a carabiner.

Once more, for emphasis: if you clip the top of the ring in the photo below, seriously bad things are gonna happen!

What is open source mapping, and why should you care about it?
Tired of using ancient USGS topo maps printed decades ago that lack modern roads and trails? Discover the benefits of using “open source” maps, the Wikipedia of cartography.
Short answer:
Think of open source maps as the “Wikipedia of maps”.
Created through literally millions of contributors, open source maps are completely free, cover the entire world, and often more accurate and up-to-date than any map you could buy from a commercial company or government agency. You can find open source maps and a great interface for printing them at Caltopo.com, and on the Gaia GPS navigation phone app.
Check out the real thing at OpenStreetMap.org.
Long answer:
Historically, maps were typically made by a government agency within a country. For example, in the United States, the 7 1/2 minute US Geological Survey (USGS) topographic map series. These maps were pretty much the only ones available for many decades, and they definitely have their shortcomings. There was no shaded relief, newer roads and trails were often not accurate, and the maps were often not updated for many decades, if at all.
And, of course, the maps stopped at the borders of the country that made them. Want to go on a motorcycle tour in Bolivia? Finding maps for a Big Trip could be a hit or miss project, because who knows if the Bolivian government has a good cartography department.
The answer is Open Street Map. Inspired by the success of Wikipedia, this visionary product was founded in 2004 in the UK. It now has over 2 million users, many of whom regularly add features and improvements, to collectively create a single, free, open sourced map of the entire world.
(Note that map heights and contours are in meters, which might only pose a problem to the three countries in the world that do not use the metric system: Liberia, Myanmar, and the United States. )
What does this mean for you, the recreational user? It means that roads and trails are probably going to be more current and accurate than you’ll find on any other map, and that the entire world is mapped with a consistent look, legend, and standard. This makes the maps especially useful for international travel.
Open source maps come in several flavors, so let's look at a few examples.
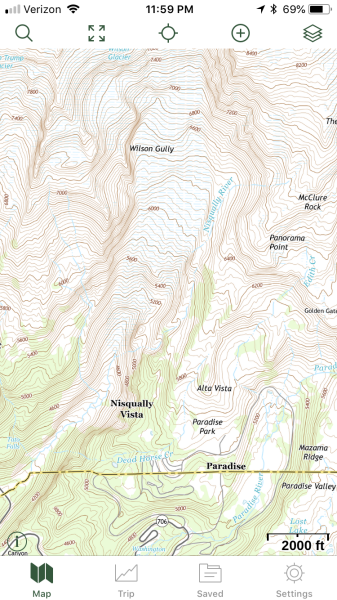
The maps below are from the main visitor area for Mount Rainier National Park, and are screen grabs taken from Gaia GPS, our favorite backcountry navigation GPS app.
Open Street map example
USGS topo map example

Above on the left is the standard US Geological Survey topographic map. Note the contours are great, but the roads are rather hard to see, and trails are sadly nonexistent. No trails, LAME! Not too helpful for the backcountry.
Above on the right is Open Street map for the same area. Notice we have nice road for driving, a bit of vegetation shading and even some trails, but no contours.
Open Cycle map example

Open Topo map example

Above on the left we see Open Cycle. This is often a great choice for hiking, because it shows shaded relief (which makes gullies and ridges much easier to see), labeled contours, and hiking trails in easy-to-see red, along with well marked roads.
And finally, above on the right we see what is often my go-to layer, Open Topo, which has shaded relief, labeled contours, some vegetation coverage such as rock, snow, or forest, more detailed streams, human made structures, and current roads and trails. The trails are printed in black and are a bit hard to see, and the text is tiny, which are small drawbacks.
So, next time you’re looking for a good map source in your favorite mapping software, be sure and have a look at any map layer with the word “Open” in the title.
Becoming a contributor is easy. You can be out on a hike or bike ride, in the woods or even on a little trail in your neighborhood. You may notice that the trail you are walking on is not on your open source map on your phone. Time to record a track of your own and add it!
Record a GPS track, upload that track when you get home, trace right over the top of it with various line symbols, and boom, in a minute or so you’ve made your own small contribution to a single map of the world. You may find doing this feels surprisingly rewarding.

What's a "global" compass?
Headed for New Zealand or Patagonia? That compass you bought in North America might not work. Here's two solutions.
If you live in the northern hemisphere, and are considering a trip to New Zealand or Patagonia, you might want to check out a so-called “global” compass.
What the heck is that, you might be wondering? My compass needle should always point to magnetic north no matter where I am, right? So why do I need a special compass to go to southern latitudes?
Well, your needle technically should still point to North, but here's the thing - when you’re closer to the magnetic north or south poles, the compass needle in a regular compass can dip and start to drag on dial of the compass, making it useless. Global compasses have a taller dial and can accommodate this. Unfortunately, they are also a bit more expensive, so don't buy one of these unless you need to.
(If you do plan to travel to a far off corner of another hemisphere, another option is to purchase a compass locally when you get to your destination, which should work just fine when you're there.)
A fine choice for a global compass - the Suunto MC-2G

image: backcountry.com
As far as I know, they Finnish company Suunto Is the only manufacturer who makes a global compass. These Suunto compasses have the capital letter “G” In the title, indicating it is a “global” compass.
An excellent option is the MC-2G, which is simply the global version of the popular MC-2. This compass has all the high end features, including adjustable and declination, deciding mirror, and a clinometer.
Don't ask me why I having a taller dial should cost an extra $20 or $30, but apparently that's how it works. As of autumn 2018, the MC-2G costs between $60-$80 online.

Protect your fixed rope with a klemheist
If you have a fixed rope loaded over an edge, giving it some protection can be an excellent idea. Here's how to do it in a few seconds with a 4 foot runner.
If you need to quickly pad a fixed rope that’s running over a sharp edge, try this trick.
Take a 4 foot or longer runner, ideally a less expensive nylon sling rather than a $$$ spectra one.
Tie a klemheist knot with as many wraps as you can around the rope.
Slide this knot over the point where the rope contacts the edge.
Any abrasion will rub on the cheap runner, hopefully not your rope sheath. If you really want to anchor it in place, tape the klemheist knot to the rope.


What's the best tent color?
When shopping for a new tent, consider to how you might feel when you’re storm bound for a few days inside. Color has a strong effect on your mood. Yellow is probably going to treat you better than green or blue.

image: from the always awesome book, “glacier mountaineering: an illustrated guide to glacier travel and crevasse rescue”, by Andy Tyson and Mike Clelland
Next time you’re tent shopping, pay attention to the color. Crawl inside (if possible) and think, “Would I want to be in this thing for several days in a storm? Color can have a big effect on your moods and spirits.
After a few soggy days in a green tent, one climber commented he felt “as though he had been swallowed by a frog.” Darker colors may be less visually intrusive in the backcountry, but balance this with how you feel inside it.
Mental attitude can be important on a tough route, and every little bit helps. Most folks prefer the more uplifting colors - ever notice how most expedition tents seem to be yellow?

image: mountainguides.com

Sunscreen: solid stick, not lotion
Sunscreen lotions can be a drag for climbing. Solid sticks are much better.
The modern approach to sun protection in an alpine environment is wearing a sun hoody to protect your arms and head, a visor hat to shield your eyes and forehead, and maybe a buff for your mouth and lower face.
But, you're still gonna have a few exposed spots on your face and that's when sunscreen is needed.
Sunscreen lotion sucks. It can freeze, leak in your pack, make your hands greasy when you’re rock climbing or cold when you’re snow climbing. (If you're going to use lotion, here's a tip: Squeeze it on the BACK of your hands and apply it that way when you’re rock climbing, so the greasy stuff stays off your palms.)
Sunscreen in a stick is much more convenient and less messy.
When you find one you like, buy a few so you can keep them stashed in different packs and jackets and don't have to hunt for it before a trip. Get the smallest one you can, many containers only weigh about 15 g. Careful about putting it above your eyes and then having sweat drip down, that's no fun.


How to always have dry socks with only two pairs
Dry Feet = Happy Feet! You can always have dry socks, even on multi day snow climbs, if you follow this tip.
On longer Pacific Northwest snow climbs such as Mt. Shasta and Mt. Rainier, (not to mention longer expeditions) keeping your feet in good shape can be a challenge. Even with modern boots, your socks and feet will get progressively more wet if you don’t take proactive steps to dry them.
Here’s a tip to have dry socks every day on milti-day snow climbs, while bringing only two pairs.
Wear a pair of socks (pair 1), get them wet.
Hang pair 1 up in the tent that night and all next day.
In the morning, put on pair 2.
That night, hang pair 2, and put pair 1 in the sleeping bag with you, and put a hot water bottle inside each sock (preferred), or put the socks on your belly. (This is a perfect use for a 20 oz. Gatorade bottle, a great water container we talk about in this Tip.)
Repeat indefinitely.