
Alpine Tips

How strong is it? GEAR (Part 1)
Part of a continuing series of looking at strength of anchors, gear, and knots. How strong is a belay loop? How about a rope after you stomp on it with a crampon? Can I trust that rappel anchor made with old, sun bleached webbing? Learn the answers to these and more.

Premium Members can read the entire article here:
What's on this page?
How strong is a belay loop?
How strong is old, crusty, sun-bleached webbing?
How strong is your rope?
How strong is a rope after it’s been spiked by a crampon?
How strong is the core and sheath of a rope?
How strong is an HMS carabiner loaded on the gate side?
How strong is an edge loaded carabiner?
1 - How strong is a belay loop?
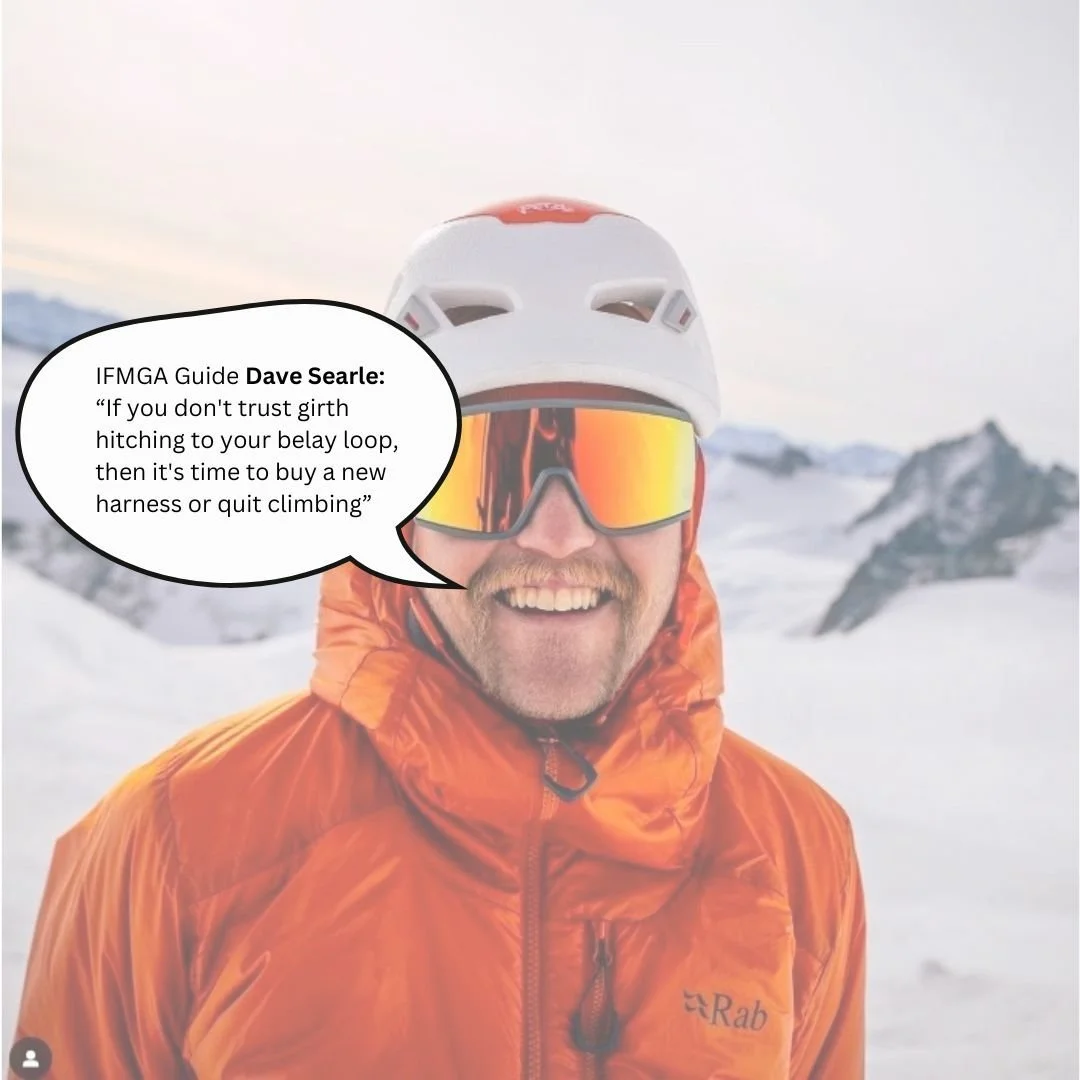
Between 20 and 30 kN
Source / testing: How NOT2, How do you know yours is safe?
We rely on this single, non-redundant point of a harness for almost everything, so it better be unquestionably strong!
UIAA ratings require a minimum strength of 15 kN. There can be wide variation depending on the age of your harness and the material, but you can count on 15 kN at a minimum.
HowNOT2 tested a bunch! The general range was between 20 and 30 kN.
(Yes, lots of Americans still remember the tragic Todd Skinner accident from 2006, where he died from a failure of his belay loop. I took a close look at that, and share some little-known details; you can read those here.)
2 -How strong is old, crusty, sun-bleached webbing?
As low as 3-ish kN, yikes!
Source / testing: HowNOT2 Youtube, “Would you rappel on this?
That tangle of rock-rat chewed, ancient rappel anchor? It can be as weak as 3-ish kN, which you can generate by bouncing a bit with just your bodyweight!
There have been at least two recent fatalities in the United States from failure of old webbing anchors. Carry some extra 6 mm cord, probably a knife, cut out old scary stuff like this and replace it with something better.

3 - How strong is your rope?
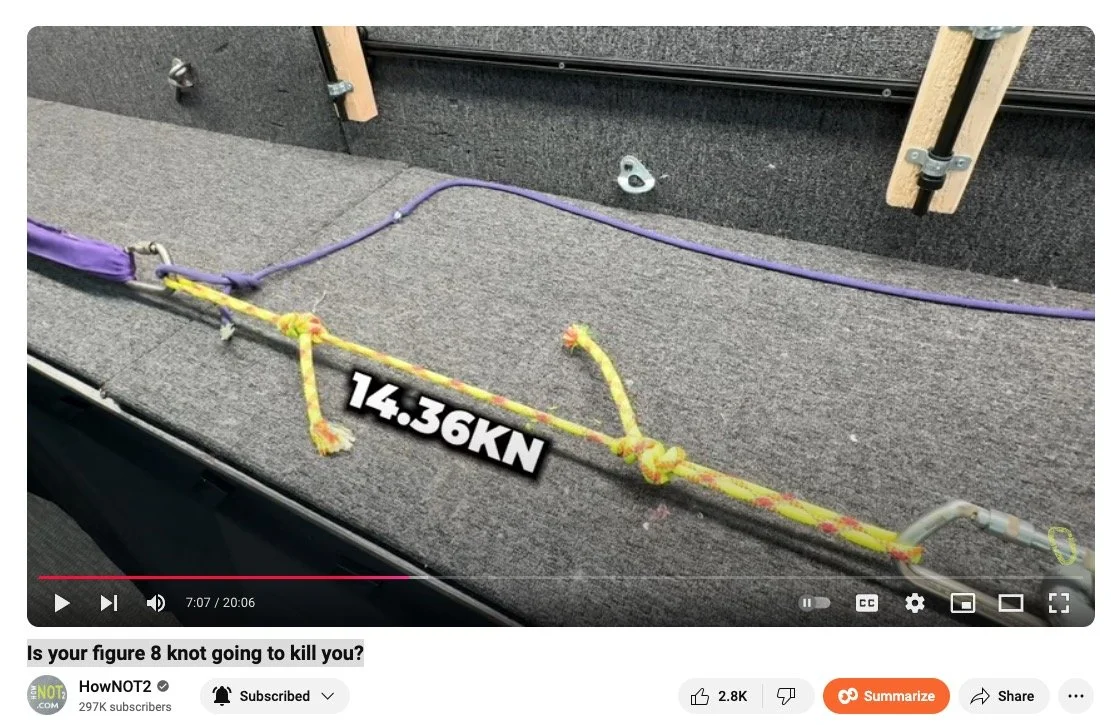
About 14 kN
Source / testing: HowNOT2, Is your figure 8 knot going to kill you?, about 7:05
Climbing ropes don’t have a strength rating like almost all your other gear, but I bet you're curious about it! Here's an approximate answer.
If you put a dynamic climbing rope that's around 9 mm around a cylindrical drum with enough friction so it doesn't have any knots, it will stretch a LOT, and break at around 20 kN.
But of course, that's not how you use a rope. A more realistic test is to take a short bit of rope, take a figure 8 on bight in each end, and break test that.
4 - How strong is a rope after it’s been spiked by a crampon?
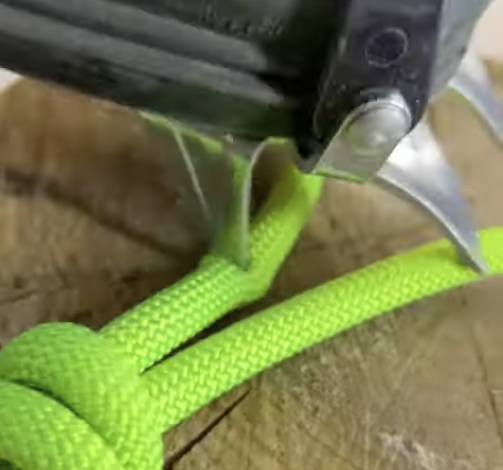
About 11-ish kN - basically full strength!
Source / testing: HowNOT2 short video, “Crampon vs. Rope” (filmed with me at HowNOT2 world HQ in Seattle)
There you are, trudging along on a glacier climb with crampons, you're tired and getting a little bit sloppy and . . . OUCH, you step on your rope that's leading out to your partner in front of you. Is this a problem?
Fortunately, probably not. Although you might wanna mark the spot with some tape to inspect later, and consider retiring that rope.
I had a lot of fun filming this with Ryan. Because the single crampon spike did not yield dramatic results, Ryan got a little crazy with a hammer and a nail, putting multiple more spikes in the rope. Even after doing that, it was still close to full strength!
If you separate the core and sheath of a rope, how strong is each part?
If you clip four different things into a HMS masterpoint carabiner, does that weaken it?
If a carabiner is loaded across the edge of a rock, is that bad?
Join my Premium Membership to read the rest of the article.
Thanks for your support!


Two ways to rig a 2:1 “C” haul
The 2:1 haul is a fundamental system in rope rescue. If you use a progress capture pulley, there are two places you can put it: on the load, and on the anchor. There are pros and cons to each; learn ‘em here.
Premium Members can read the entire article here:
A 2:1 haul is a fundamental mechanical advantage system for climbing self rescue.
To move your load 1 meter, you must pull 2 meters of rope through the system.
In a (theoretically frictionless) world, you could lift a 100 kg load by applying about 50 kg of pulling force.
It's called a “C” because if you turn your head sideways, it kind of looks like the letter. =^)
It's common to rig this for crevasse rescue by using a progress capture pulley (PCP), such as the Petzl Micro Traxion.
With a 2:1 haul: the progress capture can go in one of two places:
On the load
On the anchor
Here are the two different setups.
1 - Progress capture on the LOAD

2 - Progress capture on the ANCHOR
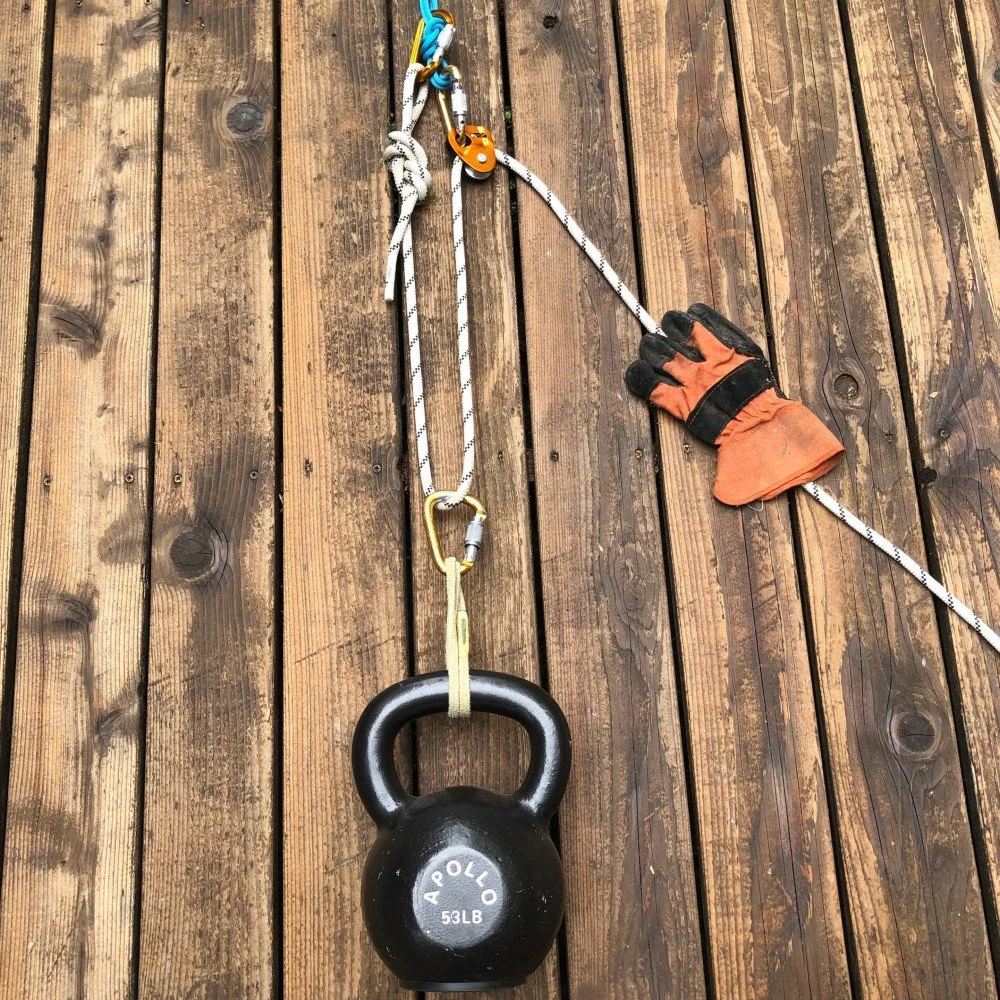
What are the forces on the anchor for each of these systems?
If you do have a redirect like in the second photo, what’s something you can do to reduce the load on the anchor?
For crevasse rescue, what are pros and cons of these two methods? (My opinion: I prefer to keep it on the anchor.)
Join my Premium Membership to learn all this in the complete article.
Thanks for your support!

How to (safely) clean an overhanging route
When lowering off and cleaning an overhanging route, you may have a problem at the bottom quick draw. If you unclip that and let go, you're probably gonna take a big swing, which may be into something dangerous. Here are two techniques to solve this problem.
Premium Members can read the entire article here:
When lowering from an overhanging route, you typically clip a quickdraw between your harness and the rope going to your belayer.
This draw slides down the rope as you're being lowered, keeping you fairly close to the rock and letting you more easily clean the gear.
This is known as tramming, because . . . (it looks something like a tram/gondola at a ski resort, hanging from the cable? That's my best guess.)
Below: nice diagram from VDiff Climbing, showing the “tramming” technique.

image: vdiffclimbing.com, shared with permission
The potential problem: when you clean the last draw.
After you clean the bottom draw and let go, you have the potential to take a huge swing out into space, because the roof now wants to hang you directly underneath the top anchor.
If you have a clean swing away from anything dangerous, then go ahead and take it, it can be kind of fun!
But that’s not always the case. I’ve heard about several accidents that have happened from this, most recently in California in 2025. The climber took a big swing into another rock which severely broke their leg and required a helicopter rescue, yikes! Don't let this happen to you!
There are various ways to prevent this problem. Let's have a look.
How to avoid the big swing when cleaning overhanging routes . . .
If you can reach the first bolt from the second bolt, try to reach down and unclip the bottom draw. This will still cause a swing, but hopefully not as far.
Do you have a fancy stick clip that can unclip draws from bolts? Lower to the ground and use that to remove the bottom quickdraw.
Can you climb unprotected to the first bolt, clean the draw, and then safely downclimb? That's an option.
Is there a permanent quickdraw on the bottom bolt? Leave it there; it’s for your safety.
Finally, if you can't remember the lower out trick I'm gonna explain below, then just leave your bottom quickdraw in place. Yes it's an expensive lesson, but it sure beats you swinging into something and getting hurt.
Try these two methods of “lowering out”
A lower out is a standard move in big wall climbing. It’s typically done by the second when following a pendulum, or when releasing the haul bag in a (semi) controlled way from the lower anchor.
In this scenario, there are two ways you could do it.
Option 1: Use the tail of the rope
The belayer tosses up the end of the rope.
Climber catches it, puts the end through the bolt, and pulls through some slack.
Climber pulls themselves in close to the bolt with both rope strands, unclips the draw.
Climber lowers themself out, hand over hand, until they're in the fall line.
Belayer lowers the climber to the ground.
See video below.
Notes . . .
Be sure and check that there are no rough edges inside the hanger that might damage your rope.
Are you worried about rope damage, even if the hanger is in good shape? It's not a problem, as you're not putting full body weight on the rope.
You also need enough remaining rope on the ground to do this. It's gonna be more than double the length of the lower out.
Option 2: Use a lower out cord
You need to pre-plan a bit for this, because it's not a standard piece of gear for sport climbing. But if you know you're gonna be climbing overhanging routes, it might be smart to have one.
Bring a 10 meter-ish long piece of 6 mm cord. (Or, you could take two cordelettes that are untied and then tie them together to make one long bit of cord.)
Similar to the “end of the rope” method, pass one end of the cord through the hanger and pull it to the middle, or to the knot connecting the two cords. Pull yourself in, taking the weight off of the quick draw. Clean the quick draw, then and lower yourself out hand over hand. A 30 foot cord gives you a lower of about 15 feet.
The climber doesn’t have to bring this lower out cord as they climb; the belayer can toss this up to them from the ground.
This can be a good option if you want to avoid any risk of your rope being damaged from running it directly through the hanger, or if the route was a rope stretcher and you don't have enough extra on the ground to use the remainder of the rope as described in option 1.
Want to see a short video about how to lower out with the rope?
How about a video on general tips for tramming and cleaning overhangs?
Want to learn out the gear hack (that I invented) that uses some simple aid climbing gear as a great way to clean overhangs?
Join my Premium Membership to read the rest of the article.
Thanks for your support!

Foot haul your pack on a multi-pitch
Hauling isn't just for big walls; pulling up your pack on a small diameter cord can be a lot nicer than having it on your back. Here's a great way to set up an ergonomic hauling system that's simple, fast, and lets you lift with your legs, not your arms.
Premium Members can read the entire article here:
This tip was inspired by a YouTube video (link below) by Brent Barghahn, professional climber and founder of Avant Climbing Innovations. Connect with Brent at his website and Instagram, @avant_climbing_innovations
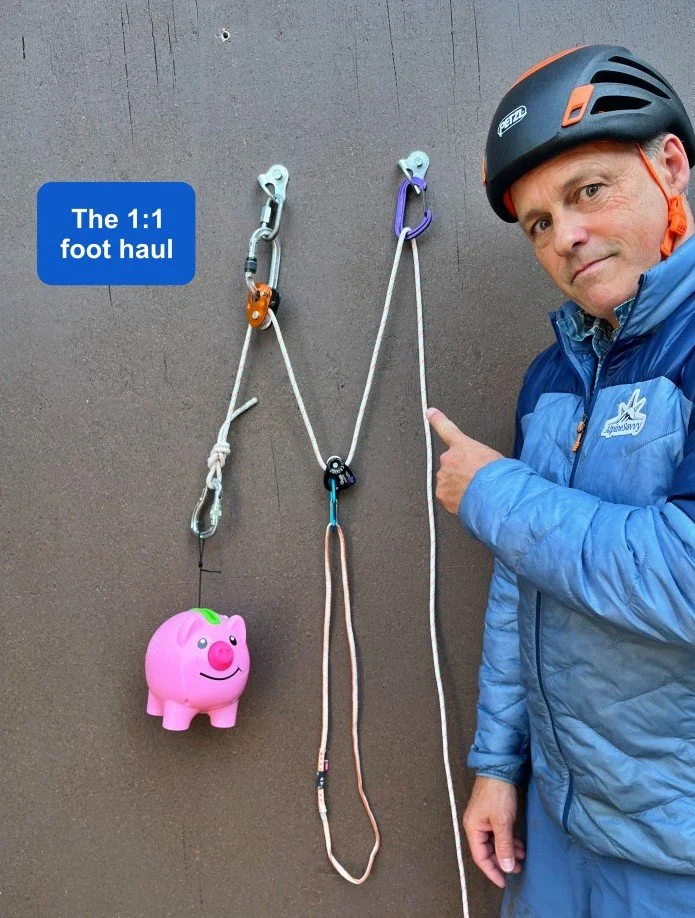
Hauling isn’t just for big wallers. Even on a modest multi pitch, it might be better to haul your pack than climb with it on your back.
Need to haul a backpack on a multi pitch (with food, water, headlamp, some extra clothing layers, maybe some approach shoes for the walk off?)
How about on a big wall, bringing up a tagline to do a “mini haul” with all the stuff you first need at the anchor, before you start the real haul with the heavy bags?
Setting new routes, and want to haul up your bolting equipment?
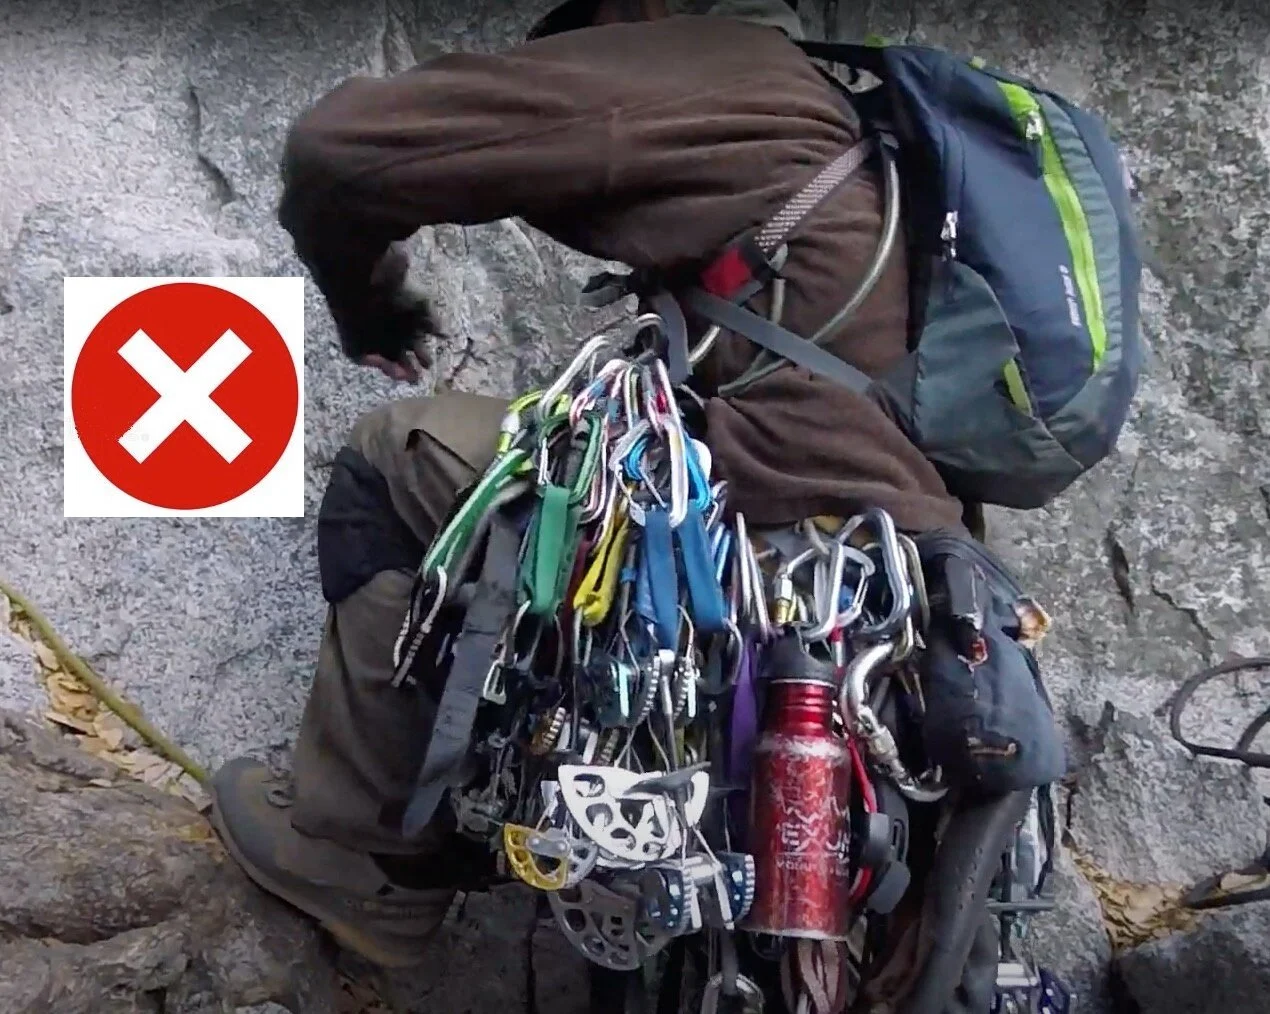
The traditional way to bring up a small load is for your suffering second to carry it all in a backpack. Not so fun for them, ‘cause carrying a backpack sucks when the climbing is hard! It also sucks to climb with all that extra stuff (shoes, water, jacket, etc.) jangling off your harness.
Don’t be this guy . . .
With modern gear such as the Petzl Micro Traxion and Petzl PURline (6 mm static rope designed for hauling), it's now a lot more feasible to efficiently haul a moderate (30 lbs. / 15 kg) load.
With a modest load like this, you don't need any fancy mechanical advantage rigging. A 1:1 is going to work fine. With a 1:1:
To lift a 15 kg load, you need to pull down with that same 15 kg of force (plus a bit more to overcome friction).
If you pull 1 meter of rope through your haul system, the load moves up 1 meter.
Progress capture required
If your pack is very light, you might pull it up hand over hand, but this usually isn’t the best choice. For most loads, you'll need some way to grab the rope to hold your bag in place when you want to take a break or adjust your stance. There are various ways to do this, the best being a progress capture pulley such as the Petzl Traxion.
But yeah, those suckers are expensive! Here are some alternatives: the Garda hitch and a Petzl Tibloc.
Garda hitch: Pros: no extra gear required, just two standard carabiners. Cons: works best with modest loads, because of the BIG evil friction from the hitch. If you do use this, you can minimize friction by pulling up on the load with one arm, and then pulling the slack rope down with your other hand.
Petzl Tibloc: Pros: lightweight, multipurpose tool you may already have with you. Many folks think of this only as an ascender, but it also works as a progress capture for hauling. Cons: it's easy to set up incorrectly (check my detailed Tibloc article on this for the right way to do it) and it also adds a fair bit of friction because you're pulling the load over a low efficiency carabiner instead of using a pulley.
Haul from a high point
At a bolted anchor, usually it's best to haul off of the bolt rather than the anchor master point (which you’re probably attached to). There are a few reasons for this.
If you're on a ledge, having your hauling point as high as possible can minimize friction of the rope running over rock.
A high hauling point can give you a longer “lifting” stroke with your leg, which is more efficient.
A well placed bolt is good for 20+ kN, an absolutely strung enough for you to bring up a modest backpack. No need to haul from an equalized masterpoint if you have good bolts.
Haul with your feet, not your hands
When hauling, it's almost always better to use your feet / body weight to lift the load, rather than your hands and arms, which you're probably trying to preserve for the next lead.
There are MANY ways to rig a 1:1 haul. Here's one that's fairly simple, works great, and uses minimal gear.
Gear you need for a foot haul:
Two progress capture pulleys (PCP), such as a Petzl Micro Traxion (or a Tibloc)
A few extra carabiners
60 cm (single length) sling
Rigging the 1:1 foot haul (Climber omitted for clarity)
1) Clip your progress capture pulley (and haul rope) to a high point on the anchor. Directly onto a solid bolt is fine. Pull up all of the slack. Yell down to your partner to release the bag from the lower anchor.
(Note: if you carry your PCP already preloaded with the haul rope, it can speed up setting up your haul, and minimize the chance of you dropping the PCP. I cover that in this article.
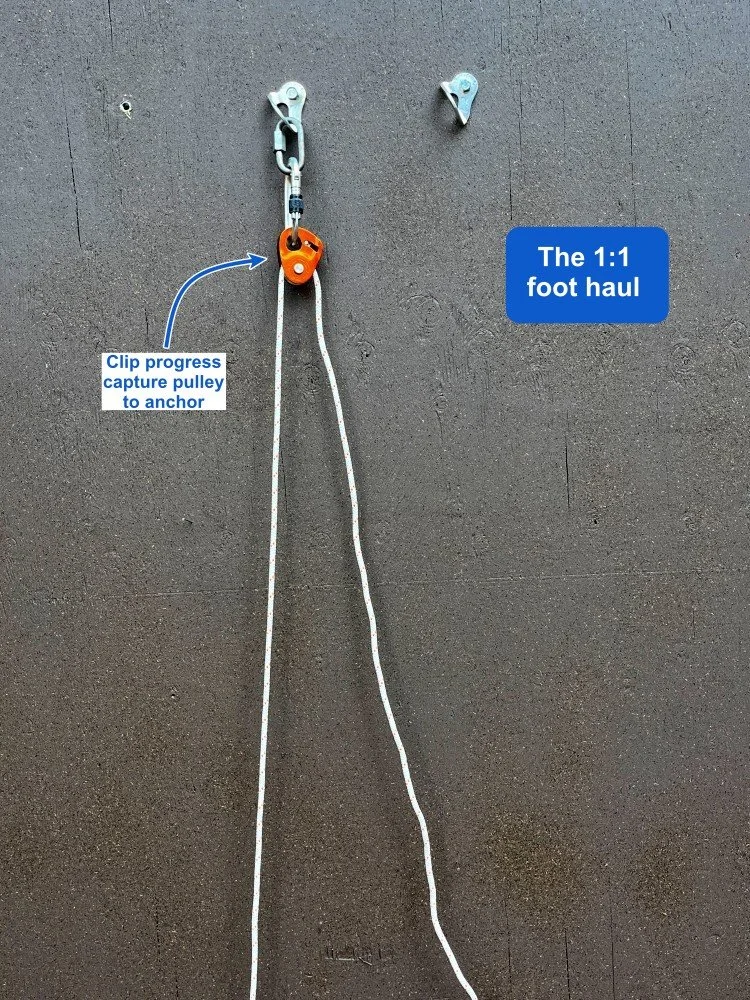
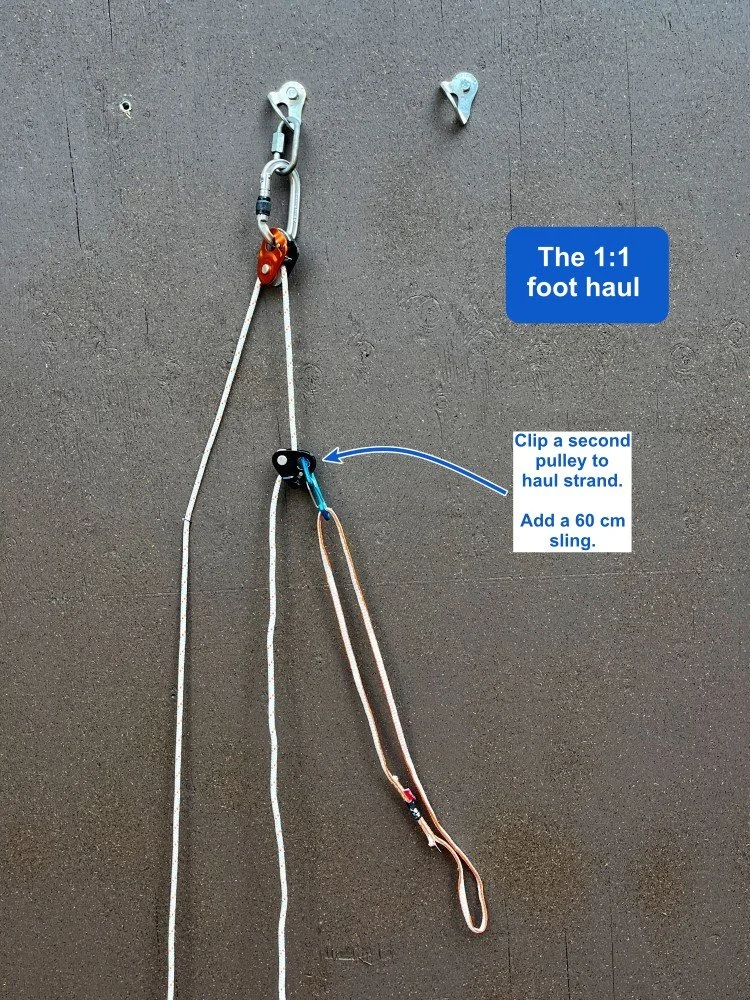
2) Install your second PCP (or Tibloc) to the haul strand. Check to see that it’s rigged ”teeth to tail”, so it pulls correctly. (It’s easy to rig this wrong; I seem to do it a lot.)
Clip a 60 cm sling onto this second PCP.
This is the point where most people would start hauling, by stepping down in the sling clipped to the black PCP. This can work, but there's a simple improvement that makes it much more ergonomic and comfortable.
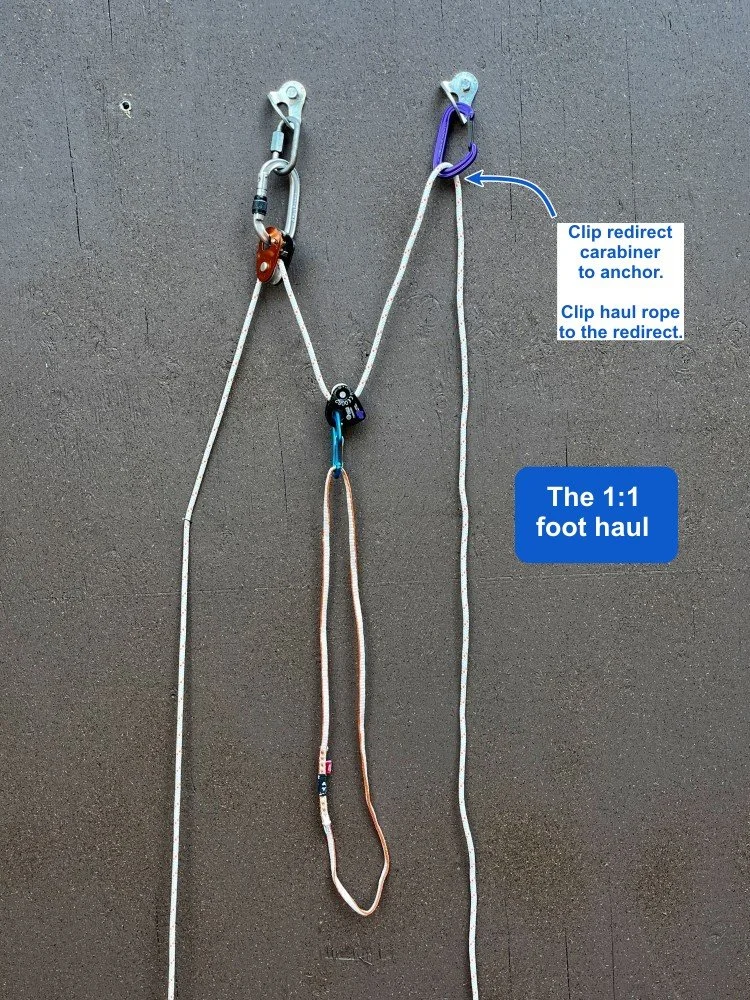
3) Clip a redirect carabiner (purple) to some part of the anchor, and clip the pulling strand of the haul rope through the redirect.
Time to haul! Step down in your foot loop. The load should lift. Unweight your leg, and pull down on the redirected haul strand to take in the slack. The PCP will “climb” the rope and reset up towards the anchor. Repeat. Switch feet if you get tired.
Note that zero load is going onto your tired arms! Your legs are doing the work, as they should. Work smart, not hard!
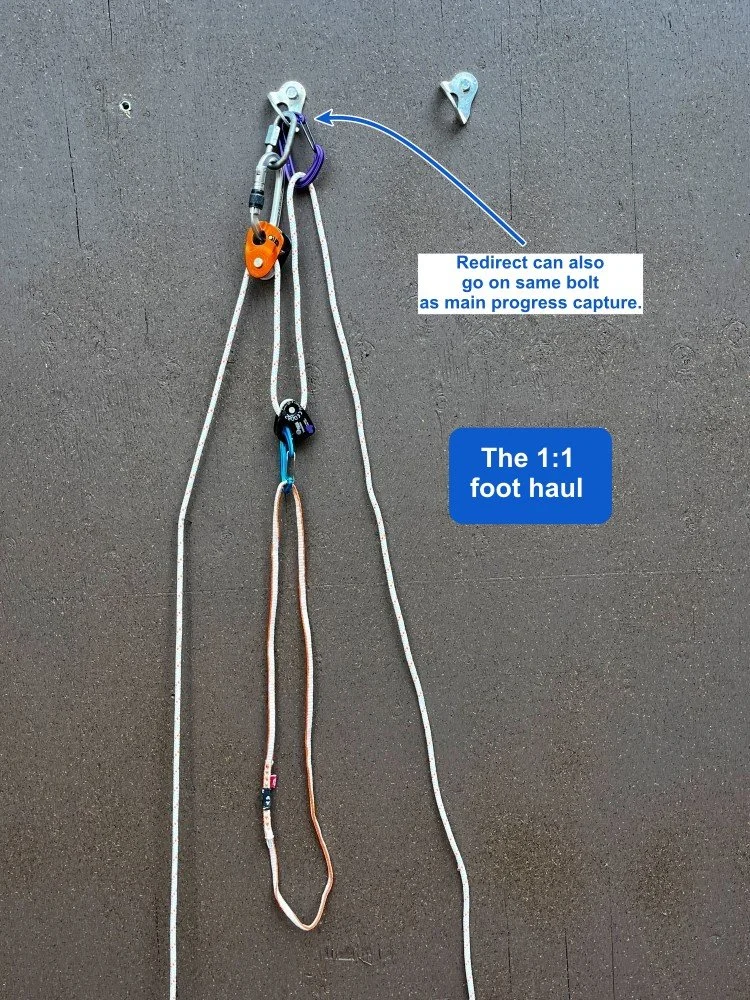
(For clarity, I clipped the redirect carabiner to a second bolt for this photo. But it can be on the same bolt as your primary progress capture. Photo of that is below.)
Instead of the purple carabiner, if you have a DMM Revolver carabiner with a small pulley in it, that can make your system a bit more efficient.
Variation: Same system, except now we have the redirect (purple) on the same bolt as the primary progress capture.
How do you manage the extra haul rope?
How can you set this up with Tibloc instead of a second PCP?
Want to to see a video of how to set it up from start to finish?
How about a video of a way to 1:1 haul a load that weighs more than you do?
Join my Premium Membership to learn all this in the complete article.
Thanks for your support!

Find free camping on public lands with these mapping tools
Being able to see in real time on your phone if you’re on public lands or not is helpful for all kinds of things, especially finding free dispersed camping spots. Here’s how to use some modern mapping tools like Caltopo and Gaia GPS to do this.
Premium Members can read the entire article here:
This is an updated version of an article I published 5-ish years ago.
There are lots of reasons why you may want to see public lands on a map (along with your position). Here are a few.
Personally, I use public lands overlays mostly to find free camping, so that's going to be the main focus of this article. Car camping can be great. Secluded car camping for FREE on public lands that allow it is even better!
You’re headed out for a dawn start for a hike or climb, and want to find a good spot near the trailhead to sleep for the night.
You want to visit a popular national park, but of course all the campsites in the park are booked. Where could you camp for free just outside the park and visit for day use?
You’ve embraced some version of “van life”, and never want to pay if it all possible when you're sleeping in your rig.
You're planning a hunting or fishing trip and want to be sure you don't trespass.
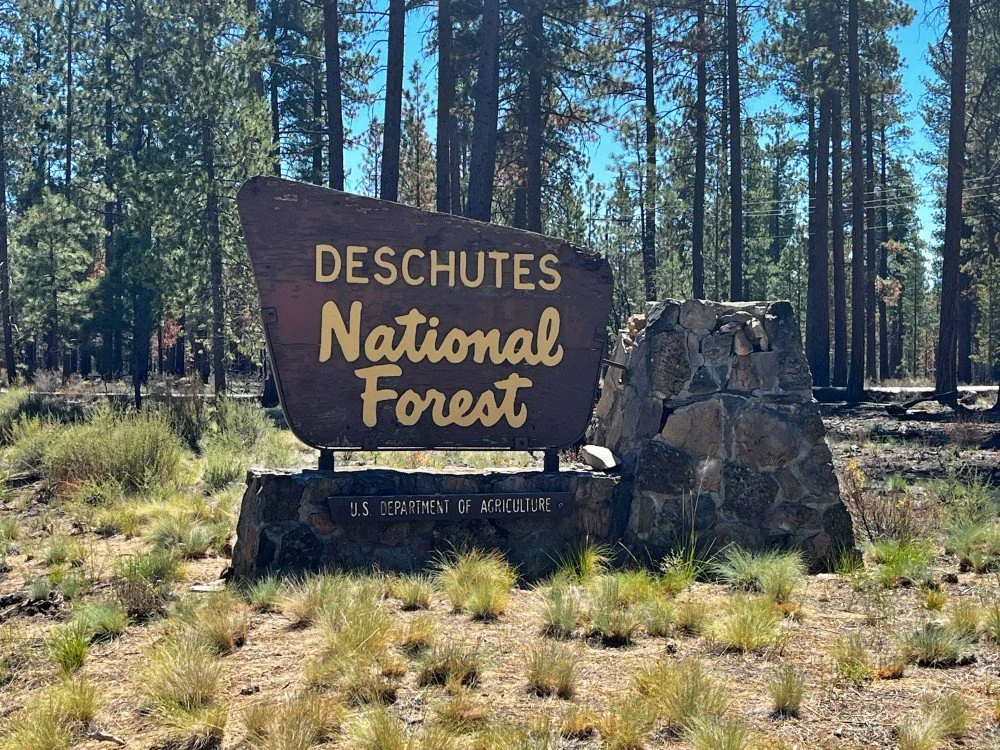
On main roads, you might see a nice welcome sign like this. But on many smaller roads, you won't.
For the most part, land managed by the Bureau of Land Management (BLM), and the US Forest Service, (USFS), allow free camping pretty much anywhere unless posted otherwise.
This applies if you don't need amenities like a gravel parking pad, running water, picnic table and a toilet. (The government-speak term for this is “dispersed camping”. RV folks might call it “boondocking”. )
This policy also mostly applies to state owned forest land in Oregon, owned by the Oregon Department of Forestry, or ODF, and in Washington, on land owned by Washington Department of Natural Resources, or DNR. Other USA states may have a similar system.
But, sometimes it’s hard to know whether you’re actually on public land that allows free camping, or not.
Good news is, there’s some good desktop mapping software and phone apps that can answer the question, hopefully leading you to a secluded, free overnight spot with no hassles.
Notes . . .
As cartographers like to say, ”the map is not the territory.” Meaning, what’s really on the ground is the truth, not the printed map or phone app in your hand. If the map says you’re on public land, but the sign on the tree says “area closed” no trespassing, or there are some grumpy locals who are giving you bad vibes, use your common sense and move on.
Leave No Trace principles of course apply. Is this obvious? I sure hope so. Don’t camp in meadows, near waterways or other fragile areas, leave zero garbage, toilet paper or fire rings behind, be VERY careful with campfires (if you even choose to have one) and observe all rules regarding fire closures, which are common in the summer. Have a walk around and pick up somebody else's trash before you leave.
When using a phone app, be sure and download your area of interest when you have Wi-Fi or cell coverage before you get out of cell coverage.
Rural gas station attendants are often great sources for good free campsites. A small tip offered for your gas before asking can work wonders. =^)
Desktop: Caltopo
For this example, let's look for possible camping spots near the Crater Lake National Park in southern Oregon.
Go to CalTopo.com, my favorite backcountry mapping software, and zoom into your area of interest; here’s Crater Lake NP. Choose a map layer. I like “Mapbuilder Topo”, the default.
Then, mouse over the map layer menu in the top right corner, and check the box next to “Land Management”, under the “Map Overlays” section.

Now, your map should look something like this. Note the clear boundary between the National Park land around the lake, and the green tinted National Forest lands around the park.

Now we’re talking! Look at all those logging roads (in the red box) just outside the main road that leads into the park from the west, all on National Forest land. Most of these should offer some decent, free dispersed camping options, just a few minutes away from the park boundary.

Here’s one more. This is just outside the main entrance station at the southwest corner of Mt. Rainier National Park. Check out those roads on the green Forest Service land; looks like a good place to camp for free and then go into the park the next day.

Phone apps - Gaia GPS “Public Lands” overlay
Phone based apps of course have the big advantage of showing your real time location AND the land ownership around you. Here are two that I like.
On the “professional version” of the app, which is $40 a year, Gaia GPS has a map overlay option called “Public Land US”. With the “pro” version, Gaia has an advantage of being able to adjust the opacity of the map layers with a slider bar, which can be a big help in seeing smaller roads and pull outs.
Below is a map legend for Gaia GPS that shows the different public lands layers.

Here we have the map layers “USFS 2016” and “Public Land (US)”. We see a brownish tint for the National Park, and a green tint for the surrounding Forest Service land.

Zooming into the same area where the main western access road enters the park, we see all of the forest service roads, many of which should offer some good camping options.

Phone apps - Gaia GPS “Gaia Topo” free map layer
Recently, a GaiaGPS made some significant upgrades to their primary map layer, called “Gaia Topo”. (One great thing about this layer, it's free, both on the desktop and on your phone.) One of these improvements is showing public lands right on the map. Here's an example around Mt Rainier. (Please ignore the waypoints and climbing routes on the map.)
The subtle shading on this map shows different types of public lands.
Along the main road Hwy 706 coming into the park, you pass through State Forest lands, shown in light purple.
South of the park is light green, which is National Forest.
Slightly darker green is a designated wilderness area (no roads or car camping there).
Finally, the light brownish orange is the National Park itself. Note, there is no dispersed camping allowed in national parks, but the State Forest and US Forest land should be fair game. Note there are lots of roads in both these areas; you need to zoom in more on the map to see them.

Gaia GPS Public lands example using Gaia GPS topo
Want to see my suggestion for an up-and-coming phone app with a great public lands layer?
How about the GPS coordinates for my go-to free camping area right outside Yosemite National Park?
Join my Premium Membership to read the rest of the article.
Thanks for your support!

Hauling systems: boost your 3:1 to a 5:1
Do you have a 3:1 hauling system set up, and need a little extra pulling power? Here's a simple way to turn it into a 5:1 with minimal extra gear.

Premium Members can read the entire article here:
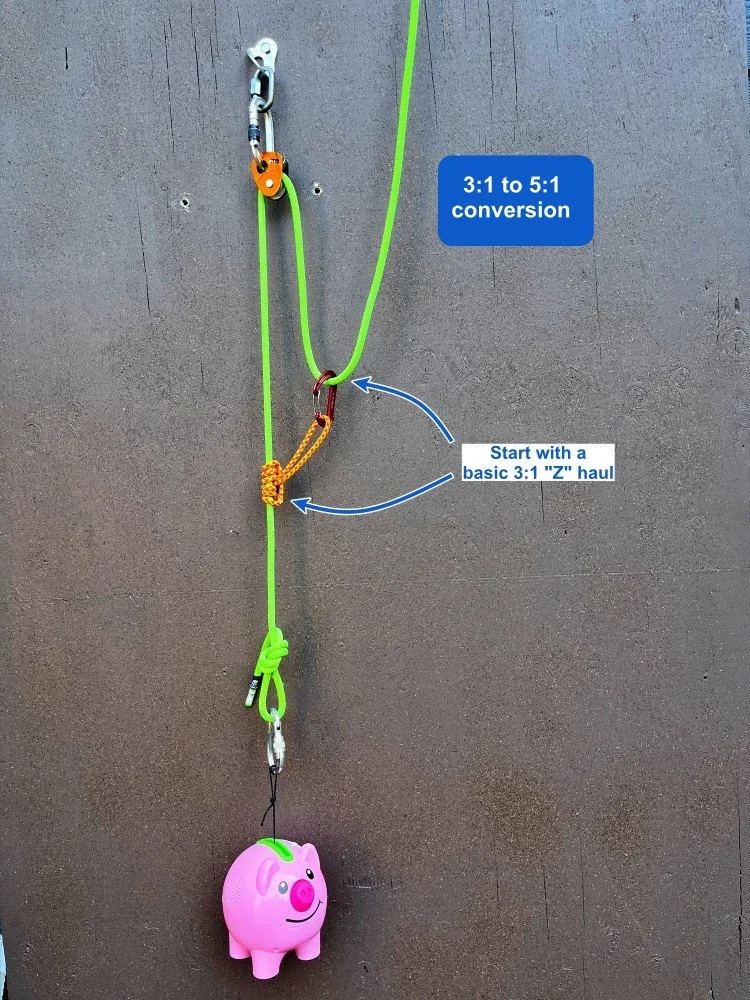
If you have a basic 3:1 mechanical advantage “Z drag” set up, and need some extra pulling power, here’s a slick way to convert it into a 5:1 system.
Advantages:
Easy to convert from an existing 3:1 system
May allow a small person to haul up a relatively large / heavy person
Requires minimal extra equipment (only 2 spare carabiners and a cordelette)
There's no change of direction at the anchor, so your pulling efficiency is increased
Easy reset
Because there are two different lines in the system, you could distribute this load across two different anchors.
Don’t have a long sling or a cordelette? You could also use the other end of the climbing rope.
Here’s how to convert a 3:1 to a 5:1.
Start with a standard 3:1 “Z” haul.
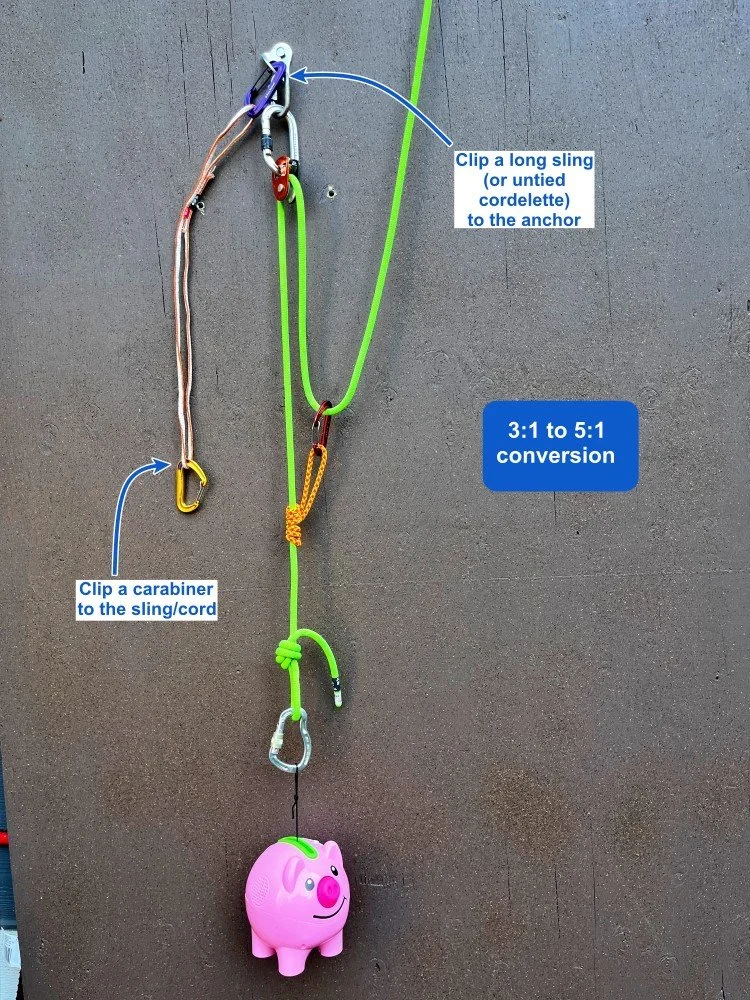
Clip a sling to the anchor. Clip a carabiner into the other end of the sling.
(If you're doing a crevasse rescue, using an untied (aka “open”) cordelette works better. Photo of that rigging is below.)
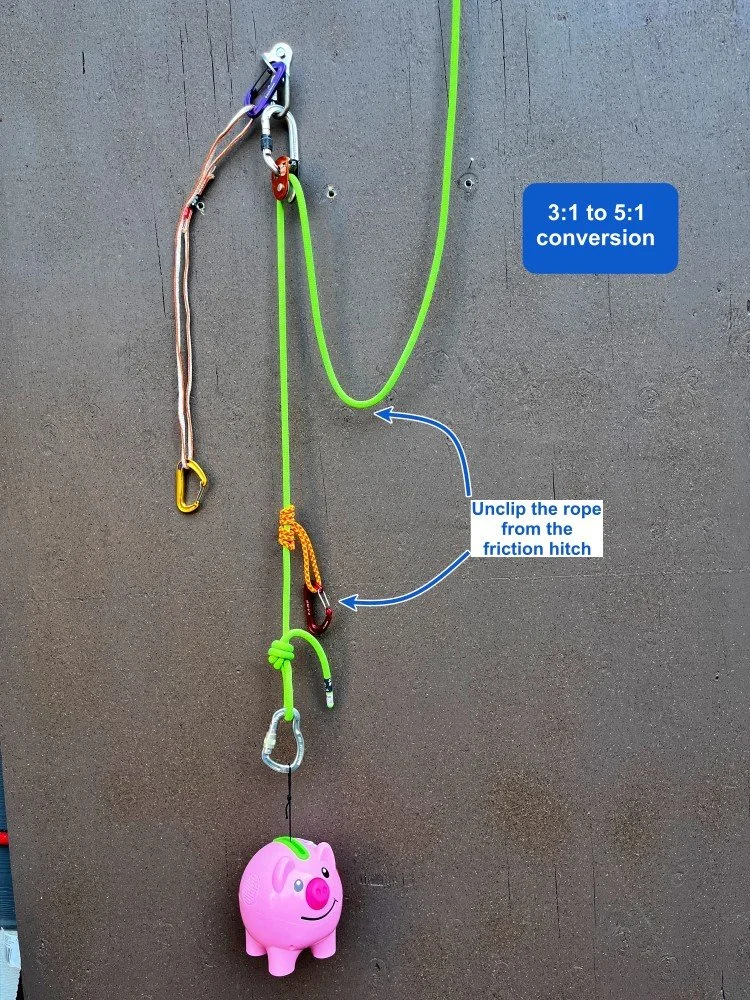
Unclip the rope from the carabiner on the friction hitch.
Clip your sling to the friction hitch.
Clip the rope to the carabiner on the end of the sling.
Start hauling!
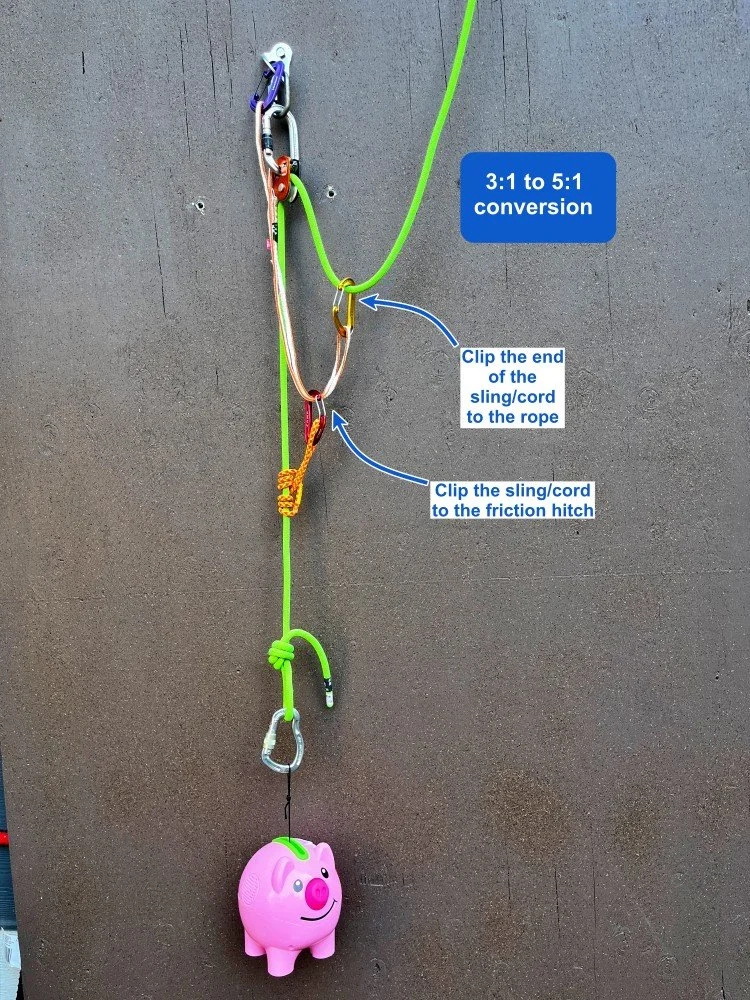
You made a 5:1 system. Schweeeet, give yourself a high five!
For every 5 meters of rope you pull through the system, your load moves 1 meter.
In a theoretical frictionless world, you could move a 100 kg load with about 20 kg of pulling power. In the real world, your actual efficiency is probably about 3.5 to 1, but that should be enough to pull your buddy out of the crevasse.
You can increase your efficiency a bunch by having a pulley at each change of direction rather than a carabiner.
Both carabiners/pulleys are moving the same direction (toward the anchor) when you're pulling, so you don't need to reset the tractor as often.
Definitely practice with this a few times in a controlled environment. It may look simple when you're reading it here, but it can cause some brain lock when you're trying to do it under some real world pressure.
Want to see an photo and video of how to set this up with a cordelette for crevasse rescue?
How can you apply the “T method” to show that this actually is a 5:1?
How about another way to set up a 5:1: with a distinct disadvantage to the method shown here?
Join my Premium Membership to read the rest of the article.
Thanks for your support!


Climbing Tips: Do This, Not That (Part 6)
Five bite sized, quick tips of best practices. In this post: 1) “boosting” a low anchor, 2) rope pull tip for a traversing rappel, 3) how a redirect increases anchor loading, 4) why you don't need an overhand knot on a tied loop anchor, and 5) how to set up a lower with a Grigri.

Premium Members can read the entire article here:
In this article:
Boost that low anchor with a pack
Traversing rappel? Pull to that side
Redirects increase anchor load when hauling
Tied webbing on a tree - skip the overhand knot
Grigri lower: Redirect the brake strand
1 - Got a low anchor? “Boost” it with a backpack
Got an anchor that’s pretty much flat on the ground? Ugh, that's not a very ergonomic position to belay from.
(A preposition is a bad thing to end a sentence with. =^)
Quick way to improve it: take a backpack and put it under the master point. This can add a bit of “lift” so you can more comfortably manage the belay.

2 - Traversing rappel? Pull to that side
If the anchor below you is off to one side, say the right, try to rig your rope so the “pull” strand is in that direction.
If you don't, the ropes can cross at the anchor and create a lot of extra friction.
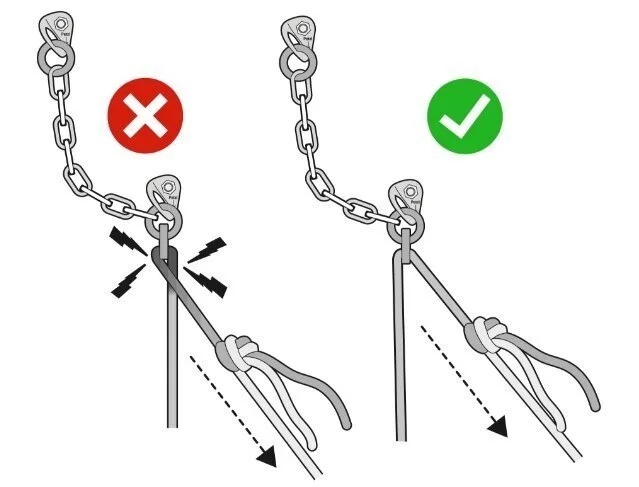
image: From the book “down”, by Andy Kirkpatrick. Used with permission. andy-kirkpatrick.com
3 - Hauling systems: Redirects increase load on the anchor
Sometimes, redirecting your pull through the anchor with a hauling system can be convenient or ergonomic.
However, keep in mind that a redirect increases the force applied to the anchor.
If you have an anchor that you're not very thrilled about, like maybe a vertical picket in snow, this could be important.
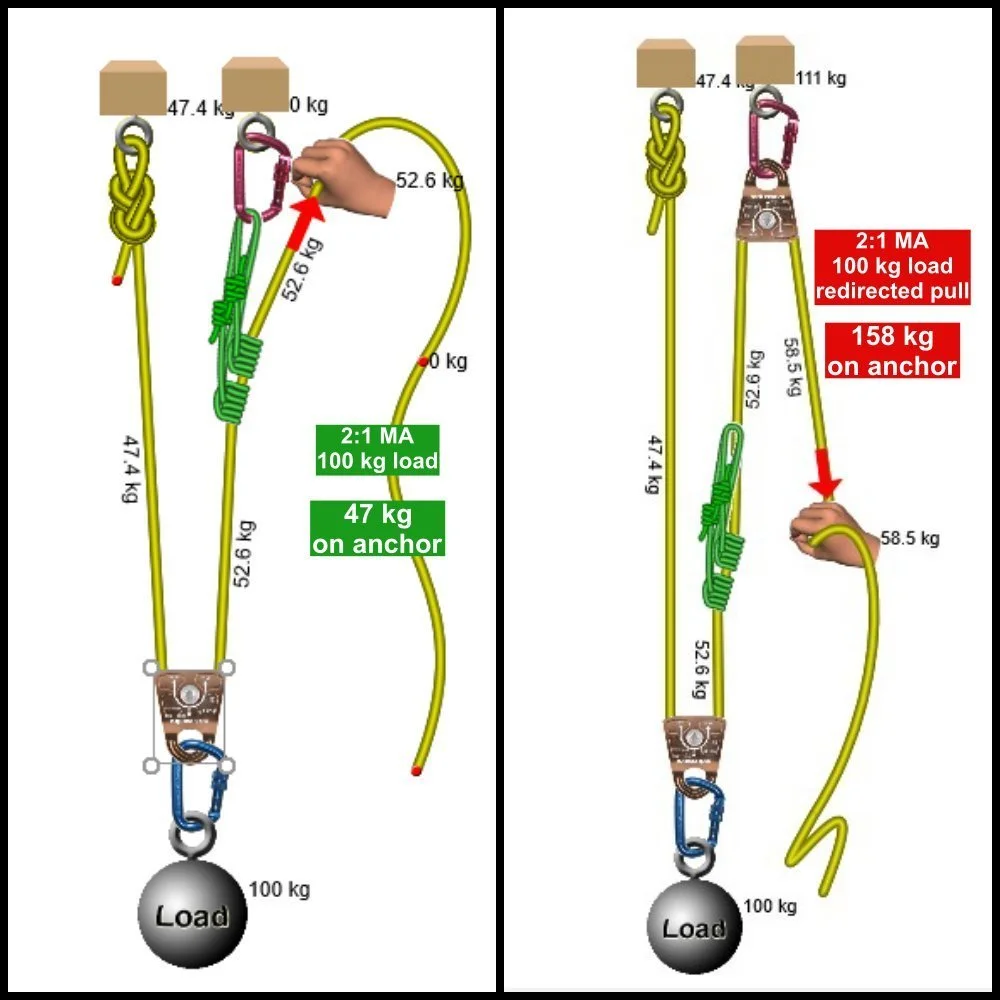
In the diagram below, we have a 100 kg load with a 2:1 mechanical advantage haul system.
On the left: no redirect. When hauling, about 0.5x the pulling force goes onto the anchor.
On the right, redirect. When hauling, about 1.5x the pulling force goes onto the anchor. That’s a big difference!
This diagram was made with some cool software called vRigger. Learn more about it at this article.
(In the diagram on the right, you can ignore the green prusik that's randomly attached to the rope. That should be clipped to the red carabiner at the top, sorry about that.)
If you tie a strand of cord or webbing around a tree for an anchor, why can you skip a masterpoint knot?
Why is redirecting the brake strand a critical step if you're lowering someone with a Grigri?
Join my Premium Membership to read the rest of the article.
Thanks for your support!


Stack your coiled rope in a sling
What to do with that extra rope at the belay? One simple method is to make a butterfly coil and clip it to a sling. There are a couple of different ways you can rig the sling; learn ‘em here.
To manage extra rope at your belay, whether it's the lead rope or a haul rope, one simple method is to butterfly coil the rope and put it in a sling.
This makes a tidy package of the rope, keeping it within reach, and out-of-the-way.
I find this to be vastly more convenient and less hassle than the more common method of making a butterfly coil, and then plopping on top of your harness tie point.
There are a couple ways to coil the rope into a sling. The one you choose might depend on conditions and what you intend to do with the rope after you coil it.
Method 1: Basket hitch the sling around the coils
This is the more common way to do it, and better for lead climbing because the rope will feed out nicely as it’s not pinched.
The use of two carabiners is optional, but handy. Green is clipped to the anchor, and purple is clipped to green. This lets you unclip purple and lower the sling if needed without ever unclipping it from the anchor.

Method 2: Girth hitch the sling on the coils
This method can better if it’s a really windy day, or you’re at your big wall bivy, and you want to snug the ropes down for the night and don't want coils flopping around or falling out. Probably not a good choice for lead climbing, because the rope is hard to feed out.


What's in my pack: Gear obsession by Colin Haley
Expert American alpinist Colin Haley is known for a few things: an expertise for routes in Patagonia, and a tremendous obsession with climbing gear. Check out this great video interview where he offers a free ranging commentary on equipment he’s designed, customized, and uses regularly.
Premium Members can read the entire article here:
I have another “What's in my pack” article featuring Colin, about his clothing systems. You can check that out here.
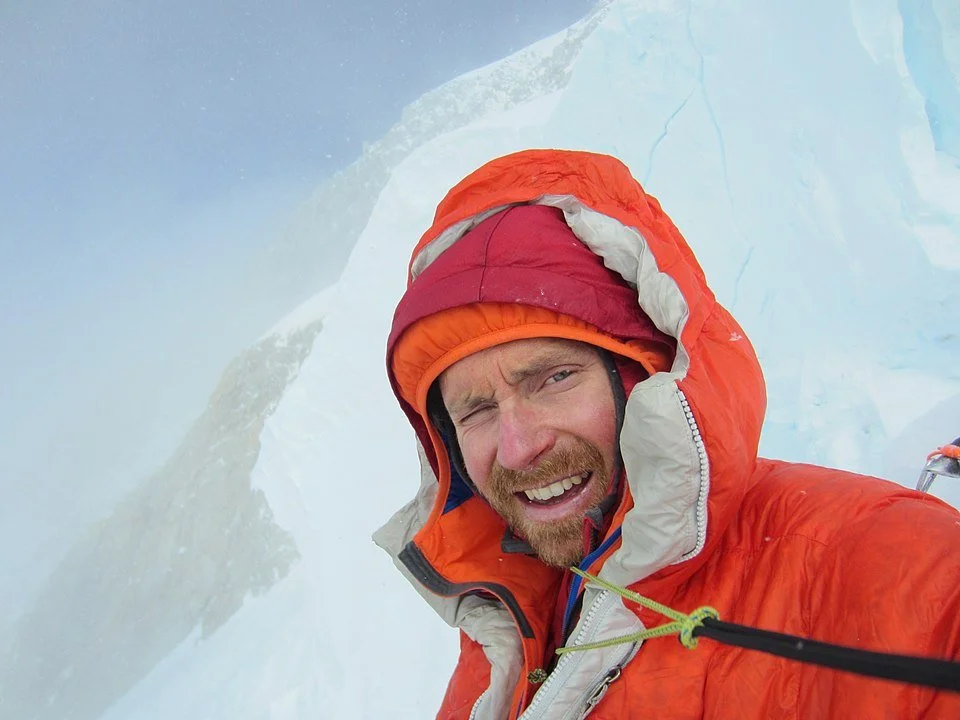
Check out this great interview with American alpinist Colin Haley, as he takes a deep dive into his obsession with climbing gear.
The link to the YouTube video is below.
Here are a few quotes and highlights I thought were especially interesting.
I added a time stamp for the video so you can find that part fast.
“I personally tweak out about climbing gear to a very small level of detail." =^)
“There are trade-offs to everything. Every gear choice is maximizing some quality at the expense of some other quality.”
What piece of alpine climbing clothing did Colin have a big role in designing for Patagonia? (M10 pant, 18:00)
Colin often wears a hard shell pant and a soft shell jacket on his climbs, which is the exact opposite of most people. Why is that? (Because it's more common for your butt to be in the snow than your torso. 19:50)
What’s the small Slovenian company that makes some of Colin's favorite functional and low-cost pitons? (climbready.eu, 20:15)
What's Colin's favorite old-school bit of tech for listening to “mountain motivator” music on a route? (Ipod Shuffle, 23:50)
Why is a top quality headlamp such a crucial piece of gear? (Colin calls is the “1 essential,” because it lets you keep pushing on when it gets dark, to maybe find a much better place to bivy. If you don't have a good headlamp, you’re stuck as soon as it gets dark. 51:30)
The complete article has answers and time stamps to these questions:
What are the pros and cons of internal tent sleeves versus external?
What are some considerations for choosing the correct crampons?
What’s a simple way you can keep your tent from blowing away when you're out climbing?
What's the one type of climbing gear that Colin thinks has the most potential for improvement?
What’s a clever modification Colin did to his helmet to make it more suitable for cold weather climbing?
What modification did Colin make to his crampons that he really likes?
What's Colin's favorite water bottle?
Which climb did Colin learn the most from?
Get the answers to all these, and the time stamps to the video for each one . . . and the link to the video itself at the Premium Member article.
Join my Premium Membership to read the complete article.
Thanks for your support.

Treat your cams nicely - wrap with a sling or strap
When you're in a hurry, it’s tempting to drop all your cams into a pack, cram some more gear on it, and get on down the mountain or to your next route. Downside, that makes a higher chance of damaging something delicate. Here's an alternative to keep your cams happier in your pack.
When you put cams in your pack, clip them to a long-ish sling, let them all hang down together, and then wrap either the sling around them (or my preference when I remember it) a ski strap.
The trigger wires are delicate, and can be damaged or even broken if you casually toss all of your rack into your pack and then cram more stuff on top of it.


How strong is it? ANCHORS (Part 1)
So how strong is the girth hitch master point? How about if one strand gets cut? Can you girth hitch a sling to a carabiner (and survive?) Here's an overview of various flavors of anchor rigging, and links to actual break testing.
Premium Members can read the entire article here:

This section of my website is where I satisfy some of my curiosities (and hopefully some of yours) about the actual breaking strength of anchors, gear, and knots.
If you're new to this part of my website , I suggest you start at the overview page, and then bounce back here.
What's on this page?
How strong is an overhand knot anchor in a nylon sling?
How strong is an overhand knot anchor in a Dyneema sling?
How strong is a girth hitch master point anchor with Dyneema?
How strong is a girth hitch master point anchor with Dyneema, if one strand gets cut?
How strong is a girth hitching a Dyneema sling to a carabiner?
How strong is a girth hitching a Dyneema sling to a bolt hanger?
How strong is basket hitching a Dyneema sling to a bolt hanger?
1 - How strong is an overhand knot anchor in a nylon sling?
About 26 kN.
Source / testing: YouTube, You aren't supposed to tie a knot in this, Startaround 15:50
One of the most common ways to make an anchor. Simple, easy to check, fast, redundant, and probably hard to untie.

2 - How strong is an overhand knot anchor in a Dyneema sling?
About 21 kN.
Source / testing: YouTube, You aren't supposed to tie a knot in this, Startaround 11:00
While many people prefer to avoid tying knots in Dyneema, many folks think it's no problem. Again, this is a common and simple way to make an anchor.
Dyneema is less strong than nylon, but it's still #SuperGoodEnough for climbing. (Just don't expect to ever untie it . . .)
Takeaway:
If you double a sling like with the basket hitch, you get double the strength.
When you tie a knot in the doubled sling, you reduce the doubled strength by about half. So in the end, that leaves you with something close to the MBS for the original material.
We see this in both the nylon and Dyneema sling in the last two examples.

3 - How strong is a girth hitch master point anchor with Dyneema?
About 27 kN.
Source / testing: YouTube, Are climbing master points made with a girth hitch or clove hitch REDUNDANT??? Startaround 7:00
The girth hitch master point is a modern standard for many climbers. Good to know it's super strong! And yes, it's redundant if one strand gets cut. Read my whole article on it here.

4 - How strong is a girth hitch master point anchor with Dyneema, if one strand gets cut?
About 7 kN
Source / testing: YouTube, Are climbing master points made with a girth hitch or clove hitch REDUNDANT??? Start around 13:20
It's still pretty strong, but not nearly as strong as the anchor when things don’t get cut.
However, this only is going to fail in the following extremely unlikely situation: 1) a sling gets cut, 2) is then subjected to a very large (6-7 kN) load, and 3) that load is continuously applied. This is probably less likely would happen than you being struck by lightning when you're climbing, so personally, I wouldn't worry about it.
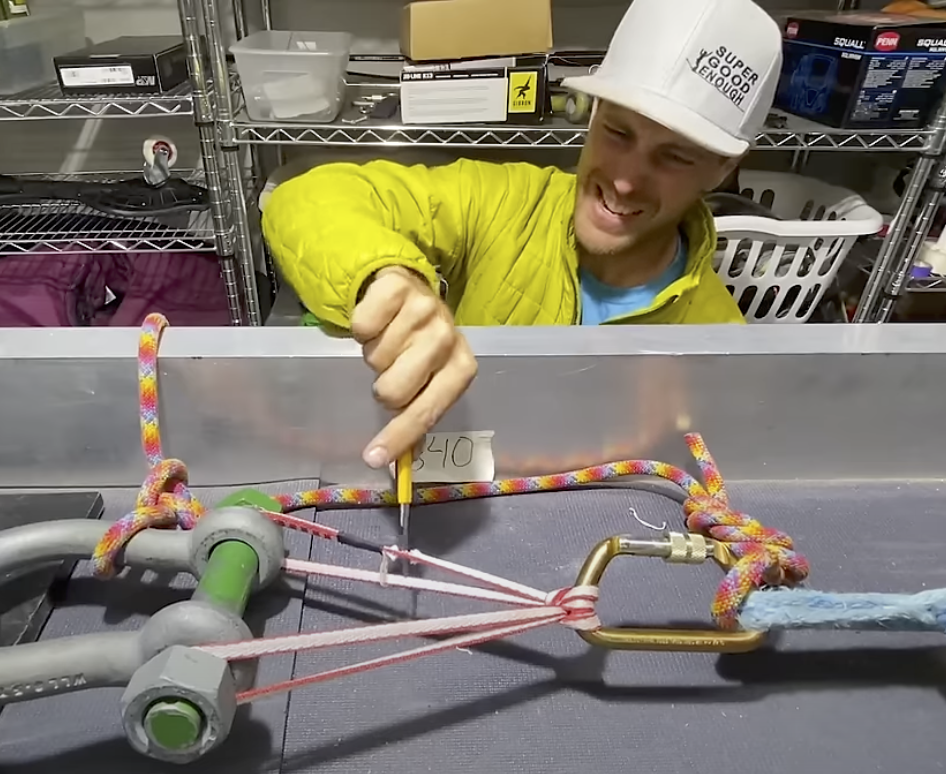
How strong is a girth hitching a sling to a carabiner?
What about girth hitching a sling to a bolt hanger?
What about basket hitching a sling to a bolt hanger?
Join my Premium Membership to read the rest of the article.
Thanks for your support!

How strong is it? OVERVIEW
We've all wondered - how strong is it? The Alpinesavvy web gnomes scoured the web to find some break testing for common (and not so common) gear, knots and rigging. Start here for an overview, and then head over to the more detailed articles.

Most climbing gear is tested and rated by Official Entities such as the CE and the UIAA. This is great! It gives us confidence that gear from brand-name manufacturers is made to the highest standards.
But not everything climbers use is covered by these ratings.
What about anchor rigging and knots?
What about rated gear that's old, a bit worn, a bit abused, but still hopefully serviceable?
What about gear that may be appropriate for climbing, but may not be officially rated by these agencies?
These are important questions.
My friend Ryan Jenks from HowNOT2.com has made an entire YouTube channel and brand based on breaking and testing climbing gear. (Give his YouTube a follow if you’re not already.)
The thing is, he's almost too successful. He's done so much testing that sometimes it's difficult to find the exact topic you’re interested in.
(To be fair, YouTube does a pretty good job of indexing his articles. If you go there and search for the term you want, you might find a video that covers it.)
So, I took some select tests (mostly from Ryan) and made a series of articles covering anchors, gear, and knots.
It's nowhere close to an exhaustive summary of all possible gear and rigging. It's more of a collection of Ryan's test results about which I was personally curious.
To keep things manageable, I have about 7 results on each article. As my curiosity continues (or I get submissions from Alpinesavvy fans like you) to add to this page, I will add part 2, part 3, etc…
I have links to sources and test results where appropriate.
If you have a new break test question / idea (and hopefully have a source for test results), please let me know about it and I might include it.
If you join Alpinesavvy as a Premium Member, you’re entered into monthly gear giveaways and regular discounts from Ryan’s store, hint hint.
Disclaimer: Yes, some of these test results are limited by the number of tests, to a specific manufacturer, they might be a static pull and maybe not drop tower, or vice versa, your mileage may vary, and blah-blah-blah. It's designed to give you a data point, not to apply universally to every situation. And as Ryan likes to say, this is entertainment, not science.
Basic premise #1 - What’s a kilonewton (kN?)
Let's start with the basics. A kilonewton is a metric unit of force, equal to the weight of about 100 kg or 225 pounds.
The way I like to think of it: one kN is the average weight of one NFL football player, more or less.
So, imagine this: A skinny 8 mm dynamic sling that's rated to 22 kN can hold about 22 football players all hanging off of it at the same time!
Yes, that is kind of crazy to think about! Yes, most all of the gear we use is impressively strong!

Fun facts . . .
the “N” is capitalized in “kN” because it refers to the last name of Sir Isaac Newton.
There are only three countries in the world that don’t use the metric system. Myanmar, Liberia, and ‘Merica. Metric measurements are the international standard of pretty much everything, especially climbing, and that's what this ‘Merican is using.
Basic premise #2 - What's the maximum force possible in recreational climbing?
About 9 kN.
Source: Engineer and climbing book author Craig Connally, from his book, The Mountaineering Handbook.
This is a somewhat challenging question to answer, but arguably the most important when it comes to talking about the strength of our gear and systems.
If the maximum possible force that you can ever create outside is around 9 kN, to me it seems kind of silly to argue about things like, “you shouldn’t girth hitch a Dyneema sling to a carabiner, it makes it weak!”, when it turns out it actually holds about 18 kN. (Which is stronger than your rope . . . )
A few things to keep in mind . . .
This maximum force can only happen in the very rare case of a factor 2 fall onto the anchor, which 99% of climbers will never experience.
There are various ways to avoid a factor 2 fall. Probably the best one is to place solid gear as soon after the anchor as possible on a multipitch climb.
This number will probably always remain somewhat theoretical, because you can't test factor 2 falls with a real humans, because they’ll get injured.
Testing in a drop tower with a concrete weight creates forces much higher than can happen in the real world . That's largely because of the squishy human body. Learn more about that here.
Here are some realistic scenarios involving real people, tested by Petzl and HowNOT2. Spoiler: Factor one fall, maximum force about 6 kN on the top piece of gear. Here's my article on that.

Petzl - Color coded carabiner gates
A nice design touch on Petzl carabiners: color coded gates for double action and triple action lockers.
A nice detail on Petzl carabiners:
The double action twist carabiners have RED gates.
The triple action twist carabiners have ORANGE gates.
You can look at your harness at a glance and know what you're grabbing. Is it mandatory? No. Is it a nice design touch? Yes.
Petzl Sm’D twist lock, my favorite for a personal tether. Once it clicks shut, you KNOW it's locked. Bonus: If you look closely, you can see a tiny hole drilled underneath the gate. If you’re a keeper-cord kind of person, this gives you a convenient place to tie one.
Petzl Rollclip, a combination triple action carabiner and (fairly) high efficiency pulley. Useful in various kinds of minimalist rigging and mechanical advantage systems, very cool tool.
(Side note: Please don't top rope through a pulley carabiner like this. The decreased friction increases force on the anchor, and makes it more difficult for you to control the lower of your partner, among other things.)


Raise your master point with a pack
Are you using an anchor (tree or otherwise) where your master point is basically lying flat on a ledge? Try this trick to lift it up and make a little room for your hands.
If you have an anchor that's basically flat on the ground, here's a trick: put a backpack under the sling or cord to slightly lift the belay device off the ground.
This usually makes it more ergonomic and comfortable to belay from the top.
Some folks call the “anchor elevator”.


Climbing Tips: Do This, Not That (Part 5)
Five more quick tips on best practices. This post covers: 1) When to untie your rappel stopper knot, 2) the proper direction for a Grigri when belaying from the anchor, 3) how not to carry your satcom device, 4) how to shorten a sewn loop daisy chain, and 5) why to keep your anchor low on a tree.

Premium Members can read the entire article here:
In this article:
First rappeller to the ground - untie the stopper knots
Grigri direct belay from anchor - handle away from the rock
Carry your satcom device securely stowed away, not on your pack strap
Shorten your PAS or sewn pocket daisy chain the correct way
Tree anchors - Keep the slings low
1 - First rappeller to the ground - untie the stopper knots
Once you’re on the ground, if there's plenty of extra rope on the ground, there’s no reason to have a stopper knots in the rope.
So here's a task for the first person down: untie them.
This completely eliminates the very common problem of the final person reaching the ground, with some relief and maybe distraction, somebody starts pulling the rope, and . . . you see the knot rising above you, maybe out of reach, and you instantly have a Big Problem.
(Ask me how I know about this, I've done it a couple of times!)
If the first person down removes the knots, this will never happen.
If there's just a little bit of extra rope on the ground, you can untie the stopper knots and then tie the ends of the rope together in an overhand. This keeps your partner from rapping off the ends of the rope in the highly unlikely event that the rope is moving through their device at different speeds, potentially lifting one end of the ground. It also makes a closed loop, so you can't pull up one strand of the rope out of reach.

2 -Grigri direct belay from anchor - handle away from the rock
When belaying up your partner directly off the anchor with a Grigri, try to rig it so the Grigri handle is away from the rock.
If the Grigri handle is against the rock, it might prevent the cam from properly engaging. It also might be harder to grab the handle if you need to lower your partner.
(Most of the time your Grigri will probably be free-hanging in space and not rubbing against the rock, but this is still something to watch for.)
You may need to add an extra short sling or locking carabiner to do this, depending on the anchor configuration.

Here's an attention-grabbing caution from the Petzl website.

image: petzl.com
3 - Carry your satcom device securely stowed away, not on your pack strap
If you carry a satellite communication device, put it securely in your backpack or maybe a well zippered pocket.
Don't carry it jangling around on your packstrap.
You wouldn't carry your phone bouncing around on your backpack strap attached with only a carabiner. Why would you do it with your satcom device?
Security is more important than accessibility.
I have a detailed article that talks about the pros and cons of different ways to carry your satcom, device; check the link above.

Wanna learn the correct way to shorten your daisy chain?
What are the pros and cons of having an anchor down low near the ground when you're using a tree?
Join my Premium Membership to read the rest of the article.
Thanks for your support!


The “4 to 1 ratio” for slings
The “4 to 1” ratio is a guideline of how many single length and double length slings you might want to carry on a typical alpine route.
A general rule of thumb for building a rack: have about a 4 to 1 ratio of single length (60 cm) slings to double length (120 cm) slings.
For an average alpine pitch with mild meandering, maybe eight 60 cm slings, and two 120 cm slings.
Of course, the length of the pitch and how much it wanders around has a bearing what you carry.
Related tip: try to color-code your slings, so all of the 60 cm are more or less one color, and your 120 cm are a different color. This lets you quickly grab the one you need.
Four single 60 cm slings in orange / yellow. One double 120 cm sling in green.
Start with this “4:1” short to long sling ratio and you should be good for most routes.


The “fish eye” anchor
A double loop bowline on a bight is a good starting point for various types of anchors. Here's one application, the “fisheye”. Make a three-piece anchor with a 120 cm sling? Yep! Learn all about it here.
Premium Members can read the entire article here:
This article was written with advice and peer review from IFMGA Guide Joshua Jarrin. Connect with Joshua on Instagram, @Joshua Jarrin
Check out this photo.
It's from a 2022 training manual published by ENSA (École Nationale de Ski et d'Alpinisme) or French National Mountain Guide School.
IFMGA Guide Joshua Jarrin Joshua sent it to me.
I already knew about the rigging on the left, a bowline on a bight for a two piece vertical anchor.
But what about that diagram on the right, for three placements? That got my wheels turning, and I started experimenting . . .

Image: ENSA
A double loop bowline on a bight (aka “BoB”) tied in a 120 cm sling can be a great starting point to build a solid anchor.

That nice round bowline loop? Looks something like a fisheye, I suppose, hence the name as explained by Joshua.

image: By Lowe - Naturalis Biodiversity Center, Public Domain, https://commons.wikimedia.org/w/index.php?curid=41730469
It's especially useful when you have vertically offset anchors. Clip the fisheye loop to the bottom anchor, and clove hitch the sling to the top anchor. Typically, this is used with two offset bolts or maybe two ice screws.
This is known as a series anchor. All of the load goes onto the bottom placement, and the top placement is for a backup. Equalization, no, redundancy, yes.
Here's a series anchor on two vertical bolts.

What’s cool about the fisheye anchor?
Tie the double loop bowline on the ground. Keep it place and use it all day.
Uses a standard piece of gear (120 or 60 cm sling) that most everybody carries, as opposed to a 180 /240 cm sling or cordelette.
If using bolts that are close together, you can probably use a 60 cm sling.
Efficient use of materials. You can make a solid 3 piece anchor with a 120 cm sling, which normally is kind of tricky.
Unlike a pre-tied quad, this has zero welded knots to untie either on your climb or at the end of the day. Bowlines are easy to untie, even after a bog load.
Unlike a pre-tied quad, this adjusts easily just for anchors that are vertically offset (like the photo above.)
How about a fisheye with three anchor points instead of two?

Let's break this down, step by step.
Step 1: Get out your pre-tied fisheye loop in a 120 cm sling. Place three pieces of gear, ideally fairly close together.

Step 2: Clip the fisheye loop to the bottom piece of gear, which is hopefully the strongest.

Step 3: Girth (or clove) hitch one strand of the sling to the middle and top pieces of protection. Adjust the hitches as needed to minimize slack between placements.
Step 4: Clip master point carabiner into the fisheye loop.
Optional bonus: the extra slack in your sling makes a clip in point for hanging a backpack, rope coils, etc. Tie an overhand in the extra as shown in the photo, if you want to keep everything redundant.

How does the fisheye anchor work in two horizontal placements?
What are some handy things you can do with the extra bit of sling?
What are the pros and cons of a girth hitch versus clove hitch?
How does this compare to the girth hitch master point?
How about a video on how to actually tie it?
Join my Premium Membership to learn these extra tips in the rest of the article.
Thanks for your support.

Using the “T method” to calculate mechanical advantage
It's easy to get crosseyed looking at a pulley system and trying to figure out the mechanical advantage. Fortunately, there's an easy way to calculate it, requiring the math skills of a third grader. (Yes, you can do this.) Let’s learn the “T method.”
Premium Members can read the entire article here:
For climbers, mechanical advantage (MA) systems are used in self rescue, and in big wall climbing to lift heavy haul bags. They're also helpful for getting your truck out of the ditch, pullings stumps in your garden, hoisting sails on a boat, building pyramids, and other useful life applications.
Even if you have a basic understanding of how they work, some of the more esoteric ones make most folks (like me) get cross-eyed counting all the strands and trying to figure out the MA!
Fortunately, there is a pretty straightforward way to figure out the theoretical MA of any system, using math that you learned in the third grade: The T method.
The method assigns a T (Tension) value to each rope segment. You add up the tensions at various points in the system to determine the overall mechanical advantage.
It's particularly useful for more complicated systems beyond a basic 2:1 and 3:1.
Here’s how the T method works.
1 - Start with “1”. Begin with a value of 1 “tension” at the point where you pull on the rope. Think of tension as how much force you (and maybe your pals) are pulling on the haul strand.
2 - Follow the tension. Trace the tension through each pulley and other components of the system.
3 - Adding the tensions.\
At each pulley (aka change of direction), the tension on the rope entering and exiting the pulley is EQUAL.
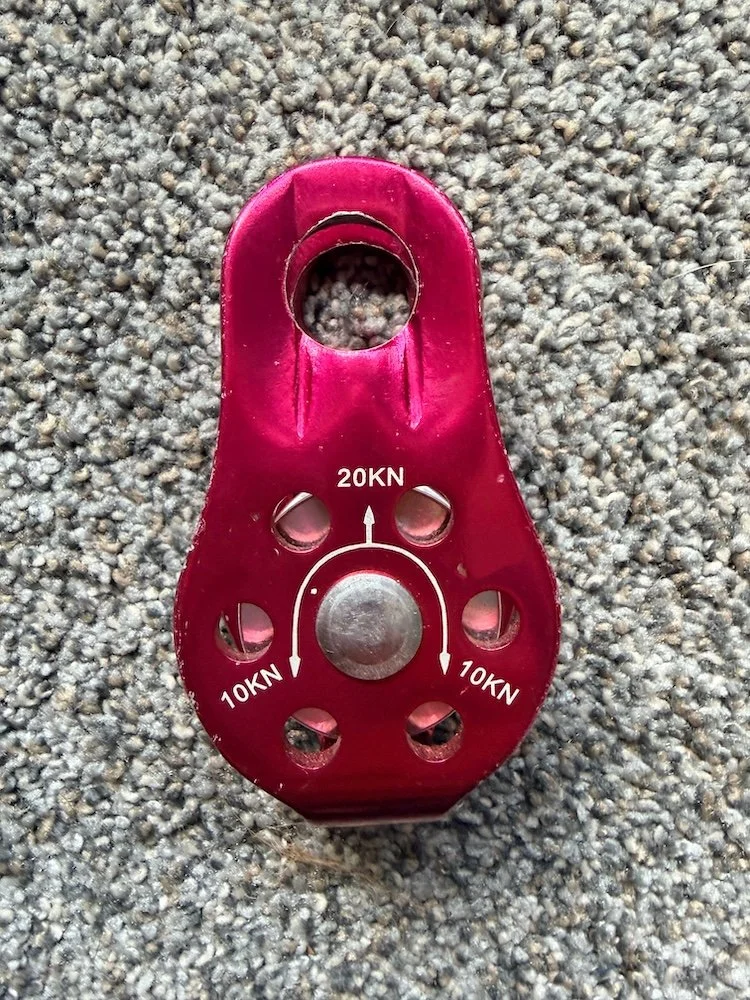
At the pulley “eye” (aka, the thing the pulley is clipped to) the tension is the SUM of the tension on the rope entering and exiting the pulley. For example, if 1 tension enters the pulley, then 2 tensions are applied to whatever the pulley is clipped to. If 2 tensions enter the pulley, then 4 tensions get applied to the pulley clipping point. (See pulley photo below.)
When tensions join (e.g., at a prusik hitch), you ADD the values.
4 - Mechanical advantage:
The final tension value at the load is the theoretical mechanical advantage of the system.
Check out those numbers printed on the pulley.
If you have a force of “X” (or 10 kn) on one side of the pulley, you have that same force of “X” (10 kN) coming out of the other side.
In the “eye” of the pulley, where it's clipped to something, you have “2X” the force that's being applied. In this case, if you have an input force of 10 kN, then 20 KN gets supplied to whatever the pulley is clipped to.
Does this sound a bit dry and complicated? That's how I felt when I first heard of it.
But, after you try it a few times, it's quite simple. If you're even slightly a mechanical advantage nerd like I am, it's actually kind of fun!
Let's look at some examples of a 2:1, 3:1, and a 6:1.
Let's start with the easiest system, a 2:1 (aka the “C pull”)
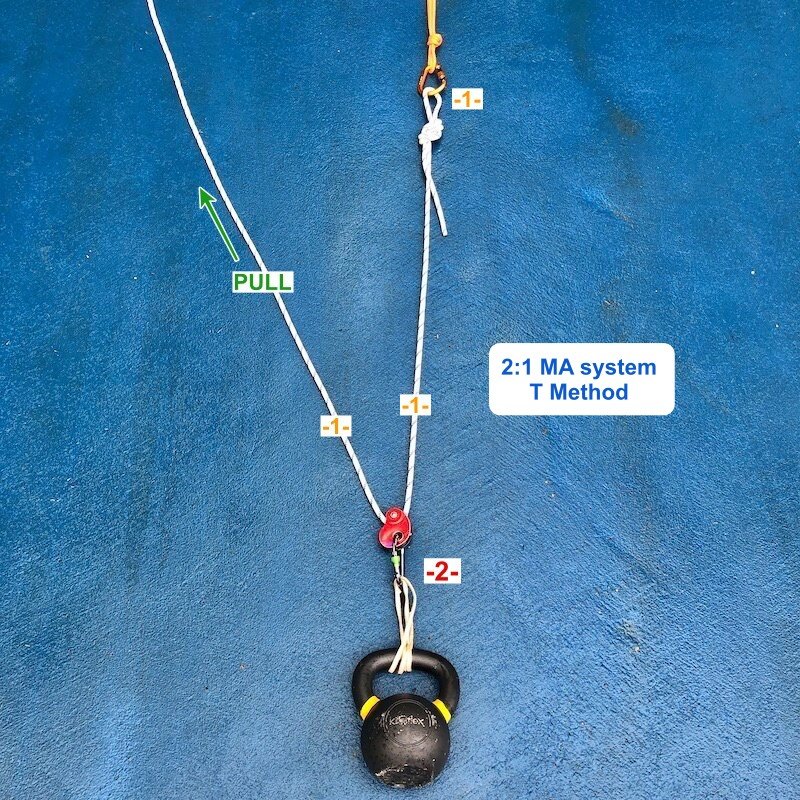
To move the load 1 meter, you need to pull 2 meters of rope through the system.
In a theoretical frictionless world, you could lift a 100 kg load by pulling with about 50 kg of force.
(Note: in this example, the progress capture pulley is attached to the load, not the anchor.)
Begin with an input of 1, you pulling on the rope.
That input force of 1 is doubled to 2 when it changes direction at the red progress capture pulley. That gets applied to the load.
The input force of 1 comes out the other side of the red pulley, remaining at 1, and then goes onto the anchor.
Summary of a 2:1 MA system:
2 units of tension go to the load.
When you’re pulling, 1 unit of tension goes to the anchor.
Got that? Good, let’s look at a 3:1 system (aka the “Z pull”)
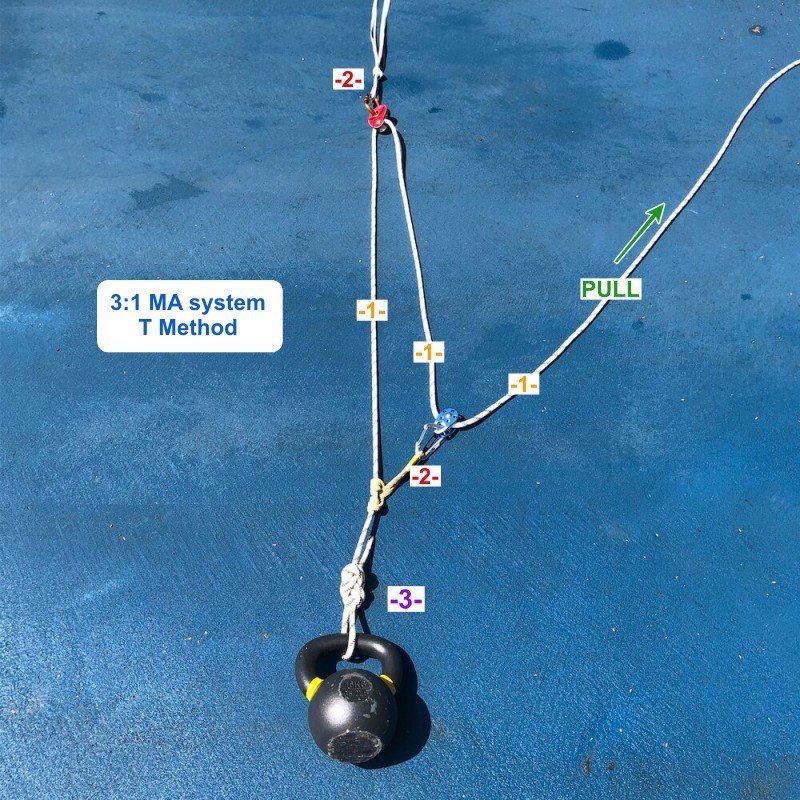
To move the load 1 meter, you need to pull 3 meters of rope through the system.
In a theoretical frictionless world, you could lift a 100 kg load by pulling with about 33 kg of force.
Begin with an input of 1, you pulling on the rope.
That input force of 1 is doubled to 2 when it changes direction at the blue pulley. That gets applied to the prusik that the pulley is clipped to.
The input force of 1 comes out the other side of the blue pulley remaining at 1. That travels to the red progress capture pulley on the anchor, where it's doubled to 2.
The input force of 1 continues at the left side of the red pulley down toward the load. Here it says “hello!” to the yellow prusik, which has a force of 2.
We add these together to get 3, the force applied to the load.
Summary of a 3:1:
3 units of tension go to the load.
When you’re pulling, 2 units of tension go to the anchor.
OK, you got all that? Sweet! Let's step it up to a 6:1.
In this example, we’ll start with a 3:1 Z drag, and then make a 2:1 C pull (with a separate cord) on top of it. This rigging is also known as a “C on a Z”.
To move the load 1 meter, you need to pull 6 meters of rope through the system.
In a theoretical frictionless world, you could lift a 100 kg load by pulling with about 17 kg of force.
How want to learn how to apply the T method to figure out a 6:1?
What's the difference between theoretical and real world MA?
How can real world MA improve by using pulleys in different places?
How about a link to a great YouTube video that describes the T method in even more detail than this?
Join my Premium Membership to read the rest of the article.
Thanks for your support.

Caution: stacked rappel with a Grigri(s)
A stacked, or pre-rigged rappel, can be a good technique to increase your efficiency and reduce risk when rappelling. However, Petzl specifically warns not to do this on a single strand with a Grigri. Learn the details here.
There is a caution on the Petzl website against doing a stacked rappel with a Grigri.
From the website:
“With the GRIGRI + from 2017 and on, and the GRIGRI from 2019 and on, unblocking and a consequent fall can occur if the rope is heavily loaded below the user. Unblocking can occur if the rope is loaded with a weight equal to or greater than that of the person rappelling on the GRIGRI.
Examples of dangerous situations:
Multiple people rappelling in sequence, GRIGRIs pre-installed on the rope. If the person waiting in turn to rappel has their GRIGRI pre-installed on the rope, it can be inverted (and thus unblocked) by the weight of the person rappelling below them. So it will not be operational when the second person wants to start their rappel.
Bottom belay: the person performing the belay maneuver must not hang on the rope.
Rescue from below: The rescuer must not ascend the rope of a person who is stuck on rappel.”
Below is a stacked rappel with a Grigri. When the first person down starts loading the rope, (apparently, in some cases) it can cause the rope to invert on the top person. (I tested this briefly and could not cause failure, but I certainly trust the Petzl engineers on this one, so don't do it!
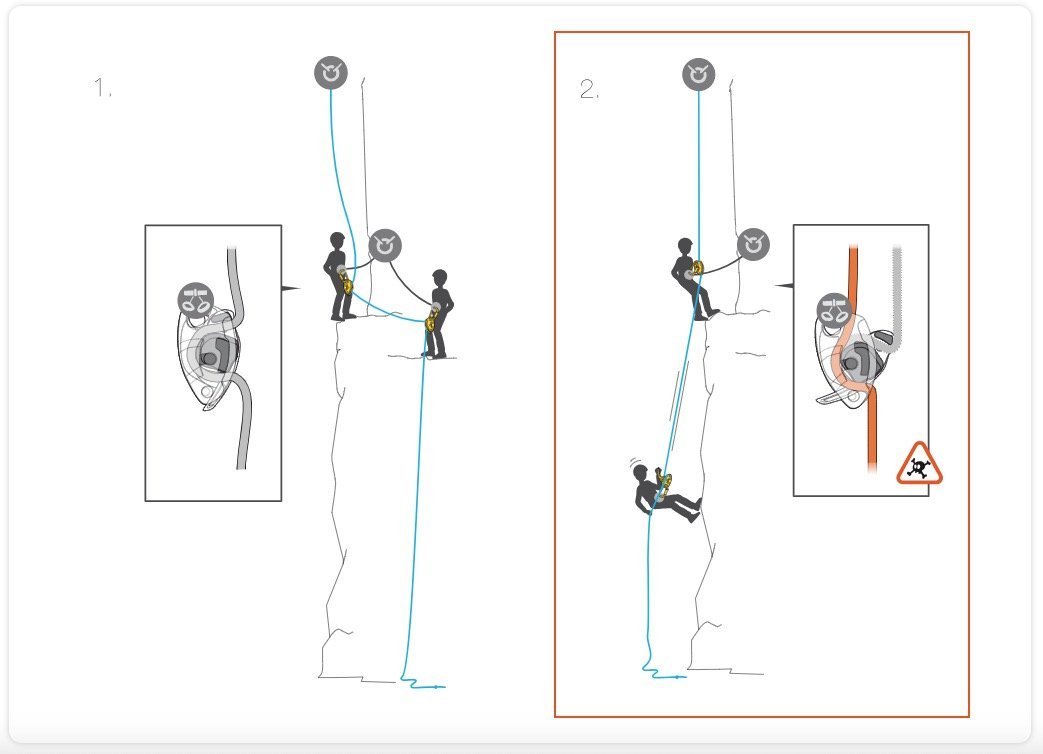
Related to this, Petzl also cautions against a firefighter belay, or someone ascending a rope when someone above them has a Grigri.


Rappelling into the unknown
At some point, all climbers will have to rappel down an unknown route. Here are some solid tips to hopefully get you down in one piece, without creating too many (epic) stories to tell later.
Premium Members can read the entire article here:
Some tips in this article came from collaboration with Adam Fleming. Adam is an AMGA Certified Rock Guide based in Utah. Connect with Adam: @adam.fleming.climbs, and his website.
I also posted this question on Mountain Project and got some helpful answers from a variety of people. I’m not going to credit all of them directly, but if you're reading this and see your words below, thank you!
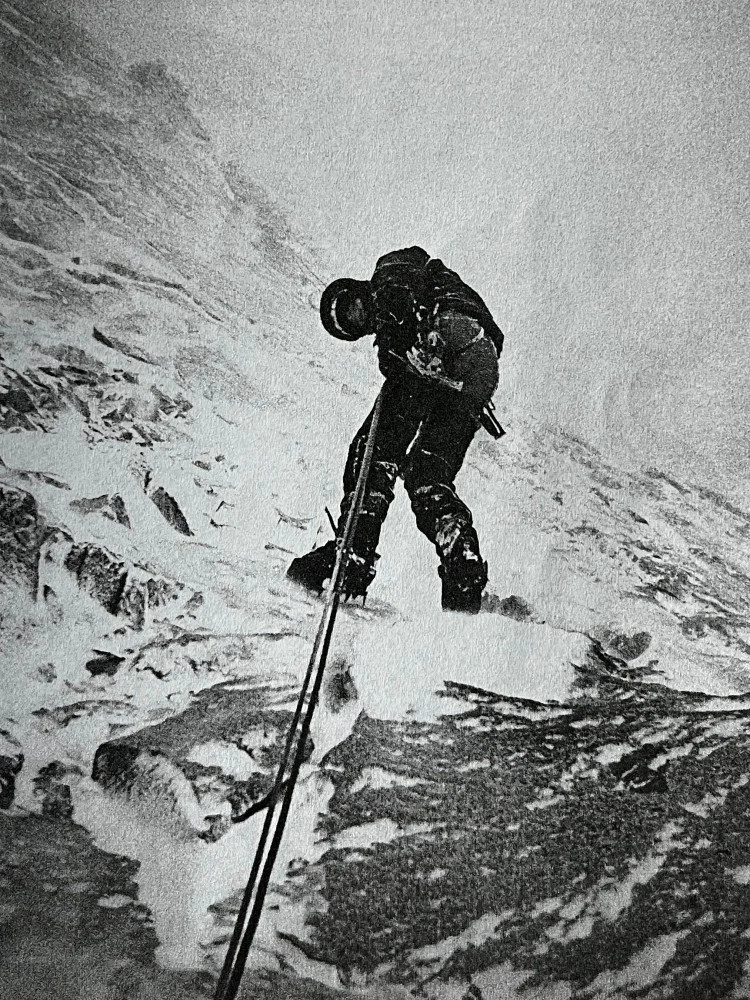
photo: Andy Kirkpatrick, from his excellent book “Down”, used with permission
All alpine climbers have to deal with rappelling down an unknown or unfamiliar route.
Maybe it's an established rappel route, but you don't know where the anchors are.
Perhaps you’re heading down a “non-standard” rappel route, and you know you're gonna have to deal with anchor building as you go down. (Also known as, potential epic in progress . . . =^)
Before we get into it, I'm gonna give a shout for Andy Kirkpatrick’s outstanding book on everything to do with getting down mountains.
Appropriately called “Down”, I consider this mandatory reading for any climber. (You can tell by the beat-up cover and the many bookmarks that I've read this many times!) Support your local independent bookstore.

Keep track of the big picture.
Whatever it is, it's easy to get drawn into the micro details of route finding and lose track of the bigger issues. As you descend, keep asking yourself these questions to keep track of the overall picture:
How far have we descended?
How far off the ground are we?
How long until dark?
How much gear do we have left?
First, let's have a look at the “established rappel route, but you don't know where the anchors are" situation.
Check the route topo, or any other source you might have access to, for descent beta. Are you looking for bolted stations or natural anchors? How long a rope do you need? Can you do it with one rope or do you need two? How many total rappels are there? Is it an older route that might have been bolted with a 50 meter rope that was standard at the time, or a newer route that might use something longer? Having an overview like this in your mind before you start down can help a bunch.
Rappel slowly, and expand your awareness to look down, left, and right. Try to think like the first person down the route making the anchors. Where would you put them? What's a logical spot, like ledges? Focus on those.
In soft rock, sometimes rope marks, or grooves toward one side, might tell you where the next anchors are.
If you come across a gear anchor that has a pre-equalized sling pointing to one side or another, that probably tells you which way you should be heading for the next anchor.
All existing anchors are guilty until proven innocent, especially if the route doesn’t get much traffic. Check everything you come across thoroughly. Be prepared to cut out old crap webbing and add your own good stuff.
Second, let's look at the more complicated situation: heading down a “non-standard” rappel route.
Examine the terrain (and the beta) before you commit
Practice making retreat anchors
First person down takes the rack
Use “block rappelling”
Consider lowering the first person
Be prepared to ascend the rope
Consider rigging with a Munter Mule Overhand (MMO)
Be ready to “extend” your rappel rope if needed
Dealing with loose rock
Look for natural anchors
Can you downclimb?
Can you traverse to another better rappel route?
Consider the “shiver bivy”
Leave the rope
Examine the terrain (and the beta) before you commit
If you commit to going down a gully, or side of a ridge line, you may be very attached to that choice. So think carefully before you do it!
Personal story: Coming off the summit of Mt. Thomson in North Cascades of Washington, my buddy and I saw a perfect rappel anchor on a stout tree that headed off down a gully. We rigged it, rapped it, pulled the rope . . . and realized a minute or so later that we were definitely off the standard route. A very sketchy traverse got us back to safe ground, but it was NOT fun!
We followed someone else's error instead of reading the topo / route description, which would've (correctly) told us to continue on the ridge another 50 meters or so to a short and easy rap.
Practice making retreat anchors
There are a few special techniques you can pull out of your #CraftyRopeTrick toolbox when you need to build rappel anchors.
I cover lots of them in my articles on alpine retreat anchors, Part 1 and Part 2.
Bring 6-ish meters of 6 mm cord in the bottom of your pack, and/or be ready to cut up your cordelette.
Bring a knife.
Wrap a bit of athletic tape around the spine of a few of your least favorite carabiners, to leave behind as your masterpoint as a “cheapskate locker.”
Here's one method to equalize two placements for a retreat anchor: Stopper and a piton, about 2 meters of 6 mm cord, flat overhand bend to connect the ends, girth hitch master point, cheapskate locker: good to go!
Practice alternative anchor techniques like this on the ground before you ever have to use them for real.
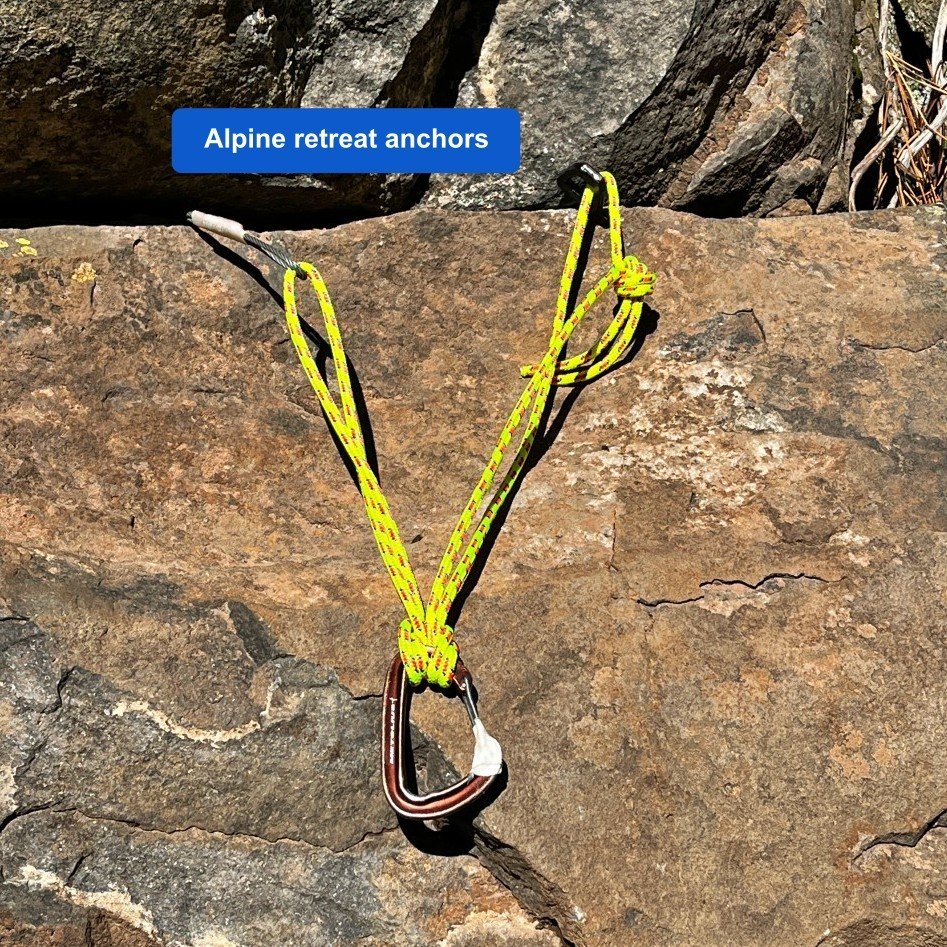
First person down takes the rack
The first person down might well have to make their own anchor, so it makes sense that they should have the rock gear with them, and most of the extra cord / webbing, and a knife.
If you're doing this in the dark (extra bonus points!) give the best headlamp to the first person down.
Use “block rappelling”
Block leading when going up means the same person leads several pitches in a row, rather than alternating leads every pitch. This can also be a good practice when rappelling multiple pitches. Typically this will be the most experienced person, but not always. This allows one person to have all the gear that they need and not be handing it back-and-forth, and to get into the mindset of focus, efficiency, and minimizing risk.
Consider lowering the first person
The first person down might need to pendulum back-and-forth to reach an appropriate anchor, build a new anchor, or climb back up the rope if they go too far. For all of these situations that require use of your hands, it’s probably less risky for them to be on a proper belay from the top.
This can also be helpful if you’re heading down with lots of loose rock around you, because anything you kick down can't fall and potentially damage the rope that's below you.
Here’s a much more detailed article I have about lowering your partner.
There are a couple of ways to lower your partner.
The simplest: lower them on one strand. Of course, this requires solid communication so they don't get lowered too far. Might be a good place for some radios, or at the very least good visual line of sight.
Another option is slightly more complicated but gives sort of the best of both worlds. You can tie off the middle of the rope at the anchor to isolate each strand, have the climber rappel single strand while being belayed on the other strand. This gives the rappeller full control over where they stop, with the security being on belay from above so they can go hands-free to swing around, build an anchor, climb up the rope, etc.
A bonus for this method is that the second strand of the rope is carried down by the first person, with no chance forward to get tangled, blown around, etc.
Be prepared to ascend the rope
If you need to go back up the rope for any reason, it's good to rig in advance to make this as easy as possible. As mentioned above, if you’re rapping a single strand with a Grigri, ascending a rope becomes quite a bit easier.
There are several ways to do this, I cover them in this article.
If you’re rappelling double strand on an extended rappel device, here's a simple technique that allows you to ascend the rope, covered in this article.
Carry a friction hitch or two (especially one that slides easily like a Sterling Hollowblock) and be ready to use it.
Consider rigging with a Munter Mule Overhand (MMO)
In some cases, such as if you think you might need to rappel more than half the length of your rope, rigging with an MMO on the top anchor can be a great idea.
Doing this allows, the first person down to rap single strand, with the rope locked off at the top by the MMO.
If the first person down finds an anchor before they get to the end of the rope, great.
If they don't, their partner up top can release the MMO and lower them down on a the Munter hitch a bit more until they hopefully find an anchor spot.
If the first person went too far, and they can climb up a bit, the Munter allows them to be easily belayed up.
If you anticipate doing this, the first person down should be tied into the end of the rope rather than relying on a stopper knot.
So now what happens to the person up top? That's the next tip!
Want to learn more tips about descending an unknown route, such as:
“Extending” your rappel rope
Dealing with loose rock
Look for natural anchors
Can you downclimb?
Can you traverse to another route?
Consider the “shiver bivy”
Leave the rope