
Alpine Tips

Climbing Tips: Do This, Not That (Part 2)
A series of quick tips on best practices, with links to my detailed articles. This post covers: quad anchor tips, pre threading your haul pulley, the twist-free Munter rappel, how to cut webbing, and a caution on ‘open” slings. (Premium Members can read all of ‘em.)

Premium Members can read the entire article here:
In this article:
Quad anchor - keep the knots low
Pre-thread the haul pulley
The (mostly) twist-free Munter hitch rappel
Cut webbing at a 45 degree angle
Don't put rubber bands or tape on an “open" sling
1 - Quad anchor - keep the knots low
With a quad anchor, if you’re using a cordelette or longer sewn sling like a 180 cm or 240 cm, it's good practice to tie the knots low down as shown. This will give perfect equalization, but minimizes extension if one arm of the anchor fails.

2 -The (mostly) twist-free Munter hitch rappel
Rappelling on a Munter hitch usually makes evil pigtails/twists in your rope. This can be a serious problem when you pull your rope, because the twists can get caught at the anchor.

However, if you flip your rope back over the carabiner like the photo below, this greatly reduces the rope twists.

3-Don't put rubber bands or tape on an “open" sling
Almost all quickdraws have some sort of a little rubber band thing on the bottom carabiner. This makes it easier to clip.
Some people think that doing the same thing on a “open” sling or alpine quickdraw might also be a good idea. Don’t do this!
If you clip that bottom carabiner back onto the sling, it can configure itself so the entire load is resting only on the rubber band and not on the sling! Yes, there have been two accidents that I know about caused by this.
It's a little hard to describe, but if you play around with it, you can figure it out.

The same applies to a personal tether. Do not put tape or a rubber band on a sling that you use for your tether. If you want to make it a bit easier to clip, use a girth hitch, or maybe better a clove hitch, to hold the carabiner in place.

How can you set up your haul system faster, and never drop the rope or your progress capture pulley?
Why can it be helpful to cut tubular webbing at a 45° angle instead of a 90° angle?
Join my Premium Membership to read the whole article.
Thanks for your support!


What are the “Screaming Barfies”?
Don't you love it when your cold hands feel like there's 100 needles in each one, and to top it off, you feel like throwing up? Nah, me neither. But that's a pretty good description of the aptly named cold weather ailment, the “screaming barfies”. Learn what causes it and how to (maybe) prevent it.
Premium Members can read the entire article here:
This recently landed in the Alpinesavvy Inbox . . .
Hi John,
I’m enjoying your regular climbing tips, as always. I have a topic suggestion for your first aid section: the dreaded screaming barfies.
Experienced climbers might get through the throbbing pain and frequent nausea with a mixture of cursing and laughter, but for beginners or anyone who hasn’t experienced this before, it can be a pretty scary experience.
When you consider the chance of this unexpected pain, nausea, and fear leading to a mid-climb mistake or lapse in judgment, the stakes get a little higher. For beginners in steep terrain, who might already be at the edge of their comfort zone, pain, fear, and nausea can spiral downhill pretty quickly.
I haven’t seen this topic mentioned very often in wilderness medicine and climbing education contexts, so I think it’s worth raising some more awareness. Being able to anticipate this can help climbers recognize the need for earlier rewarming, and also be ready to provide the support and psychological first aid their partners or students might need.
David P.
David, excellent suggestion! Let's have a look.
If you like cold weather sports, you’re probably familiar with a not very fun (unless it's happening to your partner and not you) medical condition with a spectacular name, aptly called the “screaming barfies.”
“Screaming”, because that may be your reaction to the few minutes of pain, and “barfies”, because sometimes you throw up!
What causes the screaming barfies?
The condition happens when blood flow to the extremities is restricted due to cold temperatures and physical exertion, such as gripping ice tools tightly or holding hands above the heart for extended periods.
When your circulation improves and warm blood returns, the nerves react sharply, causing a tingling or burning sensation that can be so overwhelming it triggers nausea or even vomiting in some cases. The nausea is believed to be caused by the nervous system's response to extreme pain, which stimulates the brain's emetic center responsible for inducing vomiting.
The good news is the pain doesn't last long (1-5 minutes) and goes away on its own.
How to prevent the screaming barfies?
Do what you can to maintain blood flow and warmth in the hands.
Use a multi-glove system, keeping thicker gloves for belaying and thinner ones for climbing to avoid over-gripping. Regularly shaking out hands below the heart, loosening grip on tools, staying hydrated, and keeping the body core warm can help.
Check out my recent series of posts from Canadian ice climbing expert Wild Gadd on how to keep your hands and feet warm, lots of good general tips in there.
Bad news: it sucks for a few minutes, and it can be distracting to your focus and performance.
Good news: it doesn’t put you in long-term danger, and may provide a few minutes of amusement and possibly entertaining video footage for your climbing partner. =^)
Hopefully, you can laugh about it later. Remember, it doesn't have to be fun, to be fun.
“Schadenfreude” (German) - feeling pleasure in response to another's misfortune. “Schaden” (damage) and “Freude” (joy).
Want to see more references about the screaming barfies?
How about a “schadenfreude” video of some poor sucker who has it?
Join my Premium Membership to read the whole article.
Thanks for your support!
Close-to-the-ground rope ascending practice
Training for a big wall? Your rope ascending techniques and fitness need to be solid. Here’s how you can practice, and stay just a few meters off the ground. (Also works for crevasse rescue prusik hitch ascending practice.)
Are you training to climb a big wall? Your ascending gear, fitness and technique needs to be perfect.
Tip: You don’t need a huge cliff or a 60 meter fixed rope!
Here's how to practice it on a short wall (or even a tree).
Run the rope to a top rope anchor, and then down to your partner, who has you on belay. As you start climbing up the rope, your partner slowly feeds rope through their belay device.
You may be only a few meters off the ground, but with this method, you can practice ascending the entire length of the rope. Have a stopper knot in the end so you can’t be dropped.
For handled ascender practice, you need a bit of rope weight under you, so your ascenders can slide up the rope. This means you probably need to be about 5-6 meters up the rope before your ascenders will slide easily.
Here’s a great illustration of this from the superbly talented Mike Clelland, from his book “The Illustrated Guide to Glacier Travel, and Crevasse Rescue”, highly recommended.

image credit: Mike Clelland
Happy camp feet with double boots
Do you have double boots on a cold weather climb, like maybe Denali? Here's a tip from two Denali experts of how to keep your feet warm & happy when you're at camp.
This tip is from Denali climbing veterans Steve House and Mark Postle, who have more than 30 Denali summits between them. I have an article in the “What's in my Pack” category with a detailed video from Mark and Steve about Denali gear, check it out here.
Are you on a cold weather climb (Denali) that requires double boots? At camp, remove your liner boots, put on your down booties, and then step back in your outer boot to wear around camp.
If the liners are damp, dry them inside your sleeping bag so you can wear ‘em the next day.

Ice climbing - environmental “red flags”
As ice climbing season winds down, it becomes more important to consider environmental conditions as potential hazards. Here are five of them. Guest post from IFMGA Guide Kel Rossiter.

Premium Members can read the entire article here:
This post (shared with permission) is an Instagram post from Kel Rossiter, an IFMGA guide and owner of Adventure Spirit Guides. Connect with Kel on his website and Instagram, @adventurespiritguides
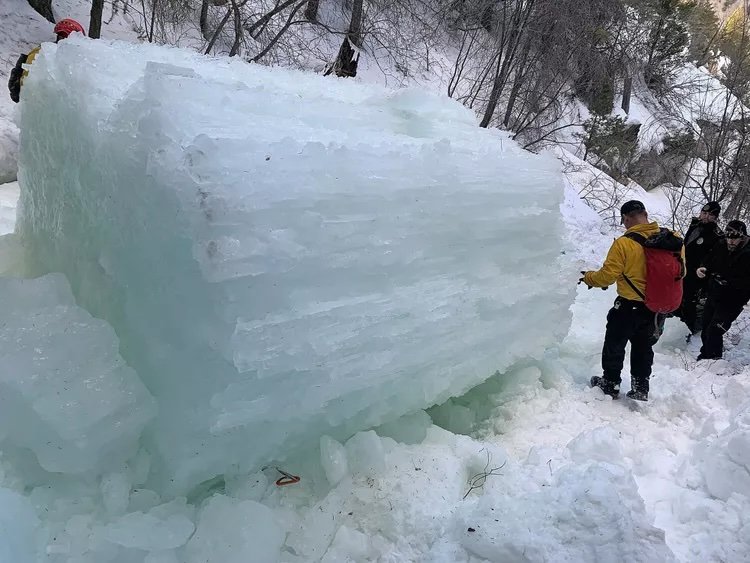
Photo: Capt. John Crowley/Duchesne County Sheriff's office
Kel Rossiter writes:
“We're moving into transition season here for ice climbing. Recently, I was asked to name the environmental factors to get my attention relating to hazards. These are the five I came up with.
The field of avalanche science has a lot to teach the climbing community in terms of risk analysis. One tool they use are the “red flags” - things like wind, heavy snowfall, etc. that should serve to get skiers attention when deciding when and where to go.
There are similar red flags in ice climbing. I came up with five, there are likely more.
Nighttime temperature above freezing
Daytime temperatures above about 40F/4C
Rain
See Premium Member article
See Premium Member article
The first three red flags have to do with warming, obviously not good for ice, which substantially increase overhead hazards.
Red flag number four . . .
Red flag number five . . .
None of these red flags are showstoppers for me. But if several of these are stacking up, it's a sign to me that I might need to change venues to shady places, a place with less overhead hazards, etc. And although I did throw out the number of 40°F/4 C, this is of course not an exact science.
There are other hazards in ice climbing, such as avalanches, cold temperatures leading to frostbite and hypothermia, and high consequence of falling. These are different than an environmental red flag, meaning hazards that have a direct effect on the ice I intend to climb.”
Want to see the environmental hazards #4 and #5?
Join my Premium Membership to read the complete article.
Thanks for your support!


Alpine retreat anchors - Part 2
Retreat (aka bail) anchors or not something you hopefully do very often. But when you need to, there are some specific requirements. See examples of strong and simple rigging here.
Premium Members can read the entire article here:
Note - This post discusses techniques and methods used in vertical rope work. If you do them wrong, you could die. Always practice vertical rope techniques under the supervision of a qualified instructor, and ideally in a progression: from flat ground, to staircase, to vertical close to the ground before you ever try them in a real climbing situation.
The techniques shown below are NOT standard anchor building practice. For normal anchors, clip a carabiner to your gear placements before you clip the sling/cord. These examples are retreat anchors for bodyweight rappelling only, when you want to conserve your gear.

Be it challenging weather, poor conditions, route finding errors, or general loss of mojo (a.k.a. “ambition exceeding ability”), there can be lots of valid reasons to turn around on an alpine route. It may not be something you actively planned for, but it needs to be handled with the same level of focus and detail as any other part of your climb.
When you retreat / bail (and yes, it’s “when, and not “if”), be it a one pitch sport climb or a major alpine adventure, the objectives should be similar:
Get to the ground in one piece
Have each rappel anchor simple to build and easily strong enough to rappel on
Leave a minimum of gear behind
Let's be clear on one thing: this is no time to be a cheapskate. Yes, we hate to leave gear behind, but if you HAVE to leave your beloved #3 Camalot for a rappel anchor, then do it without hesitation. The simple question is, what's your life worth? At the same time, you don't want to over build your anchors, and leave behind gear that you might need lower down if multiple rappels are required.
What are the forces on the anchor when rappelling?
I recently came across a nice video from the meticulous gear testers at Edelrid. (Have a look at their “Edelrid Knowledge Base” on YouTube, they have lots of goodies there.)
Check out the screen grab below from one of their videos.
Short version:
If you bounce around on the rope like some special forces cowboy, you can generate between 2 and 3 kN as a temporary peak load.
When you rappel smoothly, the load to the anchor is pretty much your body weight.
Takeaway: rappel smoothly without bouncing to minimize force on the anchor.

Image: screen grab from https://www.youtube.com/watch?v=A7rKGDxrdTA
There are lots of ways you can rig a retreat anchor. Here's a good one.
Simple (easy to check)
Fast to rig
Plenty strong enough for rappelling
Requires minimal gear
Place two pieces of solid gear fairly close to each other (here a stopper and a piton). Starting with about 2-3 meters of cord (here, 6 mm), pass the cord through both anchor points as shown.

Tie a flat overhand bend to make a loop.
Tighten the knot, leaving tails of at least 3 inches / 8 cm.

Pull down the cord, making a “U” shape.

Girth hitch masterpoint on a taped gate carabiner. (Lots of other options here. If you have enough cord, you can tie an overhand knot. If you want to use a quicklink or rappel ring, that works. I'm showing my favorite method to keep things consistent.)

This approach is fast, requires minimal fiddling with knots, and uses a small amount of cord. Efficient use of materials is the main benefit to the girth hitch master point.
Potential downside, you need to leave behind some hardware to make the girth hitch. (If you had another foot or so of cord, you could tie an overhand on a bight and rappel from that rather than the girth hitch.)
If you're new to the girth hitch master point, yes, it's legit and yes, it’s redundant. Read a more on the girth hitch anchor here.
What if the anchors are farther apart?
What if you want to use a sling instead of cord?
Tying a cord directly to a stopper wire? How strong is that?!
Join my Premium Membership to read the whole article.
Thanks for your support!
Tying off a piton
Trying to clip a fixed piton that’s sticking out too far from the rock? Here are two ways you can clip it to reduce leverage.

Sometimes a piton may stick out too far from the rock. If you clip the eye, you might leverage the piton and weaken the placement.
Or maybe the eye is rusted or broken and can't be used.
Solution:
Girth hitch a sling around the piton closer to the rock, which reduces leverage. This works better with some piton shapes than others.
Another option: put the wire of a stopper around the piton shaft. #CraftyRopeTrick for sure!

Alpine retreat anchors - Part 1
Retreat (aka bail) anchors need to be strong enough for a rappel, use a minimum of gear and cordage, and be simple to rig. Learn the principles here.
Premium Members can read the entire article here:
Note - This post discusses techniques and methods used in vertical rope work. If you do them wrong, you could die. Always practice vertical rope techniques under the supervision of a qualified instructor, and ideally in a progression: from flat ground, to staircase, to vertical close to the ground before you ever try them in a real climbing situation.
Be it challenging weather, poor conditions, route finding errors, or general loss of mojo (a.k.a. “ambition exceeding ability”), there can be lots of valid reasons to turn around on an alpine route. It may not be something you actively planned for, but it needs to be handled with the same level of focus and detail as any other part of your climb.
When you retreat / bail (and yes, it’s “when, and not “if”), be it a one pitch sport climb or a major alpine adventure, the objectives should be similar:
Get to the ground in one piece
Have each rappel anchor simple to build and easily strong enough to rappel on
Leave a minimum of gear behind
Let's be clear on one thing: this is no time to be a cheapskate. Yes, we hate to leave gear behind, but if you HAVE to leave your beloved #3 Camalot for a rappel anchor, then do it without hesitation. The simple question is, what's your life worth? At the same time, you don't want to over build your anchors, and leave behind gear that you might need lower down if multiple rappels are required.
Alpinist Steve House has a terrific video on “Failing Well”. “Success on a climb is going up, making good decisions, and coming back. That's the outcome we should be attached to. To me, that’s what ‘fail well’ means.”
Six minute YouTube video, highly recommended. Takeaways:
Strategic retreat is an inherent part of alpine climbing. It’s a skill that improves with practice.
Having solid retreat technique can give you the confidence to try harder routes, knowing that you can retreat from just about anywhere.
Maintain awareness when ascending. The way up might also be the (unplanned) way down. Remember potential anchor points, problem areas and the right way to go.
Retreat is often done under stress, tiredness, darkness, bad weather, etc. All the more reason to turn up your focus and awareness to counter these compounding factors.
Some general guidelines for retreat anchors . . .
Use two equalized pieces whenever possible. Sure, the classic climbing books are full of epic stories of rapping off of a single stopper or piton. One that’s perfectly placed should be sufficiently strong, but that shouldn’t be your first choice unless things are really desperate.
Try to avoid using multiple pieces of the same size in a single anchor; you might need that same size lower down.
Use static equalization. This is probably not the time for a sliding X anchor. Your gear may not be the greatest, and there's only two pieces, so you want to minimize any potential shock loading at one piece fails.
This anchor is only for rappelling, so the “rules” change a bit. The belay anchor general principle of striving for “three good pieces“ doesn’t necessarily apply to a rappel anchor. If you rappel smoothly on a dynamic rope, the anchor will only see about 1-2 kN, and the direction of force will always be down. So good news, your anchor doesn’t need to be multi-directional or tremendously strong. However, we're still aiming for some other core anchor principles of strong (enough), redundant, load distribution, and no extension.
The examples below don’t use carabiners on the gear. You’d never make a proper belay anchor like this as regular practice, but it's acceptable for an emergency rappel anchor. It's fine to run cord or webbing through stopper wires for a rappel anchor; it holds 8+ kN. (See previous point, the rules change a bit.)

Rappel smoothly to minimize forces on your anchor. Don't jump / bounce around like some special forces cowboy.
Keep your rigging simple. You should really only need one or two variations on the basic theme, so no need to get overly fancy. You're probably going to be doing this under a bit of stress, and bailing on marginal anchors is not something most people practice very often. Keeping your rigging clean and simple makes it easier to check and to remember.
You're going to need a fair amount cordage (and maybe a few slings) so plan ahead. 6 mm cord (rated to about 7.5 kN) is cheap, light and easy to carry, so consider that if you anticipate making a lot of anchors. Tying those pesky knots always seems to take up more cord than you think! Plan on about 2.5 meters of cord per anchor. You can get away with a bit less if the gear placements are right next to each other, or if you use some clever knots like a girth hitch master point. If you and your partner each carry about 10 meters of cord, that's enough for a LOT of anchors.
Use your cordelette. Six meters or so of cord (7mm is the standard) makes a cordelette for the way up; you can think of that is equal to about 2-3 potential anchors for the way down. If you and your partner each carry a cordelette, together that should be good for about 5-6 anchors.
Recycle your old cordelette. If you climb a lot, you probably wanna retire your lead cordelette from regular anchor duty after about a year. Great, you now have some material for emergency anchors. Keep the old one in the bottom of your pack for that purpose.
What about webbing? Tubular webbing can work as a retreat anchor, but it has a few downsides compared to cord. 1) Webbing strength drops off quickly if it gets damaged, unlike cord that has more of a protective sheath. 2) Webbing is more easily degraded by ultraviolet light. 3) Webbing usually requires tying a water knot, which can be a little finicky and a hassle to tie if you have gloves and/or cold fingers. For these reasons, cord is usually a better choice. (See an example below of how to use a sewn sling.)
Carry a knife, so you can cut up your cordage (or maybe even an end off your climbing rope) to make an anchor. Also, a knife is useful for cleaning up any rat nest of old sun-crusted cord and webbing you often find at alpine anchors. Good rule of thumb, if you add cord to improve an existing anchor, remove the oldest piece(s) and take it with you.
Don't have a knife? It’s remarkably easy to cut through rope or webbing with a small length of 2 or 3 mm cord. Tie a bight knot in each end, clip the loops to a pair of carabiners for handles, and then rapidly saw back-and-forth through the material that's under some tension. You’ll cut it through in a few seconds.
Look first for a tree or rock horn. Give it a good kick first to assess its strength. You can drape a sling or tied loop around this and use it for a rappel, with no gear left behind. Note: use caution with putting the rope directly around/over a tree or rock horn; the friction could make pulling the rope difficult or impossible. Using natural protection of course preserves your hardware.
Consider shorter rappels. Doing two shorter rappels, using natural protection is going to preserve more gear than one long one.
Look for fixed gear on the way up. Remember where it is; you might need it on the way down.
Be wary of the “bail trail”. Don't be tempted to depart from your route to go towards a retreat anchor that someone else has left. If your route description says “belay from the ledge”, and you see some sketchy looking stoppers equalized with a shoelace on terrain that looks clearly off route, that probably means it's a bail anchor and not a belay anchor intended for ascending.
Be on the lookout for down-climbable terrain, and consider the technique of “down leading”. Here, the first person raps single strand, places his gear on the way down, and clips the rope to the gear. The second person ties in to the end, down climbs, cleans the gear as they go, and is belayed by the person below. Here's an article on that technique.
Leave a cam if you have to. Yes, your life is worth it. If you have a perfect placement for a larger cam, versus fiddling around trying to equalize several different stoppers, go for the one cam and get the hell down, especially if you have multiple pitches to go and it's starting to rain, getting dark, etc.
Stoppers and a piton or two are good choices for retreat anchors. Stoppers are inexpensive, strong, easy to check if you have a good placement (well, the bigger ones, anyway) , easy to bounce test, and can be set in rock that’s dry, wet, icy, or muddy. If you have a ice tool hammer, feel free to use it to smack on the piton as well as the stopper. To weld in a piton or stopper, you can beat on it Neanderthal-style with a fist size rock (and maybe your nut tool). But a hammer is always going to be better. No one's going to be cleaning it, so don't be shy.
If you find a fixed piton, see if there’s a nearby stopper placement you can use to equalize the two pieces.
Are things getting pretty desperate? You can cut your rope and leave it if you need more material for the anchor. You can also fix your rope and do the last rappel on a single strand if you don't need the rope for anything else.
Pitons!
You don't wanna carry too much metal with you, but a knifeblade and a “Universal” piton can be great to leave behind for anchors.

Knifeblade and CAMP universal piton
There's a lot more to learn about retreat anchors!
What’s a “Universal” piton, and why is it cool?
Are Tricams good for bail anchors?
What’s a cheapskate locker, and why should I carry one?
Can I run the rope directly through the cord?
Why a metal connection for the rope?
How can I back this up?
All good questions! Join my Premium Membership to learn the answers in the complete article.
Thanks for your support!

Climbing Tips: Do This, Not That (Part 1)
A series of quick tips on best practices, with links to my detailed articles. This post covers: anchor hooks, extending a quickdraw, using a rebelay to protect a fixed rope, “alpine equalization” with cams, and how anchor hardware can twist your rope. (Premium Members can read all of ‘em.)
Premium Members can read the entire article here:
In this article:
Anchor hooks: gates facing out
How to extend a quickdraw
Protect a fixed rope with a rebelay
“Alpine Equalization" Don't clip the thumb loop
Anchor induced rope twisting
1 - Anchor hooks: gates facing out
In a typical anchor with carabiners, it's usually good practice to place them opposite and opposed. However, with anchor hooks (aka Mussy hooks), it's typically best to have them both facing OUT, away from the rock.

Why is this?
The American Safe Climbing Association has installed thousands of these anchors throughout the US. They recommend gates out. Click the article link above to read the longer reasons; here’s the short version:
“Anchor hooks are placed with gates out for a couple reasons. If opposed the inward facing hook tends to gouge into the rock and scar it up, along with orienting strangely to wear much faster on the nose or even get pushed into the bottom of the wiregate. If they are extended with chains to lay flat and opposed the rope gets pinched behind the hooks and wears unnecessarily/grooves the rock.“
2 - How to extend a quickdraw
A steep or reachy sport route may require extended quickdraws.
It's good practice to extend them as shown in the photo below. Of these two, the quick link is more secure. Or you could have a locking carabiner in the middle (left photo) to add further security.

The methods shown below are not so great. In the left, the carabiners could be twisted and unclipped in a fall. On the right, the rope can rub over the top of the dog bone, not good.

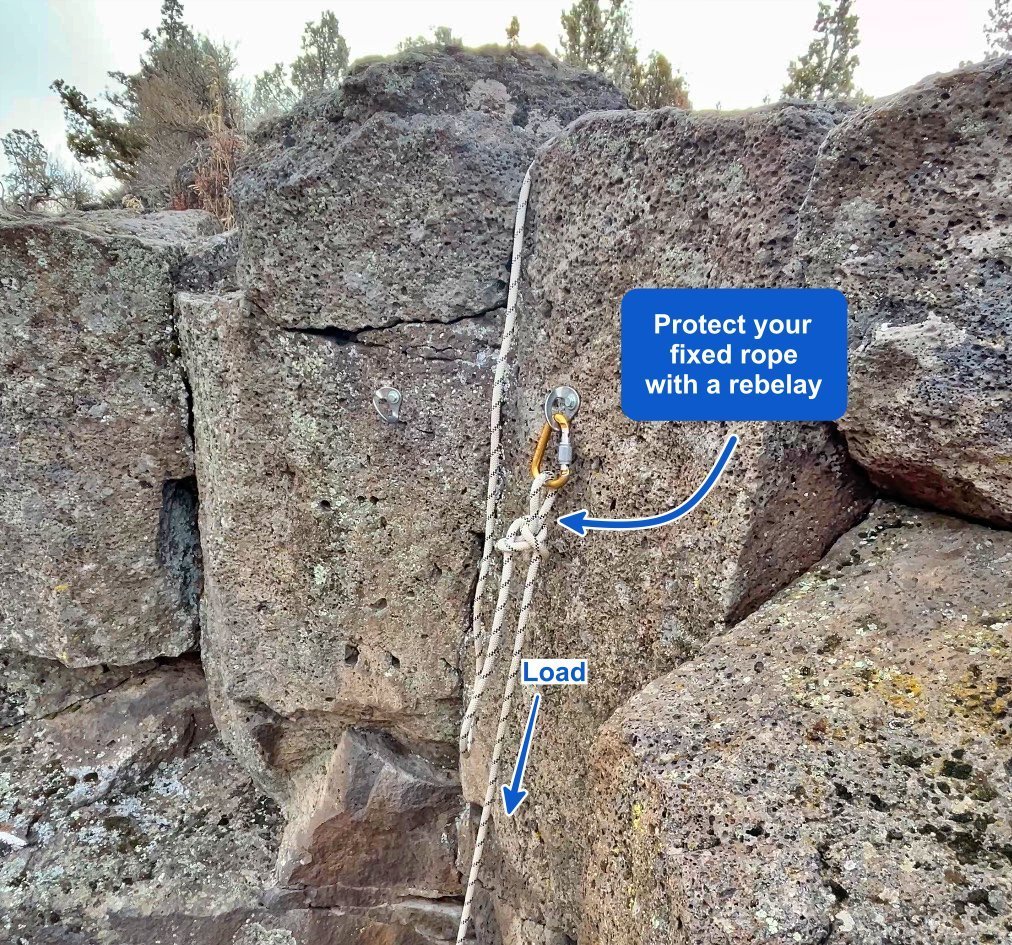
3 - Protect a fixed rope with a rebelay
If a fixed rope is running over an edge, it's quite easy to damage the rope, especially with a larger load.
An easy way to fix this: a rebelay. To make a rebelay, make another anchor point (by placing gear or clipping a bolt) below the edge that's being loaded. Pull up a bit of slack, tie a bight knot, and clip that bight to the lower anchor. Now, when the rope is loaded, no force goes to the section of rope over the edge.
For “alpine equalization”, where should you clip the cam?
What anchor rigging can cause rope twisting, and hoe can you fix it?
Join my Premium Membership to read the whole article.
Thanks for your support!
Toe warmer heat packs in your gloves
Here's a crafty way to add a little extra heat to your hands: use a toe warmer inside your gloves. It's thin, and the adhesive backing holds it in place.
I learned this clever tip from @adventurespiritguides.
Here's one way to tame cold hands: Use a toe warmer heat pack, and put it inside your glove at the bend in your wrist1.
Toe warmers have a little adhesive part to keep it in place and this helps hold it without it moving around in your glove.
On really cold days, you can add another one inside your shirt over your wrist. I’ve used a thin sweatband to hold it in place over my wrist; that worked well.
Standard hand warmers don't work too well. They can be too bulky in tight fitting gloves, and they can fall out or move around when you take your gloves off.
Buy them in bulk, they’re pretty cheap. (You’ll probably need a new box every season because they have a shelf life.)


How to cut an Aramid core rope
The normal way of cutting and melting a rope doesn't work too well with a rope with an aramid core, because it’s fireproof! Here's a simple and unconventional way to get a perfectly sealed cut on an aramid rope.

Premium Members can read the entire article here:
This tip comes from Australian rigging expert Richard Delaney. Connect with Richard on his excellent website Ropelab, Instagram, or his YouTube channel, where he has loads of concise, informative videos.
Yo! Disclaimer!
Important: the chemicals in superglue may not play nicely with most ropes. In this case we're using them only at the very END of the rope, which will never see a load. When you're doing this, be careful not to get glue on any other part of your rope.
(Aramid is the general term for a type of fiber. Kevlar and Technora are trade names for basically the same material.)
Need to cut and seal the ends of standard nylon rope or cord? The hot knife in every climbing shop works great.
But melting and cutting doesn’t work so well on Aramid core rope (such Sterling Powercord), because it’s fireproof!
Here’s a way to cut and seal an Aramid rope. (Works on regular climbing rope and cord too!)
What you need:
Tape. I used cloth athletic tape. Masking tape doesn’t hold very well.
Sharp, thin knife. Don’t use your favorite steel blade for this; it’ll dull fast. I used a tiny but very sharp ceramic knife. Razor blade works too.
Superglue. Cheap super glue have screw tops that don't work very well and the remaining glue is probably gonna dry out after you use it once. Name brand glue, like Loctite, have a much better quality, screw top, allowing you to reuse the glue. Spend a little more and get the good stuff.

Tip: Do this over a surface that you don't mind dripping superglue on! Ask me how I know this, and can't use my favorite green cutting board for food anymore . . .
1) Put a tight wrap of tape around the end of the rope. This helps make a clean cut.

2) Cut through the rope.

3) Smooooge some superglue into the fibers at the end.
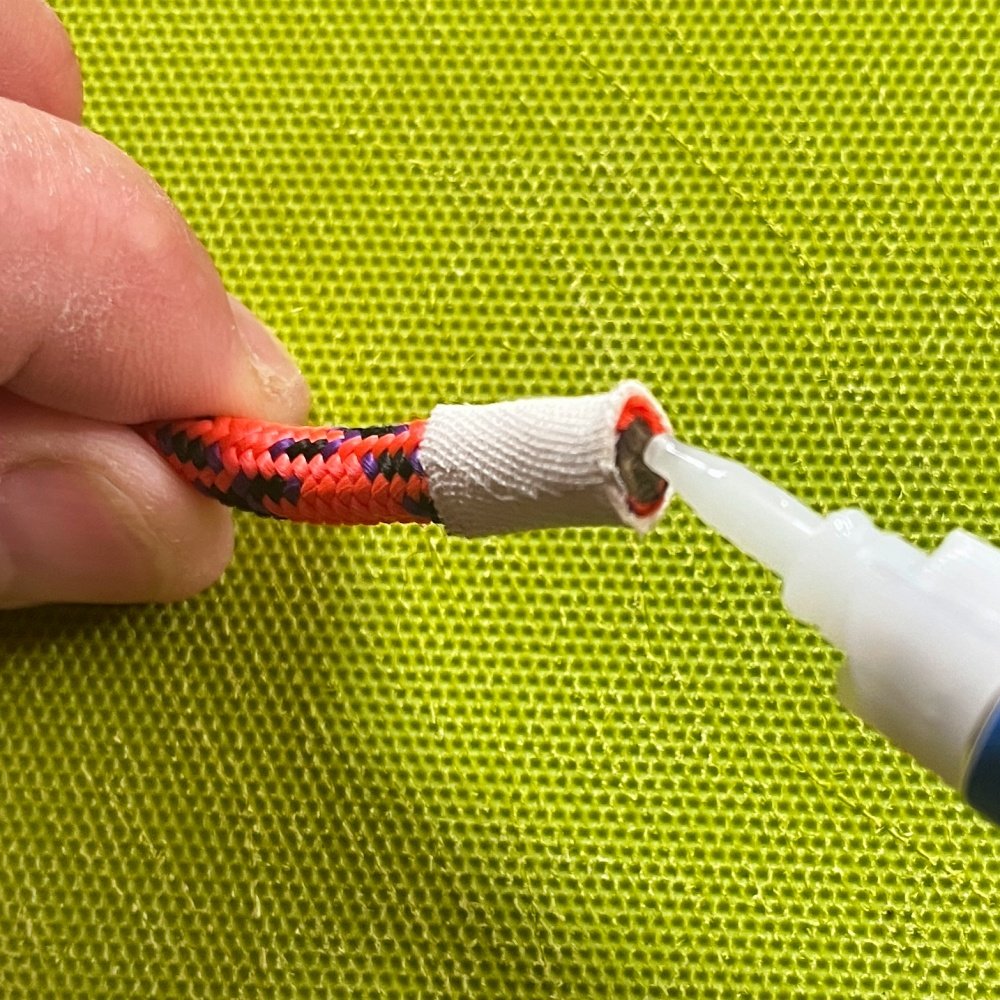
There’s one last important step.
Join my Premium Membership to read the whole article.
Thanks for your support!


How do you offer safety advice when climbing?
Have you seen another climber doing something that could be potentially lethal? How did you handle it? It's a tough call, and there are no right answers. Here's one approach.
Premium Members can read the entire article here:

You're out climbing at the local crag. You see another person (not your partner) doing something that's potentially dangerous.
Do you speak up?
If you don't speak up and somebody got hurt or worse, how would you feel?
If you do speak up, how do you do so in a respectful and constructive way?
What's your personal responsibility?
Have you ever been on the receiving end of advice about your technique? (I have!) How did you feel about that?
Have you been on either side of this delicate situation?
There are many factors and it's a personal judgment. There’s a big difference between someone using a technique that isn’t ideal or to your liking, and someone doing something genuinely unsafe.
I once came across an anchor that another climbing party had set up with a sewn pocket daisy chain. Not a PAS style with sewn loops, rated to 22+ kN, but one made for aid climbing, with sewn pockets that are rated around 2-4 kN. It was a top rope, where the loads were going to be low.
Is this standard practice? Absolutely not!
Were these climbers in imminent danger of the anchor failing under top rope loads? No.
It was a really goofy way to set up an anchor, but there wasn't anything lethally wrong with it. I chose not to say anything.
What about actions that may have more serious consequences?
Some examples where I have intervened:
Someone about to rappel off the end of the rope
Using a rope too short when top roping, and about to drop the person they were lowering
Here's the general approach that I used in these cases that led to a (mostly) constructive conversation and a good outcome. Your mileage may vary.
My opening line: "Hey there, how's it going? Can I offer a suggestion?"
How about what to say if they don’t want to hear it?
What are some other things to consider in this delicate situation?
Join my Premium Membership to read the whole article.
Thanks for your support!


How to avoid edge loading carabiners
Sometimes when anchor building, carabiners can become loaded across the edge of a rock. This makes the carabiner much weaker, not good! Here are two ways to solve this problem.

Premium Members can read the entire article here:

Scenario: you’re building a multi piece gear anchor. You place a cam in the perfect spot but . . . Bummer, the racking carabiner is being loaded over the edge of the crack or some other non-optimal way.
(This might also happen when sport climbing: if route developer drilled a bolt in the wrong place, and your quickdraw carabiner is loaded over an edge.)
Why is edge loading a carabiner bad?
It can dramatically weaken the carabiner, as in breaking around 3-4 kN rather than the rating of 22+ kN!
The carabiner gate might start rubbing and opening against the rock, which you never want to have happen.
Not good! Whaddya do?!
(Apologies for the not-so-great photos, they’re screen grabs from a video I made about this.)
Here are two ways to handle this.
Method 1: basket hitch
Basket hitch a sling to the cam sling or thumb loop. Now the sling is loaded over the edge of the crack, not the carabiner. Much better!
You could put a girth hitch on the cam sling instead of a basket hitch. (The girth hitch is less strong, but certainly strong enough for any load you're going to encounter and recreational climbing.)
Simply push the racking carabiner off to one side and ignore it; you don't need it for the anchor.

Method 2: Tie an overhand knot in the sling and clip below it
If you don't have enough material to make a basket hitch, try this.
Tie an overhand knot in the sling (or one leg of the cordelette). Pass a loop of the sling through the cam sling or thumb loop, then clip it below the knot as shown below.
Now, the purple sling is loaded over the rock edge, and not your carabiner. Nice!

Want to see my video demo of the overhand knot trick?
How about the test results of how bad edge loading actually is?
Join my Premium Membership to read the whole article.
Thanks for your support!

Tame your crampon strap with a hair tie
Crampons straps that flop around (and might even trip you up) are a hassle! Here's one way to deal with it, using the humble hair elastic “scrunchie”.

There are various ways to keep your crampons strap tidy. Here's one that works for me.
Take an elastic hair tie / scrunchie, and wrap a few times around the strap.
After you crank down your crampons and buckle them, tuck the extra tail through the hair scrunchie. This should keep it nicely out of the way.
Side note: Most crampons straps are very long, so you can fit them on just about any kind of Sasquatch foot. If you know the biggest size of boot you’re ever going to use, you can cut off some of the extra strap. Measure carefully before you do it!

How to add a GPX file to your phone
Having a good quality GPX track file of your intended route is very useful to help stay found and avoid epics. My website has more than 150 GPX files for Pacific NW routes. Here's how you can move them from my Google Drive onto your phone’s backcountry navigation app.

Premium Members can read the entire article here:

GPX track files for Mt Hood Oregon, available on my website.
A good GPX track file for your climbing route helps you to stay on course and avoid epics.
Alpinesavvy has more than 150 GPX files for some of the most popular climbing routes in the Pacific Northwest.
Here's how to get those GPX files from my Google Drive to your phone.
First, what’s a GPX file?
A GPX file is a universal file sharing format for geographic data.
Basically it's a text file of latitude longitude coordinate(s). If you draw it on computer mapping software like CalTopo, it will only have lat/long data. If you record it in the field, it usually will also have timestamp and elevation data.
A GPX file can be a single waypoint, for example say of a favorite campsite, a good place to pick huckleberries, or your car at the trailhead.
More useful for climbing is what's called a track file. Here, your GPS device, which these days is typically a phone app, records a continuous string of latitude longitude coordinates every few seconds in the field. A GPX track file can have hundreds or even thousands of different points.
GPX files are free, easy to share, and weighs 0.0 grams; what’s not to like?
If you try to open a GPX file, you make see something like this: a long list of latitude longitude coordinates. Not very helpful in this format.

Why your phone (probably) needs a little help . . .
If you try to open a file with a .doc extension, your computer knows to open it in some sort of word processing program. A .jpg extension? No problem; your clever phone knows it's a photo and has no problem opening it.
However, for more esoteric file extensions like GPX, that isn’t necessarily the case. So when you open a GPX file, you may need to tell your phone what app you want to use, because it can't usually figure it out on its own. (Silly phone . . .)
So, GPX files are cool, got it. How can I get a GPX file(s) onto my phone navigation app?
Here are two ways.
Doing everything from your phone
Moving files from your desktop computer to your phone
For this example, we’re using:
Mt. Adams in Washington
Google Drive for GPX tracks storage
Gaia GPS on my phone. (Of course there are different peaks, cloud storage options and phone operating systems, but hopefully with this example you can figure it out.)
Here’s a step-by-step process of downloading the GPX file and opening it on your phone.
Step 1 - Open your preferred GPS app on your phone. Navigate/zoom to your area of interest.

Step 2 - Open the Google Drive folder with the tracks. When you find the file you want to download, tap the “three dots” icon on the right.

Step 3 - Tap “Open in”.

Step 4 - Your phone may give you a horizontal selection of icons which it thinks might be useful to open this GPX file. My phone never seems to offer the navigation app that I want to use. So, swipe all the way left until you get to the three dots / “More”, then tap it.

Step 5 - Scroll down through the list of your phone apps, and choose the navigation app you want. In this example it's Gaia GPS. (CalTopo works fine too.)

SWEEEET, You’re done. The app should take a moment, import the GPX file and it should draw up right where you want it. If it doesn't draw right away, try closing and reopening the app. then zooming to the area.

Want to see some screen grabs showing the process when you already have the file saved on your computer?
Join my Premium Membership to read the whole article.
Thanks for your support!

Snapgate or locking carabiners on anchors?
When and where is the best use of locking carabiners on an anchor? On the gear or bolts? On the masterpoint? Is it a multi pitch anchor, or a toprope? Can I use lockers on “half” of the anchor? It's a contentious and important discussion, so let's take a look.
This article was written with collaboration from AMGA Certified Rock Guide Max Lurie. Connect with Max on Instagram, @alpinetothemax and his website.

A common question for climbing anchors: should I use locking carabiners on the bolts/gear?
It's an important topic, and there are some strongly held opinions on this, so let's have a closer look.
Short version:
For multi pitch climbing, using snapgate carabiners on the bolts or gear is acceptable.
For top rope climbing, it's a generally accepted standard in the guiding and teaching world to use locking carabiners on the anchor and master point.
We all get to choose an acceptable level of risk. Try to understand the realistic, and not imagined, risks of your methods.
Before we get into the details, let’s look at some bigger-picture concepts:
If you have a single life-critical connection, then a locking carabiner is good practice. (For example, the rope and your belay device, and your rope or tether connection to the anchor.)
If your anchor is “unattended”, like for a toprope, then locking carabiners can be more important.
If your anchor is “attended”, like a multipitch climb with someone next to it the whole time, with hands and/or eyes on the anchor, locking carabiners are generally not required.
It's helpful to understand the difference between perceived risk reduction and actual risk reduction.
The argument of, “I want to reduce my risk as much as possible, so I use lockers everywhere on my anchor”, is a bit simplistic. How far do you take that? Do you use lockers on the first couple of quickdraws when you’re sport leading? Steel carabiners are much stronger than aluminum ones, so do you use steel carabiners? I'm guessing the answer to both of these is no for just about everybody.
It's good to have a solid understanding of the capabilities and limitations of your gear, and let those guide your decision rather than emotion, hearsay, and “that's-the-way-I-learned-it”.
Be aware of generally accepted best practices among guides and industry professionals. Also be aware that what might be standard practice in one industry, such as using triple action lockers for say tree/arborist work, does not necessarily mean it's also good practice to use that same gear for recreational climbing.
The snapgate crowd says:
Totally fine to use them on the anchors.
The failure of any single non-locker would not cause catastrophe.
What's the realistic mechanism of failure for a snapgate carabiner? Any mechanism that could cause them to both fail at one time is so incredibly unlikely that using them is acceptable; each carabiner is connected to a separate independent strand of the anchor.
On a multi pitch anchor that is “attended”, any potential problem can be hopefully noticed and fixed right away.
Side note, it makes no difference whatsoever which direction the carabiners face when clipped to the anchor points. They can both face right, face left, face each other or face opposite, it makes no difference. The concept of “opposite and opposed” carabiners applies at a masterpoint, not when clipped onto the the bolts.
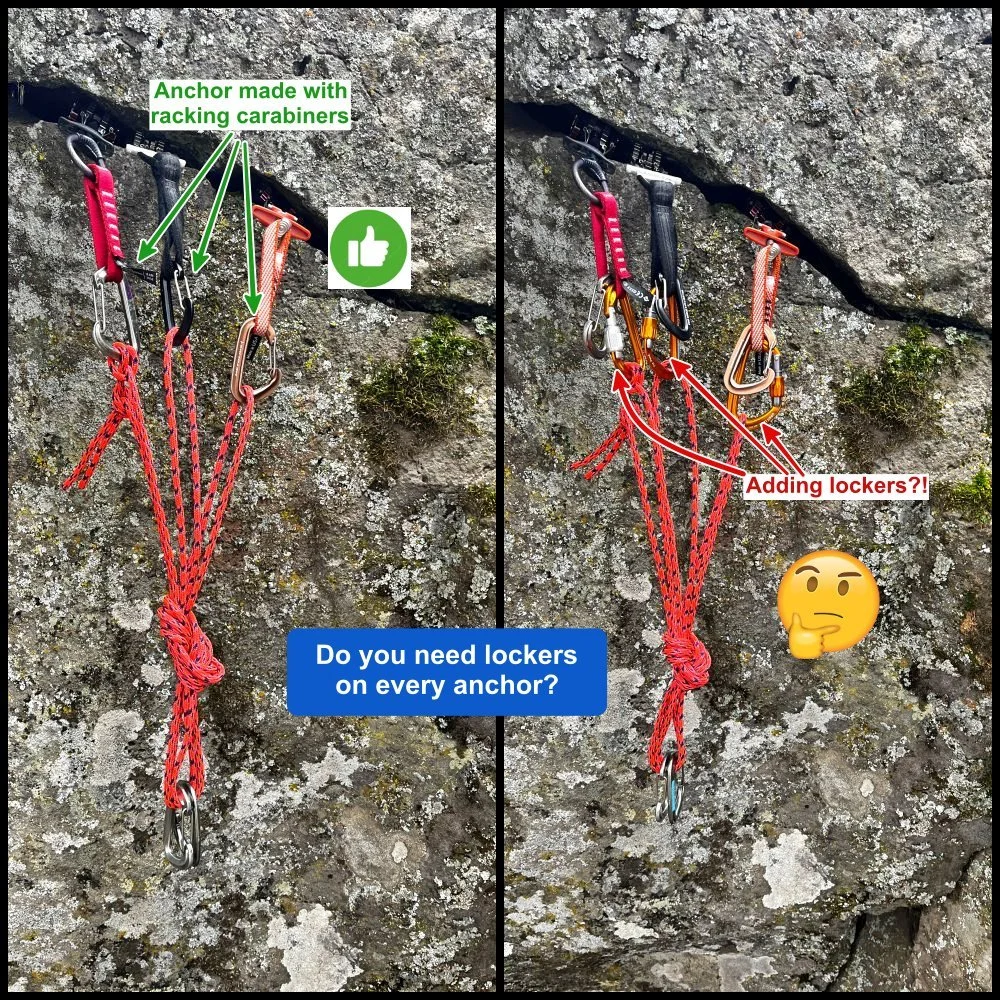
There's another way to think about it. If you build a trad anchor with, say, 3 cams, most people would be fine with using the snapgate racking carabiners already on the cams.
If you wanted lockers everywhere, and built a three piece anchor on a multipitch, you’d probably have to carry about six extra lockers (three for the leader and three for the previous anchor) which is . . . maybe a little ridiculous?
So, if you’re cool with using snapgates on your cams when building a gear anchor, logic says you should also be comfortable with them when building a bolt anchor.
What are some of the arguments in favor of using lockers everywhere?
How about using lockers on the bolts for a top rope anchor?
What does an AMGA Certified Rock Guide have to say about this?
How does the economics principle of “the law of diminishing returns” factor in?
Join my Premium Membership to read the whole article.
Thanks for your support!

Protect your fixed rope from abrasion with a sling
If you have a fixed rope (either for a rappel or anchor) and it's loaded over an edge, you risk damaging it. Here's one method to easily move the load onto a sling and away from your rope.
I learned this #CraftyRopeTrick from AMGA Certified Rock Guide Adam Fleming. Connect with Adam on Instagram, @adam.fleming.climbs

Anytime you have a fixed rope that's loaded over a ledge, (for a rappel, rigging rope, or maybe something else) you run the risk of abrading your rope. The chances or damage increase if the rock is abrasive and/or the edge is fairly sharp.
Here's a trick that saves your rope, using gear you probably already have. Use a “sacrificial” sewn sling, cord, or tubular webbing.
If using a sewn sling, you can tie an overhand knot in each end of the sling, creating two redundant strands.
Consider using (old school) 1 inch webbing. It's pretty burly, inexpensive, and is a good application for this trick.
Keep the amount of rope that's isolated by the sling fairly short. If both sections of the sling are cut, the load is going onto your rope, and you don't want that to be shock loaded. (In the photo, it's a bit too long, whoops . . .)
Inspect this sling carefully after you're done and toss it if it shows any abrasion. That's why a nylon sling or cord might be better than Dyneema; it’s less expensive.
Want to see a video I made on how to rig this? How about some other options to protect your rope from abrasion?
Join my Premium Membership to read the whole article.
Thanks for your support!

Descend by self-lowering
Rappelling isn’t the only way to get down a cliff; another option is the self-lower. There are a few considerations, pros and cons, learn ‘em here.
Premium Members can read the entire article here:
This post discusses techniques and methods used in vertical rope work. If you do them wrong, you could die. Always practice vertical rope techniques under the supervision of an experienced climber, and ideally in a progression: from flat ground, to staircase, to vertical close to the ground before you ever try them in a real climbing situation.

We typically think of rappelling (or maybe being lowered by your partner) as the only options to get down a cliff. But there’s another one to consider: lowering yourself.
This technique is less common, and has a few pros and cons. You go more slowly and have increased friction, but there are times when those might be good!
It’s pretty simple.
Pass one end of the rope through the anchor.
Tie in to this end of the rope.
Put the other side of the rope into your rappel device.
Lower yourself.
Here's how to set it up with a standard tube style rappel device. Note extension and third hand back up,

Notes, pros & cons of self lowering . . .
For a self lower, be absolutely sure the rope is going through some kind of METAL connection (carabiner, quicklink, chain, rap ring, etc) at the anchor point, never webbing or cord! The rope is MOVING through the anchor point when you lower yourself!
You’re lowering on a single strand, which usually means less friction. But the rope is also moving through the anchor point, which adds friction. These sort of balance out, and your descent speed typically is about what it would be with a two strand rappel.
You’re descending at half speed compared to a standard rappel, which can help with rope control, again good if you have a skinny rope. Or, it could be a bummer if you have a long way to go.
The person who’s self lowering must deal with the entire length of the extra rope. (If your partner is lowering you, the extra rope stays at the upper anchor.) If you can get a good rope toss to make sure it gets down the cliff without tangling, good for you. If not, having the rope in a ropebag or backpack can make life a lot easier.
Be sure and tie a knot in the end of the rope (or maybe clip the other end of the rope to your belay loop with a locking carabiner) to close the rope system, so there’s no chance you can rap off of the end.
Want to learn the pros and cons of this method?
How about another diagram from Petzl about how to rig this?
A video from an IFMGA Guide demonstrating the technique?
Join my Premium Membership to read the whole article.
Thanks for your support.


Will Gadd: Keeping your hands & feet warm, Part 3
The last of a three part series: battle tested tips from Canadian ice climbing expert Will Gadd for keeping your hands (and feet) warm.
Premium Members can read the entire article here:

Will Gadd voiding the warranty on his boots. Photo: @pete.hoang
Veteran Canadian ice climbing expert Will Gadd knows a few things about staying warm. This article is part 3 of a series of posts he made on Instagram. I’m sharing it here with Will’s permission.
Connect with Will on his website and Instagram, @realwillgadd
Warm feet - General Tips
A lot of the “Hands” tips are also about keeping YOU warm and happy first, and the same is true for your feet. Feet are harder to manage, and seem to get seriously cold more often.
I’ve never seriously frozen a finger, but I’ve frozen my feet at least twice to some extent, and have to work harder to keep them functional than my hands most days.
Realize that keeping your feet warm takes action on your part. It won’t just “happen” with one set of clothes or approach, you’ve got to be flexible with the environment, think ahead and act regularly to prevent misery in the future. It’s a war of many small battles, not, “My feet are really cold, doh!”
Cold feet start primarily when your core temp drops and your body decides to sacrifice the peripheral bits such as feet and hands. So don’t let that happen!
Control your core temperature to keep your feet warm. Have a light “moving but not sweaty” outfit and a “standing almost bivy” outfit that will keep you warm even if you’re standing around for an hour or so in the temperature you’re out in that day.
The difference in body heat output while moving vs. standing is massive, far more than peeling a few “layers” can deal with. If you just open the Goretex vents on your jacket you’ve done nothing useful. Take it off.
Layers are for onions and cakes. We need to think more “raging furnace while moving” vs “standing sleeping bag.”
Move in the least amount of clothing you can for the elements you’re in. You can move in less than you think mostly. Most people can run at -30 with running shoes on if they are moving hard enough. You’re a furnace, if you’re moving. Move, dress to stand, or freeze.
Test this in a low consequence environment, like hiking fast near your home/car on a cold day for an hour or so. Dress lightly at first. Once you're moving and body temperature is up, you may be pleasantly surprised at how little clothing you need.
A “standing” outfit means a big jacket, insulated pants, maybe mitts etc. Your “moving” outfit may be nothing more than a thin synthetic, or it may be close to your “standing” outfit if your output level is low. When I coach XC kids skiing I get laughed at for my puffy pants and jacket, but kids move so slow I have to totally overdress or I freeze.
Warm Feet: Specifics
Feet are big compared to hands. They take longer to get cold, and longer to warm up. If you start a day with cold feet you’re starting with a problem.
Unless you’re moving fast for 20 minutes or so right away you’re going to have cold feet until you do, or maybe for the day. So start the day with warm feet.
I don’t put my boots on while driving to climb or ski for this reason; my feet get cold sitting at my desk, as there isn’t enough blood circulating to keep them warm. Most of the time there isn’t enough warmth in the back of a car to keep your feet warm either, and they can actually get really cold. Oddly, some people think the exact opposite, and that’s OK too, but think about it. If your boots are really warm and you are too then your feet will sweat in the car, so make sure you keep your feet dry for the ride. Keep your boots in the car, not the back of the truck or trunk. Crank the heater and warm ‘em up on the drive.
If your feet are cold you have to get your core temperature up, and you have to circulate blood through your feet. This means moving, not just adding insulation! If your feet have gotten cold you will have to “overdrive” your body to pump enough blood through your feet to warm them up.
It takes about five minutes of going hard uphill to get the blood really pumping through your feet, and another five or so for them to be truly warm. Or 200 squats and 100 “leg swings” on each leg if you’re standing at a belay. Anything else won’t work.
Constriction on your feet is terrible in winter. If you stuff your boots so full of socks that they are tight on your feet, I guarantee you will be cold. Leave room! If you crank your ski or climbing boots down and then don’t loosen them you will get colder feet.
Loosen your boots at belays or when resting, the difference can be amazing! If you have to bivy then loosen your boots right off. It may save your feet.
Pack and organize everything you can at home. The less time standing around sorting gear getting cold at the trailhead, the better.
Want to know if antiperspirant can keep your feet warm?
How about what to do if you get your boot(s) completely soaked on a cold day?
Join my Premium Membership to read the whole article.
Thanks for your support!
Add a carabiner to the master point knot
Here is a simple trick to make untying your master point a bit easier - include a carabiner in the knot. Note, this is NOT for clipping anything; it's only to help you untie the anchor when you're done.

This little trick has been around for a while. But showing it to some newer climbers recently, they had never heard of it, so I thought I'd mention it.
Maybe under the category of “teaching the new dogs an old trick?”
When tying a statically equalized anchor from a sling, and using either an overhand or a figure 8 as the masterpoint, that loaded sling can be very difficult to untie.
Make your life easier: clip a carabiner into the knot before it gets loaded. This gives you a little “handle” to start pulling on the knot to untie it, and makes your tired fingers happier at the end of the day.
Note:
This is absolutely not meant for any kind of load, including your shoes or a backpack. The only purpose is to make untying the knot easier. If you loaded this carabiner, it could compromise the security of the knot, so don't do it! If you're climbing with beginners it's especially important to point this out, ask me how I know about this.
A figure 8 is usually easier to untie then an overhand.
This does not have to be a locking carabiner.
If you have one, use a “keylock”, or notchless, carabiner. It’s a bit easier to remove from the tightened knot.