

Alpine Tips

What’s a “Universal” piton?
A Universal piton has a sort of a Lost Arrow shape, but with a rounded eye that’s offset. This makes it easier to clip, allows it to cam for more secure placements in cracks, and can be a good problem solver when it comes to alpine rappel anchors.

Premium Members can read the entire article here:
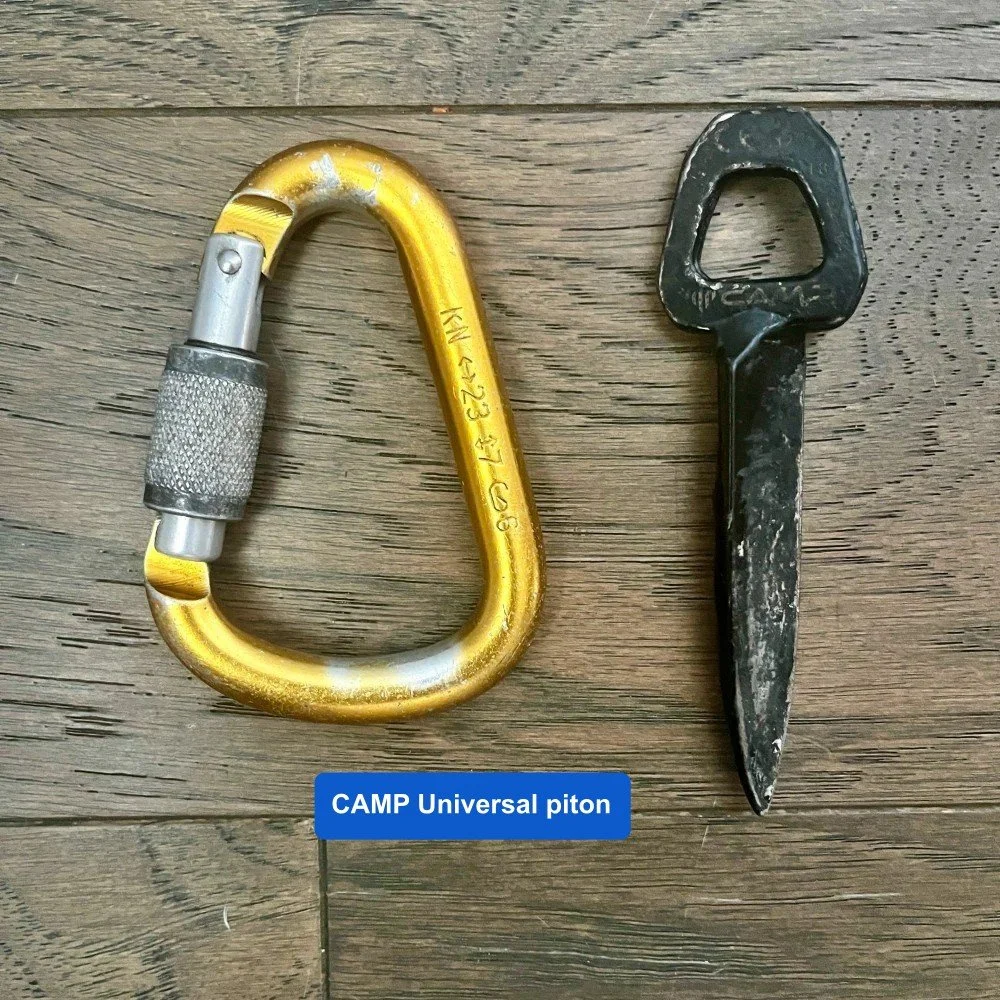
CAMP universal piton (with carabiner for size comparison)
I get it - hammerless / clean climbing started about 50 years ago. These days, pitons are used mostly on hard big walls.
However, for certain alpine climbing applications, especially making rappel anchors, sometimes a piton is just the ticket.
You’ll be pretty glad you have one if you're staring at a crack that's smaller than your smallest stopper!
The universal piton (like this one made by CAMP) is a clever design.
Similar in shape to a Lost Arrow piton, the blade is offset about 45 degrees from the head. This makes the piton rotate / cam into a (hopefully) more secure placement when loaded, whether it's a vertical or horizontal crack.
They come in hard steel (black) and softer steel (silver). The hard steel is better in most cases.
Universal pitons seem to be sort of a European thing. I don't think any American company (including the largest piton maker, Black Diamond) makes them.
You can get all different flavors of pitons, including the Universal, from HowNot2.
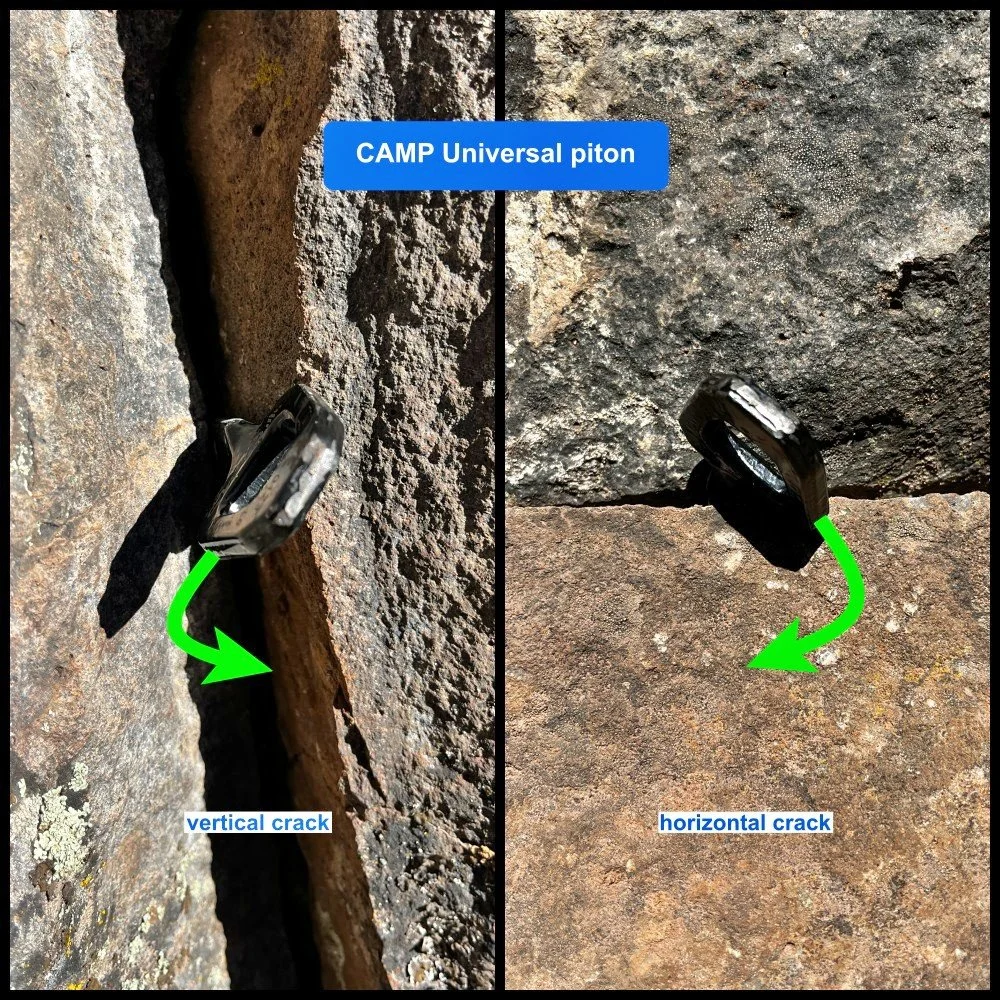
Because of the head is offset about 45 degrees from the blade, a universal piton rotates / cams into place when loaded in both a vertical and horizontal crack.
What are the downsides of universal pitons?
If you're doing hard big wall climbs, they don't replace standard pitons. (Get some beaks / Tomahawks instead.)
If you're placing them in a roof, or where the sides of the crack are at different depths (sort of like the left photo above) you may not be able to hammer it all the way in.
Some are made of soft metal, which may not hold up so well long-term.
They’re a bit heavy.
They’re a bit expensive, about $30 (spring 2026)
You need something to whack ‘em into place. (Don't have a hammer? You might get away with going caveman on it, with a baseball sized rock.)
Do you want to carry one on every climb? No. However, on a route where you need to maybe make rappel anchors, and especially if you have a hammer with you, you might want to consider it.
PS - don't leave it dangling on your harness at the rock gym . . .
Plus, whacking in pitons is just fun! (When you're practicing, be sure to do it in an area of rock where nobody is ever gonna climb.)
Because of the offset shape, a universal piton usually plays well with most shapes of carabiners, no matter how you clip it.
This makes it a bit easier to use than a more classic angle piton (below), where you usually want to clip it with the gate facing away from rather than toward the piton.
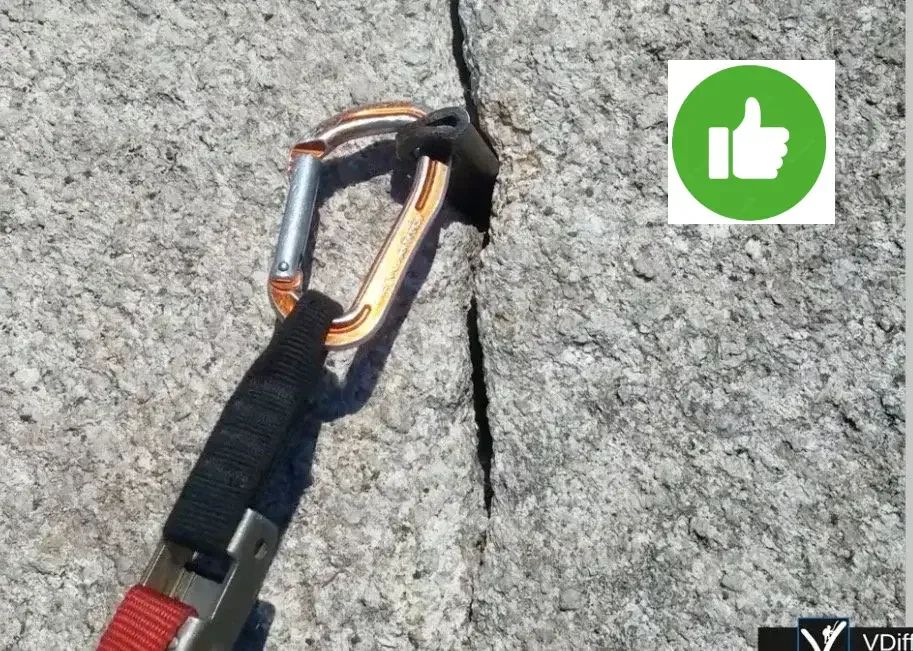
image: vDiff climbing, shared with permission
This is not a great way to clip an angle piton. The carabiner can get torqued and loaded in some strange ways; avoid this.
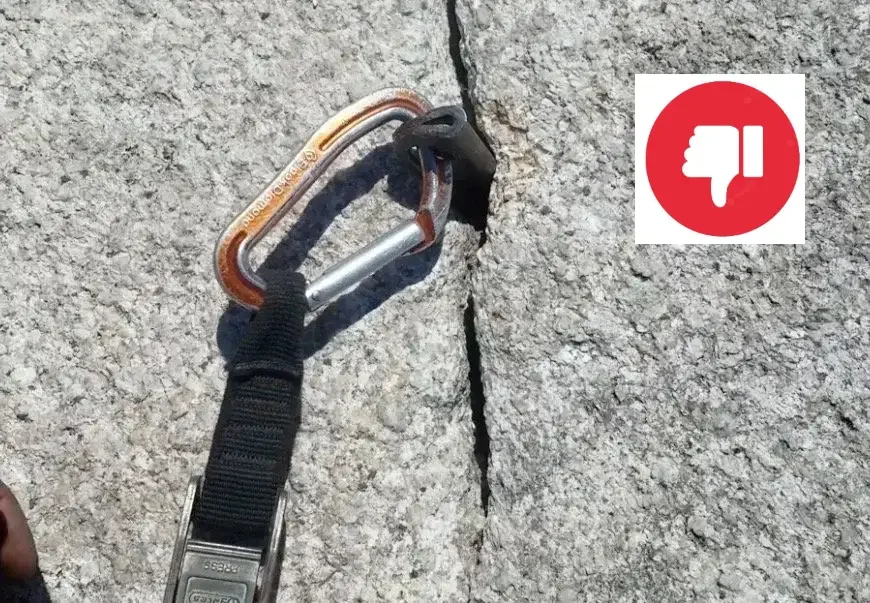
image: vDiff climbing, shared with permission
Want to see an example of using a universal piton for a rappel anchor?
What’s another size and style of piton that can be extra helpful for alpine climbing?
What are three different types of hammers that you can use to whack a piton?
Join my Premium Membership to read the rest of the article. Thanks for your support.
Premium Members can read the entire article here:


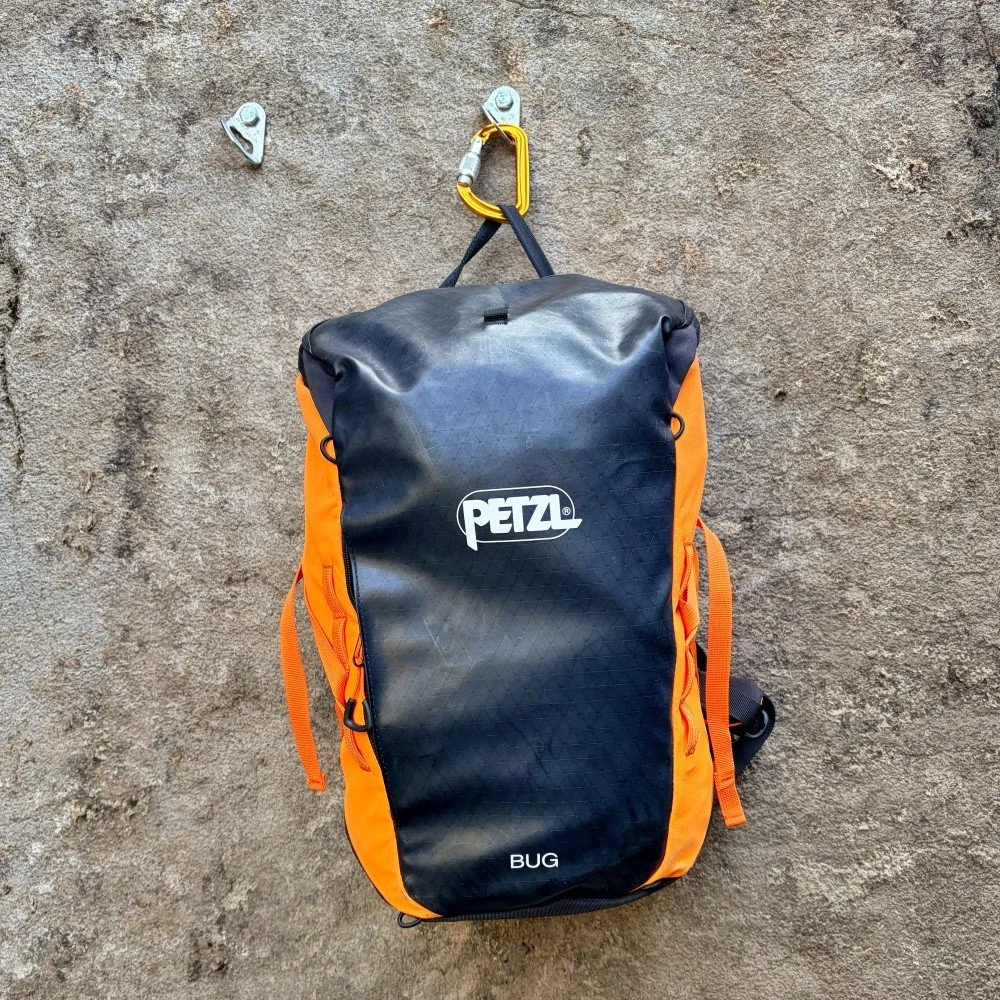
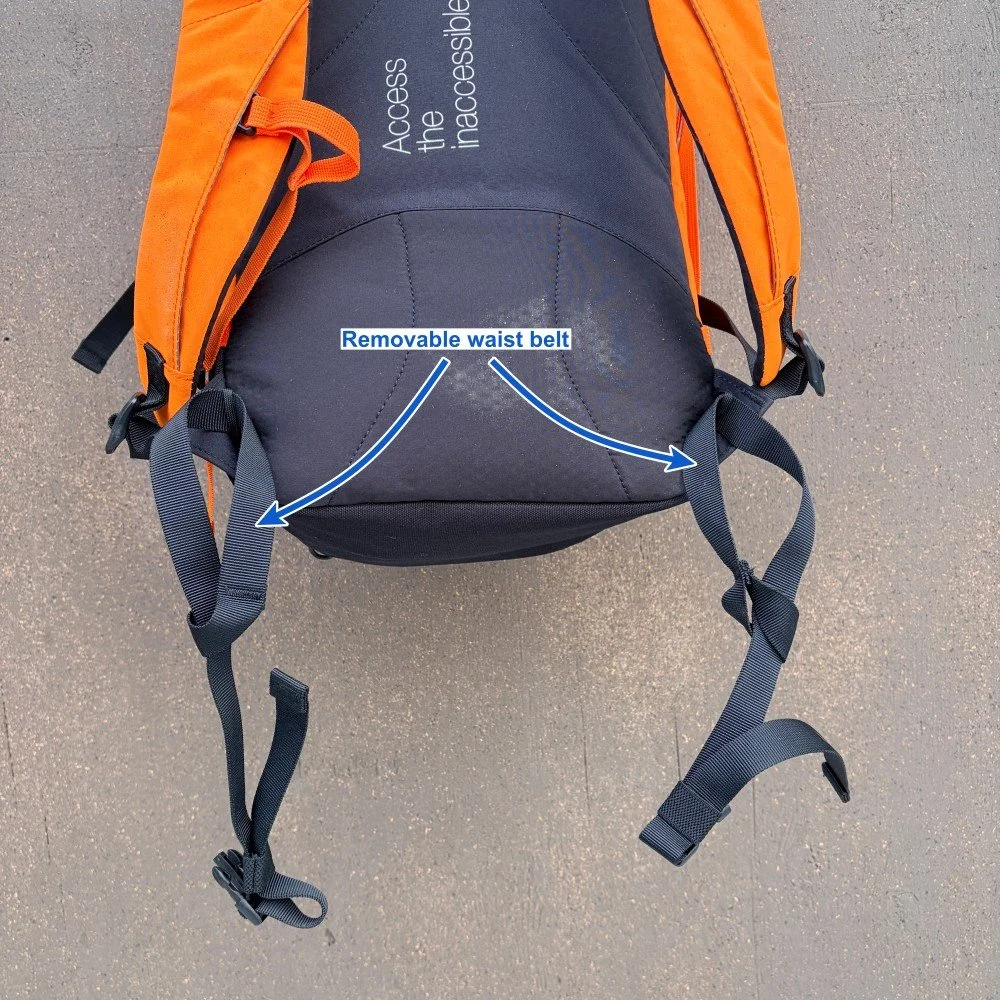
The Petzl Bug multipitch rock pack (newest version)
Looking for a small, durable pack specifically designed for multi-pitch rock climbing? You‘ve found it with the redesigned Petzl Bug. Here’s a full review.
Premium Members can read the entire article here:
Full disclosure: Petzl sent me this pack for free. That in no way biases my review; I think it's great and I want to tell you about it. There are no ads, affiliate marketing links, or paid product promotions on Alpinesavvy. In the rare cases when I get free products like this, I’ll always let you know.
The button below links to my favorite climbing goodie store, HowNOT2. I provide it as a convenience; I make $0.00 if you buy from them.
My first time on El Capitan was a test run of the Nose up to Sickle Ledge. Among various other minor mishaps that day, the Yosemite granite managed to grind a silver dollar sized hole in the side of my favorite alpine climbing pack, because I didn't have a proper haul bag.
The Petzl Bug would've been a much better choice!
While Petzl makes packs for caving, canyoneering, and industrial / rope access, this is their only offering for climbing; specifically, multipitch rock climbing.
That gets my attention. I've had a few different versions of small climbing packs over the years, notably, the Black Diamond Bullet. Up until now, the Bullet was fine. I now like the Bug a lot better.
The Bug has gone through several iterations over the years. This latest version, at 18 liters and 665 gram / 1.5 pounds, has a few understated features specifically for multi pitch rock climbing. It’s also versatile enough to kick around town as a commuter / student pack, if that's your thing. It comes in several colors; I like the classic black and orange.
My first impression out of the box: “Dang, this is a solid, well designed workhorse!”, and not “This is so featherweight, I wonder if it can handle being a mini haul bag?”
Here’s what I like about the Bug.
General features:
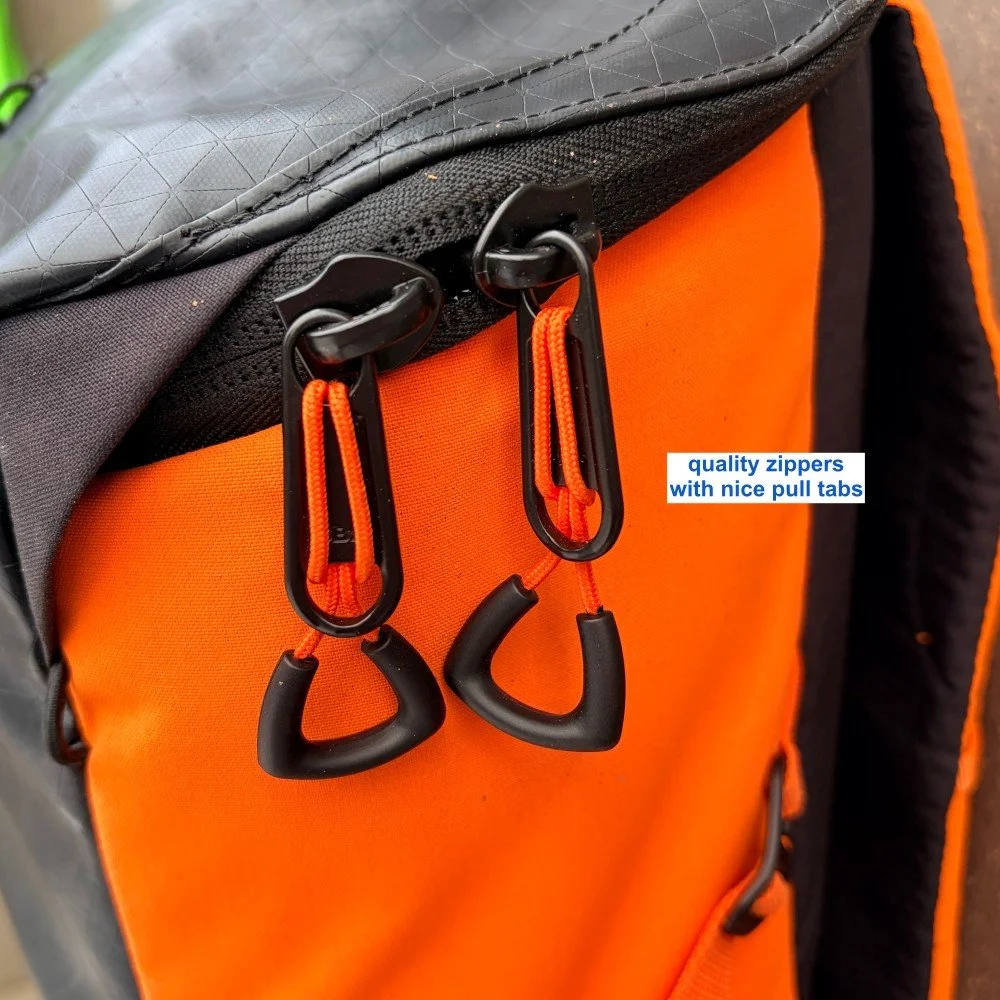
Sturdy and smooth zippers
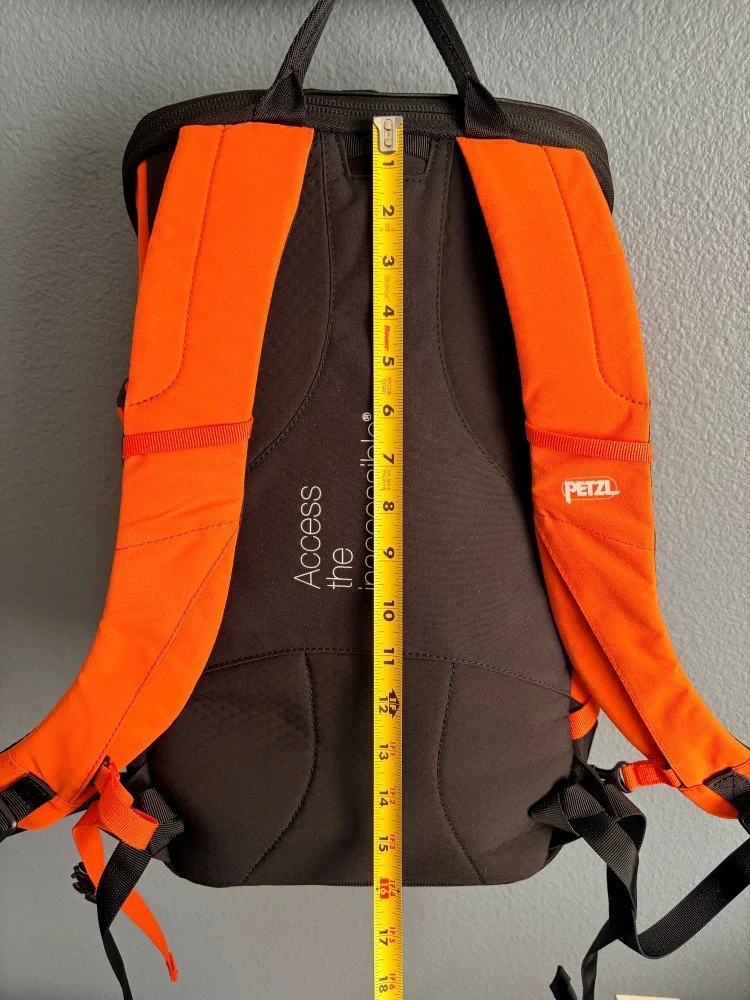
Nice fit
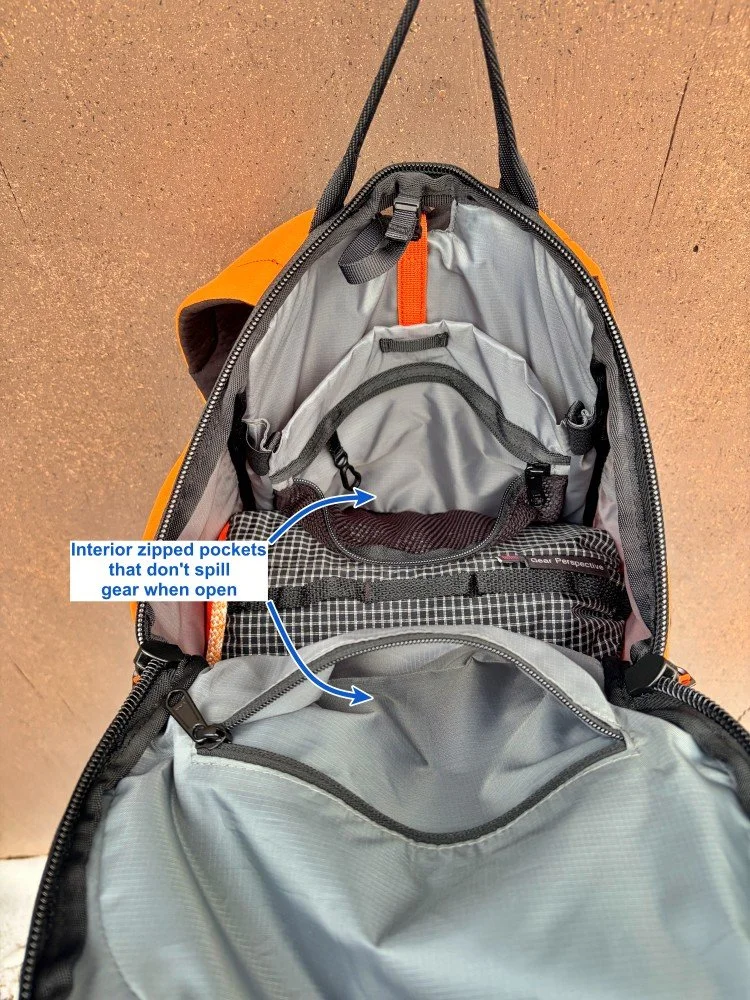
Two well-placed zippered interior pockets
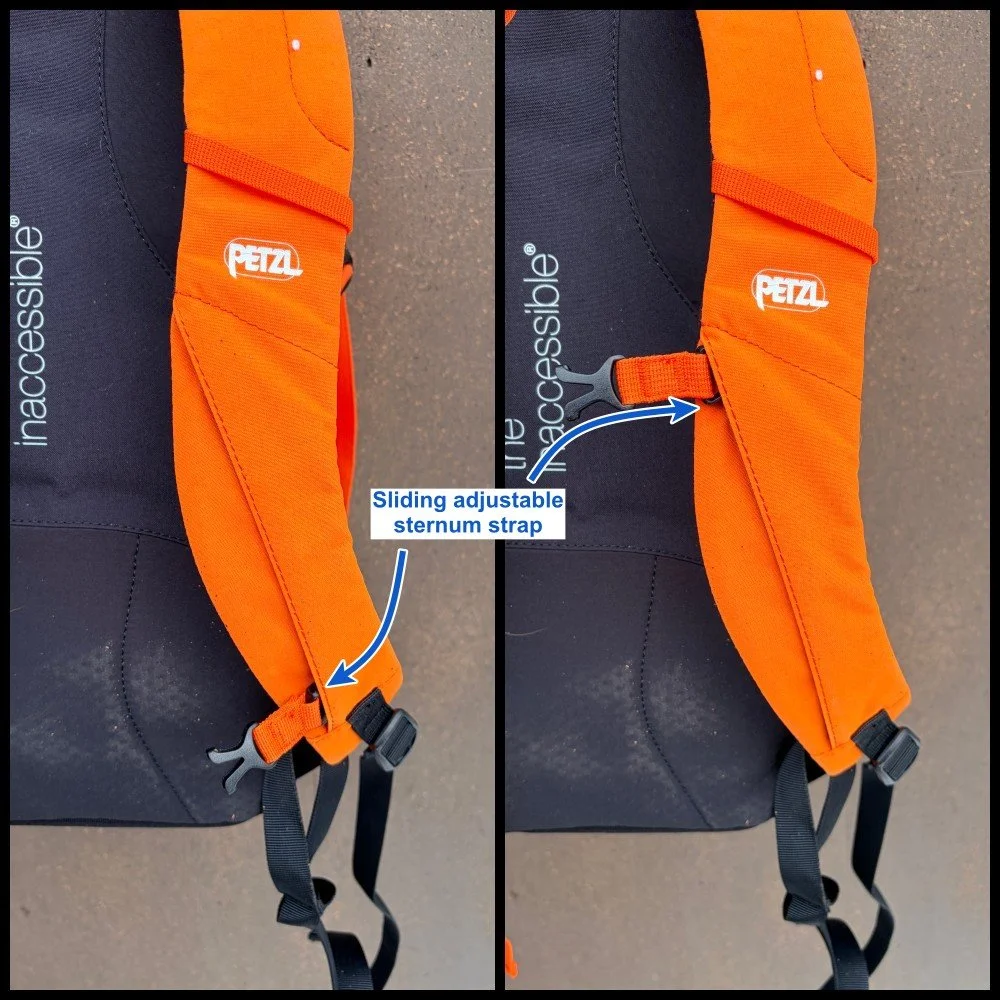
Sliding adjustable sternum strap
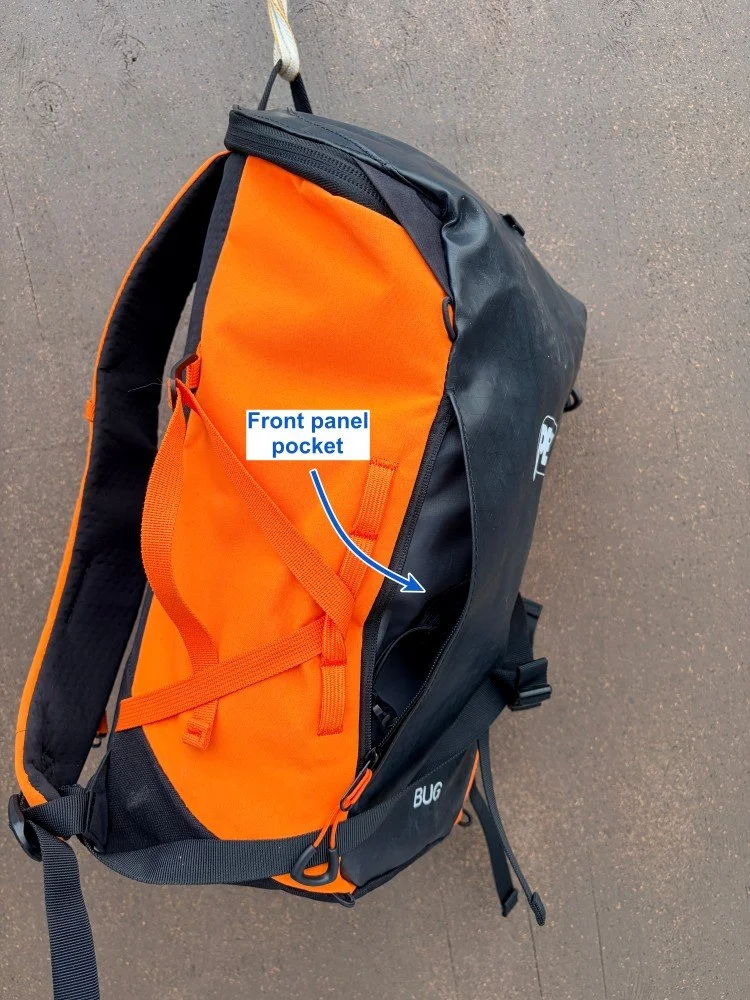
Large front panel pocket
Sits high on your body
Padded back panel and shoulder straps
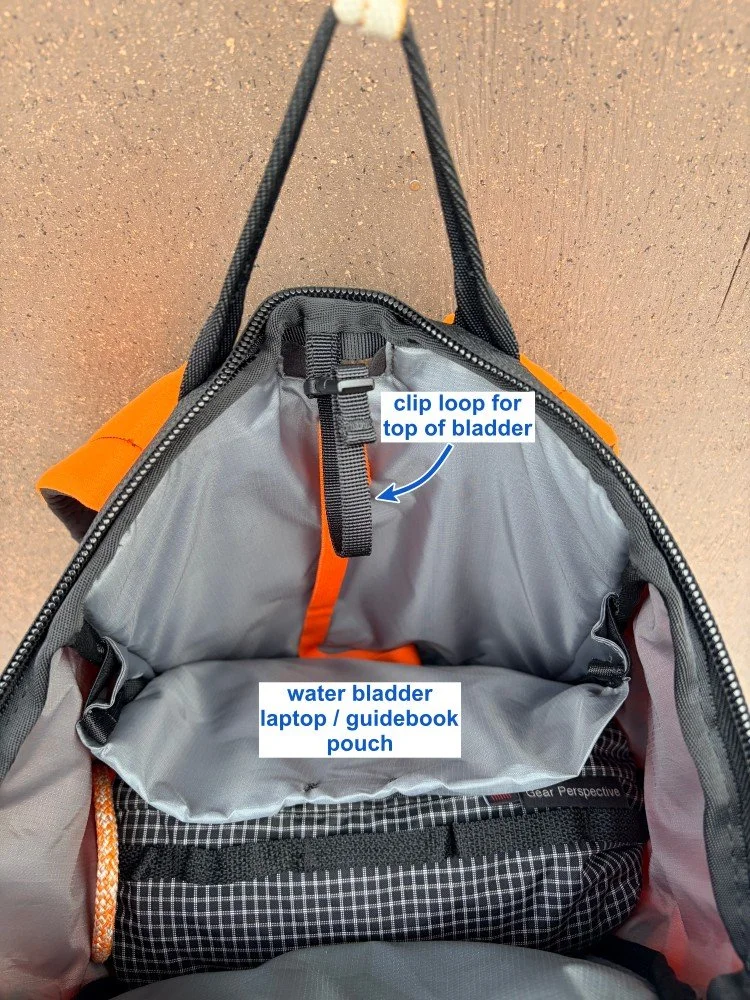
Water bladder sleeve in the back panel
Climbing features:
Durable exterior
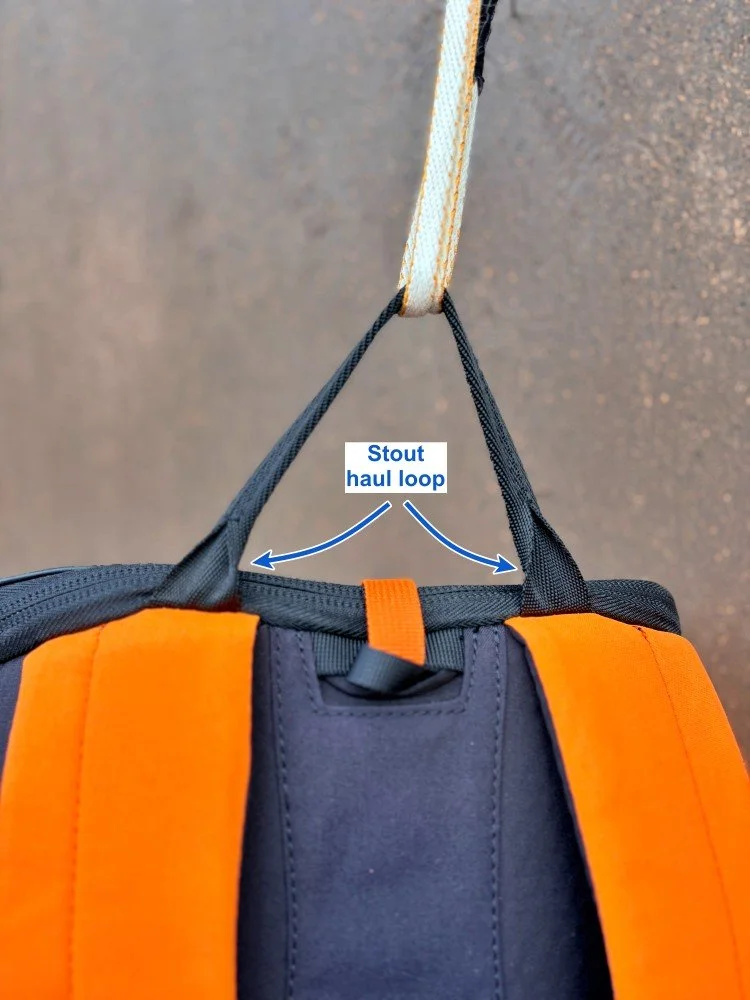
Sturdy haul loop
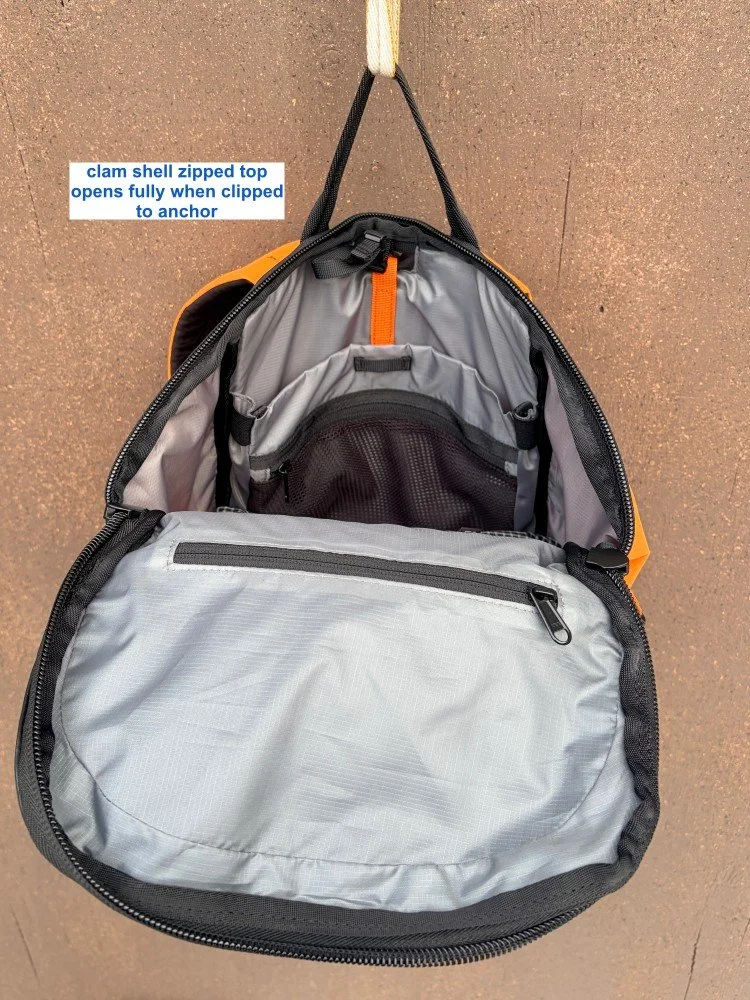
Easy access when clipped to the anchor
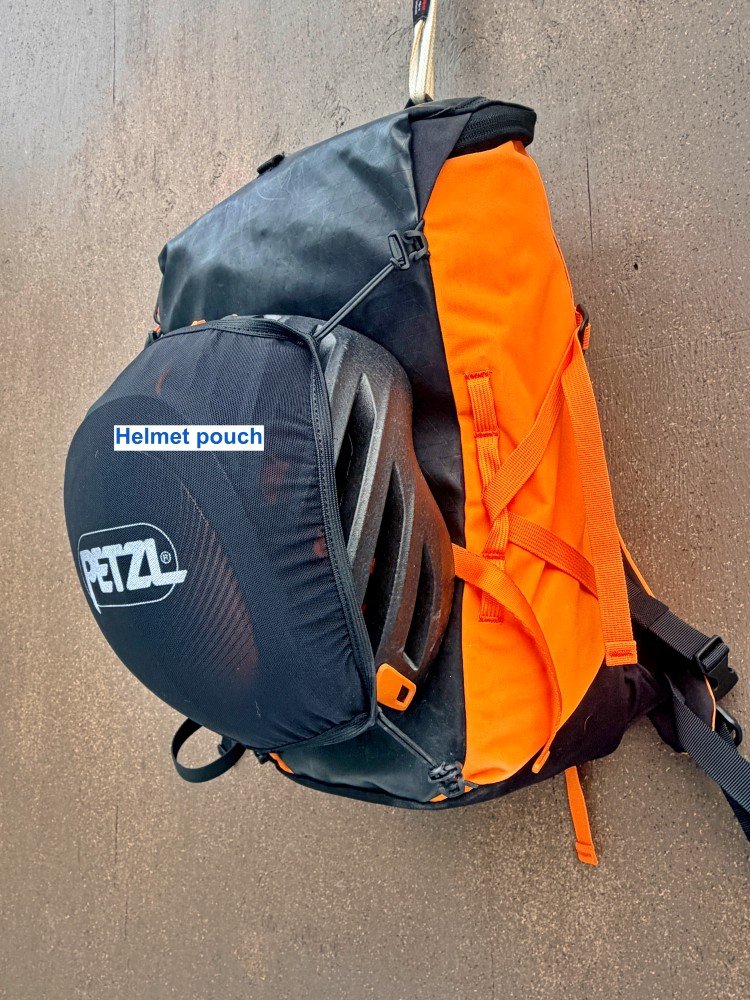
Helmet pouch
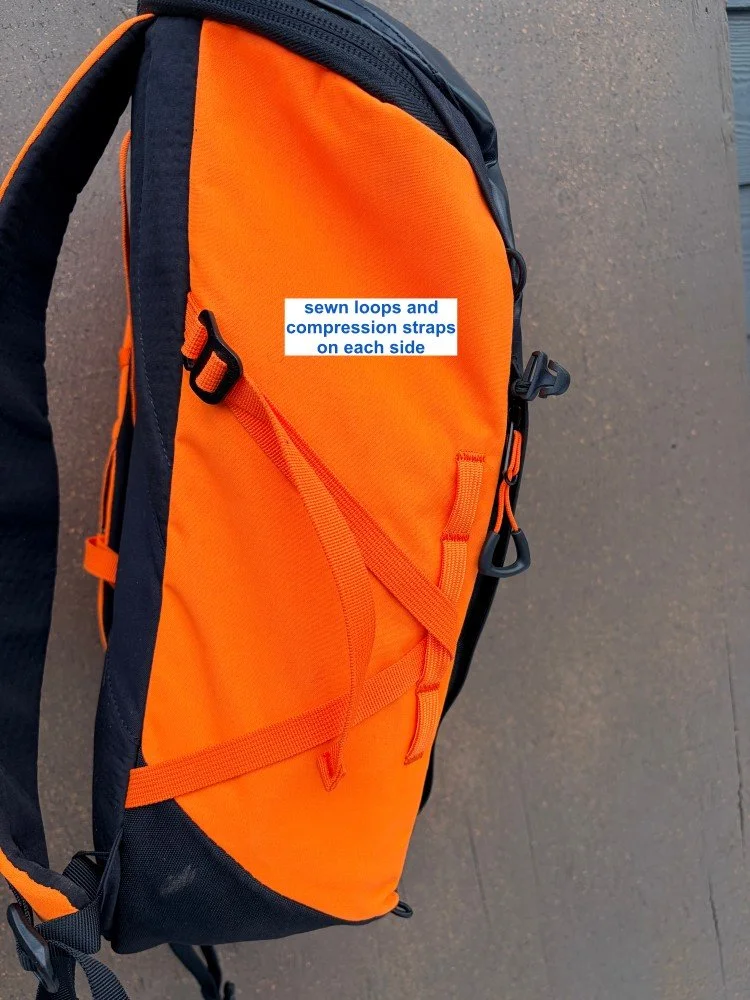
Daisy chain loops and compression straps on the side
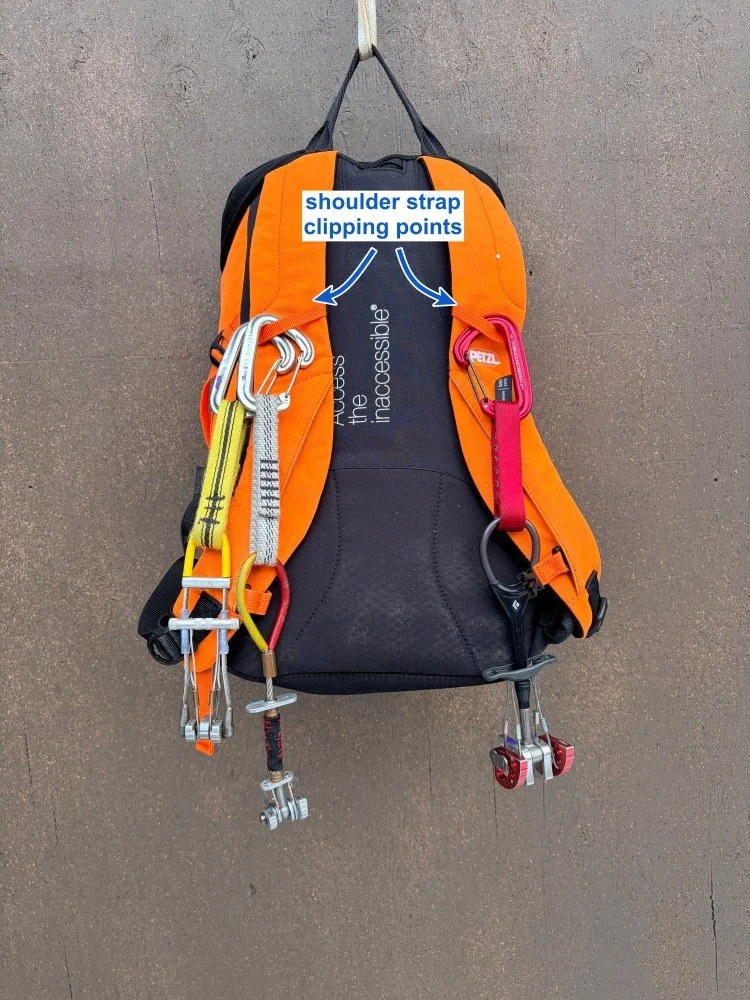
Shoulder strap clip loops
Removable waist belt
Rope compression strap
(Disclaimer: The photos below will make it wildly obvious that I’m not a product photographer, but I gave it my best shot.)
Sturdy and smooth zippers
Probably the most common failure point in all outdoor gear is crap zippers. Not a problem with this pack. The exterior zippers are beefy, and they have sturdy pull tabs so you're never fumbling to open anything.
Nice fit
It's rectangular-ish. The stiffer fabric holds its shape well when empty, which makes it easy to load up. The back panel is about 16 inches / 40 cm. The shoulder straps have a lot of fabric, so I think this pack would fit a fairly wide height range of folks.
Two well-placed zippered interior pockets
One of them has a key clip. These pockets are nicely tucked away in the main body of the pack and not attached to the lid, where you can easily drop things if you forget to zip it closed. (Not a problem in a commuter pack, but potentially a Big Problem on a cliff.)
Sliding adjustable sternum strap
Each sternum strap is clipped to a little plastic bit that slides on a rail in the pack strap, giving you about 5 inches / 12 cm of up and down adjustability. Especially for a small pack, this can give a more comfortable fit.
Large front panel pocket
When your pack is all buttoned up, especially with a rope on top so you can't open the main compartment, a pocket like this gives quick access to smaller items. (It opens vertically, so be sure and zip it back up.)
Sits high on your body
This pack doesn’t have waist belt gear loops. You want a pack like this riding fairly high so you can access your harness gear loops.
Padded back panel and shoulder straps
Yes, this adds a touch extra weight, but it also keeps your climbing hardware from poking you in the back and definitely adds comfort on the hike in. A good trade-off, if you ask me.
Water bladder / reservoir sleeve in the back panel
The large water bladder sleeve has a small clip loop at the top. This loop keeps your half empty water bladder from slipping down inside your pack, which can be annoying. There's an exterior hole for your bladder tube.
I'm generally not a fan of water bladders for cold weather alpine climbing. However, for warmer rock climbing, they can be handy. This sleeve fits my 3 liter reservoir.
This well-padded bladder sleeve is also a good spot for a guidebook, so it doesn’t get crunched in the main part of your pack.
If this is your urban pack, an laptop or iPad also fit fits nicely in the bladder sleeve.
Now, let's look at some of the climbing specific features of the Petzl Bug.
Durable exterior
The first thing you notice: the extra stout, rubbery material on the top and front panel. It feels like an industrial tarp, or almost a truck inner tube. I've seen similar reinforcement on canyoneering packs, where gear really gets beat up. This is great for long-term durability when dragging your pack up a cliff. It also might offer a fair bit of waterproofing (which you hopefully wouldn’t often need on a rock climb.) It’s both a distinctive look and very practical.

Sturdy haul loop
Nice to see on a pack designed for multi pitch rock climbing. This haul point is burly enough so I'm comfortable clipping only to this loop and not using the shoulder strap as a backup.
Easy access when clipped to the anchor
Related to the haul loop design: the Bug hangs nicely when you clip the haul loop to an anchor. The 3/4 zip clamshell top opens away from the haul loop, so you can access everything in the main body while the Bug is clipped in.
The clamshell top means you can never unzip the bag down the sides and have important things fall out, pretty key for a climbing pack.
Helmet pouch
You're not gonna fit your helmet into an 18 liter pack, so this is pretty important. I’m not a fan of having my helmet bouncing around on the outside of my pack on the hike in, so this pouch is pretty nice. It's easy to add or remove the pouch as needed.
Daisy chain loops and compression straps on the side
The side compression straps are long enough so you can strap down a rope so it behaves better on the outside of your pack. The top of the compression straps can be unclipped from the body of the pack, which makes it easier to put the strap around your butterflied rope. Combining the side straps with the main rope strap on the top, the Bug carries a rope better than any other small pack I've used.
The sewn daisy loops work for clipping pretty much anything else on the outside of your pack, like your smelly shoes or a messy chalk bag.
If you don't have much stuff, you can crank down the compression straps to make the pack even smaller.
Shoulder strap clip loops
A small loop of cord or webbing on the shoulder strap gives a convenient place to rack gear as you’re cleaning, maybe keep your nut tool handy, or keep the next few pieces of gear you think you'll need on lead in a quick-to-grab spot.
I've added gear loops to my other alpine packs, see this article. I don't have to on the Bug; there's one on each shoulder strap.
It’s also a handy spot to clip a two-way radio, if that's your thing.
Removable waist belt
The waist belt straps are girth hitched, so you can easily take them off for a more streamlined haul.
What's the clever design feature with the rope compression strap?
How well does the rope carry system work?
What type of climbing is the bug pack NOT suitable for?
Want to see a photo of everything I can fit into it?
Join my Premium Membership to read the rest of the article.
Thanks for your support!
High tech climbing cordage from Zartman Rigging
To improve gear, makers keep pushing for lighter and stronger. Zartman Rigging takes this another step, with their high tech spliced, not sewn, soft goods made for climbers. Here's an overview.
Premium Members can read the entire article here:
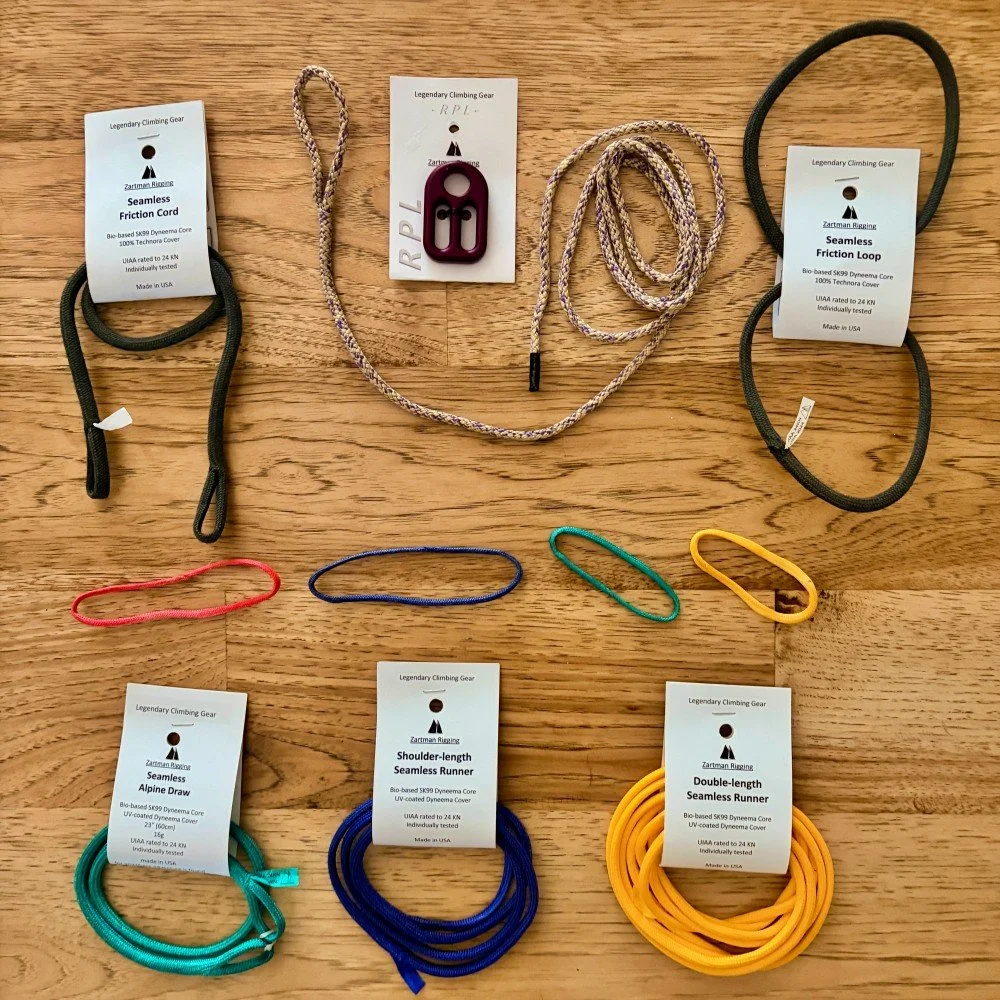
Full disclosure: Zartman Rigging sent me some goodies for free. That in no way biases my review; they are great products and I want to tell you about them. There are no ads, affiliate marketing links, or paid product promotions on Alpinesavvy. In the rare cases when I get free products like this, I’ll always let you know.
A few of the specialized spliced goods from Zartman Rigging.
Zartman Rigging - website and PDF catalog
Ben Zartman, based in Rhode Island, is a sailor, climber, and expert one-man-band producer of made in USA, high-tech spliced cordage.
“Splicing”, if you're new to the term, is the permanent method of joining rope ends or forming loops by interweaving strands of the rope. While spliced ropes and cords have been used in the boating world for literally centuries, they’re relatively new to climbing.
The main advantage of splicing is that you can make a loop, or an eye loop on the end of a length of cord, without any sewing / bar tacks. This makes a strong, light, and less bulky product, and also lets you use very thin cordage that would be impossible to sew.
Here’s Ben’s more technical description of his methods.
Something I find impressive about Ben’s products is that many of them are UIAA rated, which for a small manufacturer is a fairly expensive and time-consuming process. Ben took this extra step to give users confidence in the tested strength of his products.
How strong? UIAA rated 24 kN!
And yeah, I’ll be honest, a confidence boost when weighting material that looks like parachute cord may be needed!
Yes, it may cost more than your standard sewn Dyneema sling. However, if you're looking for about the lightest possible weight, and the lowest bulk soft goods, it's pretty hard to beat this.
It's not all soft goods. Ben also sells the RPL (“rappel”, get it?) a cool micro belay plate designed for ultra skinny 6 mm ropes.
Let's have a closer look at some of the Zartman Rigging goodies.
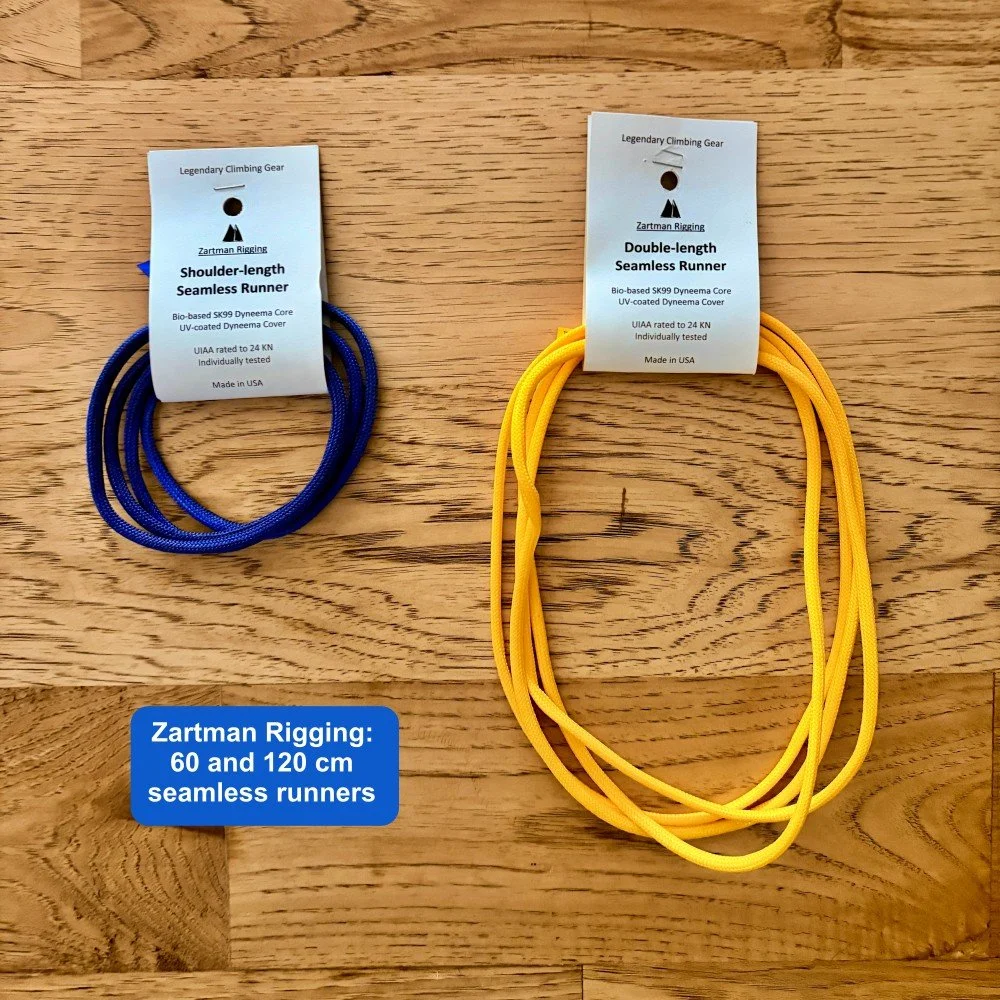
Let's start with something familiar to all climbers, single and double length loops.
These loops have a spliced Dyneema core, with an additional Dyneema sheath which protects against abrasion and UV light. These Zartman loops, which are 60 and 120 cm respectively, are about 30% lighter than the standard sewn slings of the same length. They also come in lengths of 20 and 180 cm.
These were the first UIAA certified slings (24 kN) to eliminate sewn seams.
Seamless alpine draw
This is made of similar material as the loops, but with a spliced eye on each end. This is 60 cm when extended, and is a featherweight 16 grams. You can clip it end to end to extend a placement, or shorten it up basket hitch style. UIAA rated 24 kN.
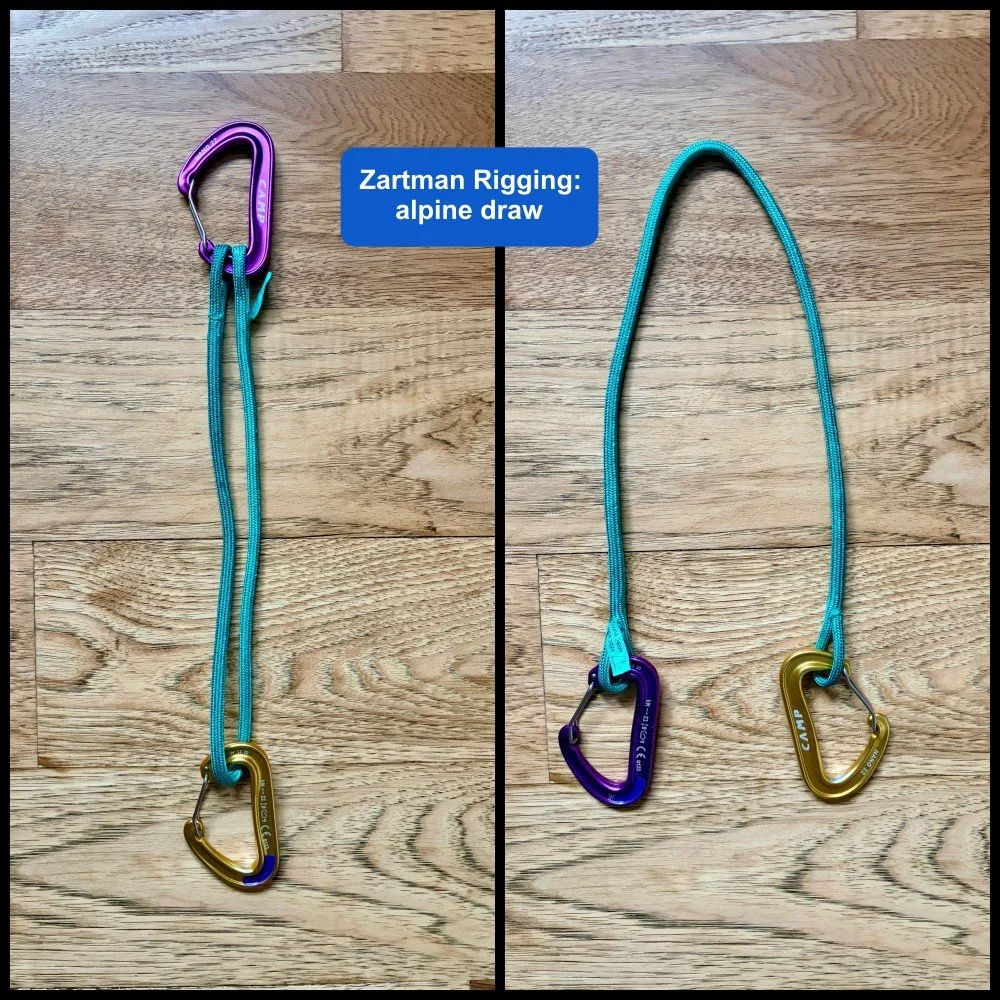
Here's a close-up of those spliced eyes, pretty cool!

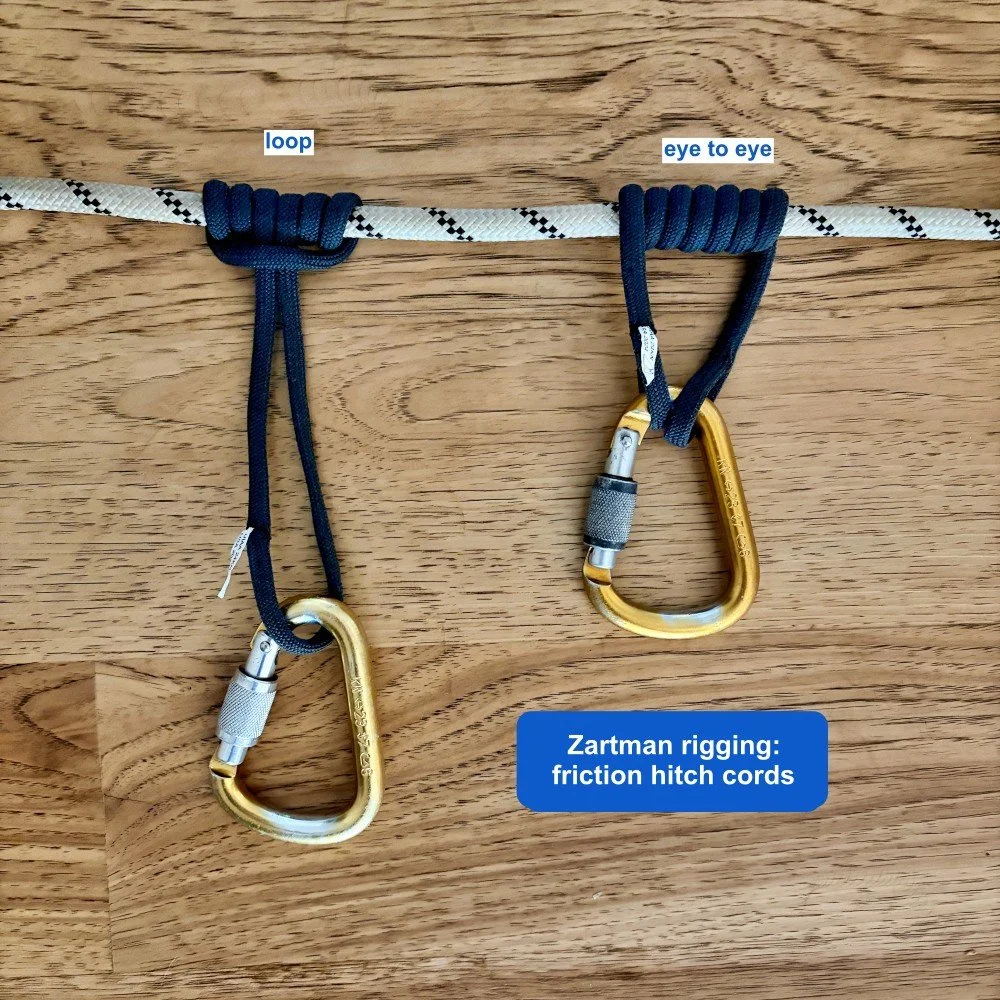
Friction hitch cords: loops and eye to eye
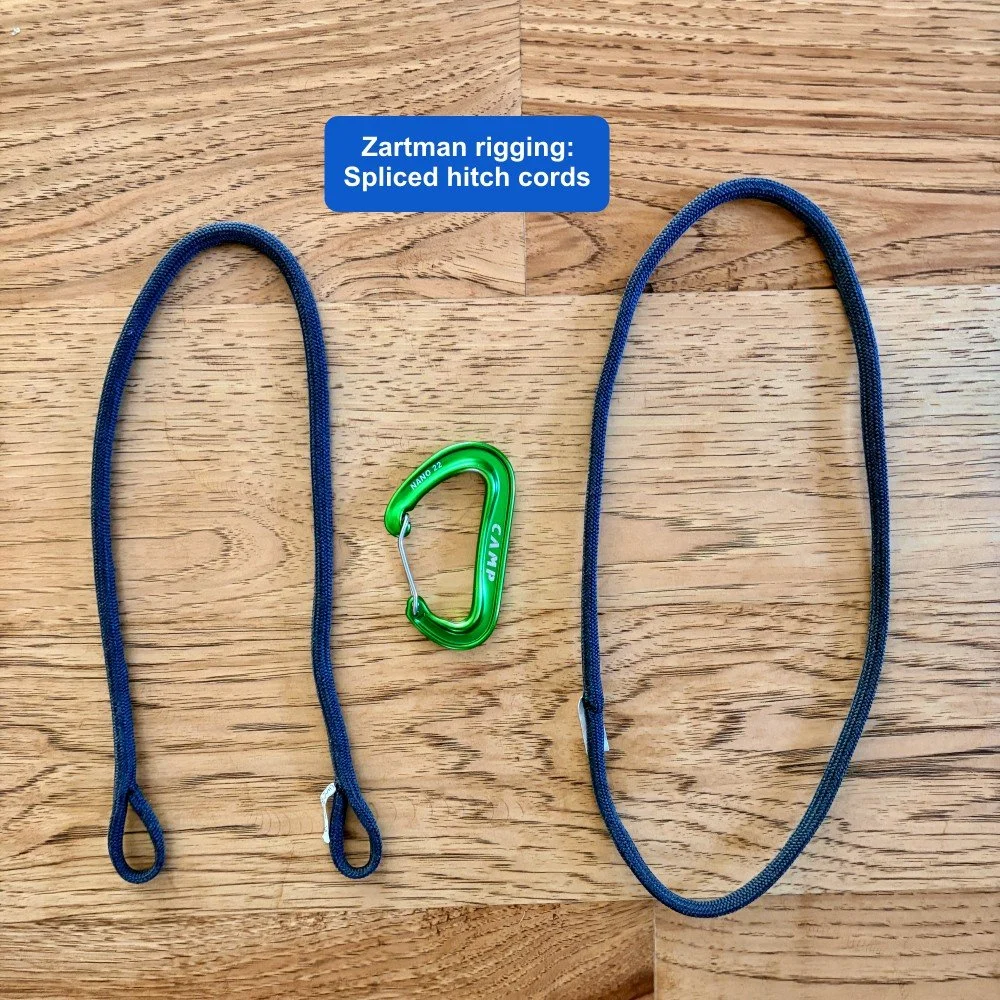
Carabiner for size comparison . . .
This is where the lack of a sewn connecting point really shines. Keeping the knot or the sewing out of the way when you're tying a friction hitch is always a bit of a hassle. Not a problem with these spliced cords. These are quite a bit thicker than the slings mentioned above.
Normally, you wouldn’t use a Dyneema sling as a rappelling autoblock, because the standard slings are not especially heat resistant. Ben uses a Technora (aka Kevlar) sheath over the Dyneema core, which makes these cords extra durable and heat resistant. Rappel backup, no problem. “Grabbiness” on the rope is excellent. UIAA rated 24 Kn.
I think my Sterling Hollowblock just got replaced . . .
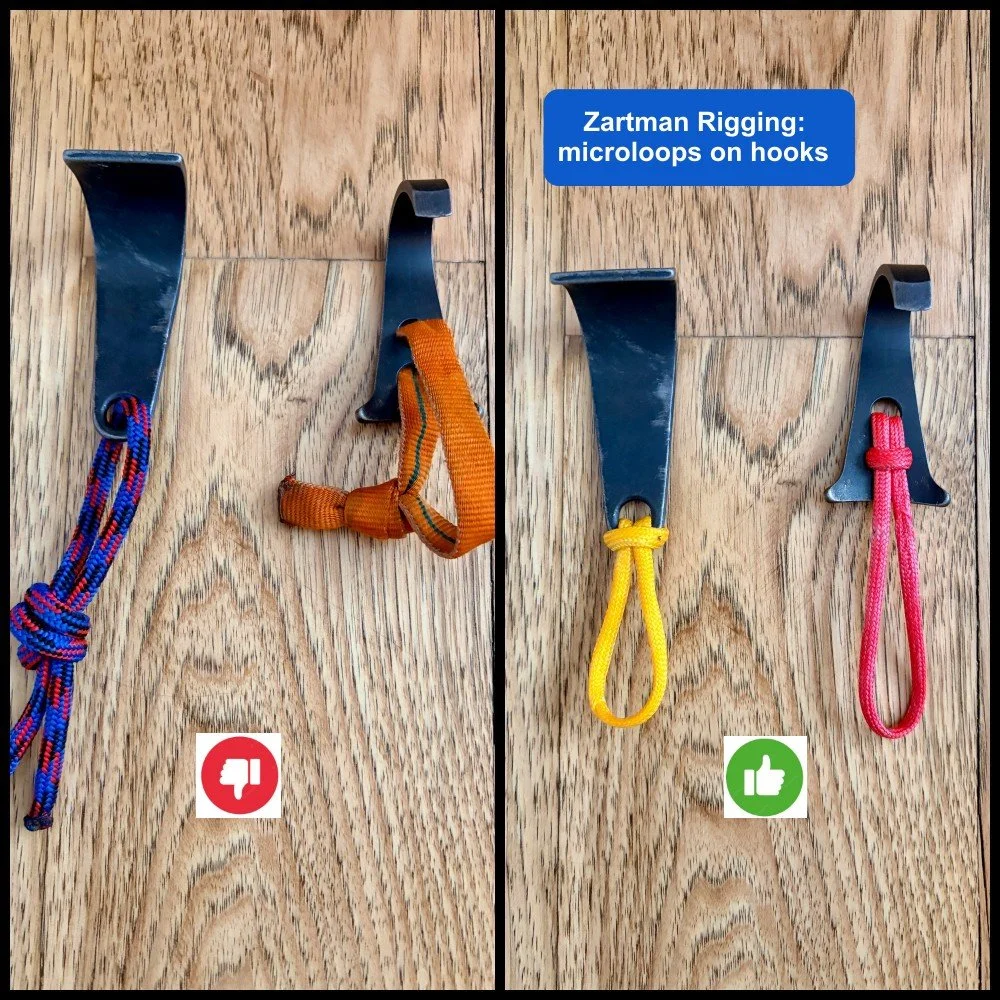
Micro loops
These loops, which come in two sizes, are very short spliced Dyneema loops that have a specialized application that may only be appreciated by aid climbers: they are perfect for girth hitching hooks. These loops break around 9 kN, and weigh a ridiculous 2.5 grams.
Attaching thick cord or webbing to hooks has always been a hassle. Up until now, the best option was to get loops custom sewn on your hooks from Skot’s Wall Gear.
Here's a before/after of two of my hooks: chunky cord and webbing on the left, micro loop on the other.
The shorter Micro loop (yellow in photo) works fine for a hook with one hole, like my cam hook.
The slightly longer “Mega” Micro loop (red in photo) fits hooks with two holes, such as the Black Diamond Cliffhanger on the right. The longer Micro loop can also be used to tie off a piton, or basket hitch to the eye of a piton, where a carabiner might sit at a bad angle.
Slight correction to photo below: on the far right, the hook with the red loop should have the loop on the other side of the hook. Doing this helps press it down and into the rock when it's loaded. Mea culpa . . .
The RPL micro friction plate
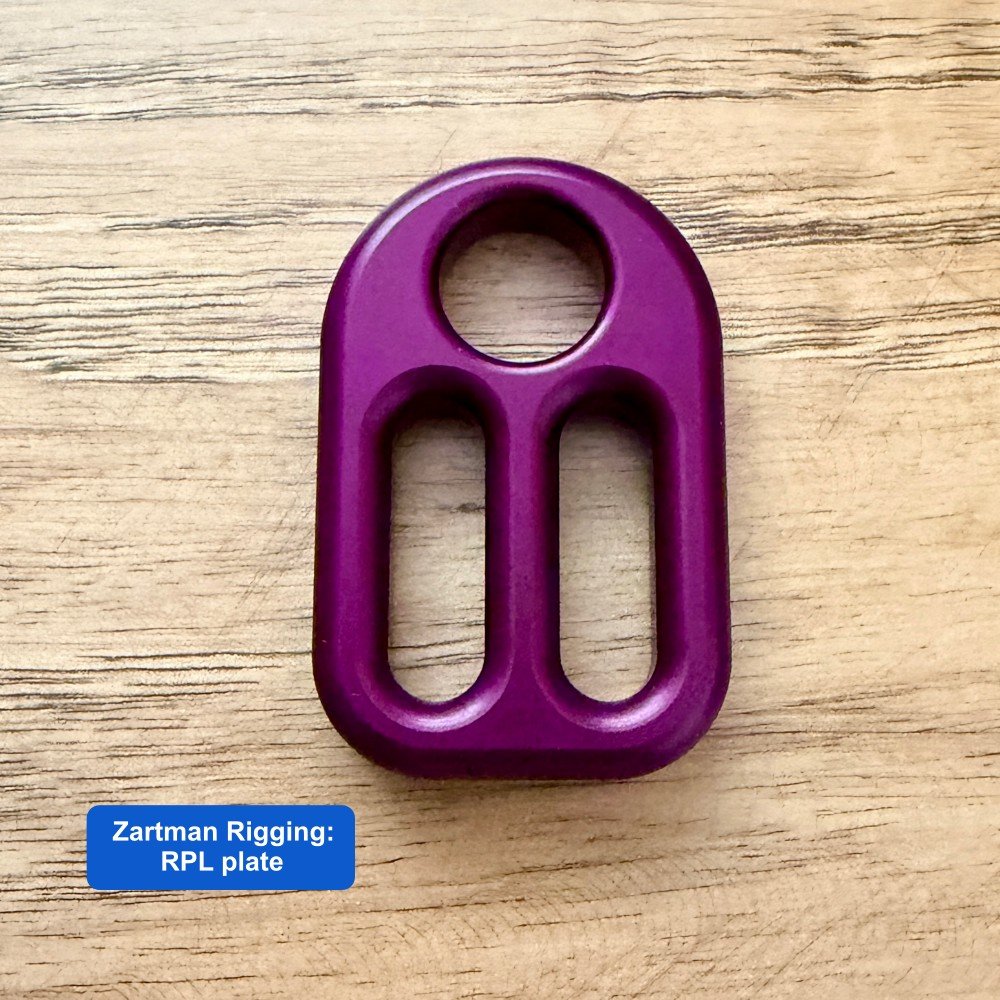
Rappelling and belaying on 6 mm ropes has become more of a thing in recent years. This is the only “metal” offering from Zartman Rigging, and it's designed for exactly this flavor of skinny cord. It has four separate functions:
rappelling on single or double strand 6 mm rope
personal adjustable tether / PAS, sort of like a much slimmer Kong Slyde
belaying in guide mode (behaves like the Kong Gigi)
rope ascending (I didn't try this)
Want to see my results about using the RPL on 6 mm cord?
Does the RPL work on a single strand of 6 mm?
How about Ben’s new offering that turns the RPL into a sweet adjustable, personal tether / PAS?
Join my Premium Membership to read the rest of the article.
Thanks for your support!
“Long link” chains for fixed anchors
“Long link” chain is about what it sounds like; the links are quite a bit longer than standard. They have a few benefits over normal chain links; learn ‘em here.
Premium Members can read the entire article here:
A “long link” chain is about what it sounds like: the individual links are longer than a standard chain.
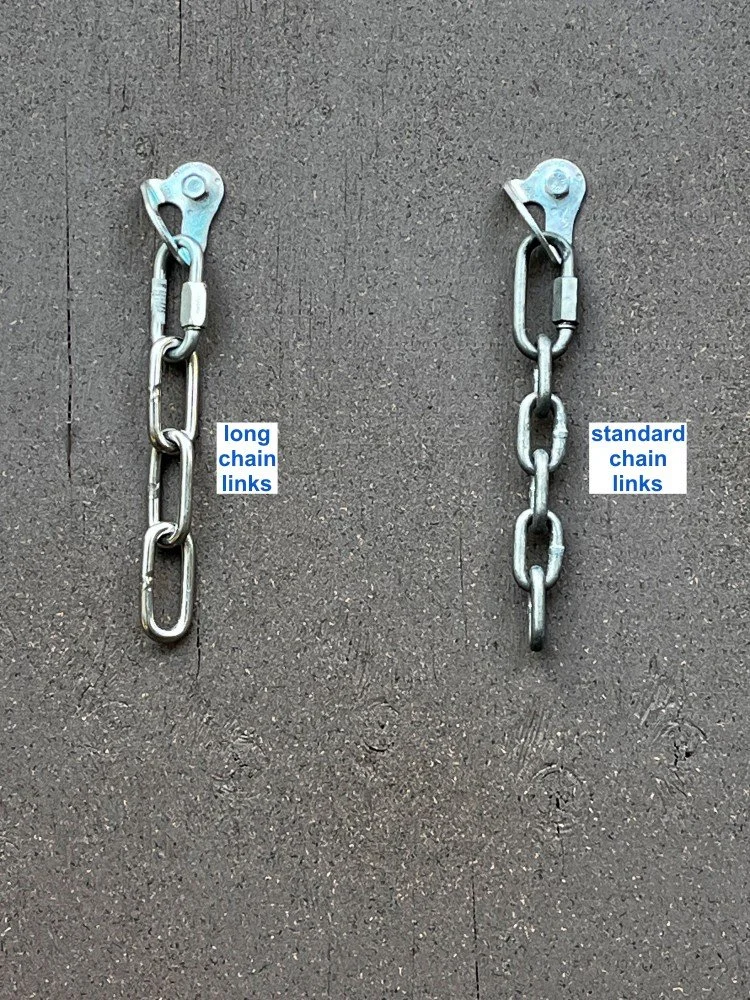
Why is this helpful? Because you can clip most any size carabiner (or multiple carabiners) into a link much more easily.
Usually you want to clip the bottom link or the hangers so you don't torque your carabiner in some strange way, but having the option to easily clip any link in the chain can be handy.
This can be especially true in big wall climbing, where you often need multiple full strength clipping points for all your extra crap.
Another plus: (a bit) less expensive. Three links are less metal and I'm guessing fewer steps to manufacture, so it’s slightly lower cost than five links.
So, route developers, how about using long link chain more?
How much does long link chain cost?
Where can I buy it?
How many big chunky carabiners can fit in one link?
What's a part of the world where you can see anchors with REALLY long links?
Join my Premium Membership to read the rest of the article.
Thanks for your support!

Two ways to (neatly) cut a rope
Yes, the electric hot knives in the climb shop work great. But I bet you don't have one in your garage when you need it. Here are two great ways to neatly cut a rope with simple tools and technique.
Premium Members can read the entire article here:
Sure, those nifty hot knife tools in the climbing shop are great. But if you need to cut a rope without one, and want a nice clean end, here are two ways to do it.
Rope cut method 1 - DIY hot knife
Notes:
Do this outside, nasty fumes are generated!
Wrapping with tape is the key move. This gives you a much cleaner cut.
Use a disposable utility knife, and NOT any sort of a good knife and especially one that’s ever going to touch food. The blade is going to have some discoloration and baked on melted rope yuckiness.
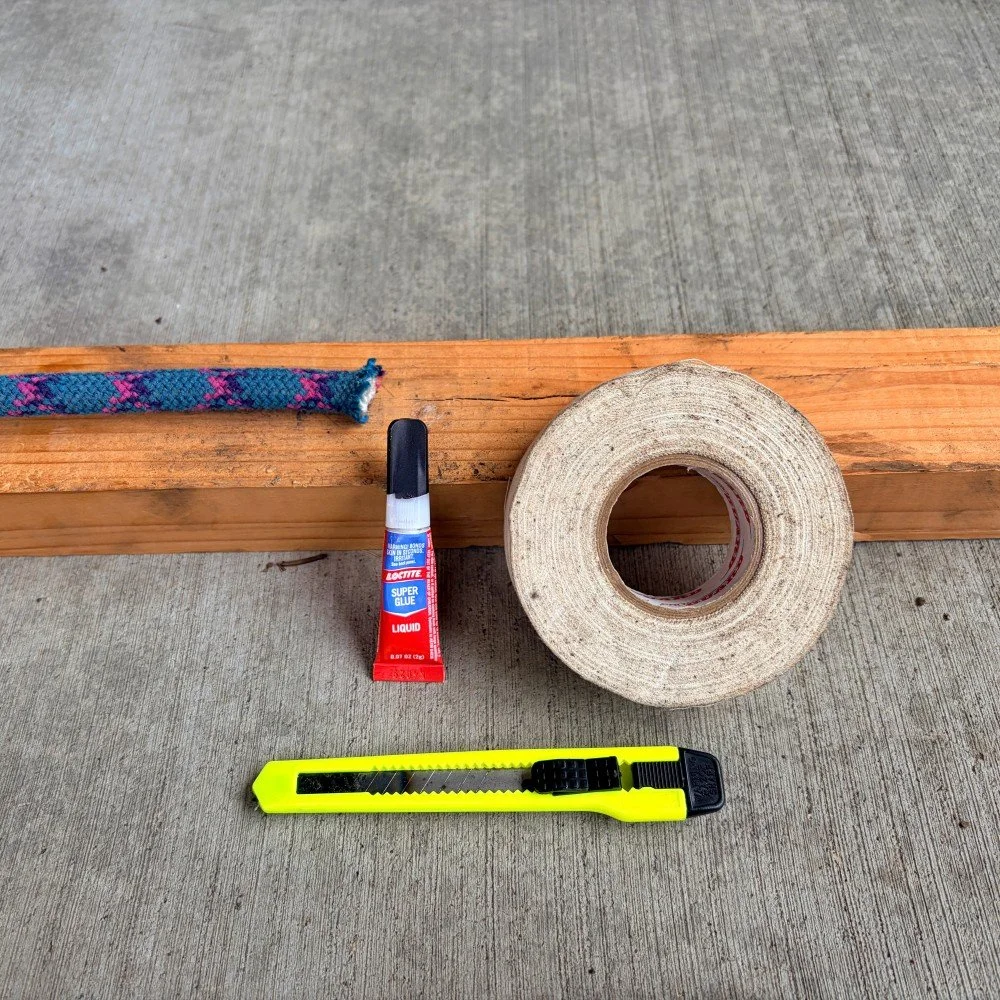
Stuff you need:
your rope (duh)
athletic tape
cheap utility knife with thin blade, get it at most any hardware store
piece of scrap wood
source of hot flame, like a camping stove or propane torch
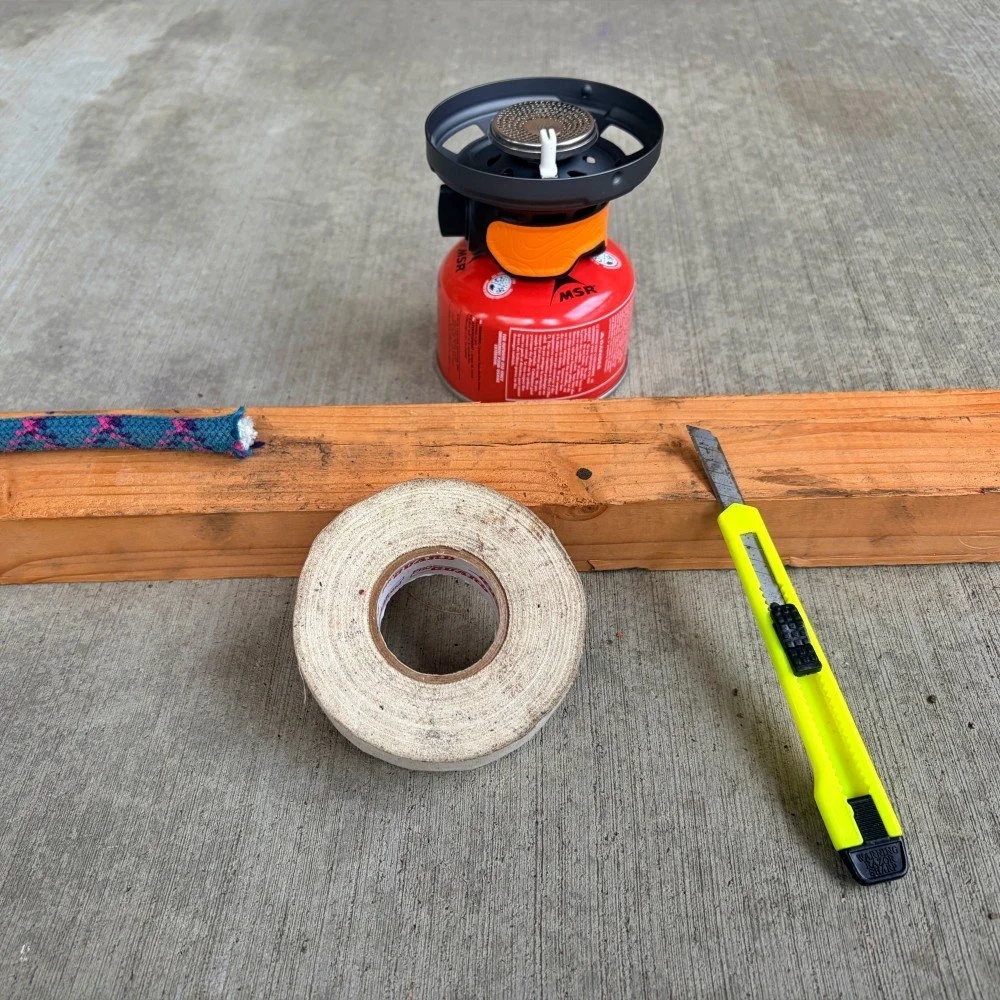
Wrap a bit of tape tightly around the rope.

Heat up the knife blade in the flame. Orange hot is good.
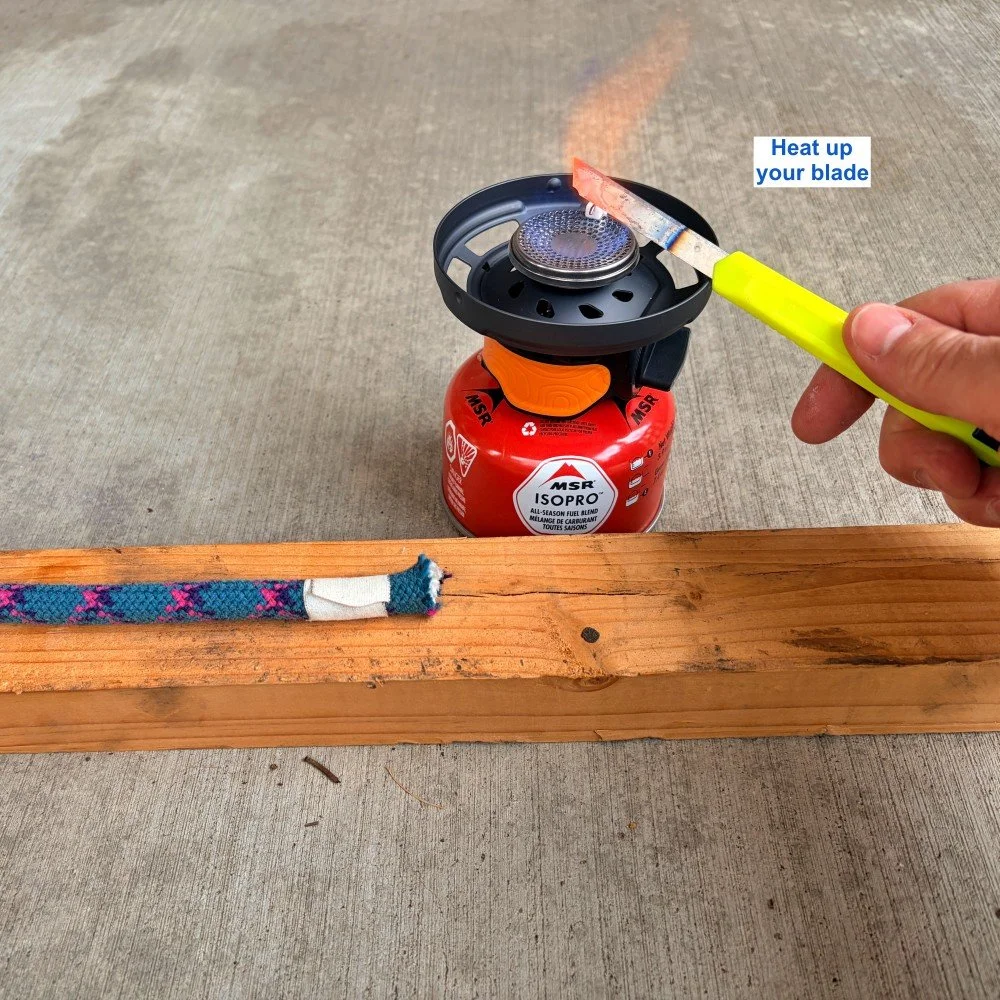
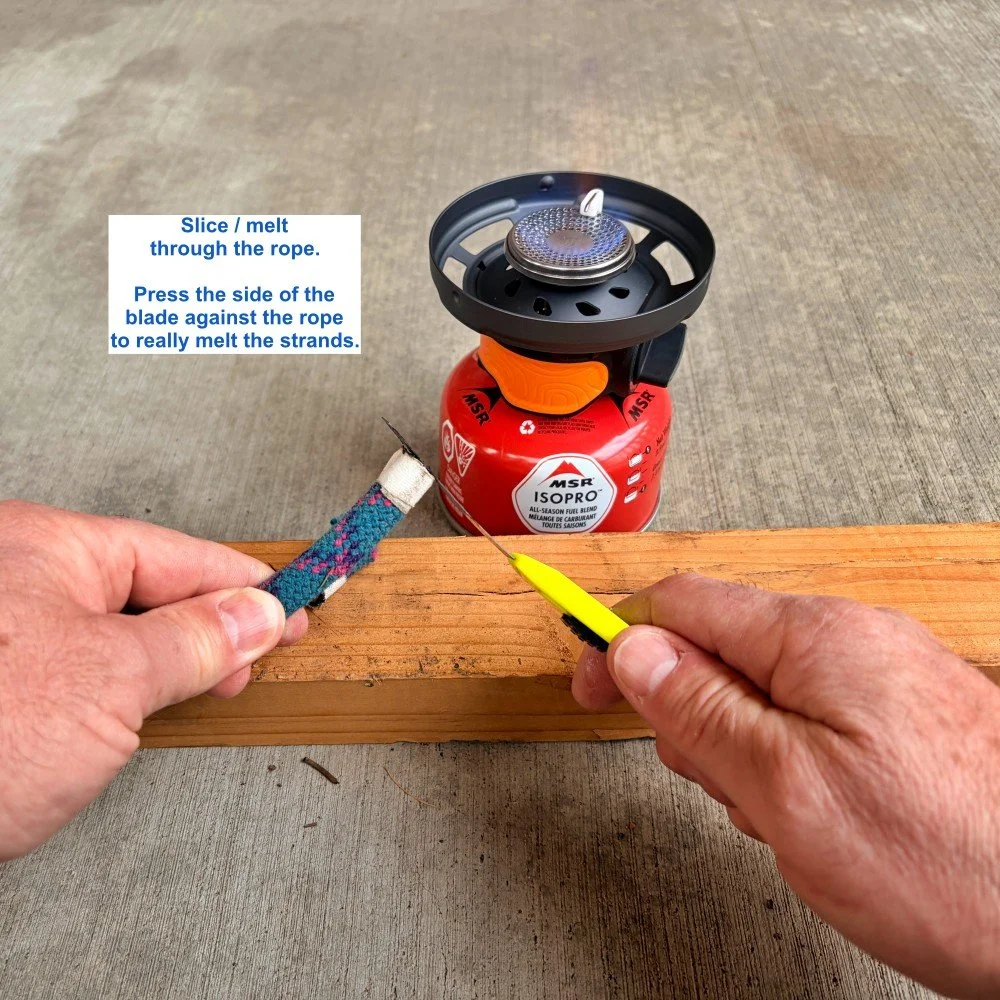
Press / slice the hot knife down in the middle of the taped section. The hot knife should nicely melt through.
If needed, you can heat the knife up again and press the side of the blade against the cut end.
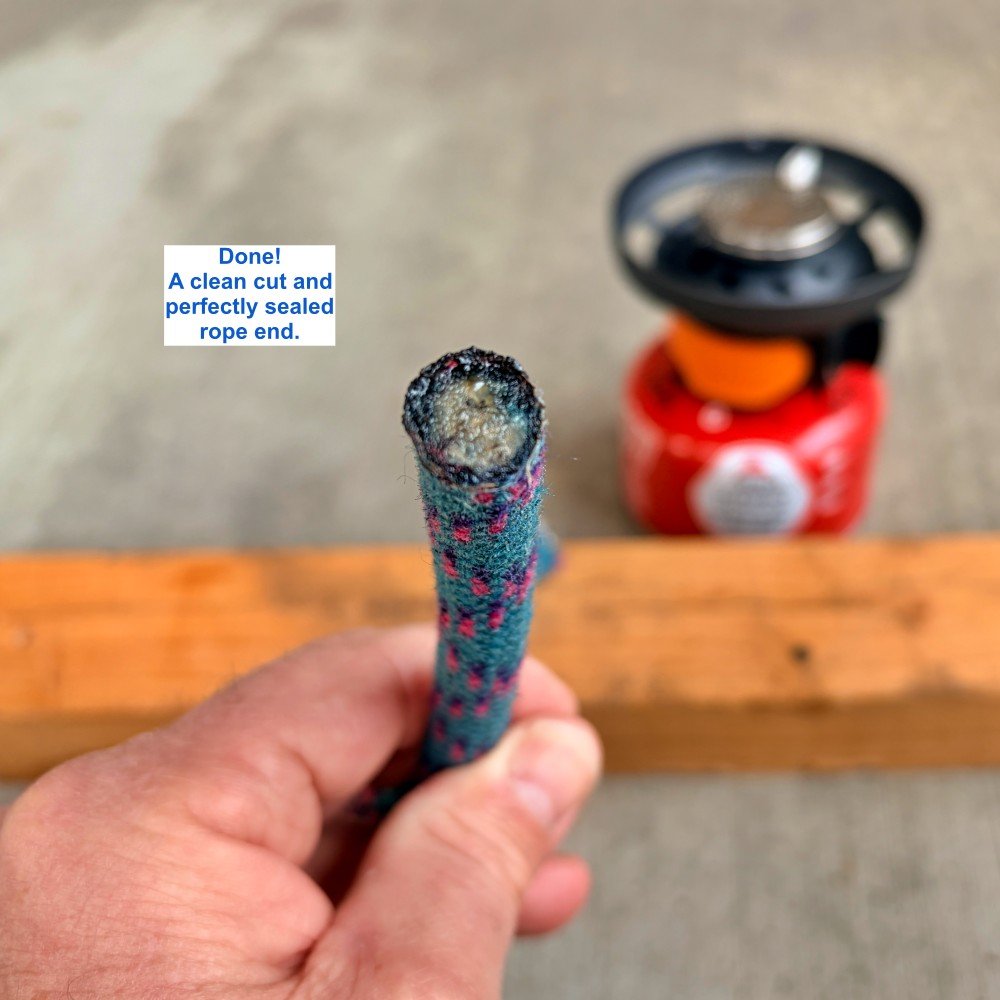
That's it! The end of your rope should be completely cauterized and ready to use.
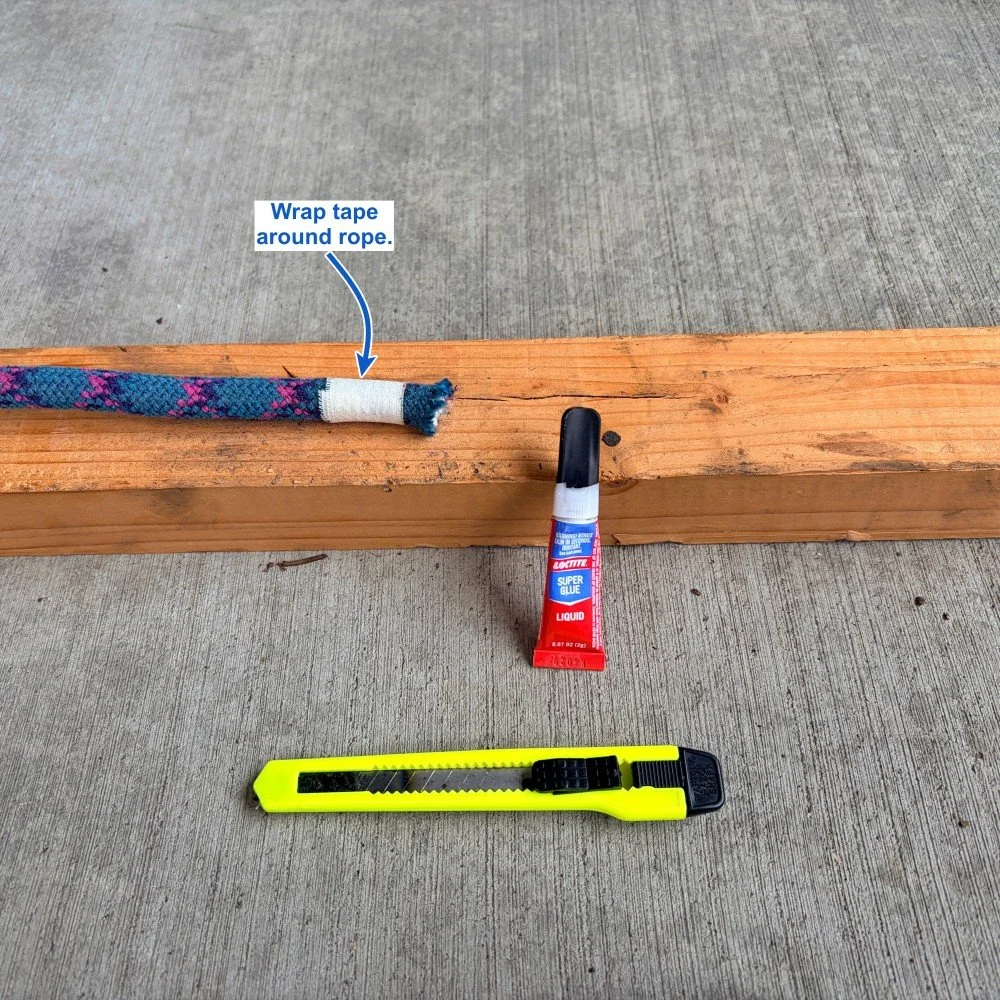
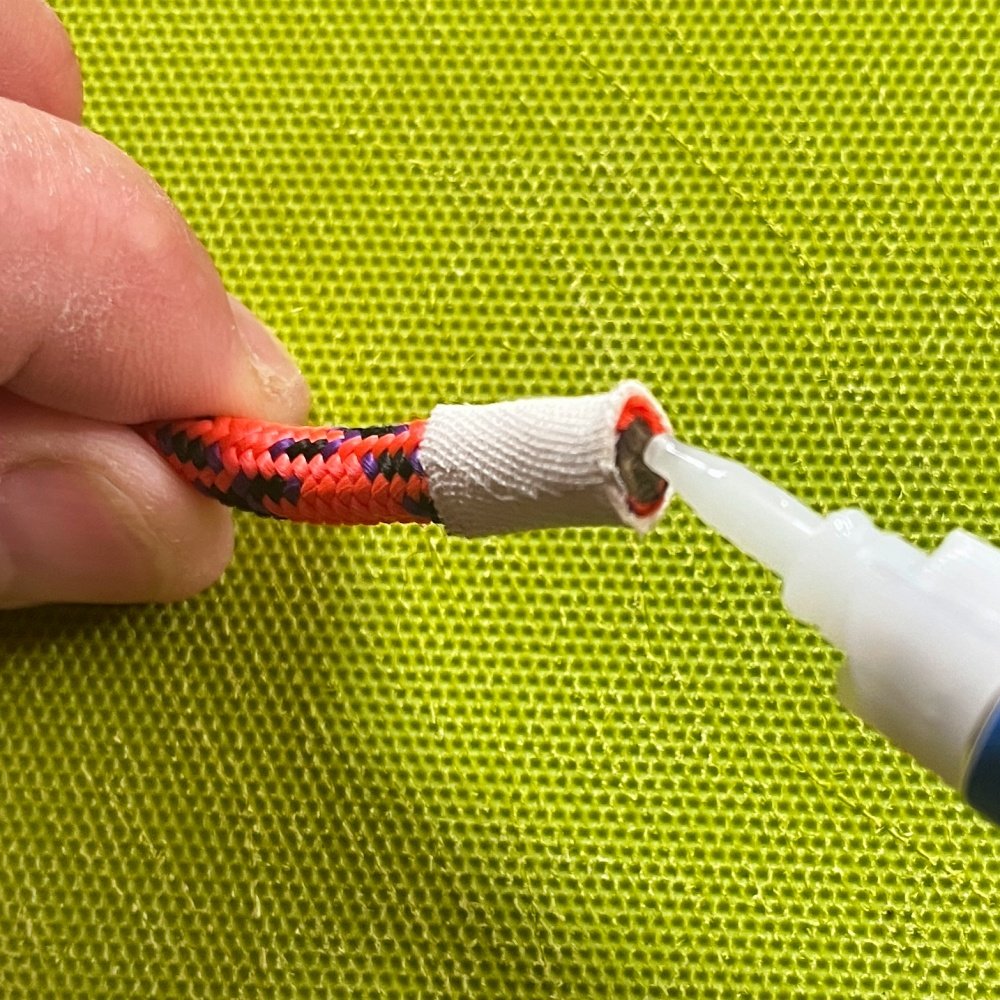
Rope cut method 2 - Superglue
Notes:
Do this outside, and on a work surface you don't mind dribbling some glue on, because you probably will.
Important: the chemicals in superglue may not play nicely with most ropes. In this case we're using them only at the very END of the rope, which will never see a load. When you're doing this, be careful not to get glue on any other part of your rope.
Stuff you need:
your rope (duh)
athletic tape
sharp knife. Disposable utility or razor knife works well. Scissors generally don’t work well.
piece of scrap wood
Superglue
Wrap some tape tightly around the rope where you want to cut it.
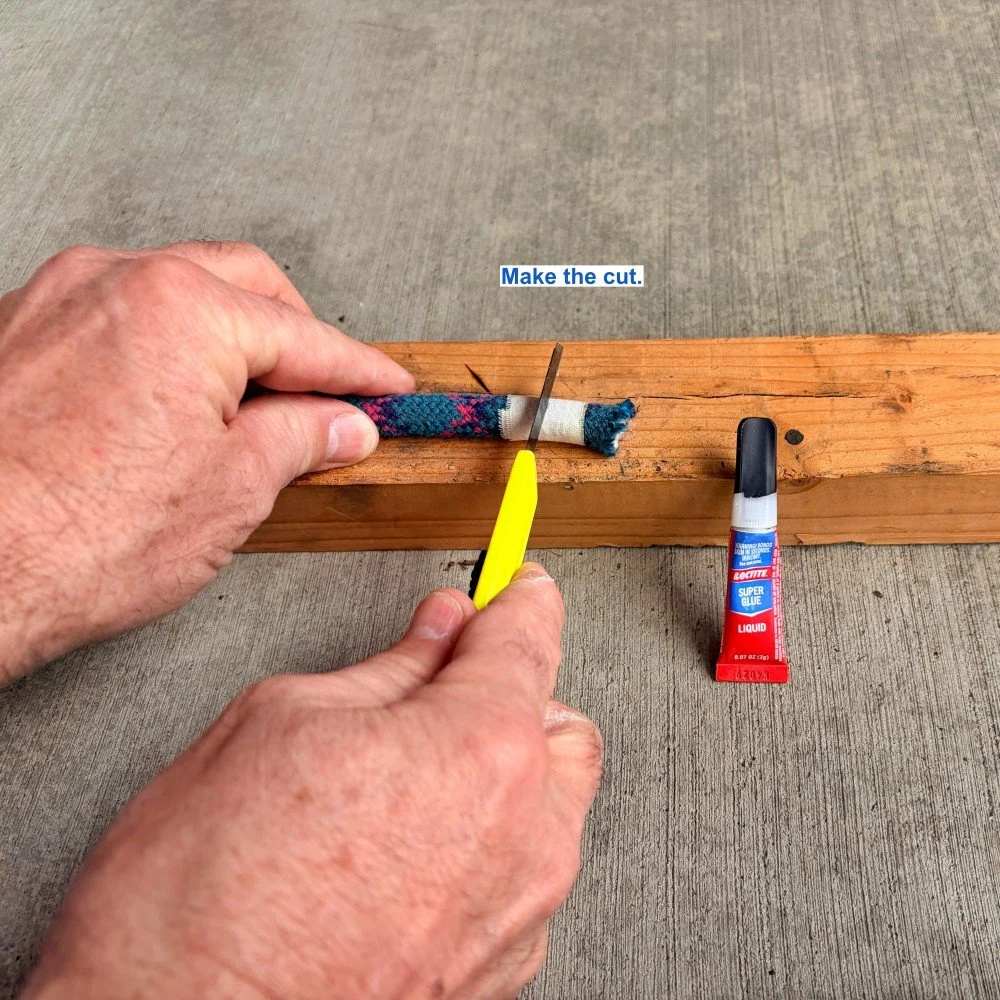
Cut through the tape.
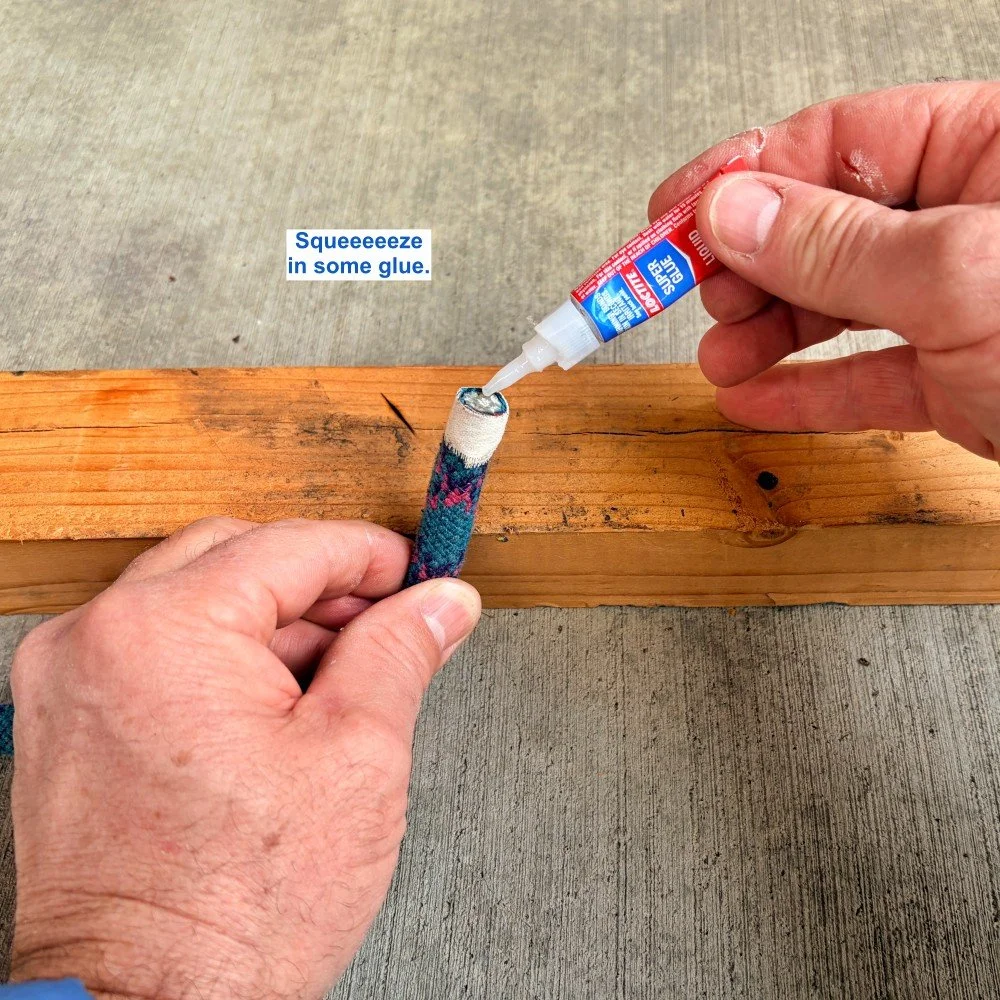
Holding the end of the rope vertically, scoooooge glue into the rope end, covering the core and the sheath.
Wait at least a minute before you take the tape off or you'll probably get some glue on your fingers, ask me how I know about this.
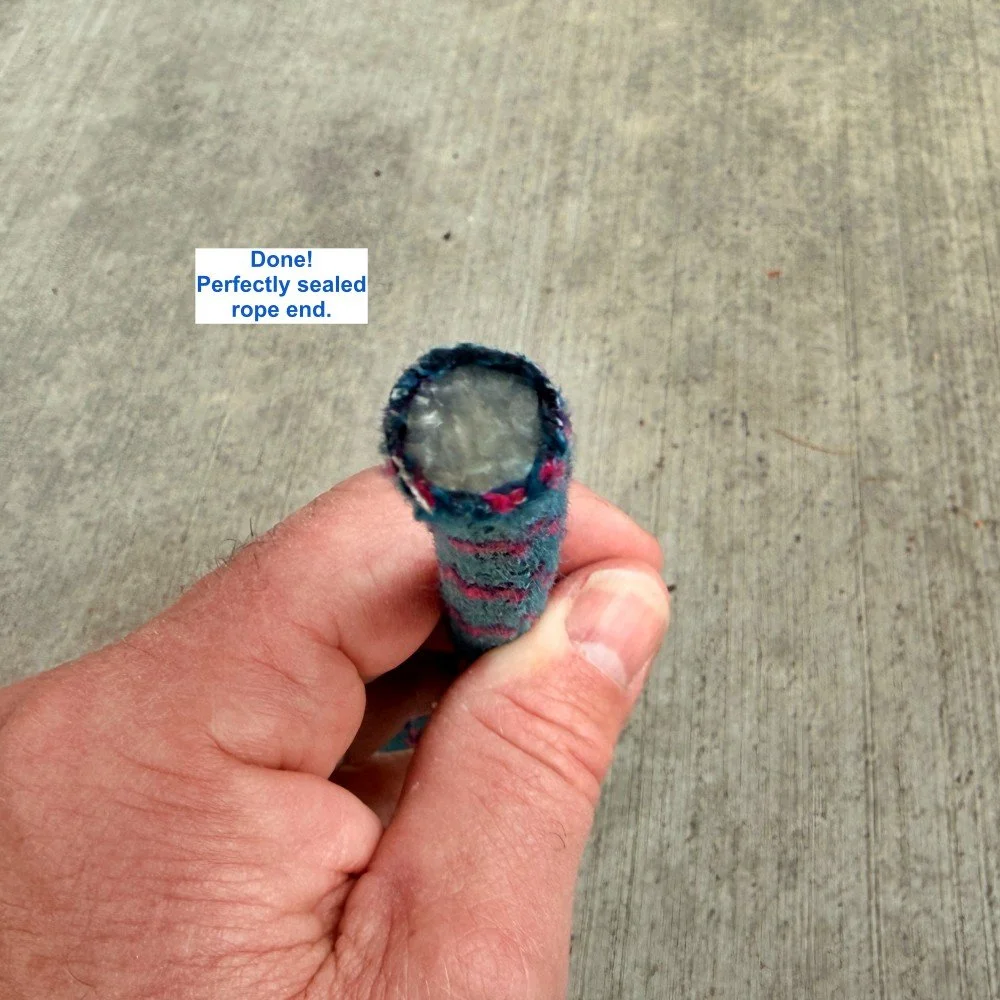
Sweet, give yourself a high five. You now have a perfectly sealed rope end.
What’s a common method used to cut and seal a rope that really doesn't work very well?
What's the best kind of superglue to use on ropes?
Which of these two methods should you use to cut an Aramid/Kevlar rope?
If you need to cut a lot of rope or webbing, what’s a low cost tool you can use to do this easily (that's not an expensive climbing shop rope cutter.)
Join my Premium Membership to read the rest of the article.
Thanks for your support!

Stirrups for rope ascending
Aid climbing requires lots of fixed rope ascending. The traditional way to do this is using your ”lead” ladders. However, an adjustable, comfortable and lightweight stirrup is a superior tool.

Premium Members can read the entire article here:
Back in the day, I saw a superb slideshow by big wall legend Hans Florine, holder of multiple speed records on El Capitan, about his vertical adventures. One was a video clip of him jumaring up a fixed rope at a ridiculous speed. It looked like he was jogging up a flight of stairs!
What was he standing in? Nothing more than a DIY stirrup of 1 inch webbing, with an overhand knot tied in each end. Clip one end to your ascender, make a sort of girth hitch out of the other end and cinch it down on your foot. Cheap, simple, efficient!
I may cover that DIY hack in a future article, but today, let’s look at a more refined tool that’s a lot more comfortable and adjustable - stirrups.
The ones I like: these sweet custom stirrups from Skot's Wall Gear.
Skot Richards is a big wall expert and one-man operation who sews everything himself from his shop in California. I like supporting his small business, innovative gear, and commitment to “Made in USA”, and I hope you do too.
(Skot was kind enough to send me these stirrups for review. In the rare cases I’m offered gear for a review like this, I’ll always tell you about it upfront. I only tell you about gear that I think is great, and never because I might get it for free.)

Almost ready to jug this rope.
(Not shown for clarity: two tethers connecting my harness and each ascender, see photo below. Those are important!)

Big wall ascending overview . . .
In big wall climbing, the rope is typically fixed by the leader and then ascended by the second, who cleans the gear.
There are three main components to a standard ascending system for big walls:
Two handled ascenders on the rope
Two tethers of some flavor, each attached an ascender with a locking carabiner
Two of something for you to stand in, which traditionally is your aid ladders
Here's a photo of the typical set up.
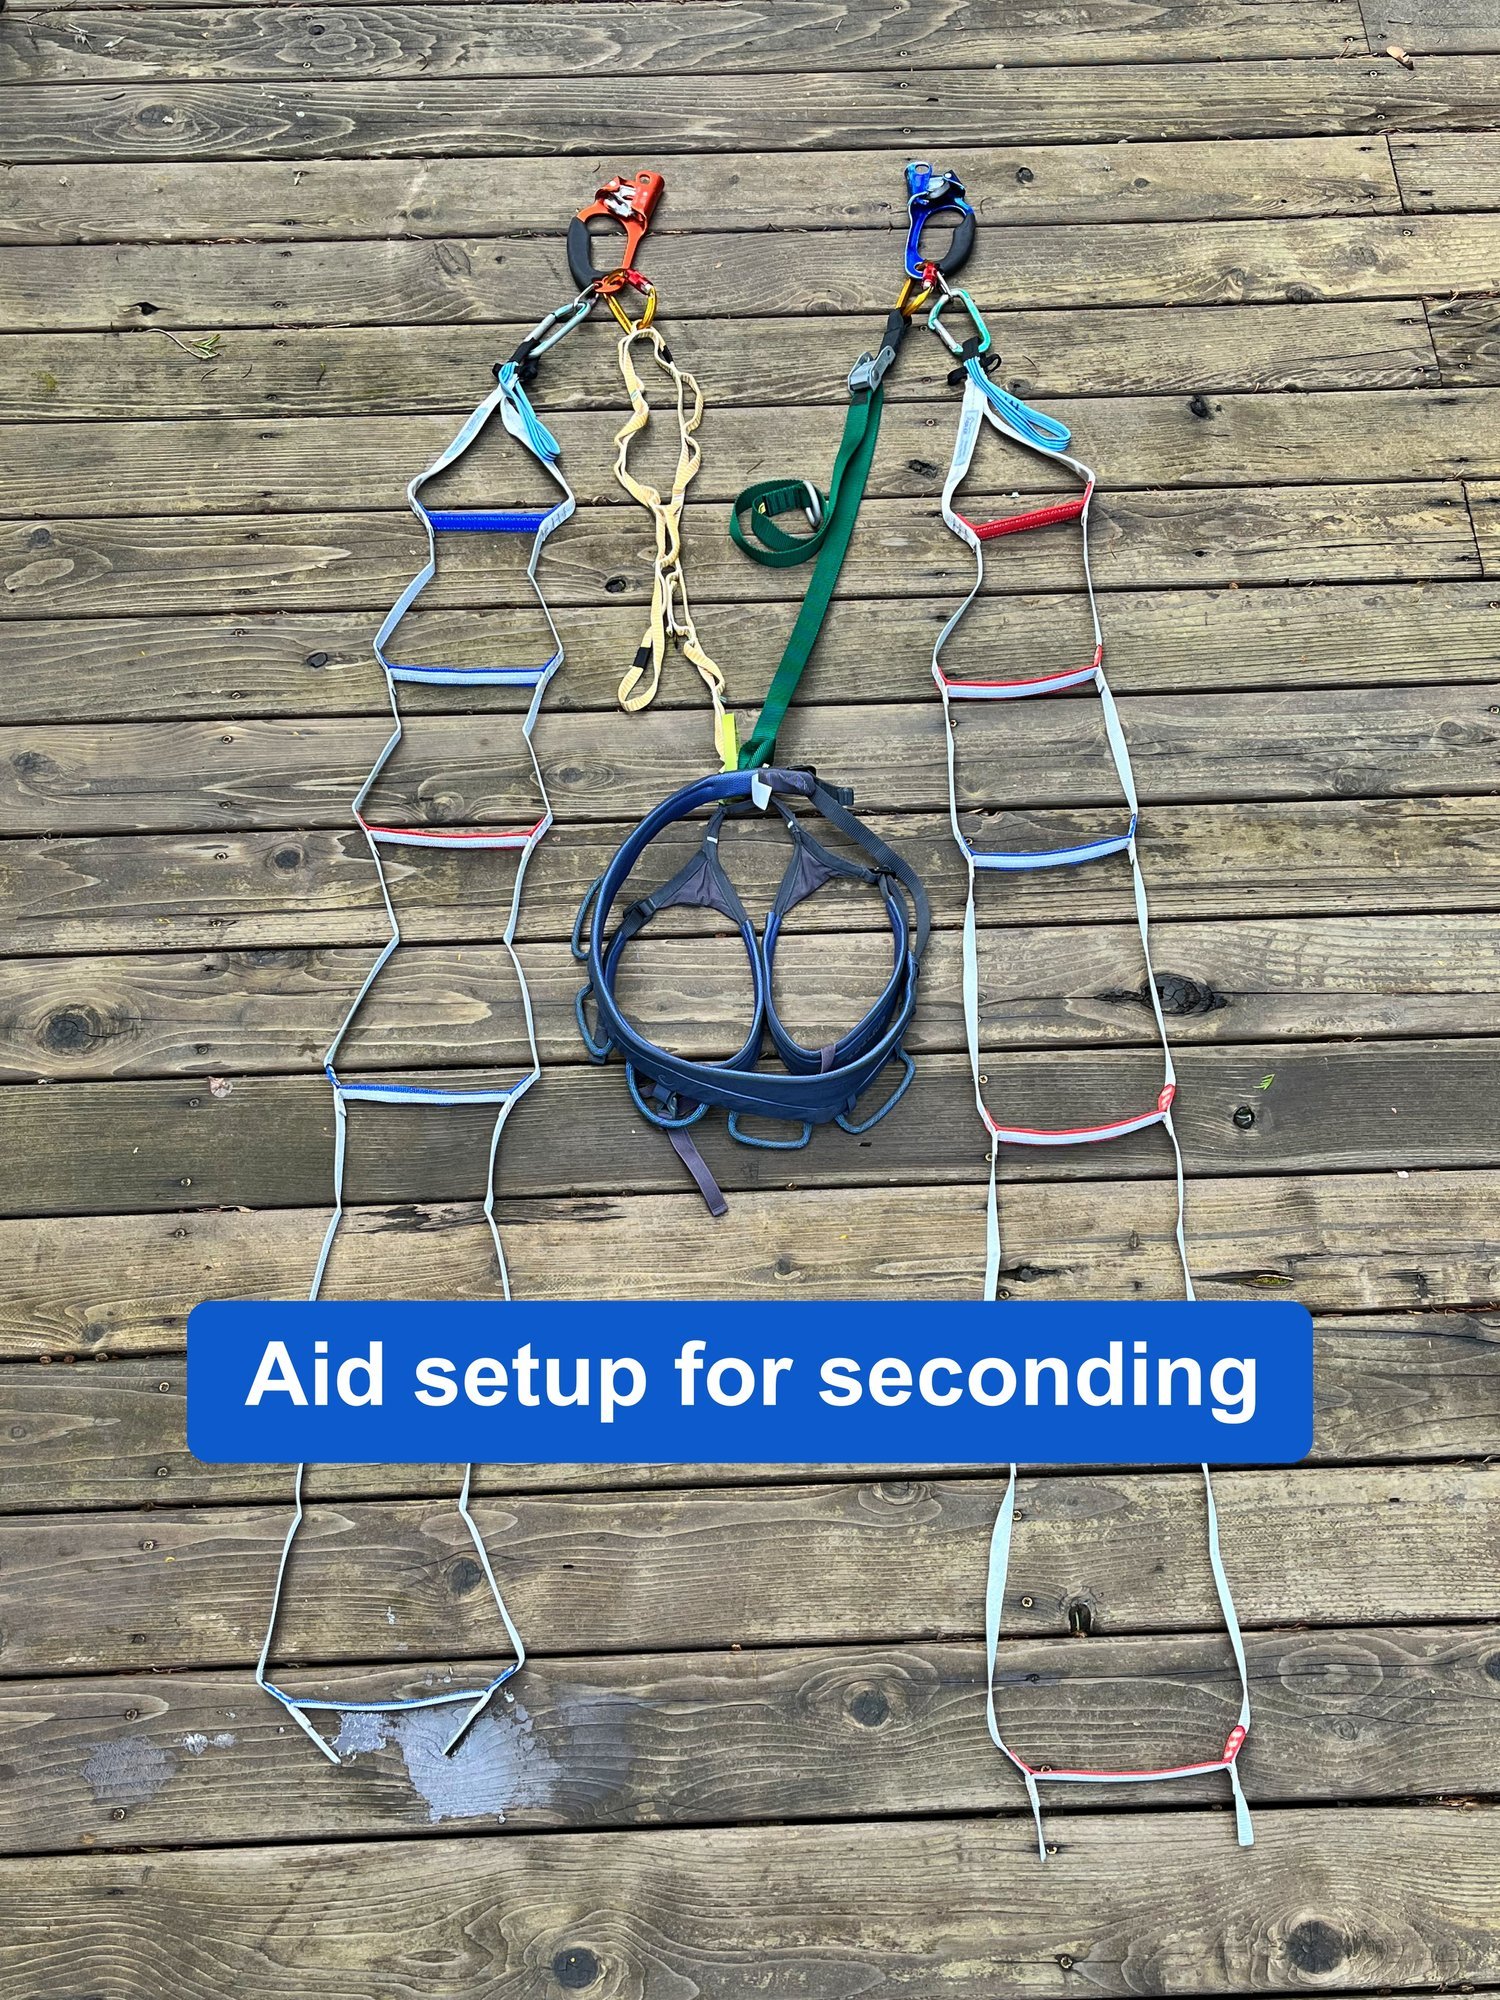
However, using your “leading” ladders for rope ascending has a few problems.
Main problem, your foot wants to wriggle out of the ladder every time you step up. Some ladders have a bit of elastic sewn underneath one of the bottom steps to try to deal with this, but that’s a bit of a bother. (Yes, once you get skilled at ascending, it’s easier to keep your foot in the ladder step, but it still is a bit of a balancing act.)
Especially on skinnier ladders with narrow steps, it's not so comfortable for your foot.
You can't fine-tune the height of the step for optimum efficiency.
The unused steps are flapping around below you, occasionally snagging on things and generally in the way.
The ladders are often heavier than necessary. This is especially true with some of the more robust, older style ladders. It may not seem like a lot of weight, but every time you slide that ascender up, you’re lifting the weight of the ladder. Multiplied by 3,000 times to get to the top of El Capitan, and that's a lot of weight.
A more modern way to ascend a rope: replace your aid ladders with a pair of dedicated foot loops, a.k.a. stirrup.
Stirrups solve all of the above issues:
They have a strap to lock your foot in place
The bottom of the stirrup has wider webbing, so it's more comfortable
They are easily adjustable, so you can fine tune the length
Nothing dangles down below your foot
They are lighter than your ladders
Bonus: relatively inexpensive, about $30 each.

Why does one stirrup need to be longer than the other?
What do you do with your lead ladders when you’re cleaning?
How do you dial in the all-important distance of the tether to your ascender?
Join my Premium Membership to read the rest of the article.
Thanks for your support!


How to cut an Aramid core rope
The normal way of cutting and melting a rope doesn't work too well with a rope with an aramid core, because it’s fireproof! Here's a simple and unconventional way to get a perfectly sealed cut on an aramid rope.

Premium Members can read the entire article here:
This tip comes from Australian rigging expert Richard Delaney. Connect with Richard on his excellent website Ropelab, Instagram, or his YouTube channel, where he has loads of concise, informative videos.
Yo! Disclaimer!
Important: the chemicals in superglue may not play nicely with most ropes. In this case we're using them only at the very END of the rope, which will never see a load. When you're doing this, be careful not to get glue on any other part of your rope.
(Aramid is the general term for a type of fiber. Kevlar and Technora are trade names for basically the same material.)
Need to cut and seal the ends of standard nylon rope or cord? The hot knife in every climbing shop works great.
But melting and cutting doesn’t work so well on Aramid core rope (such Sterling Powercord), because it’s fireproof!
Here’s a way to cut and seal an Aramid rope. (Works on regular climbing rope and cord too!)
What you need:
Tape. I used cloth athletic tape. Masking tape doesn’t hold very well.
Sharp, thin knife. Don’t use your favorite steel blade for this; it’ll dull fast. I used a tiny but very sharp ceramic knife. Razor blade works too.
Superglue. Cheap super glue have screw tops that don't work very well and the remaining glue is probably gonna dry out after you use it once. Name brand glue, like Loctite, have a much better quality, screw top, allowing you to reuse the glue. Spend a little more and get the good stuff.

Tip: Do this over a surface that you don't mind dripping superglue on! Ask me how I know this, and can't use my favorite green cutting board for food anymore . . .
1) Put a tight wrap of tape around the end of the rope. This helps make a clean cut.

2) Cut through the rope.

3) Smooooge some superglue into the fibers at the end.
There’s one last important step.
Join my Premium Membership to read the whole article.
Thanks for your support!


Deep dive article on ski repair tips & tricks
You carry a first aid kit for your body. You also need one for your ski gear, because not having one can turn a small problem into a major epic. Here’s the most detailed article you’ll ever read on backcountry ski repair, from the pros at Cascade Mountain Ascents.
Check this out: incredibly detailed article on crafty ways to fix your gear when backcountry skiing.
This was written by our friends at Cascade Mountain Ascents in Bellingham Washington.
This article is closely aligned with a ski repair kit sold by Traverse Equipment, that should cover most basic repairs. For longer tours you may want to take a few more things.

Here’s a video made by the Zach (author of the article) and Charlie (Mr. Traverse Equipment), examining what's in the kit and how to use it.

Can (or should) you resling cams yourself?
The webbing on your cam slings has a lifespan of about 10 years. What do you do then? Ideally, send it to the manufacturer for replacement, but that's not always possible. Here are some DIY options, and a list of all known places you can get replacement cam slings.

Premium Members can read the entire article here:
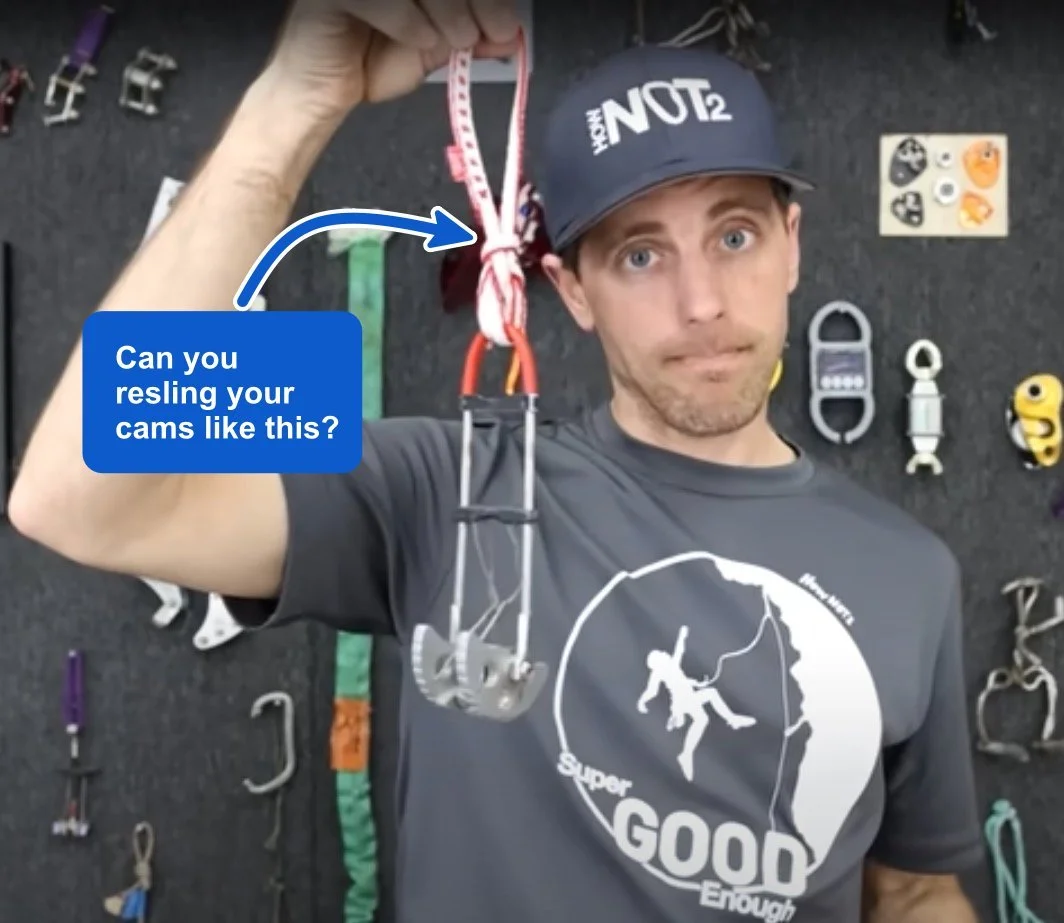
image: HowNOT2, https://www.youtube.com/watch?v=M19taMAZHp4
The generally accepted maximum lifespan of soft goods like nylon, Dyneema, and yes, slings on your cams, is around 10 years. If you use them heavily, it could be a lot less than that.
Reslinging a cam is not a money-making venture by the manufacturer or pretty much anybody else. Also, a manufacturer will almost always only resling their own cams.
If you live in the US, and a few places in Europe, getting this done by the factory is a possibility. But, if you’re outside this area (or if you live in Europe, and have cams made by Black Diamond) sending them directly to the manufacturer for sling replacement is probably not be cost effective.
So, what about replacing those cam slings yourself?
Here are some break test results of various DIY cam sling replacement options tested my friend Ryan Jenks, the mad scientist gear-breaking founder of HowNOT2.
(Disclaimer, these were tested on a limited number, your mileage may vary, if you want to be certain it's done right, then send ‘em back to the factory.)
Summary:
A 30 cm Dyneema sling doubled with a basket hitch is probably going to be your best bet. Be sure and clip both strands! Broke at 17.2 kN.
A 30 cm Dyneema sling tied in a double bowline on a bight also works. Broke between 10 and 13 kN, based on sling width. (Interestingly, the 8 mm sling tested stronger than the 11 mm sling.)
Avoid a girth hitch! Broke at 9 kN, and will probably mess up your cam. (Interestingly, it broke at 9-ish kN both on the slow pull and in the drop tower.)
Or, if you want to skip it entirely, cut off the sling and clip a short quick draw to it, good to go.
Cam reslinging companies
This information is current as of 2024. Of course, policies can change, so check before you mail anything.
If you know anyone who reslings cams who is not on this list, please email me so I can add them, thanks!
Gear companies:
Want to learn about other companies that resling cams:?
Join my Premium Membership to read the whole article.
Thanks for your support!


Petzl Traxion pulley comparison
What are some of the key differences and best uses for the Petzl Nano, Micro, Mini and Pro Traxion progress capture pulleys? Here's an overview of this very handy piece of gear.

Premium Members can read the entire article here:

Comparison of Petzl Traxion pulleys
Petzl makes a nice family of pulleys with the surname “Traxion”. They all share a few common design elements: a spring-loaded toothed cam that lets the rope (or device) move in one direction but not the other, and a high efficiency, sealed bearing steel pulley wheel (aka sheave).
Technically they are a “progress capture” pulley, which means when hauling a load, when you let go of the rope, the load doesn’t slide back down. That might sound like a one trick pony, but these little devices are helpful for lots more than just that!
You can use them as:
an ascender
a progress capture in any sort of hauling rigging
the rope grab in a mechanical advantage system
the “far end haul” for big walls
part of the set up for a Tyrolean traverse
top rope solo rope grab
belaying your partner from above (I don't recommend this! But I know people do it so I'll mention it.)
and more!
Here's a related article I wrote, comparing the Nano and the Mini.
A few Traxion tips . . .
It's best to use Traxions on an oval or HMS locker, and not a D shaped locker. Often with a D locker, the Traxion doesn’t hang straight down. With an oval or pear-shaped HMS locker, you usually get a nice vertical hang up the pulley.

When hauling, you can pre-thread the pulley onto the rope. Doing this lets you set it up faster and lowers the chance of you dropping it.

Traxions in a variety of sizes, prices, weights and best uses, so let's take a closer look . . .
Join my Premium Membership to read the whole article.
Thanks for your support!


The "Oh Sh*t kit"
If you carry some small and lightweight rescue gear, you can improvise just about any sort of hauling, rope ascending, or mechanical advantage system you might need to rig. Here's what I carry.
Premium Members can read the entire article here:
Some of the links on this page go to HowNot2.com. These are not affiliate marketing links. They are provided as a convenience to you. Your purchase supports the awesome gear testing YouTube channel HowNOT2.

Having a few basic tools to ascend a rope, set up a mechanical advantage haul system, or cut a rope / webbing is a great starting point for just about any sort of rescue scenario.
There are many items you could put in a kit like this. A frugal start is a couple of prusik loops and spare carabiners. But, having some dedicated gear offers greater efficiency and more options. Combine this rescue gear with a couple of 60 or 120 cm slings, or a cordelette, and you can do all kinds of rescue trickery!
For alpine climbing, here's what I usually carry:
Petzl Nano Traxion progress capture pulley
Petzl Tibloc rope grab
Sterling friction hitch (Hollowblock, or shown here, 6 mm autoblock cord)
Tiny hardware store cheapo lockblade knife, with tape wrapped around it to prevent it from opening accidentally, and a short clip-in loop attached. If you want a better knife, check out the Trango Piranha or the Petzl Spatha
All conveniently racked on an oval locker
The knife is used to remove sun-bleached ancient crusty webbing from rap anchors (hopefully replaced with new material by you), to cut a cordelette for rap anchor material, and if needed, to cut away something under tension in some sort of awful rescue rescue scenario where it might be your least-worst option. (See the classic Joe Simpson book “Touching the Void” for an epic story about this very thing.)
Want to learn a few more uses for this gear?
Join my Premium Membership to read the whole article.
Thanks for your support!

Snag-free screw storage with the Ice Screw Cannon
Looking for a convenient, bulletproof, snag-free and made-in-USA way to store your ice screws? Check out the Screw Cannon from High Mountain Gear.
Premium Members can read the entire article here:

Do you want a way to carry ice screws that’s lightweight, super-strong, convenient, snag free, sourced and made in the USA, and doubles as a gear stuff sack?
Look no further than the Ice Screw Cannon by High Mountain Gear.
The Screw Cannon organizes and provides easy access to ice screws. It has a unique tapered and offset tube design for snag-free storage, capacity for 12+ or 14+ screws, and is made from super durable, waterproof recycled sailcloth. Weight: 3.7 oz / 105g for the small) and 5.0 oz / 142g for the large.
High Mountain Gear has a clever accessory to increase the capacity of the screw cannon. Want to learn about it?
Join my Premium Membership to read the whole article.
Thanks for your support!

What are oval carabiners good for?
Do you think oval carabiners look chunky and old school? Well maybe, if that’s your entire rack. But, for some specialized uses, they still deserve a place on your harness.
Premium Members can read the entire article here:

image: from climbing historian and big wall ace John Middendorf’s outstanding website of historical climbing gear, https://www.bigwallgear.com/p/first-carabiners-for-climbing-summary
An oval carabiner was the first shape that was widely available to modern recreational climbers. However, carabiner design has changed a lot over the years, and now we have LOTS of different styles.
Does that mean the oval is obsolete? Nope! They’re great in certain applications.
Why are oval carabiners useful?
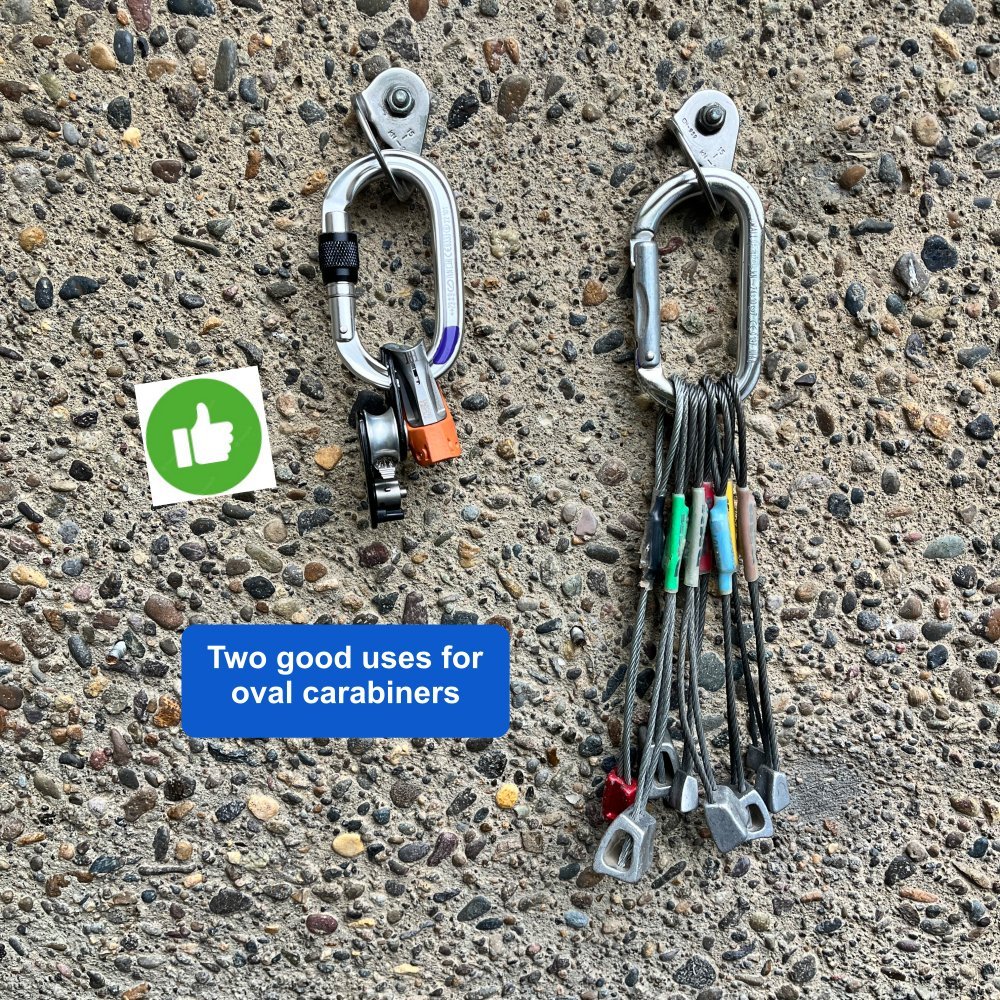
Behaves nicely with boxy devices like a Petzl Tibloc or Micro Traxion, or a fixed gate pulley
Perfect for racking stoppers. The stoppers rotate nicely around the oval end, and don't get jammed up like they can on a D shaped carabiner.
Works well with a Grigri and other types of assisted braking devices (ABDs), generally avoiding cross loading.
Tie a Munter hitch on them, and the hitch flips nicely back-and-forth. (That's right, you don't need a pear-shaped HMS carabiner for a Munter hitch.)
Rotates through loaded anchors, pitons, clove hitches, and other attachment points; doing this can be a problem with some D / asymmetric carabiners.
If ovals are three-way loaded, they retain almost full strength, (tested up to about a 60 degree angle), see video below.
Great for aid climbing, when you often have more than one carabiner clipped to another.
Works nicely as a top rope master point, using three snapgate ovals opposite and opposed. Functionally the same as two lockers, gives a nice smooth lower, and maybe puts the wear and tear on less expensive ovals instead of your more $$ locking carabiners. Here's how to set that up.
Reasonably lightweight; about 60 grams.
Fairly inexpensive, compared to other specialized lockers.
Want to learn a few more ways to use ovals?
Join my Premium Membership to read the whole article.
Thanks for your support!

vRigger - Rope rigging software
Calling all rope nerds and gear heads: check out vRigger! It’s specialized and very cool software that lets you design, test, and teach rope rigging. Here’s an overview of how it works, and a discount code when you’re ready to try it yourself.
Full disclosure: vRigger sent me this software for free. That in no way biases my review; it's a cool product and I want to tell you about it. There are no ads, affiliate marketing or paid product promotions on Alpinesavvy. When I get a free product like this, I’ll always let you know.
vRigger offers a 10% discount to Alpinesavvy Premium Members. Learn about Premium Membership here.
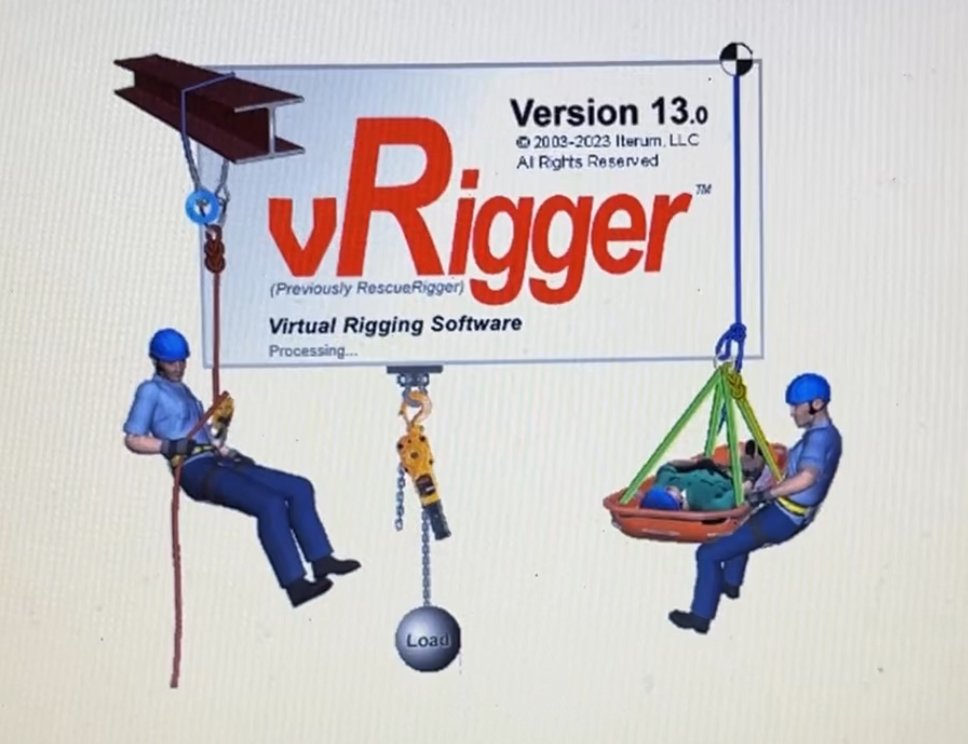
What’s vRigger? Very cool Windows software that lets you design, teach, and test rope rigging.
It may appear that it's a drawing program. But the real power under the hood is the ability to specify load and pulling forces to see how your system actually behaves in the real world.
They have a nice series of tutorial videos showing how to use every part of the software.
The “Getting Started” video is a good overview, to see if it's right for you.
I use vRigger in two main ways:
Setting up different mechanical advantage hauling systems to see the efficiency and forces anywhere in the system.
General purpose drawing and diagrams relating to rigging.
You can insert carabiners, pulleys, rope grabs, friction hitches, etc. to build just about any kind of rigging or hauling system you can dream of. They have a large “library” of pretty much every sort of rigging device available. (And, if they don't have the exact piece that you need, you can create it yourself.)
Drag one component on top of another, and they auto-magically snap together to build your system.
For example, here's a diagram that I made for an article on the three types of mechanical advantage (illustrating that a theoretical 2:1 will always be less in the real world, because of friction, rope stretch, and other hard to quantify variables.)
This shows the difference in efficiency in a 2:1 haul system, between using a pulley on the left and a carabiner on the right.
After you specify the weight of the load (here 100 kg, you can use ‘Merican freedom units as well) it automatically calculates the forces involved all throughout the system, depending on the rigging and load! Cool!
An interesting take away from this diagram: using a lower friction pulley is more efficient to move the load, but it also puts a higher load on the anchor. It's one thing to read about this in a theoretical way; it's another to see the actual numbers like this.

Here's something all climbers should know about: how changing the angles of your anchor “arms” can change forces on the anchor. These numbers dynamically update and change as you click and drag the anchor around.
Hint, you should never build a climbing anchor like this! You can see that there's no more load sharing, but in fact load magnification. If you ever make a Tyrolean traverse, be sure the anchors on either side are unquestionably strong, because they're gonna get a big load!
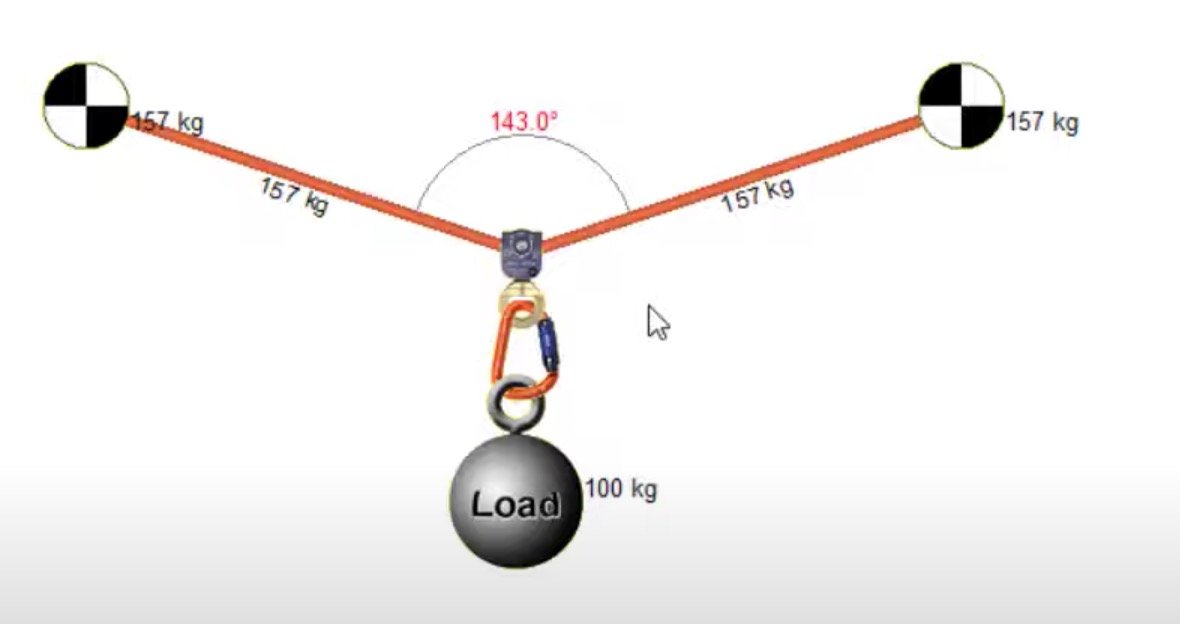
image: https://www.youtube.com/watch?v=CRxd2NPDpcw
It’s not all engineering stuff. You can make more general purpose diagrams like this. Click and drag on the points and lines to create bends in the rope.
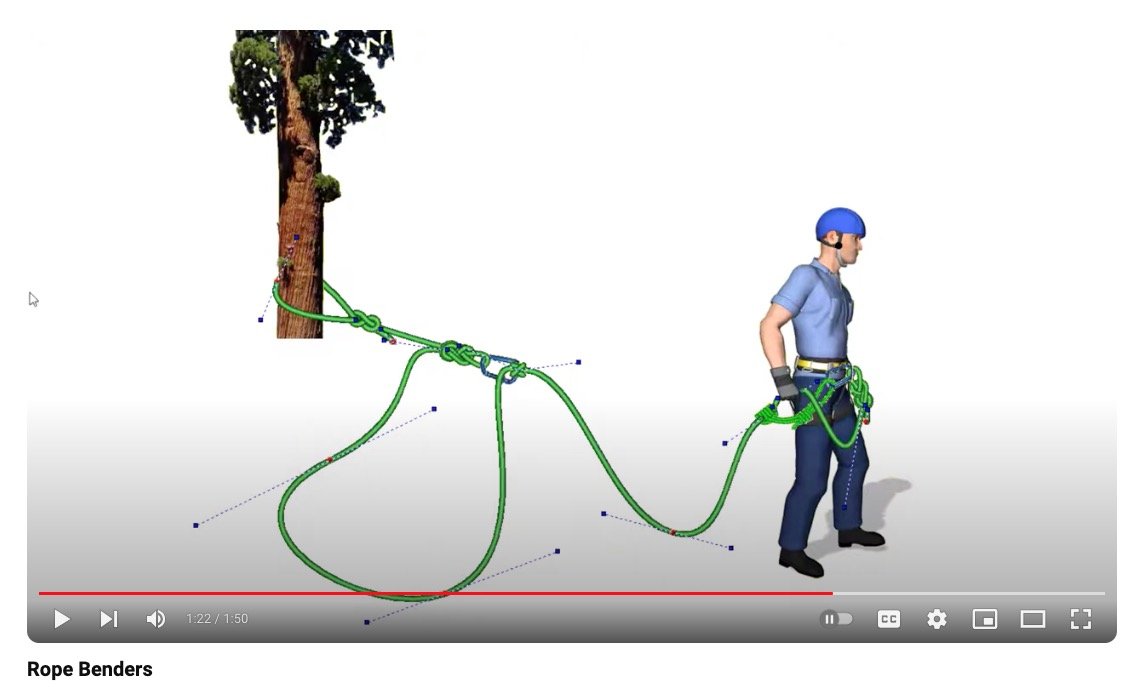
image: https://www.youtube.com/watch?v=gWBWtQzHwQc
There is a very convenient section of “sample files”, which are essentially premade diagrams for common rigging. This is a big timesaver. Here's an example, some typical mechanical advantage set ups.

There are even gear libraries for specialized applications such as industrial, rope access and theatrical.

So, that's a quick overview of vRigger. While I’m only using a small portion of the capabilities, hopefully you get a sense of how helpful is it for visualizing, drawing, and determining forces of different rigging systems.
If you want it yourself, use the discount code “AlpineSavvy” when ordering for a 10% discount.

My favorite mini headlamp - the Petzl Bindi
Headlamp technology keeps getting more ridiculously amazing, with lighter weight, brighter bulbs, and better design. While for climbing having something with 500 or more lumen output is really nice, there's also a place in your pack (and around the house) for a headlamp with more modest specs and lower cost. My new favorite: the Petzl Bindi.
Full disclosure: Petzl sent me this for free. It replaces a Bindi that I bought that decided to go for a walk. That in no way biases my review; it's a cool product and I want to tell you about it. There are paid product promotions on Alpinesavvy. In the rare cases when I get a free product like this, I’ll always let you know.

Modern headlamp technology is ridiculously awesome, and there's basically zero excuses to not have one as part of your everyday carry kit at pretty much all times.
Petzl and Black Diamond have been duking it out in the headlamp arena for a very long time, and we, the lucky customers, benefit.
For mountaineering, or longer trips in colder weather, you probably want a headlamp with a larger battery and a minimum 500 lumens, like the Petzl IKO Core, or the 900(!) lumen Petzl Swift. But for more general purpose hiking, 10 essentials, dog walking, everyday carry type stuff, a headlamp that's lighter, less expensive, with less light output works just fine - like the Petzl Bindi.
Here's why the Petzl Bindi is my favorite mini headlamp:
A ridiculously light 35 grams.
Minimalist elastic cord headband, yet still comfortable and functional.
Three main light levels: low, medium, and high (high is 200 lumens).
Red light for maintaining night vision and not blinding your friends.
Flashing red strobe light for increased visibility (and signaling, I suppose).
Rechargeable battery via micro USB port. (Yes USB C would prolly be better . . .)
Battery indicator light flashes for a few seconds after you turn it off to show the approximate battery level, very handy.
Reasonably weatherproof for hiking in the rain, but not for scuba diving.
Two different ways to lock the switch so you avoid accidentally turning it on in your pack.
Superbly engineered gear, at a fair price of around $45. I think that this (or something like it) belongs in the pack of just about everybody pretty much all the time.
Another option from Petzl that's even lighter and less expensive, but with a lot lower light output, is the e+LITE. (Personally, I like to have the option of the 200 lumens when I need it, so the Bindi recently replaced my much older eLITE.)
Reminder, there are no paid product promotion or affiliate marketing links on our Alpinesavvy. I occasionally share gear that I think is great, and there's no financial benefit to me when I do so.
Try “Tear-Aid” tape for fast, easy gear repair
Got a rip in your tent fly, gaiter, backpack, or any kind of clothing? How about a puncture in your inflatable sleeping pad? Hope you brought some Tear-Aid tape in your repair kit.
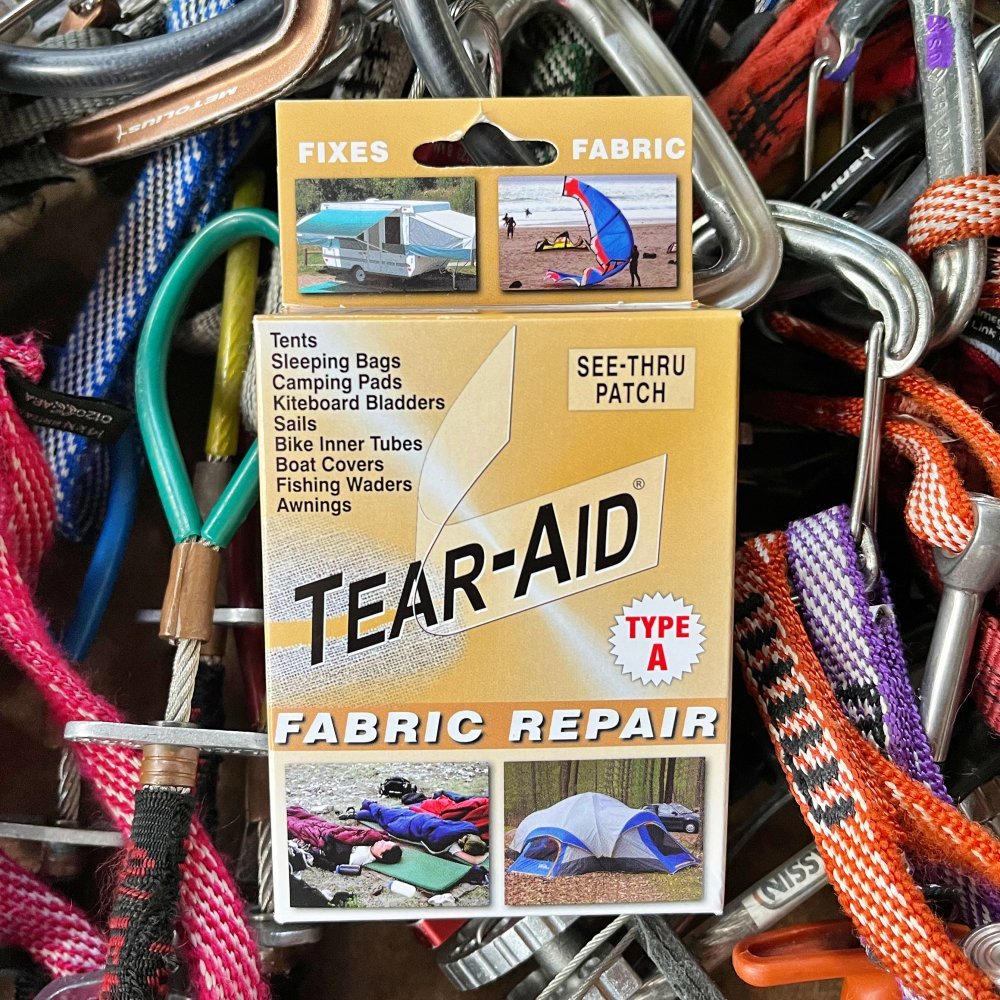
Did you rip your inflatable sleeping pad, tent fly, jacket, etc in the backcountry? Pretty hard to fix those without some repair tape. (And no, duct tape is not the best.)
High-quality tape that has some sort of backing material on it is usually better than duct/gorilla tape for fabric repair. The backing lets you cut off a small square to carry with you, rather than a big roll, and improves the chances of the adhesive working properly after a long time in storage. (That's the problem with the old trick of wrapping some duct tape around the handles of your trekking poles or ice axe; the tape is going to be in pretty sorry shape when you someday need to use it.)
I've used LOTS of different brands over the years. My new favorite: Tear-Aid.
Tear-Aid tape works great for patching and fixing most any kind of outdoor fabric. This includes inflatable sleeping pads, which can be tricky to patch. I’ve used it to fix a tent fly, hole in a puffy jacket, and a rip in the fabric of my pop top Volkswagon camper van.
Tear-Aid comes in two different flavors, “Type A” and “Type B.” Get Type A for general purpose repair. (Type B is meant for vinyl only. If you do whitewater rafting, Type B in the repair kit is an excellent choice.)
It comes in a roll 3” wide by 12“ long (plus a pair of smaller pre-cut squares and rubbing alcohol pads) and cost about $10. Yes, that’s expensive, but to me that's a good thing. Quality over quantity! This is still more tape than you would probably need for a long time, so divide it up and share the cost with some of your pals.
How does it compare with Tenacious Tape? Tear Aid is better - stronger adhesive, and much more flexible.
To use it:
Cut a patch with scissors about an inch or so larger than the area you need to repair.
Round off the corners with scissors, so the patch is oval-shaped.
Clean the area with rubbing alcohol, if you have it. (Pro tip: after you wipe off the area with rubbing alcohol, give it a good 15 minutes to completely dry. This can give much better adhesion on some surfaces.)
Carefully peel away about half of the backing material. Center the middle of the exposed sticky part over the fabric, start smoothing it down, and then pull the remainder of the backing tape off. Important! don’t touch the sticky part with your grubby fingers!
Press the tape firmly into the fabric, trying to remove all wrinkles and air bubbles.
from the Tear-Aid website:
“TEAR-AID® Repair Patches provide a simple and easy method of patching holes and tears, as well as an excellent protective film solution. Each TEAR-AID® Repair Patch is made from an exceptionally tough, matte finish, abrasion resistant, elastomer that resists puncture and tearing. It is combined with an aggressive adhesive formulated for high bond strength. Tear-Aid expands absorbing force on impact and always returns to original shape and size. This flexibility allows the patch to conform to irregular surfaces without restricting the movement of the repaired material.”
You can get it online, or at least in my corner of the US, at a local Ace hardware store.
Here's a video showing the simple repair process.

Petzl - RADline vs PURline comparison
Petzl makes two highly specialized ropes suitable for alpine climbers, the RADline and the PURline. Both have a static Dyneema core, both are 6 mm, and both are designed for different applications. Here's just about everything you need to know about these ropes.
Petzl offers two flavors of highly specialized ropes for alpine climbers: the RADline and the PURline.
What's with the acronyms?
Can I lead climb on ‘em? (Quick answer, NO!)
Are they both basically the same thing?
Can I really use a 6 mm rope for something practical, or is this a dog leash?
They both have a lot of similarities and some important differences, so let's get into it.

Similarities of RADline and PURline
Both are hyperstatic (just 2% stretch!) and NOT meant for lead climbing.
Both are 6 mm.
Both have a core of HMPE (High Modulus Polyethylene), commonly known as Dyneema. This makes them very strong (12 kN RADline, 15 kN PURline) and cut resistant.
Because of the HMPE core, these ropes absorb essentially zero water, so they're much lighter when dragging through the snow.
Both have a sheath that’s bonded to the core, which means you can use them for hauling with ascenders, such as a Tibloc, Micro/Nano Traxion progress capture pulleys, and even larger ascenders, see diagram.
The ascender/pulley compatibility may be confusing, because the technical documentation for the Tibloc and Traxions specify a minimum rope diameter of 8 mm. Apparently it's fine to use these devices on these 6mm lines. Petzl says that these ropes can take about a 4 kN load with these devices before the sheath will be damaged. See Petzl test results on this here. (Summary: Use a Traxion on RADline only.)
Because of the small diameter, both are highly prone to tangling. Using some sort of rope bag is highly recommended. If you don't have a rope bag, coiling it with a daisy chain (aka chain Sinnet or crochet) works pretty well too. If you tie the bottom end of the rope to your rope bag, you can toss it for rappel and quickly deploy the rope perfectly, even in high winds.
A basic nylon stuff sack works okay as a rope bag. However, it’s difficult to stuff the rope in a floppy bag. Here I’m using an ice screw bag made by High Mountain Gear. It's the perfect size, has a lid that stays open for rope stuffing, has a couple of attachment points, is extremely sturdy, and works great as rope bag.

RADline details
Intended use: crevasse rescue, glacier travel and rappelling.
Made for “Rescue And Descent”, hence the name.
Static ropes can be great for glacier travel, provided you have excellent rope management, i.e., minimal slack. Because it's static, the distance of any fall will be minimized - less rope stretch. On the downside, because it's static, if the people on top have extra slack out, it can give them a powerful yank. If using this rope for glacier travel, be very mindful of distance between partners and watch your slack.
Weight: 22 grams per meter (about half the weight of an 8mm dynamic rope)
It has a rougher sheath for better handling, more friction on ice and snow when arresting falls, and for extra friction when rappelling.
It's a bit more supple, which makes it a bit easier to handle and to stuff into your pack.
It's orange, which gives better contrast on snow.
Rappelling on this is easier than the PURline, but still can be challenging because of the small diameter. Definitely learn some techniques to increase friction, such as shown in this article. You also use specialized rappel devices made for small diameter ropes such as the Black Diamond ATC Alpine guide, Grivel Scream, or the Edelrid Mago 8 (see below).
I tested using an 6mm Edelrid Aramid cord as a four wrap prusik on both ropes. This held my body weight on the RADline, and not on the more slippery PURline. A Tibloc may be better choice than a prusik on rope this thin.
Comes in lengths of 30 and 60 meters.
Supposedly has a 10 year rated lifespan, which is longer than the typical dynamic rope.
Sorry, no nice diagrams from Petzl. =^(
The Grivel Scream is one of the few devices rated for ropes between 5 and 8 mm. If you are a ski mountaineer and plan on doing lots of rappelling on a RADline, this might be a good one to get. (Note, I don’t have one of these and I've never tried it. I love the name!)

image credit: Grivel
Another rappel device option is the Edelrid Mago 8. This is a modified figure 8 with a few extra horns on it, similar to rappel devices popular for canyoneering. This device is rated for ropes from 6mm to 9.5mm. (Note, I don’t have this device and I've not tried it.)

image credit: Edelrid

PURline Details
Intended use: rappel retrieval/tag line or haul line.
Made of “PURre” Dyneema, hence the name.
Weight: 20 grams per meter, a hair lighter than the RADline (about half the weight of an 8mm dynamic rope)
The PURline is both slippery and stiff, which makes it easier to pull over rock and a bit less prone to tangles when you're using it as a rappel tagline. Surprisingly durable.
It's white, which gives it better visibility on rock.
Because it's so slippery, rappelling directly on it with a standard device is not recommended, even if you take extra steps to add friction. A super Munter might work. (Don't even think about rapping with a Grigri on one strand of PURline.)
When used as a tagline, Petzl recommends using TWO stacked opposed overhand knots to join the ropes. The standard flat overhand bend is NOT recommended, see diagram below.
Hopefully obvious, but when used as a tagline, you should rappel on your normal climbing rope of a larger diameter, and only use the PURline to pull the rope down, see diagram below.
NOTE: Rappelling on a Reepschnur / knot block, and two ropes of different diameters, opens up LOTS of concerns and considerations, more than I can get into here. Definitely practice in a controlled environment with a qualified instructor before you ever do it for real.
Rappel tip with a tagline like this: thread both strands through your rappel device, as this can help remove twists as well as keep the tagline attached to you. (That’s the one strand you need to pull, so you NEVER want to let the tagline swing/blow out of your reach!)
The PURline comes in lengths of 65 meters and 200 meters. Does 65 meters sound like a strange length? It did to me, until I learned that the clever Petzl gear gnomes chose this to account for the dynamic stretch of a typical 60 meter rope that you're using it with. (And that 200 meters? Maybe that's for fixing lines on K2 or something.)
Hauling tip: If you're hauling a load or pulling down a rappel tagline, a small diameter rope is slippery and rough on your hands. Here's a quick tip: add a Tibloc, Micro Traxion or similar ascender onto the hauling side and clip a large carabiner to it as a handle. It’s much easier on your hands!
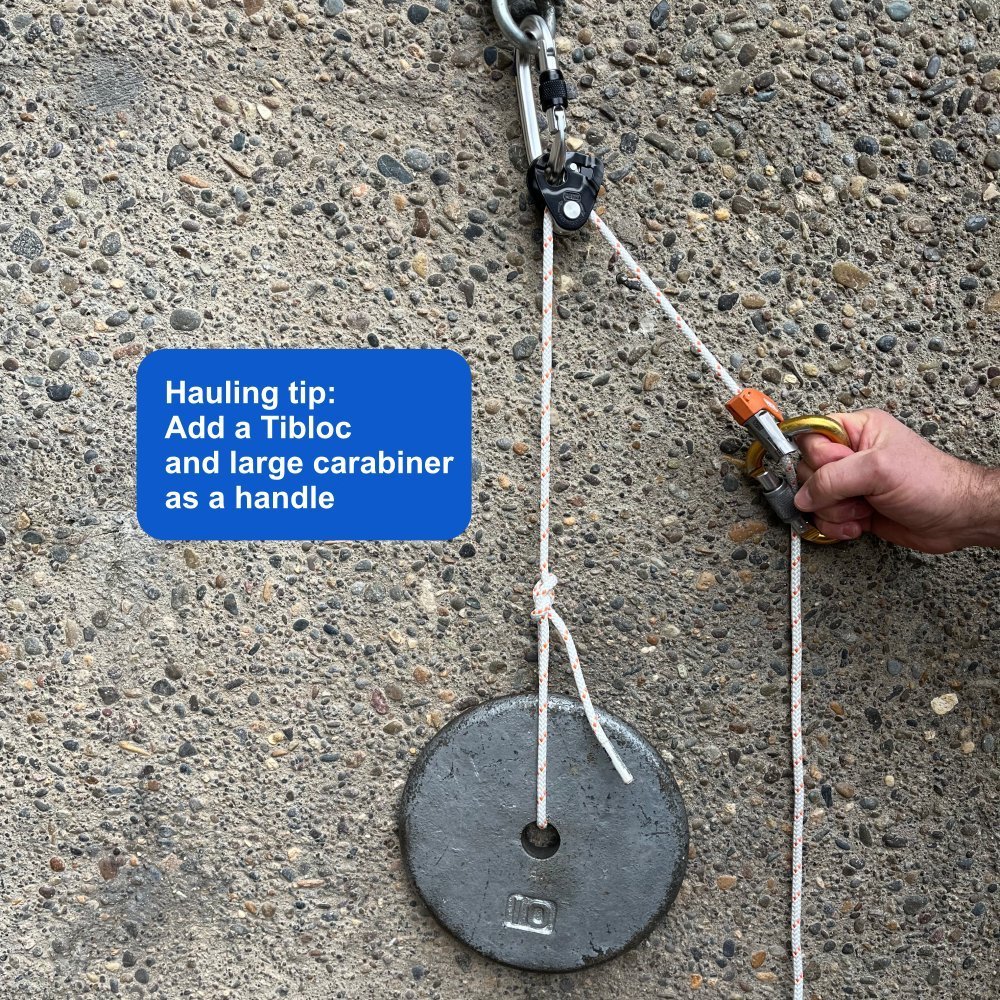
Best use: hauling and rappel pull cord.

image credit: https://www.petzl.com/INT/en/Sport/Ropes/PUR-LINE-6-mm
For hauling, the PURline is compatible for with the Petzl Mini/Micro Traxion (and even larger ascenders like the Basic or Ascension.)
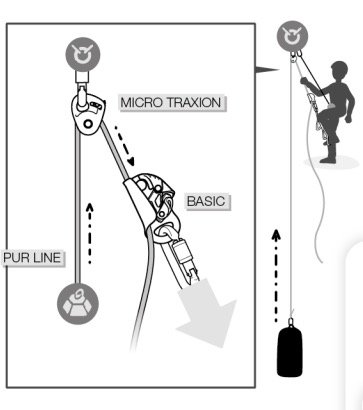
image credit: https://www.petzl.com/INT/en/Sport/Ropes/PUR-LINE-6-mm
Caution: rappel on the larger, blocked strand of rope.
PRACTICE using knot blocks and retrieval cords with a qualified instructor before ever using them for real! There are lots of ways to screw this up!
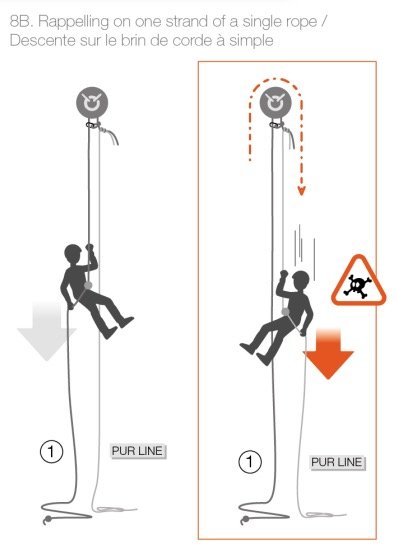
image credit: https://www.petzl.com/INT/en/Sport/Ropes/PUR-LINE-6-mm
Caution: Petzl says to use a stacked, opposed overhand to connect the two ropes. Flat overhand bend is not recommended, figure 8 bend definitely not recommended.
Petzl has a very detailed article on their website about recommended knots to use in RADline. The short version: flat overhand bend or stacked overhand is recommended. Have rope tails of at least 30 cm and dress/ snug down the knot very well.

image credit: https://www.petzl.com/INT/en/Sport/Ropes/PUR-LINE-6-mm

Backcountry ski repair kit tips
Headed out for a backcountry ski trip? You’d better have a way to fix your gear. Here are some components of a robust repair kit that can handle just about everything. (Thanks to a few ski experts who contributed to this: Pro Guiding Service and Matt Schonwald.)
The bulk of this article comes from the experts at Pro Guiding Service in North Bend WA. Follow them on Instagram, Facebook, and check their website, proguiding.com. Photo and content shared here with permission.
Some other suggestions on this page come this article from Matt Schonwald, an AMGA certified Ski Guide, Avalanche Instructor and member of Northwest Avalanche Center’s Forecasting Team. Connect with Matt at BC Adventure Guides.
Backcountry ski repairs can fall into into two major categories.
Category 1: a bummer, but you can keep moving.
A broken ski pole
Lost ski pole basket
A tear in your clothing
A broken walk mechanism in your touring boot
A bent ski
A delaminating ski
A lost skin tail clip
A lost or torn skin tip attachment
A broken heel piece in a pin binding (this a category 1 if you’re a good skier)
Category 2: a major bummer and potential safety issue.
A broken toe piece in a tech binding
A toe piece torn off a ski
A ripped out binding
A lost skin

photo: https://www.facebook.com/ProGuidingService
Here's a repair kit that can handle just about all of these situations, and a few more.
A few notes . . .
This is more of a kit that a ski guide might carry on a longer tour or multi day outing. A few things, like the toe piece and cordelette, can probably be left at home if you’re on a shorter or less committing trip.
Just like sharing the contents of a first aid kit, no one‘s going to agree 100% with everything. This is more of a starting point to get you thinking about what gear you might want to carry.
Do you think this gear is too “heavy”? I don’t know the exact weight of everything posted here, but it can’t be much over 1 pound. If that amount of weight is keeping you from your objective, consider spending more time training and less time obsessing about shaving grams from your gear. =^)
(Reminder, AlpineSavvy has zero affiliate marketing. The links are provided only for your convenience.)
A few zip ties. Consider steel zip ties, they are stronger and can hold up better in cold weather. You can also get heavy duty zip ties that can hold about 200 pounds/100 kg.
Some 2 mm cord
A meter or so of wire; 16g is a good size; stainless steel is best so it won't rust in your pack.
Fabric repair tape; Tear-Aid (type A) tape is good.
Small roll duct / Gorilla tape; Consider cloth hockey tape. It sticks well to things that are wet and cold.
Epoxy; this may make the difference when you tear the toe piece off your ski. You can get single use epoxy packets that are more convenient to carry.
Assortment of hose clamps; two small ones for pole repair, and two large ones to clamp your boot to your ski in case your binding breaks. Large hose clamps not shown in photo.
Some sort of pole splint; 15 cm length of old ski pole tube with a slit cut lengthwise. I've heard of people using a section of aluminum can for a pole splint, never tried it.
Assortment of standard binding screws; if you have a quiver of different skis/bindings, be sure you bring screws that cover everything.
Helio coil inserts for torn out bindings screws; steel wool and epoxy can serve the same function.
A multi tool with pliers and wire cutter; the Leatherman Skeletool, 5 ounces, is a good choice.
Binding Buddy; heavy, but works well. Test it and be sure that it's long enough to reach every screw on your binding, sometimes the neck can be a bit short. The Topeak Ratchet is another option for a driver that has more leverage.
Assortment of driver bits to use with your Binding Buddy or Skeletool. #3 Phillips, #2 Phillips and T20 (Torx / star bit) can be a good start, but check all your gear and be sure you have bits for everything. It's not standardized. Some gear requires Allen screws, typically #4 or #5.
Allen wrench; if your boot has any Allen bolts
4 bolts and wing nuts and a 6mm cordelette for potential construction of rescue sled; sorry, no link for this.
Glop Stopper wax; Black Diamond, glide wax for your skins, carry a small piece, not the whole big block
Glide wax
Metal ski scraper
Tent pole splint; for fixing a broken ski pole, you can also cut a section from an aluminum can
Skin tip
Skin tail clip. Can't really improvise this.
Extra ski pole basket
Voile ski straps. Bring a pair, 24 inches is a good length. Good for loads of things in addition to the obvious holding your skis together. These are in addition to the ones you have to hold your skis together. Here's a whole article on Voile straps.
Finally, a sturdy bag to put it all in. You can go bare bones with a stuff sack, or something that zips open and has a few dividers like a bag for a first aid kit.
For longer or more remote trips, consider:
Two cordelettes of about 6mm/ 6 meters long. For general anchor building and rigging a rescue sled if needed.
A few carabiners