

Alpine Tips
DIY ascending stirrups
The traditional way to ascend a rope on a big wall is with your ladders. However, there's a lighter weight, simpler, and less expensive option - stirrups. Here's a simple way to make your own.

Premium Members can read the entire article here:
Back in the day, I saw a slideshow by the great Hans Florine of his Yosemite big wall speed climbing exploits.
If memory serves, there were a few slides showing him jumaring amazingly fast up fixed ropes on El Cap, using only a length of 1 inch webbing between the ascenders and his feet, rather than the standard aid ladders.
That’s simple, lightweight, and inexpensive, three things every climber should like!
Here's how you can make some “aid stirrups” for the second to clean the route.
Typically, ascending a rope on a big wall is done with the ladders that you use for leading, but stirrups have several advantages, as I cover in this detailed article.
Personally, I’m a fan of these sweet stirrups made by Skot's Wall Gear.
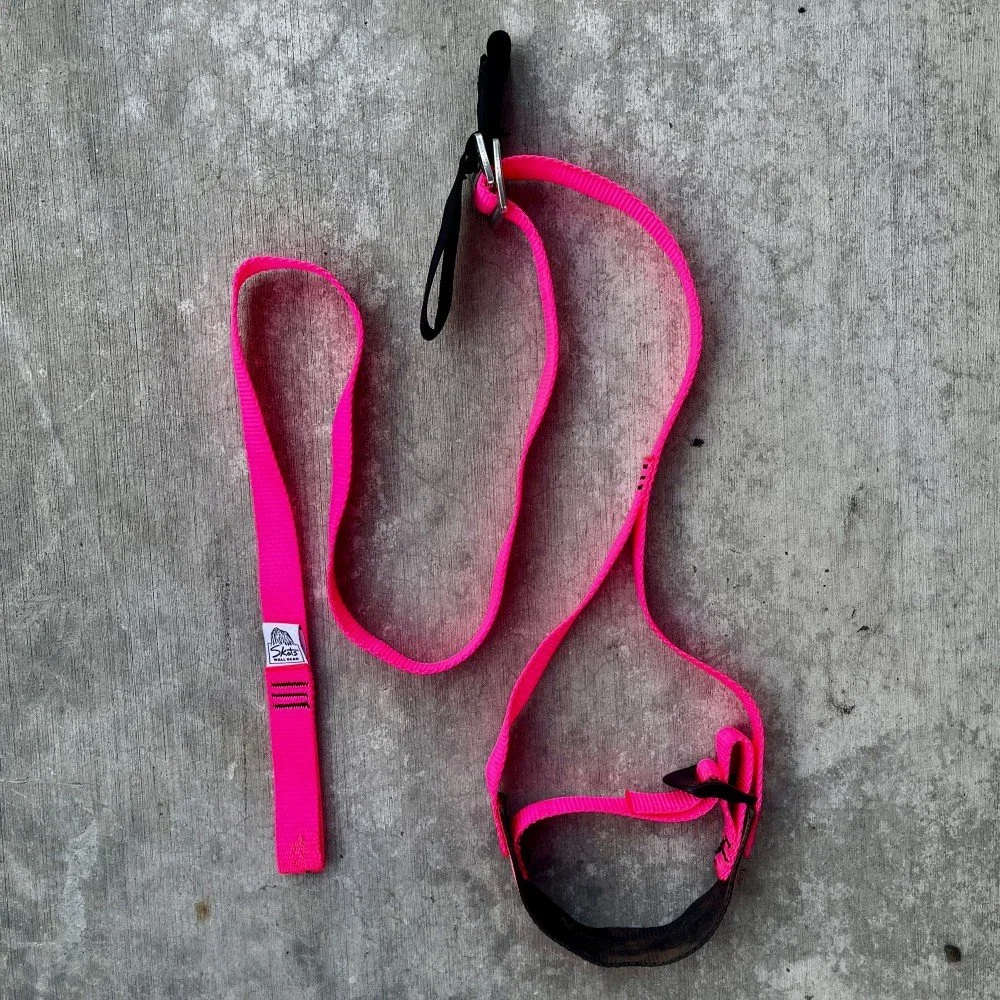
But like I said, if you want a DIY, low cost version to start or experiment with, you can try this setup.
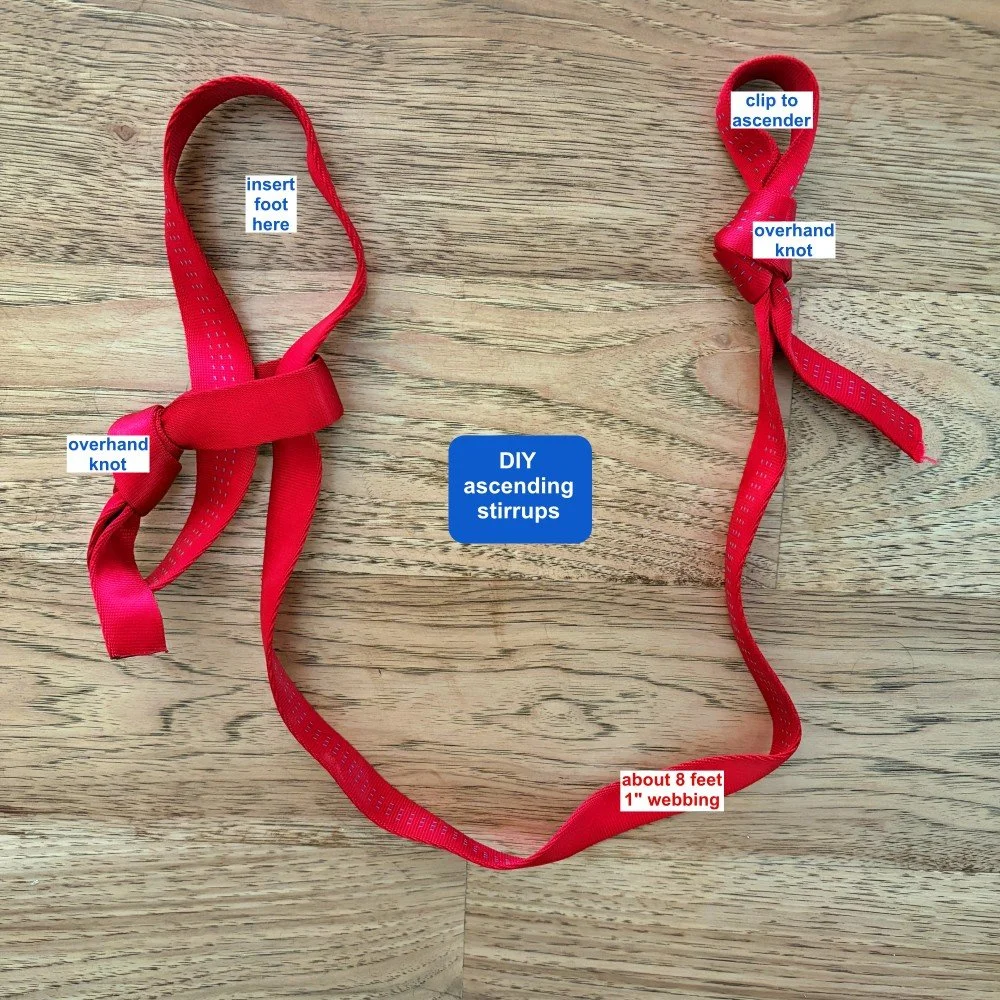
Begin with about 16 feet / 5 meters of 1 inch tubular webbing. (This makes 2 stirrups. If you're tall, buy more webbing, it's cheap.)
Tie a small overhand loop in each end. (In the photo above, my loops are a little too big; you could go slightly smaller.)
Clip one loop to your ascender with a non-locking carabiner.
Push a bight of webbing through the other overhand loop. This bight becomes an adjustable loop that cinches down down on your foot when you weight it.
Don't cinch these knots down tight yet. Practice on a fixed rope to get the length dialed in. You are almost certain to make some small adjustments to the length, so be patient with this. Have some needle nose pliers on hand if the overhand knots need encouragement to loosen up.
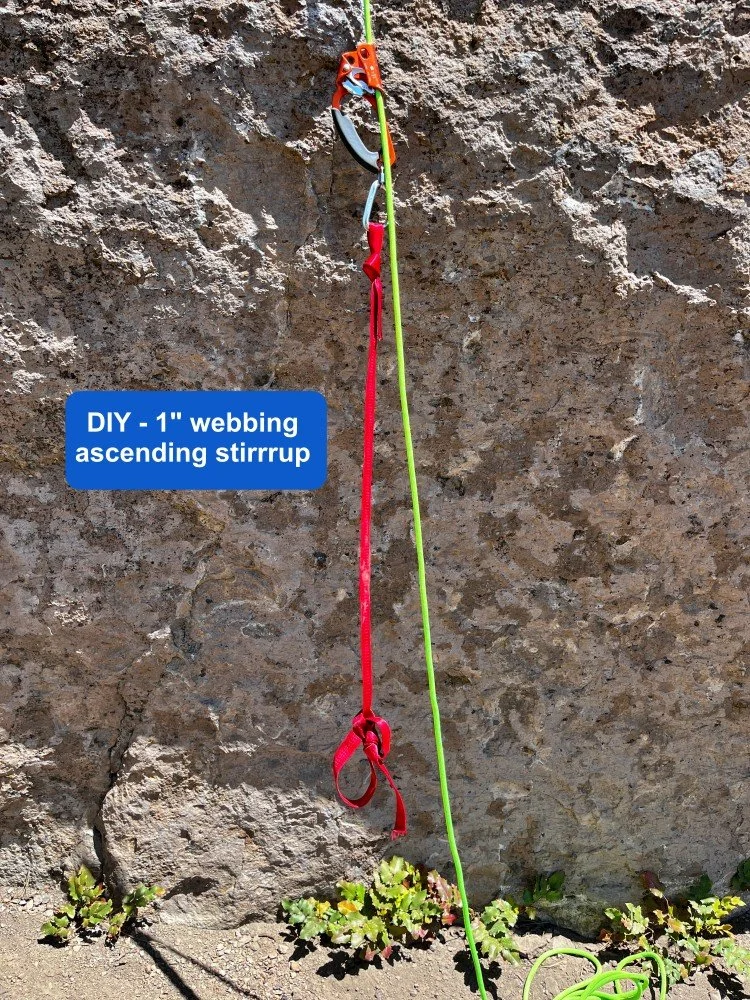
Here’s what it looks like prior to lift off. Handled ascender clipped to rope, non-locking carabiner clipped to ascender, small overhand loop of stirrup clipped to the carabiner.
Required but not shown for clarity:
Tether connecting your harness to the ascender with a locking carabiner
Second ascender, carabiner, stirrup, tether and locker for your other foot
Why do you want to color-code your stirrups?
Why does one need to be longer than the other?
How can you be sure that overhand knot never comes untied?
What's a key technique for efficient rope climbing?
Want to see a video of expert ascending technique from a speed climb on the Nose?
Join my Premium Membership to read the rest of the article. Thanks for your support!
Premium Members can read the entire article here:


How to 1:1 haul a load that’s heavier than you
A 1:1 haul is the big wall standard for moving up your vertical camping supplies. But when it starts to be close (or even a bit more) than your bodyweight, it can be very hard to lift. Here’s a #CraftyRopeTrick that let’s you haul extra-heavy bags 1:1.
Premium Members can read the entire article here:
The standard way to haul on a big wall, with moderate loads, is a 1:1 haul with a redirect on the anchor.
By standing in a sling or aid ladder attached to the haul strand, you use your bodyweight to lift the load, rather than pulling up with your arm muscles, always a good thing!
Step down in the sling, and the load moves up. Slide the ascender up, repeat about 100 times, and your pig is at the anchor.
It looks something like this:
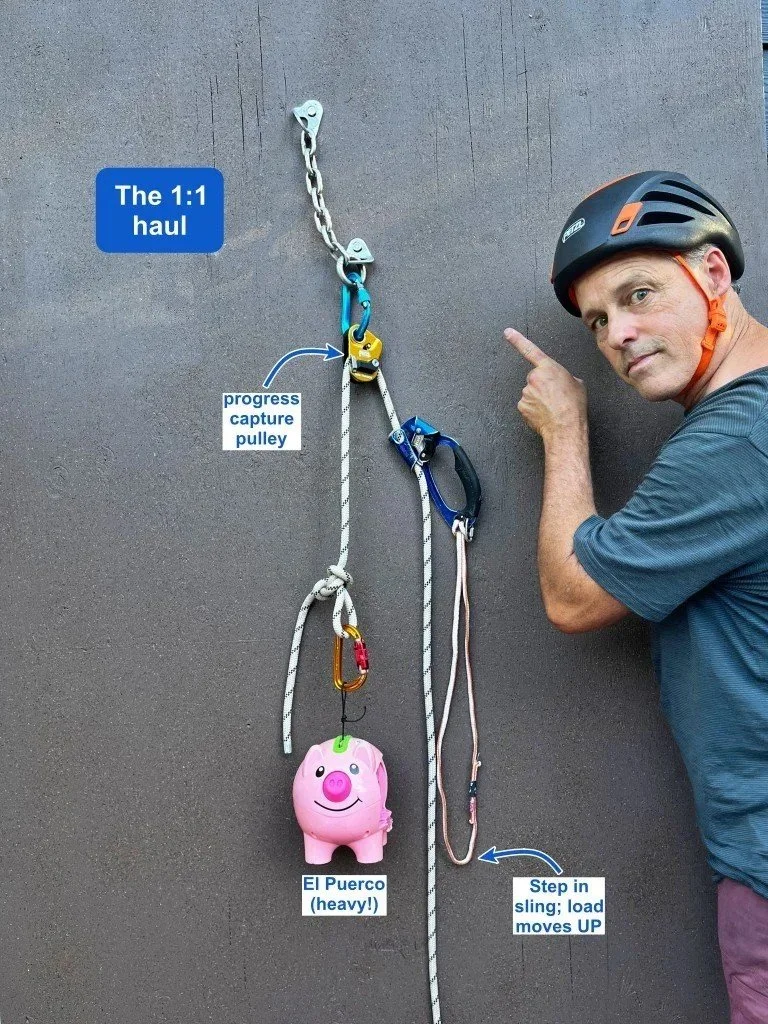
Let's say you rig your haul system with a highly efficient progress capture pulley on the anchor (such as a Petzl Traxion). If you apply your bodyweight to the pulling side of the rope, AND your bodyweight is greater than both the load and the slight added friction from the pulley, the load should lift.
For example, if you weigh 75 kg / 165 lbs, and you have a haul bag that weighs 50 kg / 110 lbs, simply applying your bodyweight by stepping onto the pull strand should lift your load.
So far so good. But . . .
What if your haul rope runs over rock between you and the load, adding additional friction?
What if your load is more like 60+ kg instead of 50 kg?
Now, simply standing with your static bodyweight on the haul strand may not be enough to lift the load.
If this happens, many climbers think . . .
They need to resort to a more complicated 2:1 hauling system.
Or do something more physically extreme, (photo below) or have your partner also attach to the rope to do a tandem haul, or something like that.
Guess what? There’s a clever trick to still use a 1:1 hauling system, even when the load you're lifting might be greater than your bodyweight.
There are two components.
Lifting UP on the load strand with one hand. (To be clear, you're not trying to lift the entire haul bag with one arm; just giving it a little bit of pull so you can lighten the load enough to move the load by pushing down with your foot on the other side.)
Bouncing / shock loading the hauling strand with your foot.
When you do these two things simultaneously, it both slightly reduces the load on the anchor AND multiplies your bodyweight on the haul side, letting you lift a load that weighs more than you do. Cool!
Want to see a video of this technique on El Capitan?
How about an example of the wrong way to 1:1 haul a big load?
Join my Premium Membership to read the rest of the article.
Thanks for your support!

Close-to-the-ground rope ascending practice
Training for a big wall? Your rope ascending techniques and fitness need to be solid. Here’s how you can practice, and stay just a few meters off the ground. (Also works for crevasse rescue prusik hitch ascending practice.)
Are you training to climb a big wall? Your ascending gear, fitness and technique needs to be perfect.
Tip: You don’t need a huge cliff or a 60 meter fixed rope!
Here's how to practice it on a short wall (or even a tree).
Run the rope to a top rope anchor, and then down to your partner, who has you on belay. As you start climbing up the rope, your partner slowly feeds rope through their belay device.
You may be only a few meters off the ground, but with this method, you can practice ascending the entire length of the rope. Have a stopper knot in the end so you can’t be dropped.
For handled ascender practice, you need a bit of rope weight under you, so your ascenders can slide up the rope. This means you probably need to be about 5-6 meters up the rope before your ascenders will slide easily.
Here’s a great illustration of this from the superbly talented Mike Clelland, from his book “The Illustrated Guide to Glacier Travel, and Crevasse Rescue”, highly recommended.

image credit: Mike Clelland

Adjustable tether + Fifi hook for tricky cleaning
Here’s a DIY gear trick that’s handy when cleaning a traversing aid pitch, or maybe a overhanging sport route. Girth hitch an aid climbing fifi hook to an adjustable tether.

Premium Members can read the entire article here:

Cleaning a steeply traversing aid pitch or a sport route that's severely overhanging and/or traversing can be hard!
The challenge you have in both cases is the gear you're trying to clean is being tensioned by the rope under your bodyweight, and that's usually a pretty big problem.
Here’s a simple way to solve it: an adjustable tether plus an aid climbing fifi hook.
I‘ve used this on the infamously traversing bolt ladder on Monkey Face at Smith Rock Oregon, and it works perfecto.
Be sure your fifi has a “release cord” loop tied into the top hole as we see here. This is key to be able to release this under load.
They usually don't come this way from the store, you have to add it yourself. I'm simply using parachute cord.
Notes . . .
It’s pretty much the same procedure for cleaning quickdraws from a steep sport climbing route, but that's a bit easier than this.
Yes, there are several methods you can use to accomplish this, but after you try this you may not wanna do the others. Give different techniques a try and see which works best for you.
What's sweet about this for aid climbing is that it uses gear that you already have on your harness. Typically you would only use a fifi when leading, but in this case, you remove it from your harness and put it on your tether when needed for cleaning.
Want to learn how this works, step by step?
Join my Premium Membership to read the whole article.
Thanks for your support!


Ascenders - when not to use the handle
Just because your ascender has a handle doesn't mean you have to use it. On lower angle rope climbing, the handle can be great. When it starts to get steep, you might want to try a more ergonomic hand position.

Premium Members can read the entire article here:
This tip idea is from Australian rigging expert Richard Delaney. Connect with Richard on Instagram and his YouTube channel, where he has loads of concise, informative videos.

Just because there's a handle on your ascender doesn't mean you have to use it.
Handles can be great on lower angled rock, but if things get vertical, it might be more ergonomic or comfortable to put your hand on top of the ascender. Squeeze and lift the top to slide it up, and sort of press down on the sides and top as you stand up.
Keeping your hand off of the handle can serve as a subtle reminder that you shouldn’t be trying to do one arm pull ups. Use your legs to push up, and your arms mostly for balance.
Big wall climbers will usually use handled ascenders, because they are alternating between low angle and steeper rock. Rope access people may choose to avoid handled ascenders, or use them in the way shown here.
Want to learn a few more ascender tips?
Join my Premium Membership to read the whole article.
Thanks for your support!


30+ tips for more efficient aid climbing
A summary of various tricks and tips to aid climb more efficiently, also known as “just about everything I wish I knew when I started aid climbing”. These tips may take years off your learning curve.
Premium Members can read the entire article here:

Nearing the top of Moonlight buttress in a day, Zion National Park, Utah. Photo by me
“Speed climbing” on a big wall route gets a lot of press. But in reality, most of us plodders would do better to focus not on speed, but rather efficiency. Efficiency can mean not running out of water when your three day climb turns into four, avoiding strangling your partner (or vice versa), not taking 30+ minutes for a belay changeover, not climbing by headlamp when you could be kicking back in your portaledge . . . you get the idea.
Below is a somewhat random assortment of climbing tips to help you climb with greater efficiency, and thus speed. Why do I mention these particular tips? Because I ignored pretty much every single one of them on my first couple of walls and sometimes went pretty darn slow as a result. Sure wish I knew all these beforehand!
If you’ve been at the big wall game for a while, you probably know most of these already. If you're fairly new to aid climbing, these tips may be more helpful. These are merely my opinion/experience, and are by no means a complete list. In no order of importance, here we go.
Don’t rush
Speed does not mean fast. Speed means smooth, controlled, well-planned, and properly executed. The Navy SEALS have a saying: ”Slow is smooth. Smooth is fast.” Do the task you have in front of you at a proper pace, and do it right the first time. “Smooth” comes from practice and having your systems dialed before you get up on a real climb.
What you're really striving for is efficiency, not speed. If you achieve efficiency, you can actually slow down in your movements, be more relaxed, and enjoy your experience more. Another way to think about it: you increase your speed by minimizing the downtime when no one is making upward progress.
Wall ace Mark Hudon: “Most wall climbers today would gain far, far more time by simply understanding and doing the basic big wall tasks faster.” So, what are the basic tasks? Leading, cleaning, hauling, anchor building, belay changeovers, rope / belay management, staying fed/watered and comfy during the day.
Think of everything physical as a “movement sandwich” (rest, move, rest)
Unlike most other aspects of rock climbing, you can rest pretty much whenever you want to on a big wall. Use this to your advantage. From big wall expert Andy Kirkpatrick’s excellent aid climbing book, “Higher Education”:
“You should never find aid climbing hard. If you do, it means you're doing it wrong. If your arms are tired when leading, you're not resting on your fifi hook. If you get pumped ascending a rope, that means your lanyards are not set right or you’re standing in the wrong step of your aider. The same goes for hauling, if you're busting a gut then switch it up to a 2:1 or maybe space hauling. Almost everything physical should be a ‘movement sandwich’, movement placed between two slices of rest. Rest-move-rest. Rest-move-rest.”
Time yourself when practicing
Yes, we’re talking stopwatch. During your training, time yourself and your partner doing different tasks. How long did it take you to do EACH of these tasks - Lead the pitch, build the anchor, fix the rope, set up the haul, do the haul, clean the pitch, re-rack the gear, and have your partner start leading the next pitch? Repeat all these on the same training route different times maybe over different days, and notice your times hopefully start to dramatically improve. Have fun, and make training a little competitive. Time each segment, loser buys beverages.
Don’t “learn” to aid on a real route
People stuck behind you who have the skills to climb it for real will NOT be happy. EVERYTHING you do on a wall should be practiced BEFORE you get to the actual climb. To put it another way, on your actual route, you should never be trying something for the first time.
Do repeat laps on obscure 5.11 cracks until you get your movement and systems dialed. Time yourself.
Haul practice: start with a moderate load of around 50 pounds until you get your systems dialed. Then start ramping up the weight.
Haul a 100 pound bag 1:1.
Experience “riding the pig” by rappelling with your fully loaded haul bag. ( Tip - don’t hang it from your belay loop!)
Set up your ledge on a real cliff and spend a night in it, not just in a backyard tree.
Poop in a bag, on your ledge
Do “aid bouldering” close to the ground, placing all manner of tiny stoppers, marginal hooks and micro cams until you really know how far you can push them before failure.
Practice passing a knot, both going up with ascenders and going down (rappelling).
Put in your training. Practice the core skills. You, your partner, and everyone behind you on the route will have a much better time. (People who go try Monkey Face at Smith Rock Oregon who have never aid climbed before and take 2 hours to lead and clean a short bolt ladder, I’m looking at YOU!)
You can practice just about every big wall skill on a short route
When practicing, make the best use of what you have. This could be a route in a cooperative climbing gym, or a one pitch obscure crack at your local crag. Don't start the pitch standing on the ground. Climb up just a few meters, make a hanging belay, and start from there. Make a few moves, build another belay, haul and bring your partner up and repeat. This gives you extra practice at anchor building, hauling, and transitions, which can be a giant time suck for beginners.
Have all the skills needed for your route
Study the topo, photos and trip reports. Is there a pendulum and a lower out? How far is it? Do you need to hook? Is there a burly off width? Do you know how to clean a traverse? What’s the hardest mandatory free climbing, and can I/we do it?
Do you know how to lead AND clean a roof? The classic “Kor Roof” pitch on the South Face of Washington Column in Yosemite has shut down many an ambitious first time big wall team. Roof climbing is admittedly hard to practice, but read the topo and do your best to train before you go. Try the underside of an outdoor staircase, playground swing set, rope between 2 trees, or roof route in a helpful climbing gym. If you’re in Yosemite, be sure to put in a practice lap or two on the LeConte Boulder.
There’s a bounty of route beta for just about every beginner route you would ever want to try. Study up, know what skills you need to have, and master them before you go.
Talk over each pitch before the climb
Before you leave the ground, go over every pitch in detail with your partner. Talk over who’s going to do what, when will it happen, and how you’re going to handle any anticipated difficulties. Do we have all the gear needed for the route? What’s the farthest we need to lower out the bags, and do we need a separate lower out line? Does a pitch go around a corner so we maybe can’t hear or see each other? (Better have a clear communication plan.) Are we leading in blocks or swapping leads? Who gets what pitches? What’s our anticipated timeline, and what do we do if we’re faster or slower than we planned?
Having an action plan means you don’t need to create one on the fly and make important decisions when you’re tired and stressed. Sure, you can change your plan, but it’s a starting blueprint that guides your actions, instead of pretty much winging it on every pitch.
Route topos
Make several copies of the route topo. One for each person on the team and one extra. I like to laminate mine at the office store, and put in a grommet, and then tie some cord through the grommet as a clip in point.
Save a photo or PDF of the topo (and other relevant beta, like the descent route) onto your phone, which is free and weighs 0.0 grams. This goes for your partner as well.
Always ask yourself when you have downtime: “What could I be doing right now to make this climb faster or safer?”
Especially for beginners, there’s almost always something. Be on a constant lookout for small potential problems, and deal with them before they become larger real problems. “Hmm, looks like that haul rope is hung up on something. I better deal with that right now before the leader starts to pull it up . . . ”
Andy Kirkpatrick: Remember the number one sentence that needs to be avoided on a wall: “Hang on a minute!”
Strive for well-organized anchors
This is probably the single biggest time suck and cluster-generator for newer climbers. Something as simple as which side of the anchor to dock the haul bag can create either an effortless release or an incredible tangle. Decide where the bag is going to go, use rope bags, have multiple full strength clipping points, keep the lead rope and haul rope separated and tangle free and you'll be well on your way.
Maintaining the psyche
Big wall expert Mark Hudon has some self-talk he uses when things get spicy: “I may be scared, but I’m at LEAST as good as the WORST climber who has ever done this route! If they got past this point, dammit, so can I!” Remind yourself of this, and maybe even laugh a little when you’re faced with a tough spot.
Be patient with your partner and do not “blame”, no matter whose fault something might be. Mistakes will happen. Work together to overcome the problem.
Use a day bag
Don’t be diving into the haul bags at each belay to get snacks, water, sunscreen, windbreaker, etc. It's big time suck, waste of energy, and greatly increases the chance of dropping something. In the morning, put all the stuff you need for the day in a smaller “day bag” (aka “piglet”) or wall bucket, tied outside your haul bag (probably on a gear tether) for easy access. (Remind your partner to get their day gear all ready at the morning bivy.) Check out the “RTFN bag” and Wall Bucket at Skot’s Wall Gear.
Second leaves the belay fast
Try to minimize time when both climbers are at a belay and not moving. Especially, strive for fast belay changeovers. Slow belay changeovers can be a huge time suck for beginners.
The leader should call down when they are getting close to the anchor (the 25 foot rule) so the second can start tidying things up. One good thing for the belayer to do at this point is to be sure the haul bags are properly packed away, unencumbered, the haul rope is running freely, and the bags and rope are ready for lift off, because the very first task for the leader is to pull the bags a little bit off of the anchor, so the second can clean everything.
The leader should never be “ready to haul” and have to then wait for the second to sort things out!fdecide
When the leader calls “rope is fixed” the second can clip their ascenders to the lead rope and fully weight it. This frees up most of the anchor, the second can get to work breaking it down, and get ready to release the bags.
Releasing the bags should be pretty much effortless if you use a docking cord, which is a tether that’s releasable under load. Forget the old school method of using a daisy chain or some other static sling to connect your bags to the anchor; this can often require brute force to get your bags moving, especially if the pitch above traverses.
If the next pitch traverses to one side (say the right), you probably want the bags docked on the right side of the anchor, so they don't swing across you and smack you when you release them.
There's really no need to haul the bags up snug with the anchor on every pitch, unless you’re spending the night there. Hanging the bags a bit below the anchor can make your belay less clustered.
Generally, the bags should never be undocked by the second until they have fully lifted off from the anchor, and the second can check that nothing is hung up, carabiner is being weighted correctly, etc.
Clean the gear in semi-tidiness
You don’t need to be super type A and organize every piece of gear immaculately when cleaning, but you also don’t want to clip it any which way.
A cleaning system that works well: have two single length / 60 cm runners, one over each shoulder. Use wider nylon slings rather then skinny Dyneema - wider is more comfortable under a load of gear.
Clip free carabiners and slings onto one runner, and gear onto the other. Generally order the gear by size, but don’t be too fussy about it at the expense of upward progress. Avoid racking gear on your waist loops, unless you like the feeling of 30+ pounds of hardware causing your harness to slowly creep down towards your ankles.
When the cleaner gets to the top anchor, these two gear slings get clipped somewhere safe, and quickly added back onto the lead rack by whoever is leading the next pitch.
Doing this allows you to quickly hand off the gear at the next belay, rather than unclipping things one by one from your gear loops. This is much faster, and there’s less chance to drop things.
Want to learn about 15 more big wall efficiency tips like this?
Join my Premium Membership to read the whole article.
Thanks for your support!

Passing a knot when hauling
Want to lead a few pitches on a big wall, and then do one long haul to bypass an intermediate anchor or two? Here's a crafty way to connect two or more ropes to do this, and easily get that knot through your hauling system.
Credit for this tip goes to Andy Kirkpatrick. It’s from his outstanding book: ”Higher Education: A Big Wall Manual”.
Note - This post discusses techniques and methods used in vertical rope work. If you do them wrong, you could die. Always practice vertical rope techniques under the supervision of a qualified instructor, and ideally in a progression: from flat ground, to staircase, to vertical close to the ground before you ever try them in a real climbing situation.
This might be a seldom-used technique in your toolbox of big wall trickery, but it can sure come in handy for one main thing: it lets you do extremely long hauls, with two or more ropes tied together, allowing you to skip intermediate anchors. For example, you could lead several pitches and then do one L O N G haul.
What’s the problem you need to solve? You have two ropes tied together with a knot that can’t pass through your progress capture pulley / Traxion. This means the knot (which is under a lot of tension) needs to be untied somehow without losing your haul bags.
(Note, if you're hauling with a 2:1 “pig rig”, passing a knot is really easy, because you already have about half the system in place. For this example, we’ll assume a 1:1 haul.)
There are several ways to accomplish this. Here's one that's pretty straightforward. Credit for this technique goes to Andy Kirkpatrick and his excellent big wall book “Higher Education”, definitely recommended.
Before we get into the technique, here’s a favorite related quote from Andy K:
“Hauling is potentially one of the most dangerous aspects of big wall climbing. This translates to ultra-caution in all parts of your hauling system and interaction with bags, haul lines, docking cords, and pulleys. If you rush and make a mistake, drop a load or have it shift where it's not wanted, you could easily kill someone or yourself. I try and teach climbers to view their bags as dangerous creatures, like a great white shark, rhino, or raptor that is in their charge. The ability to keep them calm and under your control comes down to paranoia, foresight, and heavy respect for the damage they can do.”
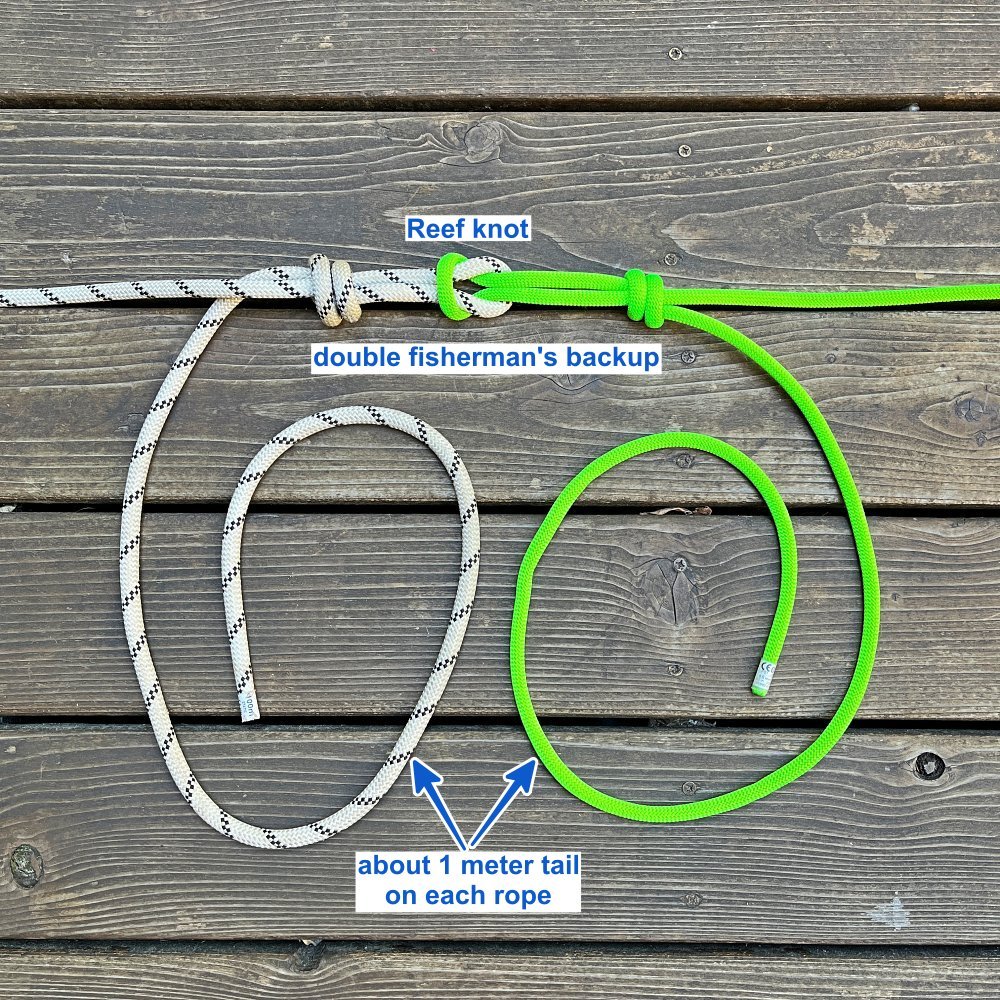
First, you need to join the ropes with a knot that won’t get welded under a heavy load, perhaps multiple haul bags. Try using the reef knot, backed up with a double fisherman’s, and a long tail of about 1 meter, as shown. There are certainly other options. This one is simple, easy to check, and works well.
It's critical here to leave a minimum of 1 meter tail on the ropes, as shown. (You actually only need it on one strand. But, so you don't screw it up, it’s simpler to make a long tail on both strands.) If you're not sure if you have enough tail, make it a bit longer.
We’re hauling on the white rope. Stop when the joining knot gets about 10 cm / 4 inches from your progress capture pulley. Don’t yank the knot into the pulley!

Get out some more gear: two lockers, a 30 cm (or so) sling, and an ascender. (Instead of the ascender, you could also use a friction hitch, but make it a good one.)

Clip the ascender upside down to the loaded rope. Clip the other end of the sling to the anchor. Here we’re using the Grivel Vlad on the master point, a combination locking carabiner and rigging plate, very helpful for this procedure. A quad, or other type of anchor rigging that gives you several different connection points, works too.
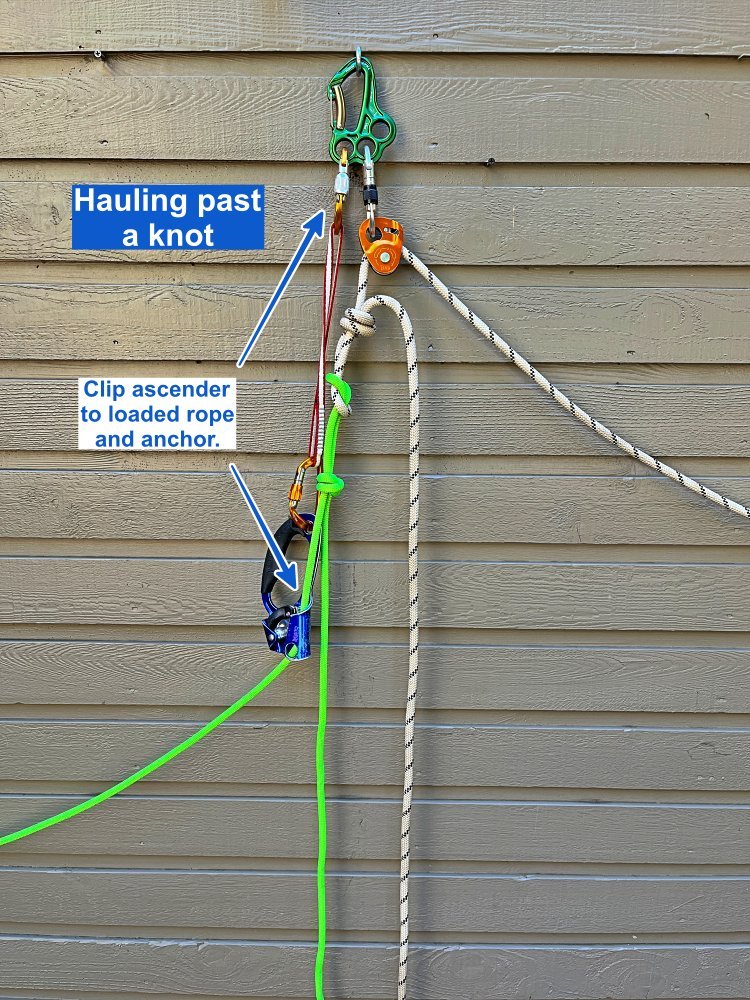
Next, pull up a bit on the white rope, release the cam on the Traxion, and slowly transfer the load onto the ascender. Once you do this, re-engage the cam on the Traxion to back up the ascender.
Notice how doing this creates slack on the knot, yay!

Safety step: tie a bight knot in the end of the green rope and clip it to the anchor with a locker. This ensures the ascender is backed up before you do the next step.

Sweet, you have slack on the knot, and the system is backed up. Now you can untie that reef knot that was joining the ropes. (Give yourself a high-five because you picked a knot that was so easy to untie. =^) Remove the white rope from the system; careful, don't drop it!
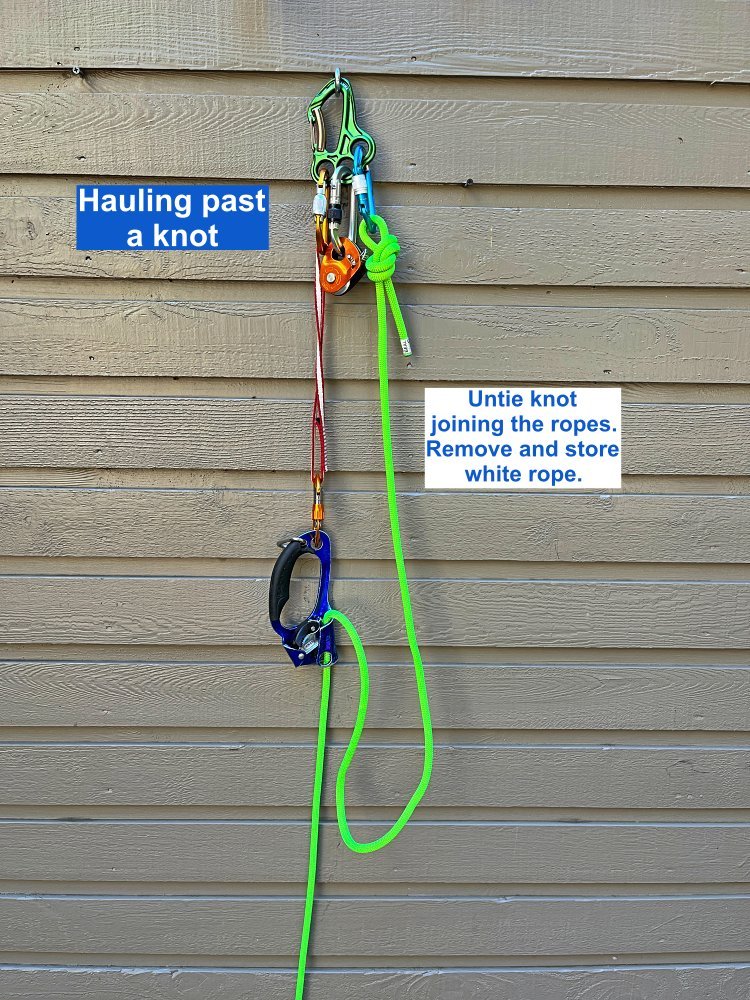
Carefully remove Traxion from the carabiner, load the green rope into the Traxion, and untie the backup bight knot. If you feel lucky and are comfortable with the ascender holding the entire load for about two seconds, you can keep the Traxion clipped onto the anchor and push the end of the green rope through the device. I'm showing a bit more conservative, less risky method.

Remove the ascender and sling from the system.

Schweeeeetness, Give yourself a high five, you're done!
All the load is now on the green rope with no knot. Now all you have is 60 more meters of hauling, lucky you!


Rack spare carabiners in a "football"
Big wall climbers need a LOT of spare carabiners. Here's a good way to keep them tidy - rack seven of ‘em together. (Like the 7 points for a touchdown in ‘Merican football, eh?)
I think I first heard of this tip from big wall ace Pete Zabrok. Pete wrote a great book on big wall climbing called Hooking Up, highly recommended!

Here's one way to help tame the entropy of your big wall gear harness.
Aid climbers need a LOT of free carabiners. Here's one good way to carry them.
Rack seven carabiners together. One to your gear loop, and then three more pairs hanging below that. This keeps them fairly compact and tidy. Seven, like the points for a touchdown in American football, eh?
Are you concerned that your fumbly fingers might accidentally unclip the top carabiner and then you lose all seven? An Instagram friend suggested racking 6 carabiners / 3 pairs, and making the top two opposite and opposed. This makes it less likely that he might accidentally unclip the whole thing.
I think this is a pretty clever idea. So there you go, do it with six or seven, your choice!