Alpine Tips
Cold hands? Do the “Penguin”
Want to warm up your hands? Try doing the “penguin”, a strange looking (and appropriately named) technique.
Yes, this looks weird! But it really works to get warmer “core” blood flowing down to your hands.
Rotate your shoulders to face your palms forward, and then start shrugging your shoulders up and down quickly between 20 and 30 times.
Check out the video below for a quick demo.
Happy camp feet with double boots
Do you have double boots on a cold weather climb, like maybe Denali? Here's a tip from two Denali experts of how to keep your feet warm & happy when you're at camp.
This tip is from Denali climbing veterans Steve House and Mark Postle, who have more than 30 Denali summits between them. I have an article in the “What's in my Pack” category with a detailed video from Mark and Steve about Denali gear, check it out here.
Are you on a cold weather climb (Denali) that requires double boots? At camp, remove your liner boots, put on your down booties, and then step back in your outer boot to wear around camp.
If the liners are damp, dry them inside your sleeping bag so you can wear ‘em the next day.
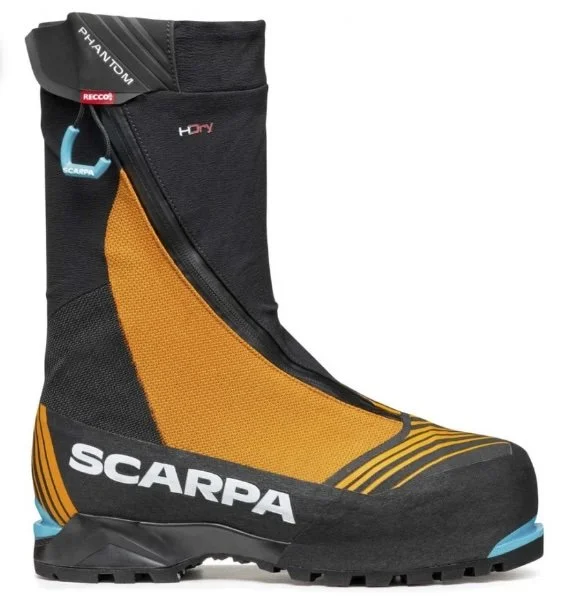

Ice climbing - environmental “red flags”
As ice climbing season winds down, it becomes more important to consider environmental conditions as potential hazards. Here are five of them. Guest post from IFMGA Guide Kel Rossiter.

Premium Members can read the entire article here:
This post (shared with permission) is an Instagram post from Kel Rossiter, an IFMGA guide and owner of Adventure Spirit Guides. Connect with Kel on his website and Instagram, @adventurespiritguides
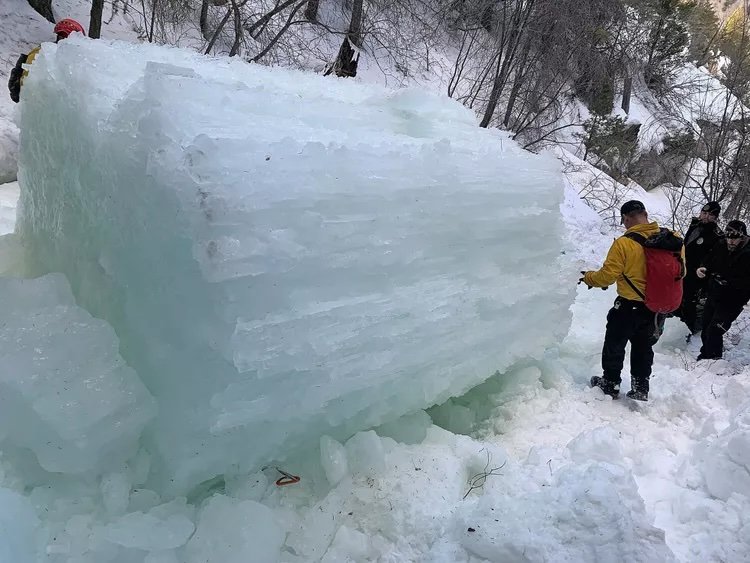
Photo: Capt. John Crowley/Duchesne County Sheriff's office
Kel Rossiter writes:
“We're moving into transition season here for ice climbing. Recently, I was asked to name the environmental factors to get my attention relating to hazards. These are the five I came up with.
The field of avalanche science has a lot to teach the climbing community in terms of risk analysis. One tool they use are the “red flags” - things like wind, heavy snowfall, etc. that should serve to get skiers attention when deciding when and where to go.
There are similar red flags in ice climbing. I came up with five, there are likely more.
Nighttime temperature above freezing
Daytime temperatures above about 40F/4C
Rain
See Premium Member article
See Premium Member article
The first three red flags have to do with warming, obviously not good for ice, which substantially increase overhead hazards.
Red flag number four . . .
Red flag number five . . .
None of these red flags are showstoppers for me. But if several of these are stacking up, it's a sign to me that I might need to change venues to shady places, a place with less overhead hazards, etc. And although I did throw out the number of 40°F/4 C, this is of course not an exact science.
There are other hazards in ice climbing, such as avalanches, cold temperatures leading to frostbite and hypothermia, and high consequence of falling. These are different than an environmental red flag, meaning hazards that have a direct effect on the ice I intend to climb.”
Want to see the environmental hazards #4 and #5?
Join my Premium Membership to read the complete article.
Thanks for your support!

Toe warmer heat packs in your gloves
Here's a crafty way to add a little extra heat to your hands: use a toe warmer inside your gloves. It's thin, and the adhesive backing holds it in place.
I learned this clever tip from @adventurespiritguides.
Here's one way to tame cold hands: Use a toe warmer heat pack, and put it inside your glove at the bend in your wrist1.
Toe warmers have a little adhesive part to keep it in place and this helps hold it without it moving around in your glove.
On really cold days, you can add another one inside your shirt over your wrist. I’ve used a thin sweatband to hold it in place over my wrist; that worked well.
Standard hand warmers don't work too well. They can be too bulky in tight fitting gloves, and they can fall out or move around when you take your gloves off.
Buy them in bulk, they’re pretty cheap. (You’ll probably need a new box every season because they have a shelf life.)

Tame your crampon strap with a hair tie
Crampons straps that flop around (and might even trip you up) are a hassle! Here's one way to deal with it, using the humble hair elastic “scrunchie”.

There are various ways to keep your crampons strap tidy. Here's one that works for me.
Take an elastic hair tie / scrunchie, and wrap a few times around the strap.
After you crank down your crampons and buckle them, tuck the extra tail through the hair scrunchie. This should keep it nicely out of the way.
Side note: Most crampons straps are very long, so you can fit them on just about any kind of Sasquatch foot. If you know the biggest size of boot you’re ever going to use, you can cut off some of the extra strap. Measure carefully before you do it!

Three ways to equalize crevasse rescue anchors
In crevasse rescue, you often build one anchor and transfer the load to it. Then (if needed) you may build a second anchor and try to equalize #1 and #2. Here are three methods to dial in this equalization.

Premium Members can read the entire article here:
While anchors for crevasse rescue operate on the same principles as other anchors, equalizing a loaded placement can require some different methods.
If you’re building a two piece snow anchor and want to equalize / share the load between them, you can treat it pretty much like a rock anchor. Place your two pickets, deadman, buried skis, whatever you‘re using, connect the protection with a cordelette, long sling, or your rigging of choice to make a master point, and there you go.
However, in crevasse rescue, this is often not the best approach. The above method can take a lot of time, digging, and packing down of snow. This is all happening while your unfortunate partner is in the hole, and hopefully your other teammate(s) on the rope are trying to keep them from slipping down any further.
So, for crevasse rescue, the typical approach is:
Get one anchor in fairly quickly. (If the snow is reasonably dense, this can be a vertical picket.)
Transfer the load to that, ideally with one team member sitting in the snow behind it to back it up.
Then, if you think it’s needed, a second anchor can be made and equalized with the first one.
Here's the tricky part: because there's already a load on anchor #1, it can be difficult to get the length of the sling or cord from anchor #2 JUST right to have proper load equalization / sharing.
Here are a few ways to fine-tune the connection between the anchors so you can get a decent load distribution.
In these examples, I'm using what I call a “crevasse cord”. It's basically a mini cordelette made from ultra-strong cord. My preference is about 10 feet / 3.5 m of Sterling VT-X cord. It's 5.4 mm, rated to 15 kN, and has a Dyneema core with a polyester sheath.
This is carried “open”, or untied, not tied into a semi-permanent loop.
Because this cord is so strong, you can rig it “bunny ears” style, with a small overhand figure eight on a bight loop in one (or both) end(s). Rigged like this it’s still probably good for 8+ kN, which is a much higher load than you should ever experience in a crevasse rescue scenario.
The standard cordelette you might use for climbing, which is about 6 meters of 7 mm cord still works fine for crevasse rescue. But I find it heavy, bulky, and usually too long; I prefer a smaller length of the Sterling VT-X.
Method #1 & 2: Clove hitch or trucker’s hitch
Clove hitch: This is probably the easiest method and uses a knot you already know. Tie a bight knot in one end of your crevasse cord. Clip that knot to the carabiner on anchor #2. Tie a clove hitch and clip it to anchor #1. Feed cord through the clove to remove as much slack as you can in your crevasse cord.
Trucker’s hitch: The trucker’s hitch isn’t used very often in climbing, but it's a super handy knot to know for lots of other life applications. This also does a little better job than the clove hitch to actually share the load between the anchors. Just like above, tie a bight knot in one end of your crevasse cord, and clip that knot to the carabiner on anchor #2. Pass the other end of your cord through the carabiner on anchor one. Tie a trucker’s hitch to put tension on the crevasse cord.

Here's a video showing the trucker’s hitch method. It starts about 11:30.
Method #3: Alpine block and tackle
Want to learn about the alpine block and tackle, and see a video of how to set it up for crevasse rescue equalization? (Sure you do!)
Join my Premium Membership to read the whole article.
Thanks for your support!

Snow anchors with Black Diamond and Mark Smiley
Black Diamond recently collaborated with IFMGA Guide Mark Smiley to test the strength of different snow anchor configurations. Some of the results were pretty surprising!
This is a great article on the Black Diamond website about recent snow anchor testing by IFMGA Guide Mark Smiley and the Black Diamond team.
They did a superb job on it, so I'm gonna send you to the link and have you read it there.
The focus is on rappel anchors, but the results are applicable to crevasse rescue anchors as well.
Even better, Mark gives access to a free sample lesson on T slot / deadman anchors from his online class, The Ultimate Guide To Modern Alpinism, as a link from the BD article, so check it out.
Here’s a table summarizing some of the results.

Takeaways:
Bounce test your anchor before using. If you give it a really good jump, you should test the anchor with about three times your body weight.
Rappel as smoothly as possible.
Buried Snickers bar, not so good. Buried Tyvek envelope, #ProbablySuperGoodEnough.
And a buried 2x4? Stronger then you think! Next time you need an snow anchor, might want to look around for a tree branch.
Check out the whole article on the Black Diamond website.

How strong is a “stabbed” rope?
Plodding along on a glacier climb, you get a little careless and CHUNK, your crampon spike goes straight through the middle of the rope in front of you. Does this dangerously compromise the strength of your rope? I tested it with HowNOT2, here are the results.

Premium members can read the complete article here:

Scenarios for a “stabbed” rope . . .
Top rope ice, climbing, you carelessly swing your tool, and CHUNK, you drive your pick straight into the rope. Whoops!
Walking in a rope team on a glacier. A careless step and you stab the rope with your crampon. Whoops!
If you do either of these, does it completely compromise the strength of your rope?
I've always wondered about this, so I tested it on my latest visit to the gear-breaking mad scientist genius Ryan Jenks from HowNOT2.com.
The rope we tested was a Beal Opera 8.5 mm, common for glacier travel.
Disclaimer, yes, results will probably be different depending on rope diameter, size of the spike, type of sheath used in the rope, etc. We had a small sample size. This is what we got, don't take it as gospel.
Test 1: Crampon stab through the rope?!
Broke at 11.9 kN. It broke in the knot, and NOT in the “stabbed” part of the rope.
That's close to full strength of the rope.
Click image below to see the short video.

Want to see the break from Test 2, pounding a nail multiple times through the rope?! Or test 3: ridiculously beating on the rope like a manic woodpecker in the same spot with an ice tool?!
Join my Premium Membership to read the whole article.
Thanks for your support!


Can you girth hitch a Dyneema sling to a picket?
Can you tie a sling directly to a picket hole? Is it going to be strong enough to catch a fall or use as a anchor in crevasse rescue? I did the testing, and have a broken picket to prove it.
Premium members can read the complete article here:

If you’re trying to shave weight on an alpine climb, you might wonder: is it okay to girth hitch a sling directly to a picket?
(Yeah I know, cool Euro climbers don't use pickets and make an anchor out of a buried pack of Gitanes, but that's a different topic.)
Does this dangerously weaken the sling?
Is the sling gonna get cut on the sharper bend radius of the picket hole?
Should I use the sling full strength (about 22 kN) and clip it with a carabiner like normal?
All good questions! I was curious about them as well. So I took a visit to the gear breaking lab of mad scientist Ryan Jenks, aka Mr. HowNOT2, to find out.
We used older Dyneema slings hitched through the middle hole on an older style MSR Coyote picket.
The girth hitch tested at a bit over 10 kN.
(Yes, with a limited sample size of 1.) For me, that's acceptable for a crevasse rescue anchor, because your picket is going to pull out of the snow before you approach that much force.
Not that you should ever be generating a load like that in a standard crevasse rescue to begin with . . .
But hey, if you want to use the sling full strength at 22+ kN, then clip it to the picket with a carabiner, your choice!
Next we tried a basket hitch. As expected, that was a bit stronger, around 16 kN.

After that, just for fun, we doubled the sling through the hole; a double basket hitch. (Yes, we kept using the same picket for every test, so it might've been weakened after the first two .)
Here's what happened. The sling it was fine. The picket broke 18.4 kN!

Want to see a YouTube short showing the break test, and a way to tie this with a bowline?
Join my Premium Membership to read the whole article.
Thanks for your support!

Crevasse rescue: simplified drop loop 2:1
The progress capture on a hauling system does not necessarily need to be on the anchor. If you have it on a fixed strand of rope, you can simplify your rigging, reduce friction, and lower the load on the anchor. Here's one way to set it up for 2:1 crevasse rescue.

Premium Members can read the entire article here:
Here's a simple method to create a progress capture on 2:1 hauling system that uses minimal gear, is fast to set up, and puts minimal force on the anchor.
Advantages to this system:
Uses basic gear you’ll always have: one friction hitch and one carabiner.
Doesn’t require a specialized and expensive progress capture pulley.
About the simplest and least complicated rigging possible.
Because there's no redirect, you eliminate this friction in your haul system, AND put the smallest possible load onto the anchor. A redirect puts 2X your pulling force onto the anchor. No redirect means a reduced load on the anchor. That's a good thing.
Modern equipment, such as the Petzl Traxion progress capture pulley, are superb tools for self rescue. They are small, lightweight, cool (because they‘re French!), and they work great.
However, they are expensive, you may not have one when you need it.
Especially with skills like crevasse rescue, a good approach is to learn it first with the bare minimum of gear, and then add fancier tools after you have the basic mechanics dialed.
As climbers, we’re often locked into the idea when we build an anchor, all the important things must happen actually ON that anchor. For example belaying up your partner, and having the progress capture in a hauling system.
However, it doesn't have to be that way. Often, we can use a fixed strand of rope, instead of the anchor itself.
Doing this can create many interesting options, which may make your rigging more efficient, comfortable, or ergonomic.
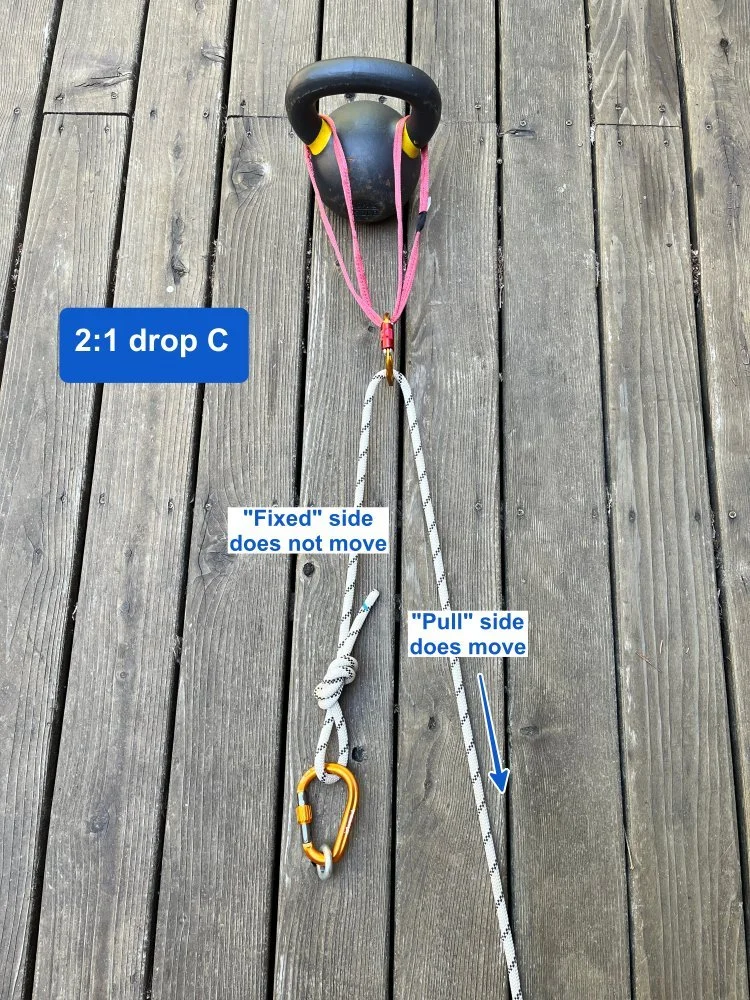
Let's have a look at the basic mechanics of the 2:1 drop loop.
When one strand of the rope is fixed to the anchor, and a loop is on the load, and you pull on the other side of the rope, you create a 2:1 mechanical advantage.
If you pull 2 meters of rope, the load moves 1 meter.
In a theoretical frictionless world, you can move a 100 kg load by applying about 50 kg of “pull. ”
In the real world with the friction of a carabiner on the load, your actual mechanical advantage around 1.5:1.
When you're pulling, you’re lifting about half the weight of the load, and the remaining half of the load is on the anchor.
Check out the photo. Note that one side of the “C “ is fixed to the anchor, the other side you can pull.
The “pull” side moves, and the “fixed” side doesn't.
This means that you can use the fixed side to attach your progress capture. This is the key to the simplified method.
Here's a step-by-step of how to set up a simplified 2:1 drop loop.
Step 1: Tie the rope to the anchor.
This could be the end of the rope, or any point along the middle of the rope (as shown here) and would be typical in a crevasse rescue. Be sure you have at least twice as much rope between you and the load.
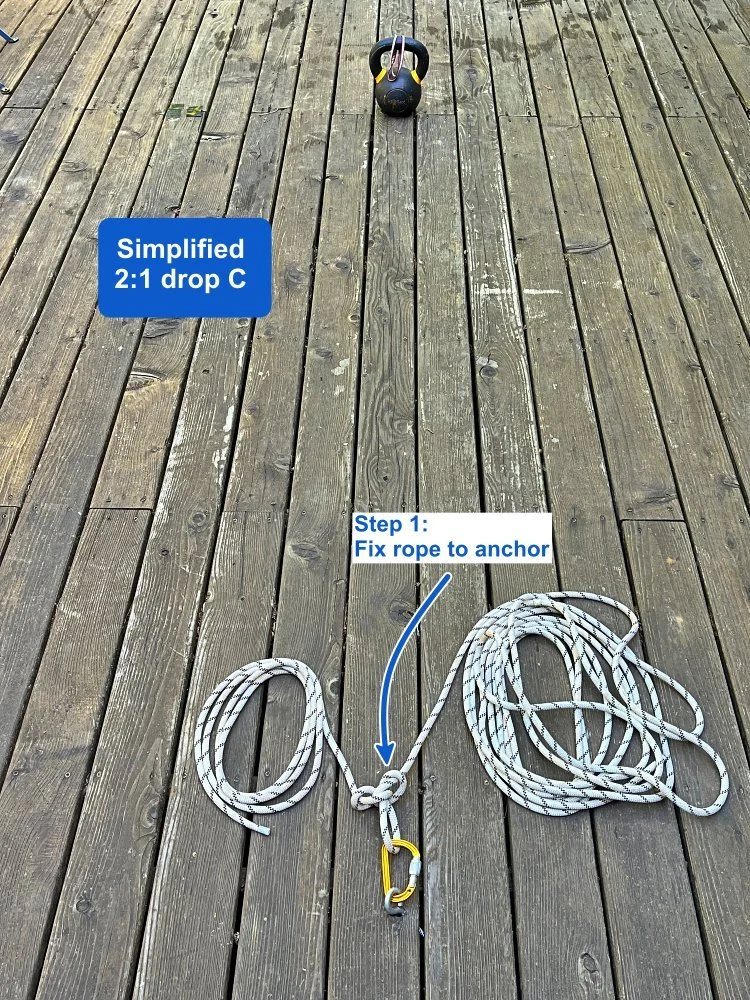
Step 2: Clip a loop of rope to the load.
In a crevasse rescue, this would typically be lowered down to the victim. If you have a pulley to minimize friction, this is a great place to use it. If you don't, it still works, but you need to pull a little harder.

Step 3: Tie a bight knot to the “fixed” strand of rope.
This is the side of the “C” that’s tied to the anchor, and it doesn’t move when you pull. Here I tied a butterfly because it's easy to untie after it's been loaded. A figure 8 or overhand works fine as well.
Tie this knot at any convenient spot along the fixed rope. Make the loop small, like fist sized.

Step 4: Tie a prusik (or attach a Traxion) to the “pull” strand of rope.
This is the side of the “C” that’s returning to you from the load, and moves when you pull. Use a prusik rather than an autoblock or klemheist, because it usually grabs the best and you don’t want this knot to slide/creep when weighted.
Here I'm using a Sterling Hollowblock which is quite short. Short is good.
If you have a progress capture pulley like a Traxion, put it on the “pull” strand and clip it to the bight knot with a locker. (This actually works better than the friction hitch, but for this example I’m showing simple gear.)

There are several more steps involved in rigging this correctly.
Join my Premium Membership to read the whole article.
Thanks for your support!


The "crevasse cord"
A standard cordelette (6-ish meters of 7 mm cord) is good for rock climbing. But it's unnecessarily long and bulky for glacier travel and crevasse rescue. Here's an alternative: about 3.5 meters of 6 mm Sterling V-TX cord, rated at 15 kN. This cord is short, light, compact, versatile and great for crevasse rescue.
Premium Members can read the entire article here:
For a long time, and without giving a lot of thought to it, I carried a pair of 120 cm slings or standard cordelette (about 5 meters of 7 mm cord) on glacier climbs.
Recently I’ve changed to a shorter, lighter, less bulky and more versatile tool. I call it “crevasse cord”.
It's 10ish feet / 3.5 m of V-TX cord, made by Sterling Rope. V-TX is impressive. It's just 5.4 mm and rated to 15 kN. It has a low stretch Dyneema core and a polyester sheath. It's fairly supple, which means it’s good for friction hitches. I carry it “open” or untied, not permanently tied in a loop with a welded double fisherman’s knot.
It's relatively inexpensive, about $1.20 per foot at my local climb shop.

Using a crevasse cord - friction hitch
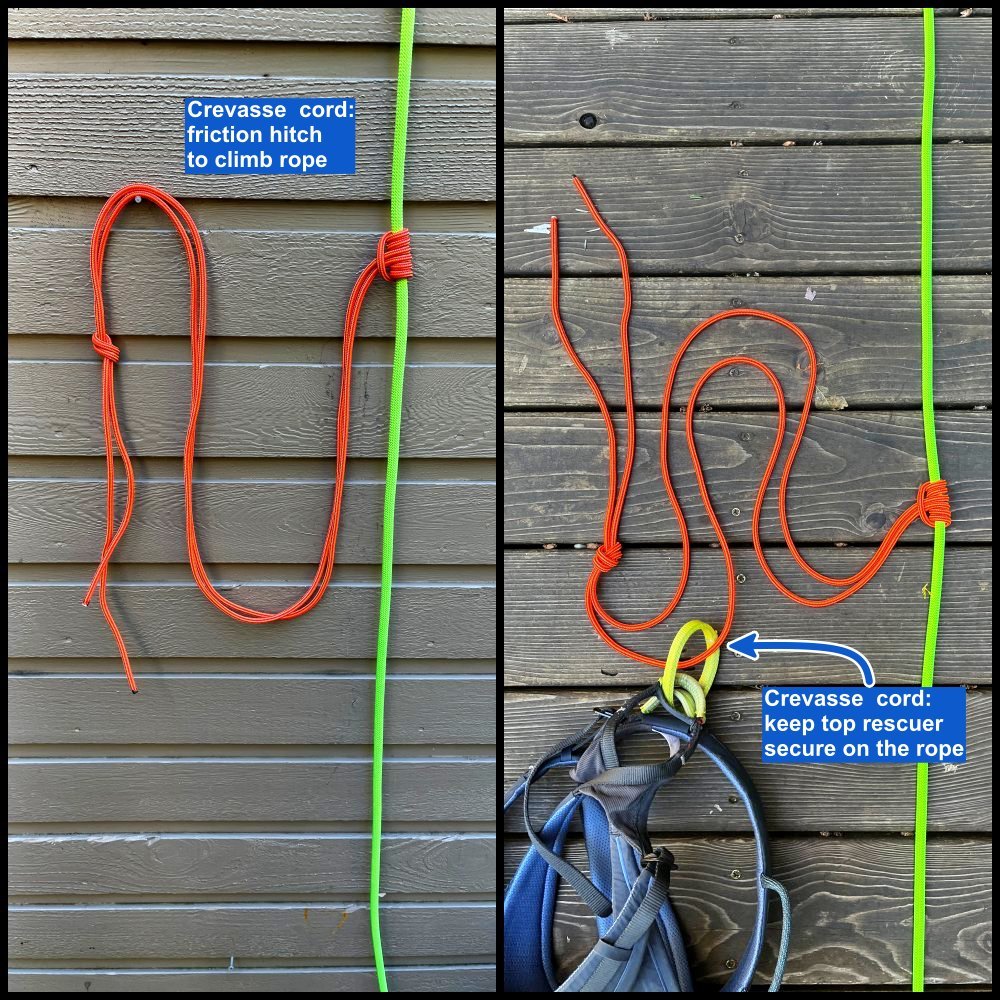
As a friction hitch - Tie any friction hitch around the rope, usually a prusik or Klemheist. If you need a shorten the connection, tie an overhand knot.
Left photo: If you’re the unfortunate person in the hole, you can tie a friction hitch and use this as a foot loop to ascend the rope. (Please, stop carrying those old-school designated “foot prusiks”.)
Right photo: As a rescuer on top, you can use this as your primary connection to the anchored rope. Connect yourself to the hitch by passing the cord through your belay loop and tie an overhand knot. Cool, you’re now connected to the friction hitch and you saved a carabiner.
Using a crevasse cord - single point anchor building
If you build a T slot (aka deadman) anchor, you need at least about 4 feet or 1.5 m of sling or cord to connect the anchor to your master point. The crevasse cord is perfect. You can basket hitch the cord through a hole of a picket, or clove hitch it around a deadman such as an ice axe.


Electromagnetic interference (EMI) and avy transceivers, from BD
Black Diamond published a very interesting study about the effects of common electronic devices and how they generally do not play well with avalanche transceivers. Here’s a link to their excellent article.

In January 2024, Black Diamond published an interesting study about how different electronic devices that we might carry in the mountains affect avalanche transceivers.
It's definitely worth a read. From their blog post:
“Various electronics often found in the backcountry were used in our test, including smart watches, GPS watches, smartphones, two-way radios, action cameras, satellite communication devices, electronic airbag packs, and even a snowmobile. The searching transceiver was held at 50cm from the torso using a static tether to help maintain the appropriate distance. Each item was then placed in a normal use position as noted below.
The goal was to determine how bad it might be to violate the 20/50 rule. To do so, many items were held closer than 50cm (i.e., heated gloves and smart watches). Each item was tested three times, and the average taken. We then calculated the reduction in range compared to a baseline with no other items present.”
“The takeaway here is that EMI is real, and it can have a significant impact on transceiver performance! And we can’t stress enough the importance of updating the firmware of your avalanche transceivers and electronic avalanche airbag packs.”

A strong, simple and fast snow anchor
The T slot (aka deadman) anchor is usually a good choice when building a crevasse rescue anchor in snow. Here’s a quick enhancement that can double the strength.
Disclaimer: There is WIDE variability in the strength of snow anchors, due to factors like depth of the anchor, what you’re using for the deadman, temperature and water content of the snow, whether you stomp down (aka work harden) the snow between the anchor and the load, etc. A certain snow anchor flavor that tests to a certain strength in one location does not mean that result applies everywhere.
If you carry a picket, you have various options for building a snow anchor. With a very hard snow you can maybe use a vertical picket top clipped. With medium to hard snow, a vertical mid clip picket can work.
However, with softer snow, or if you choose not to carry a picket, about your only option is the “T slot” (aka deadman) anchor. This anchor can be made with gear like an buried ice axe, skis, or a backpack.
Here’s a way to (maybe?) double the strength of the T slot anchor, with a few seconds of work and one additional piece of gear: Add a vertical reinforcing placement to the horizontal placement.
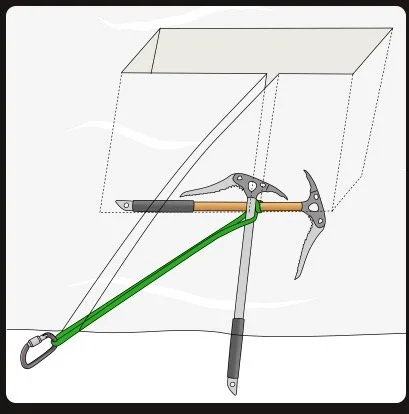
image (used with permission) : https://www.vdiffclimbing.com/glacier-travel-snow-anchors/
This does a couple of good things:
It makes the horizontal placement much harder to pull out.
If the horizontal placement, like an ice axe, shifts a little bit under load, it can prevent the clove hitch (that's on the horizontal axe) from slipping.
(If you use a picket and girth hitch the middle hole for the horizontal piece, you don't have to worry about the connection point slipping.)
The typical method to beef up a snow anchor is to build an entirely separate one, and try to connect / equalize them with cord. This is certainly effective, but it can take a lot more time and gear (more cord and carabiners) to build, and will probably end up pretty much the same strength as this one.
Sounds good. How strong is it?
My pal Ryan Jenks at HowNOT2.com tested this. He got about 8 kN, which is pretty impressive! Compare this to a single horizontal buried picket, which he tested at about 4 kN.
Adding the vertical picket to reinforce the horizontal one pretty much doubled the strength of the anchor, at least in this one test.
Keep in mind this was in high water content snow in the Washington Cascades. This usually conpacts very well and make some reasonably strong anchors. Your mileage may vary.
Keep in mind that a typical crevasse rescue anchor will only need to hold less than the weight of the victim when they’re hanging. (The friction of the rope passing through the snow reduces the load on the anchor.) When hauling with a 2:1, if the pull strand is not redirected, the anchor should see about 2–3 kN at most. So, in the typical crevasse rescue scenario, loads on the anchor usually are fairly low which is a good thing.
I’ve seen quite a few studies of the strength of horizontal deadman anchors, but this is the only one that adds the vertical element. If anyone knows of other studies, please email me; I’d like to add those to this article.
A few snow anchor testing resources . . .
Here's a link to the British mountain rescue magazine from (I think) 2018. They got results that were different. Like I said, your mileage may vary.
If you really want to nerd out on snow anchors, here’s a webpage that summarizes most of the publicly available studies.
HowNOT2 video showing snow anchor pull test results. Horizontal picket about 6:00. Reinforced horizontal picket, about 6:35.
Screen grab from the above video, setting up the reinforced picket.

Finally, for a very deep dive into snow anchors, here is a nice presentation from the Mountain Rescue Association featuring snow anchor expert Art Fortini.

Grivel Clepsydra S - the best carabiner for glacier travel?
For glacier travel, it's usually best practice to clip, not tie, to the rope. The Grivel Clepsydra carabiner just might be the best tool for the job: the twin gates will never freeze or jangle open, and the keeper gate prevents cross loading. Plus, it has a bonus feature as part of a minimalist hauling system.
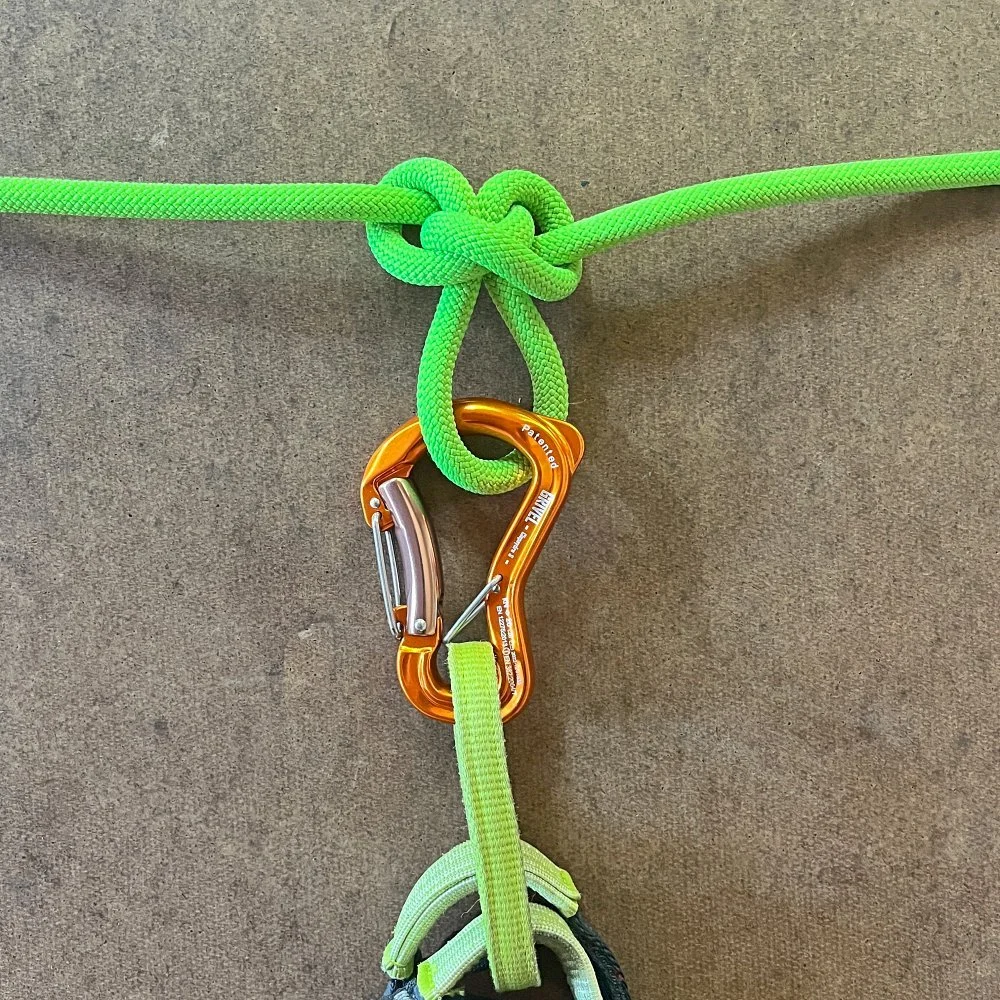
The Grivel Clepsydra is a very unique carabiner. It has a few features that make it perfect as your clip-in for glacier travel. (It comes in two sizes; here I’m featuring the small (S).)
Why is the Clepsydra S great for glacier travel?
No chance of cross loading means you only need one carabiner to clip to the rope
Unique Grivel twin gate means it’s always secure, can’t freeze shut, and can’t wiggle open during a day of glacier tromping. (Yes, the twin gate takes a little getting used to, but you'll figure it out.)
You can use the small end as a prusik-tender in a hauling system (photo below)
Small, fairly lightweight
When you’re not glacier climbing, it works perfectly with a Grigri, as the little “horn” prevents the carabiner from being cross loaded
The standard recommendation for clipping to the rope for glacier travel is to have two opposite and opposed carabiners, at least one of them locking. With the Clepsydra, you only need one.
Before I got this carabiner, I used the Black Diamond Gridlock. This works pretty well, but the screwgate can loosen up over a day, plus as an HMS carabiner, it’s larger than necessary.
Here's how to use the Clepsydra as a “prusik minder” in a hauling system. The small end of the Clepsydra keeps the prusik hitch from being pulled through.


My crevasse rescue gear
There are many approaches to crevasse rescue and many choices for what gear to bring. You need light weight, multifunction, and hopefully have teammates with similar kit to have an effective rescue. Here's my go-to crevasse rescue gear.
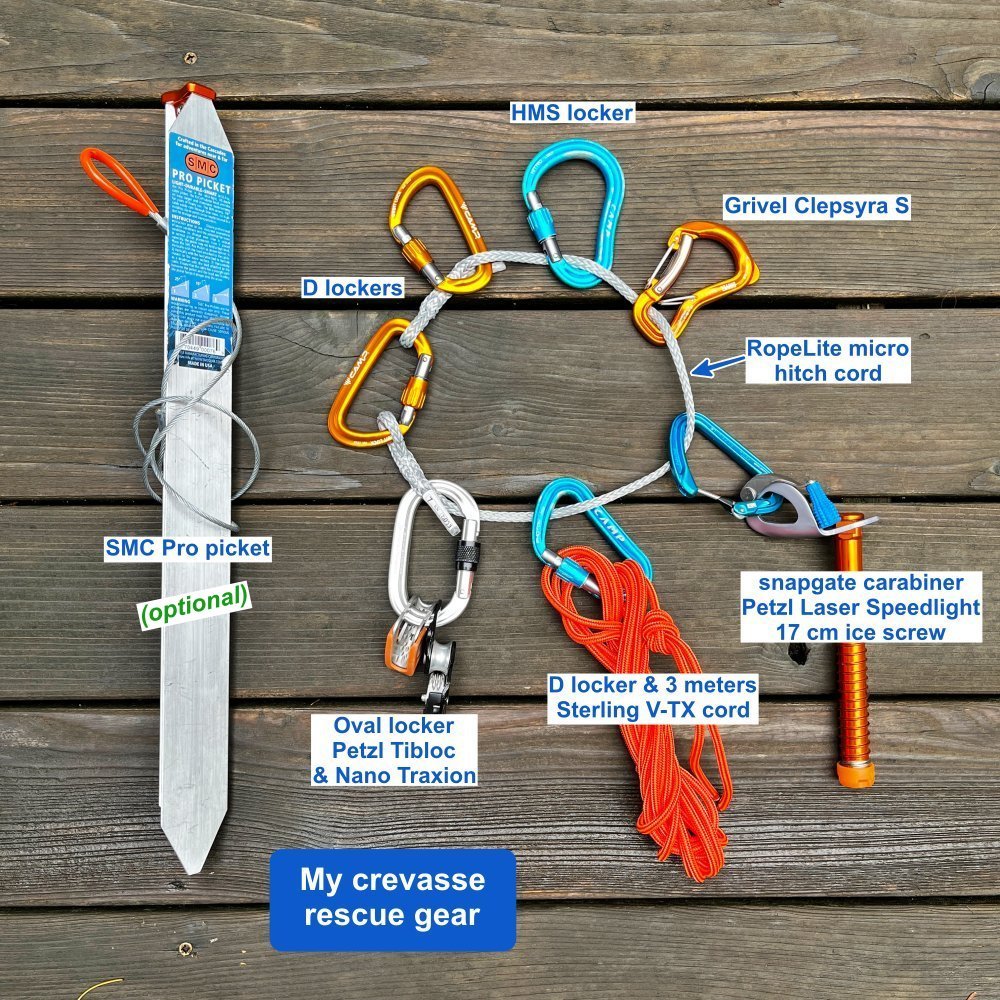
There are many different approaches to crevasse rescue, and a near infinite combination of gear that you could carry. The basic requirements are 1) being able to climb the rope if you fall in, and 2) rescuing your partner if you’re the lucky one on top, and they can’t climb out. Fortunately, modern tools and techniques lets you do both with a minimum of gear and weight.
The gear requirements can change depending on team size and general skill level, but here’s a pretty good starting point.
This is pretty much the bare minimum. The idea is with a three of four person team, if everyone carries more or less the same basic kit, rescuers can combine gear as needed.
If you're on a two person team (which is generally considered experts only) you might want to carry a few more items, like maybe another locker, or a120 cm sling.
My crevasse rescue gear
6 locking carabiners: Grivel Clepsydra S, Black Diamond oval, large HMS and three “D” - The Clepsydra works great to clip yourself to the rope, because you can never crossload it, and the gate is very secure. Also works as a progress capture with a a prusik, if you don't have any progress capture pulley like a Traxion. The oval locking carabiner is a time-tested workhorse, and plays well with devices like the Traxion and Tibloc. A larger HMS locking carabiner is helpful if you need to clip other things to it. Finally the D lockers covers any other secure connection you might need. (Yes, I probably have one more locker than I need, but Murphy's Law of rescues is you always need one more locking carabiner.)
1 small snapgate carabiner - you need to rack your screw on something. You can use a non-locking carabiner for non-critical connections, such as the “tractor” in a 3:1 Z drag.
Petzl Tibloc - handy and lightweight ascender and rope grab.
Petzl Nano Traxion (or Micro Traxion) - the modern standard for crevasse rescue gear. Yes, they are expensive, but so helpful in so many situations, they are pretty much becoming everyday carry.
17 cm aluminum Petzl Laser Speed Light ice screw - if you can get down to ice, this can be your anchor on the top. If you fall in, you might be able to place the screw and clip yourself to it to take your weight off of the rope, which can make life for your partners on top a LOT easier when they set up the rescue. Don't bring a screw shorter than about 16 cm.
About 3 meters of Sterling V-TX cord - typically used for equalizing a second anchor, ascending a rope, or securing yourself to the rope system. (Amazing cord; 5.4 mm and rated 15 kN). You don’t need the standard (7 mm 6 meters long) cordelette on a glacier.
Short friction hitch - for climbing up the rope if you fall in, and for making a “tractor” on your hauling system. Here I’m using a spliced eye 5mm hitch cord, which grips well on 6 mm rope. This is made by a cool company called RopeLite; check ‘em out for custom spliced ropework solutions. (There are many other options, such as a loop of 6mm cord or a Sterling Hollowblock.)
What about that picket? Pickets can be very helpful in building a snow anchor but they're not required. Pickets are commonly carried in North America, South America and New Zealand, but not so much in Europe. A more minimalist approach involves making a T-slot anchor with your buried ice axe, skis, or backpack. But to me the axe is a crucial piece of gear, and I'm not too excited to bury it in the snow in case I need it for something else.
When I do carry one, it's the SMC Pro Picket. This is reasonably lightweight, has a pointy end for going into the snow and a reinforced top for bashing on with a hammer. The nicest feature is a permanently attached metal cable on the middle hole, which is how pickets have maximum strength in either vertical or horizontal placements. (That means you need one less 120 cm sling.)
What I don’t bring: pulley, belay device, several “just in case” extra carabiners, designated waist or leg prusik loops. Need another pulley? Grab the Traxion from your partner. Need to rappel or give someone a belay? Use a Munter hitch on your HMS carabiner. The carabiners above are more than enough. And forget those old-school designated waist and leg prusiks; you can easily ascend a rope with the gear shown above.
Where to carry this gear? You want the gear you need to climb a rope easily accessible on your harness or pack gear loops, not inside your pack. For ascending a rope with the gear shown here, I’d keep the orange cord and the oval carabiner with the Tibloc and the Traxion on my harness at a minimum. The rest can probably go inside your pack. I’d also keep the screw on my harness. If you fall in, you might be able to place it and clip to it, removing your weight from the rope as mentioned above.
Harness: A minimalist mountaineering harness, I like the Petzl Tour. Leave that sport climbing harness with the five gear loops at home. You want lightweight, no padding because you have on lots of clothes and (hopefully) are not gonna be hanging in it, with leg loops that open so you can easily put it on while wearing crampons or skis.
Rope: Varies on team size and skill level. Good options include:
30 meter, 6 mm Petzl RADline
40 meter, 7.7 mm Sterling Dyad
50 meter, 7.1 mm Edelrid Skimmer (which is currently the lightest dynamic rope on the market)
The diameter, length, and static vs. dynamic issue of the “best” rope for glacier travel is a BIG topic. Here's a link to some articles on my website that take a closer look. 1) Petzl 6mm static RADLine, 2) static rope for glacier travel.
So, that's my kit. Simple, lightweight, everything has a function. With this I can build just about any flavor of mechanical advantage hauling system I might need, like a 2:1, 3:1, and 6:1.
Some examples of 6:1 systems are here.
Minus the picket, this is what everything weighs.


“Drop end 3:1” for crevasse rescue
The modern approach to crevasse rescue is to use a separate, unweighted rescue rope strand to pull out your unfortunate partner. Typically, this is done with a 2:1 “drop loop” system. Here's a variation with some improvements: dropping down one END of the rope, and hauling with a 3:1 mechanical advantage.
This article was reviewed by IFMGA Certified Guide Rob Coppolillo, co-author of “The Mountain Guide Manual” and author of “The Ski Guide Manual”. Sadly, Rob is no longer with us, but his tremendous love of teaching alpine skills lives on.
Credit to AMGA Certified Rock Guide Ryan Tilley, who made a video about this method. Kevin Govan @govanathon and Pierre_Gtr @biderchurch also mentioned it to me.

There are two primary systems commonly used for crevasse rescue; the “drop loop C”, and the “Z drag.” While they each have their pros and cons, the drop loop C has become the modern standard. Here's a longer article with pro tips on the drop loop C.
“Drop loop C” - 2:1 mechanical advantage
Pro: Brake knots in the rope don’t interfere with your hauling system.
Pro: You can prepare the crevasse lip to more easily pull out your unfortunate partner.
Pro: Puts the lowest load onto the anchor; (approx 1x your pulling force.)
Con: You usually need to carry at least twice the length of rope that’s between team members to be able to drop a loop. This usually means a two person team needs at least a 60 meter rope.
Con: if the middle person falls in on a 3 person team, this might be a problem, because the end person may not have enough rescue rope to reach them.
“Z drag” - 3:1 mechanical advantage
Pros: You can set up the haul system with a small amount of extra rope. This can allow teams to travel on a shorter rope.
Cons: Pretty much the mirror image of the 2:1 system: Brake knots can cause problems, and the rope often cuts into the lip of the crevasse.
Cons: Puts a larger load on to the anchor, (approx 2x your pulling force.)
However, these aren’t your only options. What if you could combine these systems to get most of the benefits and few of the downsides?
That's what you get with a “drop end 3:1”.
Benefits of the drop end 3:1:
Lets you prepare the lip so the rescue line doesn’t cut into the snow.
Brake knots are not an issue, ignore them.
Gives you more pulling power than a 2:1. (Both systems are easy to convert to a 6:1 if you need too.)
Easily reversible to a lower if needed.
Requires a LOT less rope! No need to have twice the amount of rope between partners, like with a drop loop.
Can be easier to rescue the middle person (that dirty little secret of crevasse rescue that often is not discussed when using a drop loop C.)
Allows a team to use a shorter rope. For a two person team using the drop C method, to maintain adequate spacing, maybe tie 3 or 4 brake knots (which take about 1 meter of rope each) AND for each partner to carry at least twice the length of rope as rescue coils, you pretty much need a 60 meter rope at a minimum. (This is counterintuitive for most people; a two person team needs a 60 meter rope, while a three person team can use a 50 meter rope!)
This also lets a three person team use a shorter rope. For example, you could have a three person team on a 40 meter rope: (11-9-middle-9-11) 9 meters between each climber, and each end person carrying 11 meters of rope.
Allows a greater spacing between climbers with the same length of rope. For example, in an area with large crevasses, a three person team might choose to use a 60 meter rope, and have 14 meters between climbers (16-14-middle-14-16) with this system. With a drop loop C system, you'd need to do at least 20-10-middle-10-20, with 10 meters between each climber, in case of a middle climber fall.
You learn ONE primary system that works in just about every scenario, instead of learning two different systems that may not work in every case and can be confusing to learn and remember, years later, in the heat of battle.
Drop end 3:1 crevasse rescue sequence (team of three):
Unfortunate Climber 1 falls in a crevasse. (The climbers on top remember that Climber 1 has the car keys, so they decide to pull ‘em out.)
Climber 2 (middle) and Climber 3 (end) on top arrest the fall.
Climber 2 builds an anchor and transfers the load by clipping their clip in bight knot to the anchor. Climber 1 is now secure on the anchor.
Climber 3 puts a friction hitch onto the rope to secure themselves, unclips from their clip in knot, and unties their clip in knot.
Climber 3, sliding their friction hitch along the rope to secure themselves, approaches the edge of the crevasse to check on climber 1.
Climber 1 calls up that they want/need to be hauled out.
Climber 3 ties a bight knot in the END of the rope, clips a locking carabiner to it, lowers the carabiner down to climber 1, and tells them to clip the carabiner to their belay loop.
Meanwhile, Climber 2 builds a 3:1 Z drag anywhere that’s convenient, such as on the backside of the bight knot that's clipped to the anchor.
Climber 3 prepares the lip of the crevasse a bit off to one side by carefully knocking off loose snow, and puts their ice axe onto the edge of the crevasse so the rescue rope won’t dig in.
Climber 2 and Climber 3 start hauling, climber 1 gets pulled up.
If this 3:1 for some reason doesn’t give enough pulling power, it's easy to convert it to a (theoretical) 6:1.
Assuming a 3 person team with a 50 meter rope, here’s the process in photos.
The rigging in these photos is compressed into a small area for the demo. In reality this is stretched out over much more rope.
The team is rigged and ready for glacier travel:
The middle person is clipped to the middle of the rope. (Side note: a good rope for glacier travel is a dry treated half rope. One good option is the Sterling Duetto 8.4 mm, which comes in convenient lengths like 30, 40, and 50 meters.)
The lead and end climbers, also clipped to the rope, are about 11 meters away (about 7 full arm spans, for me) either direction from the middle person.
The end climbers carry the extra rope (about 14 meters each) as rescue coils. This gives a rope spacing of 14-11-middle-11-14.
The team has brake knots between each climber to hopefully limit the fall distance. (This is optional for a three person team, but can be a good idea in some situations.)
Whoops, the lead climber (Klimber Kettlebell), falls into a crevasse!
The partners on top arrest the fall. The middle climber builds an anchor and transfers the load by clipping their clip in bight knot to the anchor. The end climber on top secures themselves to the rope with a friction hitch, unties their clip-in knot, and unties any remaining brake knots. This frees up all of the remaining rope (25 meters) to use for a rescue.

On the back side of the connection to the anchor, tie a butterfly knot as a secondary anchor point. This is optional, but has some benefits: it makes an easy-to-clip, uncluttered anchor point, can help keep rope strands from pinching/twisting/crossing, and makes it easy to build a 6:1 mechanical advantage system if you need it later.

Approach the lip of the crevasse carefully, you don't want to knock down a bunch of snow onto your partner. They’re already having a bad day, don't make it worse. Be sure you’re secured to the rope with a friction hitch.
Ask your partner what they need. In this case, let's assume they yell, “Pull me up!”
In the END of the rescue rope, tie a bight knot and clip a locking carabiner to it. Do not lock it.
Lower this locker to your unfortunate partner.
“Drop end”, get it?

Unfortunate partner clips locker to their belay loop and locks it. They are now secure on the “dropped” strand and are ready to be hauled out on this strand.

Prepare the lip of the crevasse.
If you can do this off to the side a bit from your unfortunate partner, that's a good thing.
Knock down loose snow that’s under the rescue strand, and put an ice axe or something similar under the rope so it doesn't cut into the snow. Onto the original strand your partner fell on, secure your axe so it doesn't fall in and get lost. (Securing the axe is not shown in the photo).
Pro tip: if you think you need to rappel into the hole to render assistance, it's easy to add your rappel device with an extension below your friction hitch, which greatly simplifies getting back out of the hole in guide mode. Here's a detailed article on that technique.
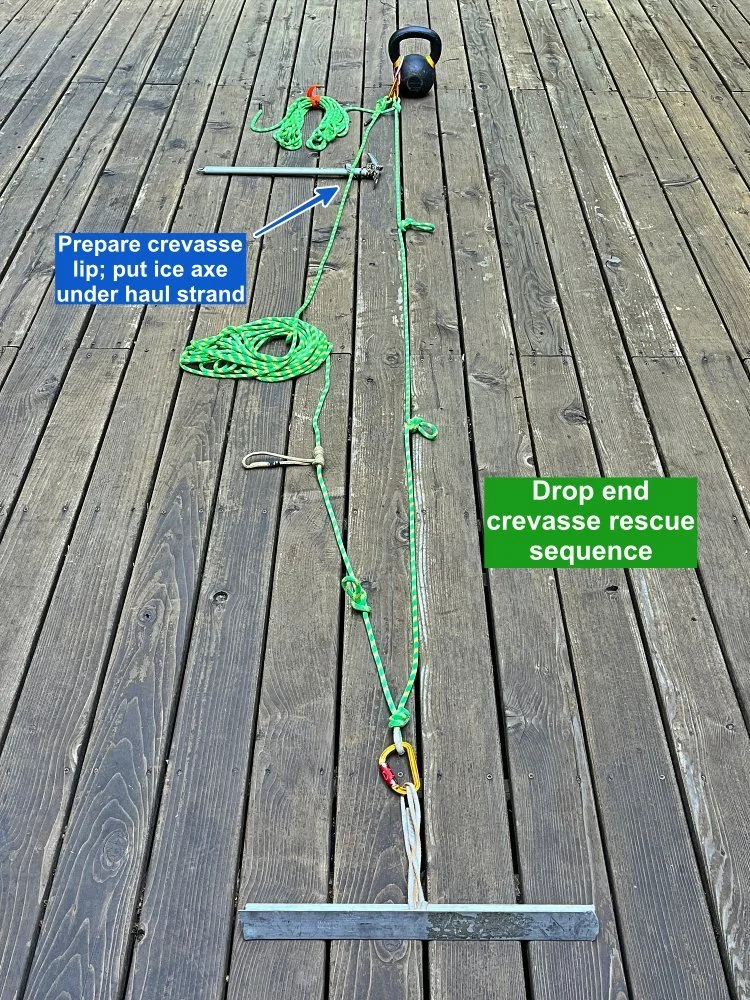
Build a 3:1 Z drag haul system with the rescue rope. Use the butterfly knot you tied as the anchor point. You need a progress capture in the system; here I'm using a Petzl Micro Traxion.
Pro tip: dig out a little hole with your hands under the Traxion pulley. This prevents snow/ice from jamming into the toothed cam. =^)
In this example, we assume that the two partners doing the rescue have a Traxion and a pulley to use. Using both of these, you get a calculated mechanical advantage of 2.7 to 1. Not quite a 3:1, but about as good as it gets. Quite a bit better than the calculated mechanical advantage of a drop loop C, which is 1.9 to 1.
Note that in the real world, the friction over the lip of the crevasse will further reduce the actual efficiency any hauling system.
Nice! You’re ready to haul.
Push the “tractor” friction hitch as far as you can toward the edge of the crevasse.
Start pulling on your 3:1. With a 3:1 system, the load on the anchor is two times the force of your pulling. So, keep that pulling force slow and steady by trying to walk slowly and continuously backward, rather than doing a “1,2,3 HEAVE,” type of pull, which can put a higher peak load on the anchor.
As your victim gets close, be sure to check on them often to be sure they don't get pulled up into the crevasse lip.
Reset the system as needed.

Here's a close-up of the 3:1 Z drag.

If you need more pulling power, it's easy to convert this into a 6:1 system.
There are various ways to do this, here's one that's pretty simple. Add a clove hitch, prusik loop or rope grab onto the pull strand, and clip the backside of the rope coming off of your secondary anchor to this.
You have now have a 2:1 on top of the 3:1, giving you a 6:1 theoretical mechanical advantage. To move the load 1 meter, you need to pull 6 meters of rope through the system.
This puts a load on the anchor of approximately five times the amount of pulling force you’re applying. If you're gonna use a 6:1, be sure your anchor system is as solid as you can make it. If you started with a single buried deadman anchor, you might want to add another one and try to equalize the two pieces.
The calculated mechanical advantage of this is around 4.7 to 1. If you had one additional pulley, you could put it on the purple carabiner, and increase your mechanical advantage to around 5.1 to 1. Friction at every change of direction reduces your efficiency. The more pulleys you can use, the better your efficiency.
Tip to increase pulling efficiency: if you have one pulley, it's best to put it closest to the strand that is getting the initial pulling force. In this case, I moved the pulley from the initial 3:1 friction hitch onto this new rope grab.

Here's a close-up of the 6:1 mechanical advantage rigging, called a “C on a Z”.
We built a 2:1 on top of the 3:1. This is called a compound pulley system. You multiply the two forces together to get a 6:1.
Here, I pretended I was a bit short on gear, so I used a clove hitch on the pull strand. Yes, resetting that means untying and retying, which is a hassle. Any sort of rope grab (prusik, Tibloc, Traxion) works better, but hey, be resourceful and use what you have.

So, that's a look at the drop end 3:1 for crevasse rescue.
It's fast to set up, it's one simple system that you can use in just about any scenario, it requires minimal gear, and you can easily increase it to a 6 to 1 if you need the turbo pull.
Is this “better’ than the drop C? Could the drop end 3:1 become the new standard practice?
Now I get it, there are many different approaches to crevasse rescue and I have no illusions that this is suddenly going to become to go to method. People are very attached to what they’ve learned. But methods evolve, better systems are invented, and it's good to keep an open mind about something that just might work better than the way you're doing it.
Give them both a try and see which one works for you.
Crevasse rescue: "drop loop C" tips
A popular approach to crevasse rescue is to use a 2:1 “drop C” as the primary mechanical advantage system. Learn some of the advantages of the drop C over the 3:1 Z drag, some easy hacks to make it work even better, and how to overcome a couple of potential problems.

There are many approaches to crevasse rescue. The traditional method of a 3:1 mechanical advantage “Z drag” was the standard, and it’s still worth learning.
(There's actually a more modern approach to the Z drag where you drop one end of the rescue rope to the victim and set up a 3:1. Here's a complete article about the drop end 3:1 method.
A popular (and modern) method is to use a 2:1 “drop loop / drop C” system.
Advantages of the 2:1 drop loop over the traditional 3:1 Z drag:
Can avoid the often significant problem and friction of the loaded rope cutting into the lip of the crevasse.
Puts the lowest possible load on the anchor. The lower the mechanical advantage, the less force goes onto the anchor. This could be a good thing in crevasse rescue.
Victim can assist by pulling on one strand of the dropped loop, more below.
If you have brake knots in the rope, you can bypass them.
It can be easier to set up.
Downsides:
Can require more rope (but with some crafty rope tricks, not always, see below.)
Notes . . .
With a 2:1 system like this, two reasonably strong team members on top should be able to pull out one person who's in the hole, especially if the victim can assist in the process by pulling down on the load strand of the rope. Doing this creates a little slack, and reduces friction on the lip.
In reasonable conditions, ONE fairly strong person on top may be able lift the person in the crevasse. The technique for this is rather than simply pulling with your hands, drape the rope over your neck, bend your knees, and do squats. If you can deadlift 100 pounds or so, you ought to be able to lift your partner. Remember, you have a (theoretical) 2:1 MA. Here's a short Instagram video clip demonstrating this.
Alternatively, you can lower a carabiner or pulley to your victim and have the progress capture on the top. There are pros and cons to both of these methods, we’ll cover those below.
Progress capture on top, or on the victim?
With the drop loop C, you have two options where to put the progress capture pulley: 1) You can lower it down on the rope to your unfortunate partner, or 2) you can have it up on top. There are a few advantages to having it on the top.
If you set it up backwards, you can easily fix it. A progress capture pulley like the Traxion has to be set up correctly, otherwise you will not be able to pull. This might seem simple when you're training on a nice sunny day, but in the pressure of a rescue it can be easy to set it up incorrectly. If you do that on top, it's simple to flip it around and correct your mistake.
It’s easy to reverse the direction of pull. If for any reason you decide you need to lower your victim, you can easily do this on top by disengaging the cam. It’s much more complicated to do this if the Traxion is on your victim. Important: when your victim gets close to the top, have someone monitoring them carefully to be sure they don't get pulled into the lip of the crevasse.
Less chance of snow/ice getting jammed in the cam mechanism. As the Traxion gets pulled up near the lip of the crevasse, there's a chance that snow could get jammed into the cam mechanism, and potentially cause it not to engage properly. Pro tip: If the Traxion is on top, you can dig out a little hole underneath with your hands so the pulley is pretty much hanging in the air, and is not in contact at all with the snow.
The victim can help out
With the drop loop system, half of the rope is being pulled up and half is not moving. If the victim is functional, they can help the process a lot by pulling down on the side that’s not moving. This greatly reduces the pulling force required by the hauling team on top. If you do this, be careful not to get your hand or glove sucked into the pulley.
Another option is that the victim can pull down or even start ascending on the original rope strand they fell in on. Doing this can pretty much completely remove their weight from of the drop loop C, which again makes hauling online easier for the people on top.
A 2:1 drop C creates the lowest forces on the anchor
In crevasse rescue, your anchor might be an ice ax buried in a quickly excavated T-slot. Depending on snow conditions, how deep you’re digging, and whether you stomped down the area in front of the ax, the strength of this anchor can vary a lot.
So, given that you're anchor might be less than ideal, it might be a good idea to have rigging that puts the least possible force on the anchor. That's what you get with a 2:1 - about 1x of your pulling force gets applied to the anchor.
To explain this, I’m going to take a quote directly from the outstanding book, “The Mountain Guide Manual”, by Rob Coppolillo and Marc Chauvin (pg. 216).
“When not moving, the climber is suspended on two strands and the friction on the lip removes forces on the anchor. What's the haul begins, only one side of the loop moves, meaning that only half of the friction needs to be overcome while the other half of the friction continues to aid the anchor.”
A redirect makes a 3X force on the anchor
You might be tempted to put a progress capture pulley on to the anchor, run the pulling strand through that, and then pull toward the victim. This can work. But, this redirect puts a load on the anchor that's about three times your pulling force. Minimizing load on the anchor in a crevasse rescue is usually a good thing, so be mindful of this.
Alternative way to rig it is with the progress capture on the anchor, but then you pull in line with the rope rather than a redirect. This minimizes friction, and put a load on the anchor only (about) one times your pulling force.

Friction hitches work for a progress capture
Check out this nice diagram from Ortovox. A prusik hitch goes on each side of the drop loop. As you pull up, the blue helmet rescuer advances the prusik, capturing the load. (See the video at bottom for a demo of this.)
If you look carefully at the close up diagram in the circle, you can see that this progress capture friction hitch is attached to the same friction hitch that is securing the blue helmet rescuer.
Here's a video that shows this in action. This particular technique starts at about 4:10.

image: https://www.ortovox.com/uk/safety-academy-lab-ice/chapter-3/rescuing-a-companion
Easily convert a 2:1 to a 6:1
If you need additional pulling power, it's easy to convert this drop loop 2:1 into a 6:1 mechanical advantage system. Here's an article about how to do that.
Clip an additional carabiner to the anchor to serve as a redirect. As mentioned above, this does increase force on the anchor, compared to your original 2:1.
Add a friction hitch, carabiner and pulley (if you have one) to the previous pull strand.
Clip the tail to the pulley. You created a 3:1 on top of a 2:1. Multiply these values together to get a 6:1 compound system. (If you have only one pulley, it should go on the part of the system that's closest to your hand that's doing the pulling. This creates the greatest efficiency in your haul system. This system also works if you only have carabiners and no pulleys, but it's less efficient.)

Here's a pro tip for rigging a drop C more easily, from IFMGA Guide Ben Markhart.
Add a locking carabiner to the pulley, clip a sling to this, and then clip another locker to the end of the sling. Instruct your crevasse rescue victim to clip the bottom locker onto their harness. This can be helpful in a couple of ways:
Provides a nice hand hold for the victim, which can help keep them more upright.
Can help “extend” the dropped loop rope if the rope is too short. (More on that below.)
(The downside to doing this is that the victim is not able to pull down on the half of the loop that’s fixed, which can make hauling for your buddies on top quite a bit easier. Like most things in climbing, there's a trade off.)

Check out Ben’s short Instagram video here.
Ben explains:
“Your instinct is to want to hold onto something, and it makes it lot more comfortable on your core muscles. So this makes people want to grab about 8-12 inches above the pulley if there is no extension, now the rope has to slide though your hand to haul and is easy to get sucked into the pulley if your not careful. This way you hold onto the sling, much more comfortable.”

screen grab from Ben markhart, https://www.instagram.com/p/Cd_OOQJJeHh/?hl=en
What if you don't have enough rope to reach the victim with a drop loop?
Solution #1: Extend the pulley
This is one of the most common concerns and potential downsides of using a drop loop system. Here are several solutions.
In the last photo above, I extended the drop loop with a 60 cm sling and a locker. How about extending it with something longer? Like maybe a cordelette, either in a tied loop or a single strand with a bight knot at both ends? Doing this extends the clipping point so it reaches your victim. Nothing in the rulebook says that the lowered pulley has to be clipped directly to the harness of your victim. Lower the pulley as far as you can, and extend it with whatever slings/cordelette you have the rest of the way if needed.
A possible downside to doing this is that the pulley might get wedged into the snow at the lip of the crevasse. If you knock down a lot of the loose snow and prepare the lip properly, this hopefully is not an issue.
Also, the anchor needs to be back from the edge at least the distance of your cordelette. If you don't do this, you will run out of rope to pull while your victim is still below the lip.

Solution #2: Your progress capture doesn’t need to be on the actual anchor
When you drop a loop of rope to your partner, one side of the “C” is fixed to the anchor, and the other side is what you pull on. If you don't have twice the length of rope between you and your victim, you can tie a bight knot anywhere on the fixed side of the “C” and clip your progress capture to this knot. This might let you stand in more convenient position, to maybe more easily monitor your victim. This can also mean that you don’t need twice the length of rope between you and your victim. Maybe only 1.5 times, as shown in the photo below.

What if the victim is unconscious, and can’t attach the pulley to themselves?
First off, if your partner is in really bad shape, your first step in rescue might be to rappel into the crevasse and try to do some first aid, at least be sure they’re breathing. If you do this, you might be able to attach a hauling system to their harness.
If you have a Petzl Tibloc, and can lean over the edge of the crevasse to reach free hanging rope, here’s an option. (If these two things are not possible, you might be better off doing a traditional 3:1 Z drag from the top, or maybe having a rescuer rappel down to the victim and attach the pulley.)
Put the drop loop through a Traxion (or a pulley) and engage the cam.
Clip the Traxion with a locker to a Tibloc installed upside down on the rope strand going down to your victim.
The Tibloc will (hopefully) slide down the rope toward the victim and stop when you run out of rope, or it rests on their tie in knot . Then you can 2:1 haul with a progress capture, without the pulley actually being attached to the victim. See photo below.

screen grab from: https://youtu.be/lsTihq92IlQ
Here's a nice video from some expert German guides showing how to do this, along with some other great techniques. This particular “lower the Tibloc trick starts about 5:30.
Tip for loading the rope correctly into the Traxion: “teeth to tail”
It's very easy to load the rope into the progress capture pulley the wrong way, especially if it's in a strange angle or you're stressed from a rescue.
A good mnemonic to remember the right way: “teeth to tail”. That means the toothed part of the spring-loaded cam goes to the tail of the rope, or the part that you need to pull. Here's a photo.


Modern crevasse rescue techniques
There are many different approaches to crevasse rescue. Some older methods are cumbersome, slow to set up, and add unnecessary clutter. With modern tools like a progress capture pulley and micro ascenders, crevasse rescue is usually faster and simpler. Let's look at some techniques and video from pro European guides showing how it's done.
image: screen grab from https://youtu.be/lsTihq92IlQ
The German Mountain and Ski Guides Association (“Verband Deutscher Berg und Skiführer” or “VDBS”) has a well-deserved reputation for professionalism and technical expertise.
Petzl and Ortovox created a superb series of instructional videos featuring some top VDBS guides. They show a few crevasse rescue techniques that were new to me, and you may find them helpful also. (Side note, there are many other solid videos in this Ortovox series: lab snow, lab ice, lab rock, and first aid.)
I’ll say up front: there are many approaches to crevasse rescue. While most of them can get the job done, some are definitely more elegant, easier and faster to execute, and result in less harness clutter than others.
Old-school crevasse rescue (at least in my corner of the world in the Pacific Northwest) was centered for a long time on several principles:
Using a 3:1 “Z drag” as the main mechanical advantage system.
Always having a designated waist and leg prusik either on the rope, or at least on your harness.
Using these prusik to (usually awkwardly) transfer the load to the anchor.
Tie in to the ends of the rope.
More modern technique, shown in these videos, is a lot different:
Using a 2:1 “drop C” mechanical advantage system as the primary tool.
No one is climbing with a designated waist or leg prusik. Yes, friction hitches are used, but they’re made from an open (aka untied) cordelette when needed, and are NOT attached to the rope while you’re climbing. (Check out the diagram below: the cord is carried untied, then prussiked to the rope and tied through the belay loop only if needed.)
Load transfer to the anchor involves no prusiks; simply clip your clip in bight knot to the anchor. Simple and fast.
Climbers clip to the rope at a fairly short distance apart. The end climbers carry the extra rope coiled in the pack to use in a rescue if needed.
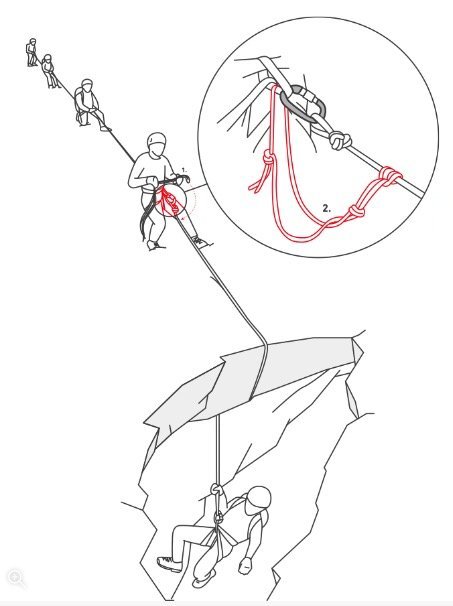
image: https://www.ortovox.com/uk/safety-academy-lab-ice/chapter-3/rescuing-a-companion
The drop C requires you have extra rescue rope, which should be no problem if you have a 60 meter rope and a 3 person team. Here's a whole article on how to rig your rope for a two, three, or four person team.
One simple approach for rigging with a three person team: middle person ties a bight knot in the middle of the rope and clips it to their harness. From the middle, the two end people measure out seven or eight double arm lengths of rope, tie two more bight knots, and clip ‘em to their harness. The remaining rope gets tied into butterfly coils and put into the packs of the end people.
Usually, it's best practice for glacier travel to have everyone clipped to the rope, not tied into the rope. You can use any sort of bight knot you like - overhand, figure 8, or butterfly.
These methods are a lot easier with some modern tools such as a Petzl Micro Traxion or Edelrid Spoc progress capture pulley, and a micro ascender such as a Petzl Tibloc.
Below are links to three videos. (They have a LOT of information, I’ve watched each one several times. Like most everything with climbing, these techniques are better learned from video or live demonstration than from a written description.)
Drop C 2:1 rescue
Self rescue from the victim’s perspective
The “team pull” rescue, with 3+ people on top
Video #1 - Crevasse rescue with the 2:1 “drop-C”
No pre-rigging with prusiks on the rope, so no need to bring separately tied chest prusik, leg prusik, etc. This means less gear to carry and less cluster on the rope and harness.
Instead, each climber carries about 5 meters of 5mm or 6mm cord, and uses this to tie friction hitches as needed.
After arresting the fall, the last person initially holds the load. (This assumes one of the end people has fallen in the crevasse. Rescuing the middle person is more problematic.)
The middle person uses an open (untied) cordelette to make a friction hitch between themselves and the victim. They tie an overhand knot to create a clipping point, pass one end of the cord through their harness, tie another overhand to secure themselves to the rope, then unclip from their figure 8 loop. Doing this lets them stand up and move around to make the anchor, while being secure and no longer clipped to a fixed loop of rope.
The middle person makes an anchor: a single ice axe buried in a T slot. Important, stomp down the snow between the anchor and the crevasse. No pickets needed.
Interesting way to transfer the load onto the anchor: clip the friction hitch onto the anchor, end person gives a little bit of slack, and then the tie in loop for the middle person get clipped to the anchor.
Using modern tools like a Petzl Micro Traxion progress capture pulley to make a drop C 2:1. With this method, the progress capture is on the victim, not on the anchor.
Using the drop-C as the primary raising system. An advantage to the drop C is that you can prepare the lip of the crevasse to minimize the rescue rope cutting into the snow.
With a 3 person rope team, you can probably haul your partner out of a crevasse with a 2:1. This is a LOT easier if the victim can pull down on the rope they fell in on, which generates a bit of slack. (If you can’t pull the victim up with a 2:1, it’s easy to make the drop-C into a 6:1.)
Alternative if you don’t have a traxion pulley: drop a C loop with carabiner (or pulley) to the victim, and add a progress capture prusik above.
Clever way to lower a Tibloc down the rope to set up the drop loop if your victim is unconscious, or if you’re short on rope.
Video #2 - Self-rescue for the victim
Again, no one is climbing with prusiks already attached onto the rope. In fact, they don't recommend prusiks at all. Instead, use a Tibloc or other type of micro ascender, then clip a sling to it. In the video they suggest a 90 cm sling, a bit hard to find in the United States. Use a 120 cm and tie a knot to shorten it up.
Using ascenders means you can easily pass them around any brake knots that might be on the loaded rope.
For your foot (or climbing) prusik, put a Micro Traxion on the rope below the Tibloc, then clip a long sling to this.
To get past the crevasse lip, remove the foot loop, clip the Micro Traxion on your harness, and run the tail of the rope through the Tibloc. This gives you a 3:1 mechanical advantage and you can literally haul yourself up the rope and hopefully past the lip.
Here's a more detailed article about using the Traxion and Tibloc in two different combinations to climb a rope.
Video #3 - crevasse rescue with the “team pull”
A larger team, with three or more people on top, can usually pull out a victim with simply walking backwards. It's very important when doing this to have one person monitoring the victim at the edge of the crevasse, and pulling in a coordinated and controlled manner. Do NOT pull your victim into the lip of the crevasse!
The team rescue does not have to happen just with your team. If another group is nearby, they can step up to help.