
Rope ascending with the Petzl Traxion
Note - This post discusses techniques and methods used in vertical rope work. If you do them wrong, you could die. Always practice vertical rope techniques under the supervision of a qualified instructor, and ideally in a progression: from flat ground, to staircase, to vertical close to the ground before you ever try them in a real climbing situation.

The Tibloc micro ascender and the Traxion progress capture pulley are a pair of versatile tools from Petzl that are handy in a variety of self-rescue scenarios.
They work especially well for those (hopefully rare) times when you unexpectedly might have to ascend a rope (working WAY better than a traditional prusik / friction hitch.)
Important:
When ascending a rope with any kind of toothed device like this, keep the rope tight between you and the anchor at all times. Do not allow slack rope between you and the anchor. A fall or slip with even a tiny amount of slack rope can generate enough force to damage the rope. Petzl has done some sobering studies on this, read them here.
The Tibloc has a reputation as being hard on ropes. Using a rounded stock locking carabiner, and not suddenly weighting the device, can help minimize this.
With both of these methods, you need two points of connection to the rope (your tie in knot doesn’t count). Never rely on just one ascender. A failure may happen for one of three reasons: the ascender comes off of the rope, the ascender fails to properly grab the rope (mud, ice, etc) and your tether carabiner can become unclipped. The simplest backup: Every 5 meters or so, tie a overhand on a bight and clip it to your belay loop with a locker. (More often if you’re scared.)
As mentioned above, definitely practice with this in a controlled environment close to the ground before you ever try it for real!
Let's look at two different methods. If you have this gear, try them both and see which one works for you. (The standard figure 8 tie knot is omitted for clarity.)
Tips:
Think of rope ascending as a “movement sandwich.“ That’s a short movement of exertion, in between two periods of rest. Rest > move > rest. Rest > move > rest. Use your legs. If your arms are getting pumped, you’re probably doing something wrong.
What carabiner to use? With both devices, a wide gate HMS belay carabiner (or oval locker, if you have one) is usually the better choice, as it aligns the load better. A “D” locking carabiner is acceptable.
Method 1: Tibloc as a foot loop, Traxion attached to your harness

Sequence:
Clip Tibloc to rope. (if you don't have a Tibloc, you could use a cordelette tied in a friction hitch shortened with an overhand knot for your foot.)
Clip a 120 cm sling to the Tibloc; this is your foot loop.
Put Traxion on rope, and clip to your belay loop. (Clip the Traxion “Teeth toward Toes”, i.e., teeth pointing down.)
To climb the rope: slide the Tibloc up the rope as far as you can, bend your foot under your butt, stand up in the sling, and simultaneously pull any slack rope through the Traxion.
Tie a backup bight knot and clip to harness every 5 meters or so.
From the (always awesome) Petzl website. It looks like this diagram shows an extra backup sling running from the Tibloc to the harness. That's another way to do it if you don't want to tie backup knots, as this provides a second point of connection to the rope.

image: https://www.petzl.com/US/en/Sport/Pulleys/MICRO-TRAXION
Method 2: Traxion as a foot loop, Grigri as progress capture
If you have a Grigri, you can use that is the progress capture.
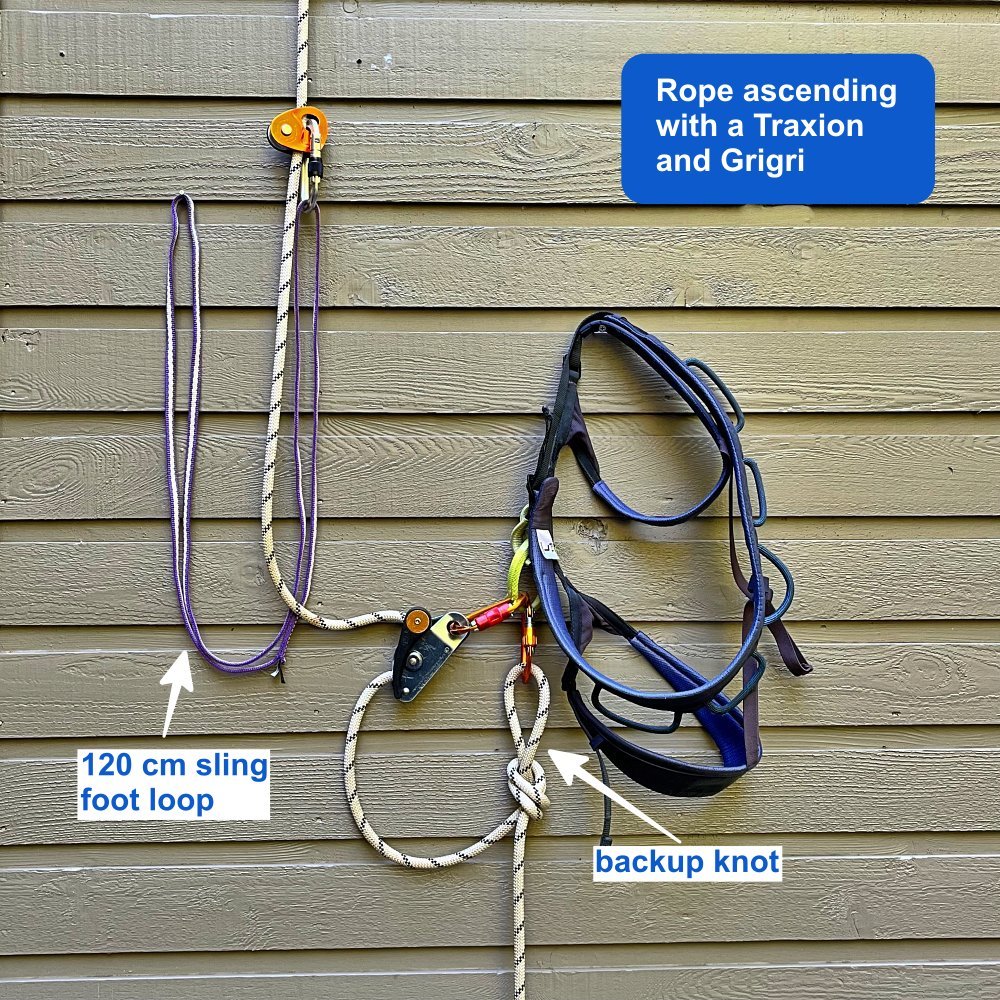
Sequence:
Clip Traxion to rope, with teeth facing down.
Clip a 120 cm sling to the Traxion; this is your foot loop.
Put Grigri on rope, and clip to your belay loop. Be sure the rope is fed correctly.
To climb the rope: slide the Traxion up the rope as far as you can, bend your foot under your butt, stand up in the sling, and simultaneously pull any slack rope through the Grigri.
Tie a backup bight knot and clip to harness every 5 meters or so.
And finally, if you're on low angle terrain and maybe want to bend a few safety rules, you could clip a Traxion to a fixed rope, clip it to your harness with a 60 cm sling, and use the carabiner /device to pretty much Batman up the rope.
Check out this Instagram video that shows an IFMGA Guide demonstrating this (pretty-darn-fast-but-probably-not-approved-by-Petzl) method.