

Alpine Tips

All about friction hitches - Part 2
Let's take a deep dive into the hitch cord, something that deserves to be on your harness. If DIY, how long a cord and what diameter? If factory made, what are the options? What about spliced instead of sewn? Are eye to eye hitch cords helpful for climbers? Answers are all here.

Premium Members can read the entire article here:
I'll start with a story that a student shared with me awhile back in a self rescue class.
This person, climbing second, was traversing on a multi pitch route. They took a fall, swung into overhanging terrain, and found themselves hanging in space about 5 meters below the last bolt. All they needed to do was ascend the rope and keep on climbing. They had a cordelette and various slings, but didn’t know how to rig them as friction hitches to climb the rope. (There was too much friction in the rope for the leader to haul them up; plus the leader didn’t know how.)
This turned into a call to the local search and rescue team, and this unfortunate person had to wait almost 4 hours to get rescued, hanging there in their harness! Ouch!
A little knowledge of improvised friction hitches, and how to use them to ascend a fixed rope, would've solved the issue.
The humble friction hitch cord. Inexpensive, lightweight, and pretty much infinitely useful when it comes to #CraftyRopeTricks and self-rescue stuff.
Let's have a closer look at the hitch cord, the Swiss Army knife problem-solver of climbing gear.
Is a “hitch cord” the same as a “prusik loop”?
Terminology: I'm using the more general and accurate term of hitch cord. Why?
You can tie several different knots with a hitch cord, like an autoblock and Klemheist, not only a prusik.
It doesn't have to be a loop, it can be “eye to eye", with a small loop on each end. (More on that below.)
How do you make your own friction hitch loop?
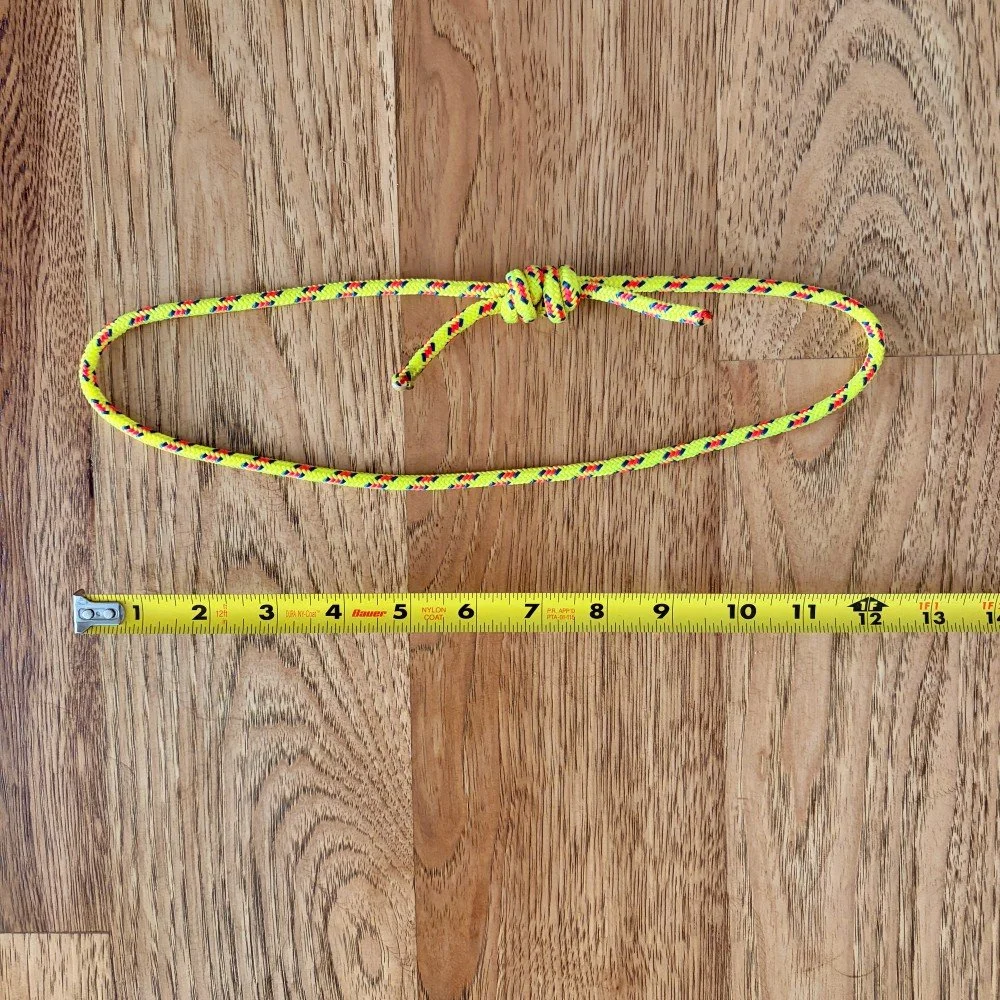
To tie your own, a good starting point is 120 centimeters / 48 inches of 6 mm cord.
I’ve experimented a lot with the length. 106 cm / 42 inches (when tied) gives about the smallest usable loop. 120 cm gives you more wiggle room. Having a little extra length in your hitch cord is usually fine, but having one that's too short can be a problem. I suggest starting with 120 cm, tie different hitches on different diameter ropes (single and double strand) and then trim it down a bit if you want.
A common mistake is making a hitch cord that's too long. You only need it long enough to tie an effective hitch onto whatever diameter rope(s) you're using, and enough space to clip a carabiner. When you first cut the cord, it's probably gonna look too long. That double fisherman's knot, with nice long tails, takes up a lot more cord than you might think.
6 mm is a good diameter. It's small enough to be grabby on small diameter ropes, but big enough to inspire confidence when you're hanging from it way off the ground.
When you're done tying it, you want a loop that measures about 30-38 cm / 12-15 inches when you stretch it out. (The photo below shows a slightly smaller loop.)
Have the climb shop use their hot knife to seal the ends. If that's not an option, tape the cord where you want to cut it, slice it carefully with a sharp knife, and then put a few dabs of superglue on the end to seal it up. Here's my longer article on how to neatly cut a rope.
Different manufacturers make cord of various softness / stiffness. Cord that’s softer tends to work better for friction hitches, so if you have a choice, go for that.
Tie into a loop with a double fisherman's knot that's properly dressed, and really snug down the knot with tails of at least 5 cm / 2”. After you get the length dialed, you can get this knot wet and crank it tight by bouncing on it, because you're never going to untie it.
Test your rigging systems
It's good to have a go-to setup, especially for a rappel autoblock, that you use all the time. Test different flavors of hitch loops with the rope that you use most often, both double strand and single strand, to see, which works the best. This could be especially important with smaller diameter rope.
You don't want to find out in the middle of a rappel that your hitch cord has too much or not enough friction. Figure this out ahead of time in a controlled environment. Maybe start on a staircase, and then move to something vertical close to the ground.
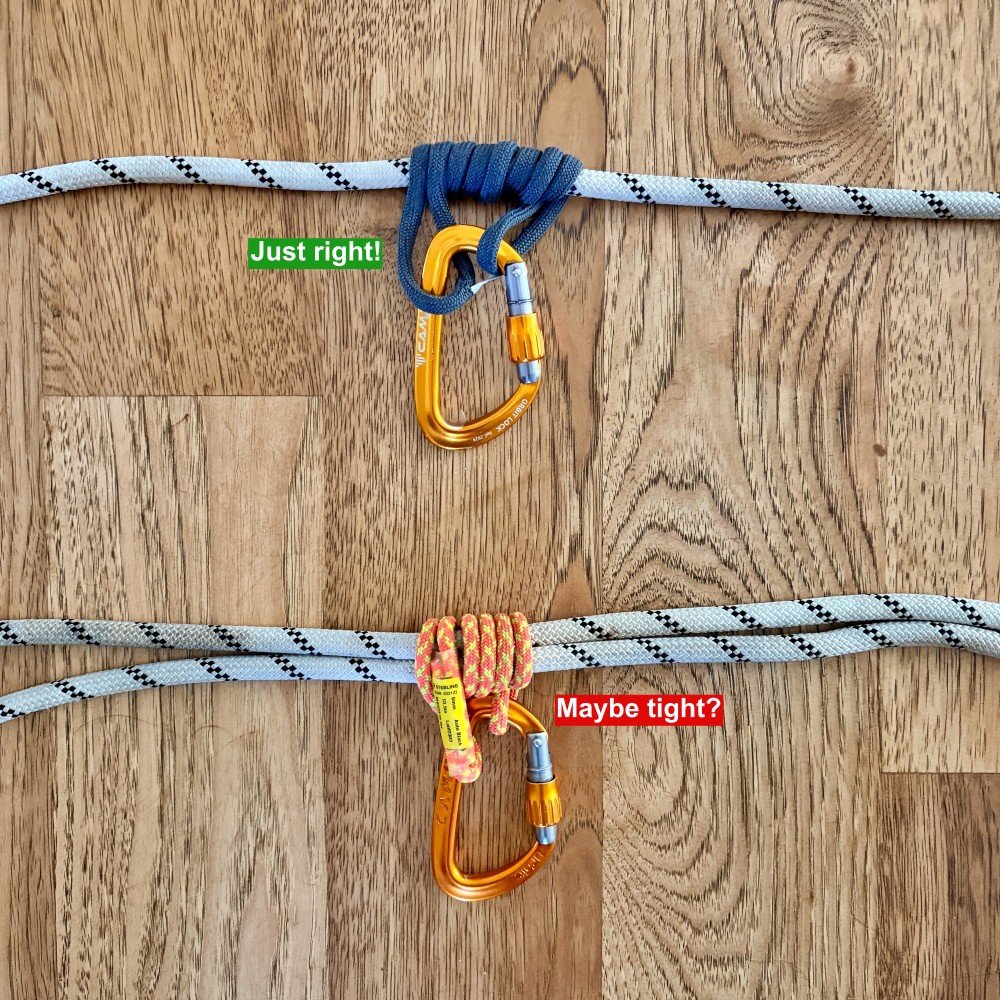
For example, in the photo below, the auto block hitch on the single strand of 10 mm rope looks great. However, the hitch cord on the double strand is just barely big enough.
How do you rack it? Do the twist
My favorite way: “do the twist”. Hold the loop by both hands, put a few twists in it, then clip it with a carabiner. The cord sort of does a little double helix thing, gives itself a hug, and makes a neat bundle for your harness. No need for fancy macramé projects. The twist is fast, simple, and works with cordage of any length.
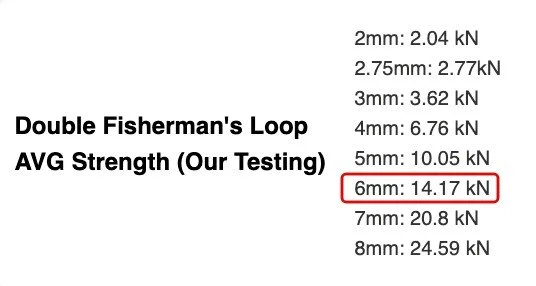
How strong is that DIY hitch loop?
Great question. Our friends at HowNOT2 have these specs on their website. Sterling 6 mm accessory cord, tied into a loop with a double fisherman's knot, is around 14 kN.
Can I use a Dyneema sling to tie a friction hitch?
Yes, you can, but cord is usually better. Cord is typically more “grabby”, so you might have to make a few more wraps if you use Dyneema. But hey, if you're in some unexpected situation and you need a friction hitch, like the one described at the top of this article, then go for it.
It's best practice to NOT use a Dyneema sling as a third hand / rappel backup. Because Dyneema has a relatively low melting point, the heat generated from a fast rappel could potentially damage the sling.

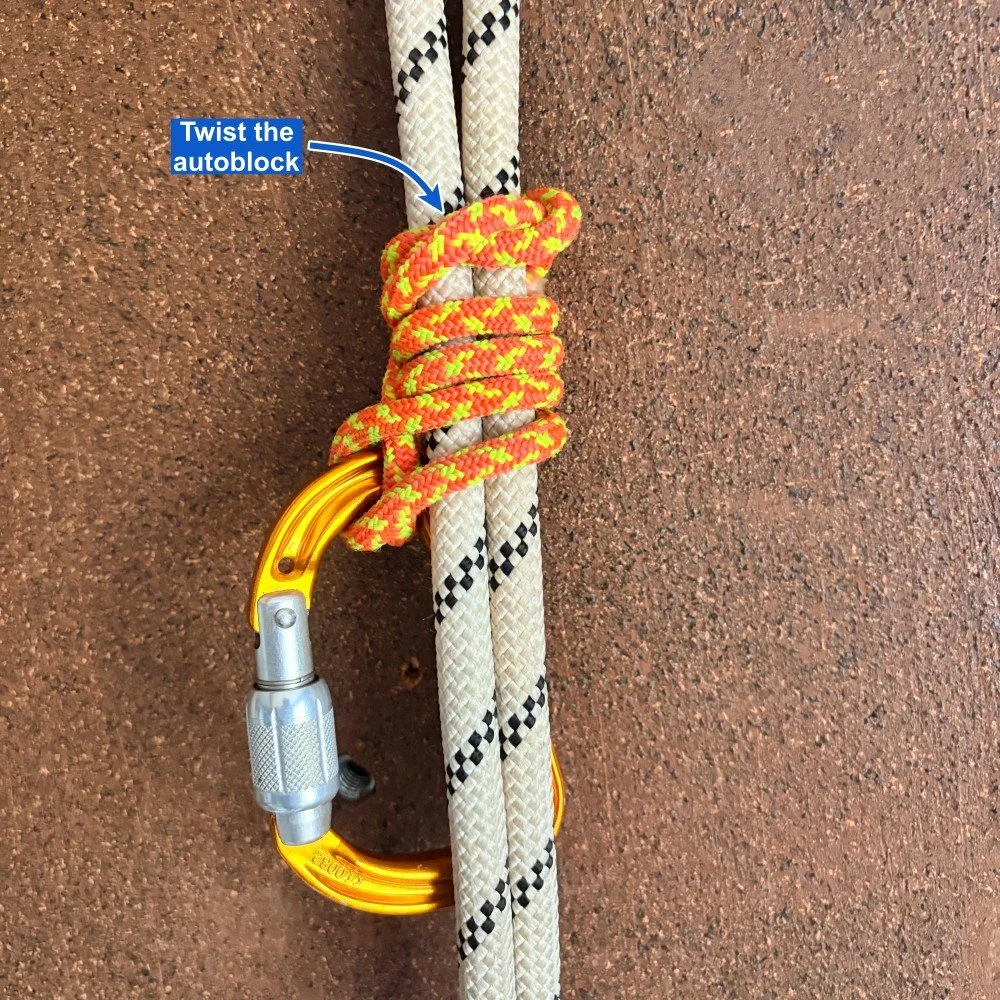
Autoblock tip: add a twist
Sometimes, your autoblock rappel backup might be too “grabby” with three wraps, or not grabby enough if you only use two wraps. Here's a trick that can help.
Instead of making the third wrap, instead twist the auto block sling a couple of times before you clip it to the carabiner. This effectively constricts the hitch onto the rope, which can often give you just the right amount of friction for a smooth rappel.
Here’s a bonus article on this topic (usually only available for my premium members) with a video from an IFMGA guide showing how it's done.
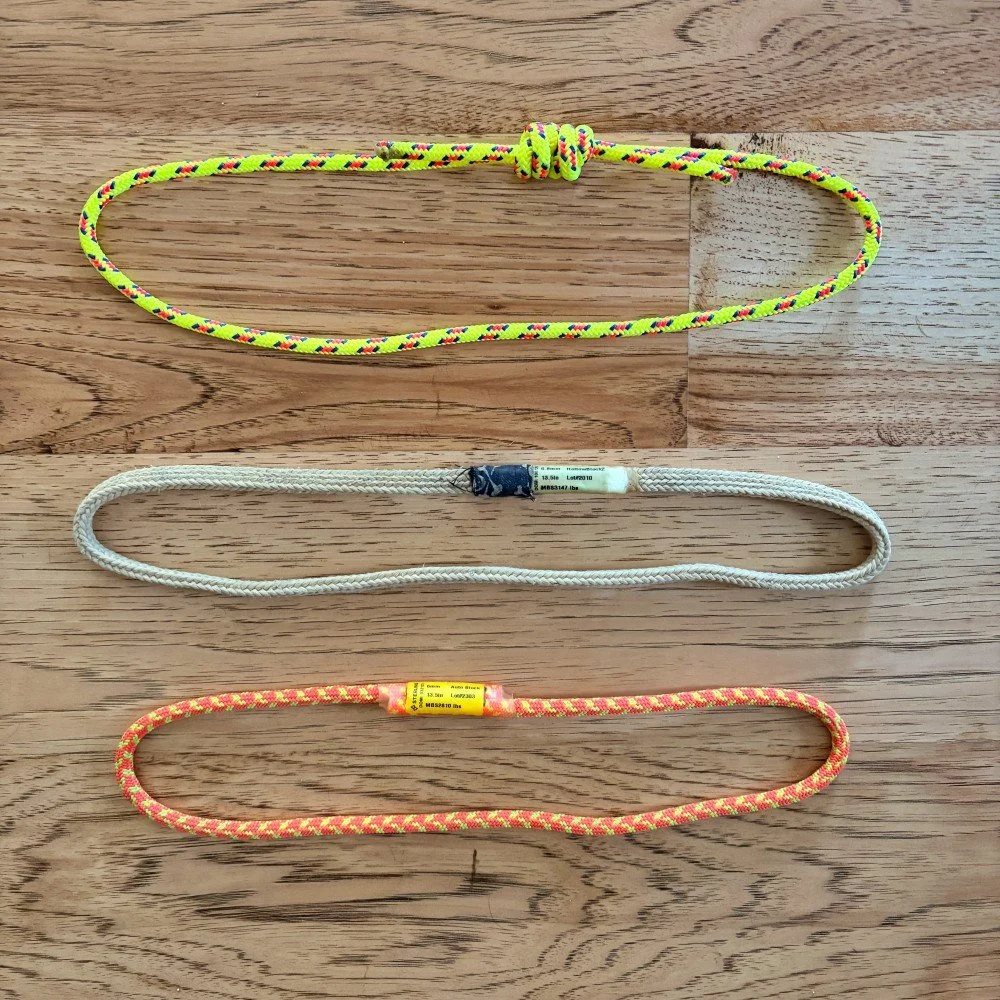
What about factory made hitch loops?
Most rope manufacturers offer some version of a sewn hitch loop. These are usually sewn, so they're a little less bulky and slightly easier to tie friction hitches. They're also more expensive than the DIY version.
When you're out with friends who have different flavors of these, give them a try and see what you think. Below are some that I have.

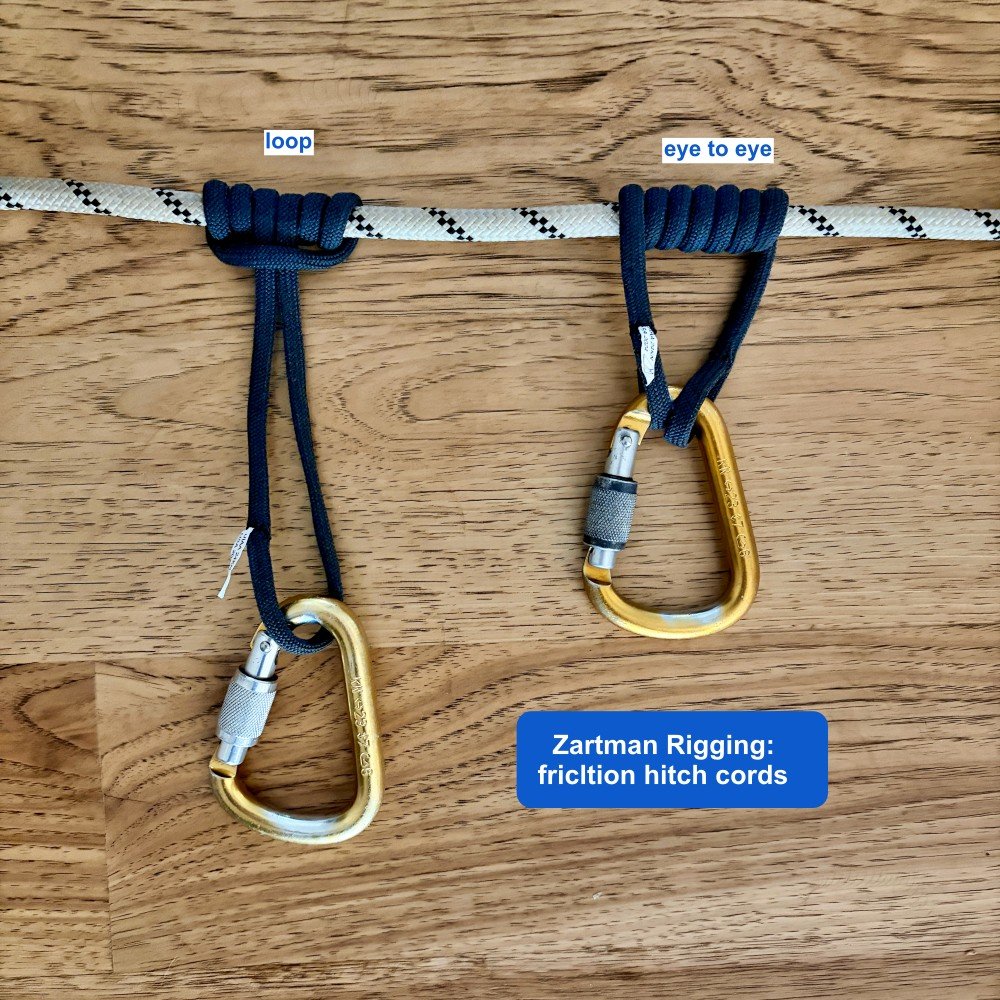
What about spliced hitch cords?
Zartman Rigging make some very interesting spliced soft goods for climbing, among them two flavors of hitch cord. One is a loop, the other is eye to eye.
Because of the splicing, there's no stitching. That makes it easier to tie a friction hitch.
Dyneema core with a Technora / Aramid sheath
UIAA rated to 24 kN
Very interesting products! Check out the Zartman Rigging catalog here.
Here's a link to my more detailed article about Zartman products.
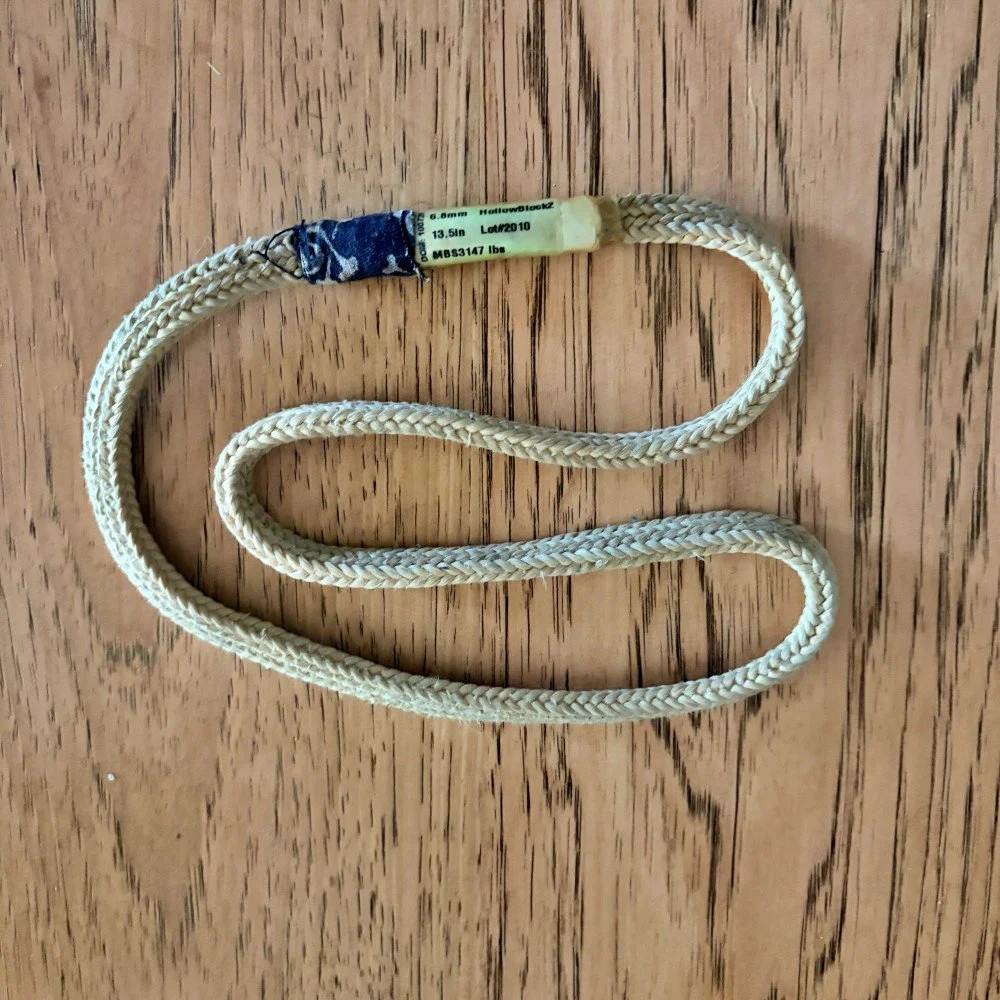
More on the Sterling HollowBlock . . .
A common factory sewn hitch loop is the Sterling HollowBlock. This is made of Aramid/Kevlar, grabs quite predictably on ropes of various sizes, and is a popular choice as third hand back up for rappelling.
Because it doesn’t have a sheath, dirt/sand/gunk can get inside the cord and compromise its strength. As with all small diameter cord, replace if it starts looking the slightest bit worn out.
Here's a nice article from Sterling about when to retire a HollowBlock.
The current iteration of the HollowBlock is version 2, which Sterling says is made out of a stronger material. Get version 2.
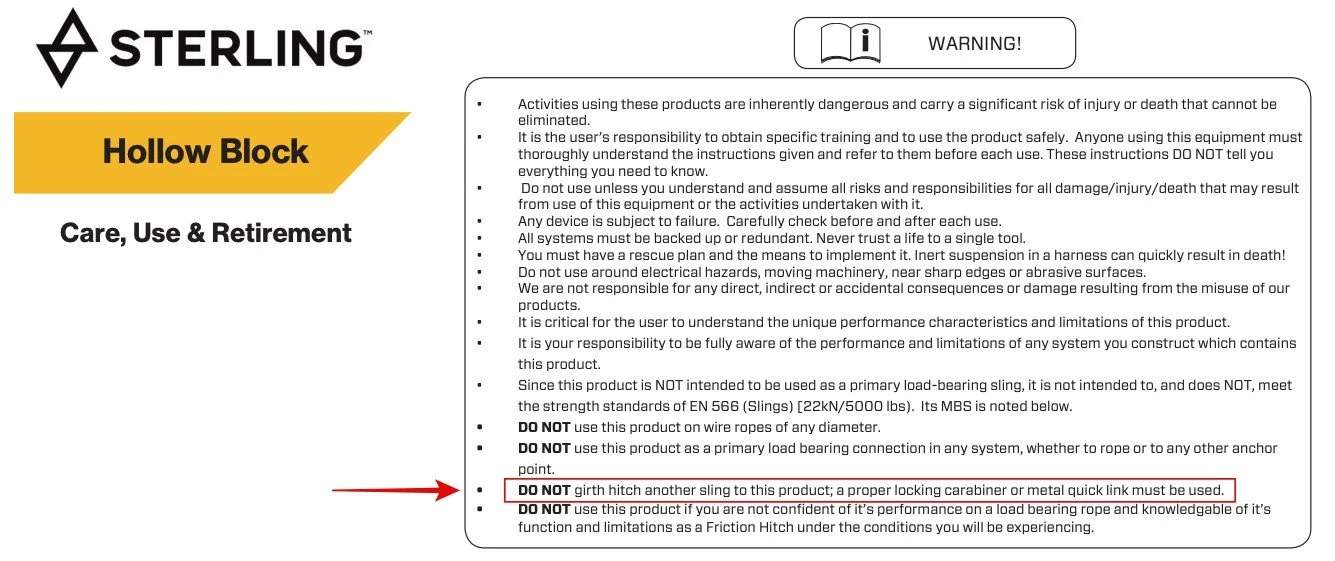
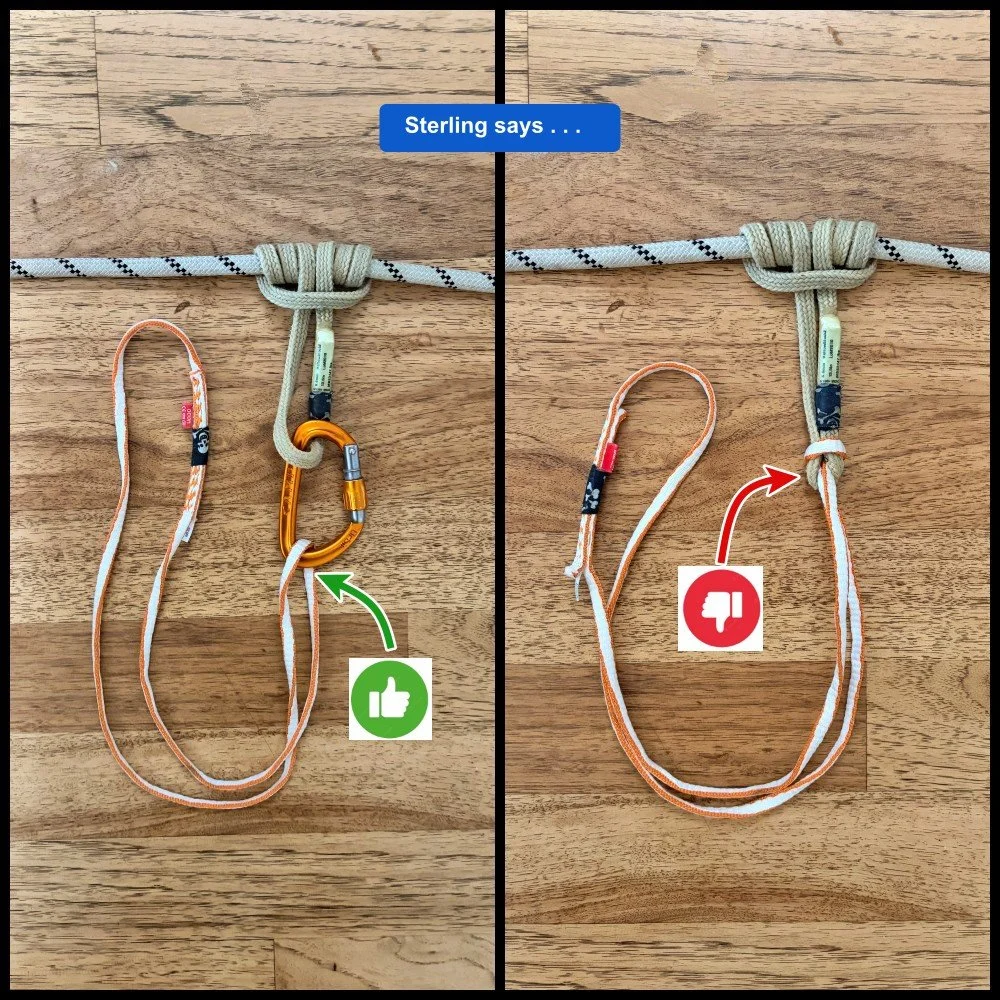
HollowBlock caution: no girth hitching
Sterling says on their website to avoid girth hitching another sling directly onto the HollowBlock. Instead, they recommend a carabiner to connect the slings.
I don't know if this notice is from the legal department or from the engineering department, but I wanted to pass it along.
(Personally, I've girth hitched slings directly on a HollowBlock for rope ascending practice quite a bit and haven't seen any damage; your mileage may vary.)
What about wet or icy ropes?
Friction hitches are usually less grabby if your rope is wet or iced up. Take additional wraps with the hitch around the rope to increase friction. This is a case when having a slightly longer friction hitch to make that extra wrap can be helpful. Test before use!
What about carrying a “waist” prusik and a “foot” prusik in case I need to ascend a rope?
Don't bother. Those are pretty much single use pieces of gear, and it's very old school to carry those. Instead, improvise with the gear you have.
With a short hitch loop attached to longer slings or cord, you can make just about any rope ascending system you need. Here's a link to my article on this.
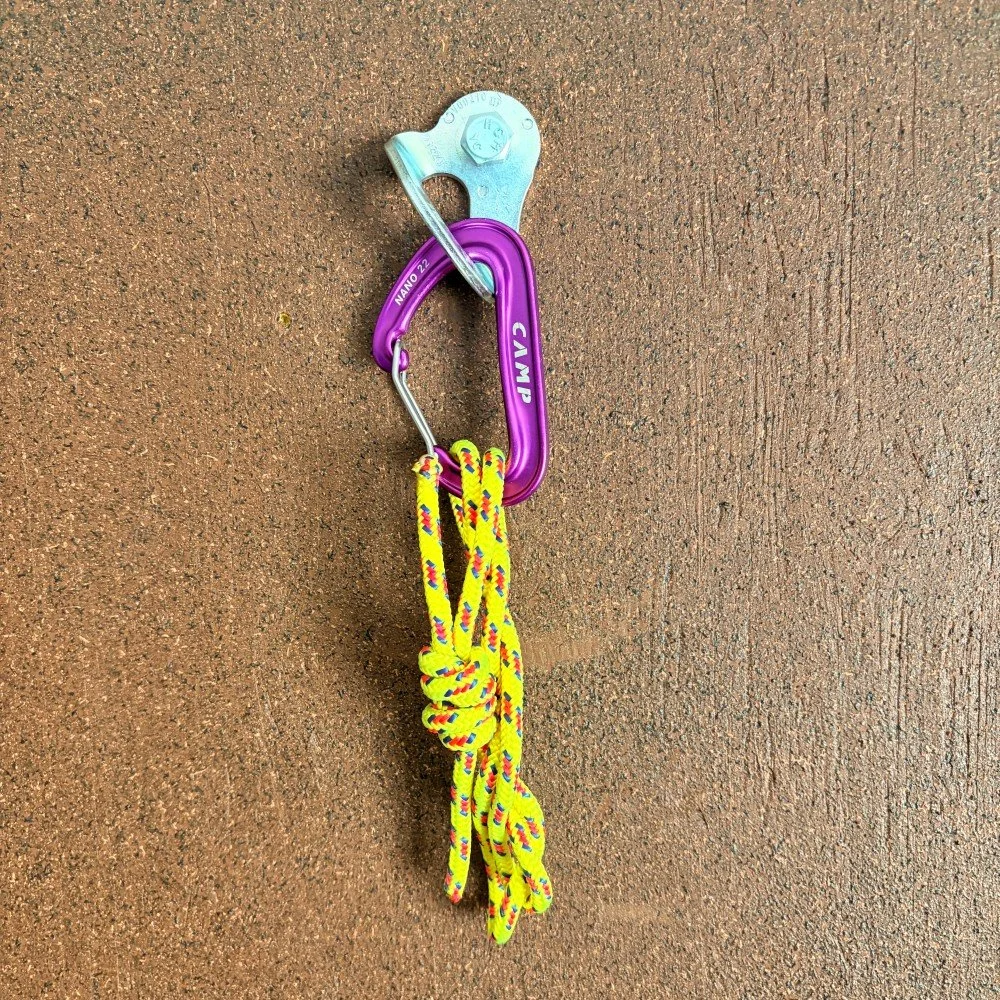
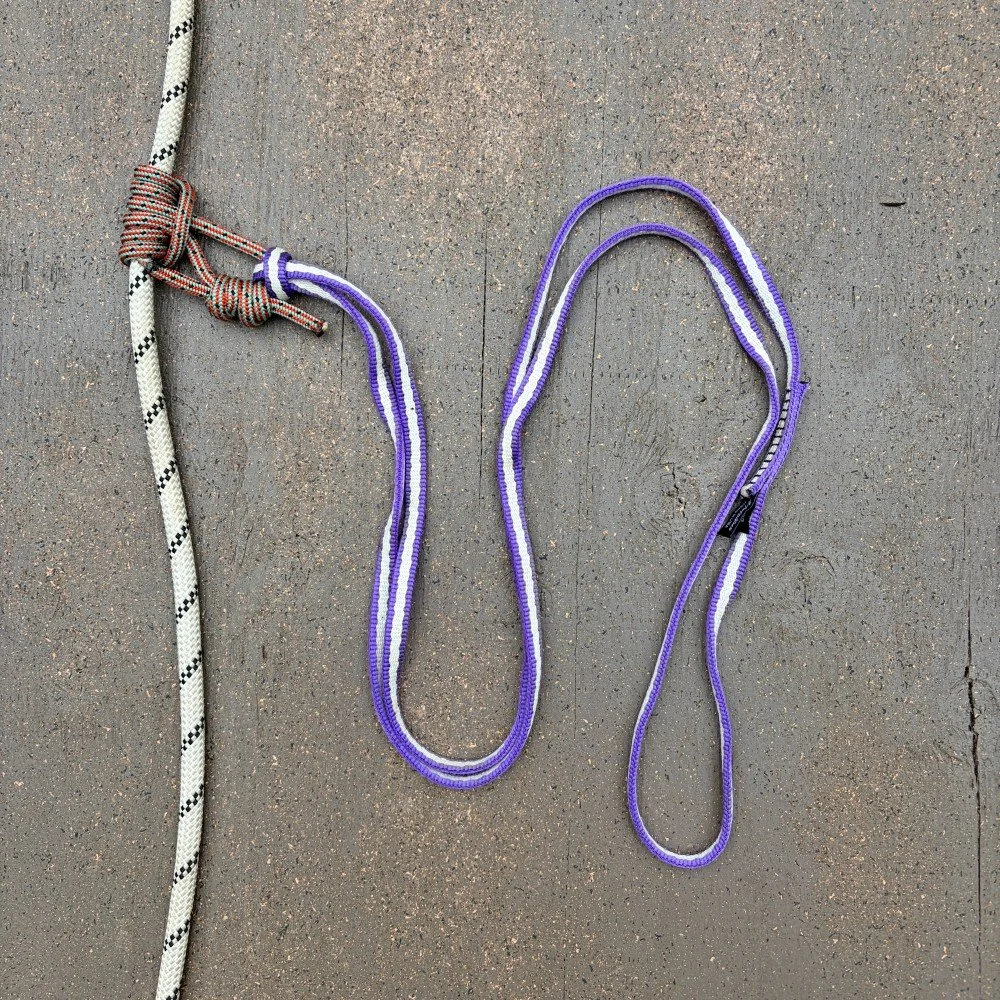
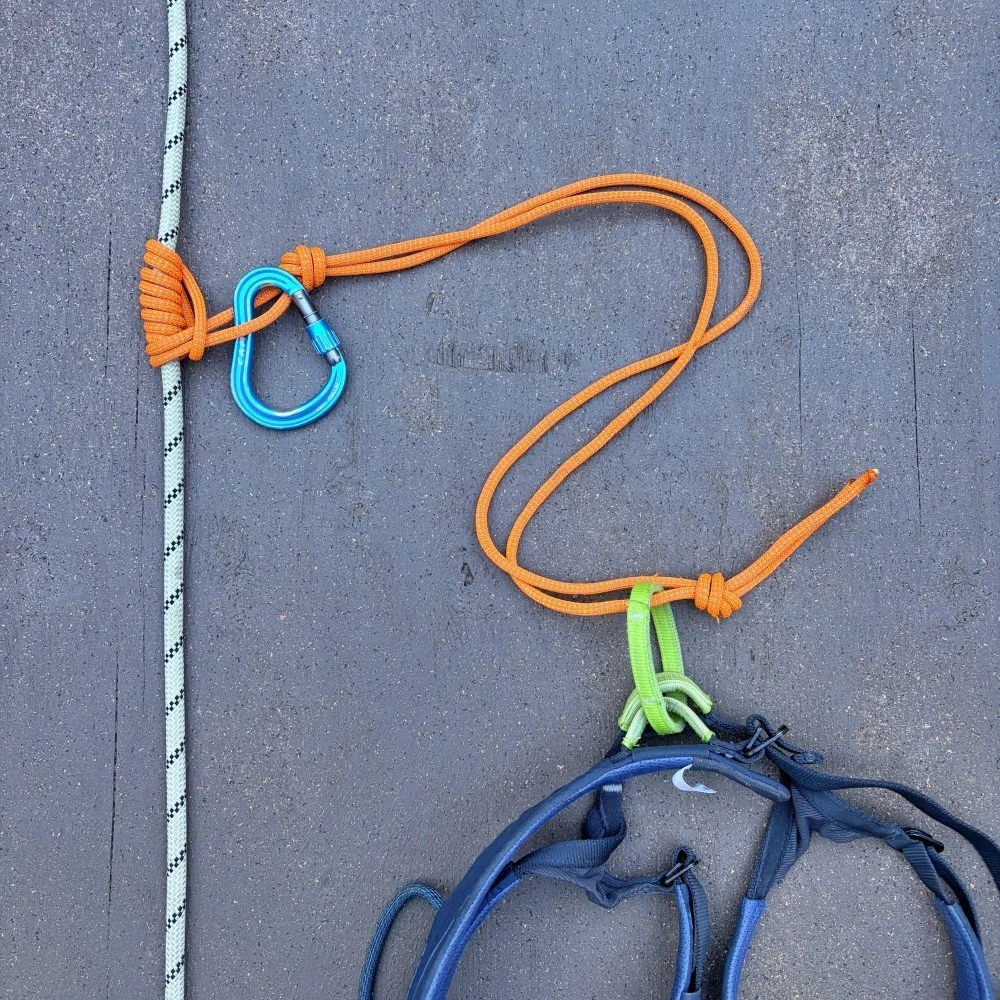
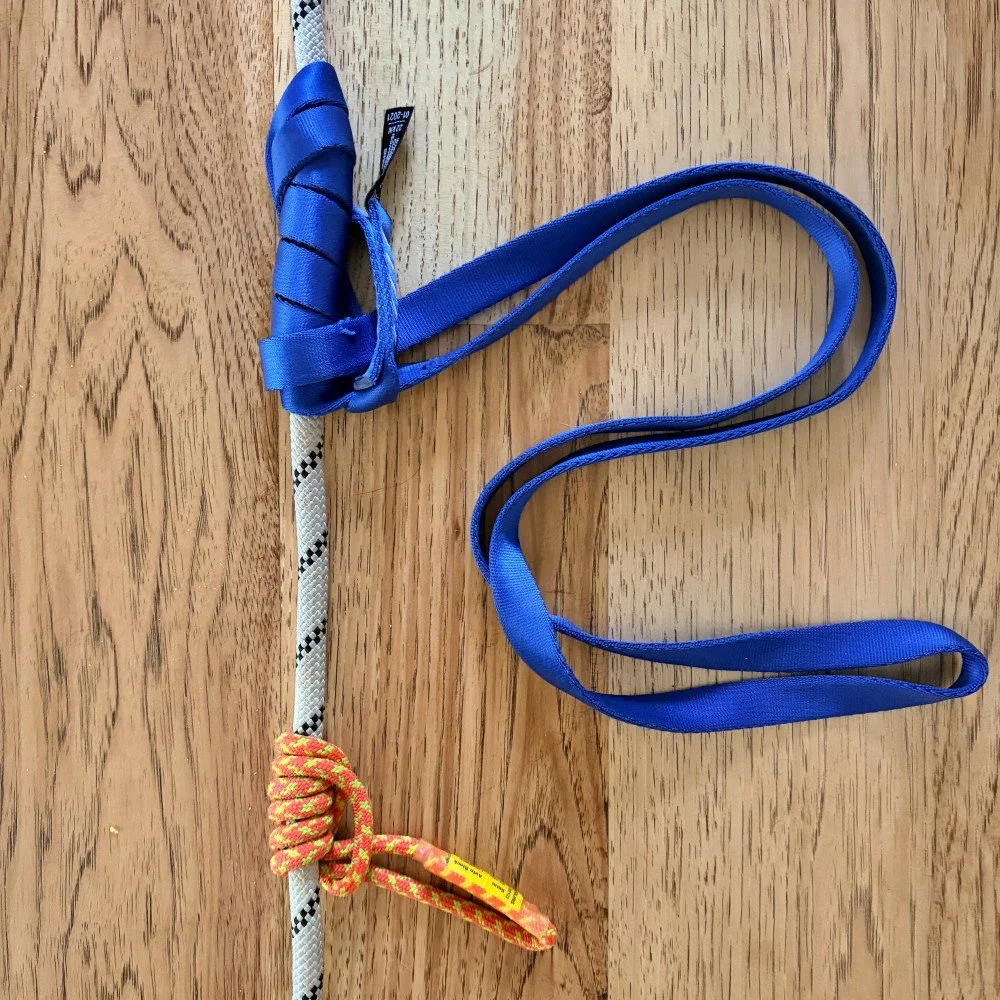
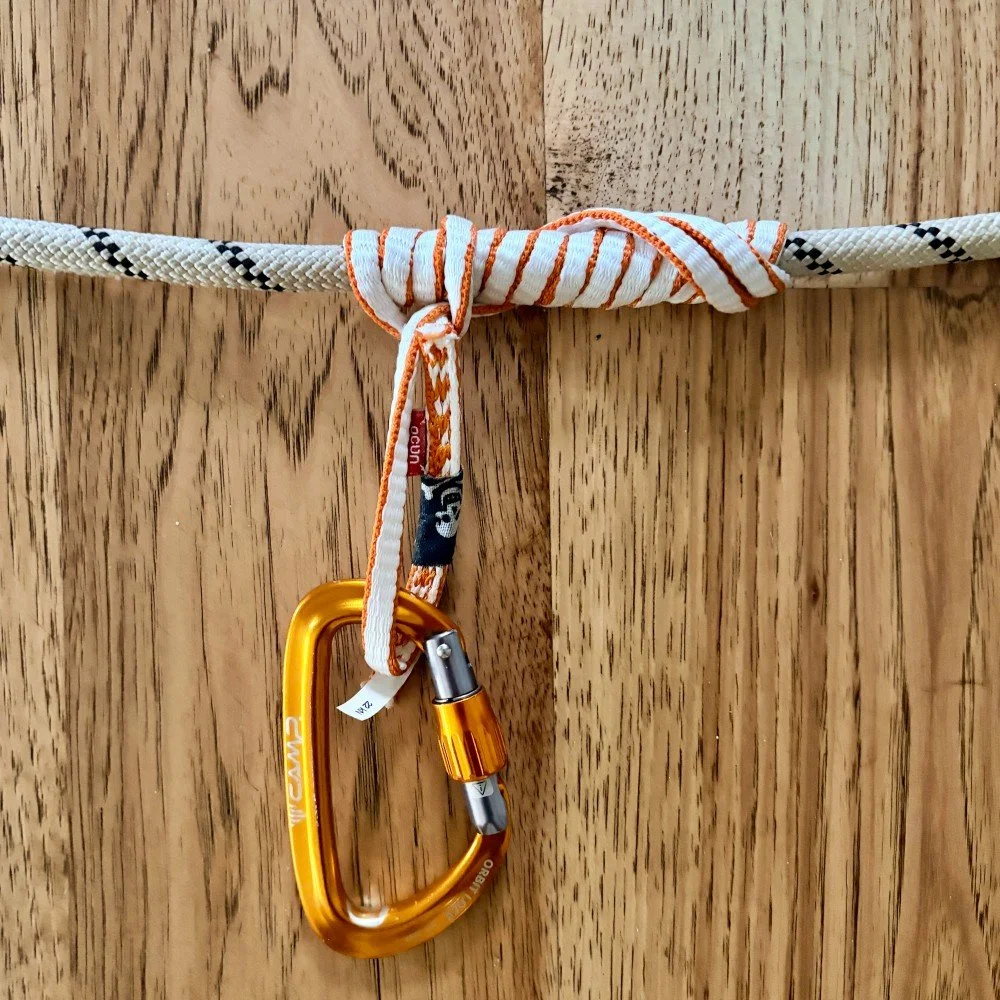
Here’s a short hitch loop, with a 120 cm sling girth hitched to it. This becomes the “foot prusik” for ascending a rope.
What about an attachment for your waist? Attach a 60 cm sling to another short friction hitch loop.
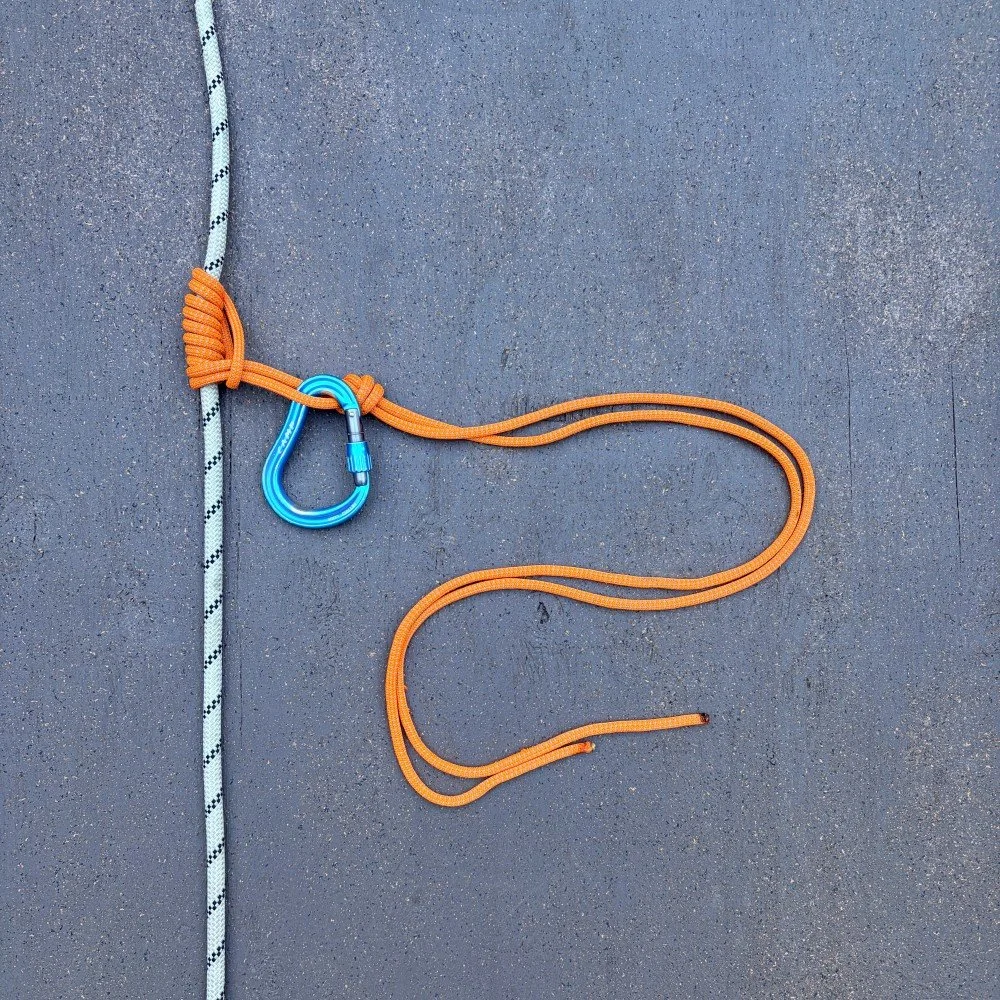
Here‘s a long 6 mm cordelette, tied with a Klemheist hitch to the rope. An overhand knot is tied close to the hitch, giving a convenient clipping point. A long cord can make a hitch loop of any length you need, nice!
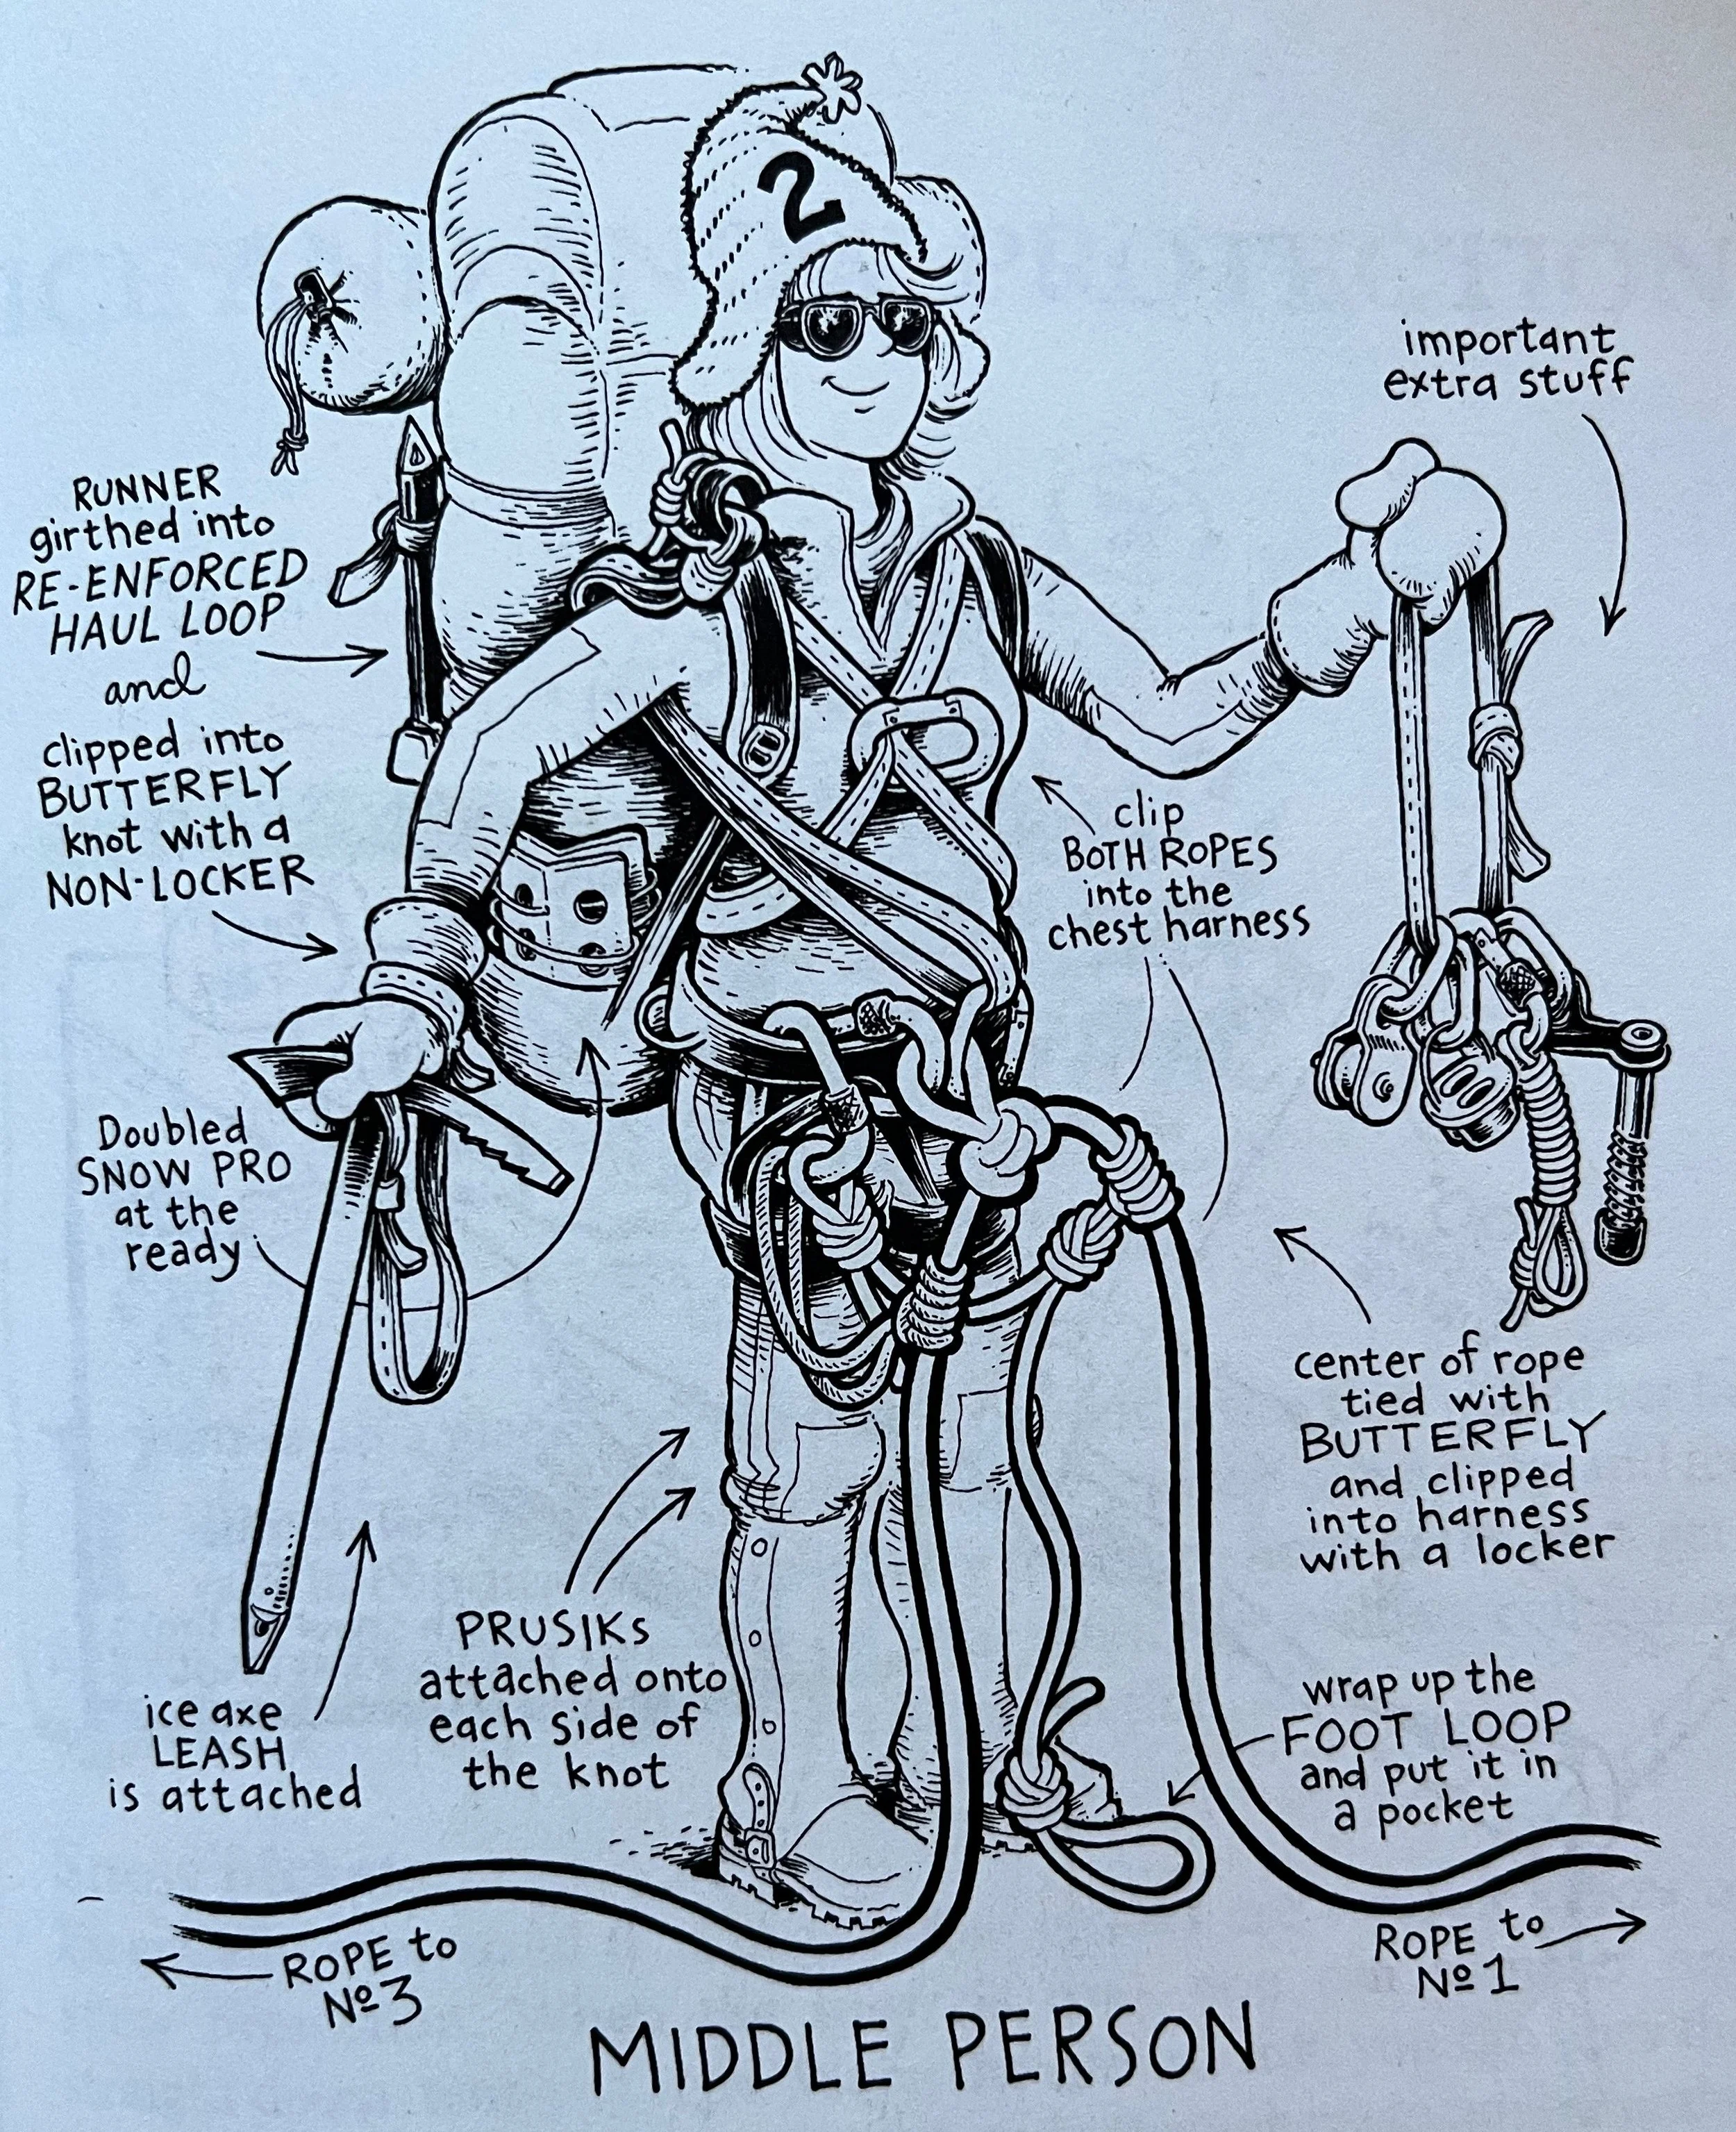
Taking the above example a step further, you can pass the cord through your harness, tie an overhand knot to connect yourself, and then clip the carabiner for hauling or other rescue operations to the short loop close to the friction hitch. This can be helpful for crevasse rescue; I cover more about this technique in this article.
(Related tip: when you're on a glacier, you generally don't need to have your friction hitch(s) already on the rope. Keep them at the ready on your harness, and add them to the rope if you need to.)
Here’s a nice diagram from Ortovox showing this method.
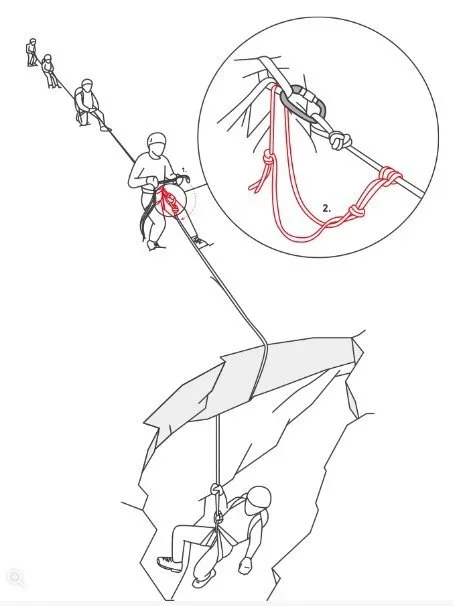
image: https://www.ortovox.com/uk/safety-academy-lab-ice/chapter-3/rescuing-a-companion
What type of hitch cord works on skinny 6 mm rope?
Usually, the diameter of the hitch cord needs to be at least a couple of millimeters smaller than the diameter of the rope it's going on. This makes it challenging to use hitch cords on 6 mm ropes like the Petzl RADline.
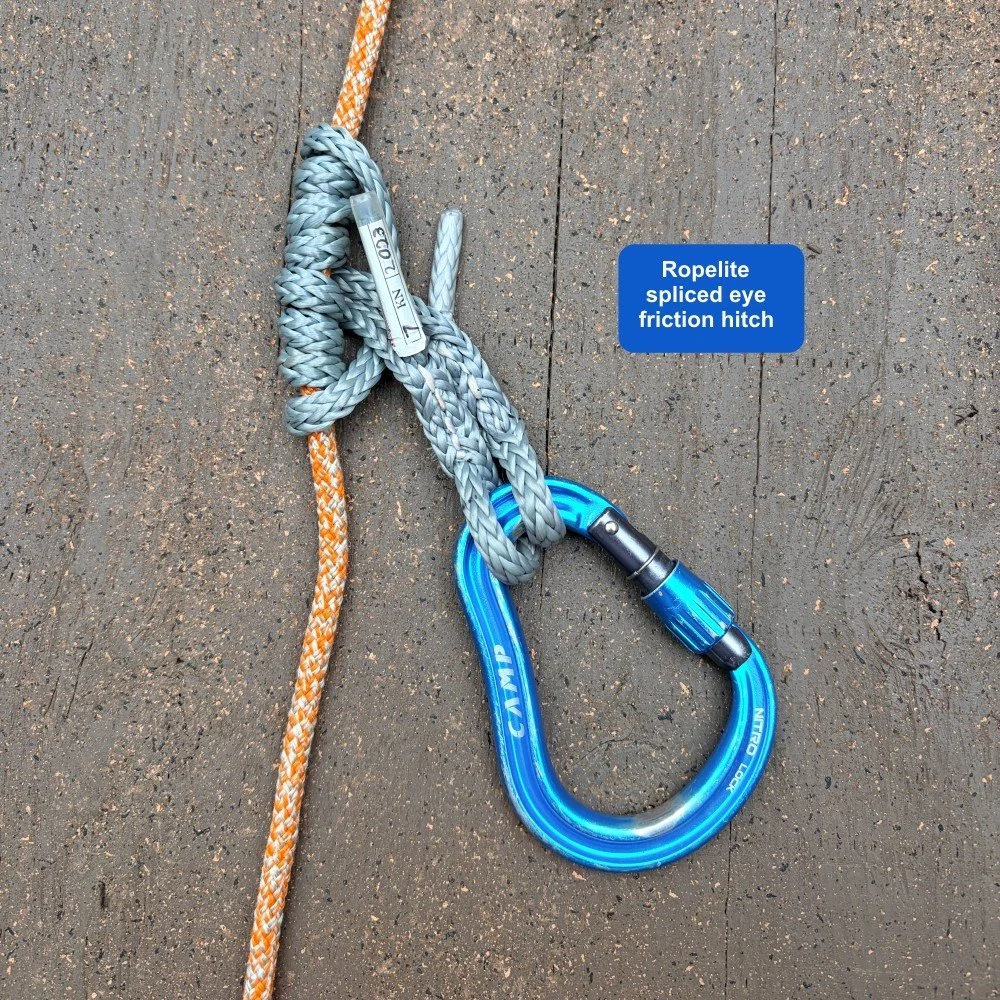
Here's what I have that works well; a spliced polyester 5 mm cord from Ropelite. Even though it's just 1 mm smaller than RADline, a four wrap prusik holds my bodyweight on a single strand.
Ropelite makes some other similar products from Vectran and Technora, as well as other creative, lightweight cordage. Check them out on my “Innovative Gear” page.
Does it matter where the bartack / stitching goes?
What about “eye to eye” hitch cords?
What’s a (small) caution on the Beal Jammy?
Join my Premium Membership to read the rest of the article.
Thanks for your support!


All about friction hitches - Part 1
The humble friction hitch: probably the lowest cost, lightest weight, and most useful thing you could have on your harness for creative rigging and self rescue. Learn about 'em here.
Premium Members can read the entire article here:
The humble friction hitch loop. Inexpensive, lightweight, and pretty much infinitely useful when it comes to #CraftyRopeTricks and self-rescue stuff.
(Something I've noticed over the years: the more experienced the climber, the more likely they're gonna have a hitch loop or two on their harness. Unless you're in the gym; then you look like a dork.)
Let's have a closer look at friction hitches (Part 1) and hitch loops (Part 2, coming soon), the Swiss Army knife problem-solver of climbing gear.
What is a friction hitch, and how is it used?
A friction hitch is a type of knot that is usually tied with a short loop of cord, which from now on I’ll call a “hitch cord”.
When a friction hitch is tied onto a larger diameter rope, the hitch grabs the rope when it's weighted, and can slide when unweighted. You can tie a friction hitch on a single strand of rope, or on two strands.
This makes it helpful for many common climbing techniques, such as:
Ascending a fixed rope
Backing up a lower
Backing up a rappel
Rope grab (and progress capture) in mechanical advantage hauling systems
Safety on a fixed line when you're near a cliff top or crevasse edge
Can I clip my grandma to one friction hitch?
Short answer, no. A single loop of skinny cord should not be your only safety connection in any part of your climbing system, and that includes a friction hitch.
A hitch cord holding a human sized load should always be backed up in some way.
Typically, this backup is:
An additional rope grab or friction hitch
A backup knot
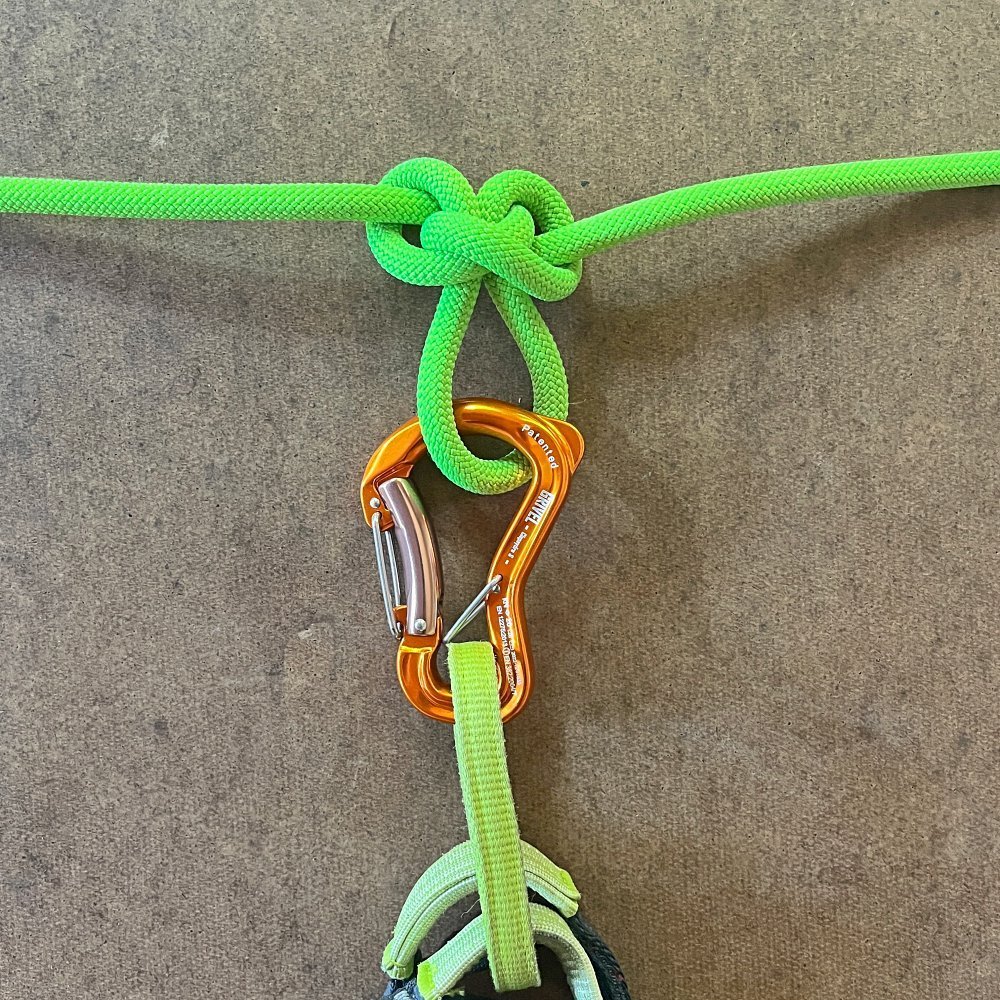
Below left: the load is held only by the friction hitch, and there's no backup. Not good.
Below right: if the friction hitch slips or fails, the load is caught by the backup knot clipped to the blue carabiner. Much better. As you pull more rope through your haul system, you can add additional backup knot(s).

Is a friction hitch the same as a prusik?
“Prusik” is one of the more confusing terms in climbing, because it's a verb, an adjective, a noun, and even a proper noun! It’s named after Karl Prusik, the Austrian mountaineer (and yes, Nazi) credited with its invention. (For this article, I'm using the more precise terms “friction hitch” and “hitch loop”.)
Short version: a prusik is a type of friction hitch, but not all friction hitches are prusiks. Without being too fussy about definitions, be aware that “prusik” is used casually by climbers to mean lots of different things:
“I'm going to prusik up that rope.” (verb)
“Did you bring your prusik loop?” (adjective)
“Good thing I brought my prusik” (noun)
How “grabby” does it need to be?
Sometimes grabby is good, other times not so good. This is why it's good to have a few different friction hitches in your toolbox, so you can use the right one for the task.
Sometimes you want a friction hitch that grabs tight and is hard to loosen up, like for a tractor on a mechanical advantage hauling system. For that application, a three wrap prusik or a klemheist with a lot of wraps might work best.
Other times you want to hitch that slides easily, like when you want to ascend a rope, or as a rappel backup. In that situation, an autoblock or a klemheist with less wraps could be a good choice.
A caution on the autoblock . . .
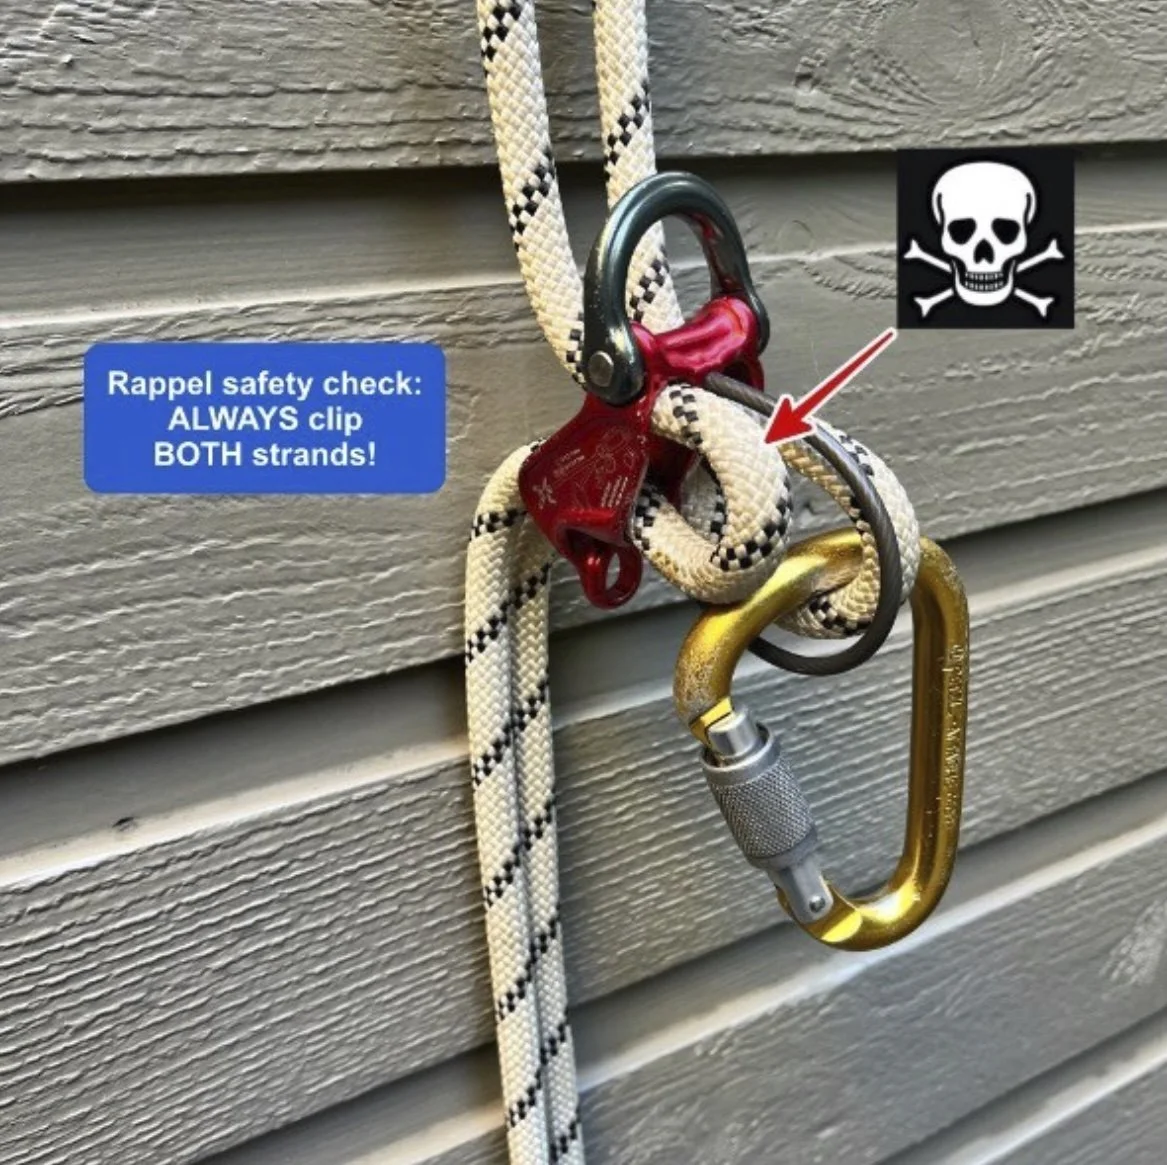
This is a quite common and potentially lethal mistake: clipping one, but not both, rope strands into your rappel carabiner.
Lots of people, myself included for a long time, thought that if you have an autoblock properly tied below your device, the autoblock would grab both rope strands (and keep you from dying) if you made this mistake.
Well, guess what, I was wrong!
If you tie your autoblock, but then clip only ONE strand as shown above, and then load the rope, the autoblock does NOT grab the rope as you might expect.
Instead, you start sliding down like the autoblock is almost not there! I tested this on fat ropes and skinny ropes, and with several different varieties of hitch cords. Pretty much the same outcome every time. It’s easy to test. Give it a try yourself.
(If you were to use the old school method of putting your friction hitch ABOVE your device, then it DOES catch you if you make this mistake. However, that comes with its own host of problems, it's an outdated technique in most situations, and I don't recommend it.)
The best way to reduce rigging errors like this: weight the rope with your tether still attached to the anchor before you commit to it.
Autoblocks are good practice for many reasons, but they don’t solve the problem of only clipping one strand. Do your partner safety checks as standard procedure. Don't be complacent, no matter how many rappels you've done in your life.
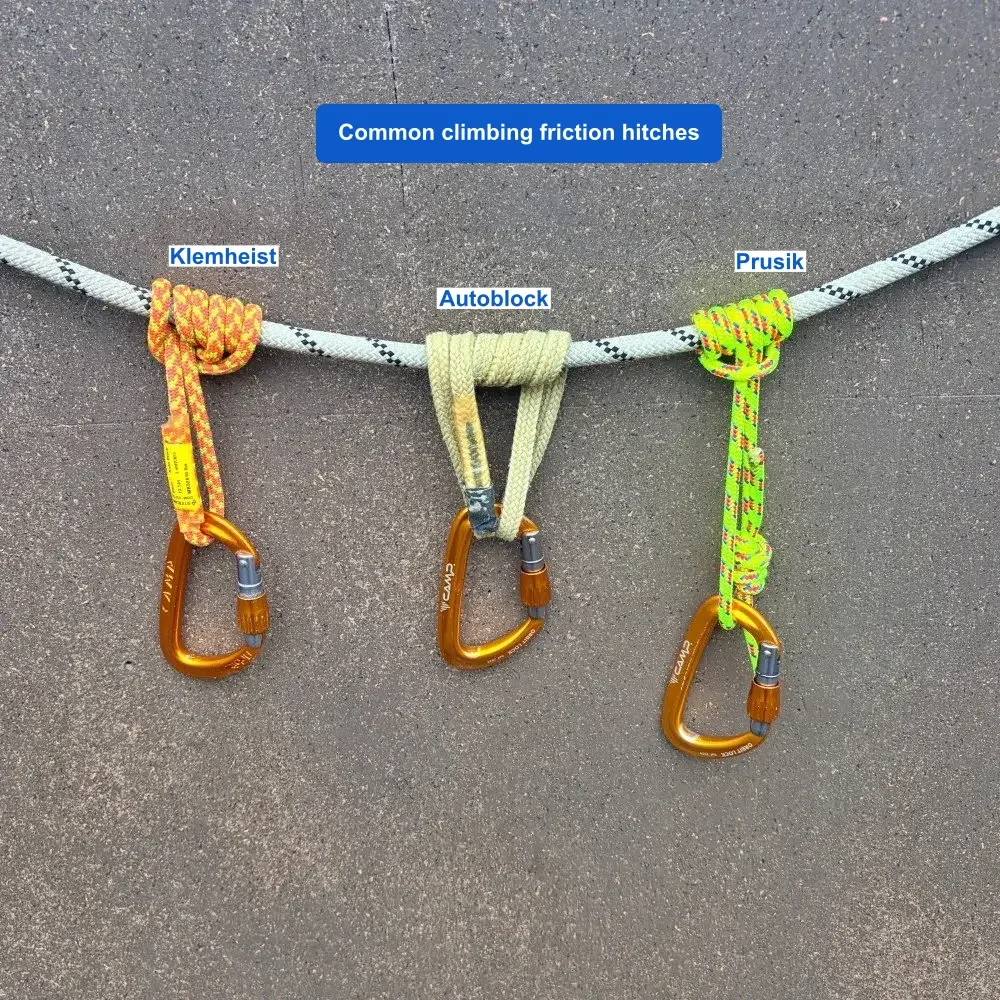
What are the main types of friction hitches?
There are MANY different friction hitches! Riggers, arborists and other rope pros have a quiver of exotically named and specialized hitches, often made with an eye to eye hitch cord (more on that below).
Climbers, on the other hand, usually don't carry this type of gear, and need to rely on a bit of improv with slings and cordage they are hopefully already carrying.
There are three common friction hitches in climbing:
autoblock
prusik
Klemheist
Autoblock
Has a few names: aka “French prusik” and “third hand”.
Has a fairly low level of grabbiness.
Most common use: rappel or lowering backup, hence the name “third hand.”
Can usually be released when it’s loaded.
Can be loaded in either direction.
Typically tied with cord (or a HollowBlock), not webbing.
You can use as many wraps around the rope as needed until the autoblock properly grabs. (As a rappel back up, three wraps are commonly used.)
Tip on using the autoblock as a rappel backup: Best practice is to have your hand on the rope just above the autoblock when rappelling, not putting your entire hand / fist around the auto block.
One more autoblock tip: sometimes two wraps is too loose, and three wraps is too grabby. Start with two wraps, and then twist the hitch cord a few times before you clip it to your carabiner. This can add some extra tension to the knot, which might be the fine-tuning that you need. (Here's an Instagram video from IFMGA Guide Ian Nicholson that shows how to do it.)
Prusik
The “grabbiest” of the three common hitches.
Typical use: “tractor” or progress capture in a mechanical advantage hauling system and ascending a fixed rope.
Needs to be dressed perfectly to work correctly, so it's a little finicky.
Usually takes longer to tie, and is harder to tie with gloves or cold hands.
Typically tied with three wraps around the rope, but can use two or four wraps.
Can be loaded in either direction.
Needs to be tied with cord, not webbing.
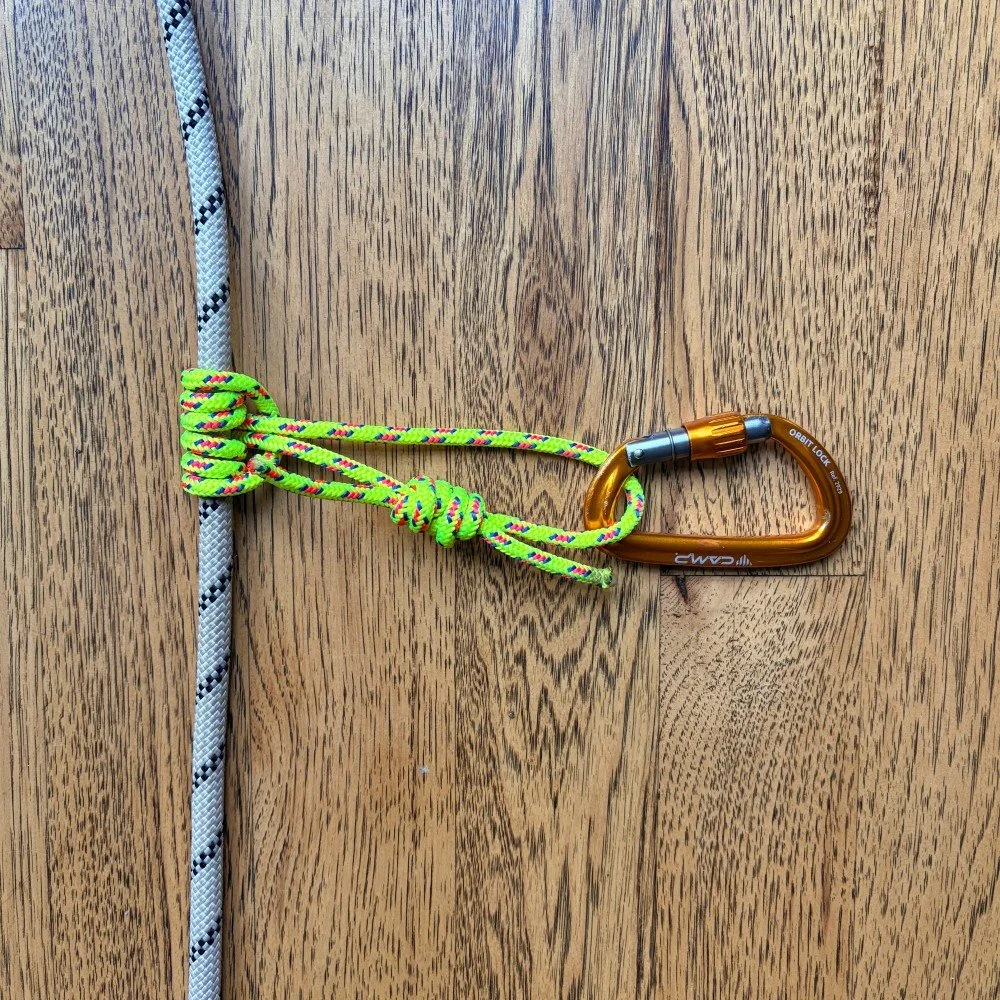
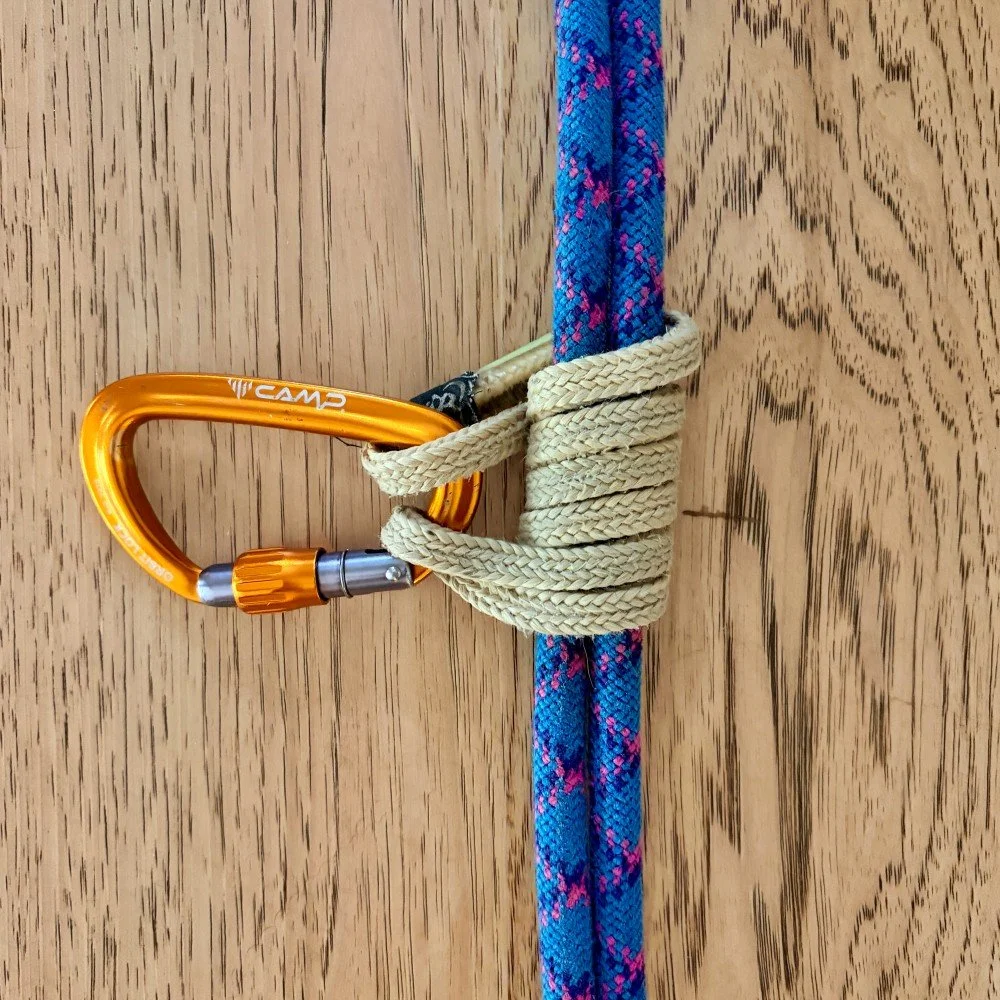
Klemheist
Has a medium level of grabbiness.
Can be tied with either cord or webbing.
Can add or removes wraps adjust the grabbiness.
Generally works best when loaded in one direction.
Works without being perfectly tidy / dressed, which is nice when you need to do it fast and maybe have gloves on.
The Klemheist is a good choice when you’re tying it with something very long, like a cordelette. It's faster to tie because you don't need to pass the ends through the knot with every wrap, only once at the end.
You can tie a Klemheist hitch with a sling/webbing or cord.
Here’s a Klemheist hitch tied with a 60 cm Dyneema sling. Lots of wraps, very grabby!
Note: because Dyneema has a relatively low melting point, it's not a good idea to use a Dyneema sling for any sort of a rappel backup. A fast rappel could potentially damage the sling.
How do you tie a “cowboy” Klemheist (with a video demo)?
Does it matter where the bartack / stitching goes on a friction hitch?
What's the real world force where these hitches start to slip or break (with video of the testing?
Join my Premium Membership to read the rest of the article.
Thanks for your support!

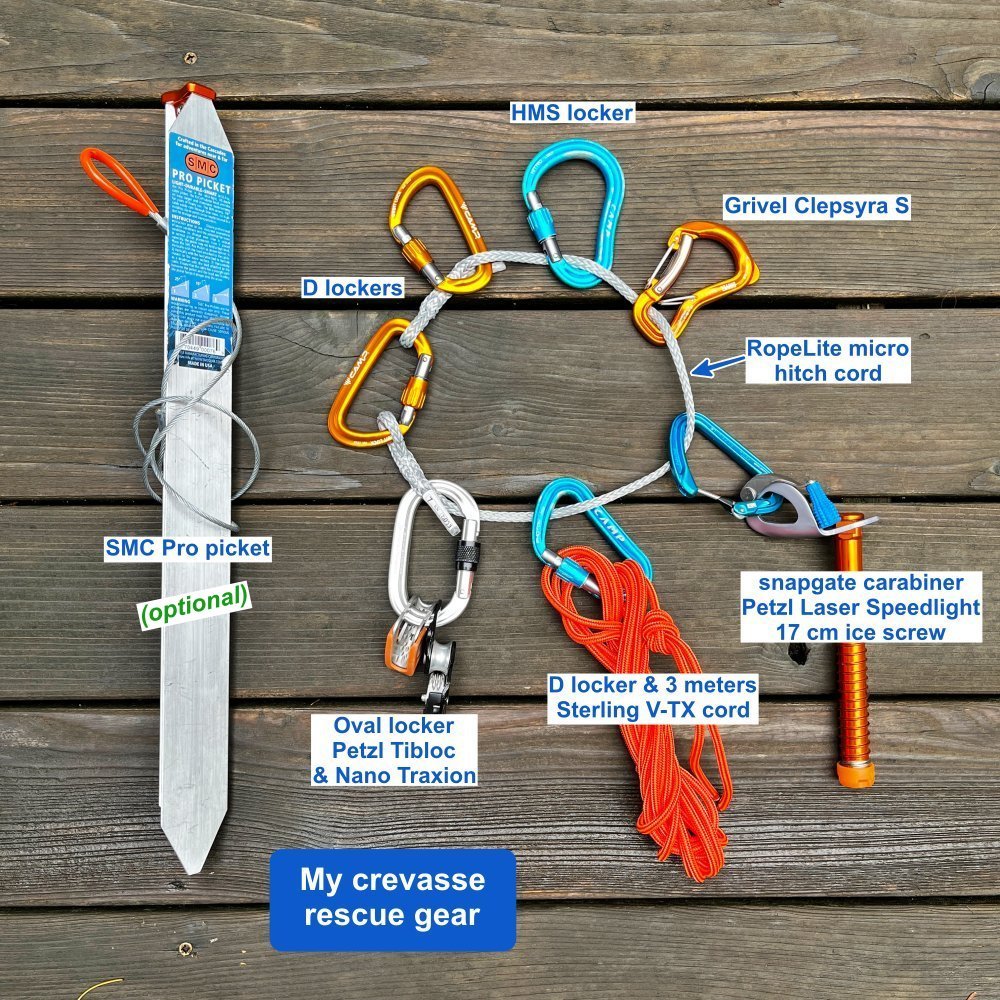
My crevasse rescue gear
There are many approaches to crevasse rescue and many choices for what gear to bring. You need light weight, multifunction, and hopefully have teammates with similar kit to have an effective rescue. Here's my go-to crevasse rescue gear.
There are many different approaches to crevasse rescue, and a near infinite combination of gear that you could carry. The basic requirements are 1) being able to climb the rope if you fall in, and 2) rescuing your partner if you’re the lucky one on top, and they can’t climb out. Fortunately, modern tools and techniques lets you do both with a minimum of gear and weight.
The gear requirements can change depending on team size and general skill level, but here’s a pretty good starting point.
This is pretty much the bare minimum. The idea is with a three of four person team, if everyone carries more or less the same basic kit, rescuers can combine gear as needed.
If you're on a two person team (which is generally considered experts only) you might want to carry a few more items, like maybe another locker, or a120 cm sling.
My crevasse rescue gear
6 locking carabiners: Grivel Clepsydra S, Black Diamond oval, large HMS and three “D” - The Clepsydra works great to clip yourself to the rope, because you can never crossload it, and the gate is very secure. Also works as a progress capture with a a prusik, if you don't have any progress capture pulley like a Traxion. The oval locking carabiner is a time-tested workhorse, and plays well with devices like the Traxion and Tibloc. A larger HMS locking carabiner is helpful if you need to clip other things to it. Finally the D lockers covers any other secure connection you might need. (Yes, I probably have one more locker than I need, but Murphy's Law of rescues is you always need one more locking carabiner.)
1 small snapgate carabiner - you need to rack your screw on something. You can use a non-locking carabiner for non-critical connections, such as the “tractor” in a 3:1 Z drag.
Petzl Tibloc - handy and lightweight ascender and rope grab.
Petzl Nano Traxion (or Micro Traxion) - the modern standard for crevasse rescue gear. Yes, they are expensive, but so helpful in so many situations, they are pretty much becoming everyday carry.
17 cm aluminum Petzl Laser Speed Light ice screw - if you can get down to ice, this can be your anchor on the top. If you fall in, you might be able to place the screw and clip yourself to it to take your weight off of the rope, which can make life for your partners on top a LOT easier when they set up the rescue. Don't bring a screw shorter than about 16 cm.
About 3 meters of Sterling V-TX cord - typically used for equalizing a second anchor, ascending a rope, or securing yourself to the rope system. (Amazing cord; 5.4 mm and rated 15 kN). You don’t need the standard (7 mm 6 meters long) cordelette on a glacier.
Short friction hitch - for climbing up the rope if you fall in, and for making a “tractor” on your hauling system. Here I’m using a spliced eye 5mm hitch cord, which grips well on 6 mm rope. This is made by a cool company called RopeLite; check ‘em out for custom spliced ropework solutions. (There are many other options, such as a loop of 6mm cord or a Sterling Hollowblock.)
What about that picket? Pickets can be very helpful in building a snow anchor but they're not required. Pickets are commonly carried in North America, South America and New Zealand, but not so much in Europe. A more minimalist approach involves making a T-slot anchor with your buried ice axe, skis, or backpack. But to me the axe is a crucial piece of gear, and I'm not too excited to bury it in the snow in case I need it for something else.
When I do carry one, it's the SMC Pro Picket. This is reasonably lightweight, has a pointy end for going into the snow and a reinforced top for bashing on with a hammer. The nicest feature is a permanently attached metal cable on the middle hole, which is how pickets have maximum strength in either vertical or horizontal placements. (That means you need one less 120 cm sling.)
What I don’t bring: pulley, belay device, several “just in case” extra carabiners, designated waist or leg prusik loops. Need another pulley? Grab the Traxion from your partner. Need to rappel or give someone a belay? Use a Munter hitch on your HMS carabiner. The carabiners above are more than enough. And forget those old-school designated waist and leg prusiks; you can easily ascend a rope with the gear shown above.
Where to carry this gear? You want the gear you need to climb a rope easily accessible on your harness or pack gear loops, not inside your pack. For ascending a rope with the gear shown here, I’d keep the orange cord and the oval carabiner with the Tibloc and the Traxion on my harness at a minimum. The rest can probably go inside your pack. I’d also keep the screw on my harness. If you fall in, you might be able to place it and clip to it, removing your weight from the rope as mentioned above.
Harness: A minimalist mountaineering harness, I like the Petzl Tour. Leave that sport climbing harness with the five gear loops at home. You want lightweight, no padding because you have on lots of clothes and (hopefully) are not gonna be hanging in it, with leg loops that open so you can easily put it on while wearing crampons or skis.
Rope: Varies on team size and skill level. Good options include:
30 meter, 6 mm Petzl RADline
40 meter, 7.7 mm Sterling Dyad
50 meter, 7.1 mm Edelrid Skimmer (which is currently the lightest dynamic rope on the market)
The diameter, length, and static vs. dynamic issue of the “best” rope for glacier travel is a BIG topic. Here's a link to some articles on my website that take a closer look. 1) Petzl 6mm static RADLine, 2) static rope for glacier travel.
So, that's my kit. Simple, lightweight, everything has a function. With this I can build just about any flavor of mechanical advantage hauling system I might need, like a 2:1, 3:1, and 6:1.
Some examples of 6:1 systems are here.
Minus the picket, this is what everything weighs.


Rigging your rope for glacier travel
Here's a fast, clever and easy-to-remember way to ensure proper spacing between team members when traveling on a glacier. Plus, a diagram and photo to show actual distances for three and four person teams.
Image: from the highly recommended and hilarious book, “The Illustrated Guide to Glacier Travel and Crevasse Rescue, by Andy Tyson and Mike Clelland. Anyone setting foot on a glacier would do well to get this book. The method shown is a bit outdated, but it's still a great drawing!
(There are a few different book editions with different covers. They're all good, get whichever one you can.)
credit: Mike Clelland
I remember when I first learned crevasse rescue WayBackWhen, it was pretty darn simple. Two people tie to each end, one person ties to the middle, and off you go! 50 meter rope, 25 meters between everybody.
Turns out that has a few problems:
Communication can be difficult because people are further apart.
All the extra rope gets hung up on ice blobs and snow-sickles.
How do you do a rescue if the middle person falls in?
Happily we’ve moved into the modern era, where you climb a bit closer together (at least in my neighborhood, the Pacific Northwest), and the end people carry extra rope to initiate a rescue. But, that still leaves a few questions:
What distance should you have between climbers?
It sort of depends on the potential size of the crevasses you may be facing, but for moderate sized crevasses typical of the Pacific NW, here’s a quick and easy to remember how to set up the rope spacing. It varies a little bit, depending on the size of your team.
Take the number of people on your rope team, and subtract that from 10. That gives you the number of double “arm spans” between climbers.
2 climbers: 10-2 = 8 - 8 arm spans of rope between climbers (need to leave a few extra meters to tie brake knots . . .)
3 climbers: 10-3 = 7 - 7 arm spans of rope between climbers
4 climbers: 10-4 = 6 - 6 arm spans of rope between climbers
Notes . . .
This is known in some circles as the “10 minus equation.”
If you’re on a two person team, it’s best practice to tie 4-5 brake knots in the rope between each climber. It's optional for 3 and 4 person teams, but if the terrain is hairy then go ahead and tie some.
Generally, you want to put the least experienced person(s) in the middle, and the two more experienced/skilled people on the end. The end people will be more responsible for route finding and probably initiating a rescue if you need one.
Note - there are lots of different ways to rig your rope team for glacier travel. This is one of many that works. In areas with larger crevasses, like Alaska and the Himalaya, you’d probably want more distance between people than what I’m describing here.
Pro tip: If you're doing an alpine start, rig your your rope with knots and coils the night before. It's one less thing to do at 0:dark:30 by headlamp when you're sleepy.
Generally, it's best practice to have all team members clip to a knot with a locking carabiner, rather than tying the rope through the harness. Doing this allows you to unclip from the rope more easily, which is convenient when performing a rescue.
The end people need a good way to secure the extra rope. Some people advocate stuffing it in your pack. Bad idea, because every time you want to get in and out of your pack you have lots of annoying rope coils. Much better is to secure the rope in a small butterfly coil, I like to secure the coil with a Voile ski strap. Yes, I know how to tie off a butterfly coil, but using a ski strap is faster and easier. I don’t like the coils around my neck unless there’s a good reason to do so, like moving from glacier to rock, where you need to take in coils and walk close together.
The standard approach to clipping to the rope is to use two carabiners, opposite and opposed usually with at least one a locker. Here's my alternative, using the odd-looking Grivel Clepsydra S carabiner. It has a wire clippy thing so it can never be cross loaded, and it has a double gate that will never freeze shut or wiggle open during a day of tromping around on the glacier. It's my new favorite.
A team of two can require a longer rope (60 meter minimum) than a team of three or even four.
Yes, this is a little counterintuitive! If you're using the modern standard of a drop loop C, that means you need about twice the distance between climbers at a minimum for a typical rescue. A party of three or four will ideally build an anchor at the closest team member to the fallen person. This allows them to use the rope between the other team members for the drop loop and thus they can carry fewer rescue coils on each end. A team of two is probably not able to do this.
This means that it's best practice for a two person team to be on a 60 meter rope at a minimum, while a three person or four person team can probably use a 50 meter rope.
Check out the below diagram for a two person team. With 8 arms spans between climbers, and with 4 brake knots which each take about 1 meter, that leaves just 15 meters in rescue coils for each person to carry.
The good news is, if your drop loop turns out to be a little bit short, it's easy to extend it with whatever extra slings, cordelettes, etc. you might have available. This means that a two person team does NOT always need to carry twice the amount of rope between climbers. (Another alternative for a two person team with a shorter rope is that they do not use a drop C and instead use a drop end 3:1, which comes with its own set of problems and benefits. Here's a detailed article on this technique.
Either way, the bigger picture, if you’re a two person team in serious crevasse terrain, you absolutely have to have your systems dialed and be completely self-sufficient to perform a rescue. Two person glacier travel is recommended for experts only.
Rope rigging for a THREE person team (with at least two experienced climbers):
Find the middle of the rope, tie a butterfly knot for the middle person.
Measure about seven full arm spans from this middle knot towards one end, and tie a butterfly knot. Repeat for the other half of the rope. These are the clip in points for the two end people. The end people coil the remaining rope for use in a possible rescue.
If you have only one experienced person on your rope team, then the novices should probably clip in starting at one end of the rope with seven arm spans between them, and the more experienced person should carry all the the remaining rope. Let’s hope the guide doesn’t fall in . . .
Rope rigging for a FOUR person team:
Find the middle of the rope.
Measure three arm spans to the right of the rope middle, and tie a butterfly knot.
Measure three arm spans to the left of the rope middle, and tie another butterfly knot.
Finally, measure six arm spans from each of these knots toward end of the rope, and tie your final two butterfly knots for the end climbers. Again, the two end climbers should ideally be more experienced people capable of route finding and crevasse rescue. They also carry the remaining rope, either coiled over their shoulder or stuffed into a backpack.
Distance wise, this works out to be about 10 meters between climbers.
(Note the orange Voile ski strap securing the coils for the climber on the right, a quick and secure way to tame extra rope.)

Check out the nice video from AMGA Guide Jeff Ward to see how this works.