
Rappelling with a (slightly) damaged rope
Did your rope get whacked by a rock and suffer minor damage to the sheath, but the core is still intact? You can probably (repeat, probably!) safely rappel on that.

If your rope sheath is slightly damaged, AND the core is intact, you might be able to safely rappel.
If you rappel carefully without jumping around too much, you're not gonna put much more than about half your body weight on one strand of the rope. The core of the rope is where the real strength is, so if that’s still intact, you're probably in good shape.
If the core is still in good condition, you can wrap some tape tightly around the damaged sheath. This helps hold the sheath together and keeps the core from being further damaged. Use a small amount of tape so the rope can more easily feed through your rappel device.
However, if the core itself is damaged, even a little, you might need to resort to more advanced rappel shenanigans, like tying off the damaged part of the rope in a knot (see below) using the damaged side as a pull cord, knot blocks, passing knots if it’s a single strand, etc.
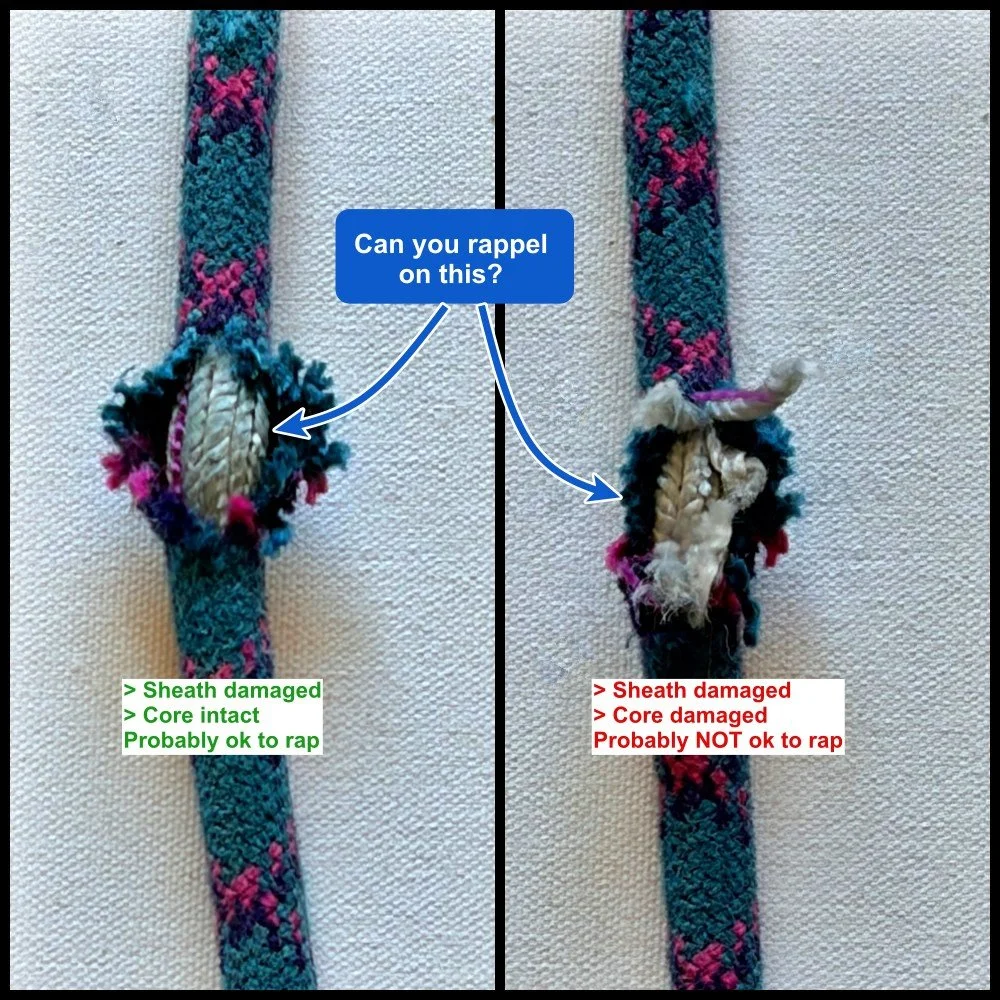
Do you have a damaged rope? Here are some options.
Is the damage near one end? Consider cutting the rope and losing a few meters, provided you can still reach the next rappel anchor.
Is the damage in the middle? Consider cutting out the whacked part of the rope and tying the two ends together. (Yes, this complicates leading, but still allows you to rappel.)
If you're concerned about preventing damage to rope in the first place, consider a Unicore rope. Here's a complete article about that.
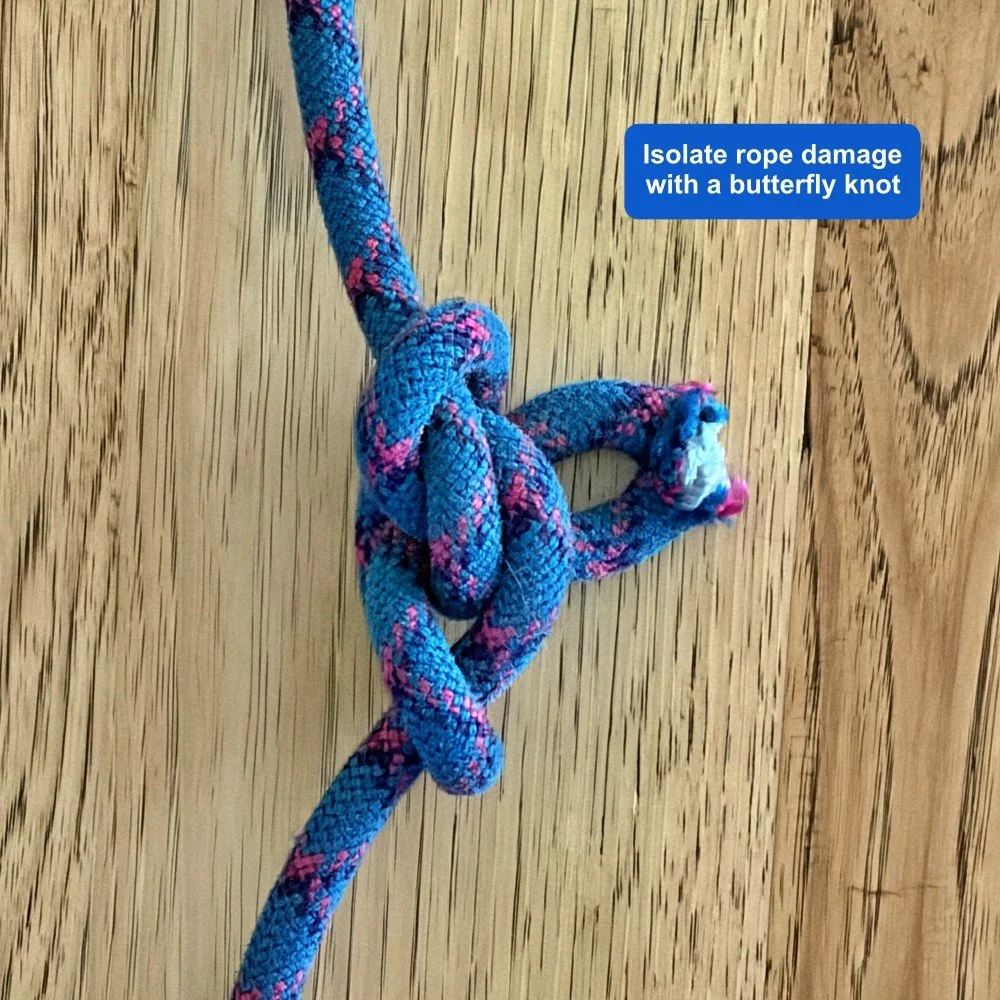
If you do have to isolate a damaged part of the rope, you can tie a bight knot with the damaged part in the loop. The standard knot for this is the butterfly, because it holds well in both directions of pull.
This is a very good time to be conservative. If you have the slightest doubt about the strength of the rope, the best plan is probably to isolate it like in the photo below, and deal with the knot on your way down.
How strong is a slightly damaged rope?
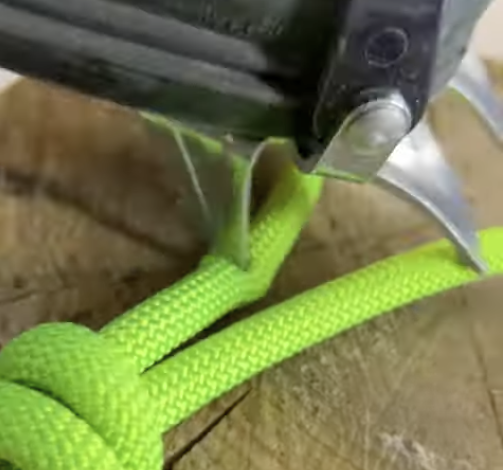
Image: HowNOT2, Youtube, “Crampon vs Rope”
It's hard to answer because there are so many variables, but I think the general answer is: stronger than you think.
Check out this video I made with my friend Ryan Jenks, founder of HowNOT2. Probably everyone who is set foot on a glacier has crampon-spiked a rope at some point. And, we've all probably wondered, does this really hurt the rope?
Even after I spiked the rope with my crampon, AND Ryan hammered multiple nails through the rope, it tested close to full strength!
I also cover this in my series of article called “How Strong Is it?”, you can read that one here. #NoGearFear

Munter hitch brake strand - does it need to be parallel?
Have you ever heard that you need to keep the brake strand of a Munter hitch parallel with the load strand, or else you somehow won't have enough friction and might drop the load? Turns out that's not quite true.
There is a bit of a myth about belaying, lowering, or rappelling with a Munter hitch - “You need to keep the brake strand up and parallel with the load strand all the time.”
Turns out: this isn't really true.
Yes, you do get maximum braking with the brake strand held out in front of you parallel with the load strand.
However, with the brake strand 180° opposite the load strand, friction is reduced by about 25%. In most cases, this is still an adequate amount of friction to control your load.
The hitch doesn't somehow magically fail if you decide to hold your brake strand in a more comfortable position, like down by your hip.
Of course, the amount of friction depends on lots of variables, like the amount of weight you need to hold, shape of your carabiner, rope diameter, age of the rope, etc.
There's a lot of well-meaning instruction I've heard over the years that implies your Munter hitch will somehow malfunction if you don't always hold both rope strands parallel.
That’s not true.
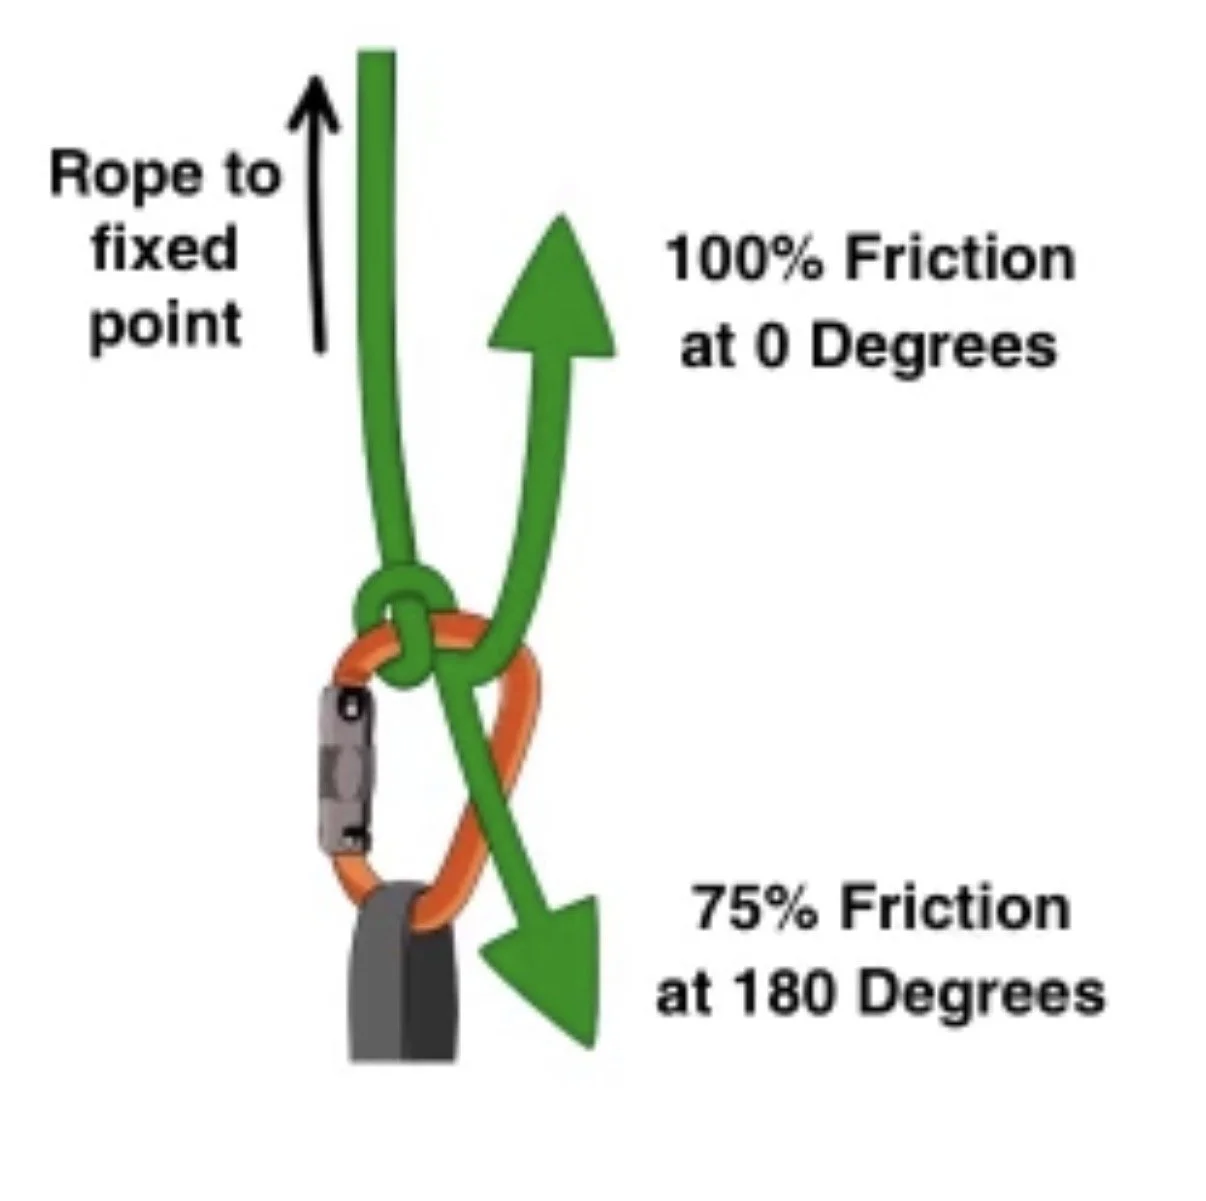
image : https://www.vdiffclimbing.com/ shared with permission
My two pieces of (unconventional) cragging gear
There are a couple of oddball pieces of gear that I bring for a day of casual rock climbing. (Yes, they’re a bit goofy, and I don't really care what other people think about it. =^) Learn about ‘em here.
When I'm headed out for a day of sport climbing at Smith Rock (my local crag) I almost always bring these two (kind of strange) items.
They’re unconventional, but they both make my day a little easier.
Awhile back, I read some snippet of pop psychology that said we achieve greater happiness by eliminating small annoyances than by chasing the next shiny thing. For me, two big annoyances at the crag are repeatedly changing shoes, and rummaging through my pack looking for some item. Here's my way to banish those small bothers.
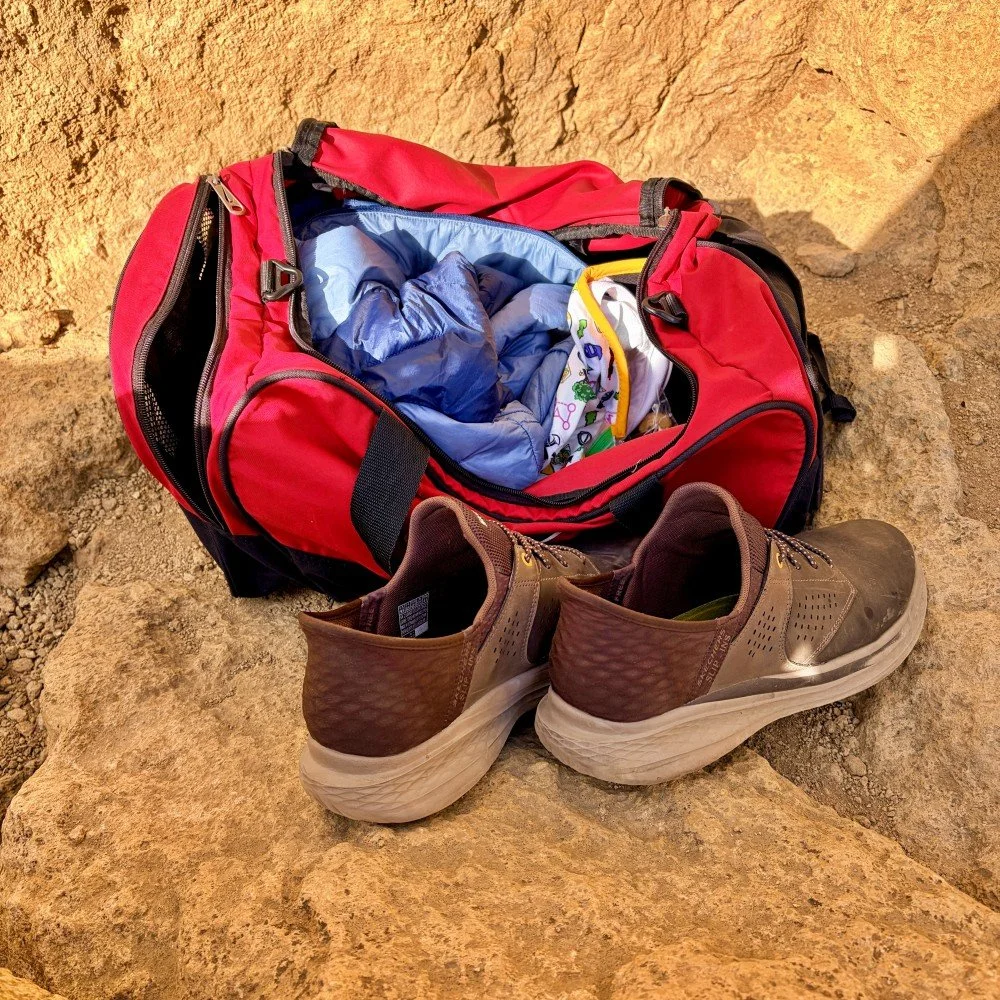
Duffel bag
This is your standard medium size, lightweight gym duffel bag. It rolls up small and goes inside my main backpack when I'm walking to the cliff.
When I get there, I transfer things like clothing, hat(s), sunscreen, dog treats, snacks, water etc. - things I need regular back-and-forth access to during the day.
I find this way more convenient than repeatedly burrowing through my top loader 40 liter pack to find that water bottle that always burrows to the bottom.
Yeah, I know about those cleverly designed crag packs that have a giant U-shaped zipper so you can open it and instantly grab what you want. I don't have one of those. =^)
Slip on shoes
Putting on and taking off lace-up shoes 10 different times over the course of the day is a big drag. With slip on shoes, I can pop off my velcro rock shoes, and instantly step into these barefoot. For taking a longer walk to the next route, I can slip on some running socks. The shoes have good support, and decent grip for walking on trails.
What about other kinds of shoes?
With good trail access I don't need my sticky rubber approach shoes.
I don't like open toed sandals because I constantly get pebbles underfoot, no fun.
Crocs or similar shoes can work, but those are usually too floppy to be much use on the approach and then you end up bringing three pairs of shoes, which seems kind of silly.
This works for me. Your mileage may vary. Yeah, it might look a little goofy, but I've been at this long enough so I don't really care what other people think about my gear choices. =^)
How can you descend a loaded rope?
How can you descend a rope that’s fully weighted? Hopefully a situation you will never encounter, but it's possible in a self rescue scenario. Here's one way to do it.
Note - This post discusses techniques and methods used in vertical rope work. If you do them wrong, you could die. Always practice vertical rope techniques under the supervision of a qualified instructor, and ideally in a progression: from flat ground, to staircase, to vertical close to the ground before you ever try them in a real climbing situation.
Rare situation, but possible: you need to descend a loaded rope.
Maybe your partner rappelled first, got stuck or incapacitated, and you need to go down and sort it out. The problem is, because the rope is loaded, you can’t install your typical rappel device.
Here is one way to do it, using gear that you probably already have with you and without tying any exotic knots.
Put two friction hitch loops onto the loaded rope. (This can be a short hitch cord attached to a 60 cm sling, or as shown below, a single 60 cm sling, probably tied with a Klemheist friction hitch.)
Clip the top friction hitch/sling to your belay loop with a locker. (If you have an adjustable tether of some kind, use that in place of the 60 cm sling for better adjustment.) Depending how tall you are, you may need to adjust the length of this connection.
Girth hitch a 60 cm sling to your belay loop. Clip this to the bottom friction hitch with a locker.
Clip a third 60 cm sling to the locker on the bottom friction hitch. This will be your foot loop. You can tie a clove hitch or a girth hitch in the sling to secure it around your foot.
Remember the primary rule of rope ascending, which in this case is rope descending: you always have two separate connections to the rope.
Now, it's time to inchworm your way down the rope. Load the top friction hitch. Slide the bottom friction hitch down. Step in the foot loop, which should give you slack on your top friction hitch. Release this top hitch and slide it down. Load the top friction hitch, and repeat. It’s slow, but relatively low risk.
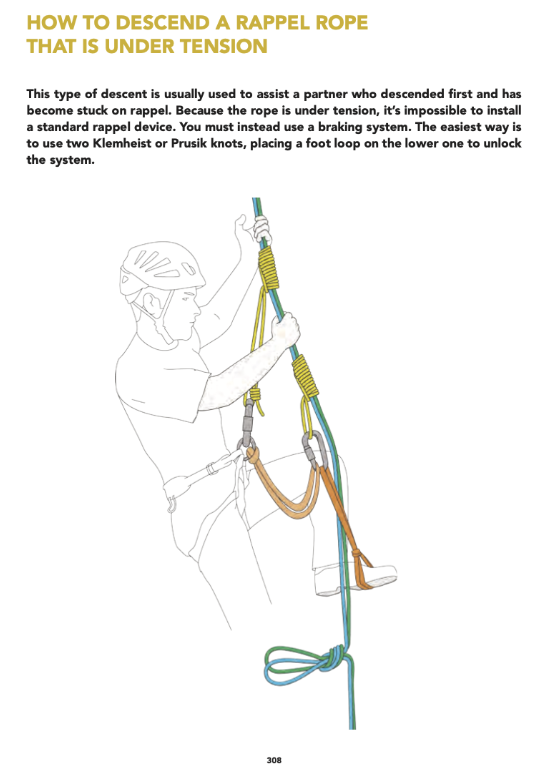
image: UIAA Alpine Summer Skills Handbook
There is one more method I know of to actually rappel on a loaded rope. It was shared with me by an IFMGA guide, who learned it at ENSA (the French National Mountain Guide School).
It involves putting a locking carabiner on each strand, passing one carabiner through the other, and then rappelling on that.
In my brief experimenting with this, it seems quite easy to lose tension on the whole system, and have a rather dramatic failure. For that reason, I'm not gonna teach that.
If you're curious, ask a French guide. =^)
Secure a water bottle to your harness
Here's a simple and unconventional way to securely attach a small water bottle to your harness.
This tip is from the excellent book “Alpine Rock Climbing Handbook” by Austrian Guide Jürgen Reinmüller. Connect with Juergen on Instagram, @alpinstil.at, and get his book here (printed version in German, eBook in English).
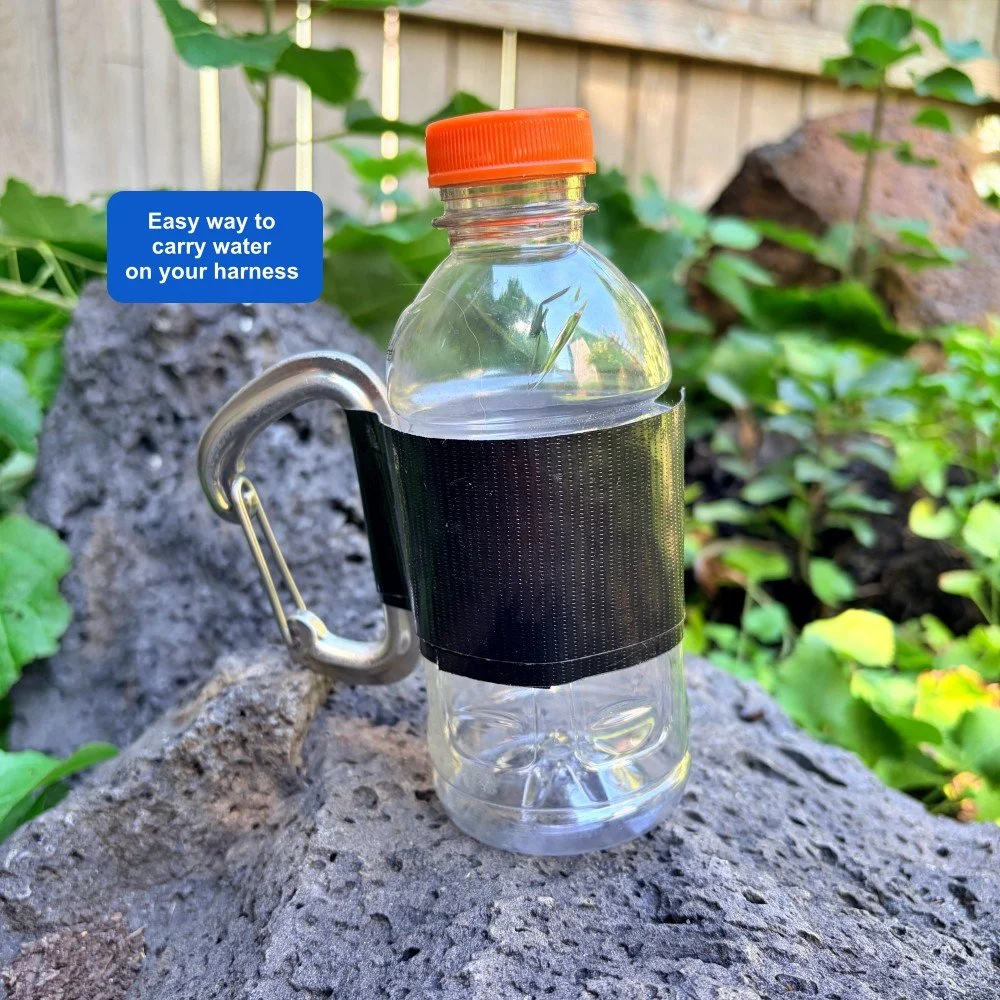
Here’s an easy way to carry a small water bottle on your harness.
Clipping a water bottle to your harness? You need to be SURE it's firmly attached. If it's held on by some skimpy cord or plastic tab, and it comes loose, you create a big potential hazard for anybody below you.
If you have a small bottle (like my favorite, a 12 ounce / 350 ml Gatorade bottle) you can rig it as shown here.
Take some good quality tape (like Gorilla tape, not the cheapo gray duct tape) a small carabiner, and tape it as shown. This keeps your bottle secure to your harness without bouncing around or dangling too far down.
If you have a large bottle (like more than 500 ml), put it in your pack. For most people, that's too much weight to have clanking around on your harness, in addition to the obvious dropping hazard.
Notes . . .
The cap isn’t attached to anything. If you're worried about dropping it, bring an extra cap.
Remove any label on the bottle so the tape sticks better.
If you're on a longer route on a warmer day, bring a second larger bottle in the backpack and refill this one as needed.
Feel free to add any sort of electrolyte mix you like. If it gets smelly, you can recycle the bottle and start with a new one.
Not a fan of plastic water bottles? Use the same technique on a small-ish metal bottle.
While some people think they’re great, I am generally not a fan of “hydration systems” with a pouch and a hose. Here's an article all about that.
Managing and carrying water on a big wall is a bit more involved. Here's my article on that.
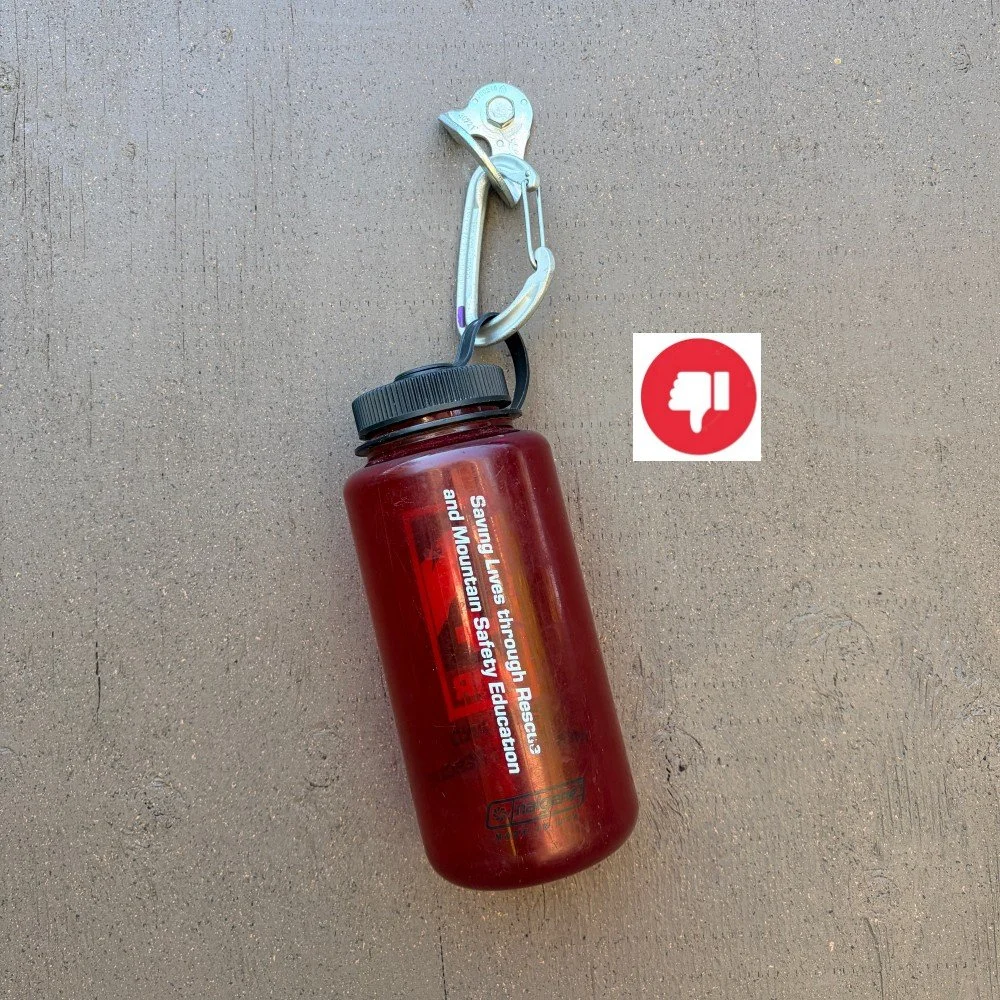
Here's a not-so-great (but still common) way to carry water on your harness. This has a couple of problems.
The bottle is too big and heavy; it’ll clank around and annoy you.
That plastic loop can break, and when it does you lose your bottle. Not good, and maybe dangerous for anyone below you.
Load transfer to Traxion pulley on a weighted rope
Scenario: You’re belaying your partner with a plaquette style belay device from the anchor. For whatever reason, you need to haul them up. Here's how to transfer the load from your device onto a progress capture pulley, for a much easier haul.
This post discusses techniques and methods used in vertical rope work. If you do them wrong, you could die. Always practice vertical rope techniques under the supervision of a qualified instructor, and ideally in a progression: from flat ground, to staircase, to vertical close to the ground before you ever try them in a real climbing situation.
(I think) I saw this on the Instagram of Vladislav Babikov, an Israel based EMT and rescue expert. Thanks Vlad! Give him an Insta follow: @babikov_vlad
In certain rescue situations, it might be helpful to transfer a loaded rope from your belay device onto a progress capture pulley such as the Petzl Traxion.
Here's a simple way to do that.
The key technique: the Traxion can be installed on a loaded rope.
Let's assume you’re belaying your partner directly from the anchor with a guide plate belay device, like a Black Diamond ATC Guide.
When might you need to do this?
It's rare for recreational climbers to actually have to haul up their partner any significant distance. For most rescue scenarios it's usually better to lower (descend with gravity), not pull someone up against gravity.
However, if you do need to haul someone / something up, it's better to do it off of a high-efficiency pulley on your master point rather than a high friction belay device.
This is a good application of a general principle in self rescue: you can extend your master point down a bit to create a new system of some kind, and then transfer the load / rope from the old system to the new system.
1) You need to go hands-free, so tie a hard backup knot in the brake strand and clip it to the anchor.
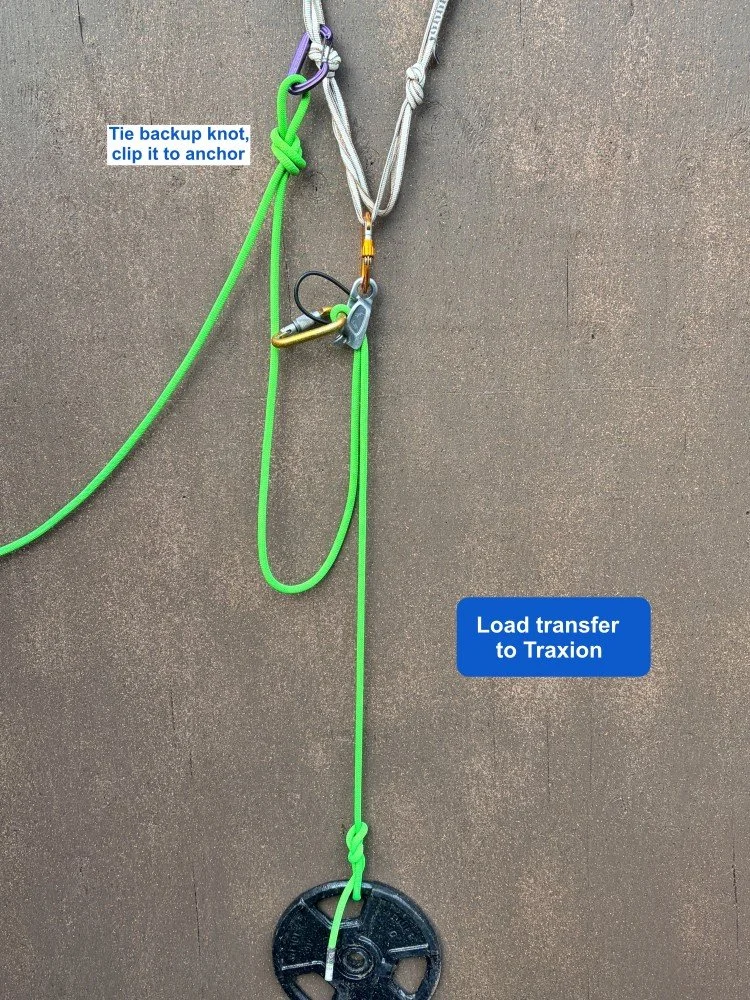
2) Get a 60 cm sling, triple it, and clip it to a new anchor point with a locker. Clip another locking carabiner to the other end of the sling. (A locking quickdraw would also work here.) You want this sling fairly short.
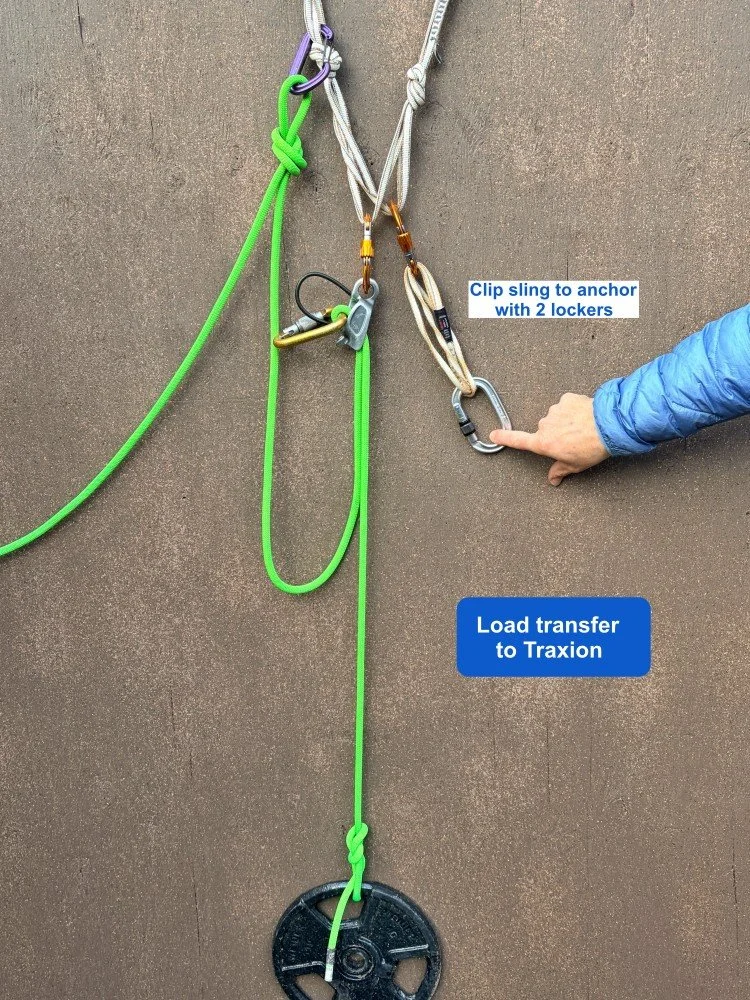
Install your Traxion on the loaded rope going down to your partner. Be careful not to drop it or let it slide down the rope, and to install with the teeth facing up, or away from the load. Clip the Traxion to the locker on the sling.
Push the Traxion down the rope toward the load to remove slack in the sling.
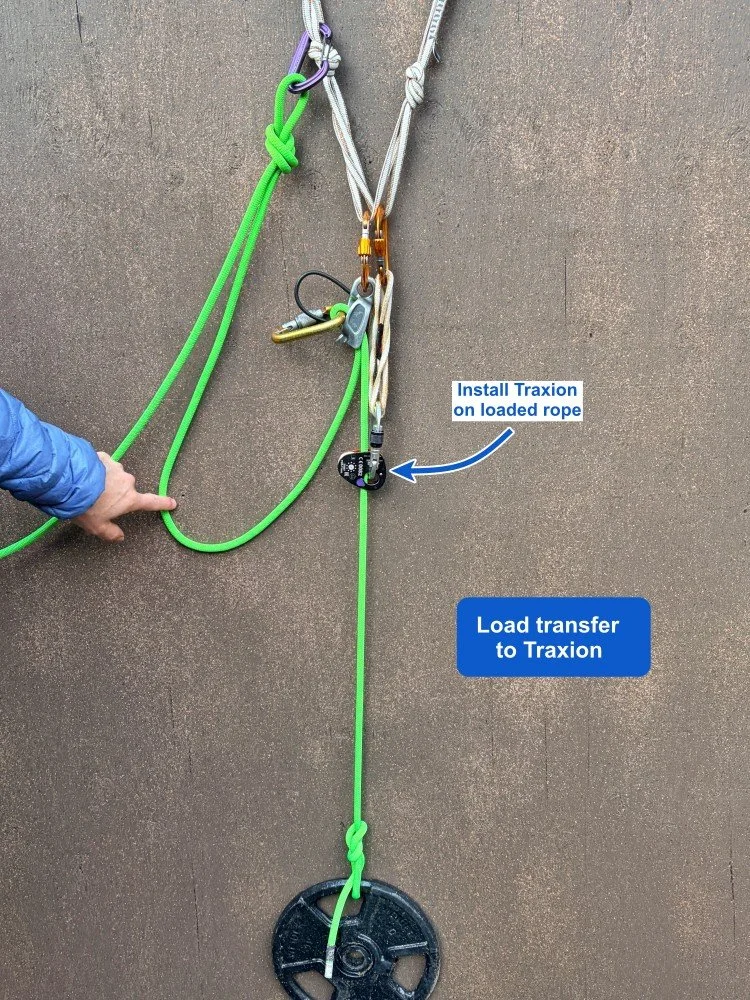
Transfer the load to the Traxion by pumping the blocking carabiner on the ATC up and down several times.
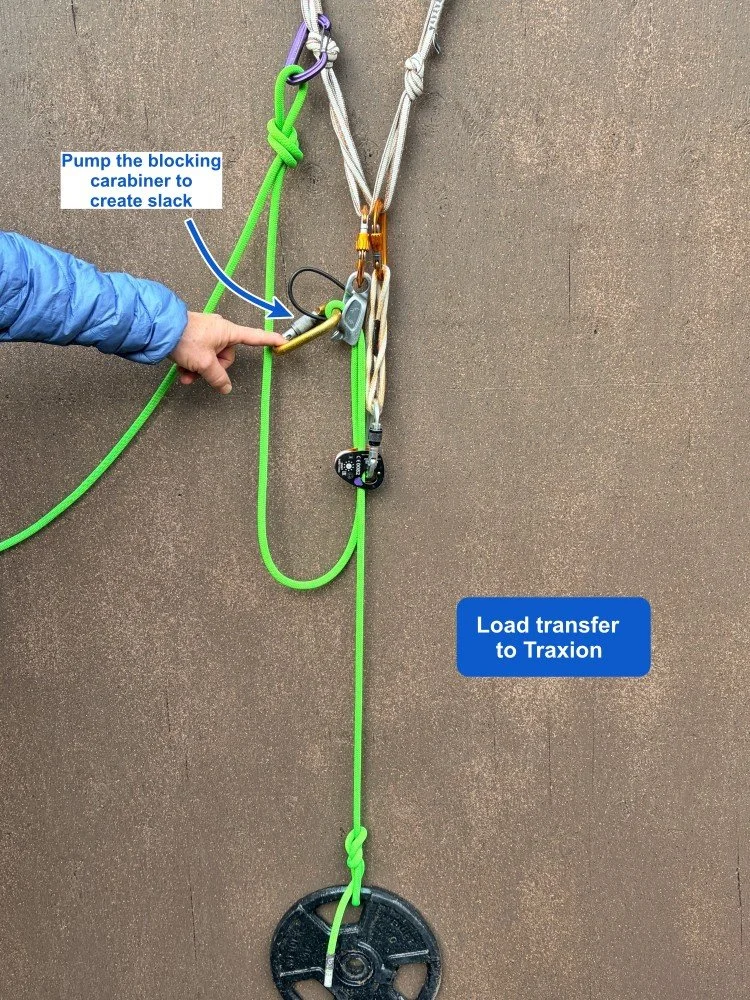
You now have slack in the green rope in your belay device, and the load should now be on your Traxion.
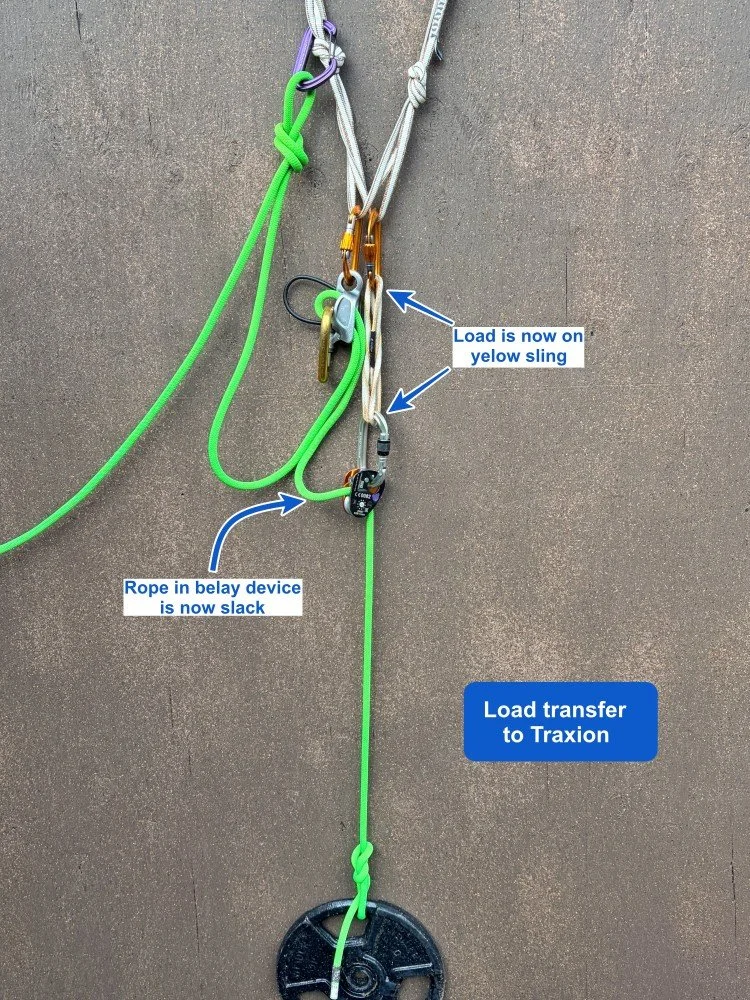
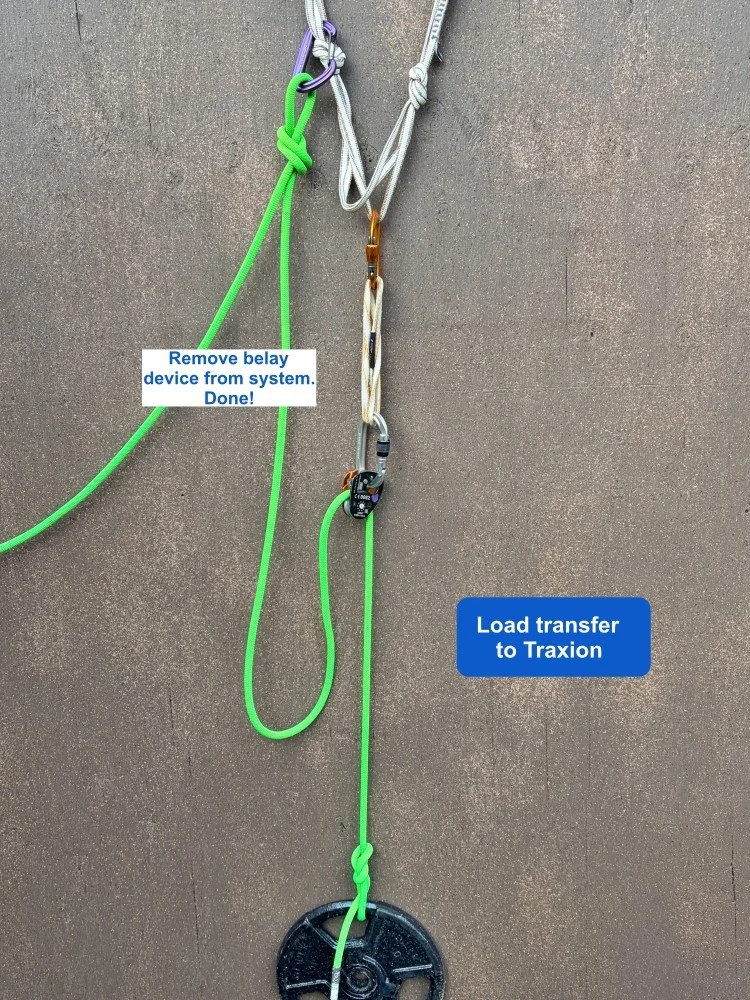
Remove the belay device and carabiners from the system. The load is now on your Traxion; give yourself a high five!
If you need to set up a mechanical advantage system for a lift, you're in a great position to do that. (Tie a friction hitch on the loaded rope below the Traxion, clip the slack rope to the hitch, and you have a 3:1.)
If you decide you want to lower, you can put the green rope through a munter hitch on the anchor, have the person below unweight the green rope for a moment (if possible), and unclip the sling and Traxion from the anchor. (There are a few more advanced options, like setting up the Traxion on a releasable hitch, but for this example we’ll keep it simple.)
Caution on “all good” check in with sat com devices
Using a satellite communication device to check in with concerned people at home is great. However, you want to avoid the problem of triggering an unnecessary rescue if you miss your check-in text.
This tip was shared with me by a friend on a Search and Rescue (SAR) team.
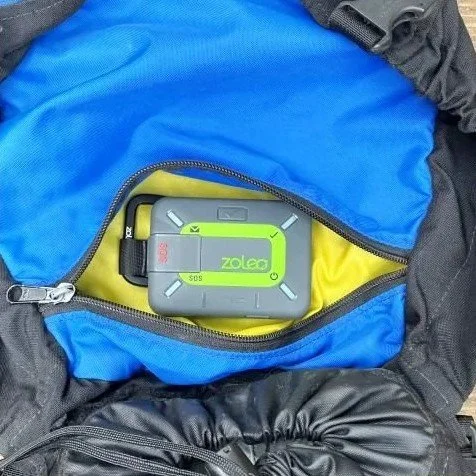
Many people like to use satellite communication devices to check in with concerned people at home and let them know everything is okay.
This is typically done with a pre-arranged check-in time window, or by using high frequency tracking, which shares a series of waypoints showing your travel path.
It's fine to send a quick daily message or have folks at home track your progress.
But don't let a LACK of check-in, or waypoints showing the device isn’t moving, become the basis for a rescue.
If you forget to check in, your sat-com device breaks, gets lost, you missed the software update, the device runs out of batteries, and you’re fine (or maybe taking a nap next to a lake instead of hiking those last few miles to the next campsite) the last thing you want is to trigger an unnecessary “rescue” because your someone didn’t receive your daily “All good” message.
This happens often!
Make it clear to anyone receiving your messages that not checking in, or lack of movement, doesn’t mean you need a rescue.

Do screamers really work?
The “screamer” load limiting sling is the climbing gear with the coolest name. It's designed as sort of a shock absorber, used when placing questionable trad or aid gear. Do they work? Here's some break testing on how well they actually function.
This article may contain affiliate links to HowNOT2. Your purchase earns a small commission for Alpinesavvy, at no extra cost to you. Your support helps improve this site, the world’s largest collection of climbing tips.
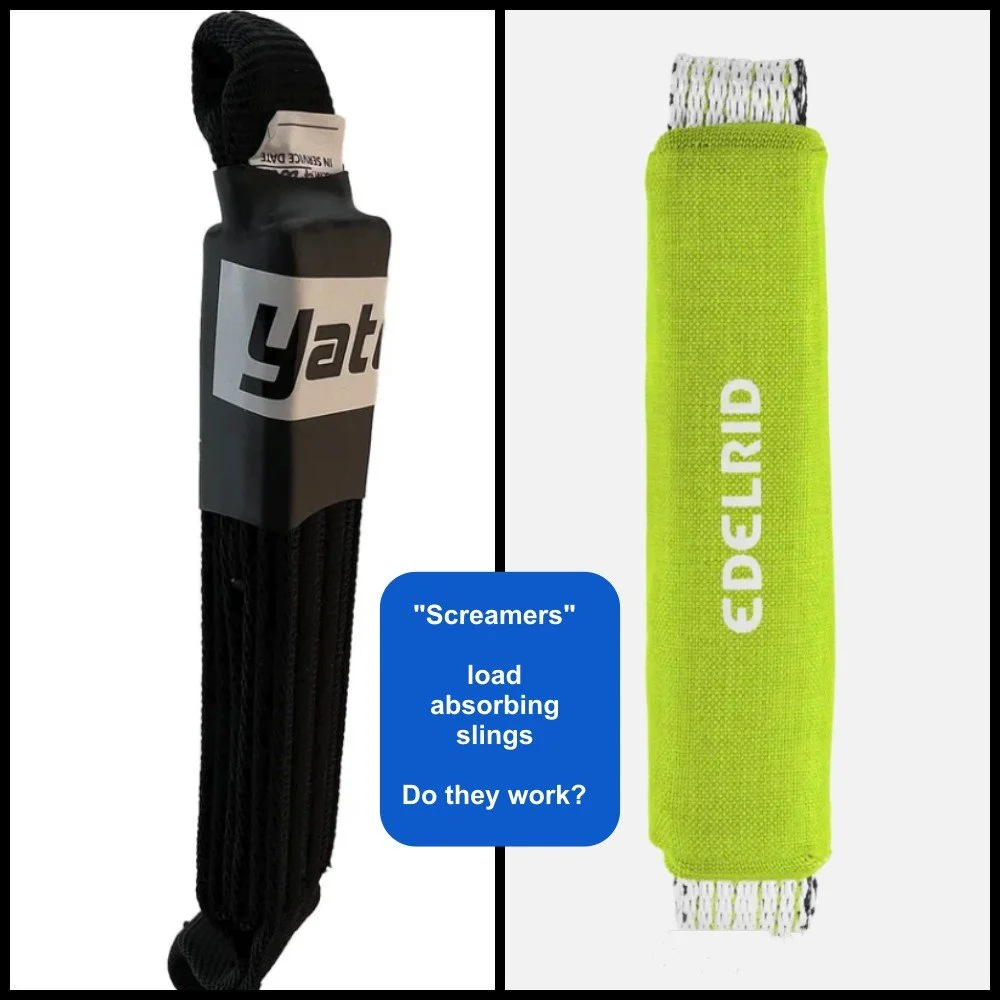
The climbing gear with the coolest name is a screamer.
It's a specialty sling that’s sewed together to be sort of shock absorber, intended to minimize the fall force that gets applied to sketchy trad or aid climbing gear.
Many aid climbers (me included) have wondered if they actually work, and are worth the cost.
HowNOT2 tested different screamer flavors, made by Yates, Edelrid and Petzl.
On a standard anchor with no screamer they found that dropping a 205 pound / 93 kg rock generated about 8 kN on the anchor.
When a screamer was added, that force on the anchor was reduced to between 3.8 kN and 6-ish kN, depending on manufacturer. (The Edelrid G screamer tested the best, with Yates not far behind.)
So yeah, up to about a 50% reduction in peak load, that’s a significant improvement! That’s still enough force to pull out a tiny piece of aid gear, but it's enough force reduction so it could definitely help with a piece that's slightly stronger.
Do you need to run out and buy a bunch of them? Probably not. But, if you’re doing more advanced trad or aid climbing on small gear, having a couple of these might be a good idea.
If you want to really nerd out on screamers and see all the break test results, here's the video from HowNOT2.
Rope gets stuck belaying second; what’ya do?
Scenario: a leader is bringing up their partner on a multipitch, and the rope between them somehow gets stuck. How would you solve this? Here's one way.
I once heard the following story:
Two climbers were on a multi pitch alpine route. While the leader was belaying up their partner, the rope slithered into an Evil Crack and got stuck.
The leader couldn’t pull the rope up, and the climber couldn't ascend because they weren't really on belay anymore.
Yikes, problemo! What would you do in this situation?
Here’s one way you could handle it.
Having good verbal communication between partners is very helpful here!
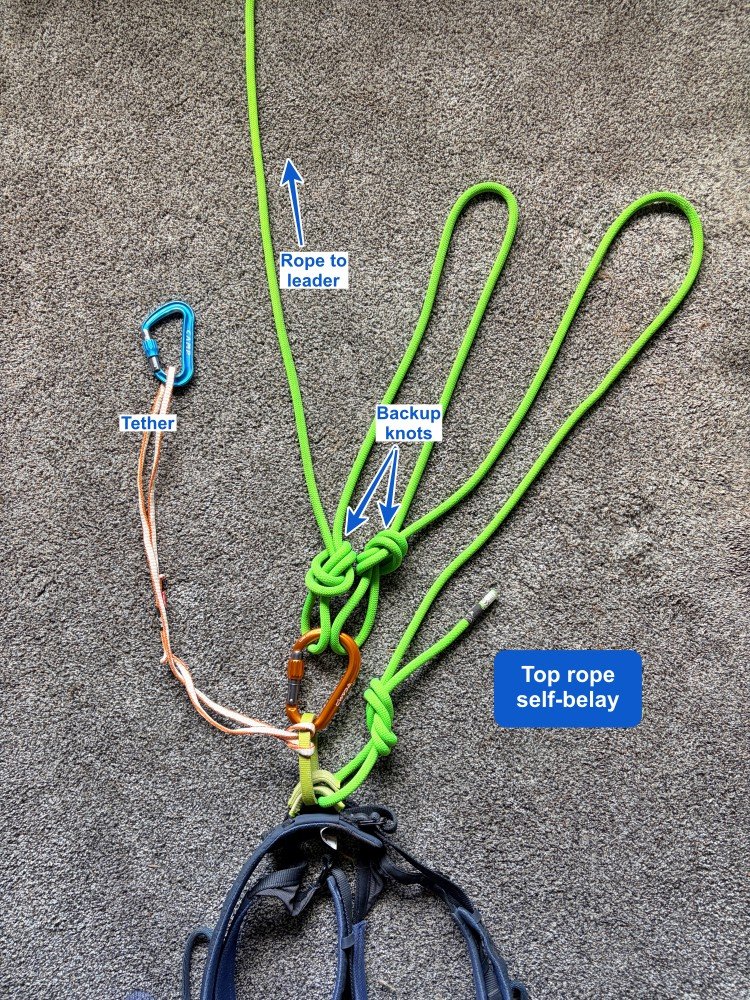
Because the leader can’t pull up the rope, the second needs to self-belay to where the rope is stuck.
A simple way to do this: tie a series of bight knots as you climb, clipping them to a large HMS carabiner on your belay loop. (This is common practice in aid climbing when the second cleans the pitch.)
Yes, you might need two hands to tie the knots. Make yourself a tether, and clip it to gear to go hands-free when needed.
Another option is a friction hitch (prusik) that you slide up the rope as you climb. This need to be backed up with a bight knot of some kind.
When you get to the stuck rope, pull it out.
Then, with clear communication to your partner above, start removing your back up knots one at a time, while the leader takes in the slack rope.
When you’re back on a proper belay with your original tie in knot, continue climbing.
Fixed point belay - step by step changeover
The fixed point belay has several advantages for belaying a leader. Here's a nice series of diagrams from Austrian guide Jürgen Reinmüller showing a simple way to transition from bringing up your partner to leading out on the next pitch.
These diagrams are from the excellent book “Alpine Rock Climbing Handbook” by Austrian Guide Jürgen Reinmüller. Connect with Juergen on Instagram, @alpinstil.at, and get his book here (printed version in German, eBook in English). Diagrams are shared with permission.
The fixed point belay is slowly becoming more common in the US. It has some advantages, especially if there is a high chance of a fall onto the anchor on a multi pitch route.
I have a detailed article on the fixed point belay, you can read it here.
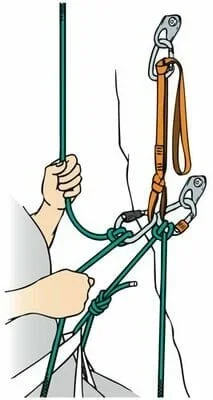
image: climbgermany.com / Georg Sojer
A common question: what are the transition steps for bringing up your partner, securing them, and then heading out onto the next pitch, belaying directly from the anchor the whole time?
It’s a better show than a tell; here’s a series of nice diagrams from Jürgen Reinmueller, @lpinstil.at showing one way to do it.
Jürgen is an Austrian guide who published the “Alpine Climbing Handbook” in both German (printed) and English (eBook). It's a terrific book, you can buy it here.
A few notes . . .
This diagram shows the anchor as a single bolt. Common in some parts of Europe, not in the US.
The leader is bringing up their partner with a Munter hitch. You could use any sort of guide style belay device here if that's your preference.
In this example, the partners are block leading, with the same person leading several pitches in a row. This same system could easily be changed for swing leading.
1 - Leader belays their partner up to the anchor, here with a Munter hitch.
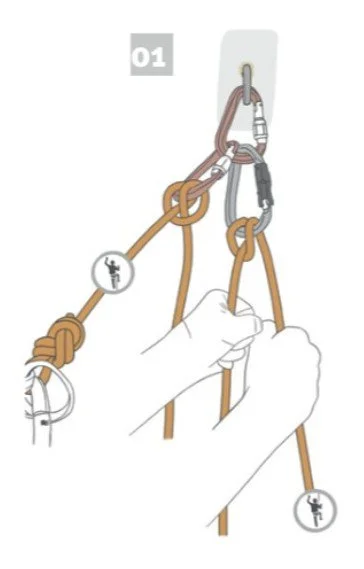
Image: “Alpine Rock Climbing Handbook” by Jürgen Reinmüller
2 - Partner arrives at anchor. Partner clips a locker to the master point carabiner and ties a clove hitch. Partner is now secure and off belay.
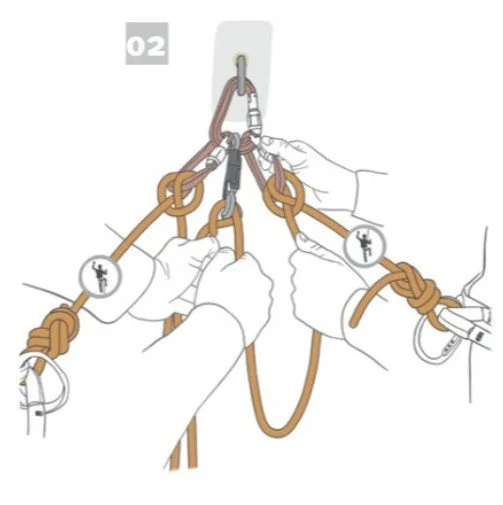
Image: “Alpine Rock Climbing Handbook” by Jürgen Reinmüller
3 - The Munter hitch is removed from the gray carabiner.
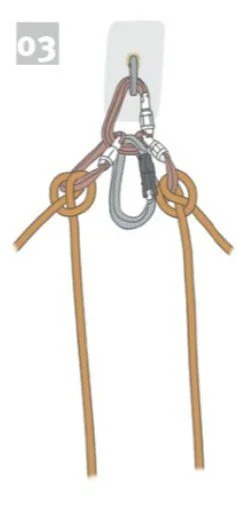
Image: “Alpine Rock Climbing Handbook” by Jürgen Reinmüller
4 - The second (on the right) puts the lead climber (on the left) on a fixed point lead belay with a munter hitch on the gray carabiner.
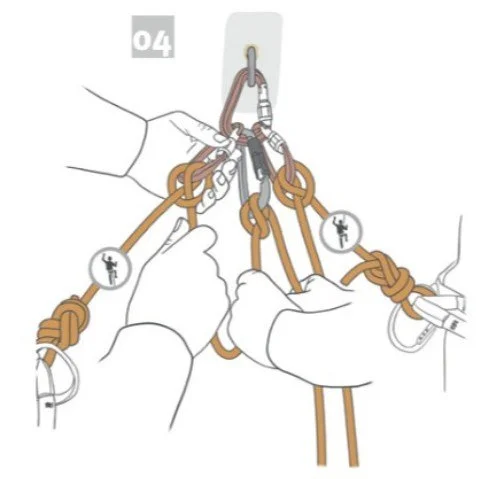
Image: “Alpine Rock Climbing Handbook” by Jürgen Reinmüller
5 - The lead climber unties their clove hitch, removes the carabiner, and starts out on the next pitch.
Clean, fast, simple!
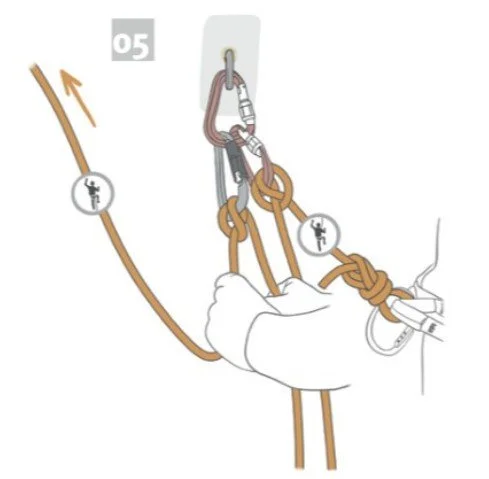
Image: “Alpine Rock Climbing Handbook” by Jürgen Reinmüller