

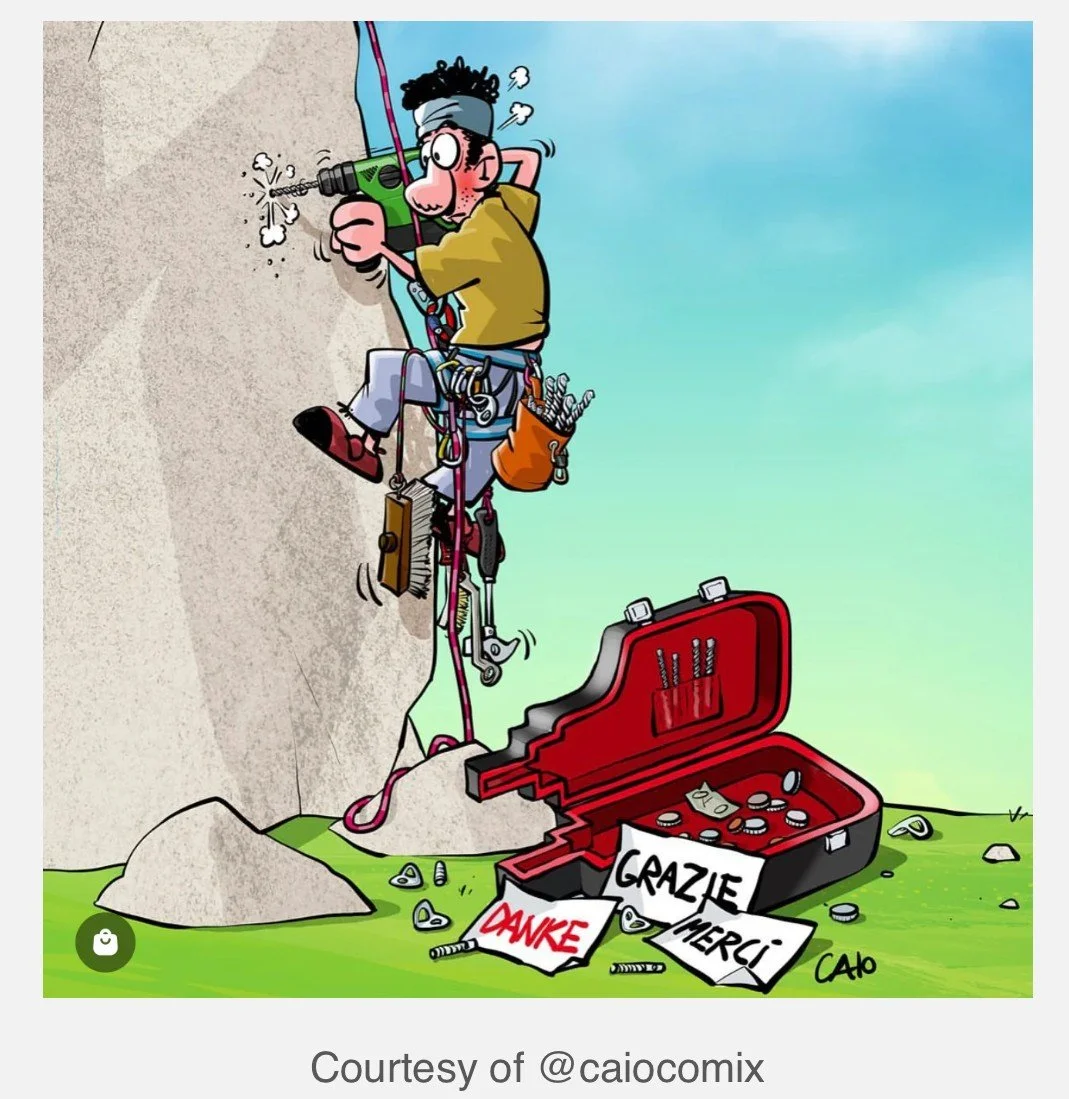
Do screamers really work?
The “screamer” load limiting sling is the climbing gear with the coolest name. It's designed as sort of a shock absorber, used when placing questionable trad or aid gear. Do they work? Here's some break testing on how well they actually function.

This article may contain affiliate links to HowNOT2. Your purchase earns a small commission for Alpinesavvy, at no extra cost to you. Your support helps improve this site, the world’s largest collection of climbing tips.

The climbing gear with the coolest name is a screamer.
It's a specialty sling that’s sewed together to be sort of shock absorber, intended to minimize the fall force that gets applied to sketchy trad or aid climbing gear.
Many aid climbers (me included) have wondered if they actually work, and are worth the cost.
HowNOT2 tested different screamer flavors, made by Yates, Edelrid and Petzl.
On a standard anchor with no screamer they found that dropping a 205 pound / 93 kg rock generated about 8 kN on the anchor.
When a screamer was added, that force on the anchor was reduced to between 3.8 kN and 6-ish kN, depending on manufacturer. (The Edelrid G screamer tested the best, with Yates not far behind.)
So yeah, up to about a 50% reduction in peak load, that’s a significant improvement! That’s still enough force to pull out a tiny piece of aid gear, but it's enough force reduction so it could definitely help with a piece that's slightly stronger.
Do you need to run out and buy a bunch of them? Probably not. But, if you’re doing more advanced trad or aid climbing on small gear, having a couple of these might be a good idea.
If you want to really nerd out on screamers and see all the break test results, here's the video from HowNOT2.
Rope gets stuck belaying second; what’ya do?
Scenario: a leader is bringing up their partner on a multipitch, and the rope between them somehow gets stuck. How would you solve this? Here's one way.
I once heard the following story:
Two climbers were on a multi pitch alpine route. While the leader was belaying up their partner, the rope slithered into an Evil Crack and got stuck.
The leader couldn’t pull the rope up, and the climber couldn't ascend because they weren't really on belay anymore.
Yikes, problemo! What would you do in this situation?
Here’s one way you could handle it.
Having good verbal communication between partners is very helpful here!
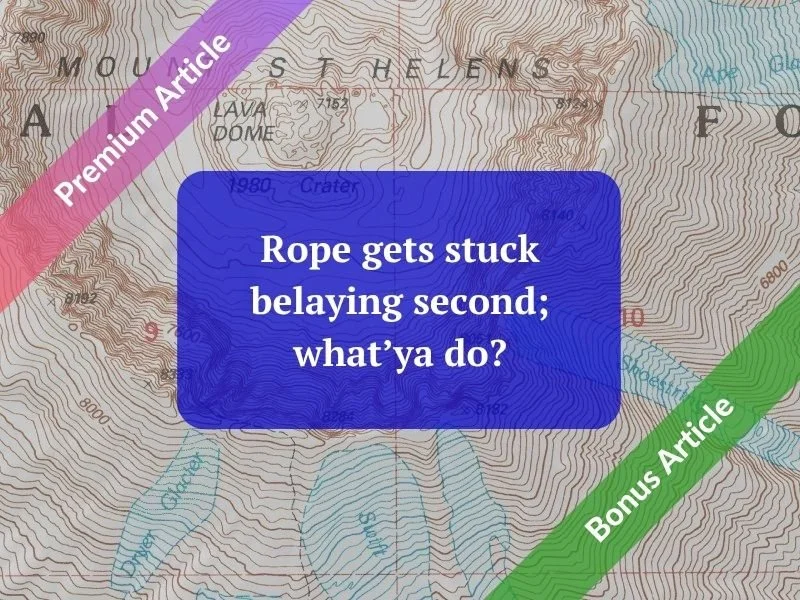
Because the leader can’t pull up the rope, the second needs to self-belay to where the rope is stuck.
A simple way to do this: tie a series of bight knots as you climb, clipping them to a large HMS carabiner on your belay loop. (This is common practice in aid climbing when the second cleans the pitch.)
Yes, you might need two hands to tie the knots. Make yourself a tether, and clip it to gear to go hands-free when needed.
Another option is a friction hitch (prusik) that you slide up the rope as you climb. This need to be backed up with a bight knot of some kind.
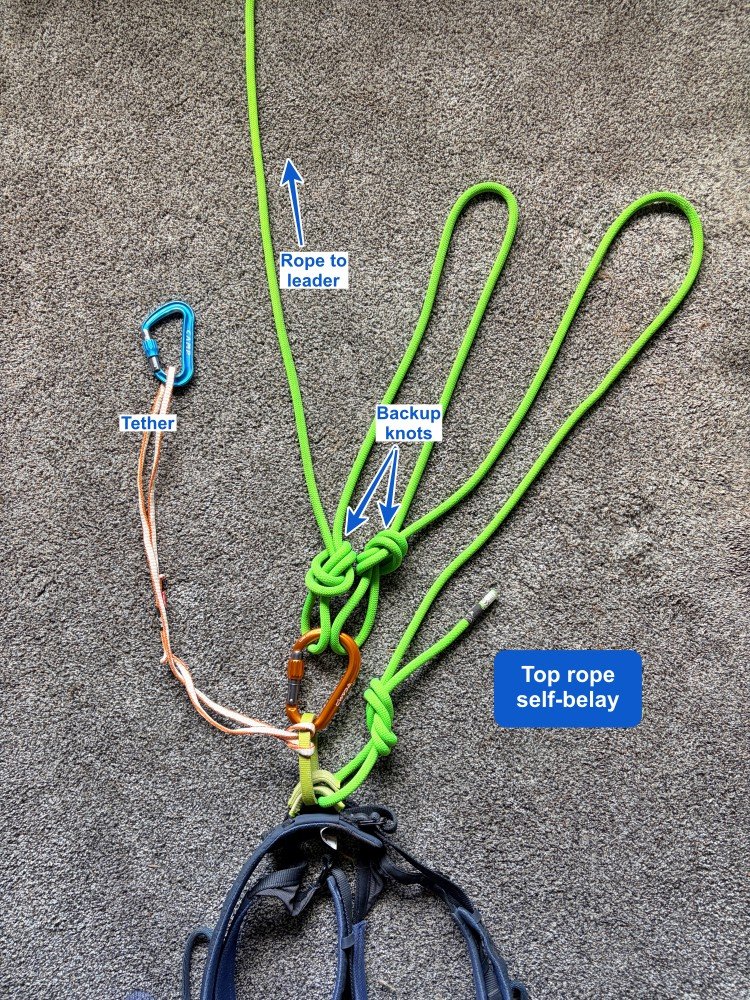
When you get to the stuck rope, pull it out.
Then, with clear communication to your partner above, start removing your back up knots one at a time, while the leader takes in the slack rope.
When you’re back on a proper belay with your original tie in knot, continue climbing.

Fixed point belay - step by step changeover
The fixed point belay has several advantages for belaying a leader. Here's a nice series of diagrams from Austrian guide Jürgen Reinmüller showing a simple way to transition from bringing up your partner to leading out on the next pitch.
These diagrams are from the excellent book “Alpine Rock Climbing Handbook” by Austrian Guide Jürgen Reinmüller. Connect with Juergen on Instagram, @alpinstil.at, and get his book here (printed version in German, eBook in English). Diagrams are shared with permission.
The fixed point belay is slowly becoming more common in the US. It has some advantages, especially if there is a high chance of a fall onto the anchor on a multi pitch route.
I have a detailed article on the fixed point belay, you can read it here.
image: climbgermany.com / Georg Sojer
A common question: what are the transition steps for bringing up your partner, securing them, and then heading out onto the next pitch, belaying directly from the anchor the whole time?
It’s a better show than a tell; here’s a series of nice diagrams from Jürgen Reinmueller, @lpinstil.at showing one way to do it.
Jürgen is an Austrian guide who published the “Alpine Climbing Handbook” in both German (printed) and English (eBook). It's a terrific book, you can buy it here.
A few notes . . .
This diagram shows the anchor as a single bolt. Common in some parts of Europe, not in the US.
The leader is bringing up their partner with a Munter hitch. You could use any sort of guide style belay device here if that's your preference.
In this example, the partners are block leading, with the same person leading several pitches in a row. This same system could easily be changed for swing leading.
1 - Leader belays their partner up to the anchor, here with a Munter hitch.
Image: “Alpine Rock Climbing Handbook” by Jürgen Reinmüller
2 - Partner arrives at anchor. Partner clips a locker to the master point carabiner and ties a clove hitch. Partner is now secure and off belay.
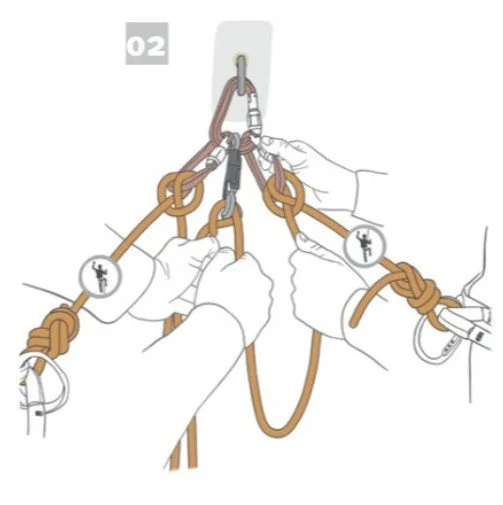
Image: “Alpine Rock Climbing Handbook” by Jürgen Reinmüller
3 - The Munter hitch is removed from the gray carabiner.
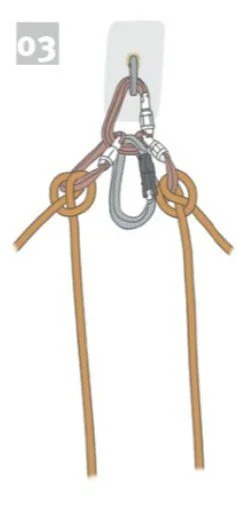
Image: “Alpine Rock Climbing Handbook” by Jürgen Reinmüller
4 - The second (on the right) puts the lead climber (on the left) on a fixed point lead belay with a munter hitch on the gray carabiner.
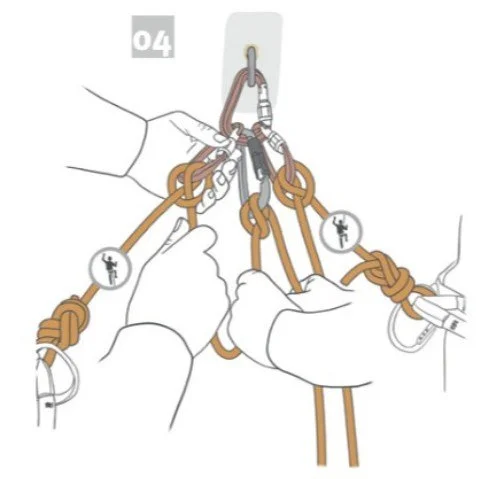
Image: “Alpine Rock Climbing Handbook” by Jürgen Reinmüller
5 - The lead climber unties their clove hitch, removes the carabiner, and starts out on the next pitch.
Clean, fast, simple!
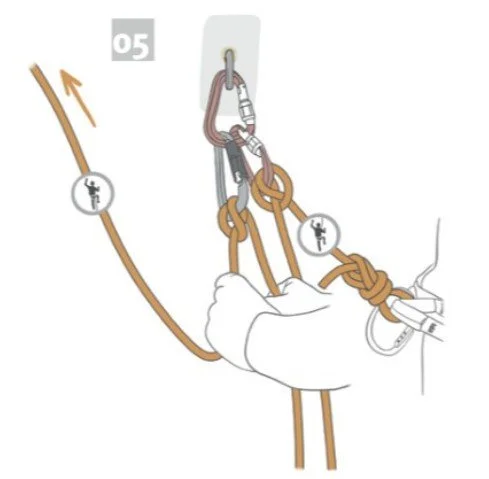
Image: “Alpine Rock Climbing Handbook” by Jürgen Reinmüller

Get to know your LCO (Local Climbing Organization)
In your favorite climbing area, there's probably a small group of dedicated volunteers with one goal: trying to put in good hardware to keep you safe. Find out who these fine folks are and support them in whatever way you can.
Who maintains the anchors where you climb? Get to know and support these good people.
Many of us, myself included, often take bolts and anchor hardware for granted at our local crag. Sort of like critical utilities (electricity, water, internet?) they're always available when you need them, and most of us don't give much thought as to how they got there.
At most climbing areas in the United States, hardware is installed and maintained by small groups of dedicated and hard-working folks who have ONE noble mission: trying to save your ass!
In my neighborhood in Bend, Oregon, this is the High Desert Climbing Alliance @highdesertclimbers.
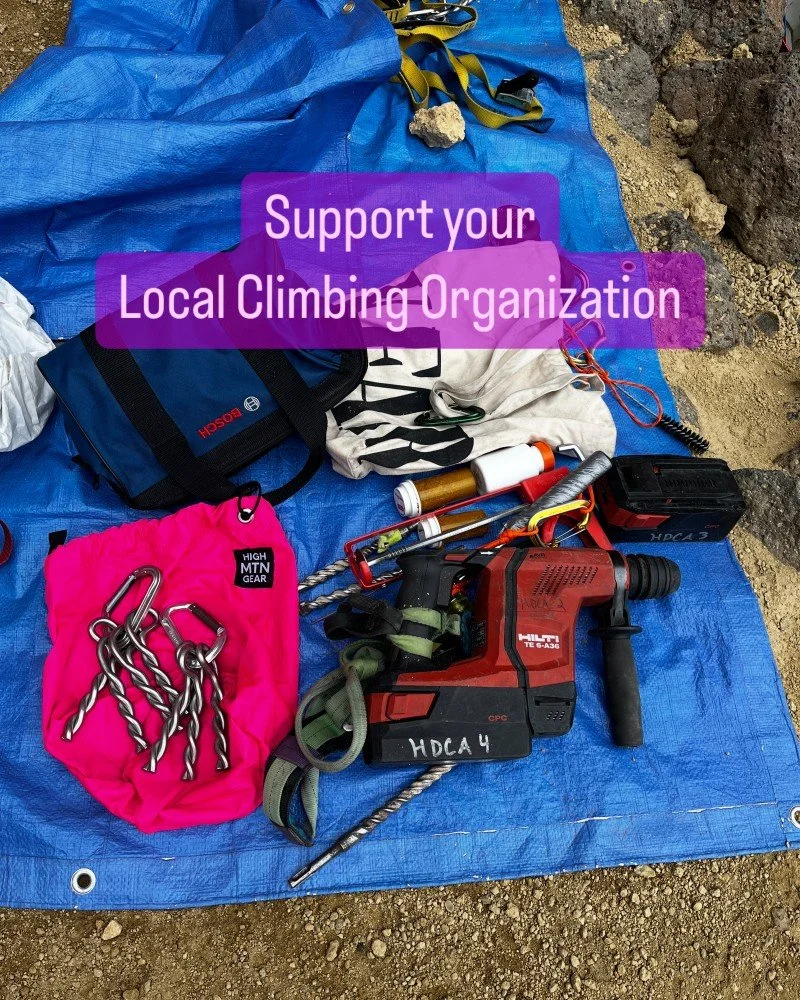
Awhile back, I went to my first volunteer re-bolting session with them at Smith Rock. I learned a lot.
The main lesson: five piece expansion bolts are a substantial hassle to remove, and, at least at Smith, glue ins are the way to go. Check out those sweet new ones in the photo above.
My sport climbing harness sucks for hanging hours at a time, maybe bring a bosun’s chair next time.
Be useful when you can, stay out of the way when you can't, don’t drop anything, and bring cookies.
The big wall gear bag I donated from @highmountaingear works great for hauling up cookies and bolting hardware.
Donate what you can to help them out, whether that's your volunteer time, gear, or money. Asking around at local climb shops is probably the best way to find your LCO.

A simple, strong alpine anchor
Check out this elegant alpine anchor from IFMGA Guide Marc Hanselman. While no anchor is perfect for every application, in the right rock type this one is pretty sweet.
IFMGA Guide Marc Hanselman shared this anchor with me. Connect with Mark on Instagram, @pro.alpine
Provided you have strong, smooth rock, this anchor style could be a good choice.
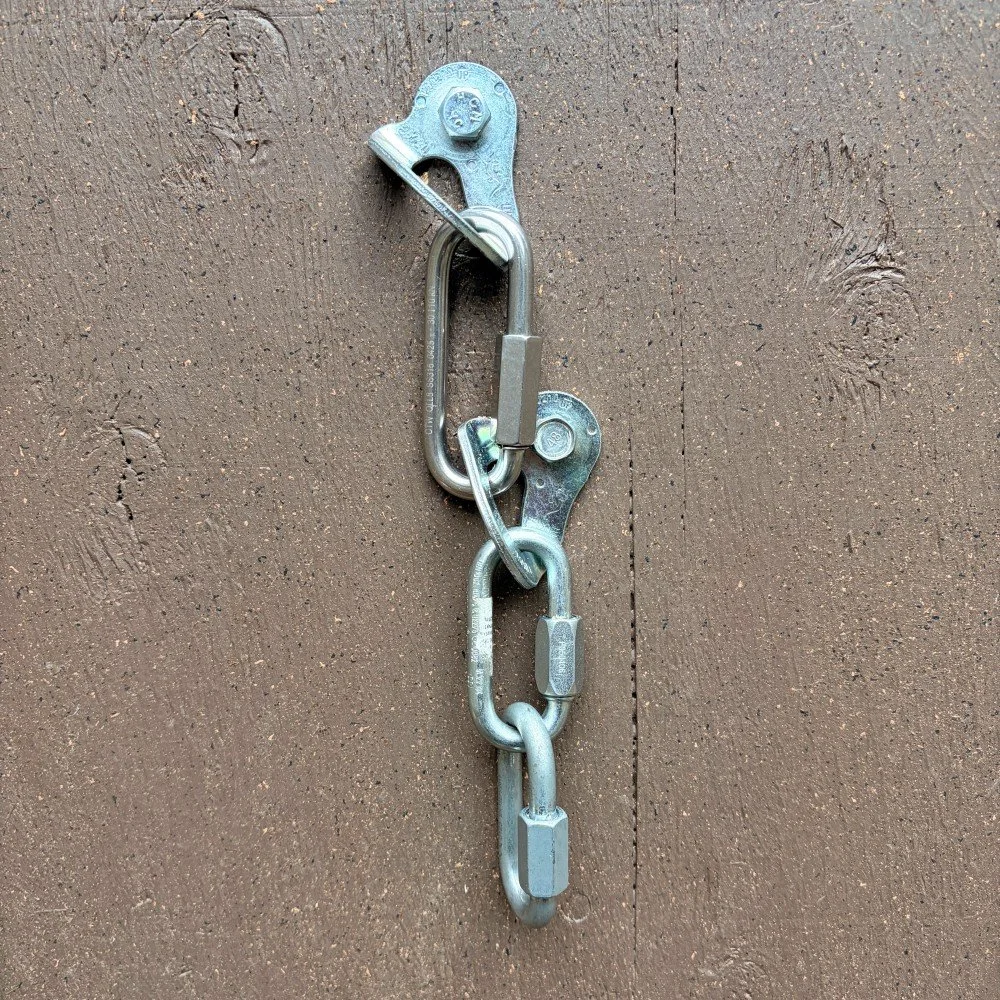
Here’s what Marc says about this anchor:
“This is my permanent alpine anchor, where weight (remote setting), safety, longevity and clean pulls on the rap are at the forefront.
In solid rock the spacing between holes needs to be 10x the diameter of the hole, or about 4”. This accomplishments that.
Installation order is key: prebuild the anchor, drill one hole, hold anchor in place of the 1st hole, mark the 2nd hole and drill. If you attempt to assemble after bolts are installed, you could be in a pickle.
I believe this is the best solution for this scenario, where economy of gear is necessary and the anticipated amount of traffic is relatively low, compared to a sport crag. I call it the “alpine ferroutage” anchor”
A few things to note . . .
This anchor has redundancy, but not equalization. All the load is on the bottom bolt. The top bolt is a backup, in the highly unlikely event that the bottom bolt fails. It's called a series anchor. I have a detailed article on those; read it here.
Yes, the bolts are close together. With a 3/8 inch bolt, 4 inches (10x hole diameter) is about the minimum spacing. If you have a half inch bolt, you'd want about 5 inches of spacing, and this method is not optimal for that.
The top quick link is an 8mm long link. This gives that necessary 4 inch minimum spacing between the bolts. These can be hard to find; buying info is below.
There are two quick links on the bottom hanger. This second link hangs perpendicular to the rock, which gives you less friction and twists on the rope pull. The second link could also be a welded ring.
What's up with the name? Marc explains: “Ferroutage” means “piggyback” in French. It’s a nod to the origins of the idea - “Chamonix anchor” (as in my concept piggybacks on theirs) as well as the actual structure of the anchor (one bolts piggybacks on the other).”
If the rock was lower quality and you wanted the bolts farther apart, or had lots of bumps and protrusions, which might make it hard to get the spacing correct, you could try the “Chamonix anchor”. It’s similar to this, but instead of a long link connecting the two bolts, you have a length of 7 or 8 mm cord. This method, which is widely used in many parts of Europe, has it’s pros and cons. Here's my more detailed article about it.
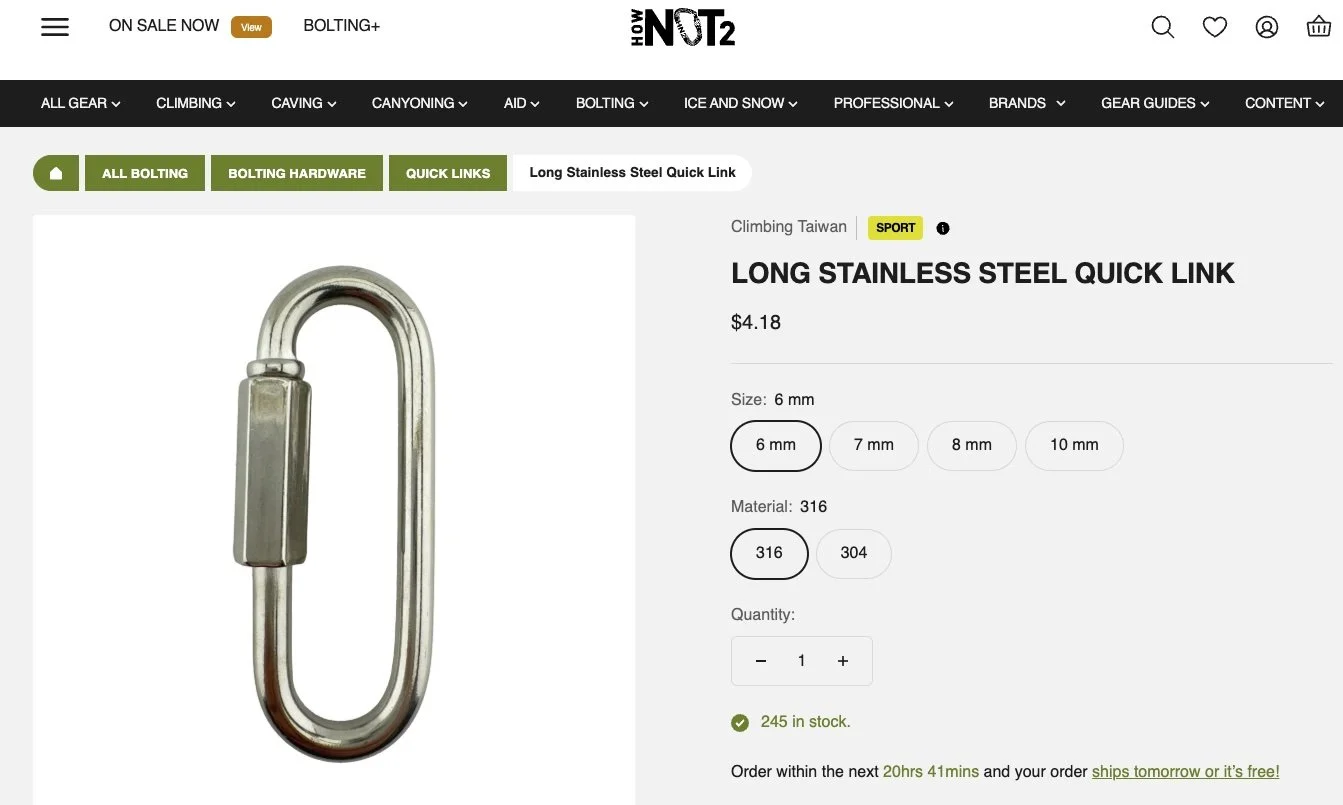
Get long stainless steel quick links like this from HowNOT2.
These come in different sizes. The 6 mm is more than strong enough, they test somewhere around 35 kN. The 8 mm is slightly longer, which is what Marc prefers.

Slick progress capture hauling system with a Tibloc
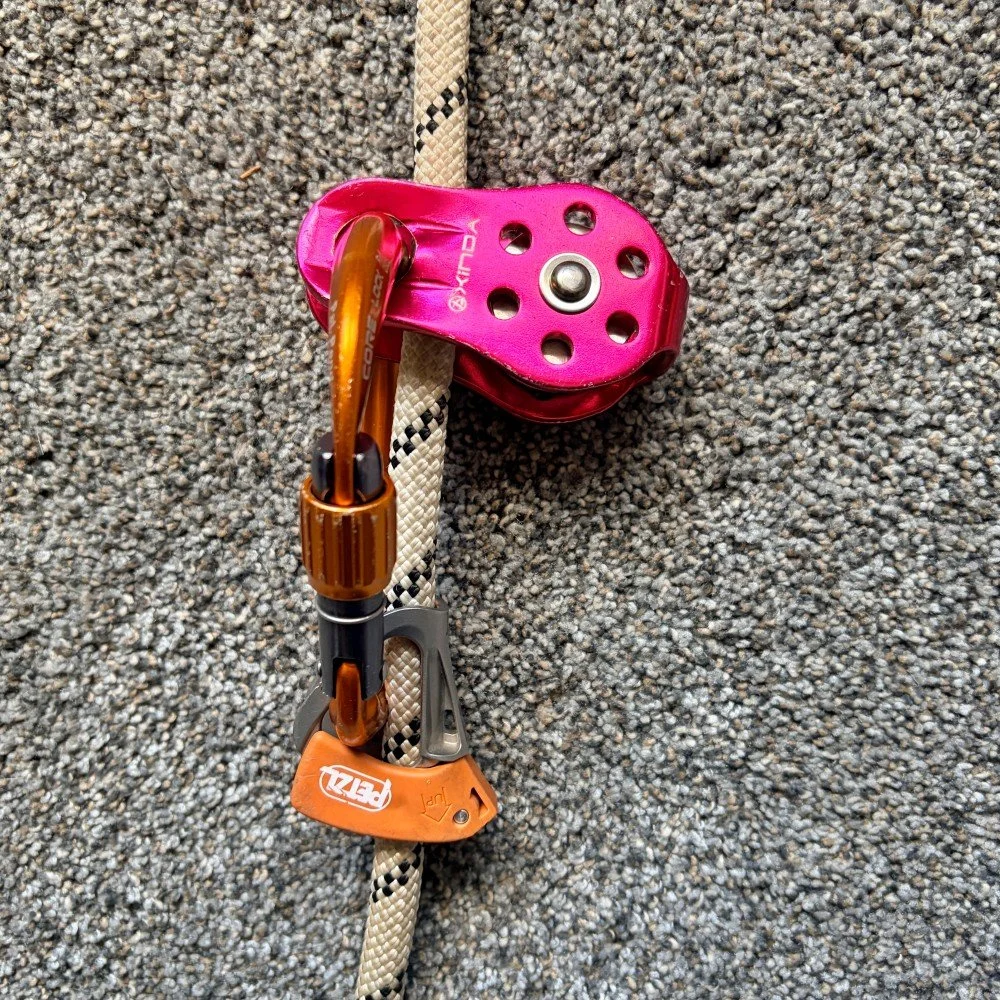
The Petzl Tibloc is great as a micro ascender for going up a rope. But did you know you can also use it as a progress capture in a hauling system? Here’s a slick way to set it up that's compact, efficient, and uses some fairly common gear.
I first saw this on the Instagram of Vladislav Babikov, an Israel based EMT and rescue expert. Thanks Vlad! Give him an Insta follow: @babikov_vlad
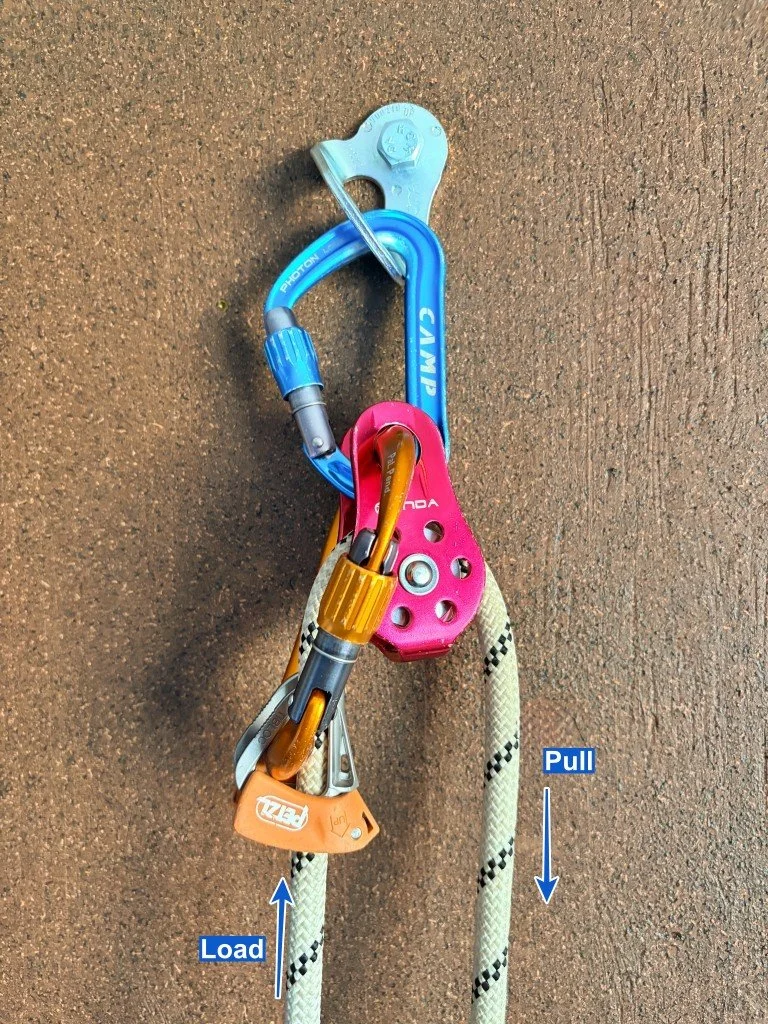
Here’s a compact and efficient progress capture haul system that uses a Petzl Tibloc as a rope grab and a fixed side plate pulley.
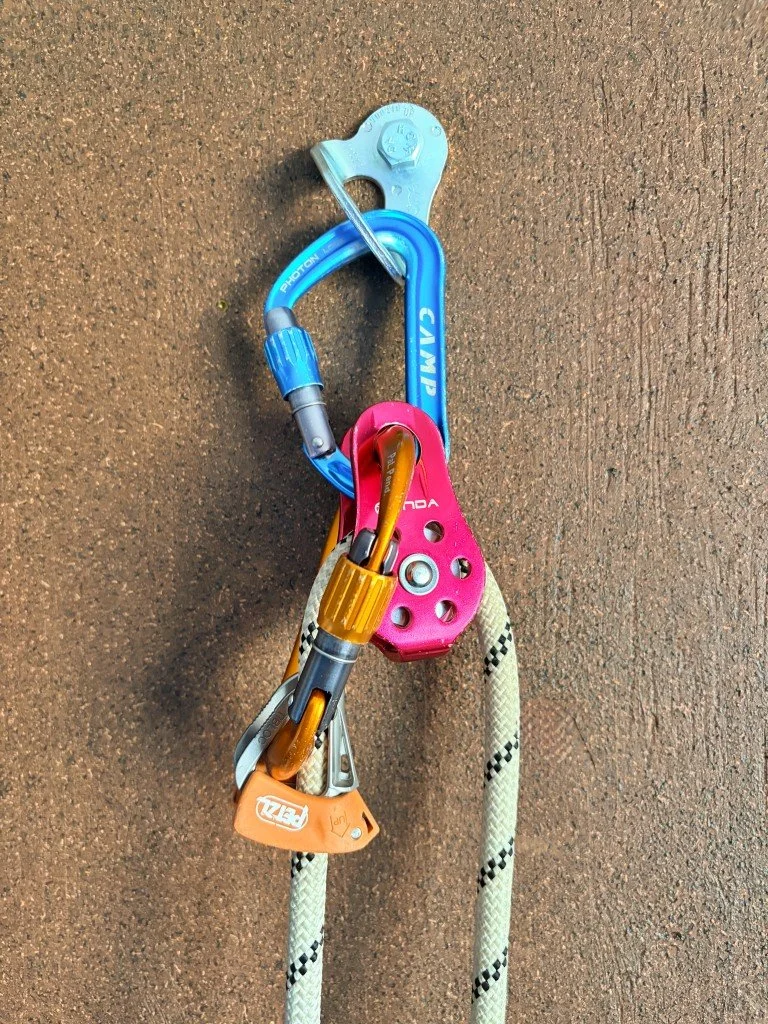
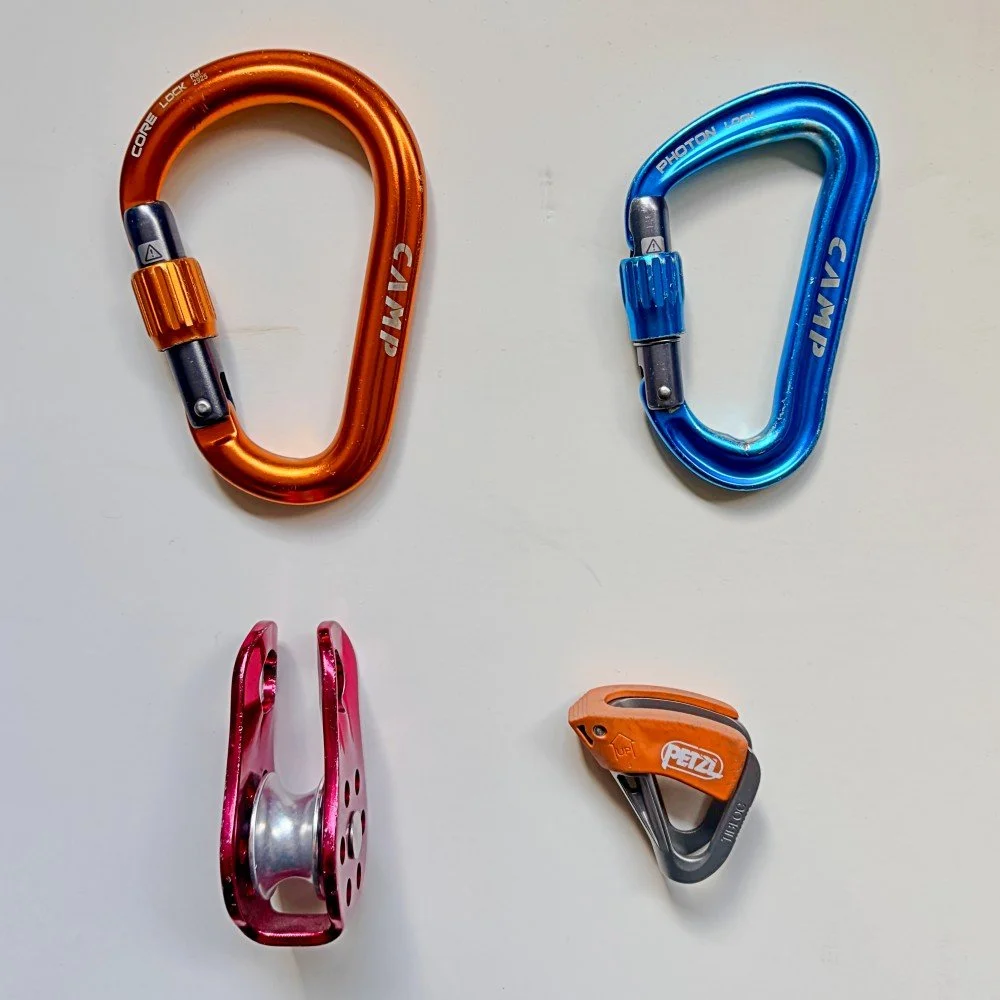
Here’s the gear you need:
A large HMS carabiner
A second locking carabiner of any flavor
Petzl Tibloc
Pulley with fixed side plates
Note the pulley with the fixed side plates. This is important. I tried this with a small swing arm pulley, and didn't work.
(If you want a name brand fixed side plate pulley, the Petzl Fixe would be a good choice. I have a cheapo from the interweb.)
If you want to know more about the Tibloc, check out this detailled article.
I will admit that it took me a rather embarrassingly long time to figure out how to rig this from the photo that Vlad posted . . .
I'll save you some time with this step-by-step photo sequence that worked for me. =^)
Step 1 - Place the Tibloc on the rope, with the top of the Tibloc pointing down, toward the load. Clip the pulley with the large HMS carabiner as shown.
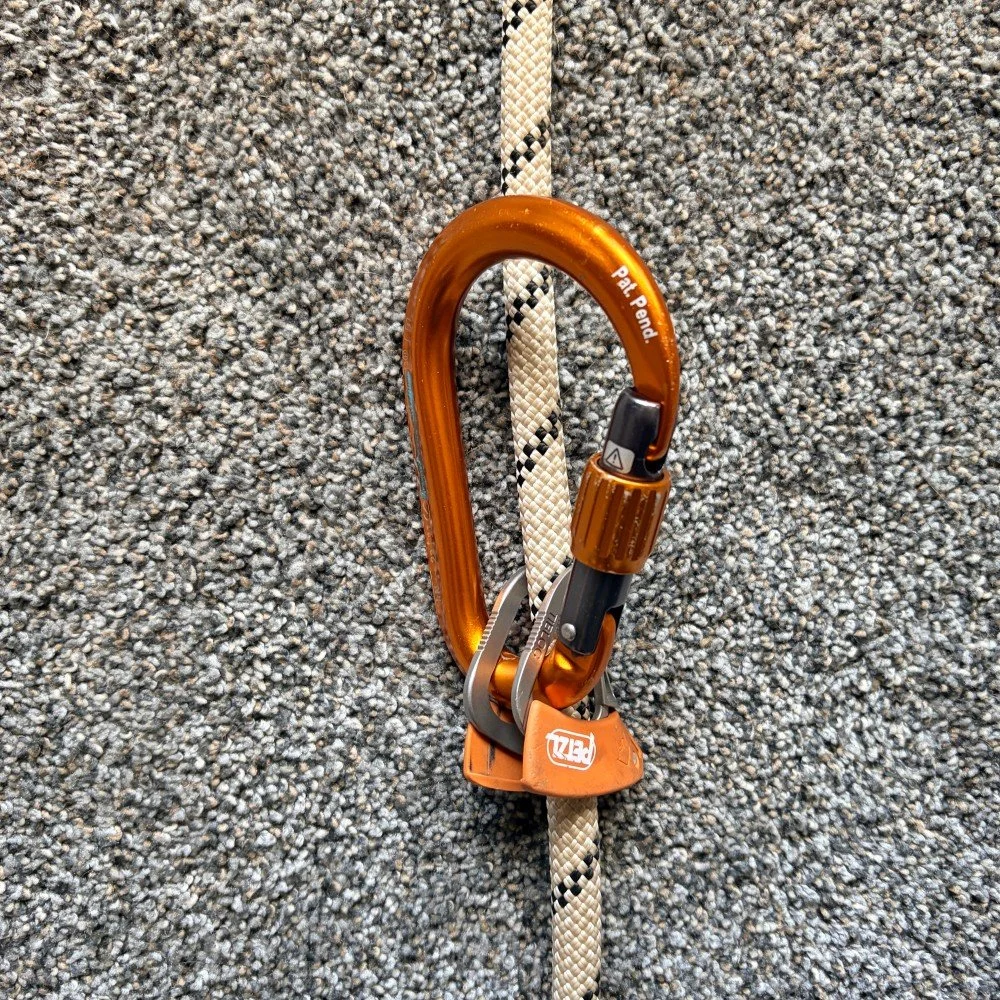
Step 2 - Place the rope through the pulley as shown.
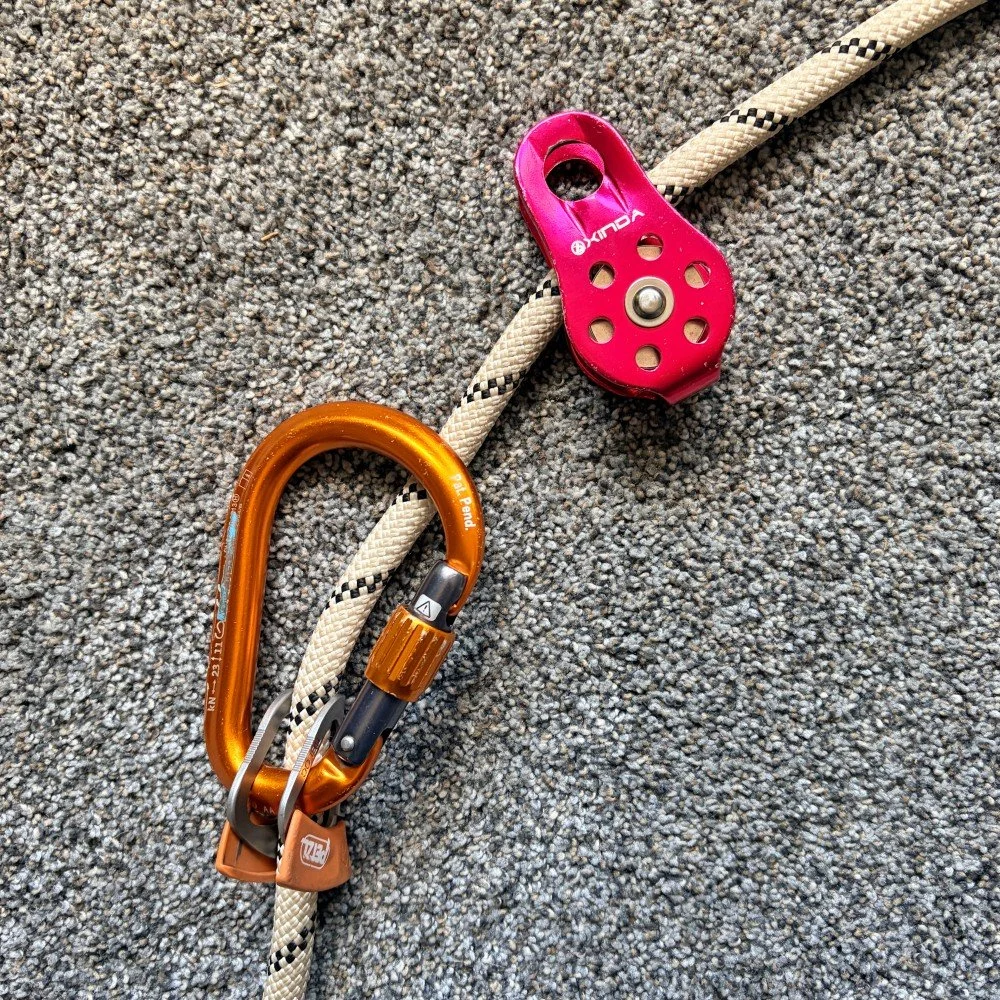
Step 3 - Clip the HMS carabiner through the pulley as shown, aligned like this.
Step 4 - Clip the second carabiner (blue) as shown. (This is why you need that fixed plate pulley; it has enough room to clip the blue carabiner in so it doesn't rub on the rope.)
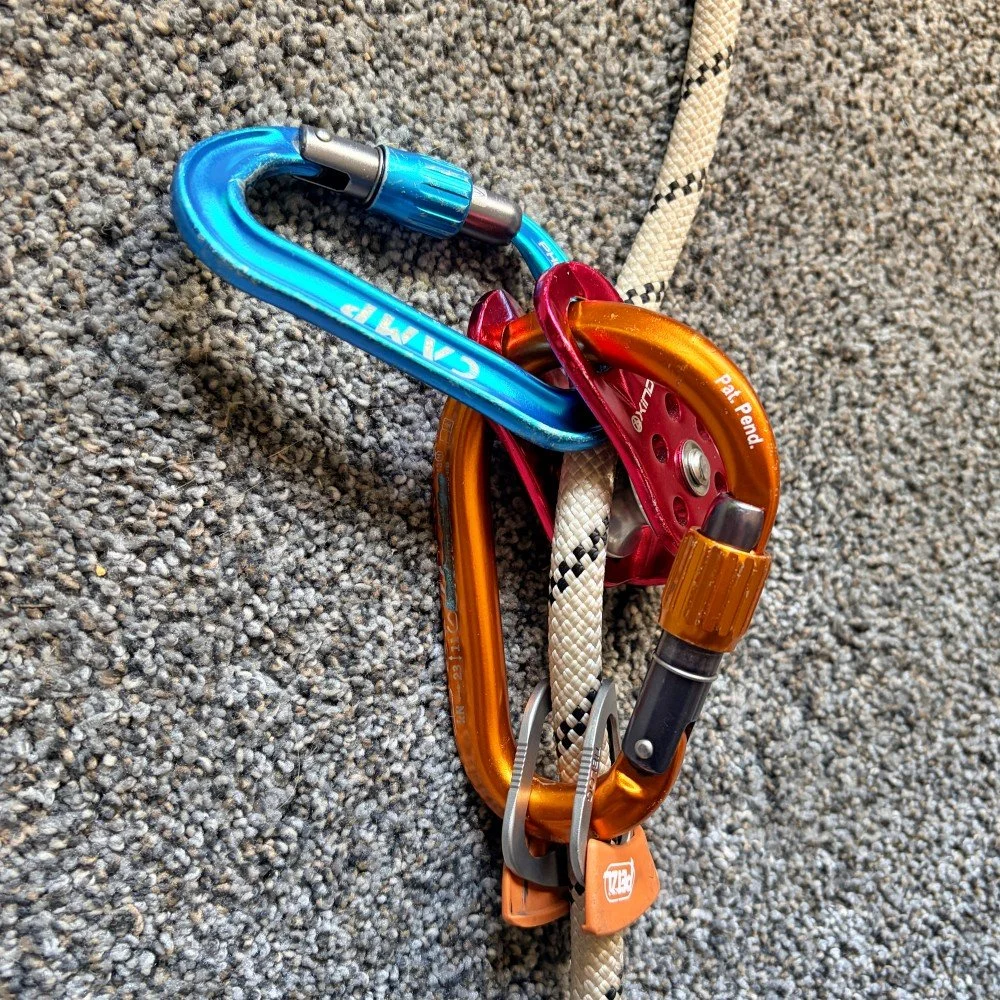
Step 5 - Finally, clip the second (blue) carabiner to the anchor.
This hauling system is very smooth and efficient because of the pulley. The rope runs in a straight line through the system without any sideways torquing or twisting. You also don't lose any of your progress between pulling strokes, even better.
A little Tibloc trick- it may seem that this is a one-direction system and can’t be reversed, but that's not quite true.
To make the Tibloc reversible: push up on the spring loaded orange hood, and then sort of rotate the Tibloc in a counterclockwise direction, which should release the teeth, allowing you to lower your load if necessary.
If you have this gear around, give it a try. It's a clever (and for me, sort of a brain-twister) way to use your gear in a creative way.
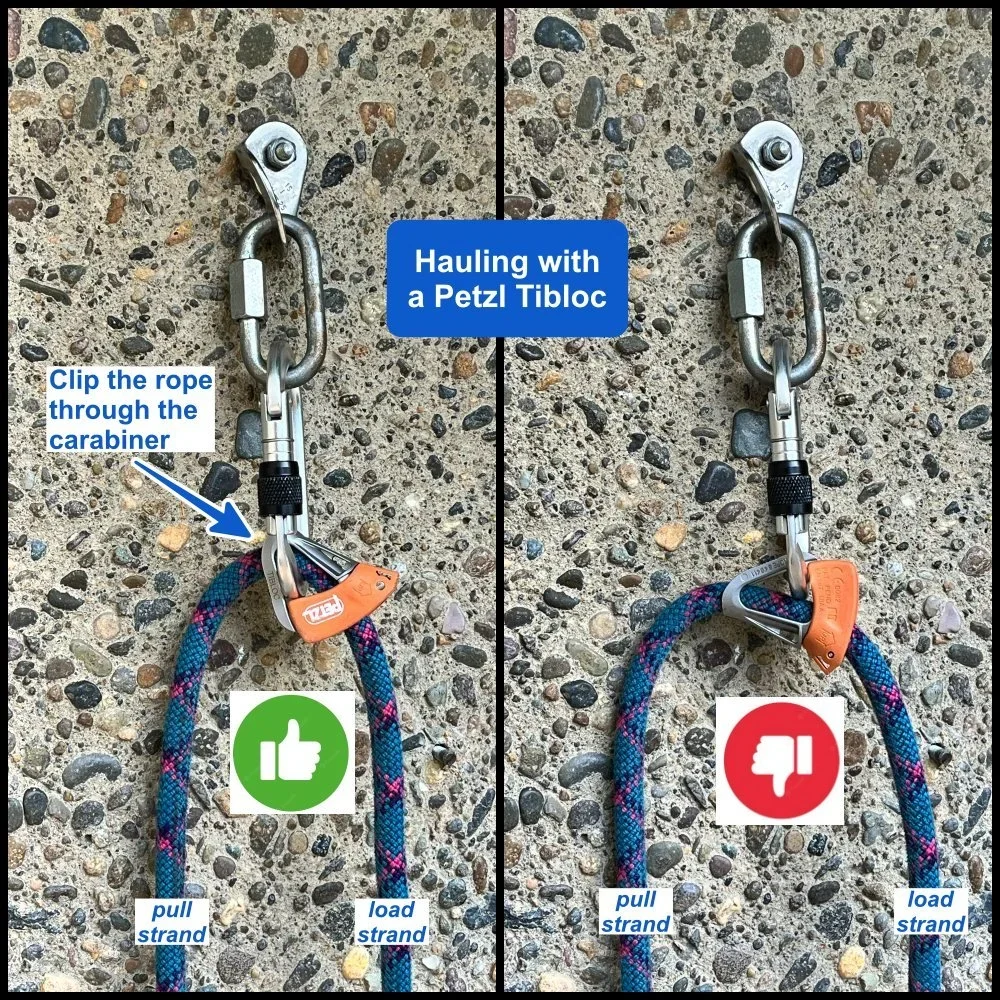
Why don't you just clip the Tibloc and rope to one carabiner and haul?
Sure, you can do that. Below is a diagram from my detailed article on the Tibloc about how to set this up the right way.
This can work fine for a smaller load, but because you're hauling through a carabiner, that's only about 50% efficient. Meaning, you need to pull down with 100 kg of force to raise a 50 kg load. Not good. With a bigger load, having a high-efficiency pulley as shown in the example above makes your life a lot easier!

How does the “Twist Test” reveal sketchy bolts?
In a perfect world, every bolt that you clip would always be reliable. Unfortunately, as a recent tragic accident in Greece has shown, even a two bolt anchor is not always 100% trustworthy. Here's a quick field check you can do that goes beyond looking and hoping.
This diagram is from the excellent book “Alpine Rock Climbing Handbook” by Austrian Guide Jürgen Reinmüller. Connect with Juergen on Instagram, @alpinstil.at, and get his book here (printed version in German, eBook in English). The diagram is shared here with permission.
A tragic 2026 accident in Kalymnos Greece is a reminder that even a two bolt anchor is not necessarily always reliable.
Can you trust that bolt? Looking at it can only tell you so much.
For a more “kinetic” test, clip a carabiner to the bolt as shown, grab the gate side, and give it a twist to apply some extra leverage.
The bolt shouldn’t move. If it does, start looking for ways to back it up.
Don't do this with anything larger than a carabiner or you might damage an otherwise good bolt.

image: from “Alpine Rock Climbing Handbook” by Jürgen Reinmüller
Here's a nice Instagram video from IFMGA Guide Jan Schneider @bergfuehrer_schneider showing how it’s done.

Multi pitch efficiency: Leader organizes the rack
On a long multi pitch climb, saving a few minutes at every belay transition can really make a difference at the end of the day. Here's one easy way to do this. (Yes, the little things add up!)
This tip is from AMGA Certified Rock Guides Lani Chapko and Sam Boyce, theclimbingguides.com. Connect with them for guided trips and clinics, including big wall instruction. Instagram: @the_climbing_school, Lani: @goatsonropes, Sam: @chossdiaries
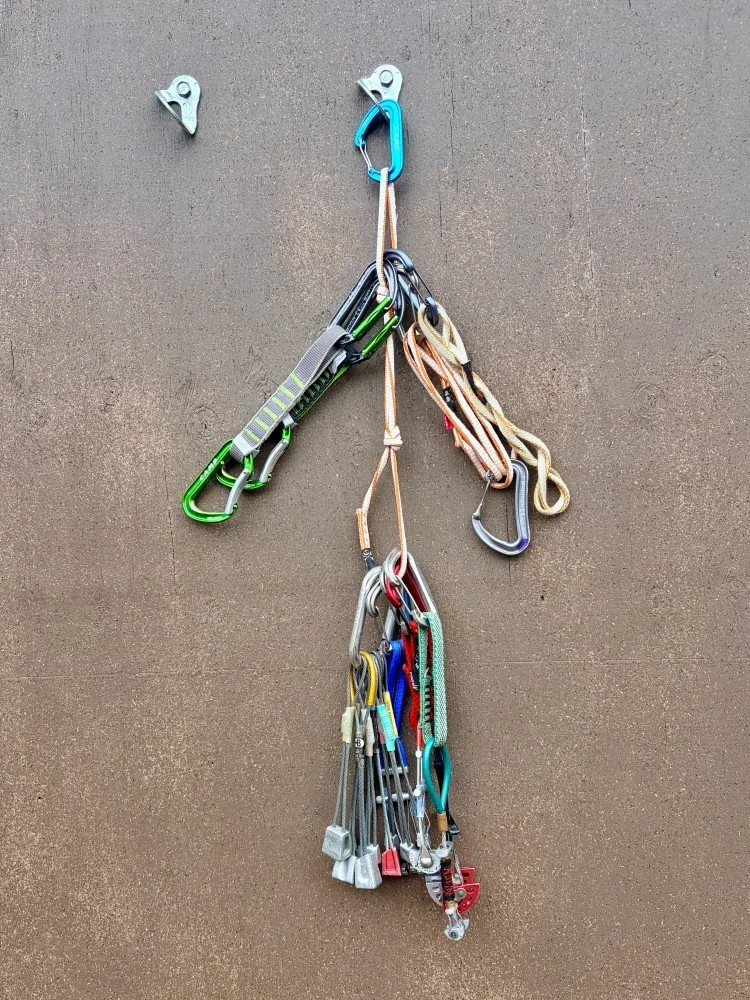
On a multipitch, you can save transition time by organizing the gear and getting it ready to hand off for the next pitch.
An easy way to do this: remove gear from your harness, clip it to a sling, and then clip the sling to an accessible spot for your partner.
If you don't have much gear left, you can clump it all together on one sling.
If you want be more tidy, tie a couple of knots in a 60 cm sling, and clip different flavors of gear to the different loops.
Why does this work well?
You don't have to pass gear hand to hand, reducing the chance of dropping gear.
Lets the second get busy racking as soon as they arrive.
If something gets dropped, it’s the fault of the second not the leader! =^)
Here's a short Instagram video from Lani and Sam showing how it's done. A 30 second transition, impressive!

Petzl Traxion - failure to grab the rope
Progress capture pulleys like the Petzl Traxion are excellent pieces of gear, that are solid and reliable in most situations. However, in these examples, it can fail to grab. Watch the videos here. And read that Petzl manual!
Most of us expect progress capture pulleys to operate flawlessly in just about any environment. Mostly, they do. But not always.
This video was sent to me by one of my Instagram followers. I’m sharing it here with his permission. (I'm leaving his name and Instagram handle out of my article.)
He was top rope soloing (TRS) on some ice, and was rather alarmed when he discovered that his Petzl Micro Traxion, which was his primary backup device, was clearly not grabbing properly onto the rope.
Yes, Petzl does have a clear diagram in the Traxion technical specs that cautions against ice, sticks, dirt, etc.

Where’s the second device? Apparently, the climber didn’t have one. It's best practice to have two different progress captured tools for top rope solo.
Would a second progress capture pulley have worked here? Hard to say. If one is slipping, it seems pretty likely that another could slip as well. If you anticipate an icy rope, a second device that has a different rope grab mechanism, such as maybe a CAMP Lift, might work better.
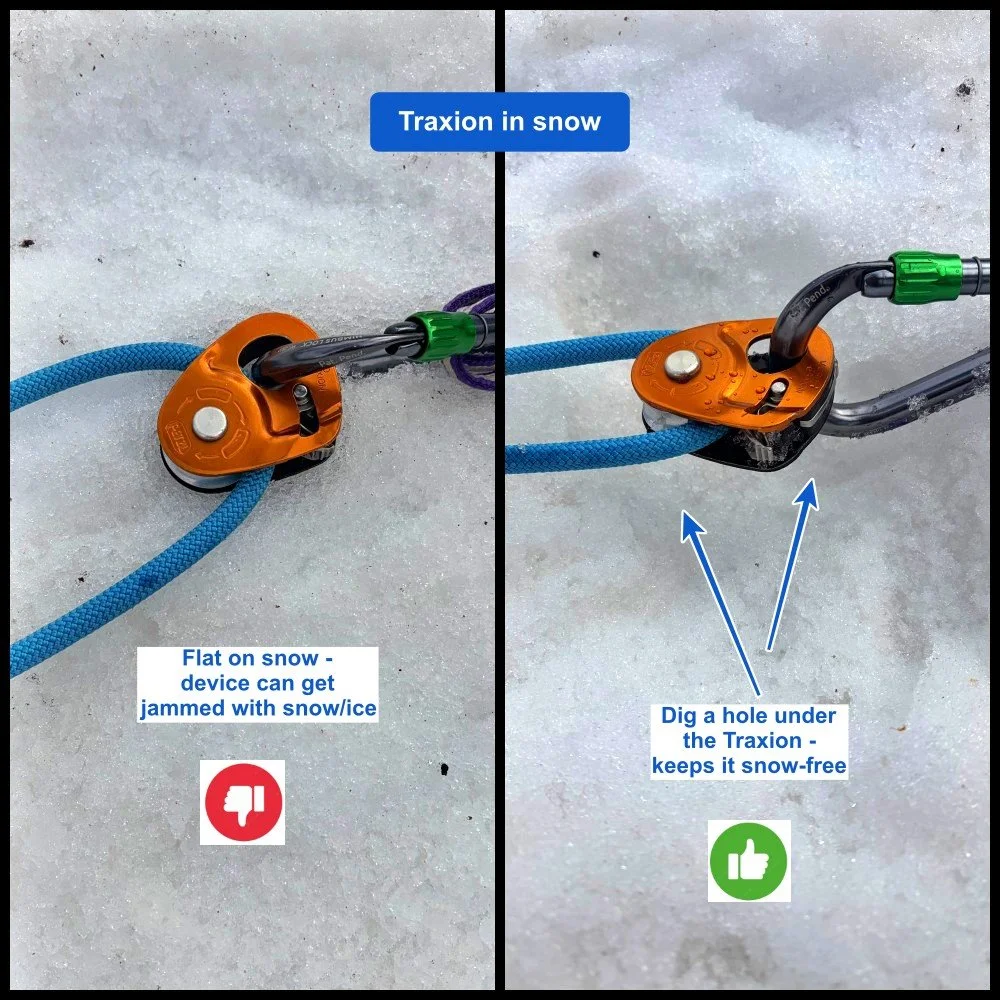
Related tip for crevasse rescue: if you have a pulley that’s laying flat in the snow, take a few seconds and excavate a concave sort of bowl underneath it, so the pulley is hanging in space and not being pressed into the snow. This lowers the chance that snow / ice can jam in the cam.
Takeaways (for me):
Always use a second device as a backup for TRS in any conditions, rock or ice.
Be cautious with using devices like this on icy ropes. This applies to TRS and crevasse rescue.
Consider tying hard back up knots in the rope below the device.
Some of the cool kids are now using this as a belay device. Personally, I’m not a fan. If you choose to do this, read up on it and make your own informed choice.
To be clear, this is not a slam on the Traxion. When used properly, they are very reliable. But as they say, RFM! (Read the Friggin’ Manual).
Here’s the video:
Here’s a similar video on Instagram from @the_climbing_school. This time the rope isn't icy, but tensioned and with an older, glazed sheath.
The better hanging belay: improvised foot stirrups
Are you multi pitch climbing a steep route without much of a ledge at the belay? That hanging belay is probably gonna hurt a bit. Here's an easy way to make it suck a little less.
On one of my first multipitch climbs, I quickly learned how much hanging belays can suck.
Without any sort of a ledge to stand on, all my weight was on my harness. My kidneys slowly merged into one, and my feet went numb.
After that uncomfortable day, I came up with this little trick. It's been a help ever since.
Here's a tip for a better hanging belay: foot stirrups.
On the backside of your rope connection to the anchor, tie a friction hitch.
Take a sling, ideally a wider nylon one, and tie an overhand knot in the middle.
Clip a carabiner “into” this overhand knot.
Clip the carabiner and sling to the friction hitch.
Now put your feet into each loop of the sling! =^)
Done! Give yourself a high five. Now your weight should be a lot more balanced between your harness and your feet. It's not like lounging in a portaledge, but it's a lot better than hanging completely off of your harness!
The friction hitch makes it easy to adjust the height of the foot loops up and down; occasionally changing your foot position makes it more comfortable.
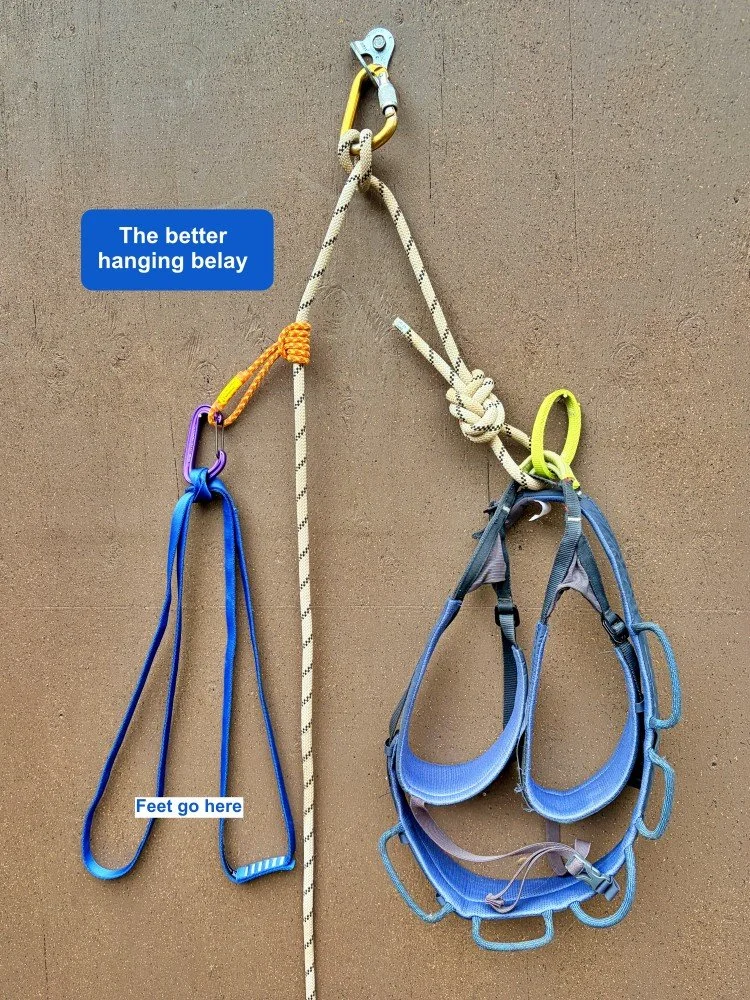
Here's a close-up of the sling, carabiner, and friction hitch. Note how the carabiner is clipped “inside” the overhand knot. This keeps the two arms of the sling from sliding around.


Block or swing: What's your leading strategy?
Learn some of the pros and cons to both block and swing leading.
One of the more famous examples of block leading. Billy Westbay, Jim Bridwell, and John Long, after the first one day ascent of The Nose on El Capitan, 1975.
Photo credit, Mike White

Photo credit, Mike White
When multipitch climbing, you and your partner have a choice to make:
Will one person lead multiple pitches at a time and then the other person takes a few pitches, known as block leading?
Will you alternate leads every pitch, also known as swing leading?
They both have their pros and cons depending on a few variables, so let's have a look.
Block leading
Block leading can be good for bigger days of harder climbing, as one person can get into the “leader-head” mentality. When the second arrives at the belay all tired, they get a rest.
If you're swinging leads, one person is standing still for two consecutive pitches as you move up the cliff. On a cold day, this sucks. When you lead in blocks, you only stand till for one pitch, so both partners stay warmer.
If you’re onsighting or on a climb where the route finding is tricky, block leading allows the person on top to scope out where to go, and maybe what gear is needed for the first few placements of the upcoming pitch.
If you're climbing in a team of three, block leading usually minimizes flubbering around at the belay.
It can be good for more experienced teams who are good at efficient belay changeovers and gear swapping.
For more advanced techniques, such as “fix and follow” or short fixing when aid climbing, block leading is strongly preferred.
(On a related note, when you have a long multi pitch rappel, it's often good practice to have one person be the “leader” and go first on all the raps.)
One early and well-known example of applying block leading strategy was the first one day ascent of the nose on El Capitan in 1975 by Jim Bridwell, Billy Westbay, and John Long. They divided the 30+ pitches between each of the three climbers, depending on their specialty, whether it was free climbing, mixed free and aiding, or mostly all aid.
Here’s a firsthand account of that famous climb, by (the late) Jim Bridwell.
You could use the same strategy on a longer multi pitch. Is one partner better with smaller size cracks because they have smaller hands? Is one partner better with thin face climbing? If you've got several pitches of a certain climb flavor, it may be best to have the person lead it who’s most suited.
Swinging leads
Swinging leads is more common for most people.
It can be better in warmer weather, because the leader can stand around more without getting cold.
Is it better for easy climbs or hard climbs? Opinions differ. When you lead every other pitch, you get sort of a built-in mental rest. On harder climbing, the follower can have a break, instead of climbing back-to-back hard pitches. So, there's some mental / psychological benefits as well as physical ones.
Swapping leads can feel a bit more fair and egalitarian.
Rope management and gear management is also slightly easier because the second has been cleaning the gear on the previous pitch. They have most of it already, plus their end of the rope is on top of the stack or coil.
That's a pretty good summary of the two methods, as I see it.
Just because most people probably learned swinging leads as the standard when they started climbing, doesn't mean you have to use that same strategy on every route. On your next multi pitch, talk it over with your partner and maybe try something new. You might like it!
Crevasse rescue - remove snow under your pulley
How can you keep snow from getting jammed in your Traxion pulley? Here’s a simple solution.
When rigging for crevasse rescue with a progress capture pulley (like the handy Petzl Micro Traxion) on the anchor, sometimes snow or ice can jam into the camming mechanism on the pulley, preventing it from fully grabbing the rope.
Here's a caution from Petzl about it.
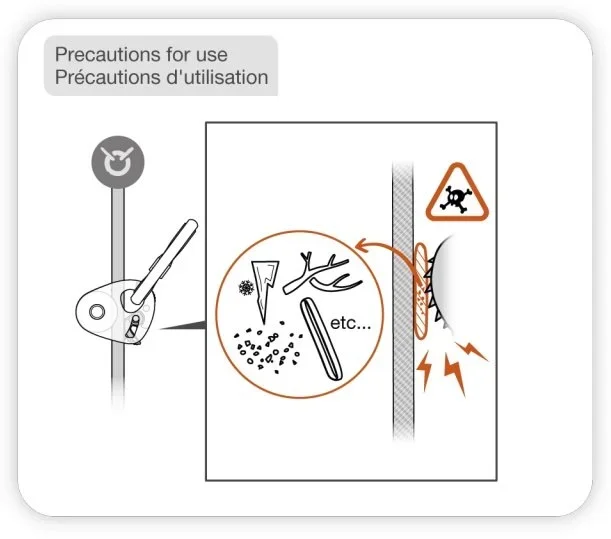
There's a simple solution. Dig out a concave “bowl” under the pulley, so it's hanging in space, rather than in direct contact with the snow.
“Top to bottom” rappel safety check
Do long, complicated “safety check” acronyms have you scratching your head, when you should be paying attention to your climbing systems? Yeah, me too. Here’s a rappel safety check method that might make a lot more sense.
For some people, long acronyms of important climbing procedures, such as SERENE for anchors, or BRAKES for rappelling, work great.
However, my brain doesn't do well with long acronyms, and many of my climbing friends seem to struggle with them too.
At a skills clinic I helped teach with (the late and great) IFMGA guide Rob Coppolillo, Rob shared a rappel safety check system that makes much more sense to me. He called it the “top to bottom” check.
If you’re pre-rigged with your partner, you check them and they check you before the first person goes down.
It's about what it sounds like: You start at the top of the rappel system, and check every component, all the way down to the bottom.
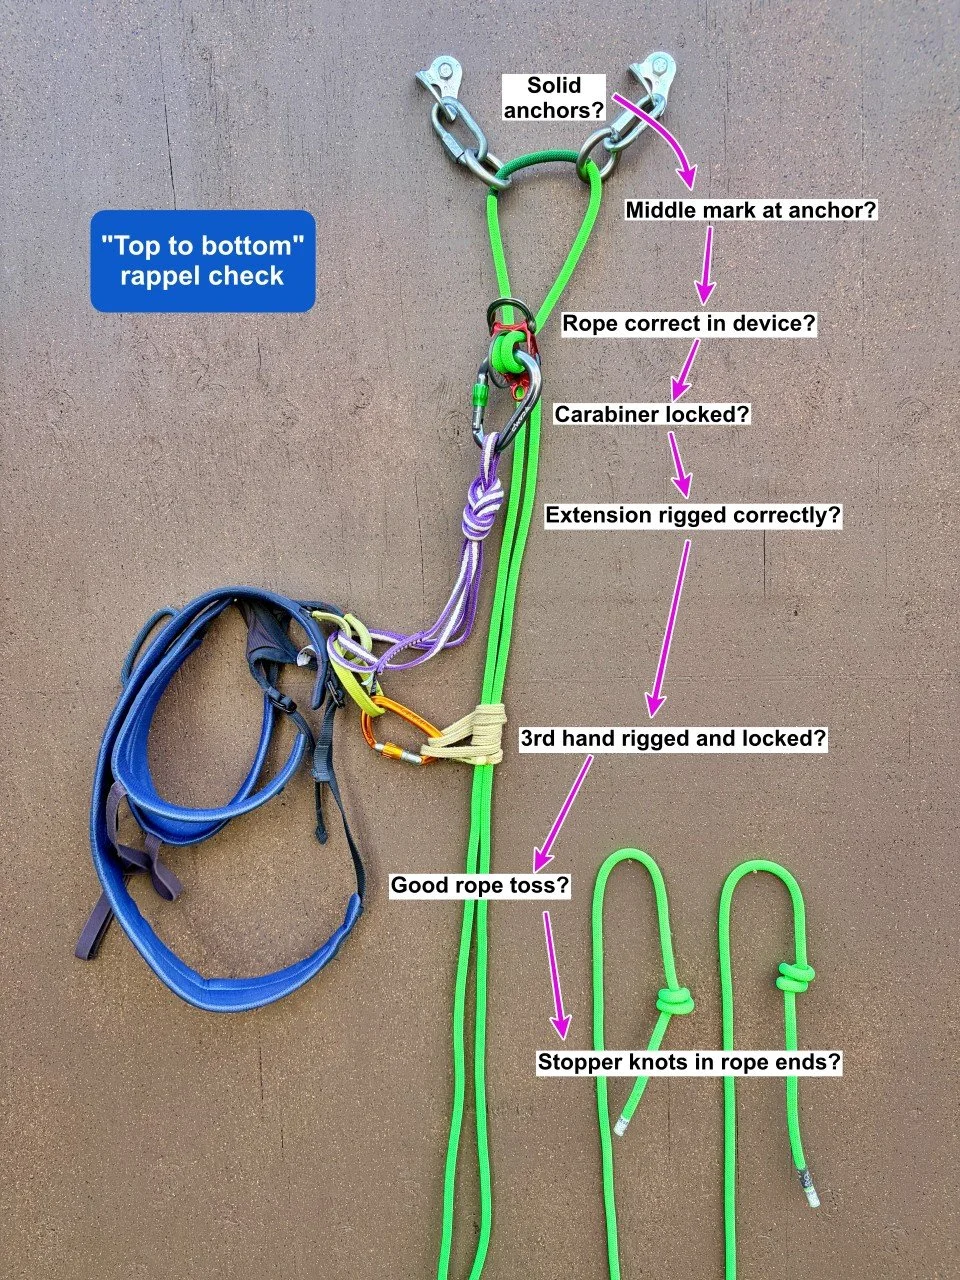
In most cases, the “top to bottom” rappel check looks like this.
Are all the anchor components solid?
For a single rope rappeI, is the middle of the rope at the anchor master point? Does the rope have a middle mark? If it doesn’t, did you flake both strands of the rope so you KNOW the middle is at the anchor? (Yo! mark your middle!)
If it's a double rope rappel, is the knot joining the ropes properly tied, dressed, and has an adequate tail?
Are both strands of the rope properly threaded through your (and your partner’s) rappel device?
Is the device properly clipped to your (and your partner’s) belay/rappel loop (or extension) with a locked carabiner?
If you're using a rappel extension, is the sling properly attached to your (and your partner’s) harness?
Does the first person down have a third hand back up properly installed? (It's optional for the second person, because they can get a firefighter belay from below.)
Do the rope ends have stopper knots in them?
Did you make a clean toss of the rope and it's hanging nicely below you, or is it hung up on something and needs attention on the way down?
Are there any cracks near the rappel anchor where the joining knot might get hung up, if you're doing a double rope rappel? (If yes, the second person down might want to deal with this before they descend.)
Do the rope ends reach either the ground or the next rappel station?
To my brain, the “top to bottom” check is a more logical and comprehensive system than any acronym I've tried, and one I'm much more likely to remember.
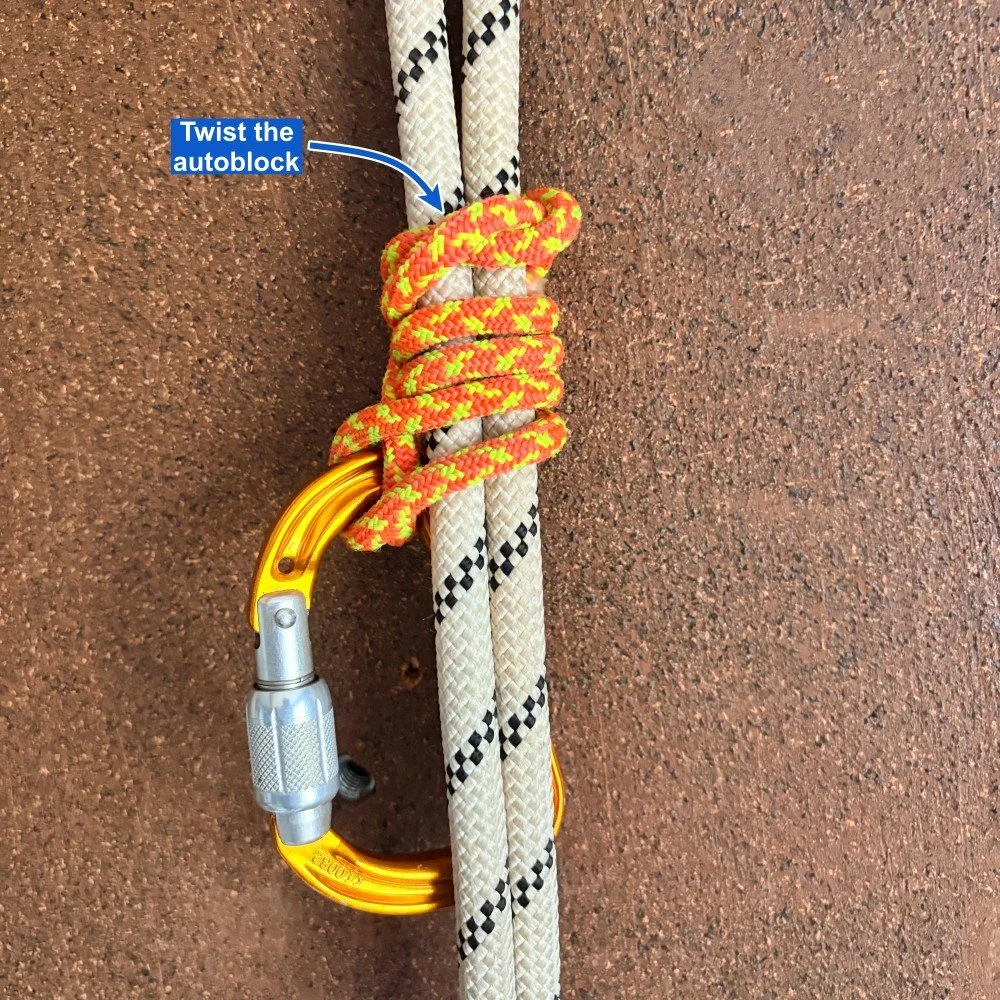
Autoblock tip: make a twist to fine-tune friction
Sometimes your auto block / rappel backup is either too tight on the rope, or too loose and doesn't grab. Here's a quick trick to fine-tune that adjustment so you get a nice smooth rappel.
When you tie an autoblock / thirdhand rappel back up, sometimes you may find that your hitch has either too much or not enough friction. Here's a trick that can help with that.
Remove one of the wraps, and then twist one strand of your friction hitch several times. This makes the remaining wraps constrict a bit around the rope. You can think of this is the equivalent of a half of a wrap, which can give you just the right amount of friction.
Here's a short video from IFMGA guide Ian Nicholson showing how it's done. Check out Ian's books, highly recommended!

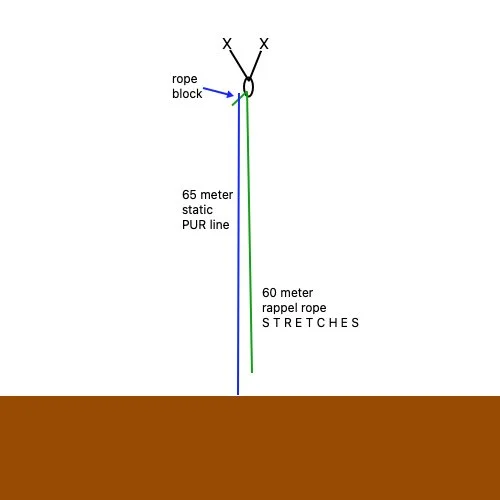
Why is a Petzl PURline 65 meters?
Most climbing ropes come in lengths that are a multiple of 10, typically 60 or 70 meters. The Petzl PURline comes in a rather odd length of 65 meters. Why is this? I asked Petzl; here's the answer.
The Petzl PURline, made for light hauling and as a rappel pull cord, comes in a rather odd length of 65 meters. Why is that, you might wonder?
I was curious about this, so I asked Petzl directly.
When you rappel on your 60 meter climbing rope on the other side of a rope block, you’re using the PURline as a pull cord.
Your dynamic rappel rope will stretch about 5 meters, which takes you conveniently to the end of the 65 meter static PURline. Yes, those Petzl product designers are quite clever!
In case you're wondering, the Alpinesavvy graphic design department is hiring. I obviously need some help. =^)

What’s the “Low Impact Style” of ice climbing?
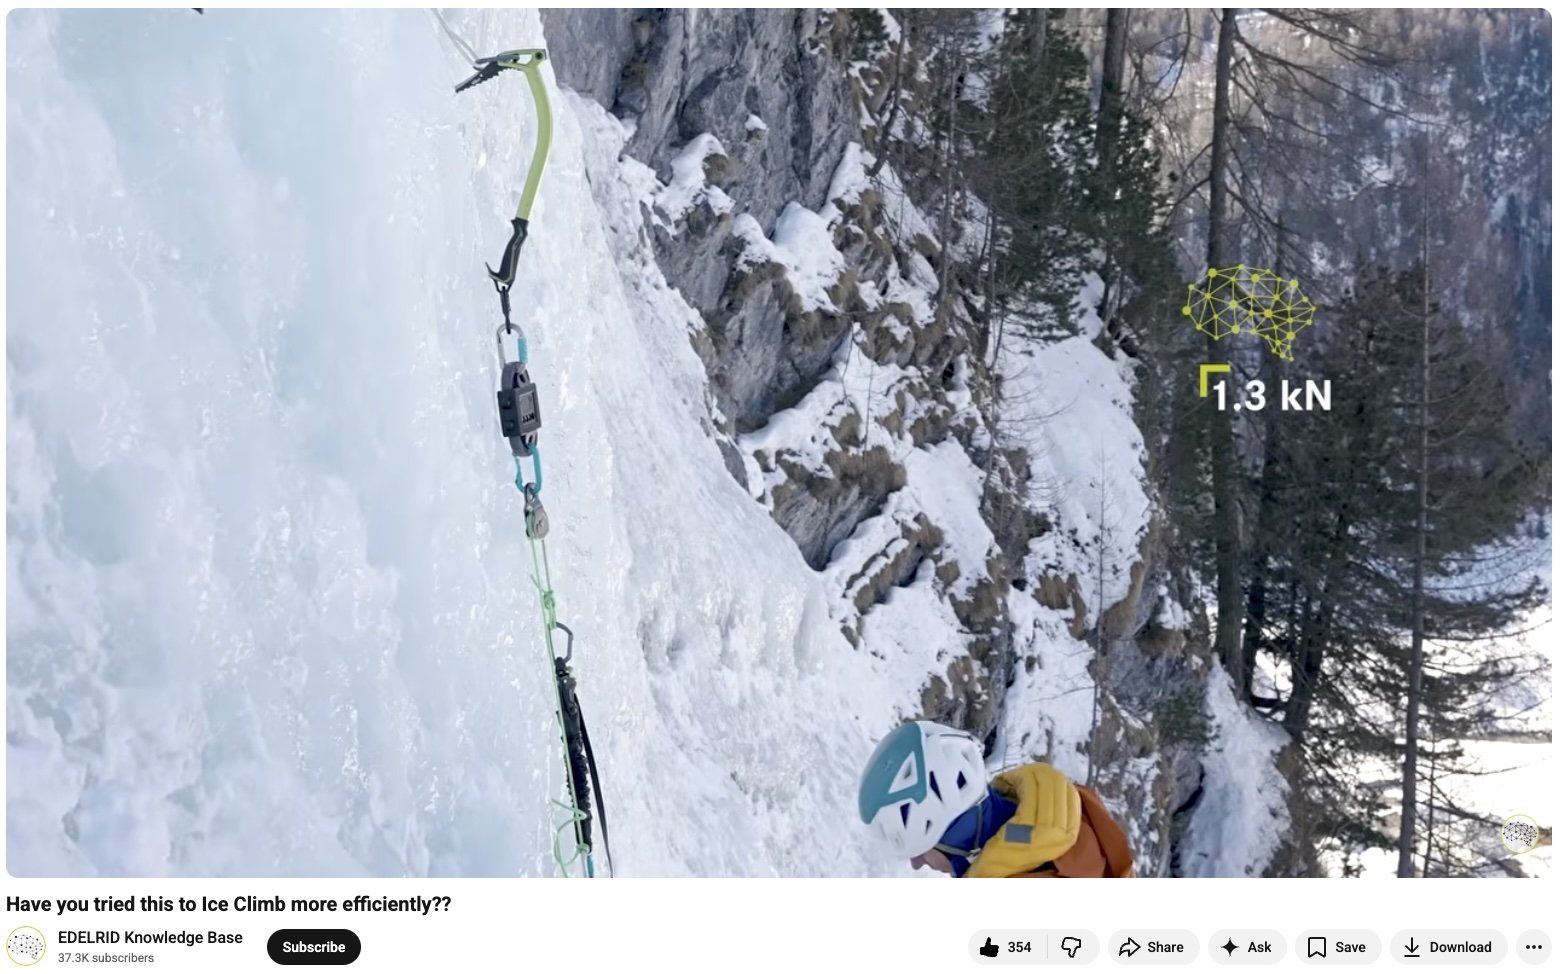
While ice climbing might feel more secure when you bury your pick halfway with every swing, doing this has a lot of drawbacks. Edelrid introduces what they call the “Low Impact Style”, a more refined technique. Their real world testing shows that delicate pick placements are stronger than you might think.
Check out this great video (link at bottom of page) from the always useful “Edelrid Knowledge Base” series on YouTube (a very underrated place to learn tech tips, in my opinion.)
While most beginners might think otherwise, ice climbing doesn’t have to be a battle of big swings and exploding ice.
This video from the (always useful!) Edelrid Knowledge Base introduces what they call the low-impact style of ice climbing, a technique that lets you climb harder routes with reduced risk, more refined movements, and with much less energy.
Beginners often hack away with full-body tool swings from hip, shoulder, elbow, and wrist. (I know I sure did when I started, because I was kinda scared!) Instead, the low impact style calls for reading the ice more like rock.
The core ideas are simple:
Look for natural features that accept the pick with minimal force.
If you don't have a natural feature, repeatedly tap lightly and precisely to make a pick placement instead of strenuous bashing.
Place the pick only 2–4 cm into good ice.
Primarily swing / tap with your wrist, rather than the whole body.
This reduces shattered ice, falling debris on you and your belayer, and preserves delicate features.
It wouldn’t be an Edelrid video without some creative experiments, would it?
They ran a series of tests on different pick placements in real ice, using a load cell and pulley system to measure how much force different placements can hold.
A “standard” deep, half-pick placement in good ice easily withstands forces above 3 kN, far more than the ~0.7 kN typically generated when the climber loads a tool with body weight during normal movement.
Shallower placements of around 3 cm still hold roughly 1.7 kN.
Even a seemingly sketchy 1 cm placement in good ice can sustain 0.5–0.7 kN—enough for controlled climbing when you’re not shock-loading the tool.
The same mindset applies to footwork. Look for precise front-pointing on features instead of hacking deep steps, which preserves ice integrity and gives more options as the route steepens.
This is more of an intermediate to advanced technique, because if your pick is just barely in the ice, and you shift the pick angle as you move up on it (a common beginner mistake) it's likely to pop out. However, if you're practicing this on top rope, which you should be, it can certainly reinforce good technique.
The takeaway:
Be a woodpecker, not a wood chopper.
Refined tapping can give you shallow but solid placements.
These shallow placements are usually strong enough and significantly more efficient.
The “low impact style” saves a lot of energy, preserves delicate features, and reduces dangerous falling ice for you and your partner.
Check out the whole video below.
Tame that long tether with a slipknot
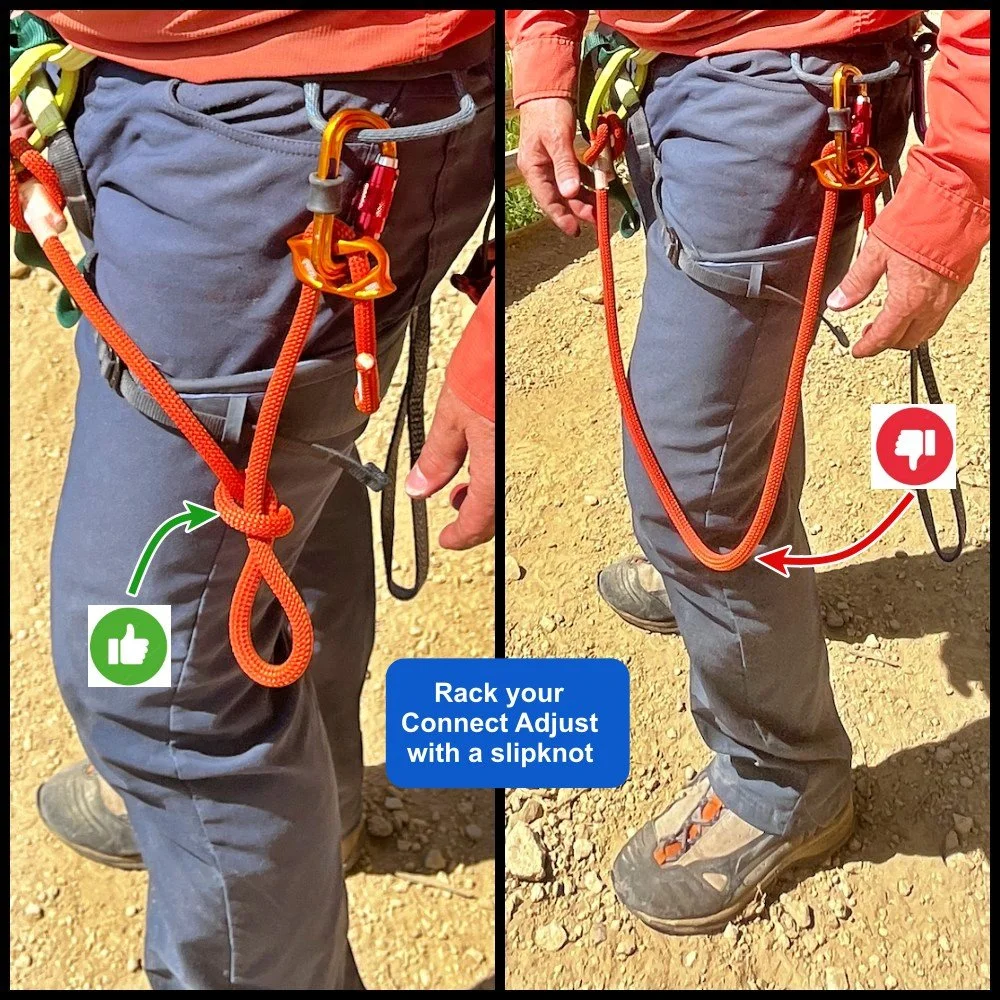
Good rule in climbing: avoid having anything hanging below your knees, because it'll trip you up. Here's a simple way to shorten up your personal tether, such as a Petzl Connect Adjust - tie a slipknot.
A good climbing guideline: avoid having anything on your harness dangling below your knees. If you do, it's probably gonna trip you.
That can be a problem with some of the longer tethers, like the Petzl Connect Adjust.
Here’s a solution: tie a slipknot in the tether.
That takes up enough of the slack so it stays out of your way. When you want to deploy, it comes undone with a quick tug.
If you want to shorten it up even more, clip the slipknot loop to the tether carabiner.
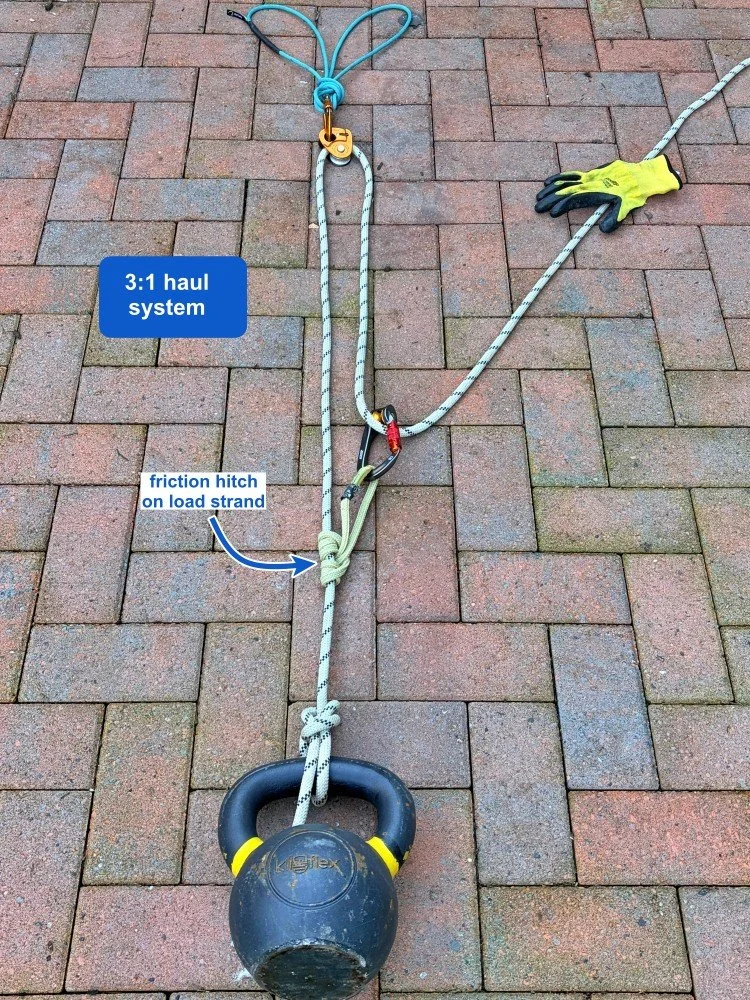
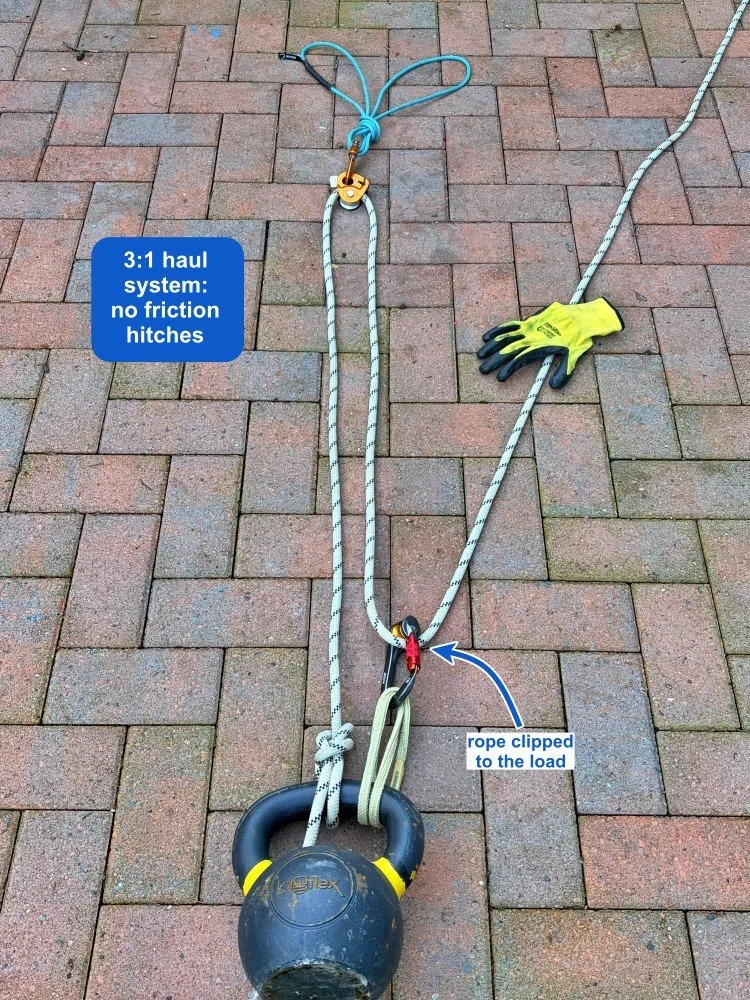
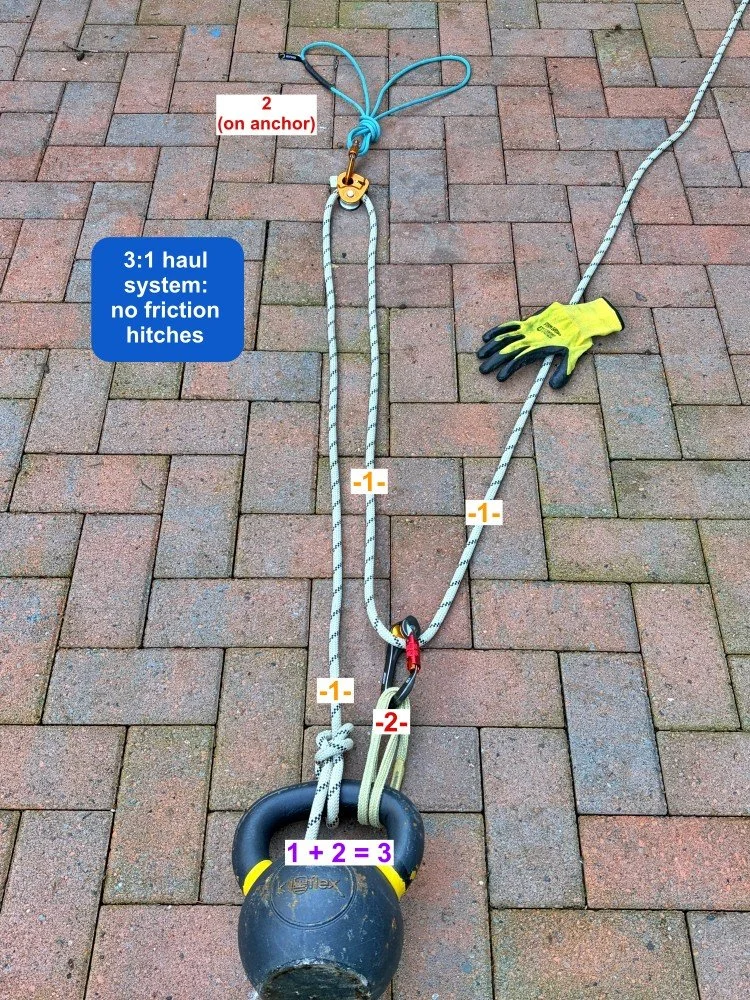
3:1 haul with no friction hitches
Standard 3:1 hauling rigging calls for some sort of a rope grab (like a friction hitch) on the load strand. Guess what: you actually don't need one! Here's how to rig it.
Here’s the typical method for rigging a 3:1 “Z pull”:
Put a friction hitch or rope grab of some kind (like a Petzl Tibloc) onto the load strand.
Clip your pulling strand to that to make the “Z”.
Start hauling.
Okay, pretty standard stuff.
But, what if you need to rig a 3:1 and you don't have a friction hitch or a rope grab?
Guess what? You can clip that hauling strand directly to the load.
Exact same mechanical advantage, but without any friction hitches or rope grabs. Pretty cool!
Some of you might be thinking, “Well duh, of course that's how it works.” But when I recently saw this demonstrated it was kind of an eye-opener, so I thought it might be something new for you as well.
Finally, to be sure this is a 3:1, let's do a quick run through with the “T method” (or counting tensions) to check the mechanical advantage. Check out my detailed article on the T method.
Here's how this can be useful in crevasse rescue.
You can drop a loop of rope with a carabiner or pulley on it to your victim, and have them clip it to their harness.
Then you can set up a 3:1 haul from the top.
This is the basic principle behind the drop loop 3:1 method; I have a detailed article about that here.

image: UIAA Alpine Summer Skills Handbook

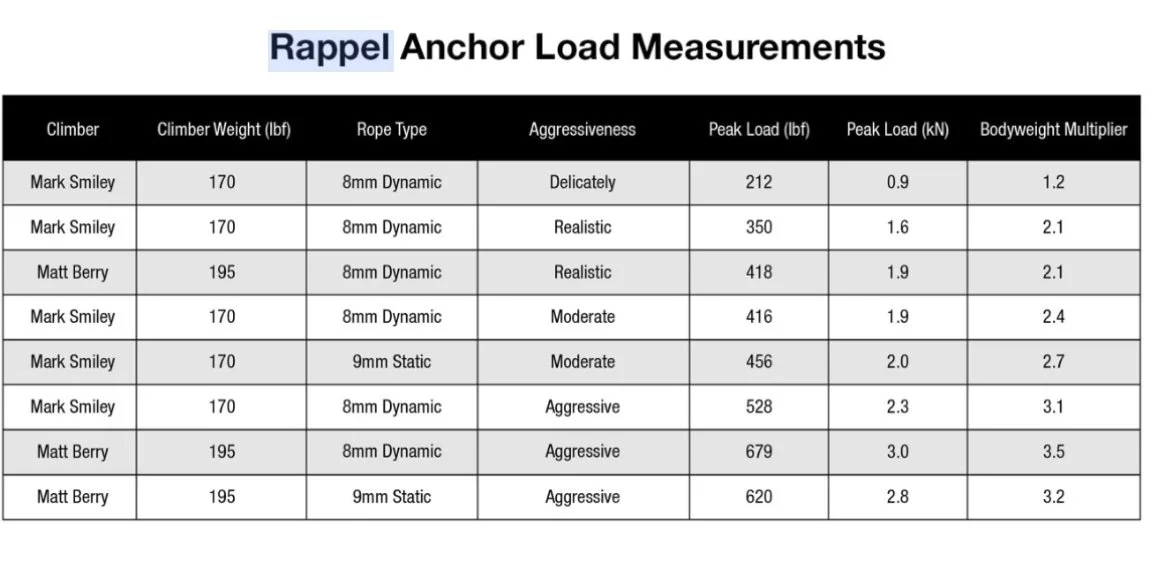
What's the max load you can put on a rappel anchor?
How strong does a rappel anchor really need to be? Good news, not very strong! Here are some real world testing numbers with climbers of different weights, static and dynamic ropes, and various degrees of jumping around.
Do you ever wonder how strong your rappel anchor needs to be?
Answer, not very strong. Even if you bounce around like a special forces cowboy and weigh almost 100 kg / 200 pounds, turns out that anchor is not gonna see more than about 3 kN, tops.
If you rappel fairly normally on a dynamic rope, the anchor shouldn’t see much more than your body weight.
The chart below comes from a nice article from Black Diamond with a collaboration from IFMGA Guide Mark Smiley. It's a good read, here's a link.
Also, in the article is an interesting test of different sorts of buried deadman snow anchors. (Hint, you want to bring a 2 x 4.)
Revive the waterproofing on your shell layers
Is your shell jacket starting to wet through? Might be time to give it a special wash with some Nikwax (or similar) products. Here's how to do that, step-by-step.
Is it soggy season? Maintain your shell layers so they (hopefully) bead water like a new Ferrari.
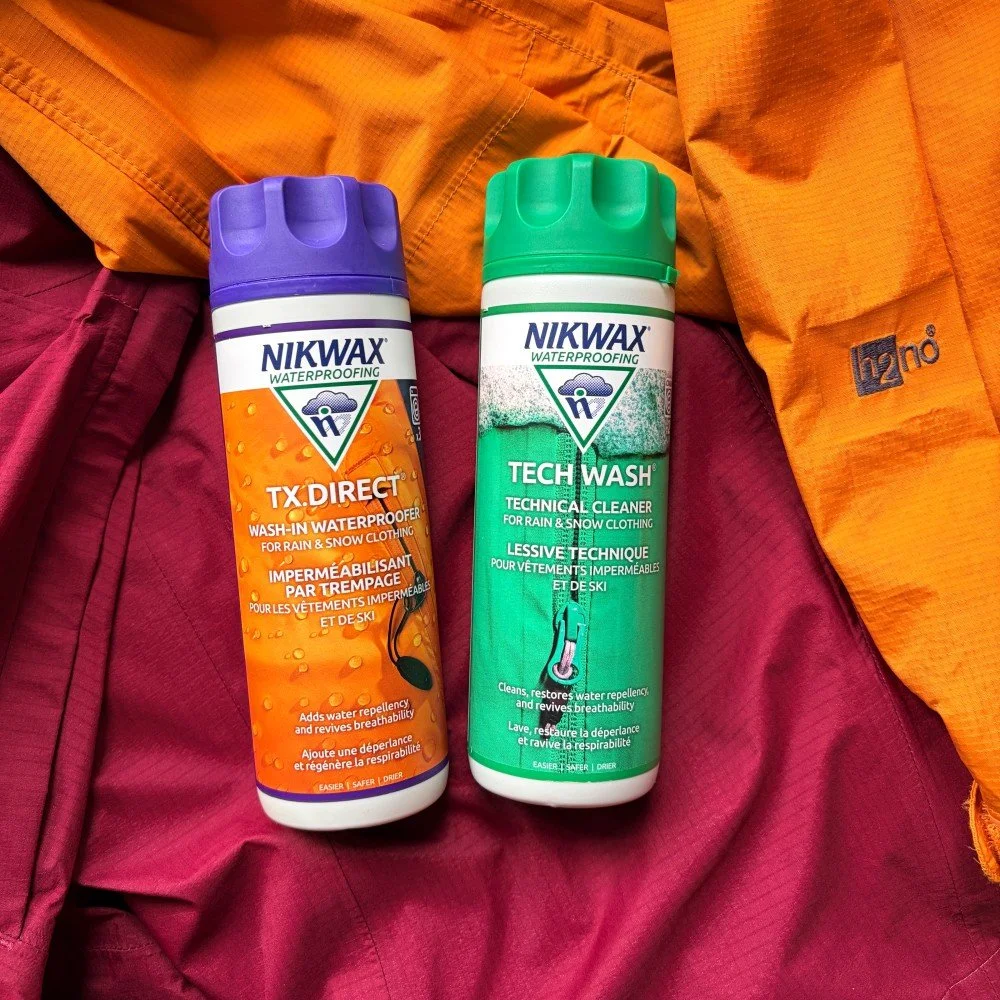
There may be other products that do the same thing, but I'm gonna tell you ones that I'm familiar with: Nikwax Tech Wash and TX Direct.
First off, manage your expectations. Products like these are never going to get you back to “brand new” water beading, but they can usually stretch a few more years out of your favorite shell.
Don't go cheap and try to use just one; the Tech Wash and the TX Direct really do work better together. (These are packaged as a pair, that's a hint.) You can wash a lot of clothes with a couple of these bottles.
Frequency of using them mostly depends on how often you're out. If you're skiing 50+ days a year, you might want to do a wash cycle with this every two or three weeks during the season. If you're not out so much, maybe twice a winter should be fine.
Nikwax says the TX Direct is more for hard shell clothing. However, I've used it fairly successfully on soft shell pants and jackets. Your mileage may vary.
If you have other outerwear that you want to protect from the weather, like down jackets, gloves, fleece, etc., NikWax has a product for it. I haven't used these other ones so I won't comment on them, but they have a waterproofing product for just about everything you could imagine.
If you're wondering about nasty chemicals, Nikwax is water based and PFC-free.
This procedure is gonna last longer on newer garments rather than older ones, but it's still a good one to do at the start of every soggy season with most of your outer layers.
How to use NikWax on your shells, step-by-step . . .
Clean the detergent tray on your washing machine. Take it (carefully) completely out of the machine if you can, remove any excess regular laundry soap that might be in there. Put it carefully back in.
Empty out all pockets and close all zippers. Wash two garments at a time.
Start with the Nikwax cleaning solution. Give the bottle a good shake, and pour about 150 mL (for two garments) into the detergent tray.
Run the wash cycle. Nikwax suggests warm or cold water, slow spin, and extra rinse if possible.
Leave your clothes in the washing machine, and then run another cycle with the TX Direct. For this, use about 200 mL. Give that bottle a good shake as well.
If your washer has a lame spin cycle, let your clothes drip dry for a bit outside or over the tub, but don't let them get completely dry.
Put clothes in a dryer on low heat.