
Dealing with rope twists mid-pitch
The Evil Rope Twist gremlin decided to pay you a visit, and you have a snarled mess of pigtails in the rope in the middle of a multi pitch. Here's how you get those out.
We've all been there: the evil Rope Twist Gremlin decides that they’re gonna mess with you today, and your second arrives at the anchor with a rope in a mess of pigtails next to their tie in point.
Who knows how the twisties got there? It's your job to get ‘em out!
Once you start getting rope twists, you don’t want to continue with them. It can cause all manner of problems, ranging from problematic belaying, to a rope-snagging snarl at the anchor when you (try to) pull your rappel rope. (I've had some bad experiences with both of these issues!)
On a multi pitch route, solving this will probably mean that the second needs to completely untie from their end of the rope. Yes, this is little nerve-racking when you’re way off the deck!
There are a couple of ways to handle this.
If you have a tether, you can clip in direct to the anchor, untie from the rope, work the twists out, and then tie in again. Ideally, have your partner check every step of this operation.
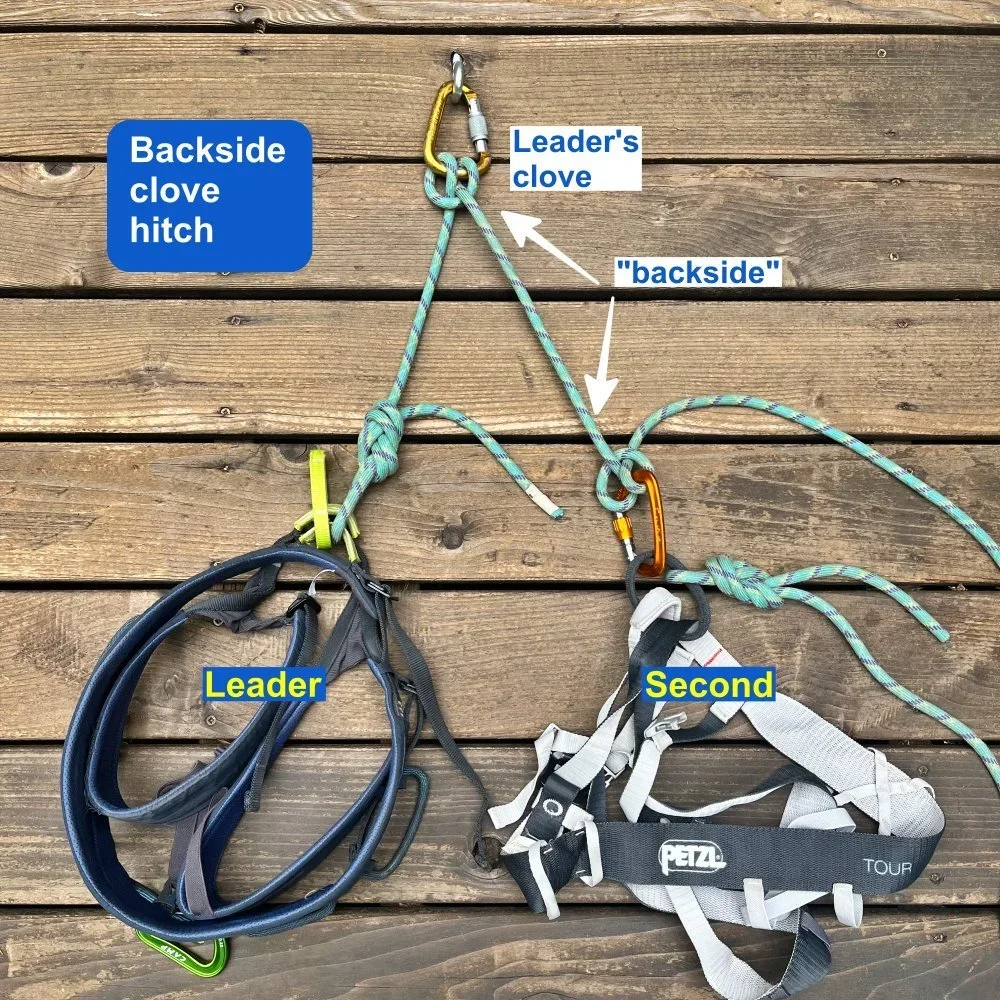
If you don't have a tether, you can try a technique called the backside clove hitch. The photo above shows it pretty clearly. On the backside of the leader’s clove hitch tied to the anchor, the leader can tie a second knot. The second clips to this knot with a locking carabiner on to their belay loop. Now, the second can untie their retraced figure eight, remove the rope twists, and then tie in again. Have your partner check your knot after you tie in.
Here's a nice video from IFMGA certified guide Karsten Delap that shows the technique. The “removing rope twist” section starts about 4:05.

How can a “vector pull” be helpful for climbers?
The vector pull, long a #CraftyRopeTrick for whitewater rescue, has some climbing applications as well. Learn ‘em here.

In Anchors 101, you may remember a diagram that looks something like this:

If you have a close-to-horizontally tensioned rope, and you add a load that's perpendicular to the anchor points, it greatly increases the force on the anchors.
According to this diagram, by more than 500%. Think of a circus tightrope; those anchors need to be super strong!
Normally, we really want avoid this situation in climbing. But there are a few rare cases when putting this kind of sideways tension onto a loaded rope might be helpful.
While it’s long been a #CraftyRopeTrick in river rescue, it's seldom known in climbing circles.
It’s called a vector pull. How might this be helpful for climbers?
Imagine your struggling second below you, unable to quite reach that next hold. If you, the leader above, lock off the belay device, and reach down and pull hard (up or down) on the loaded rope (and take in slack) it gives your partner a small boost. This may be enough to help them get past that hard move. Repeat as needed.
You're certainly not going to do any real hauling with this method; it's more for assisting your partner for a short move or two.
Check out this Instagram video from Smile Mountain Guides @smilemountainguides for a demonstration.
Here's a video showing the vector pull applied to river rescue.
Basic idea: get a rope from your boat to an onshore anchor, tension the rope, then pull sideways on that tensioned line. Hopefully that's enough to get your boat unstuck, before you resort to more complicated mechanical advantage hauling systems.

First rappeller to the ground: untie stopper knots
Does your rappel end on the ground (with lots of extra rope)? Those stopper knots in the ends of the rope are no longer needed. The first person down has a simple task - untie ‘em.
Does your rappel end on the ground? Do you have plenty of extra rope lying in the dirt?
Here's a quick task for first person down: Consider untying the stopper knots in the rope.

Once you’re on flat ground (unless the previous rappel was a real rope stretcher, and you barely made it) stopper knots are no longer needed.
If the first person unties them as a (mostly) regular habit, it eliminates the possible BIG problem of pulling a knot up out of reach when you pull your rope.
If this hasn't yet happened to you, it likely will someday, and it can be a gigantic hassle. Simple solution for a common problem!
If untying your stopper knots makes you nervous, here's an alternative. Untie the stopper knots in each strand, and then tie the ends together with a simple overhand. Now, you still have a closed rope system, and your partner coming down can’t rap off the ends. But you also have a loop of rope, so you can’t absentmindedly pull one end up out of reach.
If your rope barely makes it to the ground, this might be the best of both worlds.
There are very few “always” and “never” rules in climbing. This isn't one of them.
There are some cases when you want to leave the stopper knots in, such as:
If the rappel is a real rope-stretcher, and there's very little rope on the ground.
If the rappel ends on some kind of a downward slope. There’s a chance your partner above could swing from where you landed upslope to farther downslope, and potentially rap off the ends of the rope.
A double rope rap with ropes of say 7 and 10 mm, and for some reason, you tied the joining knot on the fat side instead of the skinny side, there's a chance your rope ends can “migrate” because of the extra friction from the larger rope.
For the vast majority of standard rappelling scenarios, if you've got a decent bit of extra rope on flat ground, untying the knots like this is going to be just fine.

Practice rope ascending on a top rope
Proper training for your first big wall involves lots of rope ascending and related skills like cleaning, lowering out, and other rope trickery. Here's a simple way to set up a practice session with you and your partner to always stay secure.
The image below is from the outstanding online big wall climbing course from VDiff climbing. It's a great course and quite a bargain; highly recommended!
Want to climb a big wall? Dialing in your rope ascending and cleaning techniques is key.
Here's a way to reduce risk when practicing these skills.
Set up a solid top rope anchor. On that same anchor point or something very close by, hang a single fixed rope.
Now, as you ascend the fixed rope (green) you're always backed up with a proper belay from your partner on the top rope (red). Now you can practice things like cleaning a traverse, leapfrogging past fixed gear, cam jugging, lowering out, maybe doing a mock lead, and other big wall shenanigans.
If you screw up anything on the green rope, no problem! You're backed up on red.
(This also applies to non-bigwall flavors of rope ascending, like prusiking for crevasse rescue practice.)

image: https://vdiffclimbing.thinkific.com/courses/take/big-wall/lessons used with permission

Backup that single strand rappel anchor
Does rappelling off of a single strand of cord give you a warm fuzzy feeling? No, me neither. Here's a quick way to back it up.
Do you want to rely on a single strand of cord in ANY part of your climbing system to keep you from hitting the deck? I didn't think so.
Don't settle for that in a rappel anchor.
If you come across an anchor with a single piece of cord or webbing, it's good practice to back it up by tying another piece of cord or webbing through the existing ring / quicklink(s). This is quick to tie, very low cost, and easy to check for anyone else using the anchor.
This is one more good reason to carry 7-ish meters of 6 mm cord, and a knife.
If you're wondering about the redundancy of that single red aluminum ring . . . It's rated to 32 kN. That's stronger than your rope, your belay loop, and your belay carabiner.
It's never gonna break, and you only need one of them.
(But hey, if it gives you a warm fuzzy feeling to add a quick link, extra rappel ring or a cheapskate locker to have another connection at the master point, go right ahead! We are all accountable for our level of acceptable risk, no one else gets to dictate that.)


Knots decrease sling strength - one may surprise you
Tying knots in any sort of rope or cord decreases the strength of that material. Usually, we think that strength can't be reduced more than about half. But there's one unusual case where you can lose almost 75% of the strength of a sling; check it out here.

image: Jürgen Reinmüller, @alpinstil.at
This nice diagram is from Jürgen Reinmüller, @alpinstil.at.
Jurgen is an Austrian mountain guide who is publishing a how-to technical book, with the publication date planned for spring 2026. (To get an reminder email when the book is available, sign up through his Instagram Bio.)
He posts nice diagrams from the book on his Instagram, and this is one of them.
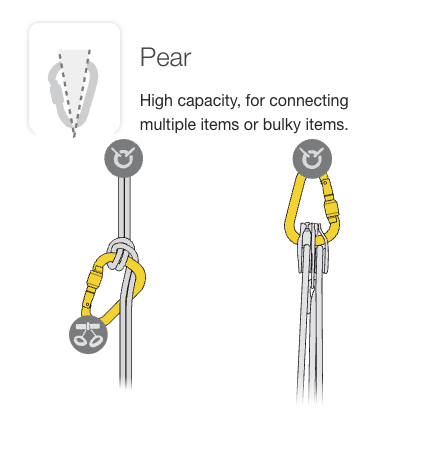
This should be fairly common knowledge for most climbers:
A sewn sling gets its full rating (22-ish kN) when clipped end to end.
If you basket hitch the sling, you share the load among four strands rather than two, so the strength is approximately doubled.
If you tie a knot in the sling (or more than one knot, as it turns out) you reduce the strength by about half.
So far so good . . . but that last example that made me scratch my noggin when I first saw it.
That seems like it would be closer to 50%, because you have 2 knots in the sling, right?
Well, turns out this diagram is correct. You're putting the load on one strand rather than two. Then, you're tying knots in that one loaded strand rather than two. Taking half of the material and reducing the strength by half gets you to around 25%.
How do I know Jurgen is right? Because I sent it to my buddy Ryan at HowNOT2, and he was nice enough to do a break test for me.
The video is below.
Ryan ran several tests. Two of them used a dynamic sling, which slipped in the testing machine so he didn't get a good result. The video below is of a nylon sling, which is a little grabbier and didn't slip.
The normal breaking strength that sling should be around 24 kN if you pull it it end to end; it broke around 6 kN.
Jurgen, thanks for teaching me something new, and I definitely look forward to reading your book.

Multidirectional gear anchor
It's often helpful for your trad anchor to be able to take a strong upward pull. Here's a fast and simple way to do this with minimal gear.
In some situations, it can be good practice to be sure your gear anchor can handle a strong upward pull.
As in the diagram below, when you're doing a fixed point lead belay off the anchor.
You have a heavy climber and a lightweight belayer, and there's a chance of the belayer getting launched into the air when they catch a fall.
Bolts, of course, are multidirectional. Cams, to a lesser degree, are also multi directional because they can usually pivot if the direction of force changes.
Most passive gear, like stoppers, are usually not multidirectional. In a typical anchor, they might be great for a downward pull, but have very little security if they suddenly take an upward pull.
There are a few ways to do this. Assuming you have some kind of gear placement down around your feet that can take an upward pull, this method is simple and effective.
Clove hitch yourself to the master point.
Take the rope from the backside of your clove, and clove hitch it to the upward directional piece by your feet.
Voilà, your anchor can now take an upward pull.
image credit: Georg Sojer / Chris Semmel / VDBS
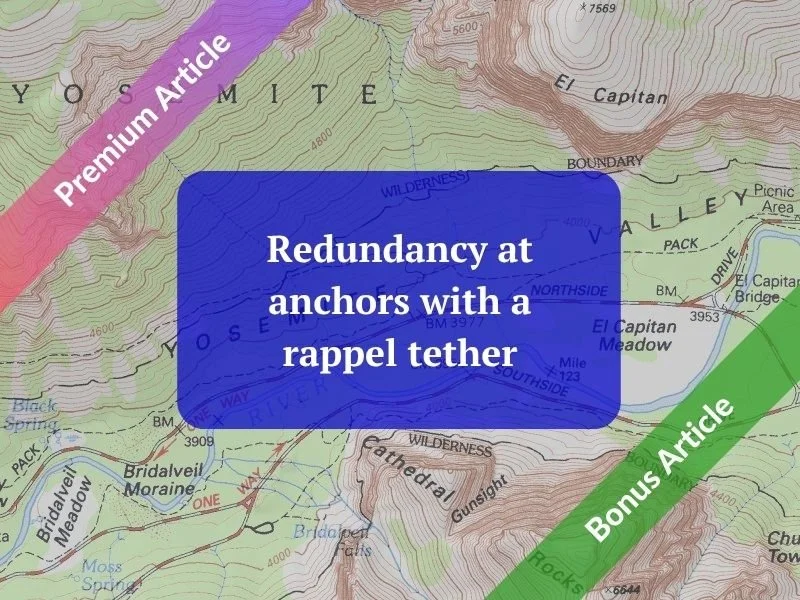
Redundancy at anchors with a tether
If you’re using a knotted sling or a sewn loop PAS as a rappel tether, here's a simple way you can easily connect to two bolts if you need to. (Redundancy, yeah!)
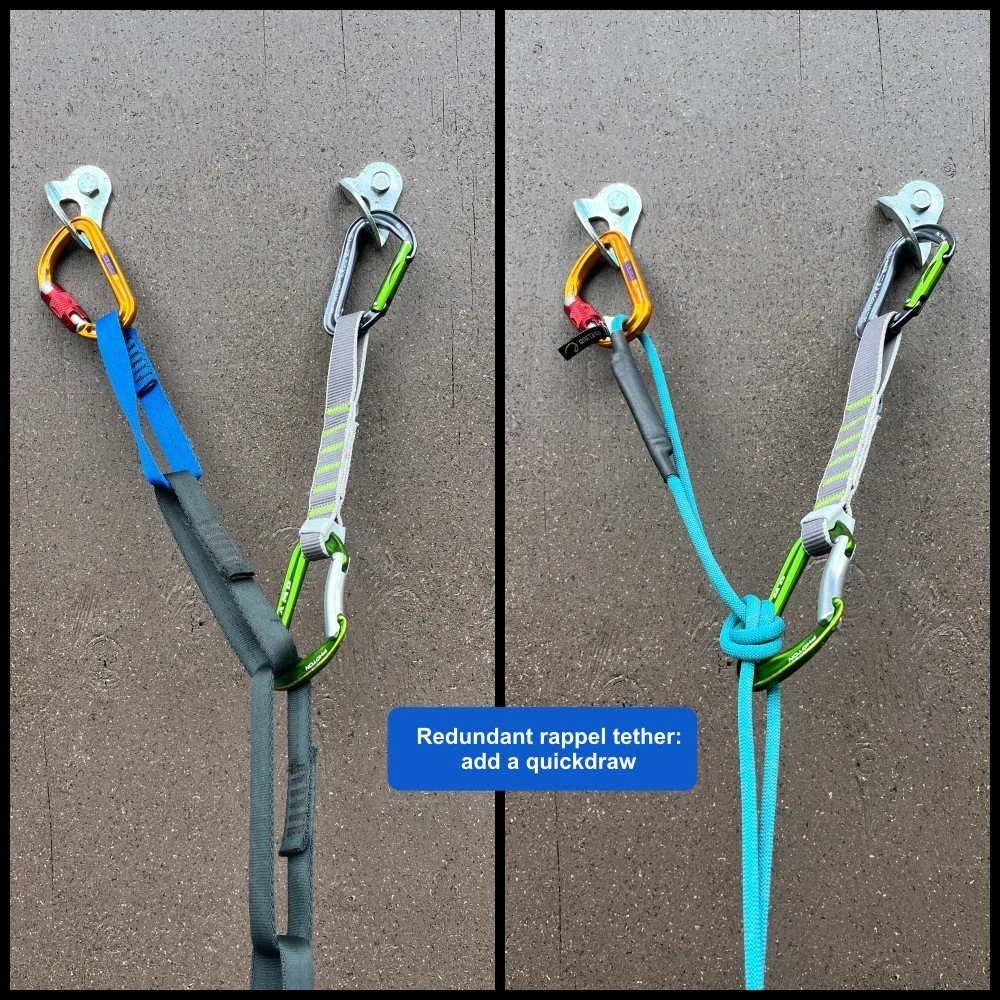
Want to clip to two bolts with any sort of a PAS or 120 cm sling with a few knots? Here's a simple way you can do it.
If you're a redundancy fan, being connected to more than one anchor point probably gives you a warm fuzzy feeling - whether you're rappelling or in most any other situation.
Clip the end of your tether to one bolt
Clip a quickdraw to the second bolt
Clip the bottom of the quick draw into one of the middle loops on your PAS. Bang, instant redundancy, while maintaining the full length of your PAS.
You can’t really do this with a tether made from a single length of cord, such as the Petzl Connect Adjust. (Well, I suppose you could, but you'd have to tie a clove hitch or something in the middle of it, and that's not quite as elegant.)
If the bolts are solid, and you're standing on a nice ledge, then you may not need to do this. But if you're at a hanging belay, and one or more bolts is less than ideal? You probably want to be clipped to both bolts.
(For the Redundancy Polizei: yes, this is technically not 110% redundant, because you are on one tether instead of two. This is more a quick fix for when you encounter a substandard bolt or two.)
Note: if you're rappelling with your partner, this is probably not a great method. Reason: If they do the same thing, you’ll have quite a mess of different quickdraws and tethers crossing each other.
Another option when rappelling is to build an actual anchor with your own gear at the rappel station, and clip your tether to that anchor. Hopefully this anchor is:
Somewhat equalized
Attaches you to both bolts
Gives your partner(s) a good place to clip when they arrive
Gives you enough elbow room to thread and pull the rope.
A quad anchor usually does this nicely.
I'm going to cover this topic in an upcoming longer article, so watch for that.

Two options for rappelling loose rock
Rappelling through a minefield of loose rock is scary! Here are two techniques to hopefully reduce your risk.
Rappelling down a section of loose rock can be very dangerous. Here are a couple of ways to hopefully reduce the risk.
1 - Consider simul rappelling
I’m generally not a fan of the simul rappel. In fact, I have a whole article on reasons not to do it.
However, one of the rare cases when it might make sense is when rappelling through loose rock. If both climbers rappel together, anything that they kick off is not going to hit the other person who would otherwise be below them.
2 - The “Zigzag” rappel
With the zigzag rappel, you attempt to move sideways as you go down, with either a pendulum or tension traverse, to make the next anchor off to one side and hopefully out of range of any falling rocks. For the next rap, you might swing back to the other side, hence the name.
Generally, a tensioned rappel will give a lower chance of the rope being loaded over sharp edges and dislodging more rocks. If you can't do that, a pendulum might work, but to be aware of these potential extra hazards.
A zigzag rappel might mean placing gear as you descend, clipping both strands to it, and then probably leaving it behind when you pull your rope.
It's highly recommended to use a third hand auto block when doing this, because it's likely you’ll need to go hands-free.
image: vdiffclimbing.com, shared with permission

How to untie a stubborn knot
Do you have a welded stuck knot that needs to get untied? Before you reach for the pliers, try this.
On my one of my early big wall climbs on the Prow on Yosemite’s Washington Column, my partner and I had such terrible rope management skills that we often found ourselves completely untying, either ourselves or the haul bag knot, to decluster some horrendous rope mess we had somehow made.
Fortunately, we had a multitool along with some needle nose pliers, which were exceptionally helpful to untie the welded knots.
Hint: it's WAY better to avoid this situation in the first place, you shouldn’t have to be untying like this on any climb if you pay more attention to the rope!
But, if you do have a stubborn knot that needs a reminder who the boss is, you can trade these tips.
Tips to untie a welded knot
Step on the knot and roll it around a bit on a smooth surface. Maybe that's a very smooth rock, or a floor inside.
If you have a hammer, you can try the same thing with a hammer. Rotate the knot and tap it.
If you don't have a hammer, you can try going caveman on it. Find a smooth rock that's not gonna damage the sling and again, rotate and tap.

image: Vdiff climbing, shared with permission
More thoughts . . .
If you're gonna put a big load on a knot, a butterfly is usually a better choice than a figure 8 on a bight. (And certainly better than an overhand.) The two little “wings” of the butterfly can usually be worked back-and-forth to untie almost anything.
There is a bit of a climbing myth out there that a figure 9 is easier to untie than a figure 8. Opinions on this very, but I've seen some pretty compelling evidence that the figure 8 is actually easier. Here is my article about that, along with a video that tests this idea.
Knots in Dyneema can be extra difficult to untie, and because there is no sheath on the sling, can be easier to damage when you're trying one of these techniques. Use caution. Be ready to throw out the sling if you damage it.
If you are going to use needle nose pliers, start gently and work slowly, so you don't damage the material. Pliers should be a last resort.

Hauling systems: “the Rule of 12”
When you're setting up a mechanical advantage hauling system, the “Rule of 12” can help keep your pulling force properly matched with the strength of the gear.

More AI image fakery, intended to deceive the public, steal from artists, and probably take over the world at some point. Pardon the slightly lame image, that's the best prompt I could come up with. =^)
I recently watched a whitewater rescue video which emphasized "the Rule of 12": never use more than 12 times the strength of one person in a hauling system.
This was a new concept for me. I thought it was interesting, and I want to share it with you.
If you exceed the “Rule of 12”, you're getting dangerously close to the breaking point of some components in the system, such as pulleys, prusik hitches, D rings on boats, maybe carabiners, etc.
How does this apply for actual mechanical advantage systems?
1:1 system: don't have more than 12 people pulling at once
2:1 system: don't have more than 6 people pulling at once
3:1 system: don't have more than 4 people pulling at once
6:1 system: don't have more than 2 people pulling at once
9:1 system, don't have more than 1 person pulling
(Yes, some of these examples are not too applicable for most climbing scenarios, like 12 people pulling on a rope at one time, but you get the general idea.)
In the real world, friction decreases the mechanical advantage of any system. In this case, when you want to avoid breaking gear and you may have a lot of pulling power available, that's probably a good thing.
If you're curious, here’s the video.

Aid climbing: How to retreat from mid pitch
If you run out of gear, mojo, or daylight on a long aid pitch, you might need to retreat back to your lower belay. Here's how do that with a minimum of risk and hassle.
This tip comes from the outstanding book “The Trad Climber’s Guide to Problem Solving: Self Rescue Techniques” from VDiff Climbing. I've read several of his books and I definitely recommend them! Available in print and Kindle format. Shared here with permission.
If you can’t finish a pitch when you’re aid climbing, whether it's a lack of mojo, incoming storm or darkness, it might be smarter to lower off and finish it tomorrow.
If you're less than half the rope length of the pitch, you can probably lower down from your top pieces to your partner. However, lowering off has a couple of potential problems.
It puts a bit less than twice your body weight on the lower off point.
It may start tensioning pieces you've already placed in upward and outward directions, which could compromise them.
For those reasons, it might be better to rappel off your haul rope, which for this example, we’ll assume you have. (Plus, if you're more than half a rope length up, you're gonna have to do this.)
Note that with this technique, you are not cleaning the gear as you go down. The next day, to get back to your high point, you ascend back up the haul rope and continue leading; hopefully with increased mojo, more daylight, and an extra shot of coffee.
When you finish the pitch, you fix the lead rope and your second ascends and cleans the gear, like normal.
Here's how to retreat from an aid pitch, step by step.
image: VDiff Climbing, shared with permission

image: VDiff Climbing, shared with permission

image: VDiff Climbing, shared with permission

Big wall gear reinforcement
Yes, your big wall haul bag is already pretty stout, but even heavy-duty gear can benefit from some extra reinforcement. Here’s a straightforward and effective way to strengthen it further.
Haul bags are some of the toughest climbing gear, but even the strongest ones can benefit from extra protection against the wear and tear of big wall climbing.
Here's a low cost way to beef up the areas on your haul bag (or maybe portaledge, or the toe end of your wall shoes) that might get abused.
Wear old clothes, wear disposable gloves, use a disposable paintbrush, and do this outside. It's smelly and messy!
The solvent allows the Plasti Dip to be absorbed more into the fabric rather than just sitting on top of it where it can get scraped off.
Note, I have not done this myself, but I've used similar chemicals on other projects. This idea and photos are all from Skot; here's the original post from his Instagram.
Disclaimer: my website offers information and ideas, not advice. If you mix this in the wrong ratio and your haul bag falls apart from the solvent, it's not my fault! Try this on a small area of your bag first and see if it damages anything before you paint the entire thing!
Get some Naphtha and Plasti Dip from the hardware store.

image: @skotswallgear
Mix the two together in a ratio of about 4 parts plastic dip to 1 part Naptha. Use a cheap throwaway brush.

image: @skotswallgear
Paint this concoction onto the area you want protected, in this case the stitching on the haul bag. Dry it thoroughly outside.

image: @skotswallgear

Chalk weakens your rope - by a lot!
Are you concerned about getting chalk on your rope? I wasn't, until I saw this testing video from Edelrid. Short version, chalk can be bad, and it's a good idea to wash your rope regularly.
I'd bet you’re probably not too concerned about getting chalk on your rope.
You might be after you watch this video below.
Edelrid did some interesting testing upon how chalk can damage your rope. An 80 kg weight tied to a short length of rope was repeatedly raised and lowered over a carabiner.
In one test, the rope was clean.
In another test, the rope had chalk rubbed directly on it.
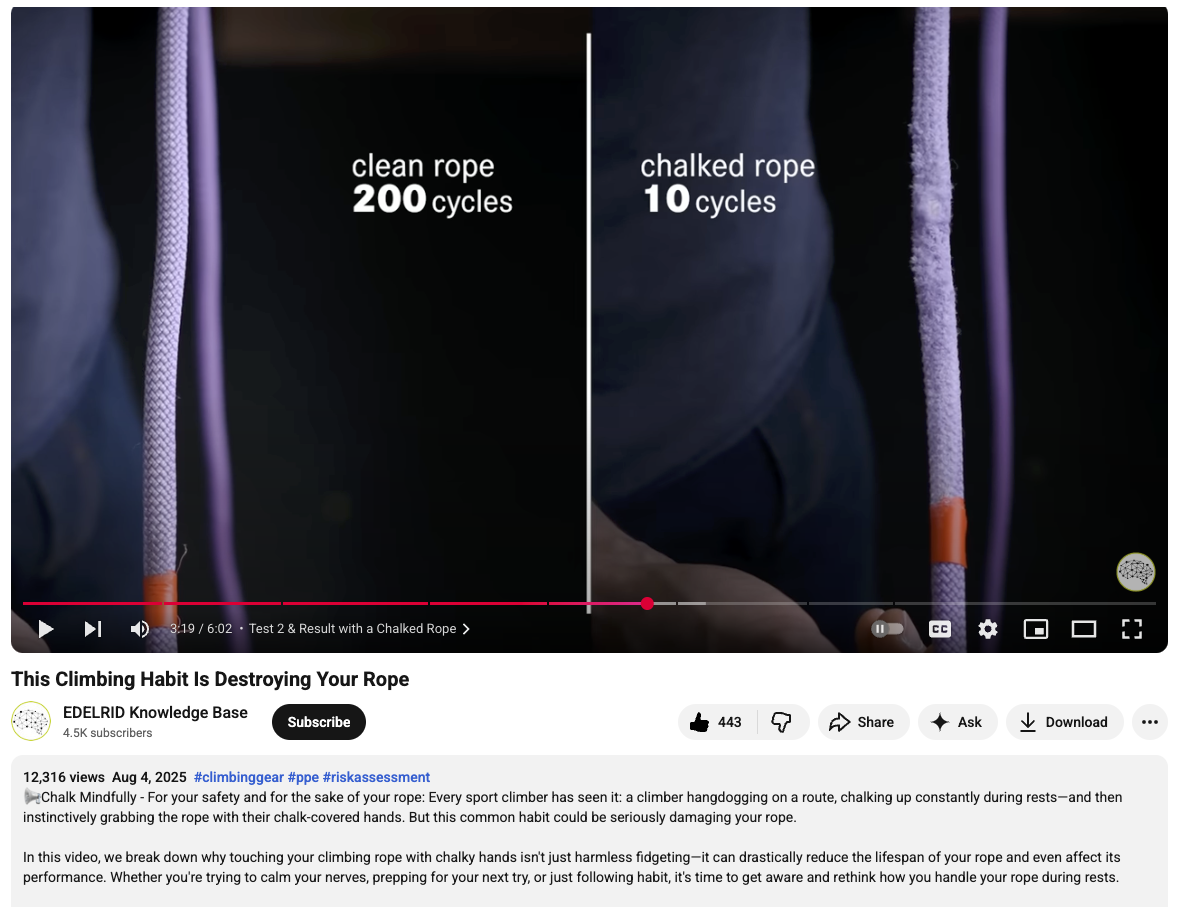
While I recommend watching the whole video, here's a summary:
The clean rope lasted a very long time - 200 cycles and no damage. (Cool, that's how we expect a rope to work.)
The rope with chalk rubbed directly on it showed some clear damage after only 10 cycles! Yikes!
The rope sheath was completely torn after only 16 cycles! Double yikes!
Wash your rope. Keep it in a rope bag, whether outside or inside at the gym. Use chalk with a bit more caution and yes, even you dirt bags, wash your hands sometimes.
There are a lot of great nerdy tech videos like this on the “Edelrid Knowledge Base” YouTube channel and on their website. Give them a follow if you don't already.
Here’s the video.

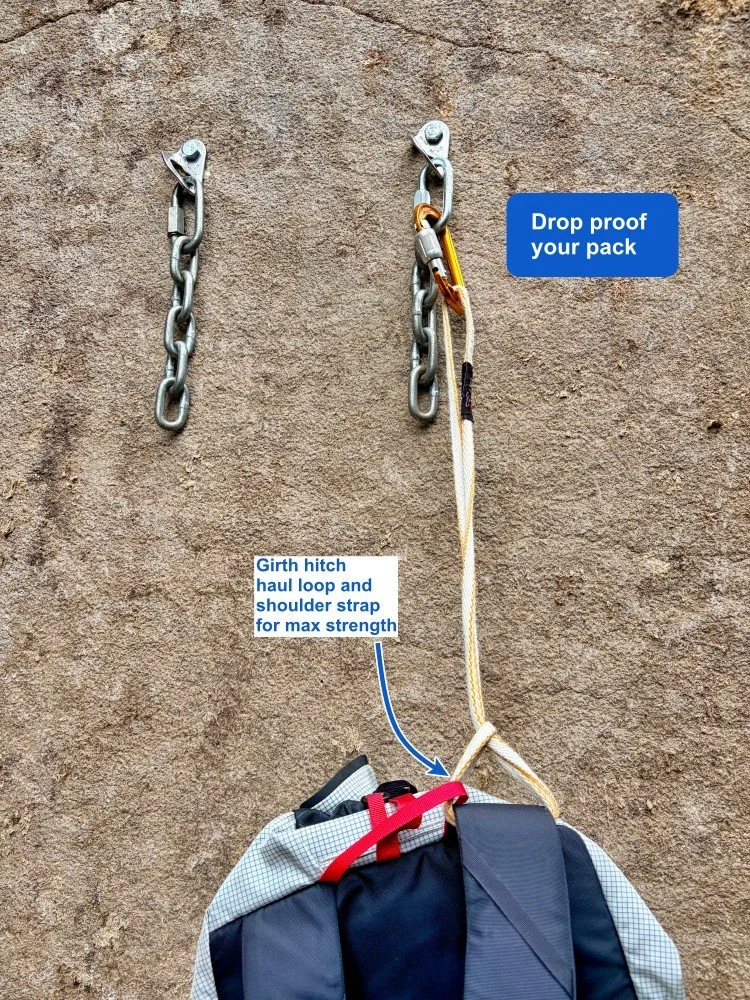
Drop-proof your pack
When multi pitch climbing, you want to be sure your pack is secure at the belay. Here's a simple way to do that.
Girth hitch a 60 cm sling to your pack when you’re on a multi pitch.
If your pack has a solid haul loop and the load isn't too heavy, you can use that. (That's one of many things I like about the new Petzl Bug multi pitch climbing pack: the haul loop is extra stout.)
Keep a spare carabiner on the sling. (Here I have a locker; non-locker is probably gonna be fine too.)
When you reach the belay, clip the pack to the anchor, and THEN take the pack off.
Doing this makes it pretty much impossible to drop your pack. When the pack is on your back, clip the carabiner to the bottom of one of your shoulder straps.
Another use for this: if you’re in a chimney or for any reason want to pack off your back in the middle of the pitch. Clip the carabiner to your belay loop, and let it hang below you. (Or, if you're completely done with carrying the pack, clip it to a piece of gear and let your second deal with it when they arrive! =^)
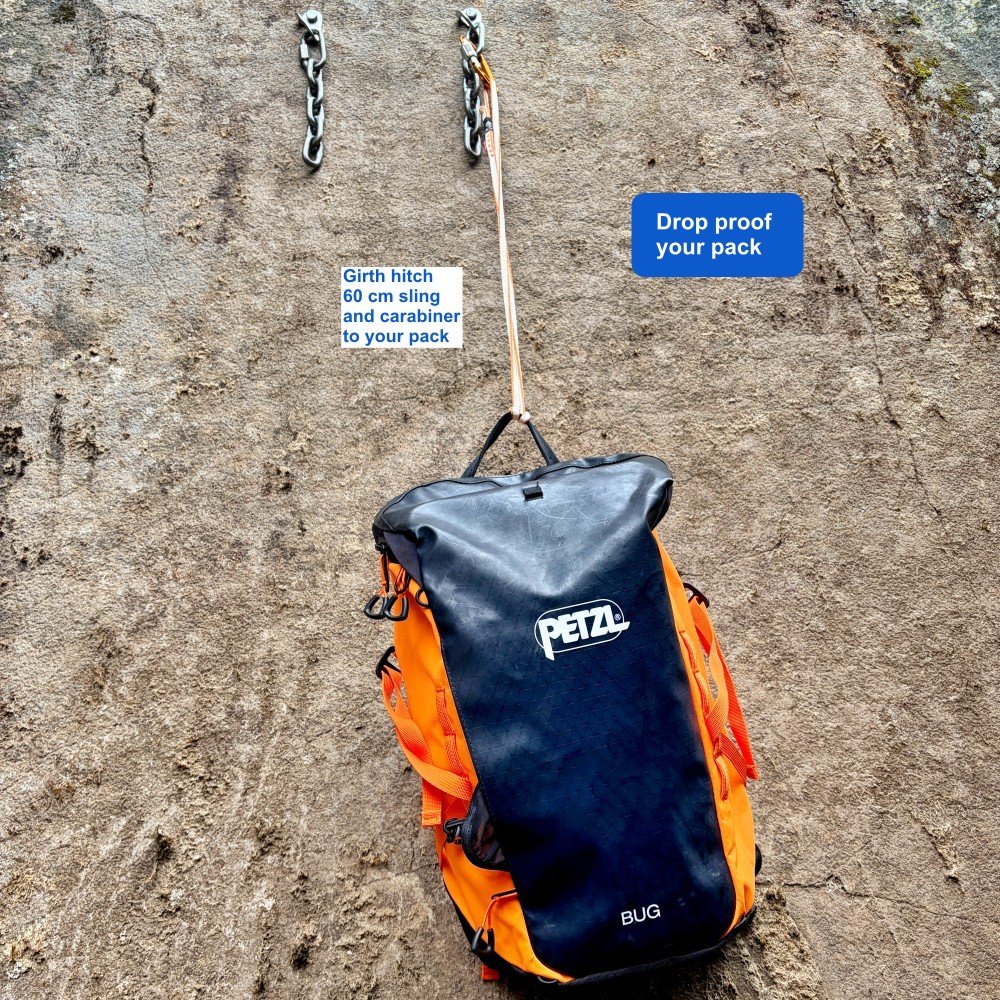
If you have the slightest concern about the strength of the haul loop, you can girth hitch the sling through both the haul loop AND a shoulder strap.

Is gate loading an HMS carabiner bad?
Yes, Petzl has a warning about it, and yes, it weakens the carabiner. But, is it something you should worry about? Get the break test results here.

Petzl seems to have a pretty clear warning and not to do this on their website. The skull and crossbones usually gets my attention.
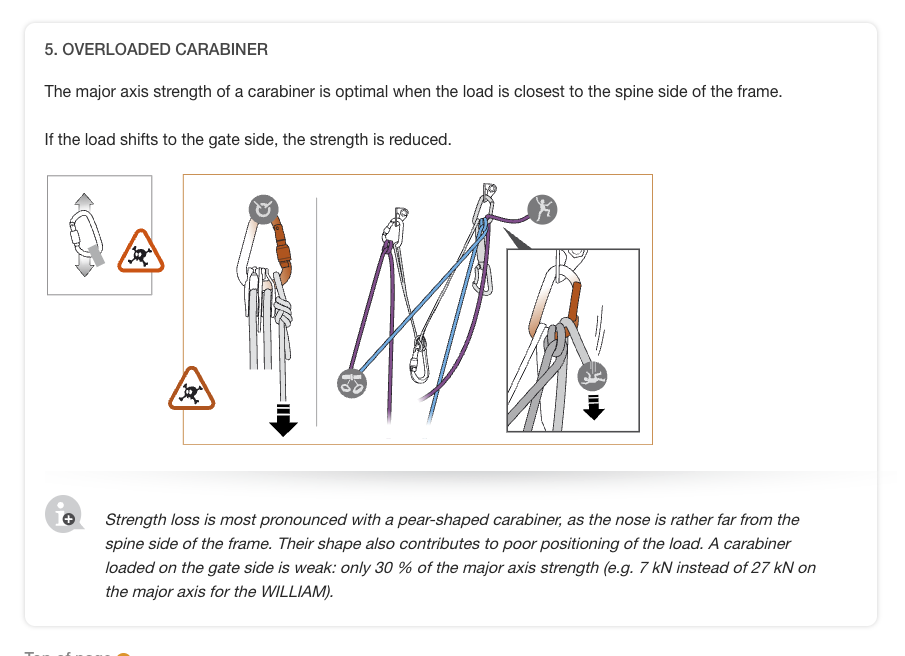
But here on their website, they say it's apparently fine to connect multiple items to a HMS carabiner . . .
So . . . clipping two items is OK, but clipping three isn’t?
We all know that you get maximum strength from a carabiner by aligning the force along the spine and not necessarily the gate. Petzl says the “strength is reduced”.
By how much? Is it really a concern for recreational climbing?
HowNOT2 did a break test on this. With a limited sample size of 1, an HMS carabiner loaded up with several things clipped to it broke around 15 kN.
Is this significantly weaker than the rated strength of the carabiner? Yes.
Given that the largest possible force in recreational climbing is somewhere around 9 kN (and that's for a crazy factor 2 fall directly onto the anchor that 99.9% of climbers will never experience in their life) am I concerned about putting a load near the gate instead of upon the spine? No.
I want to share this as more of an “FYI, carabiners can be weaker than the rated strength if you load them like this”, rather than “OMG, if you do this, Yer Gonna Die.”
Modern climbing gear is incredibly strong and very rarely breaks under normal usage. There's lots of ways to get the whack when you climb. This isn’t one of them.

Stuck rappel rope? Try the “rubber band” trick
Yep, stuck rap ropes suck. The “rubber band” is a #CraftyRopeTrick to (hopefully) get your rope down.
You start to pull the rap rope, but can’t get it moving. Try this.
You and your partner grab opposite ends of the ropes and pull, hard. One of you keeps the “pull” pressure on, while the other suddenly releases their end. The “rubber band” effect of one end of your dynamic rope “springing” upwards often will get a stubborn rope moving.
You can do this with a Grigri or similar belay device; this might let you apply a bit more force to the rope instead of just pulling with your hands.

How much is a kilonewton? A great visual
Next time you're feeling less than thrilled about hanging off of that single sling, here's a good visual reminder of how strong it actually is. It. (Hint: it’ll hold 22 people who probably weigh more than you do. )

You see it on the labels of your carabiners, slings, rock, and rock protection: “Rated by the CE/UIAA to 22 kN”.
If you stayed awake in physics class, you might know that a kilonewton is a metric unit of force, equal to the weight of about 100 kg, or 225 pounds.
But even that gets a little dry.
You have a skinny 8 mm Dyneema sling in your hand.
It says it's rated to 22 kN . . .
But you still doesn't have a real sense of how much that is.
It turns out 100 kg is about the average weight of one NFL (American) football player.
So, imagine this: A skinny 8 mm Dyneema sling, rated for 22 kN, could hold about 22 football players all hanging from it at the same time!

Isn’t that’s kinda crazy to think about! Yes, most all climbing gear is impressively strong!
Next time you or your partner is concerned about that skinny sling breaking under your body weight, or maybe rappelling off of a single quick link that's rated to more than 40 kN, think of a whole pile of football players hanging off of your gear instead just you.
Hopefully you'll feel better. =^)
Fun facts about that gear label . . .
The “N” is capitalized in “kN” because it refers to the last name of Sir Isaac Newton.
There are only three countries in the world that don’t use the metric system: Liberia, Myanmar, and ‘Merica. Metric measurements are the international standard of pretty much everything, especially climbing, and that's what this ‘Merican is using.
What about that CE rating, what’s that? CE is an acronym from the French, "Conformité Européenne," which is French for “European Conformity”. Basically, it means that the gear meets certain safety regulations established by the EU.
How about the UIAA rating? UIAA stands for “Union Internationale des Associations d'Alpinisme”, which translates to International Climbing and Mountaineering Federation. They developed globally recognized standards for climbing and mountaineering equipment. The UIAA label means it’s been tested by an accredited third party and meets the UIAA requirements.