

Petzl - Color coded carabiner gates
A nice design touch on Petzl carabiners: color coded gates for double action and triple action lockers.
A nice detail on Petzl carabiners:
The double action twist carabiners have RED gates.
The triple action twist carabiners have ORANGE gates.
You can look at your harness at a glance and know what you're grabbing. Is it mandatory? No. Is it a nice design touch? Yes.
Petzl Sm’D twist lock, my favorite for a personal tether. Once it clicks shut, you KNOW it's locked. Bonus: If you look closely, you can see a tiny hole drilled underneath the gate. If you’re a keeper-cord kind of person, this gives you a convenient place to tie one.
Petzl Rollclip, a combination triple action carabiner and (fairly) high efficiency pulley. Useful in various kinds of minimalist rigging and mechanical advantage systems, very cool tool.
(Side note: Please don't top rope through a pulley carabiner like this. The decreased friction increases force on the anchor, and makes it more difficult for you to control the lower of your partner, among other things.)


Raise your master point with a pack
Are you using an anchor (tree or otherwise) where your master point is basically lying flat on a ledge? Try this trick to lift it up and make a little room for your hands.

If you have an anchor that's basically flat on the ground, here's a trick: put a backpack under the cord to slightly lift the belay device off the ground.
This which usually makes it more ergonomic and comfortable to belay from the top.


The “4 to 1 ratio” for slings
The “4 to 1” ratio is a guideline of how many single length and double length slings you might want to carry on a typical alpine route.
A general rule of thumb for building a rack: have about a 4 to 1 ratio of single length (60 cm) slings to double length (120 cm) slings.
For an average alpine pitch with mild meandering, maybe eight 60 cm slings, and two 120 cm slings.
Of course, the length of the pitch and how much it wanders around has a bearing what you carry.
Related tip: try to color-code your slings, so all of the 60 cm are more or less one color, and your 120 cm are a different color. This lets you quickly grab the one you need.
Four single 60 cm slings in orange / yellow. One double 120 cm sling in green.
Start with this “4:1” short to long sling ratio and you should be good for most routes.


Dialing in the length of your tether/ascender connection
When climbing up a fixed rope with an ascender, it's important to properly adjust the length of the tether between your harness and the ascender. Here's how to do it.
When you’re setting up your tethers and jumars for ascending a rope (usually on a big wall), getting the correct length for the tethers is critical.
If it’s too short, you make short, choppy, inefficient strokes.
If it’s too long, you can’t easily reach your upper ascender from the rest position, and you’ll flame out your arms and abs in a few minutes.
Here's how to set your tether at the right length.
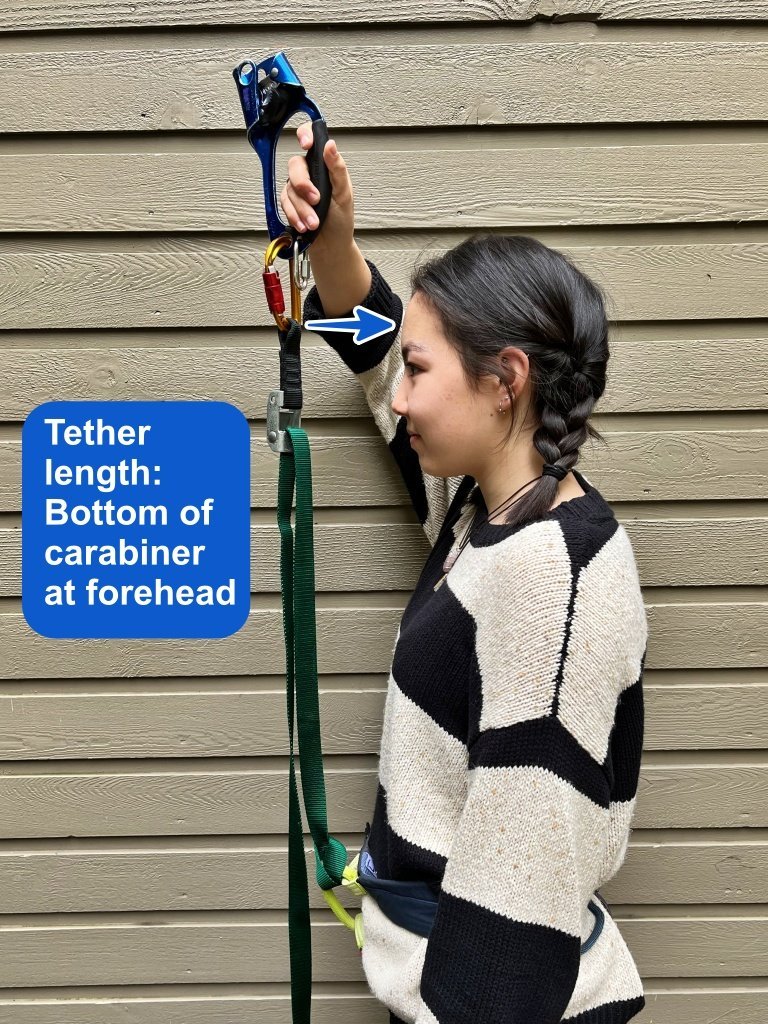
Girth hitch the tethers to your belay loop or tie in points. Clip ‘em to each ascender with a locking carabiner. Hold the ascender up vertically in front of you.
The bottom of the locking carabiner should be just about at the middle of your forehead. (See photo below)
Now, clip the ascender to your fixed rope and put full bodyweight on it. If you reach straight up, your wrist should be at the top of the ascender. This positioning ensures that you have a gentle bend in your elbow when your hand is grabbing the handle, and you can easily reach the trigger on the cam. Take the time to get this right. (In teaching this a LOT, most new aid climbers initially make their tether too long.)
Once you determine the correct connection length, mark this on your tethers. If you have adjustables, add a Sharpie pen mark. If you have traditional sewn pocket daisies, add a loop of 2mm or so cord or stout string (or burly tape like hockey tape) to the correct loop to mark it. By doing this, you set it once, and you can quickly adjust it to the right spot anytime in the future.
Note the carabiners, I‘m using: the double action, twist lock Petzl Sm’D. I think this is a great application for double action carabiners. Once you let go, you know the gate is locked. This is a crucial connection and it needs to stay secure.


Caution: stacked rappel with a Grigri(s)
A stacked, or pre-rigged rappel, can be a good technique to increase your efficiency and reduce risk when rappelling. However, Petzl specifically warns not to do this on a single strand with a Grigri. Learn the details here.
There is a caution on the Petzl website against doing a stacked rappel with a Grigri.
From the website:
“With the GRIGRI + from 2017 and on, and the GRIGRI from 2019 and on, unblocking and a consequent fall can occur if the rope is heavily loaded below the user. Unblocking can occur if the rope is loaded with a weight equal to or greater than that of the person rappelling on the GRIGRI.
Examples of dangerous situations:
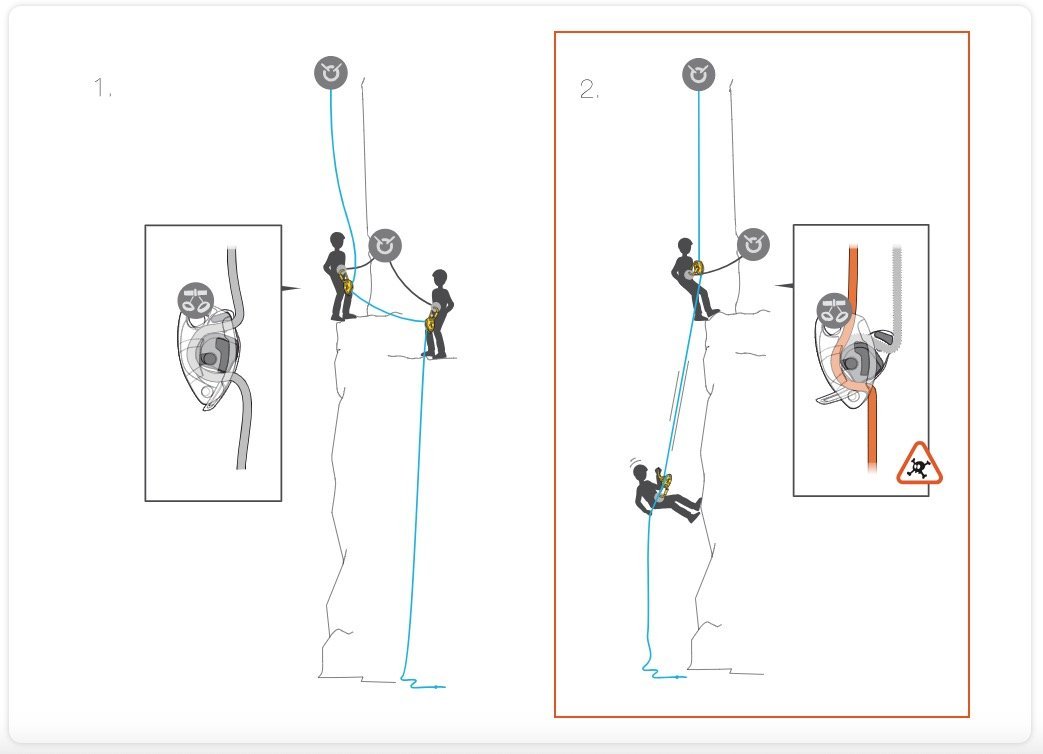
Multiple people rappelling in sequence, GRIGRIs pre-installed on the rope. If the person waiting in turn to rappel has their GRIGRI pre-installed on the rope, it can be inverted (and thus unblocked) by the weight of the person rappelling below them. So it will not be operational when the second person wants to start their rappel.
Bottom belay: the person performing the belay maneuver must not hang on the rope.
Rescue from below: The rescuer must not ascend the rope of a person who is stuck on rappel.”
Below is a stacked rappel with a Grigri. When the first person down starts loading the rope, (apparently, in some cases) it can cause the rope to invert on the top person. (I tested this briefly and could not cause failure, but I certainly trust the Petzl engineers on this one, so don't do it!
Related to this, Petzl also cautions against a firefighter belay, or someone ascending a rope when someone above them has a Grigri.


Hauling systems - Clove hitch can replace a prusik
Some mechanical advantage hauling systems, such as a 5:1 or 6:1, can require two rope grabs. If you only have one prusik loop, you may be able to rig it by using a clove hitch.

When you're setting up a more involved mechanical advantage hauling system, such as a 5:1 or 6:1, those often require two rope grabs / friction hitches.
What if you only have one?
Depending on the rigging, you might be able to substitute an actual knot, like a clove hitch, instead of a friction hitch.
Yes, you will have to re-tie the knot every time you reset your system, but if that's what it takes to get your partner out of the crevasse, then that's what you do.
Bigger picture: if you think you might need to set up a 6:1 for any reason, such as two person crevasse rescue, do yourself a favor and bring the right tools, such as a high-efficiency progress capture pulley like a Petzl Micro Traxion, and two short friction hitches.
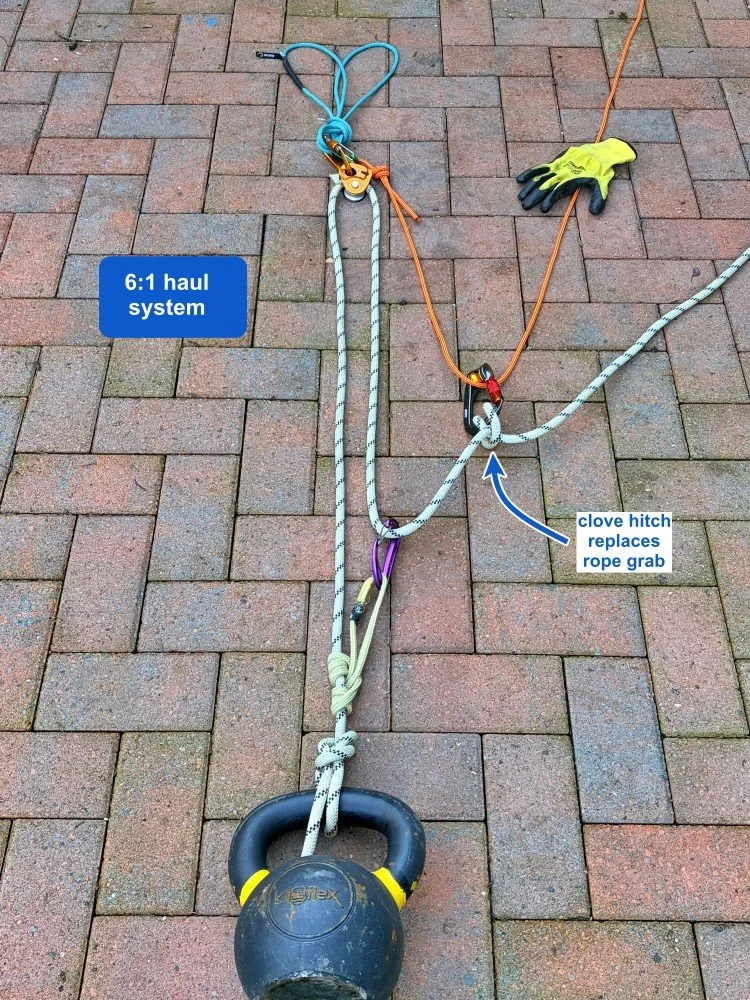
Below is a 6:1 hauling system.
The system starts with a 3:1 “Z” drag, made with the white rope. then a 2:1 “C” is added on top, with the orange cord.
Typically that orange cord would be clipped to a second friction hitch . . . but it doesn't have to be.
Because this strand of the white rope isn’t under tension when you're not pulling, this connection can be a clove hitch.
When the purple carabiner arrives at the anchor, you need to reset the system. Untie the clove, slide the green carabiner and prusik down the rope toward the load, re-tie the clove on the white rope, and continue pulling.
To learn more about 6:1 systems like this, check out this article.

Tied webbing on a tree - skip the overhand knot
Tying a loop of webbing around a tree as a rappel anchor? Keep it simple, and avoid adding an overhand knot at the master point.
If you're tying webbing around a tree to make a rappel anchor as shown below, keep it simple: tie a single loop to make the anchor.
For some reason, lots of people want to tie an overhand knot near the masterpoint, as shown on the right.
This does nothing to increase the security, strength, or redundancy of the anchor. It uses up more material, and makes your anchor slightly weaker, so there's no reason to do it at all.

How to roll a cam strap
Not a climbing tip, but still a pretty helpful hack to tame that spaghetti pile of straps to tie things on the top of your car or in the back of your truck.

Not an alpine climbing tip, but I bet you sometimes strap things on the top of your car or a truck bed using cam straps.
Here’s a slick way to keep ‘em tidy and tangled free.
If you think this is too much fiddling around, doing a daisy chain for extra long straps is another good option.
Pro tip, if you use a lot of cam straps (like I do when I’m whitewater rafting) get different colored straps for the standard lengths, typically 4’, 6’, and 8’.
Here's a nice video showing the method.

Use a slipknot to sling rock horns
A small spike of rock, also known as a “chicken head”, can be used as rock protection. If you tie a slipknot and snug it down, it's much less likely to lift off as you move by. (Hint: practice tying it one-handed.)

A horn or spike of rock (aka “chicken head”), can sometimes be used as protection.
The problem: if you just loop the sling over the top, it's probably gonna lift off as you continue climbing.
Solution: make a slipknot and snug it down on the spike.
Tighten it well.
Practice tying slip knots one handed.
Consider a 120 cm sling.
If you think the sling may lift off, maybe clip some heavy gear to it.
A clove or girth hitch can work too. Try a few knot flavors and see what work for you.
The nice diagram below is from Jürgen Reinmüller. Jurgen is a guide in Austria, and he’s publishing a book (both German and English versions) in autumn 2025 of alpine climbing tips with lots of additional cool illustrations like the one below. To see more of his nice drawings, and get on the waiting list for his book, give him a follow on Instagram - @alpinstil.at

Image credit: Jürgen Reinmüller, @alpinstil.at

What are the forces on the anchor when rappelling?
Something we've all wondered when leaning back on a rappel anchor that’s Less Than Ideal . . . How strong does this thing really need to be? The gear experts at Edelrid did some testing, here's the answer.

I recently came across a nice video from the meticulous gear testers at Edelrid. (Have a look at their “Edelrid Knowledge Base” on YouTube, they have lots of goodies there.)
Check out the screen grab below from one of their videos.
Short version:
If you bounce around on the rope like some special forces cowboy, you can generate between 2 and 3 kN as a temporary peak load.
When you rappel smoothly, the load to the anchor is pretty much your body weight.
Takeaway: rappel smoothly without bouncing to minimize force on the anchor.


Cold hands? Do the “Penguin”
Want to warm up your hands? Try doing the “penguin”, a strange looking (and appropriately named) technique.
Yes, this looks weird! But it really works to get warmer “core” blood flowing down to your hands.
Rotate your shoulders to face your palms forward, and then start shrugging your shoulders up and down quickly between 20 and 30 times.
Check out the video below for a quick demo.

Close-to-the-ground rope ascending practice
Training for a big wall? Your rope ascending techniques and fitness need to be solid. Here’s how you can practice, and stay just a few meters off the ground. (Also works for crevasse rescue prusik hitch ascending practice.)
Are you training to climb a big wall? Your ascending gear, fitness and technique needs to be perfect.
You don’t need a 60 meter fixed rope!
Here's how to practice it on a short wall (or even a tree).
Run the rope to a top rope anchor, and then down to your partner, who has you on belay. As you start climbing up the rope, your partner slowly feeds rope through their belay device.
You may be only a few meters off the ground, but with this method, you can practice ascending the entire length of the rope. Have a stopper knot in the end so you can’t be dropped.
For handled ascender practice, you need a bit of rope weight under you, so your ascenders can slide up the rope. This means you probably need to be about 5-6 meters up the rope before your ascenders will slide easily.
Here’s a great illustration of this from the superbly talented Mike Clelland, from his book “The Illustrated Guide to Glacier Travel, and Crevasse Rescue”, highly recommended.

image credit: Mike Clelland

Happy camp feet with double boots
Do you have double boots on a cold weather climb, like maybe Denali? Here's a tip from two Denali experts of how to keep your feet warm & happy when you're at camp.
This tip is from Denali climbing veterans Steve House and Mark Postle, who have more than 30 Denali summits between them. I have an article in the “What's in my Pack” category with a detailed video from Mark and Steve about Denali gear, check it out here.
Are you on a cold weather climb (Denali) that requires double boots?
At camp, remove your liner boots, put on your down booties, and then put your foot back in your outer boot to wear around camp.
If the liners are damp, dry them inside your sleeping bag so you can wear them the next day.
Tying off a piton
Trying to clip a fixed piton that’s sticking out too far from the rock? Here are two ways you can clip it to reduce leverage.

Sometimes a piton may stick out too far from the rock. If you clip the eye, you might leverage the piton and weaken the placement.
Or maybe the eye is rusted or broken and can't be used.
Solution:
Girth hitch a sling around the piton closer to the rock, which reduces leverage. This works better with some piton shapes than others.
Another option: put the wire of a stopper around the piton shaft. #CraftyRopeTrick for sure!

Toe warmer heat packs in your gloves
Here's a crafty way to add a little extra heat to your hands: use a toe warmer inside your gloves. It's thin, and the adhesive backing holds it in place.
I learned this clever tip from @adventurespiritguides.
Here's one way to tame cold hands: Use a toe warmer heat pack, and put it inside your glove on the top of your hand.
Toe warmers have a little adhesive part to keep it in place and this helps hold it without it moving around in your glove.
On really cold days, you can add another one inside your shirt over your wrist. I’ve used a thin sweatband to hold it in place over my wrist; that worked well.
Standard hand warmers don't work too well. They can be too bulky in tight fitting gloves, and they can fall out or move around when you take your gloves off.
Buy them in bulk, they’re pretty cheap. (You’ll probably need a new box every season because they have a shelf life.)


Tame your crampon strap with a hair tie
Crampons straps that flop around (and might even trip you up) are a hassle! Here's one way to deal with it, using the humble hair elastic “scrunchie”.

There are various ways to keep your crampons strap tidy. Here's one that works for me.
Take an elastic hair tie / scrunchie, and wrap a few times around the strap.
After you crank down your crampons and buckle them, tuck the extra tail through the hair scrunchie. This should keep it nicely out of the way.
Side note: Most crampons straps are very long, so you can fit them on just about any kind of Sasquatch foot. If you know the biggest size of boot you’re ever going to use, you can cut off some of the extra strap. Measure carefully before you do it!

Add a carabiner to the master point knot
Here is a simple trick to make untying your master point a bit easier - include a carabiner in the knot. Note, this is NOT for clipping anything; it's only to help you untie the anchor when you're done.

This little trick has been around for a while. But I was with some newer climbers recently, they had never heard of it, so I thought I'd mention it.
Maybe under the category of “teaching the new dogs an old trick?”
When tying a statically equalized anchor from a sling, and using either an overhand or a figure 8 as the masterpoint, that loaded sling can be very difficult to untie.
Make your life easier: clip a carabiner into the knot before it gets loaded. This gives you a little “handle” to start pulling on the knot to untie it, and makes your tired fingers happier at the end of the day.
Note:
This is absolutely not meant for any kind of load, including your shoes or a backpack. The only purpose is to make untying the knot easier. If you loaded this carabiner, it could compromise the security of the knot, so don't do it! If you're climbing with beginners it's especially important to point this out, ask me how I know about this.
A figure 8 is usually easier to untie then an overhand.
This does not have to be a locking carabiner.
If you have one, use a “keylock”, or notchless, carabiner. It’s a bit easier to remove from the tightened knot.

Deep dive article on ski repair tips & tricks
You carry a first aid kit for your body. You also need one for your ski gear, because not having one can turn a small problem into a major epic. Here’s the most detailed article you’ll ever read on backcountry ski repair, from the pros at Cascade Mountain Ascents.
Check this out: incredibly detailed article on crafty ways to fix your gear when backcountry skiing.
This was written by our friends at Cascade Mountain Ascents in Bellingham Washington.
This article is closely aligned with a ski repair kit sold by Traverse Equipment, that should cover most basic repairs. For longer tours you may want to take a few more things.
Cascade Mountain Ascents and Traverse Equipment are partners with Alpinesavvy. If you’re an Alpinesavvy Premium Member, you get 10% off select Cascade Mountain Ascents trips and courses, and 10% off this great repair kit from Traverse Equipment.
For more details, check out the Premium Member discount page.

Here’s a video made by the Zach (author of the article) and Charlie (Mr. Traverse Equipment), examining what's in the kit and how to use it.

Pacific NW mountain weather tutorial
Seattle based mountain athlete Kyle McCrohan wrote a great three part series on weather in the Pacific NW as it relates to climbers and skiers. While focused on the Cascades, there are a lot of gems that apply to many different areas, so it’s worth a read for everyone.
Getting a more nuanced understanding of mountain weather patterns involves more than looking at a simplified icon on your phone’s weather app. What does that pesky “20% chance of precipitation” really mean? You don't need to become a PhD meteorologist to go climbing, but knowing how to find and interpret a few online weather resources can really help make sense of things.
I make zero claims to be an expert in the subject, but fortunately we can learn from those who are.
Seattle based climber and backcountry skier Kyle McCrohan wrote a terrific 3 part series of Pacific Northwest mountain weather on his website.
Check it out at the links below.

Snow anchors with Black Diamond and Mark Smiley
Black Diamond recently collaborated with IFMGA Guide Mark Smiley to test the strength of different snow anchor configurations. Some of the results were pretty surprising!
This is a great article on the Black Diamond website about recent snow anchor testing by IFMGA Guide Mark Smiley and the Black Diamond team.
They did a superb job on it, so I'm gonna send you to the link and have you read it there.
The focus is on rappel anchors, but the results are applicable to crevasse rescue anchors as well.
Even better, Mark gives access to a free sample lesson on T slot / deadman anchors from his online class, The Ultimate Guide To Modern Alpinism, as a link from the BD article, so check it out.
Here’s a table summarizing some of the results.

Takeaways:
Bounce test your anchor before using. If you give it a really good jump, you should test the anchor with about three times your body weight.
Rappel as smoothly as possible.
Buried Snickers bar, not so good. Buried Tyvek envelope, #ProbablySuperGoodEnough.
And a buried 2x4? Stronger then you think! Next time you need an snow anchor, might want to look around for a tree branch.