

Alpine Tips
“Knot migration”: what is it, how to fix it?
“Knot migration” can happen when rappelling on ropes of two different diameters. The fatter rope has more friction in your rappel device, and this can move the joining knot in an unexpected and potentially dangerous way. Learn how this happens, and how to deal with it here.

Premium Members can read the entire article here:
Note - This post discusses techniques and methods used in vertical rope work. If you do them wrong, you could die. Always practice vertical rope techniques under the supervision of a qualified instructor, and ideally in a progression: from flat ground, to staircase, to vertical close to the ground before you ever try them in a real climbing situation.
This article was written with collaboration from expert American alpine climbers Jeff and Priti Wright. Connect with them on Instagram (Priti / Jeff) and their website, alpinevagabonds.com
Summary:
Knot migration can happen when you join two rappel ropes of different diameters.
The different rope diameters can have varying friction in your tube-style rappel device: fatter rope has more friction, skinnier rope has less friction.
If the joining knot is on the side of the fat rope, because of increased friction, the fatter rope may slide less (or even not at all) through your device.
If this happens, the joining knot can start sliding down away from the anchor. This can cause the rope ends to be uneven. This could range from a minor annoyance to a lethal problem.
For most climbers, in most cases, it's best practice to rig to pull the skinny rope. With proper anchor hardware, this prevents the knot from moving.
For expert climbers in certain situations, rigging to pull the fat rope can have some advantages.
Below left: the fat rope is through the hardware, so you pull the skinny rope. This is usually the preferred method.
Below right: the skinny rope is through the hardware, so you pull the fat rope. This is the experts-only method, for specific situations.
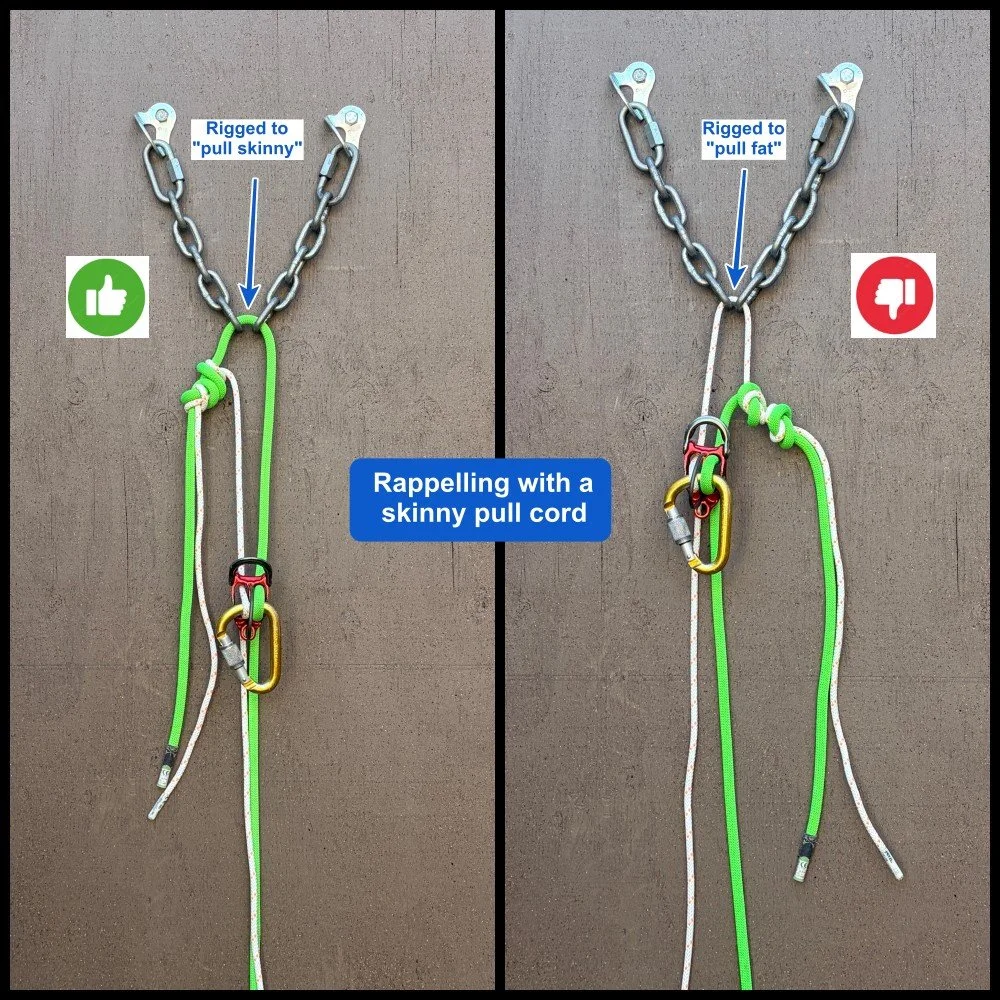
When you rig a rappel with ropes of two different diameters, you always have a choice which rope to pull. The standard rigging: pull the smaller diameter rope.
(The memory jog that I like: “PS”, or “Pull Skinny”.)
Why should you (usually) rig to “pull skinny”?
When rappelling on ropes of two different diameters, the fat rope (usually) has more friction through your rappel device then the skinny rope. This means the skinny rope might pass through your rappel device faster than the fat rope, which moves the joining knot in the direction of the fat rope.
If you rig to pull the skinny rope, the joining knot will usually be pulled a tiny bit into the anchor master point, which is what you want. If your anchor master point is a small chain link or quick link, or even a small loop tied in cord or webbing, the knot jams up against this and stops moving. Not a problem.
What happens if you rig to “pull fat”?
The same issue still happens: increased friction between your rappel device and the fat rope. However, because the joining knot is on the fat side of the rope, the knot doesn't get jammed into the anchor, but instead can “migrate”, or move downward away from the anchor.
The knot moving DOWN means the end of the skinny rope is moving UP.
This can happen with ropes that are just a couple of millimeters different, such as a 10 mm and a 8.5 mm.
It can be more of an issue with a skinny pull cord (often 6 mm) and a standard climbing rope.
I've also heard if one rope is wet and the other one is dry-ish (which could happen with a Dyneema pull cord as it absorbs minimal water) knot migration can be increased. I don't have any personal experience with this.
It can be hard to notice the ropes not moving evenly when rappelling, especially if your fat rope is a solid color and doesn't have a pattern on the sheath.
It tends to happen more at the start of the rappel, when there’s increased friction because of the weight of the rope below you.
If you have a short rappel and/or a lot of extra rope, some knot migration may not be a problem.
However, if it's a longer rappel and you're using a skinny 6 mm pull cord, knot migration can be significant, which can cause some big problems!
In July 2026, there was a fatal accident in Norway involving an American climber.
According to the accident report, the climber rappelled with a set up like the photo above on the right, pulling the fat strand, which was paired with a 6 mm pull cord.
Apparently, the climber chose not to tie stopper knots in the end of either strand. That may not have helped, because a stopper knot in 6mm cord could've pulled through the rappel device anyway. Clipping the end of both strands (or at least the pull cord strand) to their harness would probably have prevented the accident, but that’s sort of a separate issue.
The joining knot migrated down the fat side of the rope, lifting the end of the skinny rope off the ground. The end of the skinny rope passed through their rappel device, resulting in a fatal fall.
Following this accident, the Interweb was full of statements like, “You should ALWAYS rig to pull the skinny rope!”
While I mostly agree with that, it's also important to keep in mind that there are very few black-and-white, “always do this, never do that” rules in climbing. This isn't one of them.
Like most every other technique, there are shades of gray. Yes, most climbers in most situations would benefit by rigging to “pull skinny” as the default.
However, for experts in certain situations, pulling the fat rope can be a good idea, provided you’re aware of all the potential problems, and some ways to solve them.
Here's a short video of how knot migration can happen. (This is kind of an extreme example because I have a thick 10 mm rope paired with a 6 mm Petzl PURline, and my device is set in the normal high friction mode.)
There are two ways that knot migration can happen.
1 - Unintentional
If you rig the standard way to pull skinny, but the master point of the anchor is large enough for the knot to slip through, it's possible that the knot could pass from one side of the anchor through the other.
If you’re rappelling with both strands through your device, this may not be a problem. However, if you're doing a knot block and only rapping on one strand, this could kill you!
You can eliminate this by using a quick link, or if you're using cord, tying a small knot of some kind that prevents the knot from sliding through.
2 - Intentional
Hopefully, fully knowing the pros and cons, you set up your rappel so you pull the fat side of the rope. Yes, this does go against the general rule of “pull skinny”, but for experts, who understand the potential consequences, it can have several advantages.
Why might you want to “pull fat”?
If you have multiple pitches to rappel, you can use the standard technique of feeding the end of the pull stand through the lower anchor and alternating strands as you go down. (If you don't do this, every other rappel requires you to secure the rope, untie the joining knot, thread the rope so you’re pulling skinny, and re-tie the joining knot. This takes more time, and introduces additional issues, like potentially dropping the rope, and maybe tying the joining knot incorrectly.)
It's much easier to pull the rope. The larger diameter rope is easier on your hands, and there's much less weight and friction through the terrain and anchor point because of the lighter and more slippery skinny rope. The heavier weight of the fat rope assists with pulling. In terrain with lots of blocks, features, and maybe slab, this can make a huge difference.
If you pull the end of the skinny rope up out of reach, and then it gets snagged, you have a fat dynamic climbing rope in your hands to hopefully solve the problem, and not a skinny static bit of alpine dental floss.
Pulling fat ONLY works with modern high strength pull cords!
Using some version of a parachute cord / accessory cord / long shoelace as a pull cord has been done for a long time. These cords were never meant to support bodyweight, and were only for pulling down the rope.
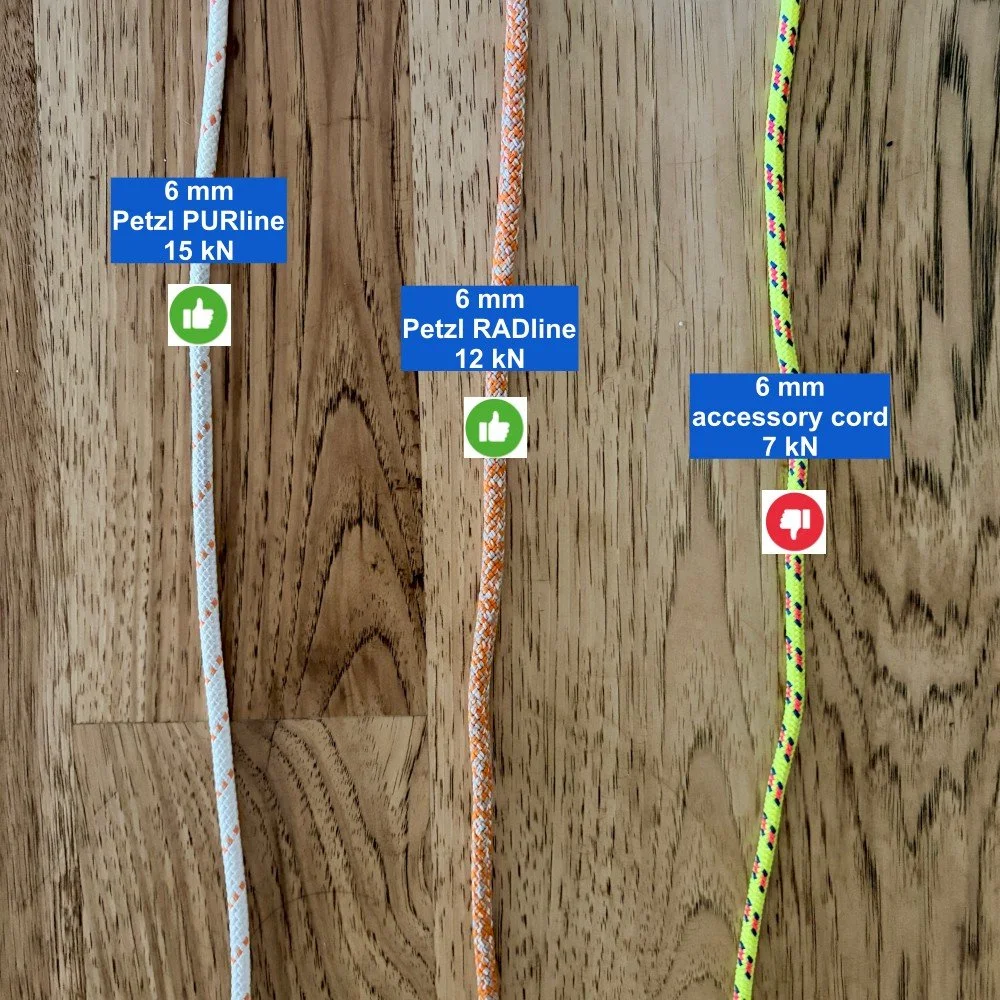
With the recent introduction of high tech, high strength rappel cords, such as Petzl PURline (15 kN), RADline (12 kn) or Edelrid Rap line (10 kN) that have a core of Dyneema or Kevlar, these fancy cords are strong enough for full bodyweight (even if the manufacturer may not be too excited about you using it that way.)
Compare that to standard 6 mm accessory cord, which is rated to about 7-8 kN.
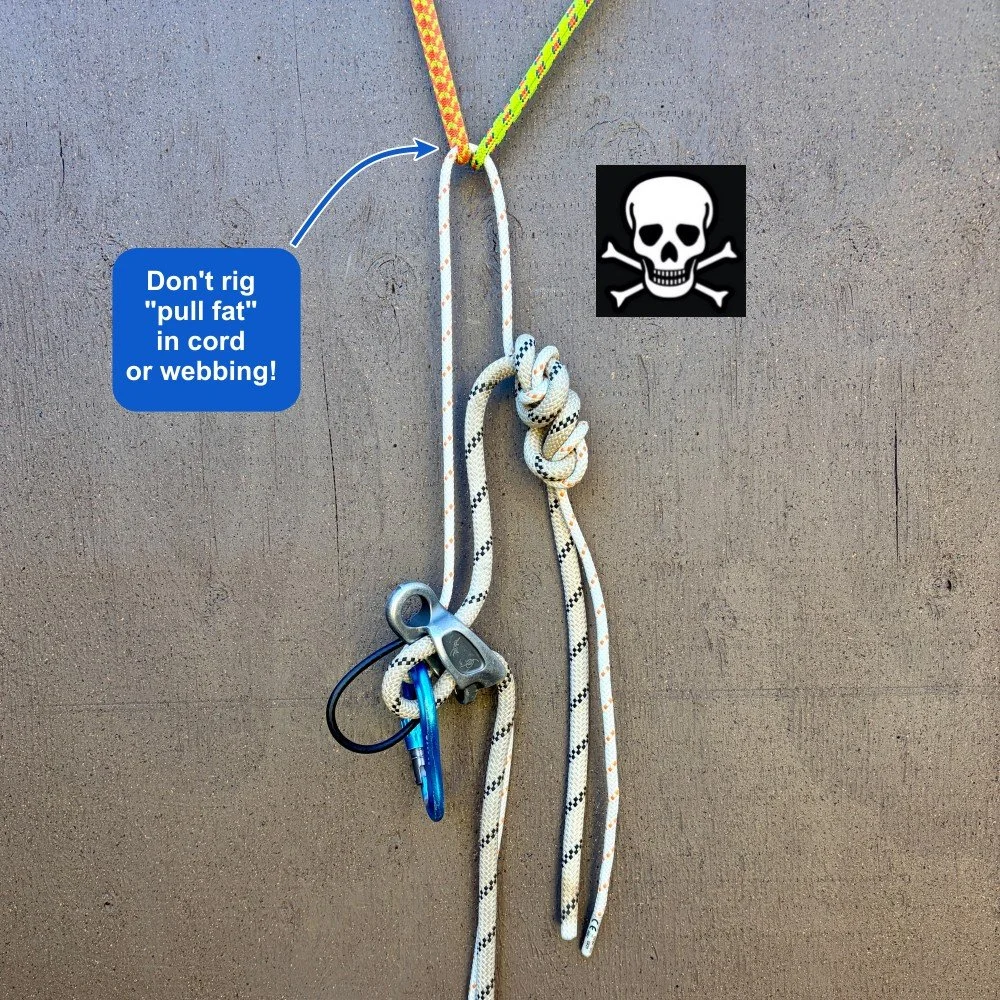
This could be a lethal mistake . . .
In climbing 101, you hopefully learned that you should never have a moving rope running through a static cord or piece of webbing. Under bodyweight and friction, the moving rope can easily cut the static material.
If you rigged a “pull fat” rappel through cord or webbing (which is something that could happen if you make a V thread anchor in ice, for example) and the knot starts to migrate, you could have this exact situation!
Avoid this by adding a quick link to an anchor that's made of cord or webbing.
One way to avoid the problem entirely: use double or twin ropes
Because the rope diameters are the same, knot migration isn't an issue. There are pros and cons to every different rope system, and I'm sure not gonna get into that here. However, it’s worth mentioning this as a big benefit to a double rope system. I'll leave it at that.
So, for you experts who are considering “pulling fat”, how can you address the problem of knot migration?
Here are two great resources from British climbing expert Andy Kirkpatrick.
A terrific overview of the issue and step-by-step walk-through of a hypothetical scenario where this could cause a big problem, posted September 2026 on Andy's Substack. Read it here.
In Andy’s Kirkpatrick outstanding book on descending mountains called “Down”, he covers knot migration, starting on page 329. (I think this book should be required reading for all climbers.) He covers at least six different ways to reduce knot migration. I'm not gonna cover all of them here, so buy his book and read it. =^)
Here are a few options to deal with knot migration.
For the first person descending, you can fix / tie off the rope(s) to the top anchor. You can do this in multiple ways; a simple one is clipping the fat strand to the anchor with locker and a butterfly knot, which is easy to untie after being loaded. Another option is the Stone hitch.
The fat rope is tied to the anchor, so the knot can’t move. The first person down rappels on the single “fat” strand.
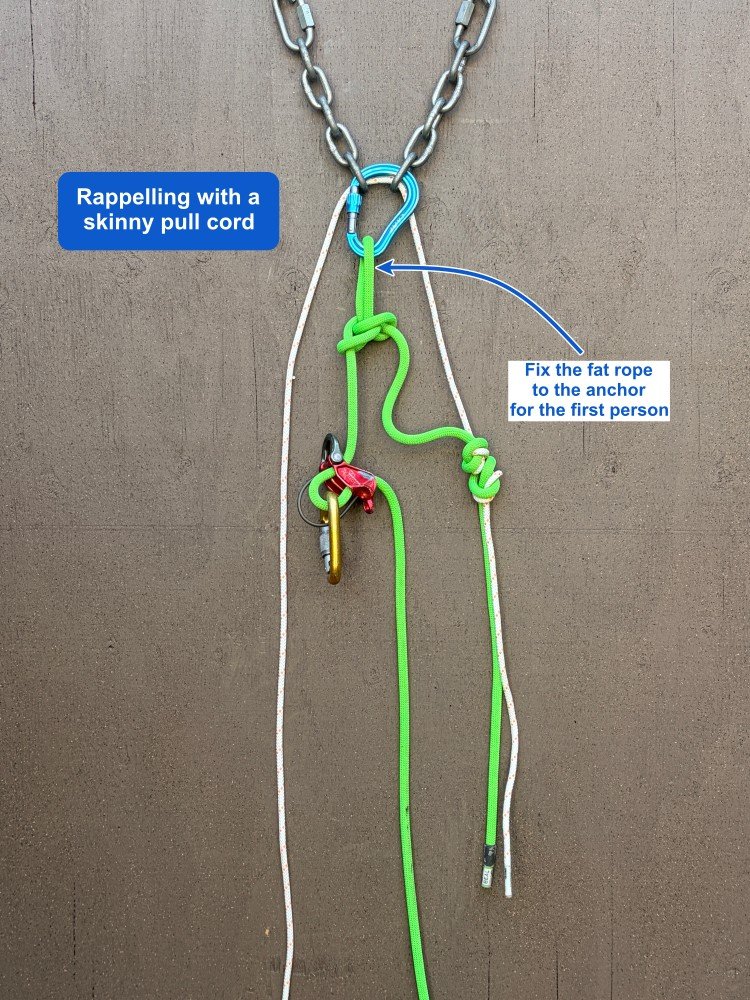
The first person down needs to always keep control of the skinny rope. They can clip it to their harness with a carabiner, or put it through the other slot in their tube style rappel device.
If you lose control of that skinny cord, it could swing or blow off to the side and cause a BIG problem if you can't reach it!
Another bonus, as you can see in the diagram below, this lets the first person down rap on a Grigri, which can have lots of advantages.
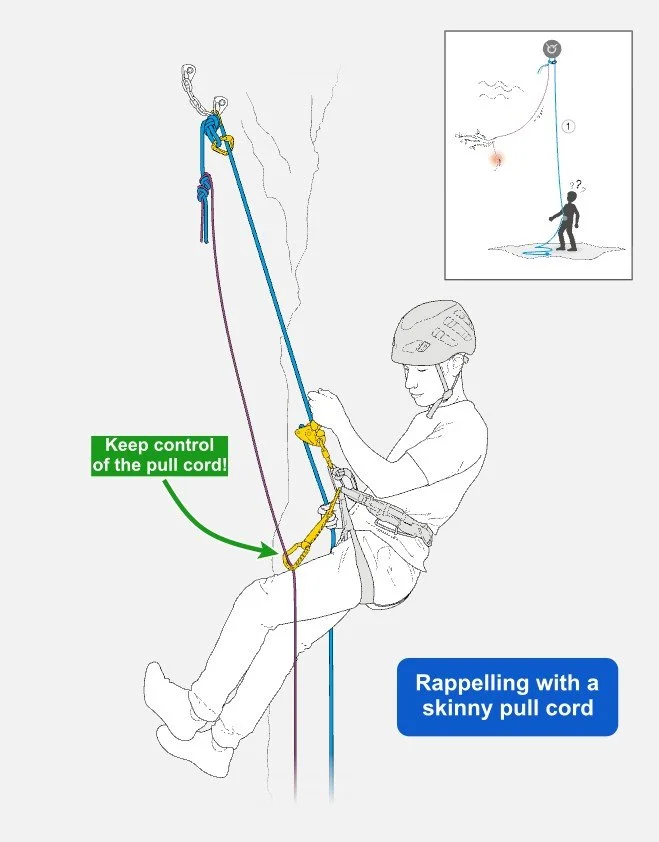
To prevent or reduce knot migration for the second person down, there are several solutions.
Experiment with different flavors and orientations of rappel devices. Sometimes it's as simple as flipping your device around so it's in LOW friction mode, so it doesn't grab the thick rope quite as much. (This might be counterintuitive; try it with your device and see how it works.) In my testing, having less friction causes the thicker rope to slide more easily, helping keep both ropes properly moving through the device.
Consider putting both ropes through the same slot in your device. Because the ropes strands are next to each other, this encourages them to pass through the device at the same rate.
How about that Munter hitch? With a Munter, the adjacent ropes tend to move at the same speed around your carabiner. And, if you use the proper technique, you can do it without twisting your rope. (Having said that, skinny 6 mm cords are already prone to tangling, and you could cause an EPIC mess if you get it really twisted, so keep that in mind.)
The first person down can tie both ends of the rope to the lower anchor. This is known as the J Loop. This had several benefits, one of them being that if one rope starts to creep upwards, it can only go a couple of meters. Granted, this might cause some problems for the next person coming down, but it's certainly better than rapping off the end of your rope.
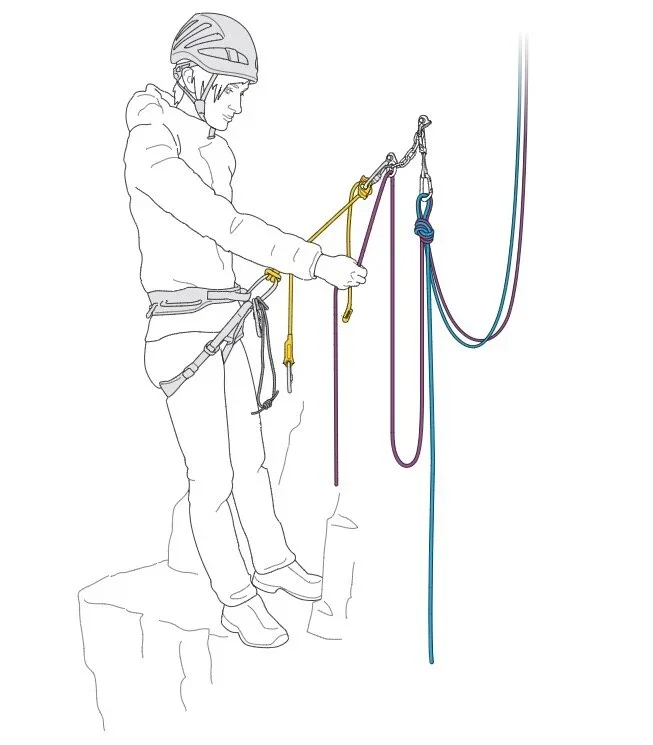
The second person down can clip the end of the skinny rope to their belay loop with a locking carabiner. This doesn’t prevent knot migration, but it does stop the potentially lethal mistake of rapping off the end of the skinny cord.
Andy Kirkpatrick covers several other methods to reduce risk for the second person in his book “Down”. Get it and study this section (pg 329).
What are three types of anchor hardware that you shouldn't use with a knot block?
What's the recommended knot to use to join a skinny pull cord and a fat climbing rope?
What's a make and model of a specific rappel device that can pretty much eliminate this problem?
Want to see a video from an expert climber who talks about this issue?
Join my Premium Membership to read the rest of the article.
Thanks for your support!
Premium Members can read the entire article here:
For just about all of us, in almost every situation, it's best practice to pull skinny (“PS”).
If you choose to rig it the other way, be aware of all possible problems, know some ways to mitigate them, and absolutely practice in a controlled environment with a qualified instructor.
Let's be careful out there.

Rope blocks 101
A rope block (aka Reepschnur), is a technique where you block one strand of your rappel rope to prevent it from running through the anchor. This lets you do a single strand rappel on the other side. Conceptually it's pretty simple. In reality there are some nuances, and definitely some ways to lethally screw it up. Learn them here.
Premium Members can read the entire article here:
Note - This post discusses techniques and methods used in vertical rope work. If you do them wrong, you could die. Always practice vertical rope techniques under the supervision of a qualified instructor, and ideally in a progression: from flat ground, to staircase, to vertical close to the ground before you ever try them in a real climbing situation.
This article was written with collaboration from Ben Wu, AMGA Certified Rock Guide. Connect with Ben at www.benwu.photography.
This is an updated version of a previous article on this topic.
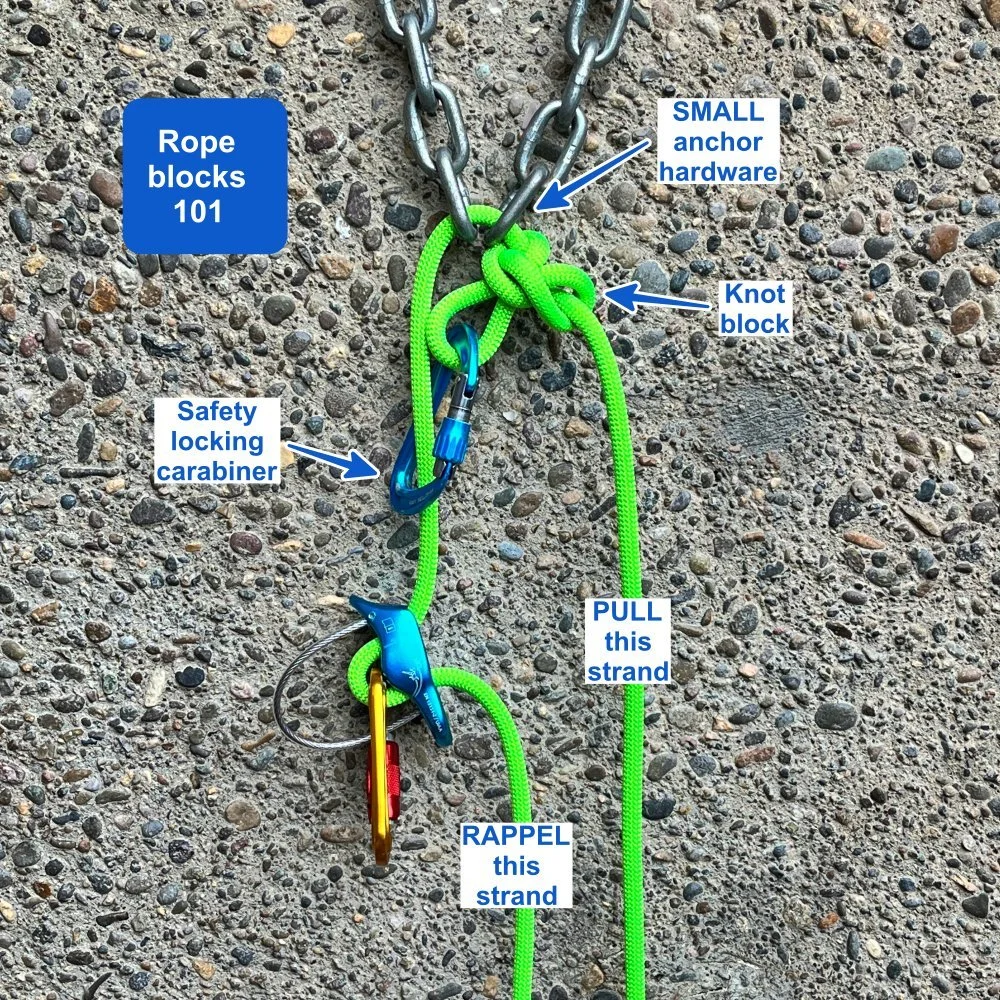
Rope block. Knot block. Carabiner block. Static block. Reepschnur.
They all mean pretty much the same thing: creating an obstruction on one strand of your rappel rope, that cannot be pulled through the anchor master point.
The rope can slide freely in ONE direction, but not in the other.
Doing this lets you rappel a single strand on the “fixed” strand of rope.
Main climbing application: it allows a full length retrievable single rope rappel; you carry less rope and weight.
To retrieve your rope, typically you use a lighter line such as a 6 mm pull cord (like the Petzl PURline) on the free running strand of rope.
Like everything in climbing, there are some definite pros and cons to this technique. If you’re considering using it, it's good to be aware of all of them. So let's get into it!
Conceptually, it's pretty simple. In practice:
There are some subtleties to doing it correctly.
There are some downsides to it even when you do it correctly.
If you screw it up, you could die or get your rope hopelessly stuck.
For these reasons, I consider it an advanced technique that you absolutely should practice with a qualified instructor. And, even when you’re confident with it, I feel it should generally not be part of your regular practice. It can definitely get you out of a jam in certain situations, but there are enough moving parts that I feel it's not a routine technique for most recreational climbing situations.
Here are articles on two closely related techniques that use rope blocks:
Not to dwell on the potential problems, but here are two reports of fatal accidents from rope blocks gone wrong:
First off, let's be clear on the Golden Rule of a rope block: it absolutely, positively cannot pull through the rappel hardware.
If you have not closed the system by attaching the pull side of the rope to the rappel side of the rope and the block pulls through the hardware, you will probably die.
If you have closed the system and the rope pulls through, your rope will probably be hopelessly stuck.
Take a close look at the anchor hardware and the diameter of your rope. If there is the slightest chance that you think the blocking knot could pull through the anchor hardware, then don’t use a knot block! (Consider a carabiner block instead, more on that below.)
There are really only a few times in recreational climbing when you might want to use a rope block.
You’re using a pull cord to do full length rappels. In this case, a rope block is pretty much mandatory. (Yes, there are some advanced ninja rope tricks like using a Stone hitch and a Fiddlestick to use a pull cord a different way, but we're not gonna get into that here.)
Your rope is too short to make the rappel. Lower your partner to the next station, make a rope block, and then extend” the “pull” side of the rope with whatever extra cordelette, slings, etc. until your DIY extension reaches the next anchor station.
There are two other situations where people often think they need a rope block, but there are other techniques you can use instead.
You damaged your rope and need to rappel. You rappel on the good half of the rope and use the damaged half of the rope with a knot block as a pull cord. To avoid doing this, you can do a counterbalanced rappel, read about it here.
If both partners have a Grigri, and you both need to rappel. It's pretty unlikely that both partners will have Grigris and not a tube device, but I suppose it could happen. You could use the counterbalanced rappel technique described just above. If one person has a Grigri and the other person has a tube style device, there are lots of other options for getting both people down without using a knot block, see some of them here and a photo example below.
Potential problems of a rope block (and pull cords)
The big one was already mentioned, but it's worth saying again: if the knot pulls through the hardware, the entire system fails and you die, or your rope gets stuck.
You’re adding an extra knot and carabiner to your system, which are two more things that can potentially get snagged when you're pulling your rope.
There are increased steps and complexity, which can increase the chances of making a mistake. This is especially true because for most people, this is a non-standard system that doesn’t get used regularly. See accident reports at the top of the page.
If you're using a lighter weight pull cord, if you pull your rope and it gets snagged after the end of the climbing rope is out of reach, you only have a pull cord in your hands to deal with the problem. Not good.
Maybe you forget what side to pull, whoops. It can be good practice to establish which side you block and which side you lower off of and do this pretty much all the time. For example. “L”=Left=Lower, and “R”=Right=Retrieve.
If you're doing multiple rappels, you can’t do the standard trick of feeding the pull strand through the bottom anchor and then pulling the rope. Why? Because you’re pulling the skinny cord, but the thick rope needs to be the one through the anchor. This means you have to re-rig the entire system at each rappel station, which takes additional time.
Yarding on a 6 mm rope can be rough on your hands. Consider adding a Tibloc or Micro Traxion on the pull cord to make the pulling easier. Gloves are recommended.
Pulling the rope can be significantly harder, because you don’t have a counterbalanced weight on the pulling strand to assist your pull.
You’re rapping on a single strand of rope, which might be uncomfortably fast. Be sure you know some ways to add friction to your rappel.
If you keep the safety carabiner clipped when you pull, it can add a significant amount of extra friction, making your rope pull more difficult. This can be especially true on a low angle slab.
If you keep the safety carabiner clipped when you pull, sometimes the ropes can more easily twist together, which can cause your ropes to get stuck.
If you keep the safety carabiner clipped when you pull, you've essentially created a closed loop that you then need to pull down. If the two sides of the rope making this loop happen to go on either side of some rock spike, boulder, shrub, ice blob, etc., the loop is going to get caught when you pull down your rope, causing your rope to get stuck. This is probably difficult to visualize, so check out the photo below. (Yes, it’s a flower pot, but I think you get the idea . . . =^)

Rope block backups, pros and cons . . .
It's good practice to backup a rope block by clipping the blocking knot onto the rappel strand with a locking carabiner. In the unlikely event of the block pulling through the hardware, this will save your life.
The backup stays in place for everyone except maybe the last person.
If the block is closely inspected after being fully loaded, and you are 150% sure that it cannot pull through the hardware, then the last person has the option of removing it. In many cases, this is a good idea.
Removing the block for the last person eliminates several of the problems mentioned above.
This is a call that the last person gets to make. (Like most everything in climbing, this is a subjective choice, and not a black and white rule.)

What’s the best anchor hardware for a rope block?
Small-medium size quick links, chains or small rappel rings are the most secure hardware for knot blocks. The openings are small and it's pretty much impossible for a blocking knot to be pulled through them.
Lots of people like to hate on carrying quick links, but this can be an outstanding time to use one. Keep in mind that a 5 mm, stainless steel, CE approved, 25 kN rated quicklink from CAMP costs about $6 and weighs just 22 grams. So weight, cost, and strength are not issues with carrying quick links, provided you get the right ones.

Some not-so-great hardware for a knot block would be a carabiner or Mussy hook. These have larger openings and greatly increase the chance of the knot pulling through. Remember, the knot will shrink as it’s loaded.
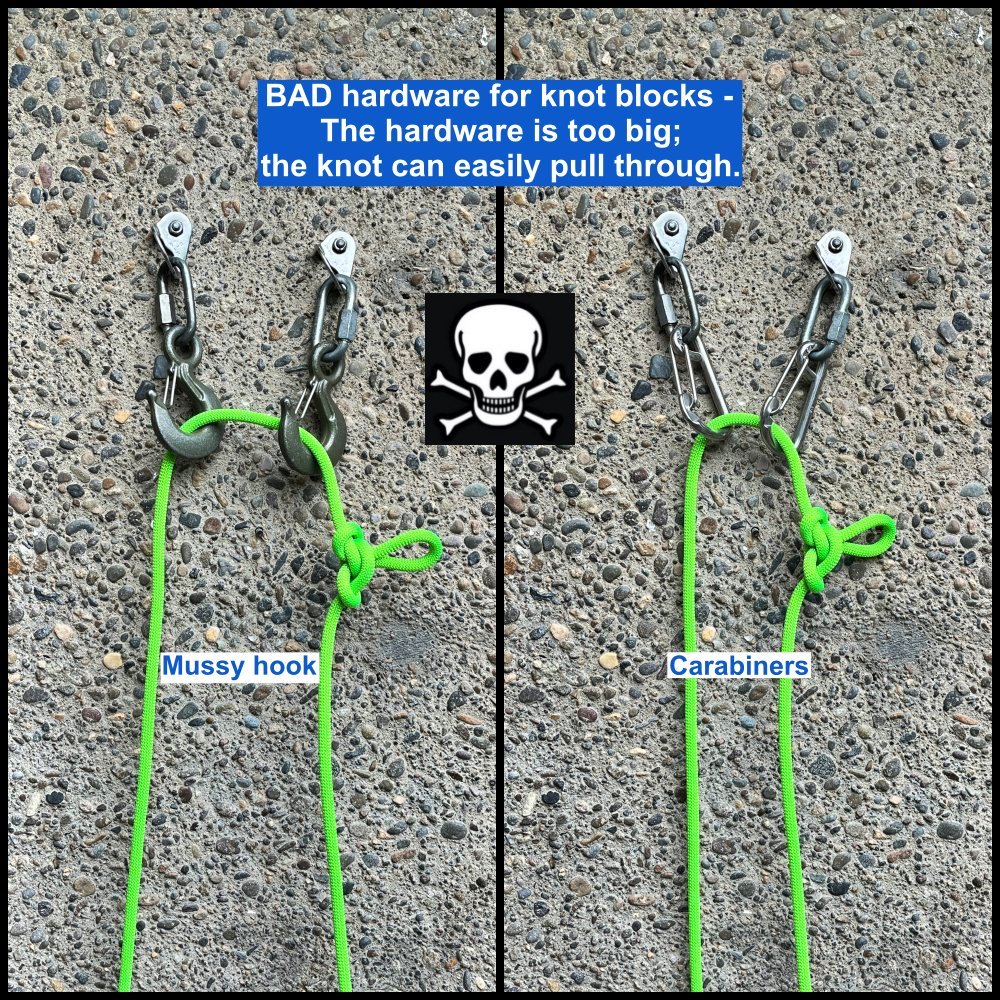
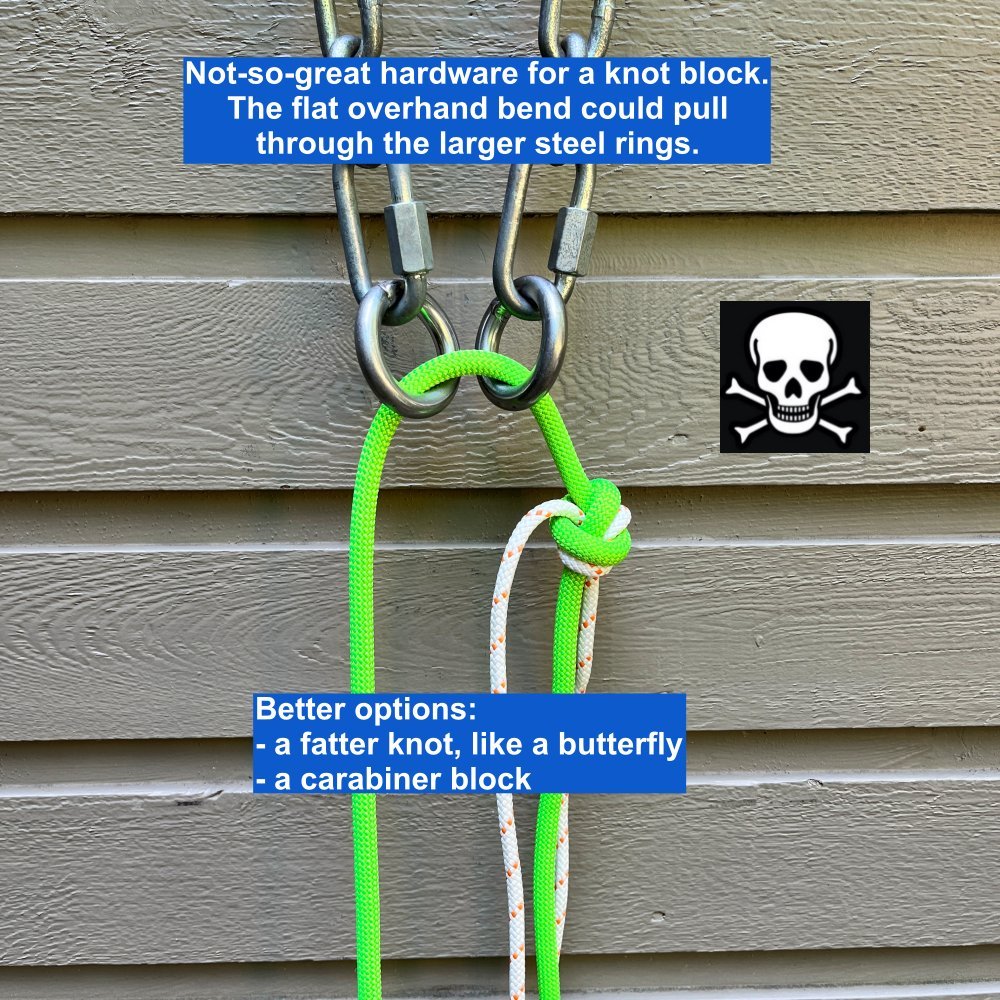
Nice diagram from the superb Petzl website. Small quicklink on the left, probably good. Large ring on the right, bad, the knot could pull through.

image: https://www.petzl.com/US/en/Sport/Multi-pitch-rappelling-with-a-single-rope?ProductName=PUR-LINE-6-mm
What about a carabiner block?
Will the blocking carabiner get damaged when I pull the rope?
What knot should I use for the block?
What about rapping with a Grigri, don't I have to use a block to do that?
Join my Premium Membership to read the rest of the article.
Thanks for your support!
There you have it: my thoughts on the pros and cons of rope blocks.
Under ideal circumstances with proper anchor hardware, they can work pretty well. But as you can see, there are a lot of subtleties to doing it correctly.
Once again: I consider this an advanced technique that I highly recommend you practice in a controlled environment with a qualified instructor before you ever try it in the wild. Choose wisely, my friends.
Can a “microline” eliminate stuck rappel ropes?
What if a spool of kite string could pretty much eliminate stuck rappel ropes? That's what you get with the microline. Learn all about it here.
Premium Members can read the entire article here:
Andy Kirkpatrick mentions the microline in his outstanding book “Down”, so credit to him.
I have a longer video showing this technique in the Alpinesavvy Premium Member expert videos collection. It was made by expert alpine climbers Priti and Jeff Wright. Connect with them on Instagram (Priti / Jeff) and their website, alpinevagabonds.com
Disclaimer: this is an advanced technique, suitable in certain niche applications. It’s NOT meant for everyday use. Practice it thoroughly in a controlled environment before you ever try it in the real world.
What’s the best thing you can see when rappelling? Your rope falling happily from the anchor above, without getting hung up!
What's the worst? Your rope getting stuck, blown off to the side, or some other potential catastrophe!
What if you could (pretty much) guarantee that your falling rappel rope would never get stuck? Imagine your rope magically guided into your hands, without getting hung up or blown off to the side?
The microline does that.
Here's how it works:
You rappel normally on two strands, either with one rope, or two ropes tied together.
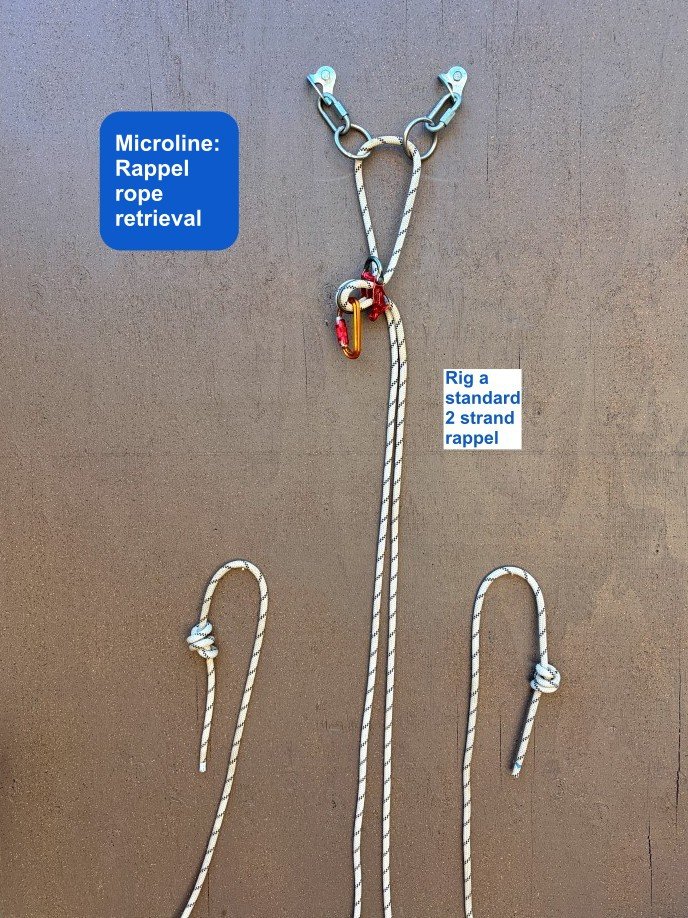
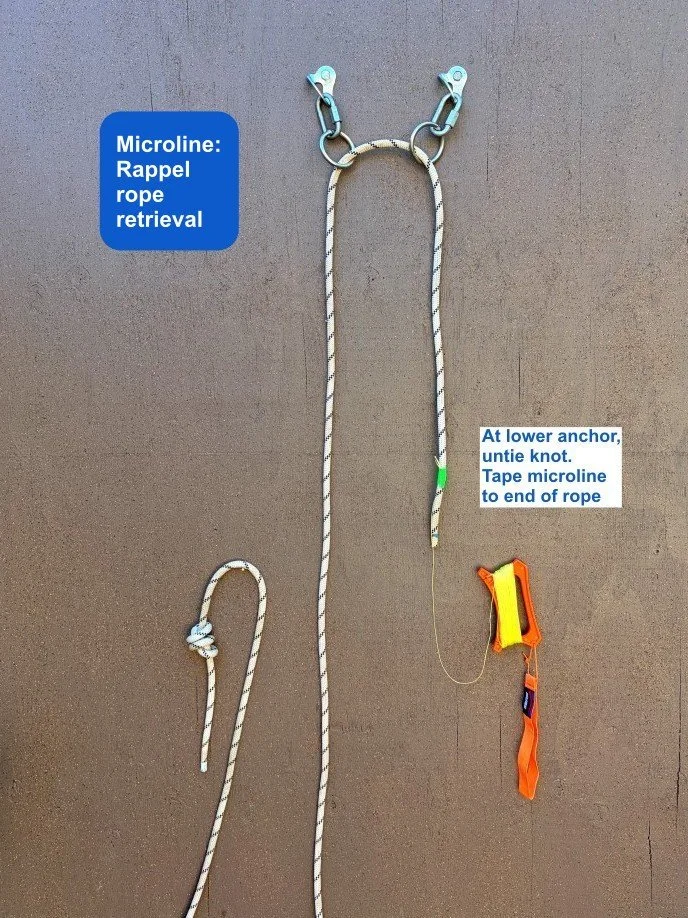
When both partners are at the lower anchor, untie the stopper knot(s). Tape the microline to the end of the rope that will be pulled up and through the anchor above you.
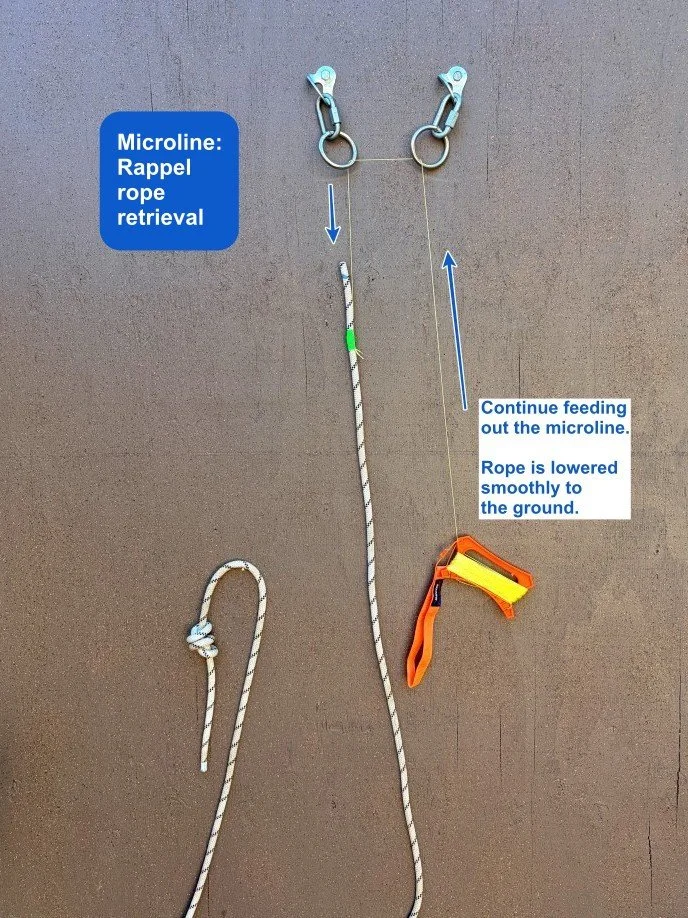
One partner pulls on the pull strand of the rope, while the other feeds out the microline. The rope and the line will pass through the anchor.
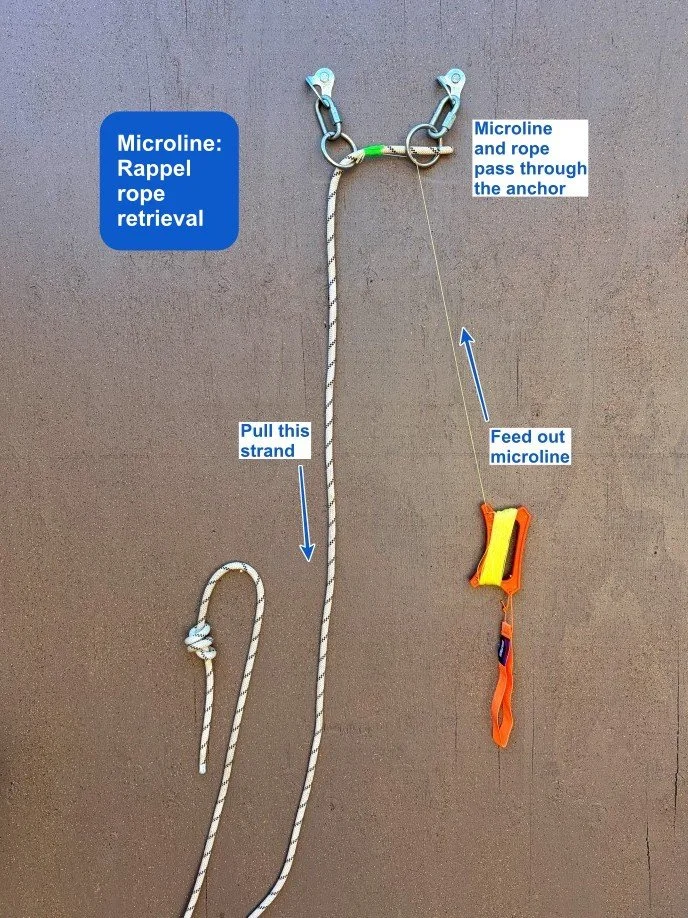
Now, instead of the rope free falling, it’s gently lowered down the rock face, by continuing to feed out the micro line.
Here's the key piece of gear for a microline - kite string winder.
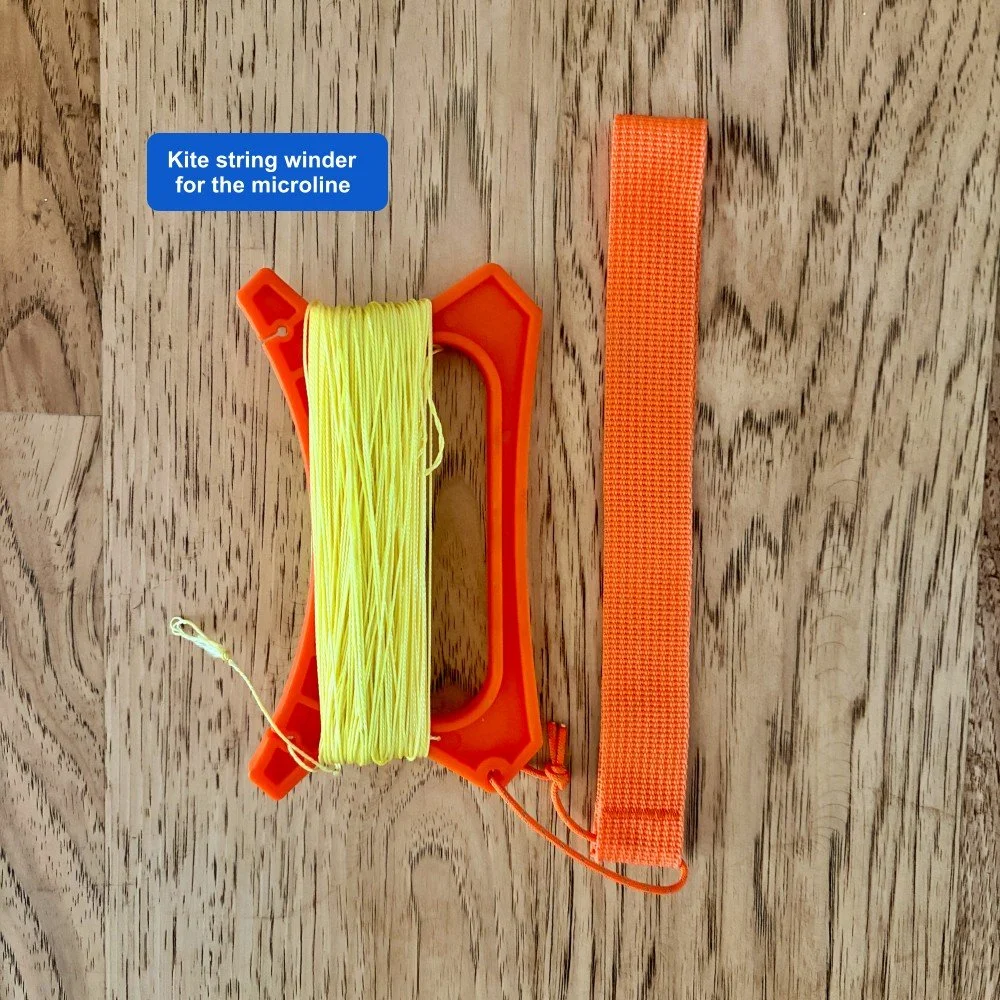
You need a spool of kite string that’s twice as long as your longest anticipated rappel. For example, a full length double rope rappel with 60 meter ropes requires 120 meters of microline.
(I've also heard of people using a fishing reel attached to a little stub of a fishing rod. I've never tried that; seems bulkier than the kite string, but potentially faster to wind up when you're done. Maybe good for single pitch cragging, but not for alpine climbing.)
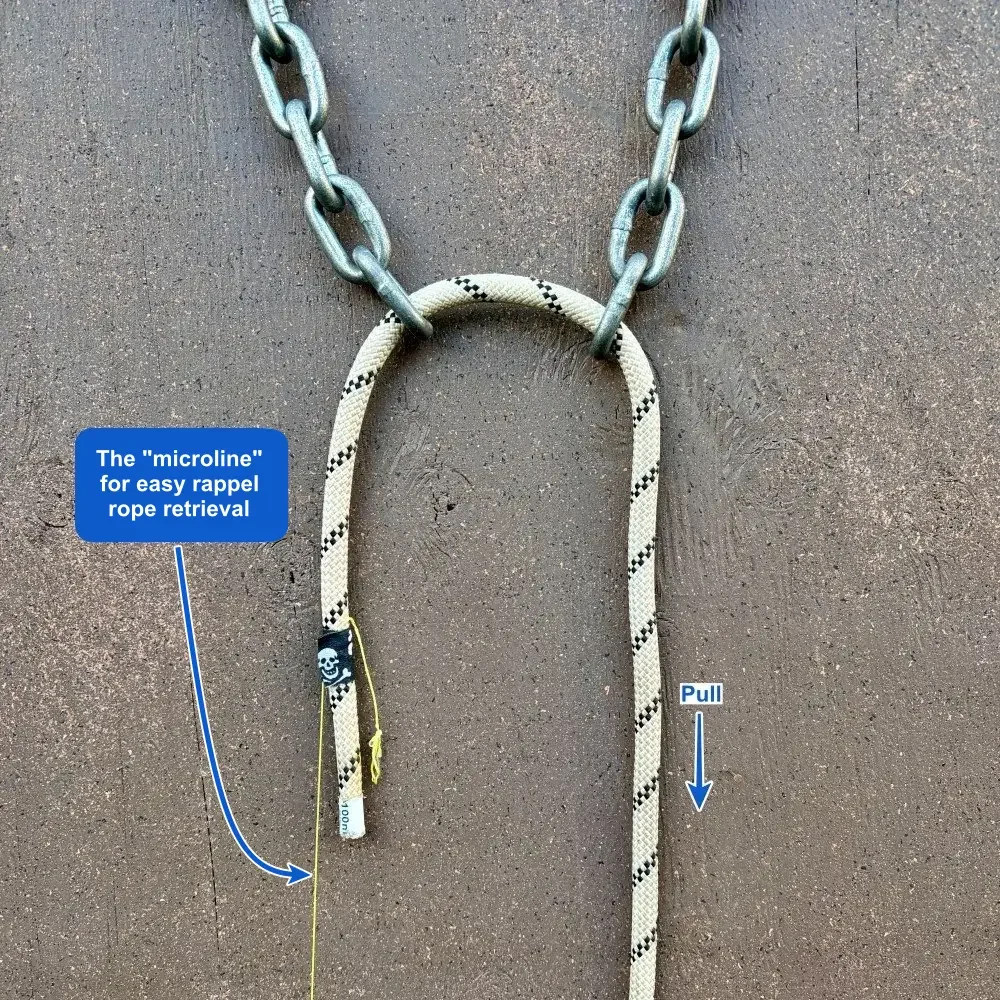
Before you pull your rappel rope, attach the microline with a clove hitch near the end of the strand that’s going up. Secure the hitch with a wrap (or two) of tape, and leave a bit of tape folded to itself so you can remove it easily.
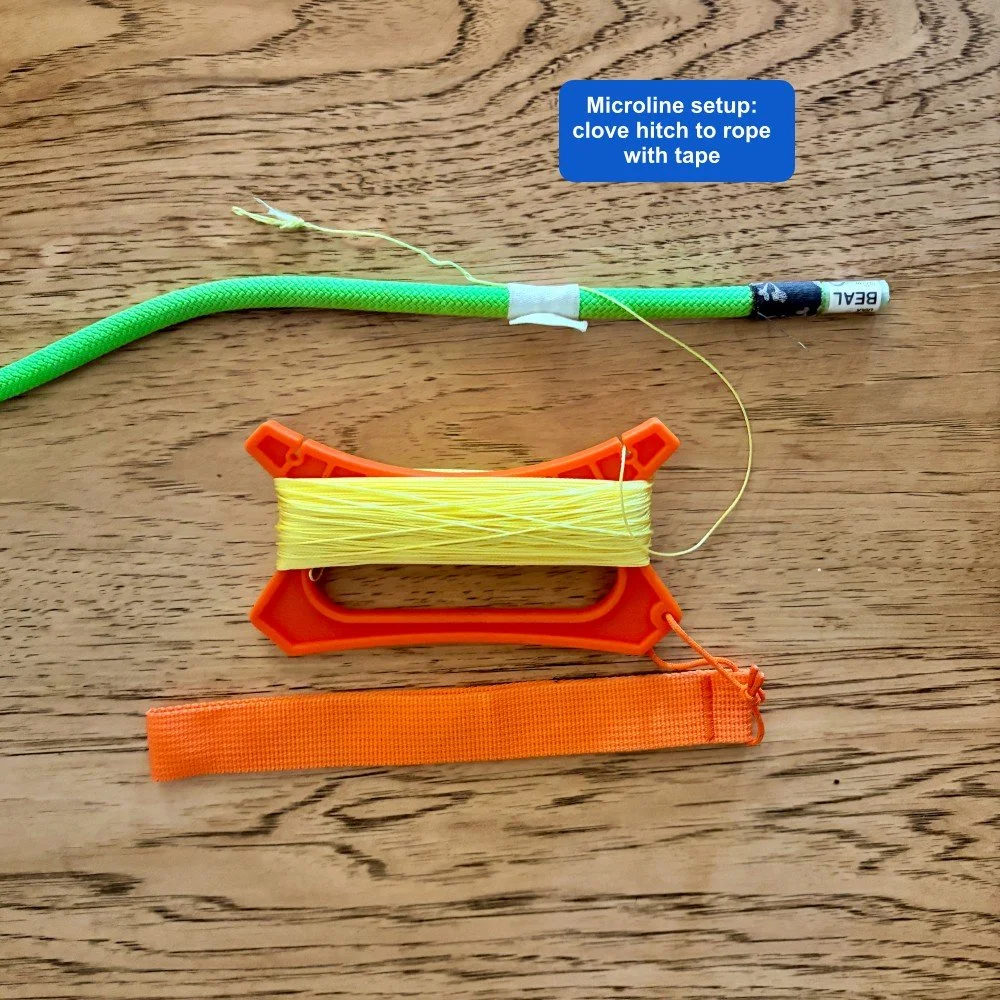
As you pull DOWN on the pull strand of your rappel rope, the microline feeds UP from the spool.
Having a small bit of tension on the microline prevents it from blowing around if it’s windy.
This is best done with two people; one slowly pulling the rappel rope, and the other one feeding out the microline. Don't pull the rappel rope too fast or you might break the microline. You can feed out the cord quite quickly by sort of waggling your hand back and forth.
As the end of your rope passes through the anchor, instead of free falling and potentially getting hung up or blown around . . . you keep feeding out the microline from below, which smoothly lowers your rope, slow and controlled, right back into your hands. YAY!
Remove the tape and clove hitch, and start winding the microline around your winder, pulling it back up to the anchor and down to you.
What are some rappelling situations where you might want to use a microline?
Want a link to where I bought my kite string?
How long does it take to wind up 120 m of line?
How much does it weigh?
How about a short video of the microline in action?