

Alpine Tips

Fixing a rope: Two knots to know
Securing one end of a rope to two anchor points, a.k.a. “fixing” the rope, can be handy in certain climbing situations. With some clever rigging, you can simply use the rope, with no slings or other cordage required. Here are two standard ways to do it: the bunny ears figure 8 and the Y hang.
This tip was written with the help of Bryan Hall, who is certified by the Society of Professional Rope Access Technicians (SPRAT) at their highest level.
Plus, high fives to Mikey Stevenson at The Rope Access and Climbing Podcast for making the nice video below that shows how to tie these two knots.

If you need to tie (aka “fix”) one end of a rope to two solid anchor points, you have many options.
Make a single master point from a sling and two carabiners, tie a bight knot, and clip the rope to it
Clove hitch to one bolt, tie a bight knot to the other bolt
You could use more exotic flavors of the bowline to make it easier to untie.
The example below are common in the rope rigging world, where strength and simplicity are guiding principles. Climbers should find these pretty easy to learn.
While it's not so common in day-to day climbing, there are some situations when you may need to fix a rope:
Big wall climbing, such as leading a pitch or two from the ground or your bivy, leaving the rope there overnight, and then ascending it the next morning to get a head start.
Needing to descend from a climb quickly, for some emergency reason (injury, lightning storm, darkness, etc.). You fix the rope, rappel the single strand, leave the rope there and (hopefully) come back and get it later.
Top rope soloing - get in lots of climbing time without boring your belayer to tears. (Note, rope soloing is an advanced skill. Please get qualified instruction before you do this.)
Some type of instruction scenario, where climbers are coming up one rope, and then rappelling down on another rope, which may be a single fixed line.
Other kinds of specialized rigging, like photography, caving or route setting.
General safety note about rope fixing: Keep the tail of the knot about 1 foot / 30 cm, no longer. The length of your forearm is a quick guideline. That's long enough to make the knot secure, but not so long that someone might make the potentially lethal mistake of rappelling off of the knot’s tail instead of the actual strand of rope. Yes, this sadly has happened. Proper length tails prevent it.
We're going to cover two methods, the bunny ears figure 8 and the Y hang. Here’s a nice video from rigging expert Mikey Stevenson at The Rope Access and Climbing Podcast showing how it's done. (The instruction on the knots starts about 2:50). Check out Mikey's YouTube channel for lots more expert rigging videos like this.
Method 1 - ”Bunny Ears” Figure 8
The bunny ears works well to secure one end of a rope to anchor points that are more or less side-by-side. This is a variation on the figure 8 on a bight, but you end up with two loops Instead of one. This one may take some practice, especially dressing the knot properly so there are minimal twists. Tip: start with making a larger bight than you think you need.
One cool thing about the bunny ears figure 8 is that the ears are adjustable. You can feed a bit of slack from one loop and pull it to the other side. This can help distribute the load more equally between two anchor points. You can do this when the knot is loose; after you snug it down, you can't adjust the ears.
Some people are concerned that the bunny ears figure 8 is not redundant, meaning if one strand were to be cut, it would pull through and the other strand would fail. This has been tested, and it doesn’t happen, so yes, the knot is redundant.
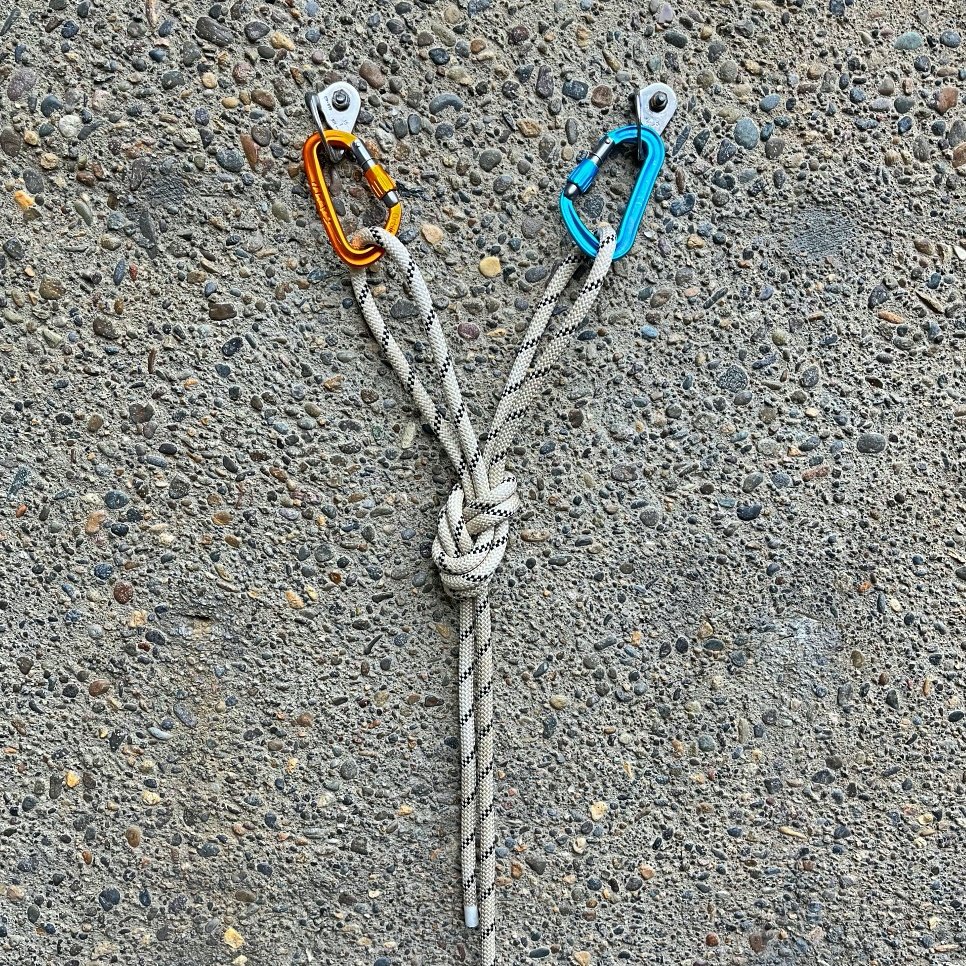
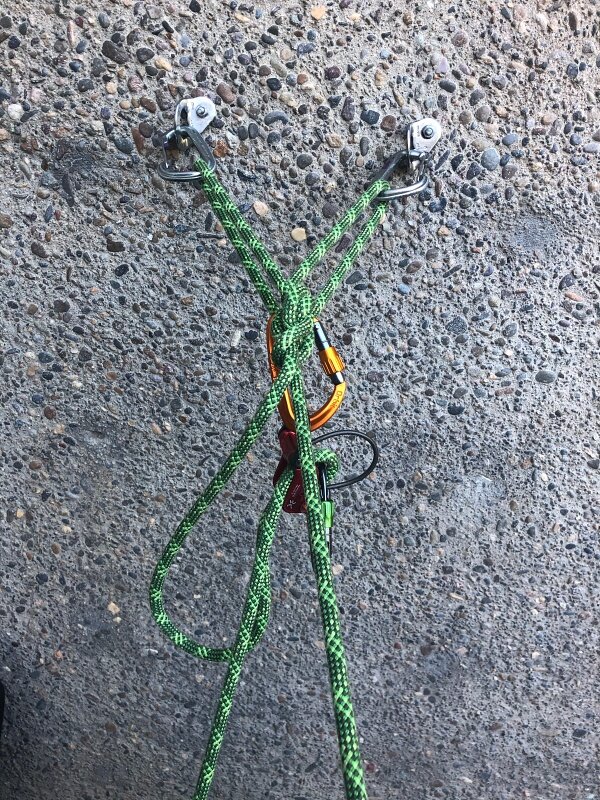
Method 2 - The “Y hang”
The Y hang can be helpful if the anchor points are vertically offset, if the load is coming from one side, or if the anchor points are side-by-side but somewhat far apart.
And, to be accurate, it's not really a single knot; it's a combination of two. That's why it's nice - it uses two knots every climber should be familiar with (as opposed to the seldom-used bunny ears figure 8.)
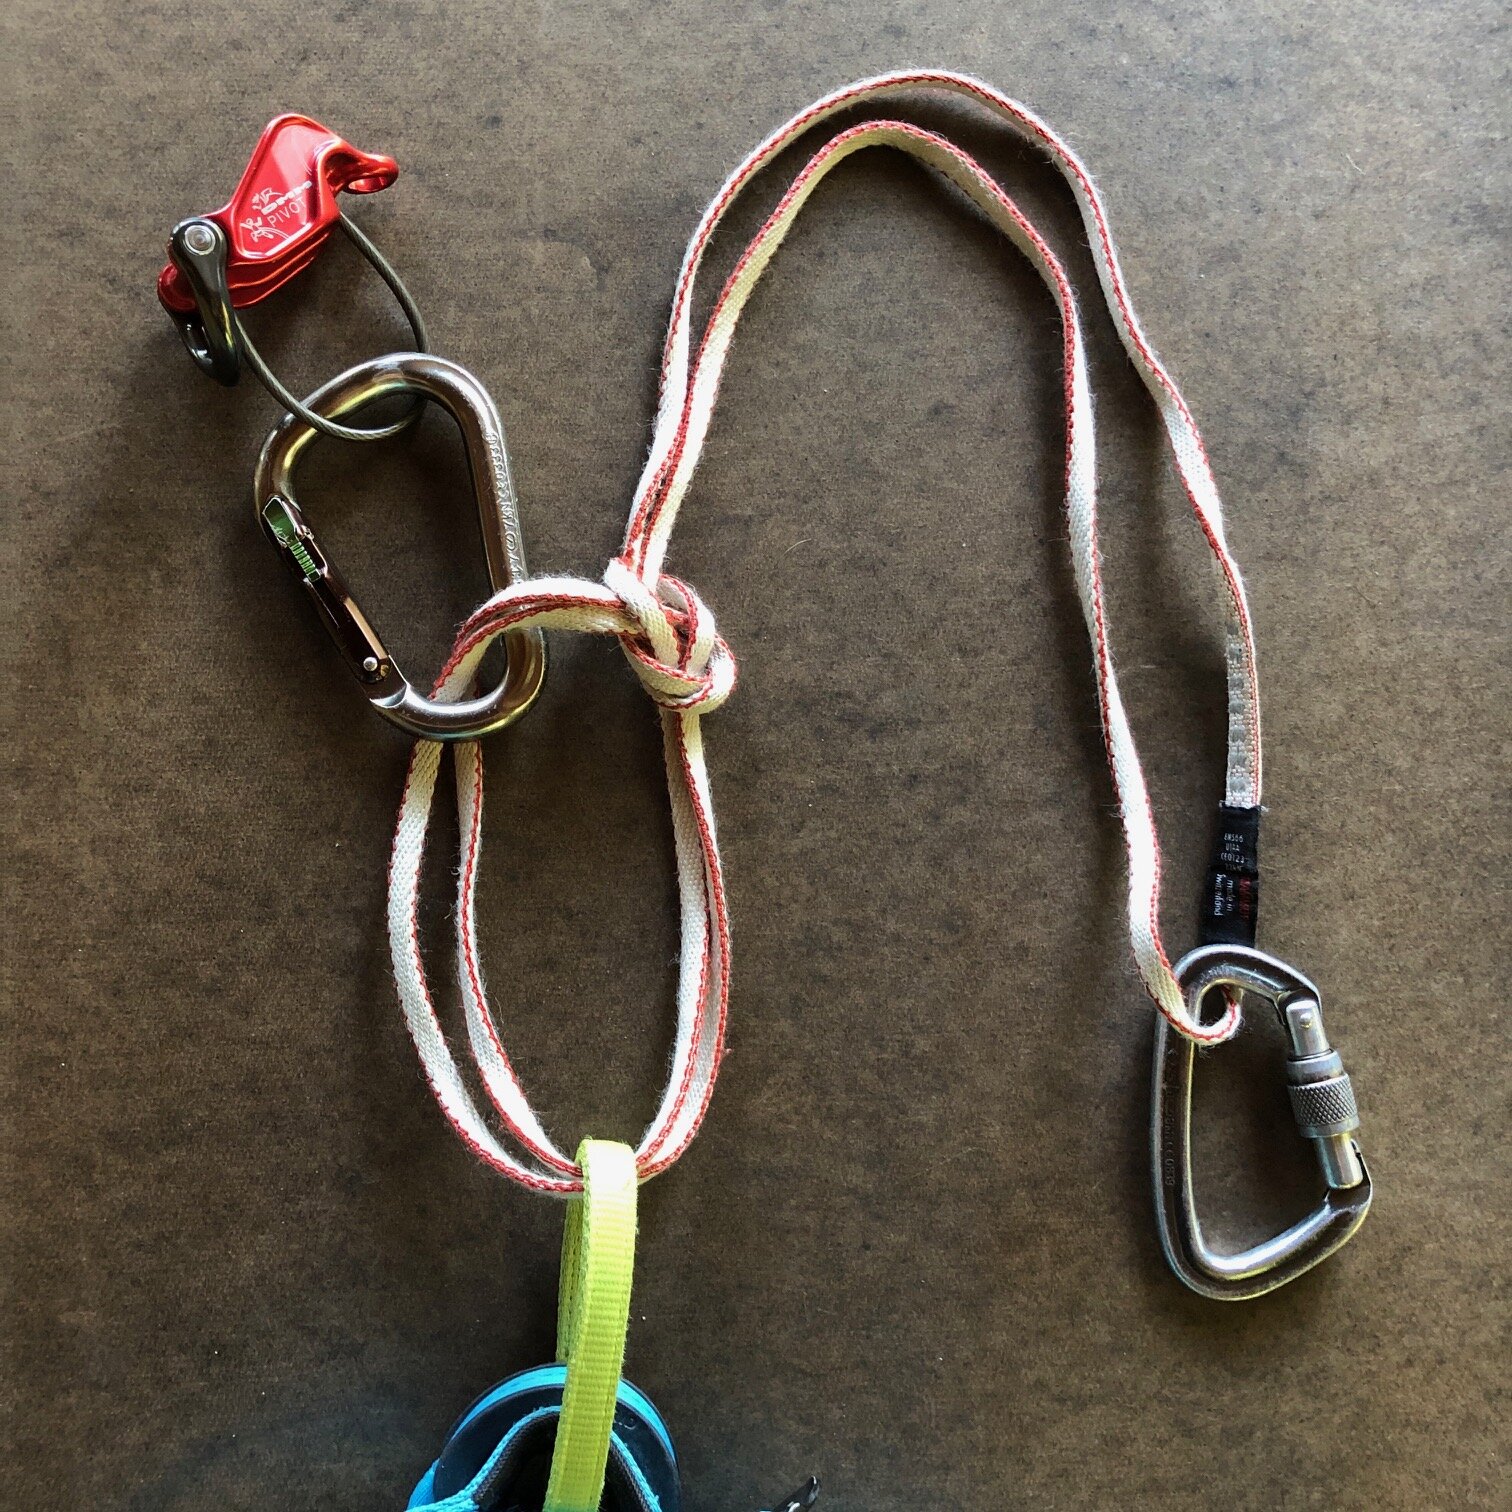
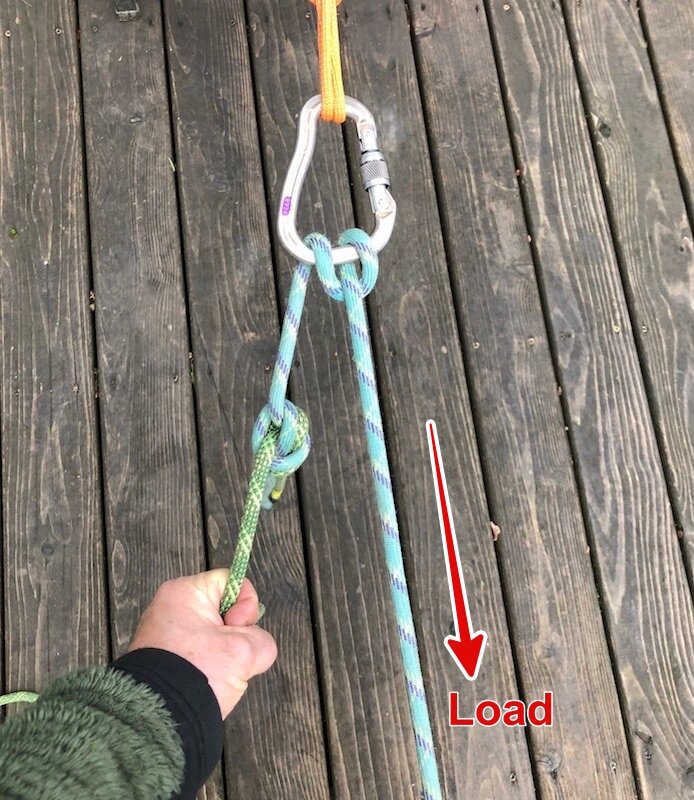
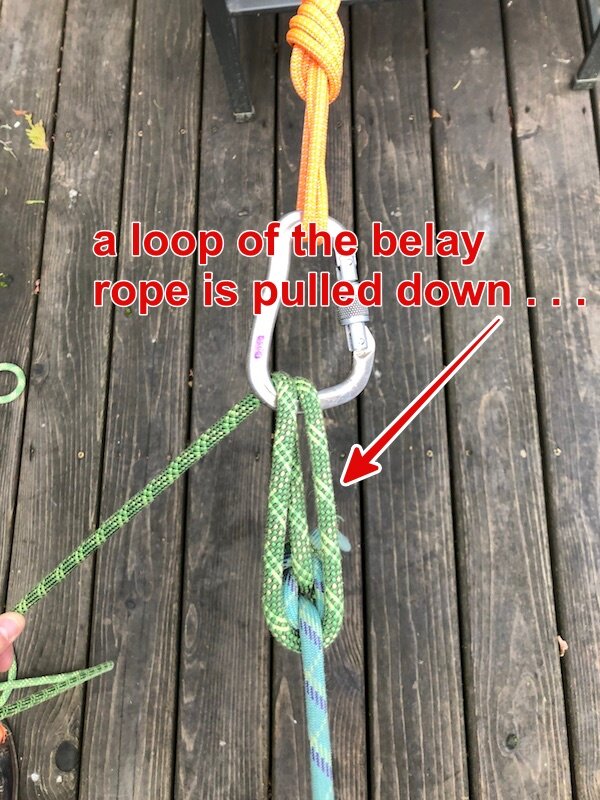
First, tie a figure 8 on a bight in one end of the rope. Make it tidy, with a small loop not much bigger than your hand, and a tail of about 12 inches / 30 cm. Clip it to the top anchor with a locker.
Next, tie a butterfly knot down the rope a bit. As shown in the video, the size of the loop can be adjusted by feeding rope into or away from the loop as needed. You will probably have to adjust it; tying a butterfly with the correct size loop on the first try is pretty rare.
Clip the butterfly loop to the second anchor point with a locking carabiner. When you weight the main rope, the load should be more or less equally distributed between the two anchors. (In the photo below it looks like there's a bit of slack going to the top anchor, but when the rope is weighted, the load is distributed pretty well.)
“Would a directional figure 8 could work here instead of a butterfly?” The answer is yes, but as far as I know it doesn't really offer any advantages. Australian rigging expert Rich Delaney said something to the effect of “a butterfly knot does everything a directional figure 8 can do”, and I tend to agree with him. IMHO, if you can tie a butterfly, there's not really a need for a directional figure 8 in recreational climbing.


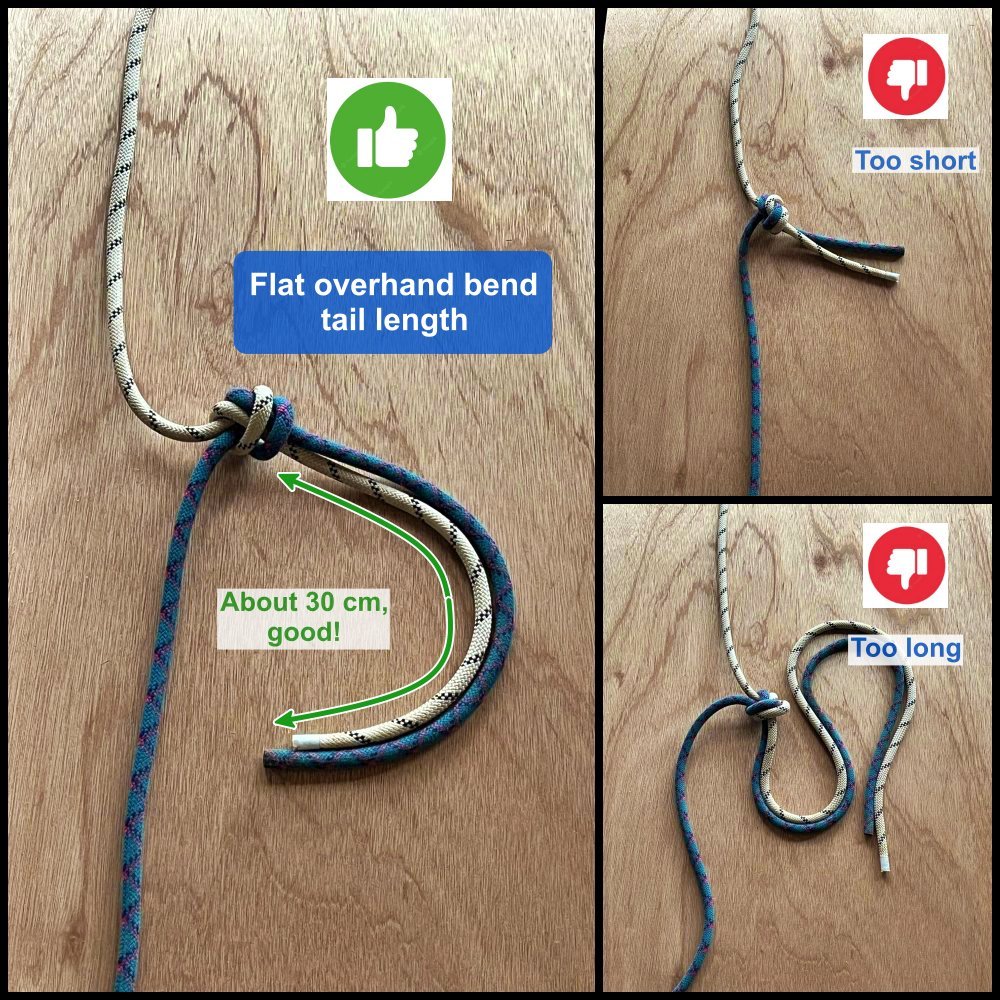
Flat overhand bend - how long a tail?
A flat overhand bend is a good choice for connecting two ropes for a double strand rappel. Pay attention to the tail length. You want it at about 30 cm, or the length of your forearm; not too short and not too long. Longer is not better, and has been the cause of fatal accidents.
A great knot choice to connect to rappel ropes for a double strand rappel is the flat overhand bend. (It was previously known by some as the “European Death Knot”, or EDK. Let's not call it that anymore, okay?)
Why is this a good rappel knot?
It’s known as an “offset” knot, because the body of the knot is offset from the line of pull. This can help the knot work its way around obstructions such as rock nubbins or ledges to lessen the chance of it getting hung up when you pull your rope.
Works well with ropes of different diameters (up to about 3mm difference). So if you want to connect a skinny 7.7 twin rope with a 9.5 single rope, no worries.
Super easy to tie and visually check.
It's plenty strong for any normal two strand rappel situation. (For a single rope rappels more common in caving and canyoneering, or for extra heavy loads, some recent research recommends a more robust knot. We’ll cover that in a future tip.)
It’s important to have the right amount of tail in the flat overhand bend. A good rule of thumb is about 30 cm / 1 foot.
Think of that as about the length of your forearm, or two hand spans. It's sort of the Goldilocks length, not too short and not too long. This length gives you a margin of error to prevent minor mistakes from becoming catastrophic.
If the tails are too short, the knot could potentially roll once or twice under an extremely heavy load and roll off the ends. A decent sized tail (hopefully) prevent this.
If you tie a sloppy, poorly dressed knot, a proper tail allows the knot to tighten up under load without pulling in the ends.
Not-too-long tails give you use of the full rope, which can be important in reaching the next rappel station if it's a real rope stretcher and you need every possible meter.
Proper length tails keep your nervous partner happy, and gives them room to add another overhand knot (aka stacked flat overhand bend) in the tail if they like, to give them a warm fuzzy feeling before they rappel. =^)
Many people think a longer tail is better. Not so. If the tails are too long, it increases the chance of someone mistakenly clipping their rappel device to the tails rather than the actual rope. While you may think this would never happen to you, this has caused fatal accidents to extremely experienced climbers, usually in darkness and/or from major exhaustion. Eliminate this potential mistake by having tails not too long, but just right.
If for some reason you’re ever fixing a rope (or using someone else's fixed rope) or tying two together like this, and the tails are longer than about 30 cm, at the very least tie a stopper knot in the ends, or tie them together, or do something to prevent someone from ever rapping off the ends.
Here are two accounts of tragic accidents where someone rigged a fixed rope with a long tail, and rappelled off the tail instead of the actual rope.
Fatal accident: Rappelling off the long tail of an anchor in Yosemite
Fatal accident: Rappelling off the long tail of an anchor in Baffin Island

Double loop bowline for a rappel tether
Using a rappel extension is a good idea for a lot of reasons. Here’s a crafty way to tie it with a double loop bowline. This gives you a strong connection, double loop redundancy, and it's easy to untie when you're done.

Using a rappel extension is a good idea for a lot of reasons, which we cover in detail here. Why might you want to use a rappel extension?
Easier to use a third hand / autoblock backup
Lets you use a stacked, or pre-rigged, rappel
Easier to rig your rappel device correctly, especially if you have on lots of clothing
Less chance of clothing getting caught in the rappel device
There are lots of ways to rig it, but I sure learned a new one from Mark’s class. It has a few benefits and is definitely a Crafty Rope Trick (CRT)!
A double loop bowline, tied through the belay loop (or tie in points). Why is this cool?
Easy to untie after its been loaded, much more so than an overhand knot.
Two redundant loops - for anyone who’s not too excited about rappelling off of a single loop of webbing, this is an elegant solution.
Because it's tied in a loop and does not cinch down like a girth hitch, it's fine to use this on your belay loop. Using your belay loop instead of your harness tie in points can make this more comfortable when it's loaded. If you prefer your tie in points, that works fine too.
Concerns . . .
“OMG, a ring loaded bowline, you should never do that, Yer Gonna Die!” If the end of the rope is anywhere near the knot, that’s probably correct. But here were using a sling, not a rope. In this configuration, it breaks at about 18 kN. As with all knots, tie it correctly and dress it well. When rappelling you're going to put around 1 kN on this sling, so no worries.
“OMG, a knot in Dyneema, you should never do that, Yer Gonna Die!” I feel that knots in Dyneema are acceptable in most climbing situations, which we cover in this article. But if you don’t, feel free to use a double length nylon sling; that works fine too.
“OMG, you’re attaching a tether to the belay loop! You're not supposed to do that!” Even though a belay loop is rated to 15+ kN, some folks are still hesitant to girth hitch a sling directly to it. But notice, that's not what's happening here. A girth hitch cinches down on the belay loop (and if you leave it pretty much permanently attached to your harness, which is NOT recommended) and can conceivably damage the loop through repeated rubbing in the same spot. However, this is a tied loop, not a girth hitch, which puts zero significant strain on your harness. But, having said that, if you're more comfortable using your two tie in points, go for it. We cover it at this article.
How strong a ring loaded bowline in Dyneema?!
Double loop bowline in Dyneema sling being ring loaded, breaks around 20 kN. From HowNot2 (about 6:30 in the video). A belay loop usually breaks around 15 kN, so think about that for a moment . . .

Here's how to tie it. This will probably be a new knot for most people, but it's simple and once you get it down, you can literally tie in a few seconds.
You’ll need a double length/120 cm sewn runner and your harness. First, a step-by-step with photos. There’s a video link at the bottom.
Pass the runner through your belay loop, from left to right. Keep the stitching at the far end of the sling away from you.
Cross two strands over to make a loop as shown. Important - Make the loop just as shown here, otherwise the knot will fail.
Pass the end of the sling up through the loop.

KEY MOVE: Instead of “running it around the tree” like a regular bowline, pass it “over the top of the tree” by passing the long tail through the small loop.

Pull on the right side of the double loop and the long tail. Voilà, you should have a bowline.

Dress the knot and snug it down. To test it, pull hard on the large loop. If you tied it wrong, the knot will collapse, or turn into a slipknot, or do something weird other than be a solid loop. (Like all knots, once you have it right, practice it 20 or so times until it gets into your muscle memory.)
When it's dressed and ready to go, it should look about like this:

Attach a locking carabiner and rappel device to the double loop, and your anchor tether locking carabiner to the end of the single loop. You're ready to rappel.
A video:

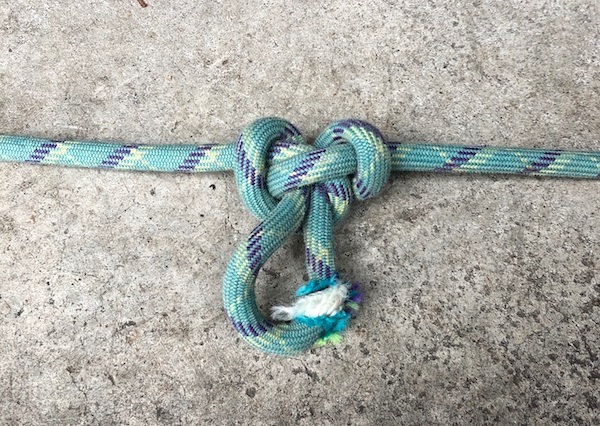
A better way to tie the figure 8?
The figure 8 knot (rewoven or on a bight) has a reputation for being difficult to untie after taking a heavy load. But, the problem might be with how you’re tying / dressing it, more so than the knot itself. There’s a subtlety that can make a big difference; learn it here.
Here are two seemingly identical figure 8 knots. But, there’s a subtle difference that can affect how easy it is to untie after loading. Can you see what it is?
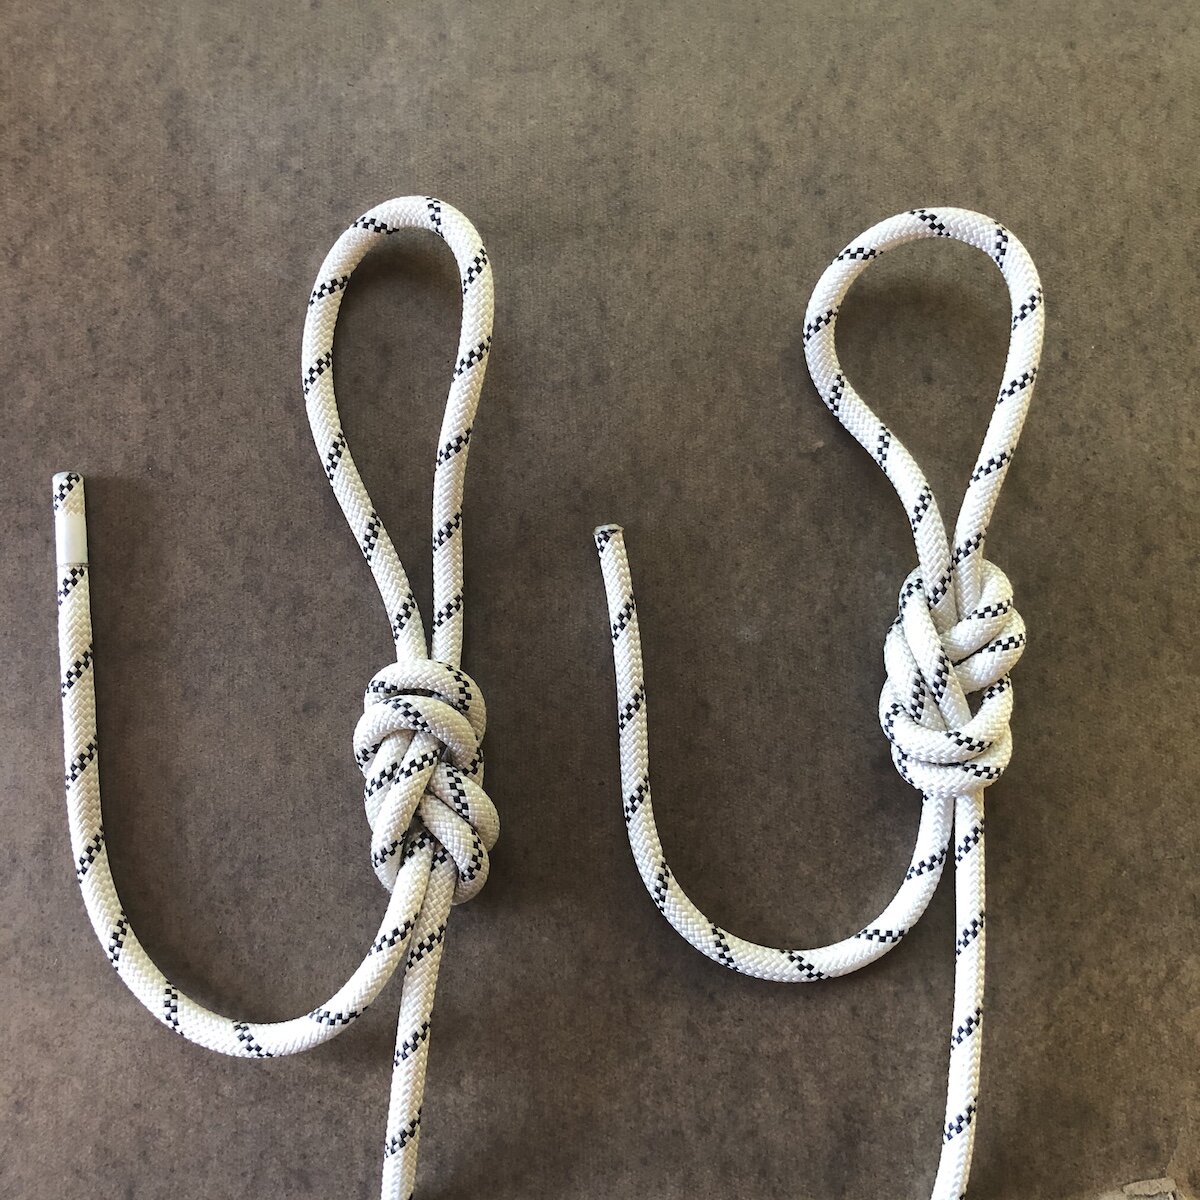
Let’s add some tape so we can more easily see what's going on. (Note the skull and crossbones hockey tape, my favorite for marking soft goods like slings! =^)
The load strand on the left comes out on the OUTSIDE of the knot. The load strand on the right goes through the MIDDLE of the knot.

Most people find the knot on the left to be significantly harder to untie. (It can depend a bit on how much load you're putting on it, the type / diameter of rope you’re using, etc.)
Why?
Load strand on the outside of the knot: When loaded, this cinches down on the entire knot, even to the point of partially deforming it. No loose strands, welded, hard to untie.
Load strand on the inside of the knot: the very top strand goes to the rope tail, and takes minimal load. This gives you a slightly looser strand to start with when you need to untie it.
Give this a try yourself. Try each version, load it with your full body weight, and bounce on it a few times. See which one works better for you!
Notes:
To emphasize, both of these knot variations are perfectly safe and acceptable to use.
Like with every knot, it should be properly “dressed and stressed”. That means no crossed strands, and pulling each of the four strands separately to snug everything down.
If you need to tie a bight knot and expect it to take a large load, a butterfly knot might be a better choice. It's almost always easier to untie than a figure 8.
The good news: if you tie a figure 8 the correct way, the load strand will almost always be in the correct position, as shown in the right side photo. (Check out the video below from the Swedish climbing instructor on one way to do this.)
If you’re a hotshot sport climber and taking loads of big falls working a project, you're probably good enough to tie in with some variation of a bowline. However, there are lots of bowline flavors, and they can be a bit hard to recognize and partner check, so I recommend a bowline only for more advanced climbers.
For beginners and intermediates, I strongly recommend using the retraced figure 8. It's been the standard tie-in knot for decades for a good reason.
Here's a YouTube video from the outstanding YouTube channel “The Rope Access Channel” where a rigging professional (Alex, he’s great) explains how this works.
Here's a short video from Swedish climbing instructor John Liungman on how to tie it with the load strand in the middle.
For a counterpoint, here’s Australian rigging expert Richard Delaney from RopeLab. Richard has a quick look at the methods of tying it, and concludes they're both equally easy to untie. (But notice he doesn't actually try to do it himself . . . )
I'm going with the Rope Access Channel on this one.

The "cowboy" figure 8 on a bight
Here’s a flashy, fun, and fast way to tie the figure 8 on a bight, one of the fundamental knots in climbing. (It just might give you a little smile every time you do it.)
What's a “cowboy knot? It's a way of tying a knot that's fast, flashy, and fun!
The figure 8 on a bight is one of the fundamental knots in climbing. Here's the cowboy version.
I learned this #CraftyRopeTrick a long time ago from the manager of a rock gym, and have loved it ever since. As always, dress your knot to remove any odd twists.
A figure 8 on a bight can be difficult to untie after it's received a very heavy load. If you need a bight knot in a high load situation, a butterfly knot might be a better choice.
This knot should always be loaded along the axis, and not “ring loaded”, or loaded across in two opposing directions. It’s possible for the knot to roll under heavy loading if it’s ring loaded. If you anticipate loading in strange directions, again a butterfly knot might be more appropriate.
Play around with this and enjoy!

The one handed clove (and munter) hitch
The one handed clove hitch is not really required for beginners, but there are some places where it can be very helpful. There are a few ways tie it, but also some ways to screw it up. Learn one solid method, and watch a couple of short videos on how to tie it and how to use it.
Big picture comment: When you’re getting started in climbing, a good approach to knots is learning ONE, and one way only, to tie all the important ones. It's much better to learn one method 110%, than to partially know several. After you've learned the basics inside and out, then you can get into variations like these.
I’ll admit, for many years I thought tying one handed climbing knots was pretty much a party trick. Like most climbers, I learned to tie the clove in a standard two handed manner (aka the “air clove”, because you tie it “in the air”). 90% of the time, I had some kind of a realistic stance where I could use both hands, or if not, I would clip a tether into the anchor. So, the air clove worked fine.
However, there are times when you’re at a precarious stance, getting pumped/scared, and can JUST get in a good piece of rock pro or clip an anchor bolt. Here, momentarily grabbing the carabiner / quickdraw and securing yourself in two seconds with a one-handed clove hitch is pretty damn handy! And, I have to say, now that the one hand version is firmly in my muscle memory, it’s pretty hard to go back to the two handed method.
Why learn the one-handed clove hitch?
It keeps you safely on belay while you are tying the knot.
It lets you dial in the correct length between your body and the carabiner.
It doesn’t twist the rope, such as the “air clove” does.
There are lots of YouTube videos on the one-handed clove hitch. Most that I've seen skip one critical point: You must pay attention to the direction of the carabiner gate. For the method I prefer, as a right-hander, I need the carabiner gate opening to to the RIGHT.
Once you get the method down, it's good to practice with both hands, with the carabiner facing in both directions.
Also a note for the nitpickers, this is not a “one-handed” version per se, because you still use your other hand to grab the carabiner / quick draw to stabilize it. I think of this as a much more practical, real-world way to do it, but if you want the true one-handed version, check out the video at the bottom.
There's a very similar method to this that's known as the handshake clove. The handshake clove results in the strand going to the climber (you) coming out the front of the knot toward you, as opposed to the back of the knot, facing away from you. There's no significant advantage to one or the other, so I'm teaching it the way I learned it which is not the handshake method. If you prefer the handshake and have some reason for wanting the rope to exit running toward you, then by all means use that.
For the one handed munter hitch, repeat this exact same process, except grab the right hand side of the rope (going from your harness to the quickdraw) with your right hand, thumbs down. Try doing this 10 times for each knot, and then 10 times with your eyes closed for each knot. That’ll help etch it to your muscle memory.
Safety note: There is one unusual situation where it’s momentarily and potentially unsafe to do this: If you’re the second, and you’re using this to tie in to the anchor as you arrive, and you’re being belayed off of a plaquette style device directly from the anchor. If you were to fall during the second or two that it takes you to tie this knot, there's a chance that the belay device will not catch you, because the rope strand from the device is no longer going downwards. If there's the slightest chance this could happen, it's slightly safer to tie an “air clove”, and clip this into the anchor. (I'll be the first to admit that this is an extremely unlikely situation for you to fall in the exact moment that the belay device is that a less than optimal angle, but I thought I would mention it for you safety enthusiasts.)
Now, for those of you who want the true one-handed clove hitch, here you go. I think I first saw this from Adam Fleming, adamflemingguiding.com, thanks Adam! Adam calls at the “party clove” because it's more of a party trick than a very practical knot, but it's still a fun one to learn. Just be careful not to get your thumb cut in there . . .
Here's a nice video by AMGA Certified rock guide Cody Bradford showing how a tying one handed clove hitch first thing at a marginal anchor is pretty sweet! (The rest of the video showing how he builds an anchor is great too.
While sadly Cody is no longer with us, his Instagram continues to stay up and is a great source of tips like this, check it out.

Knot geeks rejoice - this is your website
The Professional Association of Climbing instructors (PACI) in Australia has compiled a rather amazing library of technical articles related to knots and rigging. If you want to take a deep dive into climbing knots, this is a gold mine.
The Australian Professional Association of Climbing Instructors, (PACI) has a deep collection of technical articles on knot tying.
(Would you believe a 76 page article on just the bowline?! If you’re a rigger, rescue professional, or a citizen climber with a curiosity about knots and rigging, this website is a great place to start.
Many of the articles / papers are written by Mark Gommers, a man who clearly takes his work very seriously, and a guy I would love to meet someday.
Climbers should probably start with article number one at the top, simply called “Knots”. It's described as a: “Comprehensive compilation of life support knots - includes test data and tying methods”.
(Note: some of the PDF files are password-protected, but if you use the link below, they tell you the password most of the time, so access is easy.)
A rainy afternoon, a length of rope to practice with, and a big pot of tea are recommended accessories.
(The link below is best viewed on a big screen desktop/laptop computer, not on your phone.)
Here’s one page from the “Knots” article as an example. The below image is copyright PACI.com

image: copyright PACI.com

Make a stopper knot semi-permanent
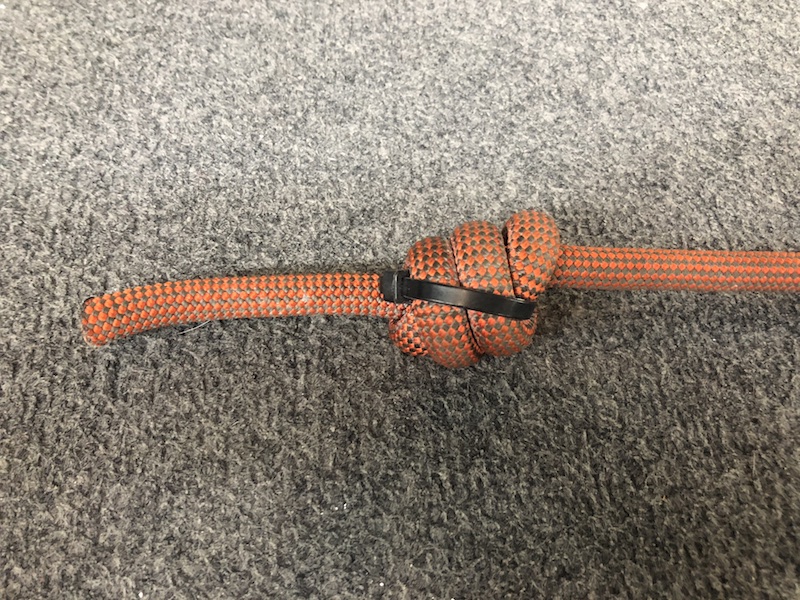
There may be a few rare times when you need to make a stopper knot semi permanent, but still have a way to easily untie it when needed. Answer: zip tie.
My local climbing gym, does this this on the belay end of every top rope. Pretty crafty! It’s not a tip for an everyday climbing situation, but hey, it might come in handy.
If you want to make a stopper knot semi-permanent, one way to do it is to run a zip tie through the knot and crank it down. The knot will be pretty much impossible to untie without cutting the zip tie.
Top roping with beginners all day and you want to be sure the rope system is “closed”, by always having a knot in the end of the rope?
Making a DIY lanyard with something like the Kong Slyde (or replacing the thick 9.5 rope in your Petzl Connect Adjust with something thinner, like 8 mm, hint hint) and need a permanent blocking knot in the end of the rope?
Ropes course?
Zip line?
Tree swing?
Caving?
SAR teams?
Riggers?
Window washers?
Who else might have a need for this?

The "Voodoo Hitch" - a magic tensioning hitch
Part tensioning hitch, part rope sorcery. Plus, it has a great name. You don't need to learn the “voodoo hitch”, but you should. Tie it 10 times, you still probably won't figure out how it works.

Let's start with a little honest disclaimer right off the top: This bit of rope wizardry is probably not something you will use in very many climbing situations. However, if you’re an aficionado of #CraftyRopeTricks, well, this is one of the craftiest you’ll see! It's halfway between a knot and a magic trick. The day I learned it, I tied it a dozen times and was still scratching my head as to how it works.
The voodoo hitch is a way to add a moderate amount of easily adjustable tension to a fixed rope. (It's somewhat related to the the trucker’s hitch, an extremely useful knot that just about every outdoors person should know. Here's a nice short video that shows how to tie a trucker’s hitch.)
The voodoo hitch is known by a few different names. Some call it the rather boring “Transport hitch”, others the “PM hitch”, which stands for “Pure Magic”. (I've even heard it referred to as the WTF hitch. =^) The way I learned it is the “voodoo hitch”. You'll learn why it's called a voodoo hitch after you tied a few times and see how it miraculously holds tension when it sure likes like it wouldn’t.
Like the trucker’s hitch, the Voodoo creates a 3 :1 theoretical mechanical advantage - you need to pull 3 meters of rope through the system to move the load 1 meter. But, because of all the carabiners adding friction, the real world mechanical advantage he's pretty much 1:1.
Just get a climbing rope and a few carabiners and try out this rope sorcery. It's cool, magic, and fun.
Here’s what's nifty about the voodoo hitch (and how it differs from the trucker’s hitch:)
You can fine-tune the tension on the rope without untying and re-tying the knot.
There's no lock off half hitch required, the voodoo just magically holds tension by itself.
A few notes:
I was taught this knot in a canyoneering class using all clove hitches. Clove hitches work, but there are several other knots work fine too, such as a butterfly or figure 8 on a bight. I’m liking the butterfly knot, because it's easy to untie after it's been loaded.
You can use any kind of carabiners for this: lockers, non-lockers, large belay lockers or tiny wiregates.
You can use pulleys to make tensioning the system a bit easier, but don't use them everywhere. Friction holds the whole thing together, see below. If you use pulleys at every redirect point, it fails.
How does it work? Opposing tension, or friction, or voodoo, or magic, or something? A clever Alpinesavvy fan on Instagram (@govanathon) shared this: “3 stands on one side of the sliding carabiner, 2 stands on the other side. Moving one way lengthens 3 while shortening 2 so net tension increases. Moving the other way lengthens 2 while shortening 3 so net tension decreases. Friction on at least 1 redirect point is necessary to hold the tension or the rope will just feed through the system and loosen.”
Here’s a good article on the Voodoo hitch, along with this nice graphic. (Note, the end of the rope is fixed at point A.)

As with pretty much anything related to learning knots, this is a better show than a tell. Check out this short (2:20) video that shows you exactly how to tie it.
Finally, if you really want to nerd out on the voodoo hitch, here is a deep-dive video from my pal Ryan at HowNOT2.com.

The “Snap Bowline” - a very crafty knot
The bowline can be a helpful knot for climbers to fix a rope around a tree or boulder. But, many people it tricky; the “rabbit coming out of the hole and running around the tree” thing is not as easy as it might sound. Check out the “snap bowline”, where a slip knot and little bit of rope sorcery semi-magically cause a completed bowline to “snap” into place.
Note: when used in climbing applications, the “simple” bowline as shown below in the photos is NOT considered safe unless the tail is backed up in some way. This is typically done with a barrel or overhand knot in the tail. (Having said that, knowing how to tie a bowline is helpful in many different non-climbing applications, even the “simple” version shown here, so it's still a great knot for the tool kit.)
If you want a deep dive into proper application of knots, the Australian Professional Association of Climbing Instructors (PACI) website is a great place to start.
Ah yes, the bowline knot. A favorite of sailors, Boy Scouts, and sometimes climbers, commonly used to tie the free end of the rope around a boulder or tree as a fixed line, or possibly stringing up a tarp.

However, for some reason, this knot is deceptively difficult for many people to tie correctly. (I’ve seen otherwise very experienced climbers screw this knot up on many occasions.)
Many people seem able to tie it properly in a somewhat controlled setting, like practicing it around a table leg. But put them on the other side of the rope, or make them tie it facing a different direction than usual, or some other minor switcheroo, and “knot dyslexia” seems to set in. And, to be honest, I’ve experienced this myself a few times.
Well, there’s a very cool way to tie a bowline that seems to solve all these issues. It’s fast, reasonably idiot proof, and most people find it much easier than the old-school “rabbit comes out of the hole, around the tree and back into the hole” method. And, as with some of the best rope techniques, and there is a bit of rope magic happening that would make you blink and say “Dang, did I just really see that?!”
Pass the end of the rope around your anchor object, here a post.

2) Make a slipknot.

3) Pass the end of the rope through the loop of the slipknot. (Keep the slip knot and loop fairly loose, as you see here.)
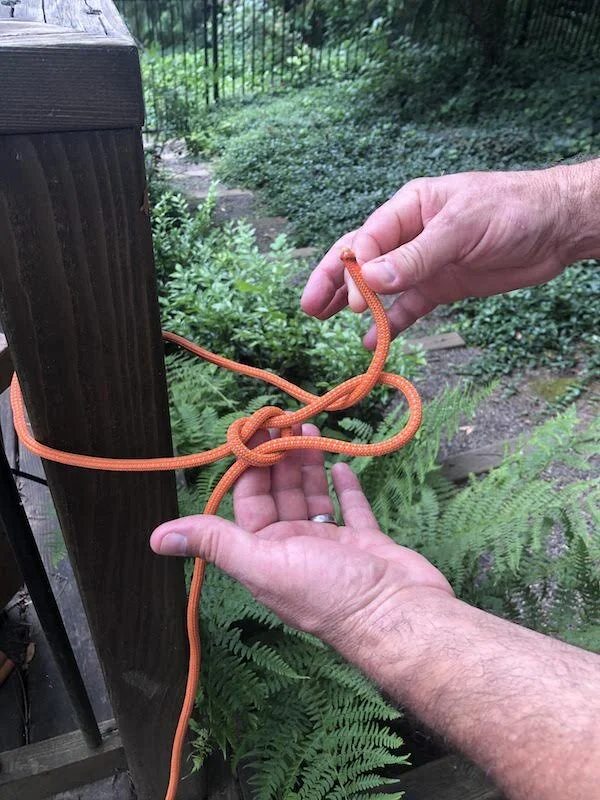
4) Tighten the slipknot. It will invert and make a “snap”, then you should magically have a bowline. (Note, for climbing, you need to tie this with a longer tail of a foot or so, so you'd have enough rope to tie a proper backup knot in the tail. But for setting up a tarp, this should be fine)

Yes, you need to try this a few times at half speed to see this sorcery for yourself, it really is sort of a magic trick!
Note: depending on how you feed the free end through the slipknot, the final version of your bowline could be in one of two configurations.
One, you may end up with the free end inside of the loop (as we see above) which is the standard garden-variety bowline. Or, you may end up with the free end outside of the loop, which is known in some circles as a “cowboy bowline.” Even thought knot-nerds love to argue about it, one is not conclusively stronger / better / preferable to the other, so it appears not to really matter which way the tail ends up. You can read more on this discussion here.
“Standard” bowline on left, “cowboy” bowline on right.

As we like to say at Alpine Savvy, most any sort of hands on skill like learning a knot is a better show than a tell.
Here’s a short video that shows you how to do it. First example is around your waist, second example is around a tree. (There's probably some crazy rescue scenario that I hope never to be involved in that might require someone lowering a rope down, and me tying it around my waist like this. Unlikely to ever need it, but fun to practice!)
Finally, here’s an example of why you want to dress your knots, use a backup, and avoid cross loading a bowline. (Yes, this is a large diameter rope, and yes, it’s tied too loosely and not dressed, but it's still an interesting demonstration.)

"Webbing knotcraft" video from canyoneer Rich Carlson
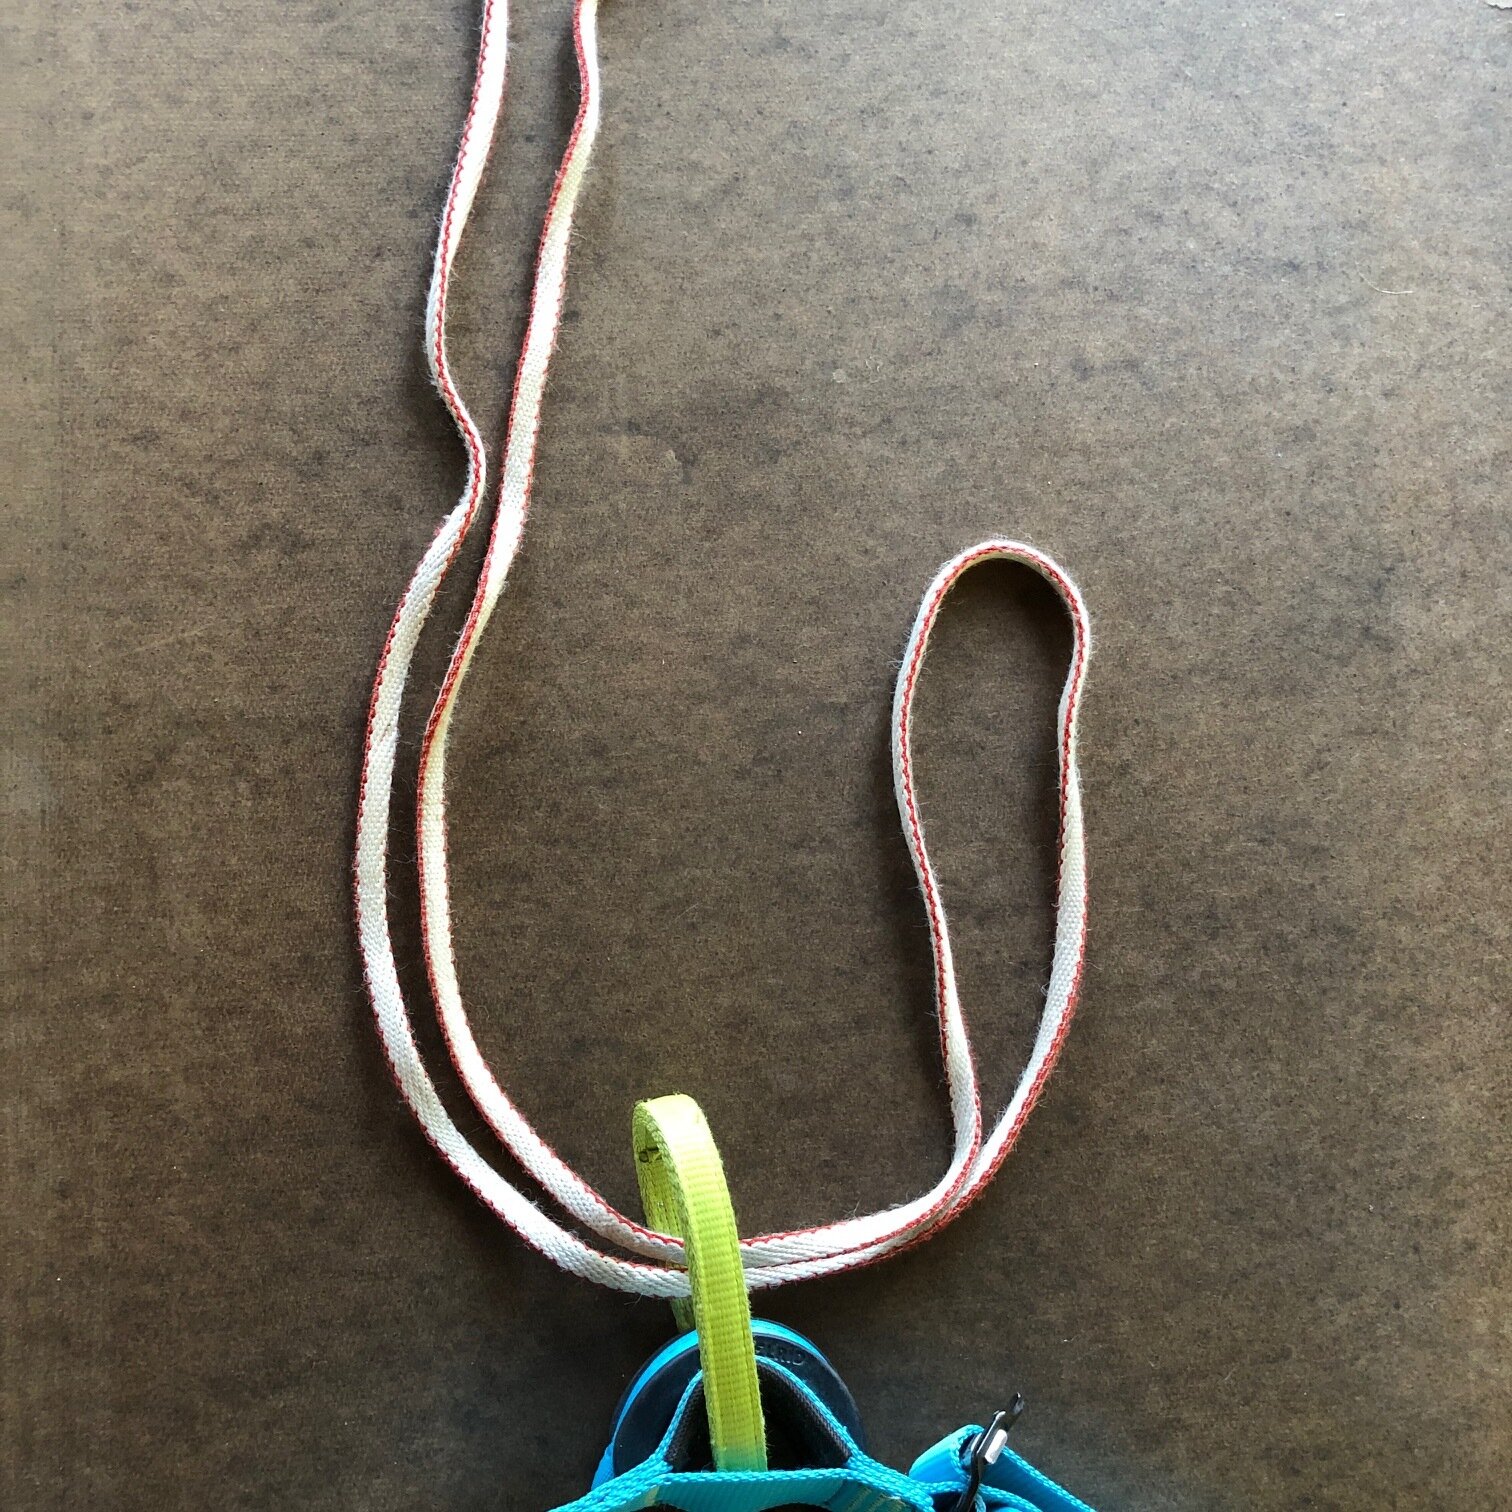
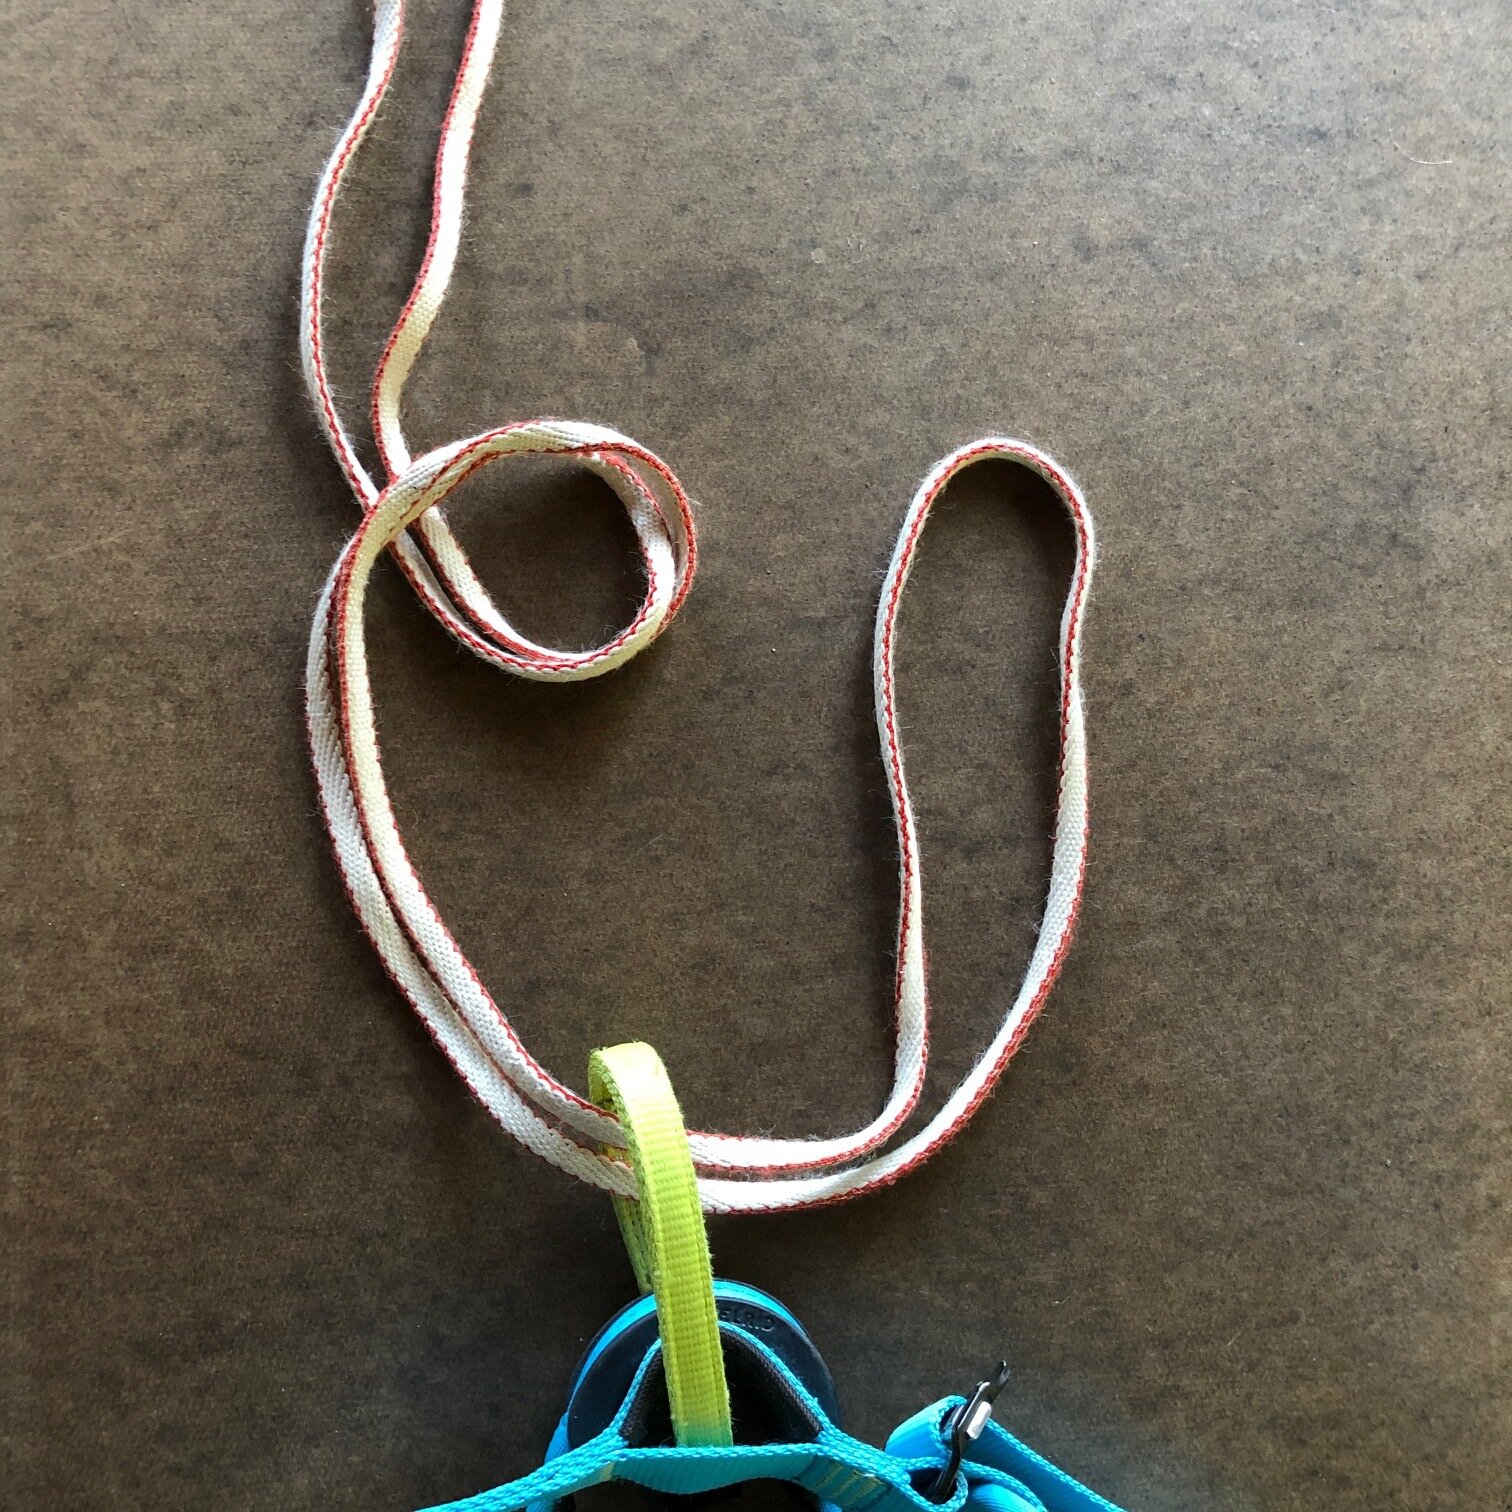
Every climber knows how to tie a water knot in webbing. But, there is a lot more you can do with a length of webbing, and canyoneers know all the tricks. Check out this video by canyoneering expert Rich Carlson to learn a few of them.
Connect with canyoneering expert Rich Carlson on his website, Canyons & Crags, and his great Youtube Channel
Sure, you know how to tie a water knot. But there's a lot more you can do with webbing, and canyoneering folks are experts at webbing related Crafty Rope Tricks (CRTs).
Webbing tends to be 1” for canyoneering, but climbers who favor the lighter 11/16” can do all the same rigging. See more climbing gear strength ratings here.
1” webbing = about 18kN
11/16” webbing = about 13kN
Alpine climbers often find that having a few 9 foot long tied runners with tubular webbing can be handy. You can use them as a standard double length runner, or use them for many of the “knot craft” techniques shown below. Read more on that here.
Some crafty rigging you can do with tubular webbing (all shown in the video below:)
When tying a water knot, what's the minimum recommended length of the tails? What's a quick way to check this when you’re tying it?
Do you know how to tie a re-threaded overhand knot in webbing around an object like a tree trunk?
If you basket hitch webbing around a tree, what are the downsides of tying an overhand knot at the master point?
Tying a knot in webbing may weaken the webbing by about 1/3. If you wanted to retain more strength, how can you position a knot (on say a tree) to do this?
What’s a “wrap 2, pull 1” anchor? What are some cases when you might want to use this?
Is a “wrap 2, pull 1” anchor redundant? (Answer, no.) How can you tie it to make it redundant?
How do you use a Frost knot to set up a courtesy anchor?
You get the idea. There’s lots of Crafty Rope Tricks beyond the water knot!
See an excellent video here by canyoneering expert Rich Carlson covers these tips and more.

Carabiner inside the master point knot
If you clip a carabiner inside the master point knot on your anchor, you probably won't have to resort to your teeth or needle nose pliers to get it untied.
Now, if you've been at the game for a while, you may know this Crafty Rope Trick (CRT). But it seems to be new to a lot of folks, so it's worth a mention.
When you're tying off a runner or a cordelette for a statically equalized anchor, that master point knot can be very difficult to untie, especially if you’re using skinny webbing, or it gets wet, or if it takes a big load, or all of the above.
To make untying it a lot easier, clip a carabiner in the master point knot after you tie it, and before it’s loaded.
Important: This carabiner is not load bearing at all, and you should not clip anything to it. It’s only purpose is to make untying the knot easier when you break down your anchor.
Try to use a notchless / keylock carabiner with a small nose on it so you can easily unclip it from the loaded knot. In the photo below the carabiner is a locker, but it doesn’t have to be.
The black locking carabiner inside the master point knot will make untying the sling a lot easier.


Cordelette - Connect the ends with an overhand knot
Yes, every climbing instruction book tells you to use a double fisherman's knot to tie your cordelette into a big loop. Guess what: the overhand knot works fine.
Yes, an overhand knot. Yes, the same one you use to tie two ropes together to rappel. (If you want to get technical it's a “flat overhand bend.” previously known as the Euro Death Knot, of EDK).
Or, to really keep it simple just carry your cordelette completely untied, also known as an “open” cordelette.
Tie a small overhand loop in each and, a.k.a. bunny ears style
Want a traditional big loop? Tie with a flat overhand bend.
Hey, if you're happy keeping your cordelette pretty much permanently tied into a loop with a double fisherman’s knot, feel free to keep doing it that way. But, if you see somebody tying a cordelette as shown below, don't freak out about it, it's fine.
Just like if you were using it to connect two rappel ropes, make sure you've got a nice long tail at least 6-8 inches, and make sure the knot is “dressed and stressed” - properly snugged down
Update: a reader mentioned on a related Instagram post that if you’re using a 5.5 mm HMPE “tech cord”, at least one manufacturer recommends using a triple fisherman's knot to tie a loop, because this material is more slippery than standard cord. So, if your cordelette is made of tech cord, probably best to avoid the flat overhand bend.

Note the striking resemblance to the Flying Spaghetti Monster . . .

Knot close up: Yep, that's your garden-variety flat overhand bend. (And please don't call at the European Death Knot (EDK), we're trying to get away from that, okay?

Hey, don't take my word for it. Here's a photo of an anchor made by IFMGA Guide Dale Remsberg, taken March 2019. Notice the flat overhand bend connecting the cordelette ends.

and, in an email to me from internationally certified guide Rob Coppolillo, and co-author of “The Mountain Guide Manual”:
“I have my cordelettes tied with flat overhands right now....and I'm liking it. Easier to untie, etc. Only time I do not leave it tied as such, is what I'm using the cord as one big loop (as in, not tying it off as a distributed, redundant anchor material).
Indeed, the flat overhand starts rolling at relatively low loads, but in the testing I've seen it rolls once or twice, then quits....unless of course the load stays on it indefinitely.
Does this make sense? So, I guess I'd say, go for it with the flat overhand...but if you're using the cord as one big loop, maybe take the time to tie a double-fisherman's, if you foresee high loads.“
And, one more endorsement, this time from a video made by Ortovox and the German Mountain and Ski Guide Association - some folks who know what they're talking about. In this video about building multi piece gear anchors, he says at about 2:20: “I fix the optimum height of the anchor by tying an overhand knot (in the open cordelette).” Screen grab below of overhand knot; See the video here.


The MOFT - a very Crafty Rope Trick
The “MOFT”, what da heck is that?! It’s a very Crafty Rope Trick (CRT) you can use if you ever need to lower someone two rope lengths.
Note - This post discusses techniques and methods used in vertical rope work. If you do them wrong, you could die. Always practice vertical rope techniques under the supervision of a qualified instructor, and ideally in a progression: from flat ground, to staircase, to vertical close to the ground before you ever try them in a real climbing situation.
I first saw this tip from IFMGA Rock Guide Karsten Delap. Connect with Karsten at karstendelap.com
“MOFT” stands for Munter Overhand Feed Through”. It’s a very #CraftyRopeTrick that allows you to pass an overhand knot that’s connecting two climbing ropes directly through a munter hitch (or a Super Munter hitch, which adds more friction) either when lowering or (less common) when rappelling.
There may be a few (probably rare) times when you may need to do this, such as:
You partner is injured 100+ meters up. They are not able to rappel on their own. You tie two ropes together, and lower the injured person 120 meters at a time using an MOFT. You then pull up the ropes and rappel normally. (Or, if it's a serious injury, fix the rope, rappel the single line and come back later and get your rope.)
You, experienced climber, are on an alpine route with two relative beginners. On the descent, there’s a long section of fourth class rock and 50 degree snow that the beginners cannot easily manage unroped, but you can safely down climb. You tie both the beginners in close to the end of the rope and lower them both down two rope lengths / 120 m off of a bomber anchor, with a MOFT. When they are on safe ground, you then break down your anchor, untie the rope, toss it, and down climb. Instead of six rappels, you’ve done one lower and a down climb. Everybody down fast, no rappelling, no beginners having to pass the knot.
You and your partner are descending a big wall route with your haul bag. You’re within two pitches of the ground. You tie two ropes together and lower the pig to the ground, using an MOFT to pass the knot. You secure one end of the ropes to the anchor. Partner 1 raps to the ground on a single strand, passing the knot on the way. Partner 1 unties the rope from the pig. Partner 2 pulls up the rope and does two raps to get to the ground. Because, rapping with the pig is generally a hassle and best avoided when possible.
Notes . . .
This is a fairly advanced maneuver that you absolutely need to practice before you try in the real world. It’s definitely strange, at least it was for me the first few times I tried it, and I did not find it very intuitive. In fact I had to do it a few times in slow motion to really understand what was going on!
Practice both the lower and the rappel. The concept is pretty much the same, the execution is slightly different.
First off, for lowering practice, you need some tension on the rope to really do this right. The easiest way is to have a friend just lean back with body weight on the rope a few feet away (on a flat floor please, not on a cliff the first time you try this!)
Second, you’re going to be lowering and rappelling on a munter hitch. Be sure you know how to tie it, and how to lower on it. Use a friction hitch backup attached to the brake strand of the rope, and clip the hitch to your belay loop with a locking carabiner.
Third, this requires a large diameter HMS, pear-shaped locking belay carabiner. Sidenote, if you want to learn what “HMS” means, click here.
Good choices for a carabiner would be the DMM Boa, Black Diamond Rocklock (photo below) or similar extra-wide carabiner. Do not try this unless you have a wide HMS carabiner, or else the knot could get stuck.
This works best on skinnier ropes. Any rope under about 9.5mm should be fine.
Photo: CAMP Core Lock on the left, Black Diamond Rocklock on the right. You need a large HMS carabiner like this for the MOFT.
Here’s how it works for lowering. (It’s pretty much the same for rappelling.)
Tie two ropes together with a flat overhand bend.
Tie your partner in one end of the rope.
Tie a munter hitch onto the large diameter carabiner on the anchor master point, and start lowering your partner. Back up your lower: put a friction hitch on the brake strand and clip it to your belay loop. (For clarity, not shown in the photos below.)
When the knot connecting the ropes arrives at the carabiner, continue lowering (or rappelling) slowly. Try to assist the tails of the rope through the carabiner, but do it carefully so your fingers don’t get caught. Yes, the overhand bend will pass THROUGH the Munter hitch and carabiner! (Like I said, Crafty Rope Trick for sure!)
If you're lowering someone, if they can stand up for a moment and take the weight off the rope when you do this, it’s a lot easier.

If you did it right, once the knot passes through, you’re going to have what looks like a strange looking mess of three strands of the lowering rope coming down from the carabiner, looking something like this. Don't worry, that's what it’s supposed to look like.
The “U” shaped loop of the munter is caught on the overhand bend. Yes, this looks like a mess, but there’s an easy fix. When you’re practicing, this is the part you may want to do slowly to see what’s going on.
Try to keep this loop small. The larger it is, the more you're gonna drop your partner which they probably won't like.
Important safety note! Do NOT reach through the loop of the rope to grab the tails, you could lose a finger! Instead, reach below the loop, take the two tails, and carefully push them through the loop.
Once you have the two tails passed through the loop, pull on them. Warn your partner before you do this, they’re going to drop a little! At this point, if the person being lowered can lean into the rock or slightly unweight the rope for a moment, that makes is a bit easier.
The more the knot has passed through the carabiner, the more they will drop, so as seen below, ideally don’t let that overhand knot go more than about 6 inches / 15 cm below the carabiner.

Now, the munter hitch will magically POP back onto the carabiner, and you can continue lowering. Yes, it looks like an optical illusion, as in “what the hell did I just see!?” Try it a few more times in slow motion to see what’s really happening. It's quite amazing!

It might be a little exciting for your partner if they hear a popping noise and the rope suddenly drops a foot. This scenario will be a much less dramatic if you can have your second lean in on some kind of a stance to momentarily take their weight even partially off the rope. Actually, with dynamic ropes and your partner being 60 meters below, they may not even feel it.
Also, it's probably best to do this when using a standard dynamic rope. If you do this with a semi-static rope, the extra little drop can put additional force on the anchor, which is generally not a good thing.
Some people seem concerned that this will shock load the anchor. That's not gonna be a problem, because you've got 60 meters of dynamic rope below you. Yes some of the stretch is taken out, but it's still going to be very gentle on your anchor. If your anchor is more than halfway decent, this is not an issue.
Finally, here's a nice Instagram reel that shows how it's done. They’re using a double fisherman's to connect the ropes, which is even more bulky than an overhand, and it still works fine.

Add a carabiner to easily adjust your clove hitch
You can quickly adjust your clove hitch connection by clipping a carabiner to the “heart” of the knot. This can be helpful for adjusting your position at the belay, as a back up when ascending a rope, or for lead rope soloing (advanced climbers only!)
Note - This post discusses techniques and methods used in vertical rope work. If you do them wrong, you could die. Always practice vertical rope techniques under the supervision of a qualified instructor, and ideally in a progression: from flat ground, to staircase, to vertical close to the ground before you ever try them in a real climbing situation.
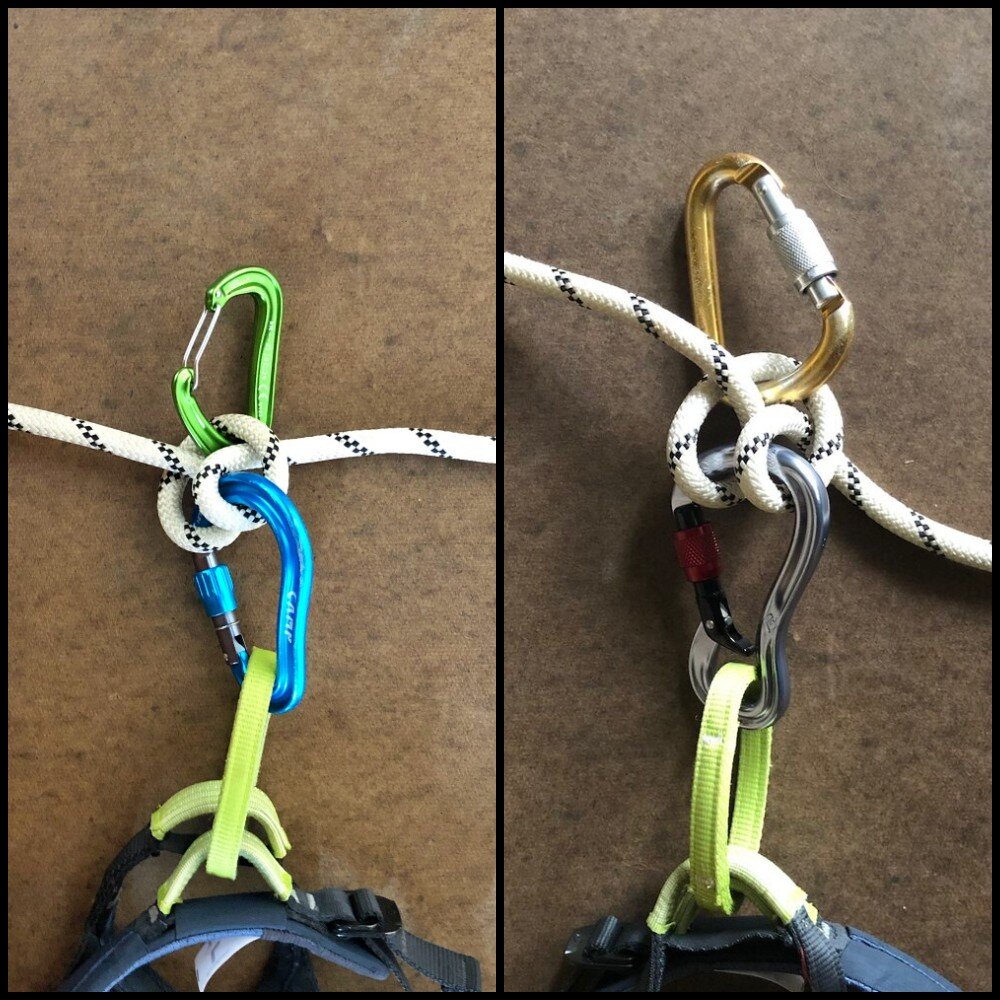
Here’s a #CraftyRopeTrick to easily adjust a clove hitch: clip a carabiner (locker or non locker, either works) into the top loop of the knot as shown above. Pulling on this carabiner creates slack, which you can then feed in either direction you need.
When might this be helpful?
Adjust your connection length to the anchor, say on a larger ledge when you want to move away from the master point to the edge to watch your partner. (In the photo, that's the set up on the left, with the non-locking carabiner.)
As a backup when you’re ascending a rope
For lead rope soloing / short fixing on a big wall (advanced climbers only!) In the photo, that's the set up on the right. Because that's your primary connection to the rope, a non-cross loading style carabiner on your harness and a locker in the clove hitch is recommended.
Some crazy rescue scenario, where you need to lead solo to save the day (without further compounding your troubles, of course . . . )
Note: Alpinesavvy does not endorse lead rope soloing. It's can be scary, it can be dangerous, and it’s an advanced maneuver that’s beyond the scope of what’s usually recommended here. I’ve done it a few times, and even on easy ground it was still spooky. If you do it wrong you could die or get seriously hurt. (And yes, that caveat also applies to lots of other things we do in climbing.) Consider yourself warned.
Notes . . .
If you fall, the carabiner in the clove will cinch down and stop you.
With the carabiner, there’s no chance of getting your finger pinched (or removed!) in the clove hitch, if you fell while pulling out a loop of rope.
Note the Black Diamond Gridlock carabiner on the belay loop, which minimizes the chance of carabiner cross loading or other unwanted weirdiosities.
Additional cautionary note: If the carabiner in the clove were to catch on to something at the same moment that you take a fall, the knot will fail. (Highly unlikely, but worth mentioning.)
Even a clove hitch failure should not mean a horrendous fall in most cases. In addition to the clove, you’re tied into the end of the rope. If you’re ascending a rope, you probably have back up knots as well.
Of course, try this on flat ground, then in a very controlled vertical environment close to the ground before EVER trying it on a real climb.
(Sort of) related note: if you're ever thinking of rope soloing on an ATC Guide in auto block mode, don’t do it!
If you take a lead fall onto an ATC in guide mode, it MIGHT result in some of the following: the rope becoming hopelessly jammed in the device, the blocking carabiner twisting and doing weird things, and the ropes becoming inverted and thus losing almost all braking power. In other words, don't do this.
Besides, Black Diamond does not recommend using their ATC Guide for lead soloing.
Read more on this issue here and here, and watch a video here.

The auto locking Munter hitch
While more of a trick knot used by guides, the auto locking Munter hitch can still be a good tool in your bag of Crafty Rope Tricks (CRT).
Note - This post discusses techniques and methods used in vertical rope work. If you do them wrong, you could die. Always practice vertical rope techniques under the supervision of a qualified instructor, and ideally in a progression: from flat ground, to staircase, to vertical close to the ground before you ever try them in a real climbing situation.
An old school yet effective way to belay your second is with a simple Munter hitch. The Munter has one advantage over an auto locking belay device such as a Black Diamond ATC or Petzl Reverso, in that you can easily lower your second if you need to. However, most people think that one of the downsides is that the Munter does not have the nifty auto lock feature that these belay devices offer.
Not so, grasshopper! With this crafty rope trick (CRT) you simply add one carabiner to a Munter hitch to make it autolocking. There are a couple of ways to do this.
Here’s one method. By adding the carabiner, the hitch remains in raising mode, and can't “flip” into lowering mode.

A few things to note:
Let’s start off by saying this is kind of a guide trick, and may not have a lot of utility for recreational climbers.
This knot is best used in situations where the chances of the second needing to be lowered is unlikely. This is a subjective choice that depends entirely on the skill of the climbing team. Also, it should probably not be used on any sort of traverse where you might swing into something vertical or overhanging. If there’s more than a slight chance that the second may need to be lowered, it’s probably better to use a regular Munter hitch or some other belay method.
Let’s start with a few general principles of Munter hitch belay.
As always when using a Munter hitch, it’s best to use a large pear-shaped “HMS” belay carabiner with round metal, which helps minimize friction.
Using a thinner rope or a new one with a sheath that’s a bit slippery works best. I’ve tried it with my ancient 10 mm workhorse rope with a fuzzed up sheath, and it’s quite a bit of work to feed that rope through the hitch.
You want to use two hands. Your”feed” hand pulls in slack rope and the the brake hand simultaneously pulls it down. If you only pull on the brake side of the rope, you’re going to get a lot more friction, do more work than you need to, and potentially get some twists into the rope.
Some specifics of using this hitch in auto lock mode:
You can add or remove this auto lock method into the Munter belay at any point in the pitch when your follower is coming up. For example, if the climbing starts off easy and then gets hard for the final part of the route, you could have your follower in auto lock mode for the easy part, and then simply remove the blocking carabiner when they get to the crux, so you have an option to lower them if necessary.
Or, you can belay mostly without the auto lock. If you need to put on a jacket, sort out the ropes, take a photo, whatever, you can put it into lock mode, do your business, and then remove the locker and go back to normal. Can't do that with any other type of belay device that I can think of.
Be sure the hitch is set up in “raise” mode before you clip the blocking carabiner.
Test this before your follower begins, to be sure it is locking up properly.
One handy use for this knot is for light hauling, such as a backpack or light haul bag. The blocking function serves to capture the progress of your haul. Typically, another semi-obscure knot called the garda hitch would be used in this situation, but many people find this knot to be, shall we say, temperamental.
Another use of the auto locking munter hitch is to climb a rope. If you're short on gear, like a plaquette style device (Reverso), Grigri, extra friction hitch, etc., the auto lock munter can be your progress capture on your harness. This is definitely a trick use of the knot and something you wanna practice in a controlled environment before you ever use it for real!
This knot suffers from the same general problem as a standard plaquette device like the Petzl Reverso: if your follower is weighting the rope and needs to be lowered, you can’t easily do so.
By far the easiest way to transition to lowering mode is to have your follower unweight the rope just enough for you to unclip the blocking carabiner from the load strand. Once the carabiner is gone, you’re back to a normal Munter hitch, and can easily lower your follower.
If that’s not possible, there is in fact a way to release this when loaded. Use a small locking carabiner for the blocking carabiner. Unclip the loaded rope from the blocking carabiner. This should allow the hitch to flip into lowering mode, and the small carabiner should pass through the large carabiner. Having a third hand autoblock backup on the brake strand before you do this is highly recommended. Yes, this is kind of clunky, and it's probably better to avoid that situation in the first place, but it is possible.
As stated clearly at the top of this post, please practice this in a controlled environment before you ever do it in real life!
Here's a nice video on how to do this.
Here’s a second method, which results in less friction. Depending on your rope, this might be a big help. Watch the video for the whole scoop. (Start about 2:00 for the action.)
At first glance it looks like a bit of a mess, but it works remarkably well.

The brake knot for 2 person glacier travel
The brake knot, designed to add increased friction in the event of a crevasse fall, is the best choice for traveling as a two person team on a glacier.
For glacier travel, many experts feel that four is an optimum number on a rope team, with three slightly more risky. If you choose to travel as a two person team, each climber needs to be highly skilled in crevasse avoidance, crevasse rescue, and have all the necessary gear.
A two person team is harder, because stopping the fall and then trying to build an anchor with the weight of your fallen partner on your harness is a significant challenge.
Studies by ENSA (École Nationale de Ski et d'Alpinisme) or French National Mountain Guide School, determined determined that a few bulky brake knots in the rope between a two person team can significantly help with crevasse rescue, assuming fairly typical snow conditions on the surface - not completely bare, and not too loose and fluffy. The knots typically shorten the length of a fall, and make it easier for the person on top to hold the victim.
(On the flipside, the knots can complicate prusiking up the rope and rigging a mechanical advantage system, but the benefits of a shorter and easier to catch fall generally outweigh these shortcomings.)
The short version from ENSA:
“Our tests validated the effectiveness of this technique, and we strongly recommend climbers use it.”

IMAGE: HTTPS://WWW.YOUTUBE.COM/WATCH?V=QHW9AM7AHLA
While a standard figure 8 on a bight loop or butterfly knot is effective, ENSA suggests using a “brake knot”. It creates a larger diameter, more spherical-shaped knot that offers more friction against the snow.
Here’s the method they recommend to tie the knot. Fortunately, it's a simple modification of the figure 8 on a bight, so it should be easy to learn and remember for pretty much anyone.
Tip - Don't make the loops too large, because this is just wasting rope.
Each brake knot takes about 1 meter of rope, so take this into account when setting your rope spacing. Tie the knots first, and then measure your 7-8 or so arm spans between climbers.
Start with a standard figure 8 on a bight, with a loop of about 1 foot.

Next, tuck the loop around the knot . . .

and finally, pass the loop back through the knot, then snug down each strand to dress it. The final loop created should be just a few inches tall.

The knot tying instructions starts at 6:20 In the video below, hopefully this link should take you right there.
And here's a nice video from Ortovox featuring some pro German guides who have much the same conclusion. It works!

Use the rope to make an anchor - 2 knots
If you're on multi pitch bolted routes, you may not need any anchor building supplies. The rope and a crafty knot or two are all you need.
Climbing multi pitch routes with bolted, side-by-side anchors? You might want to leave the cordelette and anchor slings at home. All you really need is the rope you’re attached to and two carabiners.
Many experienced climbers (like Peter Croft and Steph Davis) prefer this approach, because it's simple, clean, and requires less gear.
This can also be a good approach if the climbing is tough and run out right off of the anchor, and thus a greater chance for a leader fall to put a large amount of force onto the anchor and belay. Having the entire anchor made out of dynamic rope gives more stretch to the system and will lower the force on all the other components.
Because the leader is directly tied to the anchor, this generally works best of each partner is swinging leads every pitch. If you are not changing leads every pitch, it's usually easier to use a more standard sling or cordelette style anchor, because you have a single master point.
If you are going to use a rope anchor as described here, and are not changing leads, typically climbers will swap the ends of the rope at every belay. The easiest way to do this is to connect your harness to the rope ends with a figure 8 on a bight knot and two stout locking carabiners, rather than the standard rewoven figure 8 knot.)
Rescue geeks, I can hear you now: “But how are you going to escape the belay if you need to rescue your partner?” The answer is, yes, it’ll be a little more difficult, but you can do it. But, here’s a question to ponder - have you, or anyone you personally know, ever had to actually do this in real life? Climbers who use this method generally feel the simplicity, weight savings and lower cluster factor of tying in directly with the rope outweigh highly unlikely rescue scenarios.
There are many other options for using the rope to tie in directly. We cover one in another article, using just clove hitches, read about it here.
Here are two different knots you can use to tie directly to a two piece anchor.
1 - Bowline on a bight
This is my preferred technique. This is essentially a bowline knot with two loops rather than one. The knot is easy to learn, fast to tie, and easy to visually inspect to see if you did it right. You can adjust the size of each ear to equalize the anchor.
Typically, bowlines are not popular with many rope professionals for securing the end of a rope, because the knot can loosen up unexpectedly. However, in this application the bowline works fine, because the end is secured to your harness and can’t possibly pull through the knot.
John Long tried to popularize this in one of his rock anchor books about 15 years ago, but it never really seem to catch on. Too bad, it's a great knot. Maybe it was the cheesy name I think he gave it, the “atomic clip”. Just call it a bowline on a bight; that’s the common name and describes it perfectly.
Here’s a video showing how to tie a bowline on a bight.
Here's what it looks like, from the leader’s point of view.

You can clip your belay carabiner to the shelf (both of the loops to go to the bolts) to bring up your partner.
2 - “Bunny ears” Figure 8
This is a variation on the figure 8, familiar to every climber. This might take a little practice to tie neatly with no twists, and to get the length of the loops correct. This knot is popular with professional ropeworkers, who use it to secure one end of a fixed rope. (Tip: start with a larger bight than you think you need to, at least 2 feet.)
This knot has a cool feature of being able to slide the “ears” to two different lengths, to accommodate one bolt that may be a little higher than the other. This is actually sort of magical, you just need to play with it to see how it works. You need to do this when the knot is relatively loose. After you snug it down, the “slide” feature does not work.
One more thing: some people think that the bunny ears figure 8 is not redundant, meaning that if one strand were to be cut, it could conceivably pull through and the knot would fail. This has been tested many times and does not happen, so yes, the knot is redundant.
Here's a short article that covers it nicely, from Australian rigging expert Rich Delaney and Ropelab.
Here’s a video showing how to tie a bunny ears figure 8, by expert climber Beth Rodden. (She calls at the “super 8”, same thing.(
Here's what it looks like, from the leader’s point of view.

Same as with the bowline on a bight, you can clip your belay carabiner to the shelf to bring up your partner.


Try the "Super Munter" for lowering big loads
Need to lower two people at once on a rope, or some really heavy haul bags? The “Super Munter” hitch is an excellent choice.
The illustration and video in this article come from the excellent website RopeLab, run by Australian rigging expert Richard Delaney. RopeLab has a ton of great material for anyone who wants to dive into ropes, rigging, and mechanical advantage, check it out! There's a fair amount of quality free information, but getting an annual subscription unlocks the entire website. You can also connect with Richard on Instagram and his YouTube channel, where he has loads of concise, informative videos.
A variation of the Munter hitch is the "Super Munter", which adds a lot more friction and therefore control over your rope. It may not have much application in day-to-day climbing, but in certain situations, it is a very useful tool.
On a larger diameter rope, lowering extra heavy loads like haul bags or two people at once
On a smaller diameter rope, lowering a person or rappelling
Rappelling on a single strand, in any situation where you may want increased friction
I know, I can hear you now: “What about those evil twists that come from using a Munter hitch!?” Believe it or not, the Super Munter knot actually kinks the rope less, as one part of the hitch puts a kink in, and the second takes it out. (Granted, kinks in your rope it will probably be the least of your concerns if you use this during a rescue scenario, but it’s still a side benefit.)
Knots are always a better show than a tell, see the image below.
(Note in the image below, the brake strand ends up on the gate side, which is not optimal for a Munter hitch. If you tie it like this, be sure the brake strand does not rub against the carabiner gate.)

image: https://www.ropelab.com.au/munter-hitch
and here’s a video showing lowering 600 pounds with a super munter. (Starts at 2:30)

Uses of the butterfly knot
The butterfly knot is probably something you didn’t learn on day one of climbing school. But after the basics, it's a good one to add to your toolbox. Learn five climbing situations where the butterfly knot comes in handy.
The butterfly is generally not one of the standard climbing knots beginners learn, but it’s well worth learning once you have mastered the basics.
It's often referred to as an “alpine” butterfly, but I have no idea why. Let’s drop the “alpine” and just call it a “butterfly” knot, okay?
Photo: butterfly knot used to isolate a damaged part of the rope.
How is the butterfly knot useful for climbers?
The butterfly is generally easier to untie after it’s been weighted. Use it anytime you're significantly weighting a rope (like fixing ropes for a big wall, or tying off one end of rope for snow anchor testing or crevasse rescue practice.) Grab each of the "wings" of the knot and flex them back and forth to untie. Once you gain some experience with the butterfly knot, you may find that you use it to replace the figure eight on a bight in just about every situation.
It’s symmetrical and can be loaded on either strand. This makes it a good choice for the middle member(s) on a rope team. While a figure eight or overhand on a bight is acceptable for the middle person, it’s designed to be weighted in only one direction. As the middle person on a rope team, you don't know which strand will hold you in a crevasse fall.
It’s adjustable. If, after you make the initial loop, you decide it needs to be a little longer or a little shorter, you can feed the slack through the knot to adjust the size of the loop. (You can do this with a figure 8 on a bight, but it's quite a bit more awkward.)
It can be tied as a “brake knot” between rope team members for glacier travel, to help minimize the length of a crevasse fall. Any kind of crevasse rescue situation is more difficult with just one person doing the pulling, but if you tie a few knots in the rope between you and your partner, these can hopefully catch on the lip of a crevasse in the event of a fall, and minimize the length of the fall. (Yes, they can complicate the rescue, but that’s another topic.) Under the right conditions, this has been tested and proven effective. There is also another knot that has a slightly larger diameter called the brake knot, which may be preferable for two person crevasse travel, but the butterfly is acceptable.
It can isolate a damaged part of the rope. Through stepping on the rope with a crampon, an ice tool puncture, being loaded over a sharp edge or maybe rock fall, a rope might get some minor damage so you’re not comfortable using it anymore. With the butterfly, you can isolate the damaged part of the rope inside a loop of the knot and you’re good to go, with a near full strength and full length rope. (Now you need to figure out how to pass the knot while you are on rappel or belaying . . . but that’s a different topic!)
How about a directional / in-line figure 8?
This might be a useful knot in some sorts of rigging situations, but for recreational climbing I personally don't see a need for it. Anything the directional figure 8 can do, the butterfly can also do, so why bother?
That's not just my opinion, Australian rigging expert Richard Delaney feels the same way, check out the short video below.
And, because it's pretty much impossible to explain how to tie a knot in words, here is a short and sweet video from REI that does the job.
(It's not my preferred method, because this darn knot has probably more ways to tie it than just about any other, but it works fine. My advice: just learn one good way to tie this knot and don't confuse yourself with several.)