

Alpine Tips

DIY - Duct tape on the Jetboil pot
Ever drink a hot beverage out of your Jetboil pot? Yep. Ever burn your lips when you're trying to do it? Probably. Pro tip: Add a strip of duct tape onto the pot lid so you can leave that mug at home.
Do you ever use your Jetboil pot as a coffee cup or soup bowl?
Sure you do.
Tip - Put a small bit of duct tape on the rim of the pot so you don’t burn your lips.

Racking your cordage - Do the Twist
A basic climbing skill is knowing how to rack your cordage In a tidy and fast manner. One great method: Do the Twist. Learn how in this short video.
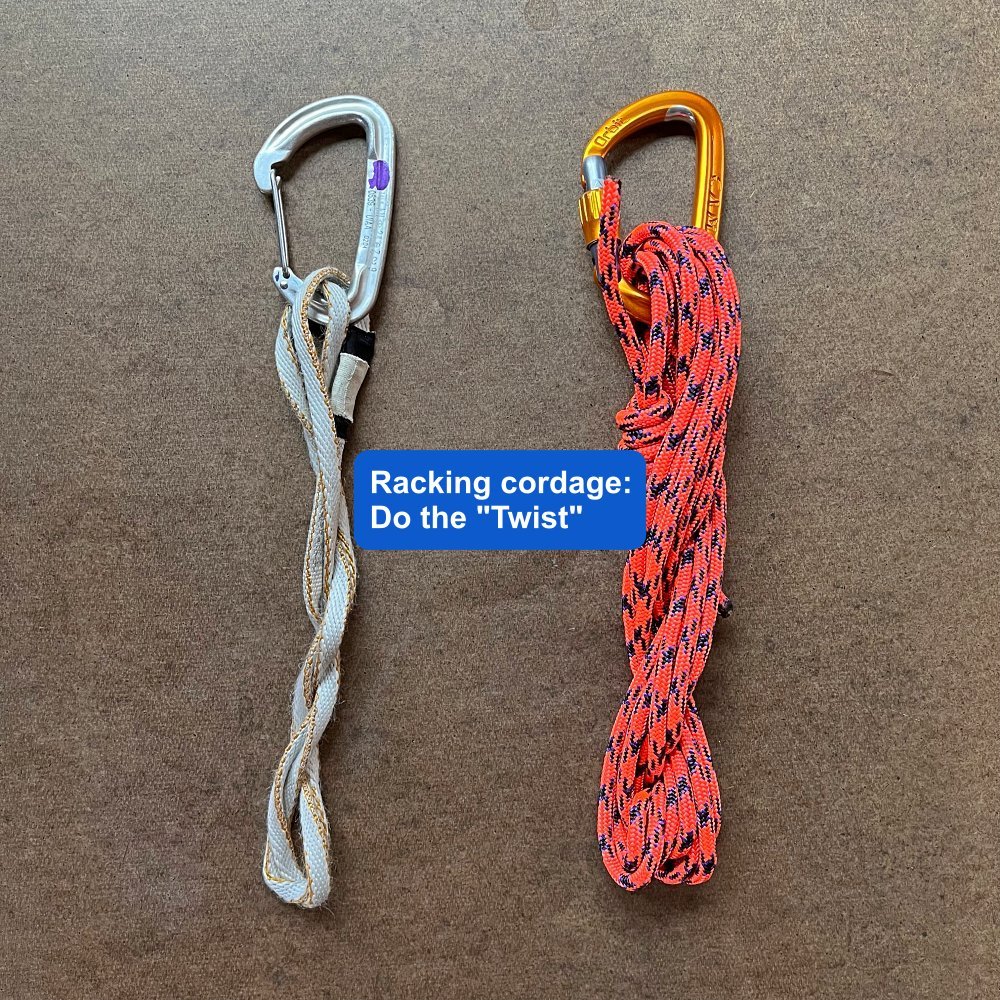
A basic climbing skill is learning to rack your cordage - slings, runners, cordelettes, prusiks - quickly, in a tidy loop, and making sure they never hang below your knees, where they can trip you up.
I've seen lots of people take several minutes to rack their cordelette with some cutesy macramé project. Yes, it may look nice on your harness, but I prefer simple and speedy, especially for gear that you're using every pitch. Here's one good way to rack it:
Do the Twist!
If you take any sort of loop (sewn or tied), twist it a few times, and then hold the ends together, the material will rather magically do this sort of double-helix twist around itself, resulting in a tidy, compact bundle.
It may look like a complete mess, but to deploy, simply unclip it, give it a shake or two, and it should return itself to full length, ready to use.
This also works with 60 cm slings and even a long cordelette. You need to double up these longer slings to get them down to about two feet long before you start.
As we'd like to say around here, this one is a better show than a tell. Here’s a quick video demo on how to do this.

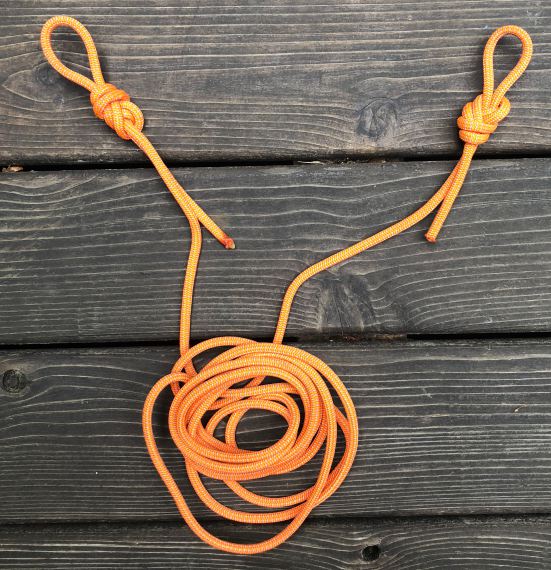
Cordelettes - what length and diameter?
Cordelettes - If you want to use one, the first choice is diameter and length. There are some standards, but which one you pick might depend on what kind of climbing you’re mostly doing. (If you climb a lot on snow and rock, you might want to get one for each.)
If you choose to carry a cordelette, the first questions are: what diameter, and how long?
For snow climbing or glacier travel, consider 4 meters of 6 mm cord.
For rock climbing, consider 5 to 7 meters of 7 mm cord.
6 mm cord is dramatically less strong than 7 mm. But, on snow or lower angle alpine ice, you can build anchors usually pretty much wherever you want to, and usually the impact of a fall is going to be fairly low. Because of this, you can probably use a shorter, smaller diameter cord.
On rock, it’s the opposite. You’re going to have potentially higher impacts on the anchor, and your placements have to align with what the rock offers you and the gear you have left, which means they may be farther apart. Both of these point to using a longer, larger diameter cord.
Cord strength (a kilonewton is a metric unit of force, equal to about 220 pounds)
5mm - 5.5 kN
6mm - 7.5 Kn
7mm - 13 kN
Look at that jump in strength going from 6mm to 7mm! For me, that’s a pretty compelling reason to use 7 mm cord for rock climbing. But hey, don't take my word for it, keep on reading for more expert opinion.
Try tying it “bunny ears” style, with a small figure 8 or overhand loop in each end, rather than the standard configuration of one big loop. Because the bunny ears style gives you a wider reach, you may find you can get away with a shorter length cordelette. But try climbing on the slightly longer cord for a while and see what you like. (You can always cut off a meter if you think it’s too long, but you definitely can’t add one back on.)
Expert climber Steph Davis address the cord diameter issue on her blog, by consult with an expert from Mammut. He says to always use 7 mm cord. (Bold text below is mine,)
From: https://stephdavis.co/blog/cordelettes-for-climbing/
“Although some climbers may use cord thinner than 7mm for constructing belay anchors, it is important to note just how much stronger the slings and 7mm cord are in comparison, especially when you consider that these are often weakened by knotting them and by concentrated wear at the knots.
We definitely do not advise people to use 5 and 6mm cord for anchor construction, and if climbers choose to do so they should be acutely aware that they are putting themselves at extra risk by doing so and take any necessary precautions (frequent wear-checks, being extra conservative in deciding what is worn and discarding it, always placing protection specifically to protect the belay from high impact, using a dynamic belay device and techniques, terrain and belay location choices, etc).
A calculated risk may be acceptable to some people if it is truly calculated, but done out of ignorance or by guesswork it is asking for trouble. Because most people aren’t willing or able to objectively test these out for themselves to see what their true level of safety (or lack thereof) is, if a nylon cord is used I’d strongly recommend using 7mm for anchor construction, and if the weight and bulk is a significant problem using a Contact sling with a 22kn breaking strength, remembering to tie into the anchor with the rope.”
Dave Furman, Hardgoods Category Manager, Mammut Sports Group, USA and Canada

Google Earth screen grabs - The best route beta tool?
Google Earth is great for wasting time at work, but it's good for a lot more than eye candy. Learn a few tricks about how to scope your route at home, complete with a route line and annotation added.
Most climbers know that Google Earth (aka GE) is a great tool for scoping out your route at home and getting a feel for the terrain. But, with a few other simple steps, you can take GE to a whole new level of usefulness.
Before we proceed, a couple of tips.
Have Google Earth Pro installed on your desktop computer. It's now free (it was $$399 before 2015!), and has some additional functionality over the web base software. And, it's a lot easier to navigate than the GE phone app. A desktop computer is easier to use than a tablet.
At least for my clumsy fingers, GE is MUCH easier to use if you have an external mouse with a scrolling wheel. Highly recommended.
Mt. Stuart WA Cascades, West Ridge route in Google Earth, with imported KML track and waypoints. That's what I'm talking about!

As we like to say at Alpinesavvy, having a map or photo is great, but having a map or photo with your route drawn on it is much better. And, when you can see your route in 3-D with high resolution satellite imagery, it gets even MORE better!
Here’s the general workflow, with a longer explanation below.
Find a GPX track file of your route.
Open it in Caltopo, and export it as a KML file.
Open the KML file in GE
Make a few screen grabs
Annotate your route in photo editing software (optional)
Print your images if you want, and/or save the edited image(s) to your phone or Google Drive for offline viewing and sharing with your team
Step 1 - Find a GPX track file of your route
You can get track files for more than 70 of the most popular routes in the Pacific Northwest right here at Alpine savvy at this link. If You want a peak that's not on this list, a good place to go is peak bagger.com. We cover how to find GPS tracks at Peakbagger at this article.
Note that if your GPX file has both lines and waypoints, the resulting KML export will have both of these features also. This is great for showing both the climbing route and point features such as water sources, good campsites, important trail junctions, etc. Pro tip - If you name your waypoints in Caltopo, such as (“climber trail junction”, “rappel” or “campsite”), these waypoint names will appear in Google Earth in your KML file. Very helpful!
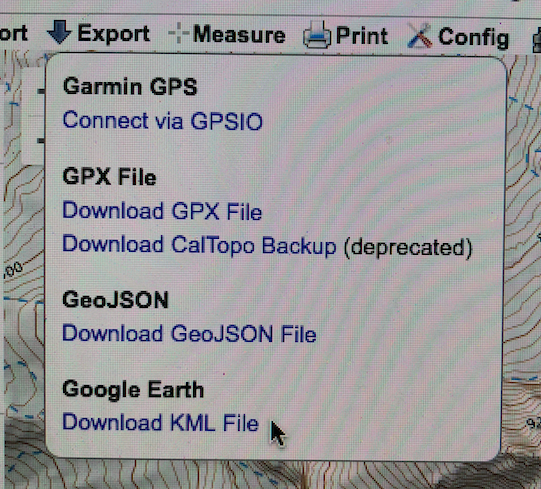
Step 2 - Open it in Caltopo, and export it as a KML file
Caltopo is pretty intuitive. Go to Caltopo.com, import the GPX track, then choose Export > Download KML File from the drop-down menu on the top. (Alternatively, you can download a single zipped folder of KML files for most of the popular mountain peaks in the Pacific NW right from this website.)
Below is a screen grab of what this looks like in Caltopo.
Step 3 - Open the KML file in GE
A KML file (or Keyhole Markup Language, for you computer nerds), is a file of geographic data that plays well with GE.
Once you have the KML file on your hard drive, double click it to should launch GE and draw your KML file. (Or, you can launch GE, and just drag and drop the file onto the GE screen.) Zoom in close, and waste another 10 minutes of your life in GE land flying around your route. (Ever notice how it’s always a bright sunny bluebird day in GE land? Apparently it never rains there. =^)
Step 4 - Make a few screen grabs
So, you’ve zoomed and rotated GE around until you find a few good spots that show the key points of your climbing route.
Now it’s time to do a few screen grabs. GE makes this easy.
Zoom and pan to just the spot you want to capture.
Go to File > Save > Save Image.
Click the “Save Image” button at the top of your and it will save a JPEG image file to your hard drive. Don’t be shy, fly around and take several different shots. You don’t have to keep them all.
Tip: Take screenshots from a variety of different heights, from zoomed out several thousand feet in the air to zoomed WAY in, just hovering above your route. When you zoom way in close to the ground, you get a more realistic view of what you are really going to see, a big help in making route finding decisions. It can be a little tricky to find just the right spot, that's where the external mouse with the scroll wheel can come in handy.
Below - GE screen grab from the start of the Fisher Chimneys section, Mt Shuksan WA, a notorious place to have route finding difficulties. This shot is taken zoomed in quite low to the ground, and looking up the route This more realistic “human-eye” view like this can be a great help in the field.
And notice with the high resolution satellite imagery, you can actually see the climber trail, very helpful also.

Here's a more oblique, birds-eye view of another route on Mt. Hood.

Step 5 - Annotate your route in photo editing software (optional)
Most of the time having a simple redline in the photo from the KML file is going to be enough, but if you want to get fancy you can add additional route info / text onto the photo.
Open your JPEG in some simple image editing software. You don’t have to be a Photoshop wizard to do this. I happen to like some free software called “PhotoscapeX”, but there are many options.
Add in arrows showing hazards, maybe mark where the rappels are, add elevation to key decision points, show the descent route if it’s different than the way you went up . . . You get the idea.

Step 6 - Print your images if you want, and/or save the edited image(s) to your phone or Google Drive for offline viewing and sharing with your team
If you like hard copies, print out your screen grabs and bring them with you on your climb for reference. A color laser printer is more weatherproof than an inkjet. Be sure and put them in something to protect them from the weather, a 1 gallon Ziploc bag is perfect.
Email the photos to the rest of the people on your climbing team, so they have the benefit of your efforts.
Finally, get those photos back on your phone so you can reference them on the route if you need to. Email them to yourself, save to photo roll, or whatever crafty thing you like to do on your phone to save photos. Now you have a free and weightless back up to your printed photos.
(Or, as we cover in this Tip, a convenient way to keep a lot of image files like this handy on a climb or hike is to store them in Google Drive in a designated folder, and then select each of them to be available offline. This lets you view the photos when you don't have cell coverage.)
A slight caution: GE tends to flatten out pointy peaks
If the summit area is especially steep/pointed, at present (2018) GE may display it as significantly flatter than it is in reality. Do not be suckered into thinking that the most technical part of the climb is an easy walk up, always check route descriptions and look at a contour map to see for yourself.
Here's an example in the Oregon cascades, Mt, Thielsen, probably the “pointiest” summit in the whole state.
This is what it looks like in a Google Earth screen grab (Amazing detail, you can see the climber trail.)

This is what it looks like in real life - Quite a bit different! There is one pitch of 5.easy climbing at the top but it has about 2,000 feet of exposure, so pay attention.

Now, this procedure may sound a little complicated and time-consuming when you’re doing it for the first time or two. But trust me, when you get this down it takes literally a few minutes.
Google Earth is a great way to visualize the terrain before you leave town, and also have a great navigation tool en route in addition to your map, compass, and navigation brain.

Gearspeak: What’s an “HMS” carabiner, and why do you want one?
Many books refer to an “HMS” carabiner. What ‘da heck is that, you might be saying? If you don't speak German, that’s an excellent question. Here's why using one as your main belay carabiner is a good choice.
Note: thanks to Richard Goldstone for some German proofreading in this post.
A techie climbing term you may come across is an “HMS” carabiner. What ‘da heck does this mean? (Hint, it’s not “Her Majesty’s Ship.”
If you don’t speak German, it’s a reasonable question.
It’s actually an acronym for “Halbmastwurf sicherung”, which loosely translates as “Munter hitch belay carabiner.” Let’s break it down.
“Halb” = half
“mastwurf” = mast hitch, aka clove hitch
“sicherung” = to protect or secure; in climbing it refers to the belay
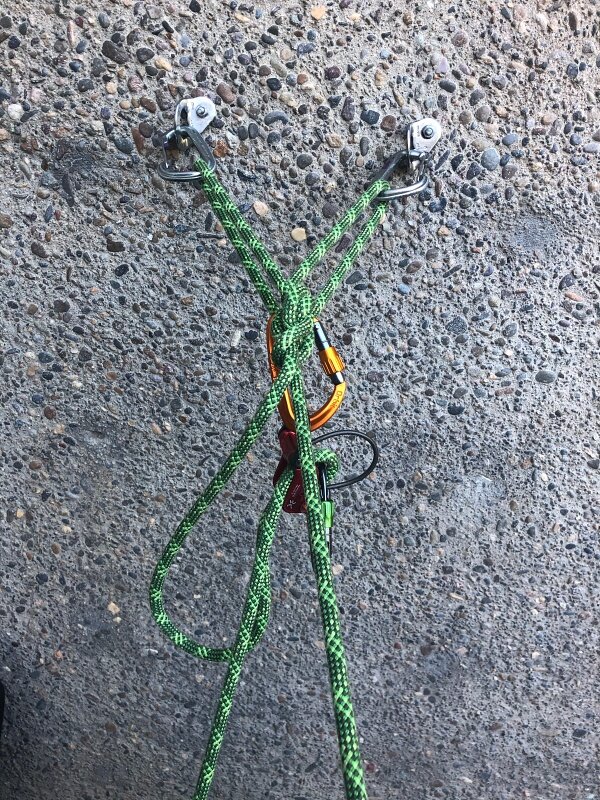
So an “HMS” carabiner is, roughly, the “half clove hitch belay” carabiner, a large, locking pear-shaped carabiner, suitable for belaying with a Munter hitch.
(Side note - belaying the second with a Munter hitch directly off the anchor might seem a little old-school, but it’s a very useful technique that every climber should know. Read more about how to do it here.)
In American climber slang, this sometimes gets shortened to a “pearabiner”, which is certainly more descriptive.
Look, they’re almost cousins!

One of the advantages of using a pear-shaped carabiner like this is that the bottom edge is wide and relatively flat. This offers a few benefits.
One, as the name implies, you can easily belay off of this with a Munter hitch, because the wide gap in the bottom allows the knot to flip back and forth as you take in or let out rope.
Two, the wide and flat bottom allows you to clip other carabiners onto it, and add them and remove them fairly easily, even if one carabiner is loaded. If you were to use an asymmetric or “D” shaped carabiner on your master point, the loaded carabiner will often pinch down on the other ones, making removal much more difficult.
This can be especially helpful on big wall climbing, when the first step to build an anchor is usually clipping a large pearabiner into each of the bolts, and locking the gates. Everything else you add to the anchor typically gets clipped into those primary carabiners.
And, there are some old school safety police out there reading this, who are probably having a FREAKOUT right now that I’m advocating clipping one carabiner onto another. Don't worry, they’re lockers, and it's fine to do it at an anchor. But if you don't like it, you don't have to.
Close up of master point with an HMS / pearabiner, showing 2 carabiners clipped to it under load.


Expedition hygiene - 6 items for your kit
Heading out for a longer climb or trek, like Kilimanjaro, Peru, or Everest base camp? Having a few extra personal care items along can really go a long way. Here are six goodies you may want in your kit.

If you add these small and lightweight items to your personal kit bag for your next extended trek or expedition climb, you’ll be a most happy camper.
1) Q-tips. You’ll be amazed what you can (carefully) extract from your ears after a week or so at a dusty base camp. (Of course follow the manufacturer’s and your grandmother's recommendation not to put them in your ear canal, yeah right.)
2) Ear plugs. Be sure and bring the ones connected with a string, so you can find them when you lose them in the sleeping bag, which you will. An extra pair is a fine idea too. Available at any hardware store. Vital for a good nights sleep with a snoring tent made or flapping tent.
3) Ayr Nasal saline gel. This is simply saline solution in a slightly watery gel form. The air at altitude holds less moisture, and it can really dry out your nasal passages. If you dab a tiny bit of this gel into each nostril (not as gross as it sounds) you’ll have instant relief from irritating dry nose. Get at any well-stocked pharmacy. (Side note - I had a friend who got up to 26,000 feet on Mount Everest, got an incredible gushing nosebleed from the cold dry air, and actually had to come down because of it. He was convinced that if he had some nasal saline gel, he would've made the summit.)
4) Foot powder. It can help keep your feet drier, smelling much nicer, gives you a nice psychological boost of “Ahhhhh” when you put it on along with a pair of dry socks, and can help avoid blisters. I like Gold Bond brand.
5) Small travel sized bottle alcohol gel sanitizer. Put a dab of this on your feet every night to keep them fresh and kill any bacteria. This can be especially helpful if you are not being so diligent about changing and rotating your socks.
6) Small package unscented baby wipes. A quick wipedown of your more fragrant body parts with a few baby wipes can (almost) make you feel as though you had a real bath. Be sure to get unscented; (you don’t want to smell like a clean baby, do you?) Note, Packets like this may not work if it's seriously cold, like Denali, because they may freeze into a solid block. Instead, looked for individually packaged baby wipes that you can thaw inside your clothing if needed.
Not shown, but can (literally) save your ass: Calmoseptine ointment. This is a zinc oxide and menthol-based thick cream that does an amazing job healing rashes and irritated skin.
Okay, we're getting into the messy details here: if you have some chafing in the sensitive crotch area, it can be debilitating and there aren’t many ways to fix it. This ointment works overnight and you’ll be good to go the next day. Typically it comes in a large tube, but you can buy individual very lightweight packets like this one online. (If you can't find this exact product, I think most any ointment that has zinc oxide based should work in a similar way.)

And here's one intriguing option to the baby wipes, as mentioned by an Alpinesavvy reader: Wysi-Wipes. This clever product is a sort of dehydrated and ultra compressed heavy duty paper towel. It sort of looks like a big antacid pill, and weighs basically nothing. When you add about a tablespoon of water, it magically swells up to be a 9” x 12” useful towel. You can even compost them. On trips where weight is more important and you don't want to carry the wet baby wipes, this could be a great option. (When dry, it looks like a big gauze pad; I’m curious about how these might work in a first aid kit?)
A bag of 100 cost about $12. Here’s a purchase link. (As always at Alpinesavvy, there’s no affiliate marketing, I add just the link so it's more convenient for you to check out this product.)


Use the rope to make an anchor - 2 knots
If you're on multi pitch bolted routes, you may not need any anchor building supplies. The rope and a crafty knot or two are all you need.
Climbing multi pitch routes with bolted, side-by-side anchors? You might want to leave the cordelette and anchor slings at home. All you really need is the rope you’re attached to and two carabiners.
Many experienced climbers (like Peter Croft and Steph Davis) prefer this approach, because it's simple, clean, and requires less gear.
This can also be a good approach if the climbing is tough and run out right off of the anchor, and thus a greater chance for a leader fall to put a large amount of force onto the anchor and belay. Having the entire anchor made out of dynamic rope gives more stretch to the system and will lower the force on all the other components.
Because the leader is directly tied to the anchor, this generally works best of each partner is swinging leads every pitch. If you are not changing leads every pitch, it's usually easier to use a more standard sling or cordelette style anchor, because you have a single master point.
If you are going to use a rope anchor as described here, and are not changing leads, typically climbers will swap the ends of the rope at every belay. The easiest way to do this is to connect your harness to the rope ends with a figure 8 on a bight knot and two stout locking carabiners, rather than the standard rewoven figure 8 knot.)
Rescue geeks, I can hear you now: “But how are you going to escape the belay if you need to rescue your partner?” The answer is, yes, it’ll be a little more difficult, but you can do it. But, here’s a question to ponder - have you, or anyone you personally know, ever had to actually do this in real life? Climbers who use this method generally feel the simplicity, weight savings and lower cluster factor of tying in directly with the rope outweigh highly unlikely rescue scenarios.
There are many other options for using the rope to tie in directly. We cover one in another article, using just clove hitches, read about it here.
Here are two different knots you can use to tie directly to a two piece anchor.
1 - Bowline on a bight
This is my preferred technique. This is essentially a bowline knot with two loops rather than one. The knot is easy to learn, fast to tie, and easy to visually inspect to see if you did it right. You can adjust the size of each ear to equalize the anchor.
Typically, bowlines are not popular with many rope professionals for securing the end of a rope, because the knot can loosen up unexpectedly. However, in this application the bowline works fine, because the end is secured to your harness and can’t possibly pull through the knot.
John Long tried to popularize this in one of his rock anchor books about 15 years ago, but it never really seem to catch on. Too bad, it's a great knot. Maybe it was the cheesy name I think he gave it, the “atomic clip”. Just call it a bowline on a bight; that’s the common name and describes it perfectly.
Here’s a video showing how to tie a bowline on a bight.
Here's what it looks like, from the leader’s point of view.

You can clip your belay carabiner to the shelf (both of the loops to go to the bolts) to bring up your partner.
2 - “Bunny ears” Figure 8
This is a variation on the figure 8, familiar to every climber. This might take a little practice to tie neatly with no twists, and to get the length of the loops correct. This knot is popular with professional ropeworkers, who use it to secure one end of a fixed rope. (Tip: start with a larger bight than you think you need to, at least 2 feet.)
This knot has a cool feature of being able to slide the “ears” to two different lengths, to accommodate one bolt that may be a little higher than the other. This is actually sort of magical, you just need to play with it to see how it works. You need to do this when the knot is relatively loose. After you snug it down, the “slide” feature does not work.
One more thing: some people think that the bunny ears figure 8 is not redundant, meaning that if one strand were to be cut, it could conceivably pull through and the knot would fail. This has been tested many times and does not happen, so yes, the knot is redundant.
Here's a short article that covers it nicely, from Australian rigging expert Rich Delaney and Ropelab.
Here’s a video showing how to tie a bunny ears figure 8, by expert climber Beth Rodden. (She calls at the “super 8”, same thing.(
Here's what it looks like, from the leader’s point of view.

Same as with the bowline on a bight, you can clip your belay carabiner to the shelf to bring up your partner.


"Triple locking" carabiners
What’s a “triple locking” carabiner, and why might you want to have a few? Well, pretty much every arborist or industrial rigger has a few on their gear rack, so you might want to get some too. There are some pros and cons to this style of carabiner, plus a trick to easily open it with one hand.
A triple locking carabiner (also known as a “3 way”, “twist lock”, or “triple action” or a “tri-act”) can be a good choice for certain climbing uses. (And, not such a good choice for others . . .)
The idea: there are three separate actions that are required for the gate to be opened. Typically, that’s 1) sliding a metal sleeve, 2) twisting the metal sleeve, and then 3) opening the gate.
These carabiners are common in rock gyms, climbing schools, industrial rigging, high rise window washers, mountain rescue, arborist work, and with Professionals Who Do Dangerous Things Far Off the Ground, so that ought to tell you something about how safe they are.
But, safety does not always mean ease of use. Let's read on.
The Petzl William is a triple locking belay style pear-shaped carabiner.
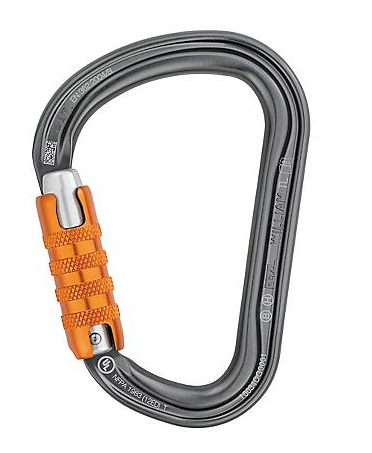
image - moosejaw.com
The Petzl Am’D is a more all round “D” shaped carabiner.
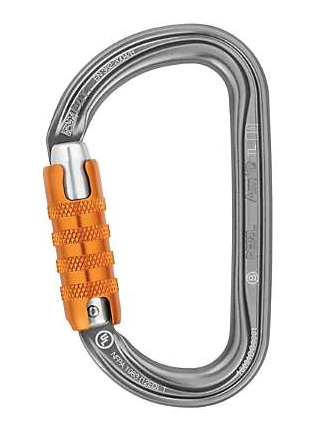
image - moosejaw.com
Twist lock carabiners have some nice features . . .
1 - When the gate is closed, you know that the carabiner is locked, and that’s it’s very likely going to stay that way. With a normal screw gate locker, there is always that little nagging background voice that asks “Well, the gate is closed, but is actually locked? And, if the gate rubs against the rock or some other weirdness, is there a chance it could unlock itself accidentally?” If you use a twist lock carabiner, those two concerns are much gone. This makes them a good choice for beginner climbers, because you can be pretty much sure it's going to work as intended, without reminding the beginner all day long to be sure and lock the carabiner. That's one of the reasons guides like to use them for clients.
2 - It’s easy to open the gate even after the carabiner has been severely loaded. If you put a big load on a standard screw lock carabiner, tighten the gate, and then unload the carabiner, sometimes the screw sleeve locks in place and it can be tricky to open. No such issue with a twist lock.
They also have some not-so-nice features . . .
1 - They are not well-suited for snow/ice climbing, because A) they can be difficult to open if you're wearing gloves, and B) bits of snow and ice can get stuck in them, causing them to fail in various ways. (Yes, people have been known to pee on their carabiners to get them open, but I don't have a video tutorial on that one yet. =^) The same concern applies to dirt and mud, so probably not so great for caving and canyoneering, but I don't have any direct experience with this.
2 - They can be tricky to open with one hand. Often it's helpful, especially at a more complicated belay, to be able to operate a carabiner easily with one hand. There is a bit of a trick to doing so: Hook your ring finger in the bottom of the carabiner to apply a little downward pressure, and then use your thumb and index finger to slide twist and open the gate. Like most things in life, pretty easy once you know how.
Here's a quick video I made showing the technique.
3 - They are a bit heavier and more expensive than a standard screw gate. Below: Petzl Am’D 79 grams, Black Diamond screw gate, 55 grams, difference of 24 grams. Probably not a dealbreaker for most people, but if you're a lightweight nerd, it might be a consideration.


So, what's the best use for twist lock carabiners?
Should you use them for every part of climbing that requires a locker? No.
Like almost all aspects of climbing, it comes down to personal preference, so here's mine: When you absolutely positively want it 150% bomber.
Setting up top ropes or fixed lines in an instructional setting where you’re not around to keep an eye on them.
Various things on big walls, where large loads hanging at strange angles and super-secure connections become more common and important (such as fixing the rope for the second to ascend, connecting a tag line onto the haul rope, or connecting haul bags to each other and the haul rope.)
Making a carabiner block, so you can rappel on a single strand. (This is an advanced technique for canyoneering and crafty climbers that I'm not going to cover right now, but you can Google it.)
Here's the easy solution: buy one and see how it works for you.
One other option - try the more modern flavors of auto locking carabiners. I'm not going to try to summarize them here, but many of these have some innovative designs to try to address some of the problems with twist locks mentioned above, such as not working well in the snow, or being able to open them with one hand easily. I have both of the carabiners below and they work great.
If you want to read more about this, here’s a good summary of the different flavors of auto locking carabiners.
Black Diamond Magnetron. Clever design uses magnets to keep the gate closed. Easy one hand opening, works with snow and ice.

Edelrid Slider HMS carabiner. A nice belay carabiner, easy one handed opening, works well in snow and ice.


Locking carabiners for sport anchor quickdraws
A majority of sport climbers are fine with using two standard quickdraws for their anchor. Most of the time, that's probably cool, but for instructional settings or your own peace of mind, you can go one step further and use lockers on everything.
A standard single pitch anchor is for the leader to simply clip two standard quick draws to the bolts (opposite and opposed at the master point) and lower off.
Gates on the quick draws are facing away from each other, or outward. This makes the bottom gates opposite and opposed and also mostly keeps the bottom gates from potentially messing with each other.
Nothing wrong with this setup. The fact that it is been done literally millions of times without incident should probably tell you that it's an acceptable practice.

Having said that, many people prefer at least one designated “locker draw” as part of the anchor.
If you’re in an instructional setting, with many people top roping off the same unattended anchor all day, without a more experienced person going up regularly to check things, locking carabiners can add great peace of mind.
Because it's a top rope, you’re not right there next to the anchor to see if any carabiners are getting cross loaded, gates getting unscrewed, or other strangeness that could lead to an anchor being compromised.
(Sidenote: there are lots of other handy uses for having a locker draw, you can learn them here.)
Personally, I pretty much always use one locker draw on top rope anchors.
This is an easy and inexpensive set up. You probably already have a few extra locking carabiners around, and spare “dogbone” draws are only $5-$6 apiece.
If you’re inclined to be a little more cautious, using lockers on your sport anchors can be a little extra insurance, with low cost and high confidence factor. Look at it this way: Other climbers might call you a little paranoid, but there's really not much downside to doing this.
“I don't want to climb with that guy, he's too safety conscious.” That's the kind of criticism many people don't mind hearing. =^)
As I like to say here at Alpinesavvy, it's YOU who’s accountable for your level of comfort and acceptable risk. It doesn't get to be dictated by anyone else, regardless of their experience or credentials.
Now, we have a locker draw in place of one of the regular quickdraws. Definitely a bit more security here. (The angle of the rope running through the carabiners will add a bit of friction, but it's still acceptable.)
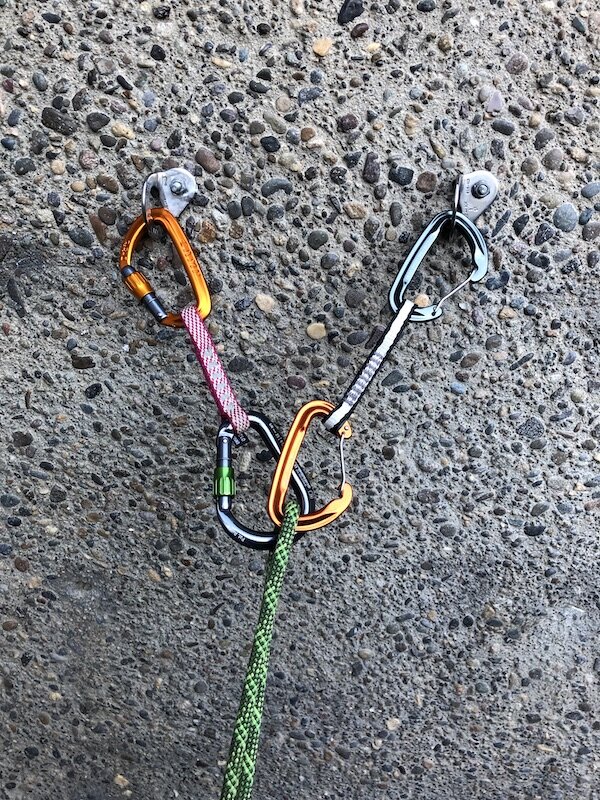
Here’s an (overly cautious?) alternative. Similar setup, this time with two locker draws. Long dogbones, round stock carabiners at the bottom for a smooth lower, and super secure.
There's no way to objectively prove this, but personally I don't think that extra locker draw offers much tangible improvement and safety. But hey if it gives you a warm fuzzy feeling and you want to do it, go right ahead.


Are you more likely to get lost going up or going down?
Are you more likely to get lost when you are climbing up a mountain, or heading down?
Quick question: Are you more likely to get lost going up a mountain, or on your way down?
Answer is: going down. This is true for several reasons.
Terrain features like ridges and gullies diverge you go downhill away from a summit, magnifying the mistake of choosing the wrong feature.
On the way down, you’re physically and mentally more tired, so you're more prone to navigation errors.
Returning to your last known point (usually the best way of getting unlost) usually involves going back uphill, which sucks. It's easier to keep going down, which can turn slightly lost into completely lost.

Learn to belay with a Munter hitch
A Munter hitch belay might seem old school, but it’s free, weightless, and a good skill to have in the toolbox. And for belaying the second, it has a big advantage over new school “plaquette” style belay devices.
Note - This post discusses techniques and methods used in vertical rope work. If you do them wrong, you could die. Always practice vertical rope techniques under the supervision of a qualified instructor, and ideally in a progression: from flat ground, to staircase, to vertical close to the ground before you ever try them in a real climbing situation.
At Smith Rock in Central Oregon many years ago, I came across a group of Eastern European climbers working on a hard sport route. They looked a little scruffy from weeks of sleeping out of their car, and their off-brand gear gear was well worn, but the thing that really caught my eye was no belay devices. They were working a 5.13, with the leader taking more than a few falls and takes, with the belayer only using a Munter hitch.
Now, belaying a leader with a Munter hitch is something that hasn’t quite caught on (yet) in the United States. But belaying a second with a Munter is a simple and useful skill that should be in everybody's toolbox.
Why might you want to learn this technique? The most common reason is to belay your second directly off the anchor. Belaying directly off the anchor is usually a preferred technique if your anchor is super strong, as in two bolts, but people typically do it with fancy belay devices like the ATC Guide or Petzl Reverso.
These devices generally work great. But if you ever need to lower someone while the rope is under load, they have the downside of requiring a rather complex, potentially dangerous, and easy to forget sequence of steps, known by some as “defeating the plaquette”. (If you want to learn how to do this, have a look in our video section.)
And, if you do this wrong, you can have a serious accident in a split second.

image: Multi-Pitch Belaying- Potentially Fatal Errors to Avoid - www.youtube.com/watch?v=s9np7B1Zao4
With a Munter hitch, there is no such futzing around. Your second calls for a take and needs to be lowered a few meters? They lose their mojo and need to be lowered all the way to the ground? No problem. Just release a little tension on your brake hand, the hitch will “roll” over to the other side of the carabiner, and you can lower away.
Want to make lowering with a Munter hitch even more secure for your second? Just add a friction hitch (prusik or Klemheist) to the brake strand of the rope, and clip it to your belay loop. Now, of course you should still never take your brake hand off of the rope, but this friction knot does give you a little back up.
And of course, another benefit to learning this is if you ever drop your belay device, you can still easily continue the climb.
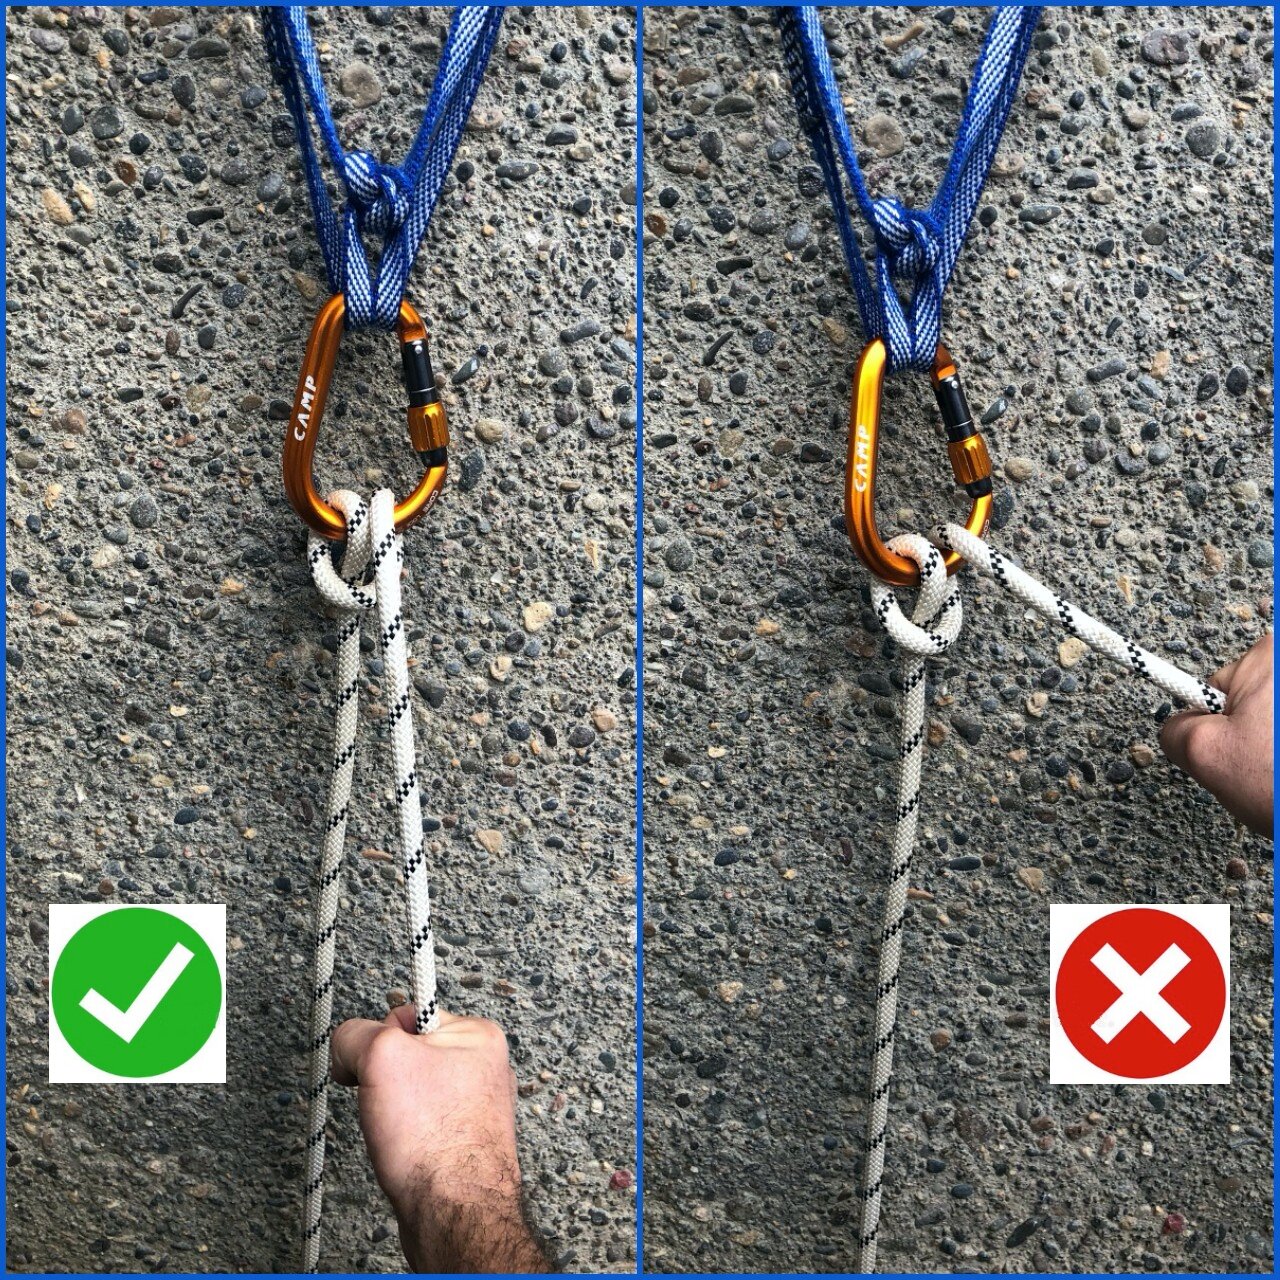
Many people think that using a Munter hitch in any form is going to twist your rope into some evil tangle. Not if you you use two hands. Your ”feed” hand pulls in slack rope up, and the the “brake” hand simultaneously pulls it down. If you only pull on the brake side of the rope, you’re going to get a lot more friction, do more work than you need to, and potentially get some twists into the rope.
Lowering with a Munter: You can minimize rope twist by keeping the brake strand parallel with the load strand, as seen on the left. Holding the brake strand out to the side, as on the right, can increase pigtails in your rope, as well as reducing braking friction.
As always when using a Munter hitch, it’s best to use a large pear-shaped “HMS” belay carabiner with round metal, which helps minimize friction.
There’s a crafty trick that makes your Munter hitch auto lock when belaying your second. Learn how to do it at this article.
Using a thinner rope or a new one with a sheath that’s a bit slippery works best. I’ve tried it with my ancient 10 mm workhorse rope with a fuzzed up sheath, and it’s quite a bit of work to feed that rope through the hitch.
If you’re climbing with snowy or icy ropes, the munter hitch is sometimes the only belay method that can work.
Note: When belaying with a munter hitch, you get maximum braking friction when both strands of rope are parallel to each other. This is exactly opposite to the normal braking action when using a belay device, so this may require you to un-learn what might be engrained in your head. Give this some practice in a controlled environment (a staircase is a fine choice) before you use it in the vertical. (This is covered briefly in the video below, starting about 2:00.)
As with most climbing things, it's a better show than a tell. Watch this short video to learn how to belay the second with a Munter hitch.

DIY - Fix that rip with seam grip
Got a tear in most any kind of outdoor fabric? Put away that needle and thread, and reach for the seam grip and tape.
Repairing small tears in your outdoor gear is a fact of life. Some folks like the old standby, duct tape, but the results are usually Less Than Ideal - an unsightly blob of grey tape on your gaiter, pack or jacket, peeling adhesive, and usually a short life span.
A better alternative is to use Seam Grip, an adhesive available in most any outdoor store. Or, most general purpose household clear adhesives like Shoe Goo work as well. Plus, Shoe Goo dries a bit faster and comes in small sized tubes you can treat as single use, see below.
To fix a tear, put some tape (most any kind will do) on the outside of the gear you’re fixing - in this example, a gaiter. Next, turn the gaiter so the inside is facing toward you, and reposition the flapping piece by pressing it down on the tape so it’s temporarily held in place. Now, put a good layer of adhesive on the tear, spit on your finger and rub it in, let it cure overnight, and then remove the tape. You’ll have a fix that’s durable and almost invisible.
For a more substantial tear in a thin fabric that's going to have some tension on it, such as a tent fly, try this:
Tape the edges together with duct tape on the outside of the tent.
On the inside of the tent, put down a layer of seam grip, then smoosh in a section of cut mosquito netting, and then put some more seam grip on top of that. Read more on this technique at this tip.


DIY - Candle lantern with sand in a bag
Hissing propane lantern, or silent windproof candle? Candles, thank you.
A slick way to make a candle lantern requires a plastic bag, some sand or gravel, a candle (ideally a tall taper) and a couple of sticks. Pour a few inches of sand into the bag. Stick the candle into the sand. Poke the sticks into the sand, and use them to keep the sides of the plastic bag from getting too close to the candle flame. This works well in the woods, as the sand forms onto the (often irregular) surface of whatever you put the bag on. This can be a very nice alternative to the hissing harshness of a propane lantern. This is more for car camping than backcountry use.
Thanks to the creative river guides on the Sun Kosi river in Nepal for teaching me this tip.

DIY - Glove Retainers
You really want to avoid dropping your gloves on a big mountain. With this quick DIY project, you'll never have to concern yourself with this again.
Here’s a simple way to make some glove retainers, crucial if you are to whip your gloves and mitts on and off when climbing. All you need is two lengths of 4mm or 5mm shock cord and two cord grips. Tie one end of the cord through the cord grip with a figure eight or fisherman’s knot, then pass the cord back through the cord grip forming a loop. The other end can then be tied via a strong point or through a hole melted in the hem of the glove.
By pulling on the cord you cinch down the size of the loop, which is best on the forearm so the gloves stay out of the way and the loop is opened by pulling on the cordlock with your teeth. If you’re removing your mitts to carry out a delicate task and don’t want them flapping around in your face, then loosen the loop and slide them up to your shoulders out of the way.
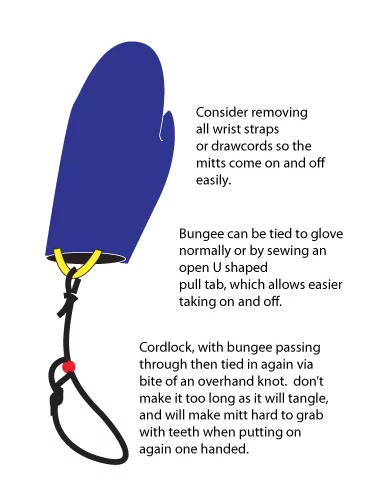
from: https://andy-kirkpatrick.com/articles/view/one_mitt_sytem
This tip and image is from "1001 Climbing Tips" by Andy Kirkpatrick.


“Wrap 3, Pull 2” - about the strongest anchor possible
Need to make an absolutely bombproof anchor around a tree, for a rappel or maybe to pull your car out of a ditch? Try this.
The "wrap 3, pull 2" has long a preferred anchor method with rescue teams for rigging on trees or similar round objects. What are some benefits to this anchor?
Super strong, because the load is distributed among many strands of webbing instead of one or two. (This anchor tests around 35-40 kN.)
Load distributing, to a certain extent
Pretty much zero force is applied to the knot, which otherwise would be the weak point of the system
But, it has a few downsides:
Require a LOT of 1 inch webbing
Can take a while to tie, if you don't practice it much
Is not redundant (when tied in the typical way)
Strengthwise, it’s overkill for most recreational climbing situations. (If your carabiner is rated around 20 kN, you shouldn't need an anchor that can hold 40.)
But, if you are a rescue person, or want to use it in a high load situation like river rescue or maybe pulling your car out of the ditch, it can be handy to learn.
You need is a long (10+ feet) length of 1 inch webbing.
Note that you can’t make this anchor with a sling that's sewn into a loop. You have to have a single long piece of webbing.
To make the “wrap 3 pull 2” anchor:
Make three wraps with the webbing around a large solid object. This is probably a tree.
Tie the free ends in an overhand knot (or water knot) with at least 3 inches of tail.
Now, pull / wiggle the two strands of the webbing that don’t have the knot in them, leaving the actual knot against the tree.
Clip your master point carabiner to these two strands extending away from the tree.
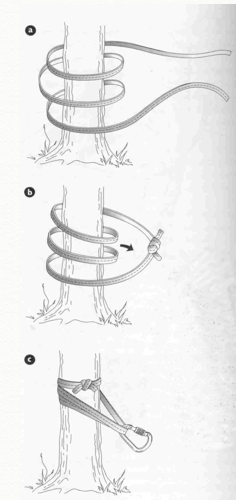
Diagram: Freedom of the Hills, 7th edition, The Mountaineers Press

Glove storage for your first aid kit
Latex gloves for your first aid kit can be tricky to store. Fortunately a pair fits perfectly in a 35 mm film can. (Remember those?)
While gloves aren’t mandatory for a minimalist first aid kit, many climbers choose to carry them. (If you don't carry gloves and are treating someone else, do your best to wash your hands before and after you touch your patient.)
But, it’s a hassle to neatly store them. Gloves easily tangle with other gear and can get punctured. Many people put them in a small sandwich bag, which works okay but can still allow damage.
One solution: put the gloves in a 35mm film can. Two rolled gloves fit perfectly. A clear film can lets you see what’s there. A label makes it easy for others to find if needed.
Yes, film cans can be hard to find these days. You can find ‘em on Amazon.
Or, another option, if you live in one of the progressive and liberated states in the US, your friendly neighborhood cannabis store sells fine herbal products in the perfect container. Dispose of the original contents in whatever way you like, and reuse the nice plastic bottle. =^)


Another option is a 50 ml Nalgene snap top bottle. You can get these at the excellent Wild Med Center website, a great place to stock up on hard to find wilderness first aid kit supplies.


Tick removal made easy
Ticks. YUCK! I’ve heard stories of people actually going to the emergency room to have a tick removed, which is a little overkill. Here's a way to do it yourself. (Also works on your dog.)
Have a tick buried in someone’s skin (hopefully not yours)
Make a "lasso" slipknot out of dental floss, tighten it around the tick’s head, and slowly pull the little bugger out.

Ice axe + trekking pole for moderate snow ascents
Don’t ditch your poles when the going gets steeper and snowy. Having a pole and ice axe can be a great combo, especially when traversing.
Many climbers use trekking poles, but restrict their use to the approach trail or low angle snow. When the terrain gets steeper, most people put both poles in the pack and use only their ice axe. On moderate snow ascents, try using one pole in combination with your ice axe. Keep your axe in your uphill hand, and the extended pole on the downhill side. This is especially nice on traverses.
This technique has two benefits: One, you create a lot of additional stability with the downhill pole, adding greatly to balance and confidence. Second, once you get into the rhythm, you can lean a bit on the downhill pole and use some arm muscle to push uphill, taking some weight off your legs. Take some load off your legs, feel a lot more in balance, and climb faster - what’s not to like?
Here’s a photo of a climber traversing a moderate snow of about 35 degrees on the lower approach to the Cathedral Ridge route on the northwest side of Mt. Hood. Note the pole in the downhill hand, axe on lanyard in her uphill hand. She walks quickly, in balance, and the pole is there to keep her that way.

If you need any more evidence, here’s a photo of Ed Viesturs on the summit of Nanga Parbat, showing him with an axe in one hand and . . . you guessed it, a trekking pole in the other.


Use rope bags - decluster your big wall anchor
Having designated rope bags can keep your anchor a lot more organized.
Big wall anchors can turn into an incredible cluster if you don't stay on top of things and keep it tidy. An excellent way to do this is to keep the lead and haul ropes contained and feeding smoothly by using rope bags. It may seem like one extra bit of a necessary gear, but it can keep your big wall belays WAY more manageable and less tangled.
You have several options.
Low budget: Doubled grocery bags. Put one inside the other, Gorilla tape the handles together, and tape the two top edges together.
(This “double bag” trick is from the excellent big wall climbing book, “Hooking Up”, by Pete Zabrok and Fabio Elli, highly recommended for a big wall climbers.)


Metolius Big Wall stuff sack, size large.

image: https://www.metoliusclimbing.com/
Fish Gear makes some great rope bags. fishproducts.com > Product catalog > Big Wall
double and single Fish rope bags:

fishproducts.com

fishproducts.com

Aid climbing - bring a “beak” piton
Having a specialized “beak” style piton, even on an moderate big wall that’s otherwise hammerless clean climbing, can be a great secret weapon.
My partner and I were on the classic big wall route The Prow, on Yosemite‘s Washington Column. He was leading around the fifth pitch, which the route topo said had a few fixed heads. He was making pretty good progress, when the rope came to a halt and I heard a few mumbled curse words floating down.
“This friggin head has the cable broken off”, he yelled down. “Send up the pecker!”
I clipped it to the haul line, he pulled it up, and in a minute the rope started to thankfully move again.
When I was cleaning the pitch, I saw the spot that had stopped him cold. There was about a 8 foot section of blankness, with only a very thin crack and a copperhead with the cable broken off. The pecker saved the day - my partner had carefully looped it over the copperhead and stepped on through.

image: from the great aid climbing book “HOOking UP”, by Fabio Elli and Pete Zabrok
Even if you’re climbing an aid route cleanly, meaning without a hammer, having a “beak” style piton can come in very handy.
A beak piton (a shortening of the broader term bird beak) is a very thin piton with a V-shaped downward hook at the end. It looks a lot like a bird head, hence some of the clever names: Toucan, Tomahawk, Pecker etc.

Black Diamond Pecker piton blackdiamond.com
They’re designed to be hammered into extremely thin cracks, and have been a key piece of gear that have opened up many of the most cutting edge difficult aid climbs.
But, if hardcore A4 isn't your thing, having a beak piton with you even on a hammerless “clean” rated route (like C1, C2, etc) can be helpful.
Rather than hammering it into a very thin crack in traditional piton style, a beak can sometimes be gently hand placed in a very thin crack without a hammer.
In our case, hooking a beak over the top of the smashed in copperhead saved the day. If you come across this scenario even once on a route, it can stop you cold unless you have a way to get past it.
You can even place them in a shallow horizontal crack and use the tie off point near the head to minimize leverage. Granted, this is a creative and fairly uncommon placement, but it just might get you past that tricky part.
The Black Diamond Pecker is the one I have and it's great. It comes in three sizes, 1, 2, and 3. I suggest number 2. If you're going to be hammering them on a real aid route, be sure and tie a sturdy bit of cleaning webbing in the top hole. (Also, the steel cable that comes with the Black Diamond beaks is not very robust, so you might want to back that up with some webbing as well.)
The “Tomahawk” beaks made by Moses are another well regarded design. As you can see, these have a slightly different profile and a stout clipping loop.

image: http://mosesclimbing.us/home/tomahawks/
Finally, here's a great instructional video with some action photos and really nice animation showing how to use them in detail.