

Alpine Tips

Don’t use your compass in a car
A large metal object, like your car, and the delicate magnetic needle of your base plate compass, do not play well together. Read this cautionary tale.
It was about 10 years back, and I was driving some boondock road in Central Oregon.
I was on a dirt road that seemed to be running directly north south, but I was feeling a bit turned around. So I stopped the car and got out my trusty Suunto M3 baseplate compass, to make sure I was driving in the intended direction.
Sitting behind the wheel, I pointed my compass straight ahead, spun the dial to put red in the shed and . . . The compass indicated that the road was heading pretty much east/west! Very puzzling!
Then I had an idea. I got out of the car, walked to the other side of the road, and once again took a bearing on the road in front of me. The compass now showed the road running exactly north south, just like I thought. Keeping a close eye on my compass needle, I walked back toward my car. When I got a few feet away, sure enough, the needle started slowly moving randomly. As I walked around the car with compass in hand, that large block of metal continued twitching my compass needle.
So, here’s The Takeaway. Don’t use a baseplate compass intended for backcountry navigation inside or nearby your car or any other large metal object. (Compasses that come built into the car, such is the one that might be on your rearview mirror, are already calibrated by the clever Car Engineering Gnomes to be correct.)
And, related to this, avoid using the hood of your car as a place to lay out your maps, take bearings, and in general do any kind of work with your compass. It’s usually is the largest, flattest and most convenient place to look at a map. But as you now know, trying to do anything that involves the magnetic needle of your compass on the hood of your car is a Bad Idea.
What are some other metal objects that can interfere with your compass?
electric power lines
belt buckles
zippers
most any sort of electronics, especially cell phones and avalanche transceivers
Try this: Put your mobile phone flat on the table, and move your compass slowly toward it, especially near the bottom (speaker part) of the phone. You should see the compass needle swing dramatically.

Keep your tent fly all the way under your tent to avoid a waterbed
This one might sound like a no brainer, but so many people do this wrong - Keep your ground cloth all the way underneath your tent.
If you put a ground cloth under your tent that's larger than the tent footprint, then all of the rain that runs off your tent fly is going to be funneled underneath your tent. Not good, unless you like sleeping on a water bed, and testing the quality of your tent floor.
To avoid this, just set up your ground cloth so the edge of the tent, or tent fly extends beyond the ground cloth. Tuck the ground cloth in underneath the floor of your tent an inch or so if you need to.

Clean sport anchors by lowering - New AAC guidelines
When you finish a single pitch sport route, should the last climber rappel off, or be lowered? The debate on this can get pretty hot and heavy, but the momentum is swinging towards lowering. Read why and learn how here.
The sport climbing anchor debate of “should the last climber lower or rappel” debate has raged back-and-forth over many years. It’s not my wish to fan these flames.
But, shared here as more of an FYI, public service announcement, the American Alpine Club (AAC) has officially come out with the stance that they support lowering.
Summary of reasons:
Changing from one safety system to another (from belaying to rappelling), and the potential for communication errors regarding whether a climber is on or off belay, has contributed to many accidents. Here, the climber stays on belay the entire time.
The climber is never untied from the rope, which means they never have a chance to drop it.
No additional specialty gear, such as a rappel device, extra carabiners, daisy chain, tether, or PAS, is required.
The well intentioned rationale for rapping is usually to avoid putting wear and tear on the anchors, but the AAC calls this “. . . misplaced sense of stewardship that seeks to preserve anchor hardware.” Modern anchor hardware is extremely robust, and ideally meant to be easily replaced.
Here’s how to do it:
The second climber climbs the route, cleaning gear as needed.
The second climber arrives at the anchor, and clips directly to the masterpoint of the existing anchor. This connection can be made with either a quick draw, or a tether / PAS.
Remaining on belay, the second calls for slack, pulls up a large bight of rope, and feeds it through the anchor hardware meant for lowering.
The second ties an overhand or figure 8 on a bight, and clips it to their belay loop with a locking carabiner.
The second calls for “tension” or “take”. The second checks to see that they are being properly held by their belayer, the rope is threaded correctly through the anchor hardware, and their carabiner is locked.
The second cleans the anchor material from the bolts.
The second unties the rewoven tie in knot from their harness, and pulls the tail of the rope through the chains.
The second calls “ready to lower”, and lowers to the ground.
To clarify, this does not mean that a group of two or more should initially set up to top rope on the anchors. You should pretty much always do this on your own equipment. This scenario is only for the last person up the route, who needs to clean the gear and safely get back to the ground.
The AAC is certainly not saying that every sport climber should start to do this on all routes tomorrow, nor that it’s best in all situations. But for the AAC to make an official policy statement on this is a pretty big deal, many instruction schools and guiding companies are doing this already. So it’s important for the climbing community to be aware of this, regardless of your own thoughts on the matter.
Here's a nice graphic from Petzl that shows you the step-by-step:

image: Petzl.com
Here's a video from the American Alpine Club, showing this technique. The lowering procedure starts at about 3:10.
Here’s a nice video from AMGA Certified Rock Guide Cody Bradford, see how fast it can be?
While sadly Cody is no longer with us, his Instagram continues to stay up and is a great source of tips like this, check it out.
And here's a longer one, with IFMGA Guides, that goes over the steps in a bit more detail and a couple of different scenarios.

Dry out your tent after every trip
Don't you love that funky smell that old tents always seem to get after a few years? No, neither do we. Be sure and dry it out after your trip to keep it smelling fresh.
No matter how dry you think your tent is at the end of your trip, it’s always worth letting it hang for 24 hours in your house when you get home. Moisture can linger in strange corners of your tent, and it will soon create that unmistakable and hard to vanquish “moldy tent smell” if you don’t dry it out completely.
Never wash your tent in a washing machine, the agitator can damage it. Try handwashing with gentle soap in a bathtub, and air drying outside.
Read more detailed tent cleaning tips here.
This tip is from "1001 Climbing Tips" by Andy Kirkpatrick


Keeping track of a group in low visibility
Here are two simple and quick ways to be sure your team always stays together at night or in low visibility.
If it’s dark and/or a white out and you have a large group of people to keep together, here’s a couple of techniques. They might sound a little cheesy if you’re reading this on a bright sunny day, but each can bring peace of mind to the team, and some psychological comfort that everyone is part of the group and not isolated.
(Of course, the leader can remind people to take breaks when everyone in the group stops and not to randomly stop whenever they feel like it, which can easily lead to getting lost in the dark.)
1 - Assign everyone a buddy. After a break and when you’re ready to get going again, the leader calls out “buddy check”. Everyone on the team looks around and hopefully finds their buddy. If they see them, they don’t say anything. But if their buddy isn’t there, they give a shout to indicate someone is missing.
2 - Count off. Everyone on the team gets a consecutive number, and they shut out the number one at a time to make sure everyone is accounted for. Make one person the leader, “one”, so when they call “one”, everyone answers in order: “two”, “three”, etc.
This tip is partially from the excellent book "1001 Climbing Tips" by Andy Kirkpatrick


Try the "Super Munter" for lowering big loads
Need to lower two people at once on a rope, or some really heavy haul bags? The “Super Munter” hitch is an excellent choice.
The illustration and video in this article come from the excellent website RopeLab, run by Australian rigging expert Richard Delaney. RopeLab has a ton of great material for anyone who wants to dive into ropes, rigging, and mechanical advantage, check it out! There's a fair amount of quality free information, but getting an annual subscription unlocks the entire website. You can also connect with Richard on Instagram and his YouTube channel, where he has loads of concise, informative videos.
A variation of the Munter hitch is the "Super Munter", which adds a lot more friction and therefore control over your rope. It may not have much application in day-to-day climbing, but in certain situations, it is a very useful tool.
On a larger diameter rope, lowering extra heavy loads like haul bags or two people at once
On a smaller diameter rope, lowering a person or rappelling
Rappelling on a single strand, in any situation where you may want increased friction
I know, I can hear you now: “What about those evil twists that come from using a Munter hitch!?” Believe it or not, the Super Munter knot actually kinks the rope less, as one part of the hitch puts a kink in, and the second takes it out. (Granted, kinks in your rope it will probably be the least of your concerns if you use this during a rescue scenario, but it’s still a side benefit.)
Knots are always a better show than a tell, see the image below.
(Note in the image below, the brake strand ends up on the gate side, which is not optimal for a Munter hitch. If you tie it like this, be sure the brake strand does not rub against the carabiner gate.)

image: https://www.ropelab.com.au/munter-hitch
and here’s a video showing lowering 600 pounds with a super munter. (Starts at 2:30)

Avoiding burns in the backcountry
Fortunately there aren’t many ways you can suffer a burn in the backcountry. Here’s some easy ways to avoid it.
When pouring hot water into anything - cup, bowl, thermos, dehydrated meal - always put the receptacle onto a flat place, never hold it in your hand.
When you’re tending your stove, try to do it from a squatting position and not sitting. If you’re squatting, you can jump up and more quickly move away from spilled hot water or a flaring stove.
Lots of modern camp stoves might boil water in just a few minutes, but they are often tall and unstable. Try to secure your stove from tipping over by putting a few rocks around it to hold it in place.
Modern outdoor synthetic fabric such as fleece, polyester and capilene can be extremely sensitive to flame. As in, they can melt in a second or two, sometimes directly onto your skin, resulting in a serious burn. If you’re wearing these fabrics, be very careful around campfires and the intense flame of a camping stove.
Don’t step over a campfire or stove, step around it.
Also, sparks from a campfire can easily land unnoticed on your nice fleece jacket and instantly burn a small hole through it. Probably won’t hurt you very much, but it’s sure not helping your gear.
First aid for minor burns
Clean the affected area with cool water, not ice cold.
Cool the area by putting on fabric soaked with cold water. Don’t put ice or snow directly on the burn, this can cause frostbite and restrict circulation, which is needed for healing.
Moist dressings are fine for small burns (less than three percent of the body surface area). Use dry dressings on extensive burns.
Check every 24 hours.

Be cautious of “grade inflation” in climbing gyms
Don't let your head get big because you can climb “5.11” in the vanity gym. You may be in for a big surprise your first time outside.
Many outdoor climbing areas have a reputation for ratings that are relatively easier, or harder, than the generally accepted grade.
Red Rock Nevada? The bulletproof sandstone is sticky, the cracks eat cams, and the bolts are plentiful. You’ll probably feel like Superman and climb a grade or two above your normal level. (But, the climbs are long and committing and the rappels are prone to getting your rope snagged, so bring a headlamp!)
Joshua Tree California? Just about everybody seems to get spanked on their first day. Between the sharp rock that shreds your hands, and flaring cracks that don’t take gear very well, that “warm up” route can definitely feel like a lot harder!
Similarly, some indoor gyms have a reputation for “vanity grades”, meaning what they might call a 5.10 is really more like a 5.8 or maybe 5.9.
If this is the only place you climb, you may start to believe that your ability is higher than it really is. If you then head outside and try a route at this same rating, you may be in for a rude awakening.
To mitigate this: Climb at different gyms and get a sense of how the ratings vary on routes of the "same" grade.
On your first few trips outside, leave your ego in the car. Try routes that are a couple of number grades below what you think you can comfortably climb in the gym. Even if you can lead climb safely in a gym, try top roping a few pitches initially when you’re outside, and consider using a stick clip so you don’t deck before you clip the first bolt.
When making the transition from indoor to outdoor, it’s an important safety issue to have a realistic knowledge of your abilities.
Sure, you might feel like Superman in the "vanity gym", but wait till you try going outside.


How to sew with your Swiss Army knife
That sharp little pointy thing on your Swiss Army knife is good for more than you thought.
I’ve carried Swiss Army knives around for decades, and always vaguely wondered if the awl was good for anything more than punching a hole through the occasional stout object. Turns out, it definitely is.
With a little practice and some stout thread (or even dental floss) you can turn your Swiss Army knife into a miniature sewing machine for backcountry repairs.
Awls have been used for thousands of years. You may find, as I did, that learning how to do it is surprisingly rewarding, and may leave you astonished once again at the cleverness of human beings.
As with many hands on skills, it’s a much better show than a tell.
Here’s a nice YouTube video that shows you how.

Most common way to get lost in the Columbia River Gorge
People can get lost for any number of reasons, but there is one common factor in most “lost hiker” stories in the Columbia River Gorge. What do you think is the number one cause?

Quick, what situation do you think is responsible for more people getting lost in the Gorge than any other? (and the same probably holds true for many other parts of the world as well.)
Picture this scenario. It’s early April, you’ve felt stuck indoors after a long soggy Northwest winter, there’s a weekend forecast of clear sky, and you’re busting to get outside. You head out to the Gorge to try a tough trail that goes up approximately 3,000 feet to the plateaus of the Oregon side. You've hiked the trail a few years ago, but you don't quite remember where it goes.
No problem for the first 2,000 feet or so. The trail is obvious, and you’re feeling strong. But, as you continue to climb, snow patches appear, start getting thicker, and then your trail completely disappears under the snow.
Here’s your answer. Continuing on a trail that becomes covered with snow is the number one way people get lost in the Gorge.
If the trail you're on becomes snow-covered, it’s a great time to take a break and reassess your objective for the day.
How familiar are you with the rest of the trail?
Are you doing an up and back hike on the same route, or a loop that comes down a different way? (On an out and back, at least you can maybe retrace your footsteps.)
Do you have a solid GPS track on your phone GPS app or GPS receiver that you can follow, even if the trail becomes snow-covered?
The takeaway: When going on a hike where you anticipate snow at higher elevations, always be sure of your route, use a GPS track if you have it, and definitely consider turning around if the trail you were relying on is no longer visible.
(This tip was shared with me a while back from a Search and Rescue team member from Hood River. Now, I’m not sure if this is statistically accurate or not, as it only comes from this one source, but it is still a good cautionary tale.)

Glove tip - always bring 2 pair
Good rule of thumb for snow climbing: always bring two pairs of gloves at a minimum. They don't need to be name brand, especially your back up pair. Here's how to find some online.
While we all have wide range of cold tolerance for our hands, I consider at least two pairs of gloves for snow climbs mandatory. (Read the classic book “Annapurna” for some epic frostbite tales, if you need convincing.) If you ever drop a glove on a cold route and don’t have a spare (or at least an extra sock) you could be in serious trouble.
The gloves I bring on pretty much every trip are Showa Temres 282-02. They are inexpensive, waterproof, extremely warm, and work great. Here's a detailed article about these terrific gloves.

The second pair? Of course, the temperatures where you're climbing dictates your glove choices. In moderate conditions, a light windstopper or Powerstretch fleece may do the job.
For technical climbing in really cold conditions, many climbers bring three or four pairs of gloves.
The backups sure don't have to be name brand glove$ from the $pendy mountaineering $hop. Try an Amazon search for “cycling gloves”. Here’s a pair I got for road biking that do fine as a backup for climbing - stout fabric, windproof, and have touchscreen capable fingers. And, how can you go wrong for about $12?


Easy way to pass the knot on a single rope rappel
It’s rare, but you might someday find yourself having to rappel two full rope lengths on a single strand. Here is a simple, fast and unconventional way to get past the knot.
Note - This post discusses techniques and methods used in vertical rope work. If you do them wrong, you could die. Always practice vertical rope techniques under the supervision of an experienced climber, and ideally in a progression: from flat ground, to staircase, to vertical close to the ground before you ever try them in a real climbing situation.
This tip was written with the help of Bryan Hall, who is certified by the Society of Professional Rope Access Technicians (SPRAT) at their highest level.
Short version:
You’re rapping on two ropes tied together in a single strand, and you need to pass the knot connecting the ropes to make it all the way down. (For some scenarios when you might need to do this, keep reading.)
Solution: Tie a butterfly knot just above the knot connecting your ropes. Use the butterfly loop as a ready-made clip in point when you’re passing the knot.
We're trying to keep it simple in this example, so we’ll assume you're on something less than completely vertical or free hanging terrain. On something less than vertical, you can momentarily “batman” down the rope to reattach your device as shown below, and hopefully also step up for a moment to unclip your tether.
If things are completely vertical, it gets a bit more complicated, more on that below.
What about passing the knot if you have a standard double rope rappel? Well, with some knowledge of Crafty Rope Tricks, you should pretty much never have to do this! Learn more at this article.
When might you need to rappel on two ropes tied together in a single strand?
You’re between one and two rope lengths up on a climb, and you have some sort of emergency situation: injured person, incoming lightning storm, impending darkness, whatever, and you just want to get to the ground ASAP and leave your ropes to get later.
You have two or more rope lengths below you on moderate terrain (4th class rock; steepish snow) that at least one person on your team is comfortable downclimbing without a rope. You send your whole team down on the two ropes tied together. The last person unties the rope, tosses it, and solo downclimbs. (or “downleads” by cleaning gear left by the next to last person. (Learn more about downleading here.)
You’ve fixed two or more rope lengths up to the high point on a big wall, and you’re rapping back down to the bottom. In a day or two, you’ll come back, ascend your ropes, and continue with the route.
You’re descending fixed ropes that someone else set up, like descending from Heart Ledge, Sickle Ledge or the East Ledges on El Capitan.
Anyway, those are some not-so-normal-but-entirely-plausible scenarios where you might need to pass the knot on a single rope. Can you think of any others?
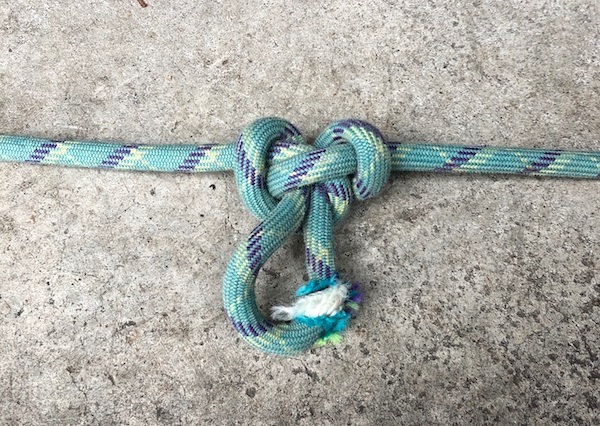
Two ropes connected with a Flemish bend, with a butterfly loop in the “upper” rope so you can safely pass the knot. Try to tie this butterfly as close to the Flemish bend as you can.
The butterfly is one option; any bight knot will work. The Flemish bend is preferred for a single strand rappel over the flat overhand bend, which is a standard for rappelling on two strands.
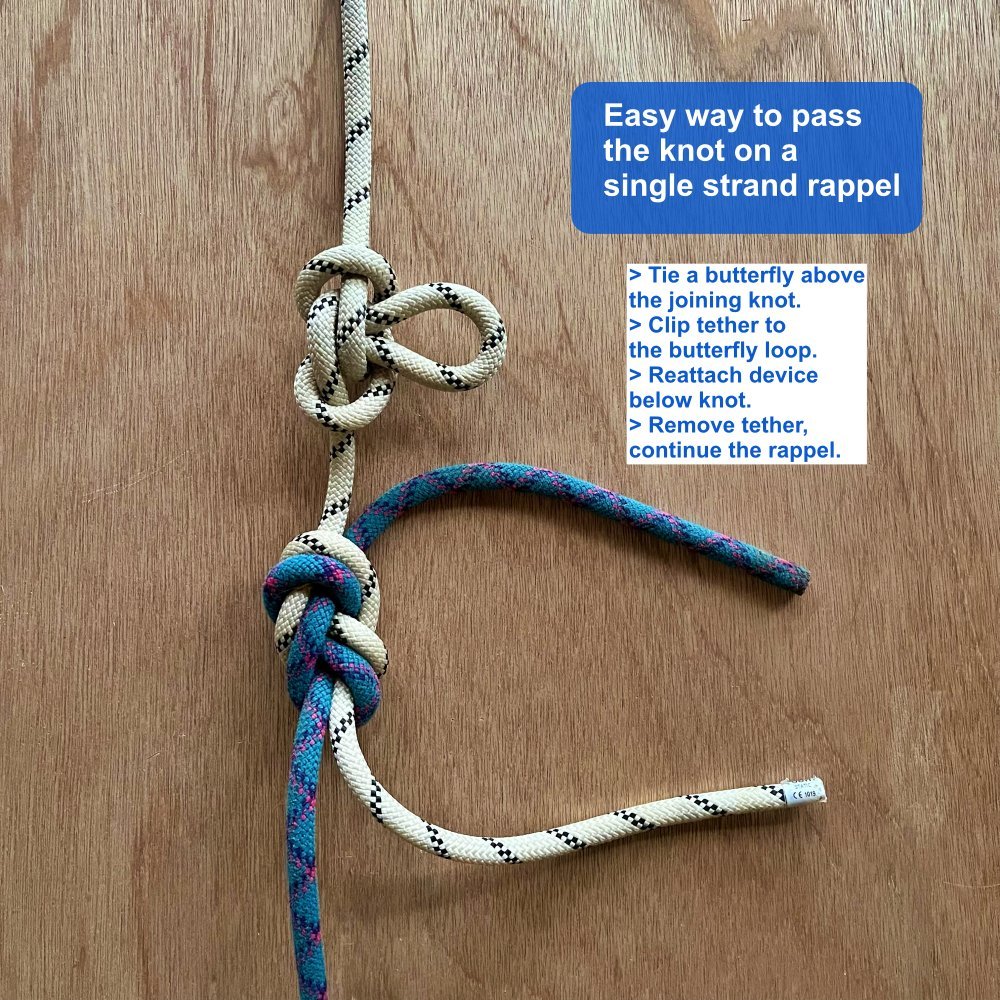
1) Before you start down, girth hitch a clip a short (60 cm sling or PAS) tether to your harness, and clip it with a locking carabiner. Rappel down the upper rope, and stop when you get just above the butterfly.

2) Clip your pre-tied tether into the butterfly loop; remember to lock it. Nice, you're now secured to the upper rope with your tether.

3) Remove your rappel device from the upper rope. Yes, this will require you to get some kind of stance for your feet to unweight the rope a little bit. (If this steep or you're scared, you could tie a catastrophe knot in the bottom rope and clip it to your harness as a backup.)

4) Downclimb or “batman” down the rope until you're below the joining knot. Reattach the rappel device to the bottom rope.
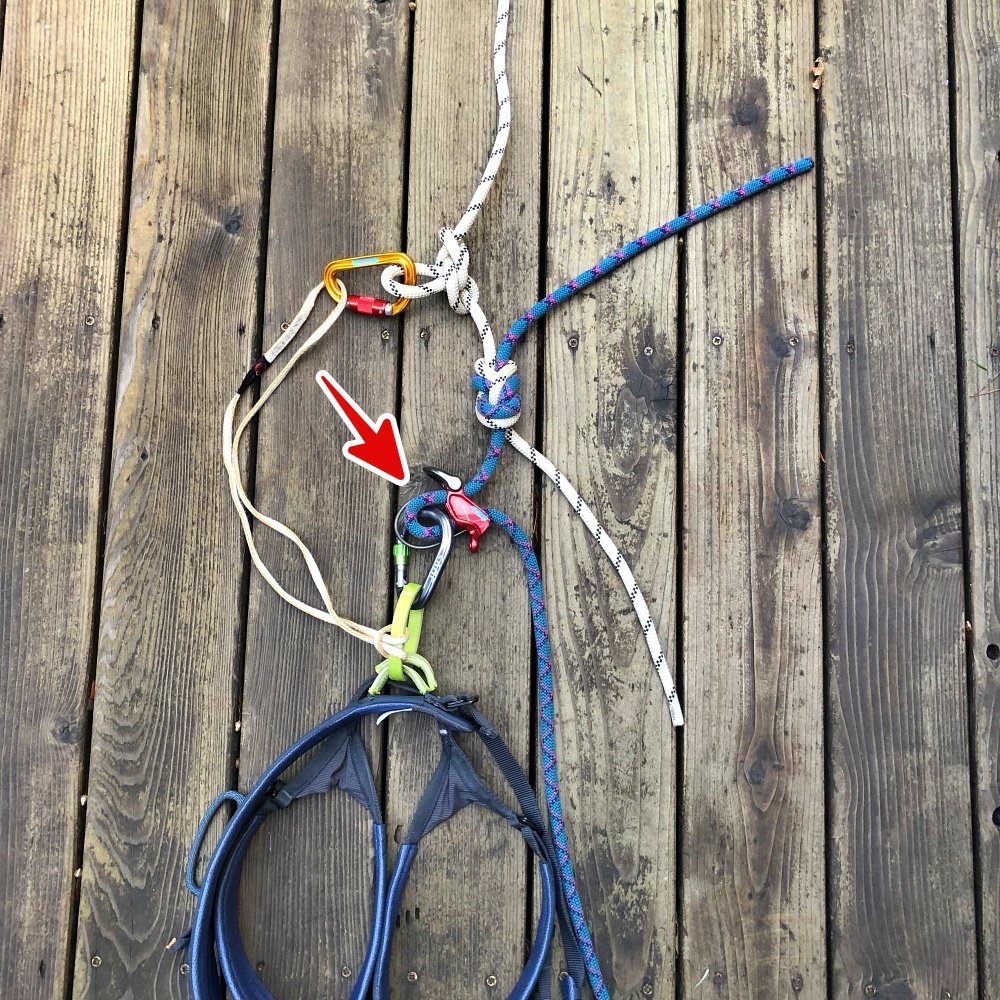
5) Unclip your tether and continue with the rappel. Schweeet, you just passed the knot!

Typically, this is set up with just a knot connecting the two ropes, such as a rewoven figure 8 bend, also known as the Flemish bend, or simply a flat overhand bend.
Sure, these knots are safe enough, but it sure doesn’t give you any assistance when you need to get past the knot. This is the beauty of adding the butterfly loop - you have a ready-made, secure point to attach a short, repeat, SHORT, leash to add an instant safety when you’re transferring your belay device from the top rope to the bottom rope.
This process is MUCH easier if you can find a small stance for your feet so you can momentarily take your weight off your rappel device. This should typically be possible on steep snow, ice, or low fifth class rock.
If you’re trying to pass a knot on a completely free hanging rappel, things get more complicated. You typically would add a friction hitch or ascender above the knot, weight that, remove your rappel device and reattach it below the knot, unweight the friction hitch / ascender, remove it, and continue rappelling. If you find yourself having to do this in a very steep terrain, you’re probably a caver or big wall climber, have an ascender, aid ladder or other helpful gear, and have already practiced this technique. Even so, the butterfly knot can still give you a handy place to clip for additional security.
What about using a flat overhand bend on a single strand?
If you use a standard flat overhand bend here instead of the Flemish bend or a more robust knot, you're probably gonna be fine. However, it's not best practice for a single strand rappel. Here's a much longer article examining this issue.
Safety note: keep your rope tails about 30 cm
Typically, when tying two ropes together for a rappel, you tie the knot with long tails, at least one foot. Some folks do it closer to two feet (the extra length doesn’t make them any safer or stronger, but it might add a little psychological boost.)
However, anytime when tying two ropes together like this, you want to AVOID using very long tails. Reason: the person rappelling could make the fatal mistake of reattaching their belay device onto the tail(s), instead of the actual rope. Yes, it has happened. It probably sounds like a mistake you would never make if you’re reading this indoors on a nice sunny day, but if it’s at night, raining, in a cave, you’re physically and mentally fried, whatever, simple mistakes like this can happen all too easily.
Here's a longer article on this topic.
The better practice is:
Tie your knot to connect the ropes, and keep the tails about 30 cm / 12-16 inches max (or, about the length of your forearm.)
Tidy the knot properly, then snug it down (aka “dress it and stress it.”)

What's in my pack - alpine climbing by Steve House
It's a rare opportunity to hear from a world class expert on what specifically they bring for an overnight alpine climb. Get it straight from Steve House. (You’ll never believe what he fits in a 30 liter pack!)
Connect with Steve and learn cutting edge alpine training at his website, uphillathlete.com
Want to know what a world class alpinist takes for an overnight climb? Watch this great YouTube video as Steve House explains his detailed gear choices. You’ll be amazed at all of the gear he manages to fit in a 30 liter pack!
Some key points:
Food: pretty much energy bars
No Camelbacks or water bladders. Steve uses 600 ml soft flask collapsible water bottles. Carry no more than one liter total, because water is heavy. Put the flask in a mitten to insulate it if it's really cold, and try to always start off with hot water. He has a dilute electrolyte mix already in the water
When you get to your bivy, first thing to eat is some nuts (almonds cashews, raisins). Also, have some sort of recovery drink mix like Roctane. You want carbs, amino acids, and electrolytes in the recovery drink
Tries to avoid heating too much water, like for soup or tea, because that means you need to bring more fuel
Dinner: freeze dried food. 1 bag per person, 800 calories. Pour in boiling water, put it inside your jacket to stay warmer
Breakfast: instant coffee, 10 g protein powder, energy bar. Keep the energy bar in your sleeping bag so it's not frozen in the morning
Stove MSR Windburner. One small canister can last two people for one day, if you’re careful. Brings an extra foil windscreen for the stove. Generally does not use a hanging stove
Branched-chain amino acid tablets and electrolyte tablets to eat with dinner, for recovery
Gloves: up to four pairs of gloves! Take mittens, belay gloves, lightweight action gloves
Outer shell jacket: Patagonia Houdini if weather is good, Patagonia M10 if it’s going to be colder or windy
Patagonia hyper puff belay parka
Navigation: Garmin InReach, Garmin GPS, paper map in plastic bag, altimeter watch
Sleeping bag: one night trips always bring down bag, more than one night, almost always bring synthetic bag. (Exception, long expedition style climb like Denali when you’ll have the chance to dry out your down bag.)
Always keep a pair of dry socks stored in the sleeping bag. When you’re ready for bed, take off your damp/wet socks, put them on your chest to dry them, and put on the dry socks to sleep. In the morning, swap them, repeat for many days
Sleeping bag get stored inside the bivy sack, and not in a compression stuff sack
Neo air sleeping pad, folded up and put it inside the sleeve inside the pack; this can keep it from getting punctured
Take a 4‘ x 8‘ very lightweight nylon tarp, to string up over his bivy sack
Backpack: 30 Liter Patagonia Ascensionist
Put a trash compactor bag inside your entire backpack, and pack everything inside of that to keep it waterproof

DIY - Homemade chalk ball
Loose chalk, while a lot cheaper than a premade chalk ball, is also a big mess. But if you can get your hands on some delicate undergarments, you can easily make a homemade chalk ball on the cheap.
Tired of paying $5 plus for a chalk ball, when loose chalk costs about 1/3 of that? Here’s a way to make your own.
Take a woman’s nylon stocking/pantyhose. (Guys, how you procure this is up to you!) =^)
Cut off most of a leg
Put powdered chalk in the toe area. Do this outside, it makes a mess!
Tie an overhand knot in the leg. Instant chalk ball!
If the chalk comes out too fast, just invert the toe back into the stocking to make a double or triple layer of fabric.

How to make bomber tent anchors in snow
There's no such thing as a freestanding tent on a windy mountain. Here's a light weight and nearly free way to make solid snow anchors for your tent.
I was about 30 minutes outside of Camp Muir on Mt. Rainier, turning back after a storm-induced retreat. Just as I caught a view below me of the tent city, a giant gust of wind smashed into the camp, lifted several tents into the air, and cartwheeled them thousands of feet down the glacier and out of sight. Whoops! Fortunately, it wasn't mine, but lesson definitely learned!
If you’re setting up a tent in the snow, you need a good way to anchor it down. (There’s no such thing as a freestanding tent in a windy place.) Buried trekking poles, sticks (maybe collected on your approach hike), skis and rocks work well, as do some sort of a buried deadman. A picket is bomber, but you’ll probably need them for your climb.
Here’s a great choice: 1 gallon ziplock freezer bags. Reinforce the lower sides with duct tape, fill about 2/3 with snow, and seal. Then tie the tent cord around the middle making it into an hourglass-like shape, then bury it. For knots, use a tautline hitch or a trucker’s hitch to fine tune the tension on the tent cord. (See another tip of the week for how to tie these very useful knots!)
So, how strong are they? Answer, more than you think. A study by the French National Guide School conducted some pull testing on various types of deadman snow anchors, and they found that a buried plastic bag could hold a load of approximately 200 kg!
One more option: If you anticipate high winds but no precipitation, you can remove the some or all of the tent poles when you leave camp, lie the tent flat, and put some rocks (ideally with a tarp or something underneath ‘em) or snow blocks gently on top of it.
Don’t let this happen to you!

image: https://manonice.com/2014/10/

Tincture of benzoin - what it is, how to carry it
Tincture of benzoin is great to have in your first aid kit, as it's often the only way you can make tape stick to sweaty feet to prevent blisters. Here’s a crafty way to carry it that’s leakproof, low-cost, and very lightweight.
Tincture of Benzoin is a brown liquid that looks like iodine, which toughens skin and makes it very grippy for tape application.
Putting a dab on your heels be fore taping is a great way to get tape to stick on sweaty feet for blister prevention.

I always have it in my first aid kit. Put a few drops of benzoin on a fingertip, rub it over the area to be taped, and wait about 2 minutes for it to dry. Rip off some tape, and smooth it over the benzoined area. The benzoin will make the tape grip on your sweaty feet, and the surface of the tape provides a low friction surface to stop blisters from developing.
However, benzoin generally comes in a heavy glass bottle that holds much more than you’d need on a weekend trip.
It also comes prepackaged in some commercial first aid kits, in small glass vials or pre-applied on a Q-tip sort of thing. Both of these are Less Than Ideal, because the glass can break, and the single use Q-tip thing can dry out before you use it.
Here’s a great way to carry benzoin, with just the amount you need in a tiny container that will never leak.
Buy the tiniest (and cheapest!) bottle of eyedrops you can find – probably 1/8 of an ounce.
With a safety pin, slightly enlarge the dropper hole.
Squeeze out and discard the eyedrop solution.
Pour a bit of benzoin from the large drugstore bottle into a bottle cap or other small disposable container.
Squeeze the empty eyedropper bottle to make a vacuum, then place the tip into the bottle cap of benzoin.
Release, and the eyedropper bottle will partially fill with benzoin. Repeat until full.
Label the bottle. Cloth first aid tape and Sharpie pen works well.
Refill after a trip as needed. This weighs next to nothing, is leakproof, holds enough for many applications and it’s easily refillable. The original glass bottle is huge and holds more than you'll ever use, so feel free to share it with a friend.
Tiny eyedropper bottle about 1/2 full of benzoin, penny for scale.


Everyone carries a nut tool
You may think that a nut tool is only for the second who’s going to be cleaning the gear. Here's a few good reasons why the leader may want to carry one as well.
You may think a nut tool is only for the second, but it's a good idea if the leader carries one as well. Why?
If the leader yanks hard on a nut to set it, and then decides whoops, they want to take it out and use it somewhere else, they need a way to do that.
Sometimes the leader can use a cleaning tool to, ahem, “clean” placements that have dirt or tiny rocks.
If the second drops their cleaning tool, the leader has one as a backup.
Sometimes to extract a deeply buried cam, you may need two nut tools to pull on both sides of the trigger.
It's one of the least expensive and longest lasting pieces of gear you're ever going to buy, so pretty much every climber should carry one.
If you choose a bare-bones nut tool that doesn’t come with it’s own racking carabiner, be sure and get a full strength mini carabiner for it.
Don't use a cheap keychain carabiner for this, because someday you'll find yourself scavenging this carabiner for a real climbing purpose, and when that day comes you want a full strength one.
The Metolius Torque is a good choice. It has a carabiner built into clip to your harness, a smooth end to not hurt your palm so much when you smack it, and the clever design of several sizes of wrenches to tighten loose hanger bolts.


Tricams - part of the trad climber’s toolbox
If you have a close look at the harness of an experienced trad climber, odds are you’ll find a few tricams. There’s a reason for this. Learn why they may deserve a place on your rack.
Tricams are often an underappreciated bit of gear; if you haven’t used them, you might be missing out. Less expensive, lighter, and sometimes more versatile than active cams, they may well have a place on your rack. (This is especially true of the fabled pink tricam, which has a legendary following among a subspecies of trad climbers.) Once you get into harder grades you'll probably be reaching for spring loaded cams more often, but when you're learning and for easier terrain, tricams can be pretty sweet.
A few tricam tips . . .
Get the smaller sizes. A good starter set is the first four smallest units, least expensive when purchased as a set. You won’t have much use for the huge “cowbell” tricams, which are typically seen only on the harnesses of graybeard mountain goats, who have been climbing since Mt. St. Helens was a real mountain, and are still using harnesses braided from blackberry vines and mud.
Because they can be placed in so many positions, tricams can be great for building anchors. Consider using your active cams when leading, and keep tricams in reserve for anchor building.
In a horizontal crack, place the "stinger", or point, facing down. This usually gives a more secure placement. Tricams can be especially effective in horizontal cracks, because their flexible runner easily handles being loaded over the edge of the crack.
On lead, always try to extend the placement with a runner to minimize the rope wiggling the tricam out of position.
One of the main gripes against tricams is that they can be hard to clean, especially if the person that placing then gives a stout tug. This can be true! Don’t use them when you’re aid climbing and expect to ever get them back again, ask me how I know this.
Give a gentle tug to set them, but expect your second to curse a bit when they arrive and maybe even ask you for a take while they try to clean it. Be sure your second has a cleaning tool.
They now come in a few different flavors and different styles of webbing, but they all pretty much work the same way. And, as mentioned, consider the pink one at the very least!
https://www.backcountrygear.com/camp-dyneema-tricam-set.html

image: backcountry.com

Uses of the butterfly knot
The butterfly knot is probably something you didn’t learn on day one of climbing school. But after the basics, it's a good one to add to your toolbox. Learn five climbing situations where the butterfly knot comes in handy.
The butterfly is generally not one of the standard climbing knots beginners learn, but it’s well worth learning once you have mastered the basics.
It's often referred to as an “alpine” butterfly, but I have no idea why. Let’s drop the “alpine” and just call it a “butterfly” knot, okay?
Photo: butterfly knot used to isolate a damaged part of the rope.
How is the butterfly knot useful for climbers?
The butterfly is generally easier to untie after it’s been weighted. Use it anytime you're significantly weighting a rope (like fixing ropes for a big wall, or tying off one end of rope for snow anchor testing or crevasse rescue practice.) Grab each of the "wings" of the knot and flex them back and forth to untie. Once you gain some experience with the butterfly knot, you may find that you use it to replace the figure eight on a bight in just about every situation.
It’s symmetrical and can be loaded on either strand. This makes it a good choice for the middle member(s) on a rope team. While a figure eight or overhand on a bight is acceptable for the middle person, it’s designed to be weighted in only one direction. As the middle person on a rope team, you don't know which strand will hold you in a crevasse fall.
It’s adjustable. If, after you make the initial loop, you decide it needs to be a little longer or a little shorter, you can feed the slack through the knot to adjust the size of the loop. (You can do this with a figure 8 on a bight, but it's quite a bit more awkward.)
It can be tied as a “brake knot” between rope team members for glacier travel, to help minimize the length of a crevasse fall. Any kind of crevasse rescue situation is more difficult with just one person doing the pulling, but if you tie a few knots in the rope between you and your partner, these can hopefully catch on the lip of a crevasse in the event of a fall, and minimize the length of the fall. (Yes, they can complicate the rescue, but that’s another topic.) Under the right conditions, this has been tested and proven effective. There is also another knot that has a slightly larger diameter called the brake knot, which may be preferable for two person crevasse travel, but the butterfly is acceptable.
It can isolate a damaged part of the rope. Through stepping on the rope with a crampon, an ice tool puncture, being loaded over a sharp edge or maybe rock fall, a rope might get some minor damage so you’re not comfortable using it anymore. With the butterfly, you can isolate the damaged part of the rope inside a loop of the knot and you’re good to go, with a near full strength and full length rope. (Now you need to figure out how to pass the knot while you are on rappel or belaying . . . but that’s a different topic!)
How about a directional / in-line figure 8?
This might be a useful knot in some sorts of rigging situations, but for recreational climbing I personally don't see a need for it. Anything the directional figure 8 can do, the butterfly can also do, so why bother?
That's not just my opinion, Australian rigging expert Richard Delaney feels the same way, check out the short video below.
And, because it's pretty much impossible to explain how to tie a knot in words, here is a short and sweet video from REI that does the job.
(It's not my preferred method, because this darn knot has probably more ways to tie it than just about any other, but it works fine. My advice: just learn one good way to tie this knot and don't confuse yourself with several.)

Posting photos online? “Redline” your route
Posting photos of your latest mountain outing is great. How about making them a lot more useful by adding in some route info with simple drawing tools?
As we like to say here at AlpineSavvy: “A map or photo of the route is great, but a map or photo with your route drawn on it is better.”
You’ve just finished a climbing route that’s been on your tick list for a long time, you took a bunch of great photos, and you’re ready to post to social media.
If you have some good photos of the mountain and route, do everyone a big favor before you post: take a minute or so, use a simple photo editing tool, and “redline” your photo(s) showing exactly where you went. This turns your photo from a pretty picture into a useful tool for anyone who sees it. (And it sure doesn't have to be red, use any color you like.)
Drawing a simple line on a photograph can be done with lots of free or browser-based photo editing software. If you want to get fancy, you can add an arrow or some text annotation as well. (I’m a fan of PhotoScape X. It’s free, works on Mac and Windows, lots of features but still easy to use for simple things like text and arrows.)
Note that you don't even have to use your own photo for this. You can take a Google Earth screengrab, save it as a jpeg, and then draw over that. Examples are below.
It’s helpful to make a copy of the original photo before you start so you don’t mess with it.
Example: Here’s a photo of North Sister from the SW Ridge approach. Ho hum, pretty boring. But, add a simple line, and suddenly it's a LOT more useful. And, maybe add an arrow and annotation, which only takes another minute or so, to improve it even more.
Photo taken on route: North Sister OR, SW ridge. Yawn, not much help to anybody.

North Sister, SW ridge approach. Route redlined. Now we have something that’s actually helpful for someone else to routefind.

North Sister, SW ridge approach. Route redlined and key route beta added with arrow and text. (Gee, thanks for ruining my onsight!)

You can also do the same thing with Google Earth screengrabs. Here's an example of the Leuthold Couloir route on Mt. Hood.
Google Earth pro tip: You can easily save an image of your Google Earth screen from the menu. Try File > Save > Save Image. It even lets you add a title and description to your saved image, as you can see below.
Mt Hood, Leuthold Couloir route, Google Earth screen grab.

Mt Hood, Leuthold Couloir route, Google Earth screen grab, with route redlined.
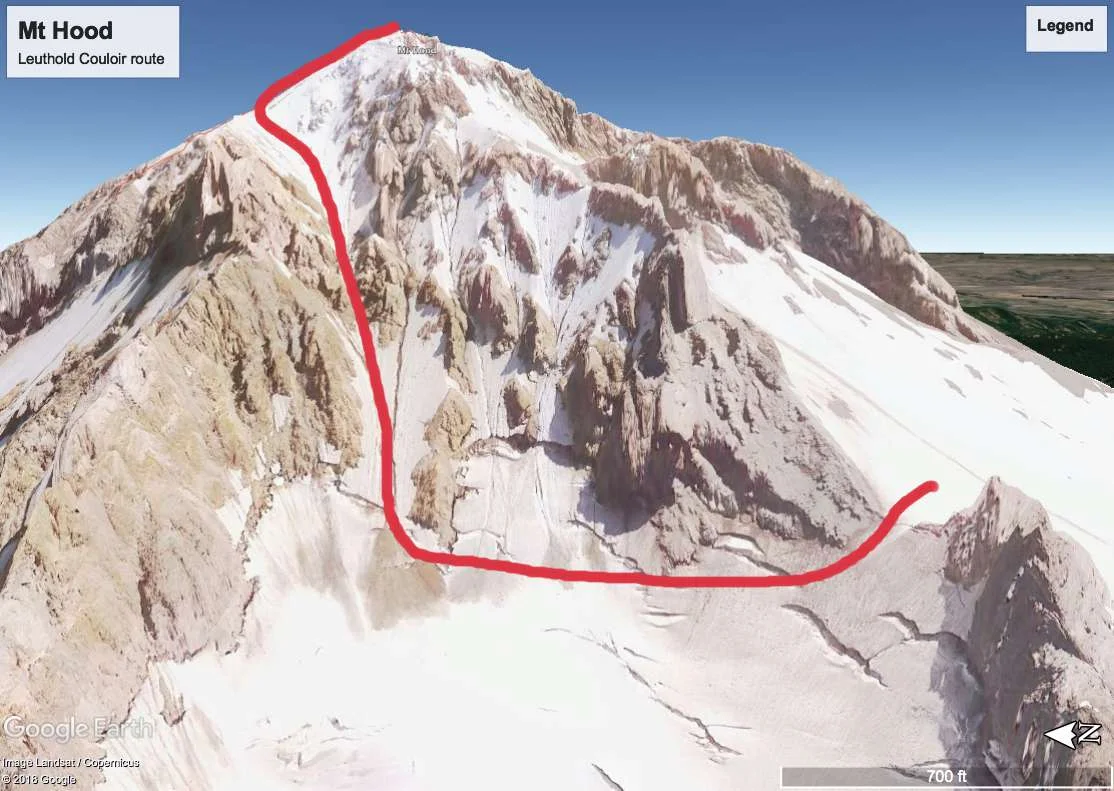
Mt Hood, Leuthold Couloir route, Google Earth screen grab. Route redlined, and adjacent "off route" areas shown.

One other good way to use Google Earth screen grabs is to have your route drawn in with a KML file, and then zoom in close to the ground and take screen grabs looking up the route. This gives you sort of a virtual “climber’s eye” view that can be really helpful for route funding in the field.
If you want to learn how to use KML files in Google Earth, check out this video.
Here’s an example of the Fisher Chimneys route on Mt. Shuksan in Washington, on a section with notorious route finding difficulties. Zoomed close to the ground like this can give you a good reference for making better real world route choices.
