Alpine Tips

Big wall haul rope options: length, diameter, static or dynamic?
Big wall climbers have to choose between three variables when choosing a haul rope. Here is one great option.
This tip is from big wall expert Mark Hudon. See more great tips and El Cap route photos at his website, hudonpanos.com
There are lots of different flavors of rope to choose from, but here’s one that should suit just about everybody:
10 mm
60-70 meters
static rope
10 mm minimum because you want burley; haul ropes take a LOT of abuse!
60-70 meters long, because you can use the tail of the rope as a lower out line, and 70 meters is long enough for any pitch. A 60 meter rope should work fine for most routes as well.
Static, because hauling on a dynamic rope is not so fun; you have to pull all of the stretch out of the road before you even start to move your haul bag. However, some big wallers like using a dynamic rope for hauling, reasoning that if the lead rope were to be damaged, you could continue on with the haul rope. Like with most things in climbing, this can come down to subjective preferences, so give each one a try on a practice wall and see which method you like.
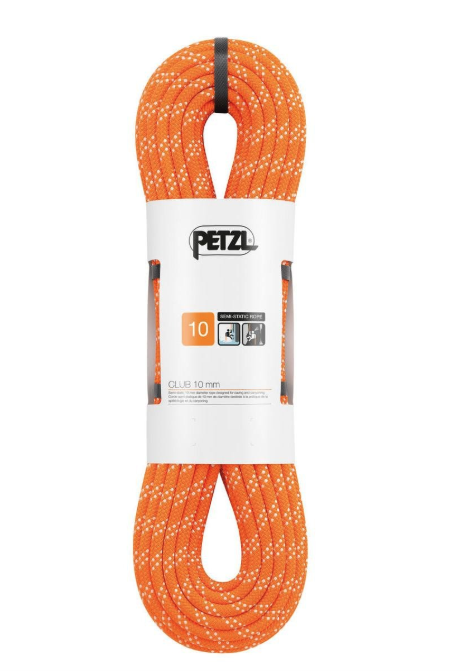
Petzl "club" 70 m static rope. image from gotyourgear.

Portaledge set up - Top Tips
Setting up your portaledge and getting it dialed to the perfect height can be an acrobatic and frustrating challenge. Here are some wall-tested tips to make it a lot easier.
Some of these tips are from big wall expert Mark Hudon. See more tips and El Cap route photos at his website and Instagram.
Some diagrams here are from vDiff, an outstanding online big wall course. Images from this course are shared here with permission.
See related post - Assorted "vertical camping" tips
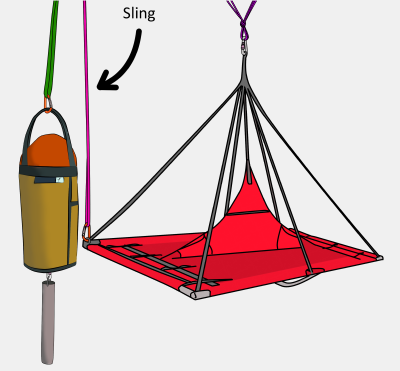
Here are several possibilities to rig your ledge and haulbags.
The combinations to do this are near limitless, here are just a few examples to get you started.
(Images and captions, shared with permission, are from VDiffclimbing.com. I highly recommend this online big wall course.)
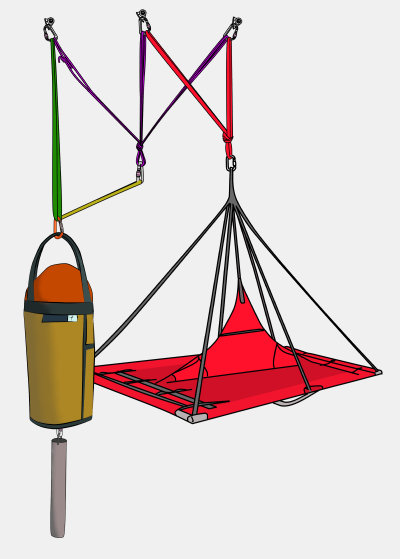
Haulbags docked on left bolt, backed up to main point. Portaledge hanging from trad gear, backed up to right bolt.

image, used with permission : https://www.vdiffclimbing.com/big-wall-camping/
Haulbag docked on left bolt, backed up to main point. Portaledge hanging from right bolt, backed up to center bolt.
image, used with permission : https://www.vdiffclimbing.com/big-wall-camping/
Haulbags docked and backed up on main point. Both portaledges hanging from trad gear, backed up to a bolt.
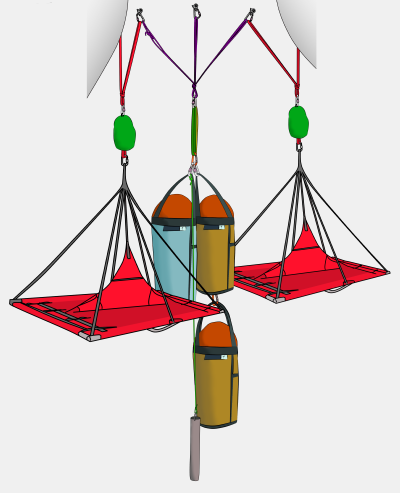
image, used with permission : https://www.vdiffclimbing.com/big-wall-camping/
Give yourself enough room to set up your ledge, but stay secure. You need to move around a lot when you're setting up your ledge. To give yourself enough slack to do this, take a large bight of lead rope, tie it to the same anchor bolt as your ledge, and attach yourself to this rope with a GriGri.
Between using aid ladders and this extra rope, you should have enough room to swing around and set up your ledge. Because you are clipped into a closed loop, there's no way you can slide off the end.
It's pretty much a one person job. Setting up the ledge is generally best done by one person. While you're setting up the ledge, your partner can be unpacking the haul bags, sorting the rack for the next day, and stacking the ropes in rope bags.
Keep suspension straps long. The suspension straps are not really for setting the height of your ledge. They’re more for fine-tuning and balancing. For the most part, they should be kept long and extended. If you shorten them up, they merely reduce the living space in your ledge.
Pay attention to the door on your rain fly, and make sure it faces your haul bags. For example, if your rain fly door opens to the left, you want to hang your ledge on the right side of the anchor, and have your haul bags docked on the left side of the anchor. This offers easier access to the bags once you're zipped inside your rain fly.
When tightening the floor tensioner straps, clip a carabiner to the straps, and pull on the carabiner to tighten up the floor. The carabiner gives you an ergonomic handle to really crank down on the tension straps, which is much easier on your tired wall hands. Tension the outside corners first, then the inside straps.

photo: Mark Hudon
Hang from a fifi hook or adjustable daisy when leveling the ledge. The last step is to adjust the long straps that hang from the anchor point to make the ledge hang level. Fine-tuning this can be tricky to do when you’re actually standing or sitting on the ledge, as your body weight is constantly shifting the natural "angle of the dangle" of your ledge. Try this simple trick: First, loosen all leveling straps to their full length. Then, hang by your fifi hook or adjustable daisy from the anchor point of the ledge, putting no body weight on the ledge itself, while you adjust the length to make it (more or less) level. This lets the ledge hang in its natural position, but with you close enough to the corners so you can reach all the straps.

Yates adjustable daisy
Attach a Yates adjustable daisy to the top clip in point of your portaledge. This gives you an easy way to adjust the exact height. Generally, this ideal position is about 2/3 of the way up the side of your haul bag. (Of course, this varies depending on the belay and bolt configuration.) This allows you to stand up in your ledge and easily rummage around in your bag. Adjustable daisies should be retired from lead climbing once they start to get fuzzy and worn out, and a “retired” daisy works fine for this ledge connection.
This Yates adjustable daisy is not the only connection of the portaledge to the anchor. Do you really want to be sleeping hanging off only some flat webbing in a cam buckle? I didn't think so. Mark’s pro tip: permanently tie 10 feet or so of 8 mm cord to the top of your ledge, and then have that go off to another bolt to back up the adjustable daisy.
Once the ledge is set up, transfer everything you need for the night to stay comfy from the haul bags. Ideally, you do this once, because getting in and out of the bags multiple times is a hassle.
Have your gear in color-coded stuff sacks. Mark likes different color coded bags: kitchen, food, clothing, personal care, and technology. This makes pulling out exactly what you need from the bottom of the haul bag a lot easier. You can get some sweet big wall stuff sacks from High Mountain Gear.
Consider hanging an aid ladder (or sewn pocket daisychain) close to your end of the ledge. You can use the steps or loops to clip in most all of your personal gear, and not have it dangle in your face when you're sleeping.
Having some sewn tie in points points added onto your ledge makes it much easier to keep your stuff safe and secure. Learn how to use a Speedy Stitcher awl to make your own, or make friends with your local shoe repair shop, who probably has a sewing machine that's older than you are that's sturdy enough to sew through heavy duty webbing.
Consider getting a dozen or so small “bivy carabiners” that are only used for clipping stuff bags, shoes, water bottle, etc. onto your ledge. It's helpful if these carabiners are all one model and color, so can tell at a glance they’re for camping, not climbing. In case you ever mix them up, be sure and buy proper rated climbing carabiners and not the cheapo keychain carabiners from the hardware store.
Here's a solution to one of the most annoying and scary parts of portaledge camping. With your ledge only hanging from one suspension point, when you put weight on one corner (like the one nearest your haul bag when you need to get something) your ledge wants to flip you out into space. Solution: run a sling, or maybe a cordelette with a clove hitch to adjust the length properly) to that corner of the ledge, and clip that cord to the anchor. Now you can stand on that corner and your ledge won't flip you.
image, used with permission : https://www.vdiffclimbing.com/big-wall-camping/
When you have it all dialed, you’ll be a happy vertical camper, like this guy!

image from Morning in the Portaledge - https://www.youtube.com/watch?v=GnxpesLE1Q0

Big wall - what's the leader’s first tasks at the anchor?
Yes, you just had a hair-raising lead, and all you want to do at the anchors is catch your breath and maybe pop a Valium. Sorry, you've got a few tasks first.
This tip is from big wall expert Mark Hudon. See more great tips and El Cap route photos at his website, hudonpanos.com
Once the leader arrives at the anchor after a big wall lead, they have one main task: Get your second off of the anchor below you as quickly as possible, and THEN get comfortable.
But the second can't do much until the leader does 3 things:
Build a simple strong anchor as quickly as possible
Fix the lead rope for your second
Set up your haul system and pull a few strokes to get the haul bags off the anchor
Do these in order. (If communication is difficult because of wind, a long pitch, or the route going out of sight, when the second sees the haul bags start to move, they automatically know that the lead rope is already fixed for them.)
Only after all this happens can the second start breaking down THEIR anchor and start cleaning.
After these 3 tasks are done, only THEN can the leader take a break!
When you're big wall leading, resist the temptation to kick back, take pictures, relax, etc. right when you get to the anchor; you still have work to do.
Side note: Should the leader pull up slack rope before fixing?
Usually, no.
However, on a shorter pitch, it might help for the leader to pull up the lead rope until it comes tight-ish on the second before fixing. Doing this means the second doesn’t have to carry the entire weight of the rope hanging below them as they’re cleaning, which can save them quite a bit of energy. (Of course, if there are any lower outs or other sneaky maneuvers where the second requires extra rope, be sure to leave them enough slack to make that move.)

The best liner socks to avoid blisters?
Blisters are usually caused by friction. Minimize friction with a slick pair of liner socks.
For a blister preventative, try this – polyester dress socks as a liner sock. Your climbing pals will envy you as the best dressed hiker at the trailhead, and your feet will be happy as the slick synthetic socks slide right over those problem areas of your heel. Blisters are typically caused by friction, and if you can minimize friction inside your boots, you decrease the chances of a blister forming.
I once had some boots that took a long time to break in, and I had constant blister problems. After trying most other blister preventative tricks out there, I gave this as try – even though it sounded pretty goofy. Not a single blister.
You can buy low-end dress socks for about 3 pairs for $10. Costco usually has multi-packs for a super low price.
It's fine to combine this with preventatively taping your known problem areas, such as the back of your heel. Remember to use tincture of benzoin on your skin before you put on the tape, to make sure the tape doesn't slide off.

Acute Mountain Sickness (AMS) - a quick field check
Here’s a quick test to see if your climbing teammate is suffering from altitude induced loss of coordination, which can indicate more severe problems.
Acute Mountain Sickness (aka AMS, or altitude sickness) can bring you or a teammate to a halt with various mild symptoms such as loss of appetite, headache or nausea, Untreated, it can lead to more severe problems like cerebral or pulmonary edema.
In particular, ataxia, (doctor speak for "loss of coordination") can indicate more severe AMS, or may be a precursor to cerebral edema, which is extremely serious.
Here’s a quick field test can help determine the degree of ataxia, and can help you decide if someone needs to descend.
Ask the AMS affected person to stand in a flat, safe place. Have at least one other person standing alongside to catch them if they start to stumble. Have the AMS “patient” stand with their feet together (insides of the boots touching) have hands at their sides, and finally close their eyes.
If they can hold this position for 10 seconds without a stumble or fall, they are okay to continue. If they stumble, consider a prompt descent.
This tip was taken from from Rock and Ice magazine
A Gamow bag, used to treat severe altitude related illness, is NOT where you want to be on your climb. But it beats the alternative.

photo: http://expeditioncompany.co.uk/

Caffeinated climbing - coffee options
There are lots of options for backcountry coffee, depending on your level of coffee snobbery.
Some of us just have to have that coffee jolt in the morning, but what to do on summit day when the team is ready to leave and there’s no time to brew a real cup of coffee? Here are a few ideas.
1) If you have an espresso maker at home, try this: make a few shots at home, let it cool, then transfer to a small plastic container with a solid lid. In camp, all you need to do is boil water, pour in the ‘spro, and you have an Americano in a few minutes, without fiddling with grounds, filters, and presses. If you lack a home brew espresso maker, just stop at a coffee house on the way to your climb and get a few shots to go. (A great tiny plastic container for this is Gerber kiddie juice bottles.)
2) Bring along a few tablets of No-Doz, Vivarin, or other caffeine tablets. Each tablet typically has 200mg of caffeine, as much as two decent cups of coffee. This might keep your headache away and give you a little giddyup as well. (Note that caffeine has a few side effects that make it not a good choice when climbing, among them making you urinate more. Use sparingly at altitude.) Another use for the caffeine tablets might be to give a teammate who is really slow a little extra boost, when you really don't have time to sit down and properly brew up coffee.
3) If you do have more time in camp, fire up a pot of “cowboy coffee”. Leave the frou-frou camping espresso maker at the REI store. To make real camp coffee all you need is good ground beans and a pot. First, boil some water - a tall and thin pot is best. Once the water reaches boiling, stir in the desired amount of coffee grounds (coarse grind is best), remove from heat and cover. Let the grounds sit for about 3 minutes. Remove the cover and pour a small amount of cold water over the surface of the hot coffee. Immediately give the container a solid whack or two on the side with a spoon. The cold water wants to travel to the bottom of the pot and as it descends, it will take most of the grounds with it. Take care not to agitate the pot too much as you may re-suspend the coffee grounds.
4) If you can handle instant coffee, Trader Joe’s (and most Asian grocery stores) sell small packets of premixed creamer, sugar, and instant coffee. This is a very fast and convenient solution, if not the tastiest.
5) For early morning trailhead departures, canned coffee is a good alternative. Check Trader Joe’s for some well-priced triple espresso lattes, yummy!

Post climb comfort
Plan ahead a bit, and enjoy a little luxury when you get back to the car after your epic.
We finished our climb and were back at the car at the trailhead after a long hike out. We were both sweaty, thirsty, and starving.
I started rummaging in my glove box in search of last summer’s Clif bar, and reached for the lukewarm gallon of water I always kept in the trunk .
Meanwhile, my climb partner . . .
strolled over to the small creek next to the trailhead and retrieved an icy cold adult malted beverage she stashed there 3 days back when we arrived.
After she cracked her beer, she wiped off the trail grime with a few unscented baby wipes she brought in a ziplock bag.
Then, she grabbed a bag of chips and inhaled the calories and salt that are so well earned after a big climb.
Finally, she changed into a fresh T-shirt, shorts and comfy sandals for the long drive home, and topped it off with a canned energy drink (also cold from the creek) to stay alert while driving.
She glanced over at me with a smirk. “So", she said, "how’s that Clif bar?”

Have a “plan B” for climbs - bring an extra guidebook
Toss that extra guide book in your car before a trip, case you need to suddenly change objectives.
There are many reasons why a climb may not “go”, from the route being too dry or too wet/snowy, wildfire closures, getting lost on the approach, or being attacked at base camp by a well organized gang of rock rodents.
So the weekend isn’t a total bust, consider bringing a guidebook or two for other nearby hikes or climbs in case the main destination doesn’t work out. If the primary climb goes, the guidebook stays in the car. That way, you may be able to enjoy an alternative destination, and still be able to salvage the trip. This becomes even more important with high gas prices and the longer a trip is from your home!
You can of course bring a physical guidebook. Or, it might be more convenient for you to buy a guidebook or two in Kindle format, and just keep that loaded onto your phone so it's always there.

Climb faster – by stopping less
Here’s a few simple ways to shave hours of of your climbing time. Individually, not so much, but taken together, it can save you major time.
Mountain trivia question: Most Pacific NW climbers know the vertical gain from Timberline Lodge to the top of Mt. Hood is about 5,000 feet. But how far is the linear distance from Timberline Lodge to the summit of Mt. Hood? Answer: about 3 miles – a lot less than most people think. “So”, you may reason, “even if I walk at the slow pace of 1 mph, I should be able to climb Hood in 3 hours.” If that’s even close to being true, why do many parties take upwards of 6-7 hours to reach the summit?
The answer lies largely in how often you stop. For most moderate snow ascents such as Hood, speeding up the “climb time” is much more a matter of minimizing breaks than it is actually walking faster. It’s simple - avoid time spent standing still. On a moderately paced climb, a fit climber should not really need to take breaks of more than 10 minutes. The constant two and three minute stops to adjust clothes and get a bite to eat can really add up to hours at the end of the day – especially if everyone on your team is doing them at different times! Here’s some tips to better organize your gear, clothes, food and pockets to shave time off your next climb.
Remember: keep often used items in pockets you can access while on the move, not in your pack.
Consider an add-on front pocket for your pack, like the Marmot Dry Rib. It’s a very handy place to store often-used goodies like sunscreen, GPS, map, gloves, hat, snacks, small water bottle, etc.
While the main food bag and larger water bottles can stay in your pack, keep snacks and a small water bottle in pockets or clipped to easily eat on the go.
Keep gloves and hat in pockets, not in your pack, to more easily regulate your temperature.
Have a versatile layering system with lots of venting zippers to minimize clothing breaks.
Don’t use an ice axe leash. Use a lanyard instead, clipped to your harness – so you can change hands quickly when switchbacking uphill.
Be competent in all the rope skills (clipping through protection, for example) needed for the climb.
In a larger party, agree to take a fixed break at a fixed time, such as a 3 minute break every 20 minutes. If you need something from your pack, wait until the entire group takes a pause together.

Downward Bound – options for faster downclimbing
There are several ways to descend. Generally, choose the fastest, and pick the right one for the skill of your team members.
When descending, options are basically these:
rappelling (slowest)
fixed line travel (next slowest)
downclimbing (fastest)
If the terrain can be downclimbed or all or most team members, that should usually be your first choice. If some of the team can downclimb but some don’t want to, send down the climbers first, then rap or travel fixed line with the rest - don’t make everyone rappel.
What if the terrain is a loose and rocky, with a high chance of climber-induced rockfall? The conservative, (and slow) approach is to send down only one person at a time through the shooting gallery. However, it’s often just as safe to send down 2 or more people at the same time, and making sure they stay close together, ideally on the same contour. That way, any rocks kicked loose bound harmlessly away, and two (or more) can descend in the same time as one.
One other option is what's called “downleading”. The second to last person descending can place some gear and clip the rope to it, to partially protect the last person who downclimbs. It's covered in more detail at this tip here.

Is there a wildfire near my climb? Check here
Use this great website to see all of the active wildfires in the Western US. Check this before you leave home in the summer - don’t let a distant fire shut down your trip.
A few years back, I was heading out the door out to try the West Ridge of Mt. Stuart in central Washington - an area notorious for summer fires. As we rolled out the driveway, I had a sudden thought. “Hey, I’m going back in and check for fires, I think I heard something on the news,” I said.
Sure enough, a call to the local US Forest Service office told me a fire had started the day before near the trailhead and all backcountry access was closed. If we hadn’t checked, we would have driven 5 hours for nothing. Even if a fire may be far away from your destination, the land management agency still may decide to close a big area. Don’t let this ruin your weekend, always call first!
Here are three websites and phone apps that can give you the most current fire information: 1) CalTopo, 2) Gaia GPS, and 3) Inciweb.
1 - CalTopo “Fire Activity” map overlay
From the always awesome CalTopo, click on the map overlay “Fire Activity”. The fire data come from a variety of sources, typically satellite-based. It shows where the active fronts of the fire (red and orange) are, which can be more useful than simply seeing the area that's been burned. This is my new go-to for active fire info. You can read more details at the CalTopo website.
This works on both CalTopo platforms, desktop and phone app. Plus, it's free! (Fire maps below from Sept 2020.)

Here's what it looks like on the CalTopo phone app. Tap the “map layer” icon in the top right corner, and check the box next to “fire activity” to add this overlay to your chosen base layer, here Open Street Map.

2 - Gaia GPS
Gaia GPS is a good place to check, because in addition to fire coverage, it shows smoke coverage forecasts which can be helpful also. It takes a few clicks, but follow the steps below and you'll have it set up in a minute or so.
Go to gaiagps.com. If you don’t have an account, make one for free. (Normally Gaia offers weather information like this only to Premium level subscribers, but to their credit, they make fire and smoke maps free to everyone, thanks Gaia!)
1 - Click “Layers” on the left side menu.

2 - Click “Add Map Layers”

3 - Click the “Weather” icon.

4 - Select anything in the purple boxes you want to see by clicking the green “plus” icon to add it to your map.

Click the back button. Toggle on the layer you want to see. Here's the 24 hour smoke forecast, yuck (July 24. 2021)

Here’s is the current Air Quality map. (Yikes, let's not go to North Central Washington this weekend.)

Finally, here’s the current wildfires map layer.

3 - InciWeb
InciWeb is the “Incident information system” for active wildfires throughout the west. You can click on each icon for more detailed information about each fire, such as the location, the lead agency fighting it, start date, how big it is, containment percentage, and expected date of containment. It also has links about campground, road and land closures.
A screen grab from Sept 2020, a major fire year:
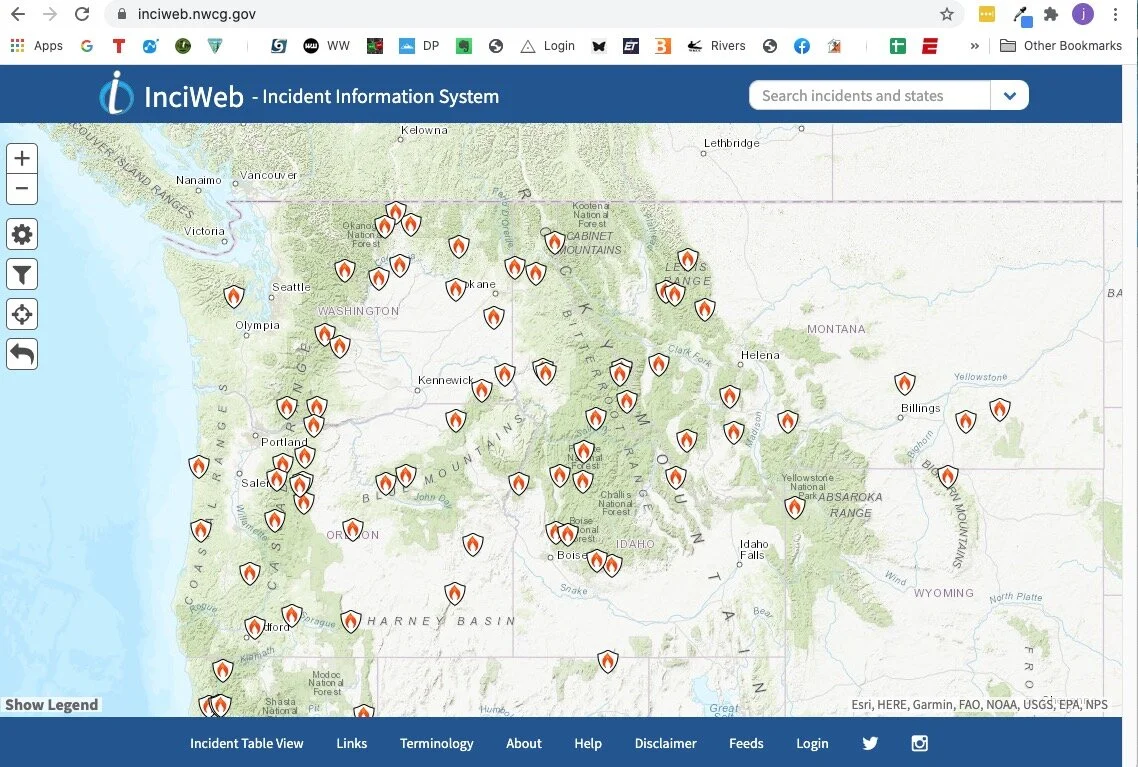
If you click on a fire icon, it brings up more specific information about that fire. If you scroll down the page a bit, there are some easy to miss tabs they can give you helpful info like evacuation announcements, area or trailhead closures, photographs, and more.


Bring a backup map as a PDF file
If you already have a PDF file of a map that you’ve made in Caltopo or other mapping software, why not save a copy to your phone? It’s free, fast and weighs 0.00 grams.
With modern mapping software such as Caltopo, it’s easier than ever to procure or make a PDF file of a good quality map. While you should of course have a printed map with you, why not also have a copy of the PDF on your phone?
(In addition to a map, you can take photos or scans of guidebook pages, or even an entire guidebook as a PDF file, if it's available. Or, you can really go for it and maybe purchase an entire guide book in Kindle format, and keep that on your phone as well.)
The map is free, a PDF file does not “weigh” anything, and it takes just a minute to add it to your phone. Having a backup copy of the map on your phone can be handy if your paper map is lost or destroyed, and it lets you share it with someone on your hike or climb who perhaps did not bring one. You can pan and zoom, and with a good pdf, be able to see even fine map detail.
Android people, I'm not sure about you, but there are several ways to view a PDF file on your iPhone. Here’s how I do it.
Save or download the map to your hard drive.
Email it to yourself and open the email on your phone with the native iPhone email app (not Gmail, Outlook, etc).
Tap the email to download the PDF, this should take a just couple of seconds.
Do a long touch on the PDF file. A window should open that gives different way to view or save it. I use the native iPhone “iBooks) app.
Tap “Open in iBooks”, and the pdf should open for viewing in iBooks.
Below - example .pdf map made in Caltopo of the Adams Glacier route, Mt Adams, WA. (This is a screen grab, the actual PDF file has a better resolution than this.)


Google maps pro tip - Full 3D in satellite view
Want to make Google Maps act like Google Earth, and view the whole world in fly around 3-D satellite view? Here's how to do it.
Here’s a very cool yet little known function in Google maps - Satellite view 3-D fly around, which makes Google maps behave pretty much like Google Earth. This is great for scoping out your next backcountry adventure. Super simple, here's how to do it.
(Open Google maps up a new browser tab and give it a try!)
Zoom into your favorite mountain in Google maps.
Change to satellite view by clicking the satellite icon in the lower left corner. (Yes, it still looks pretty useless, but wait, it gets better!)
Click the “3D” button in the lower right corner.
Hold down the control key on your keyboard, and left click and drag.
Use the scroll wheel on your mouse to zoom in and out. (Yes, a mouse with a scroll wheel is a big help here.)
This gives you complete 3-D viewing. Click the 2-D button to go back into "direct overhead" view.
Before this feature, the only way you could do this was to zoom around in Google Earth, which takes longer to load and has a bit of a learning curve to effectively fly around.
Mt. Adams (WA) in 2D Google maps, standard view, YAWN!
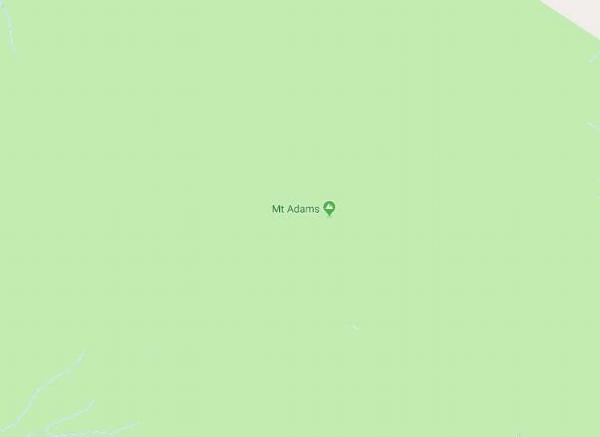
Mt. Adams in 2D Google maps, satellite view. More useful! Click "3D" in the lower right.
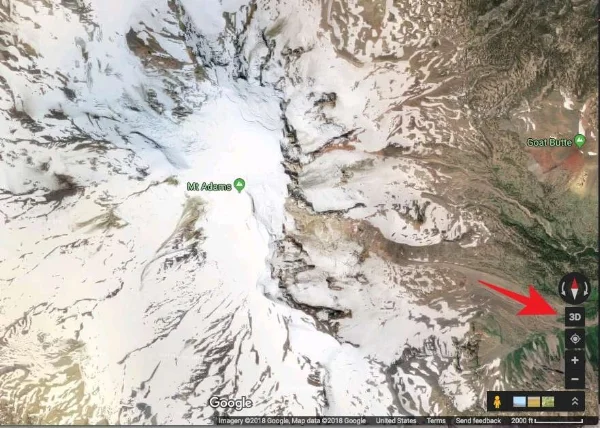
Now we're cooking! Zoom and pan around the mountain like Google Earth, to see the satellite view in 3-D.


How to make the "alpine quickdraw"
You want to avoid having gear dangling below your knees. So, how to rack those 60 and 20 cm slings? Answer: the “alpine quick draw”.
A good rule of thumb in climbing is to never let anything hang below your knees. But what do you do with a single /60 cm or double / 120 cm runner to shorten it up for racking?
Answer: the “alpine quickdraw”.
A simple trick is this method, best described with a photo. This triples up the webbing material, shortening your runner to a manageable length. You can clip to gear it tripled like this, or remove two of the three strands from one carabiner to use it at full extension.
(I learned this crafty trick decades ago, and still remember my fascination at seeing it for the first time. At the time I thought it was the really clever! Hopefully if this is new to you, you’ll think somewhat the same thing. :-)
1 - Start with a runner and two carabiners.

2 - Pass one carabiner through the other.

3 - Clip the bottom loop.

Done! A short and compact draw that hangs nicely on your harness, but is easy to deploy at full length.

Safety note: Having a rubber band or something similar to prevent the bottom carabiner on a sport climbing quickdraw from rotating is fine. But you never want to do this on an “open” sling, as the rope can easily become completely unclipped from the carabiner without you noticing. More details at this article.


Glissading - not always your best option for descent
Glissading - You might have learned how to do it on your first day of climbing school. It can be fun, save time, and your quads muscles in certain ideal situation. But there are also a lot of reasons why you may want to avoid it.
Glissading, the skill of (mostly) controlled sliding down a snow slope either sitting or standing, can be a lot of fun and save you time and legs on the proper slope. Pacific NW routes where this can work well include Mt. Hood south side, Mt. Adams south side, the Muir snowfield on Mt. Rainier, and various routes on Mt. Shasta.
Beginning climbers often learn this technique on day 1 of snow school, and then mistakenly think that it's something to be done at every opportunity. (And, hopefully you learned this on day 1 of snow school as well, but it's worth repeating: never glissade with crampons on!)
However, glissading has some serious downsides, and saving a few minutes on the descent may not always be worth it. Before you glissade, consider these points:
Much greater chance of injury than simply walking (usually a broken/sprained ankle, going too fast and cratering into a rock, talus or scree, or dropping into an unseen crevasse)
You wear out your gear faster (seat of your pants and pack bottom)
You get your butt wet
You can lose gear strapped to the outside of your pack, like trekking poles and crampons unless it’s very well tied down
Questionable time savings – saving 20 minutes on a descent by glissading may not mean so much when you weigh it against the downsides mentioned above, and the fact that a round trip climb may take 8-10-12+ hours.

LED “keychain” lights
Micro LED lights are handy to have around the camp, in your emergency kit, in the car glove box, in your chalk bag zipper pocket . . . They’re inexpensive, so might as well buy a multi pack.

image: https://www.amazon.com/Finware-Keychain-Flashlight-Batteries-Included/dp/B01GVJFBUW
Tiny ultra-light, single-bulb LED lights might look like a toy for a keychain, but they’re useful for far more than that. Get a few of them, they’re cheap!
They cast enough light to easily follow a trail in pitch dark, or find that rappel anchor heading down from a longer-than-planned alpine day.
Consider putting a shoestring on it, or it’s going to get hopelessly lost. A shoestring lets you to keep it comfortably around your neck, even when you’re sleeping. You could also girth hitch it to a loop inside your tent. Use it as an in-tent light rather than blasting your tentmate with your face-melter 300 lumen climbing headlamp.
Get one that has a switch to turn it on without holding constant thumb pressure on it - not all lights have this feature.
Make a “lantern” in your tent - turn on a microlight, put it on top of a water bottle, and then either tape it or put a sock over it to hold it in place. The light will diffuse through the water, casting a soft romantic glow over you and your smelly climbing partner.
Keep one in your first aid or survival kit for day hiking - no need to carry a heavy flashlight as a backup on hikes when an LED light will probably light your way out in an emergency just fine.
Buy a bunch, keep them in various places. Tape one inside your helmet if there’s room. Does your chalk bag have a zipper? Put one in there. Car glove box? Sure.
Here's an Amazon link to get 5 for just $9. If you have a few extras, give them to your pals.

Fix your broken tent poles
Do you have a broken tent pole? No problem, there’s a Northwest company that can fix it for you.

image: https://www.loopnews.com/
A company in the Vancouver WA area specializes in creating replacement tent poles for most any brand and size of tent.
Check ‘em out: Tent Pole Technologies

Use a “sparker” for lighting stoves
There’s one tool that you can always rely on to light your camp stove. And it's not a lighter or matches.
Lighters and matches don’t always work when damp or wet, and can break or malfunction – especially the cheap ones. Lighters can be less effective at altitude. Even if your stove has a built in igniter, they can be uncooperative; it’s best to have a backup way to light it.
A sparking device, aka “firesteel”, will always light your stove (gas or butane) or help make a survival fire. They have no moving parts, work when wet and at altitude. Weight, about 50 grams, cost about $20.
The simpler sparker models have a striker and a sparker, while a more upscale version has a small bar of magnesium included. Shave off a few bits of magnesium, add a spark, and you get a burst of almost 2,000 degree C flame.
The Swedish company Light my Fire sells high quality sparkers; a solid addition to your 10 essentials kit.


Sterling rope technical manual
What are the two chemicals you should always avoid getting on your rope? If a rope is wet, is it less strong, and by how much? Can I safely mark my rope with a Sharpie pen? Learn all this and more from the experts at Sterling, in their technical manual.
Think you know “the ropes”? The Sterling Rope Company has a great 16 page technical manual (.pdf file). Check this link and learn a few tricks.
(It's a 6 MB file, be patient on the download, it may take a few seconds.)
Learn about . . .
The difference between S twist and Z twist
Details of rope construction
The differences in manufacturing process between a static and dynamic rope
The five requirements of UIAA rope testing
The dramatic loss of strength that happens to a wet rope
The two chemicals you should ALWAYS avoid getting on your rope
The Word on marking your rope with permanent (Sharpie) pens
Sterling rope technical manual

Backup battery and charging cable - the 11th Essential
If you bring electronics in the backcountry, (smartphone and GPS app), it's pretty much mandatory to carry an extra power source. Here’s a great choice, at about 3 oz and $20.

Phones, watches, satellite communication devices, rechargeable headlamps . . . Most of us are carrying more important electronics into the back country, so it's crucial to have a means of charging them.
While always putting your phone in airplane mode at the trailhead to save battery is good practice, having some backup power is inexpensive and lightweight.
Here’s a very detailed article I wrote about battery saving tips in the back country.
Some people only will take an auxiliary battery on a multi-day trip. That works great provided you remember to charge your phone fully in your car driving to the trailhead, but that is a little task that's easy to forget. For me, it's more reliable to just carry a fully charged extra battery and cable as standard practice.
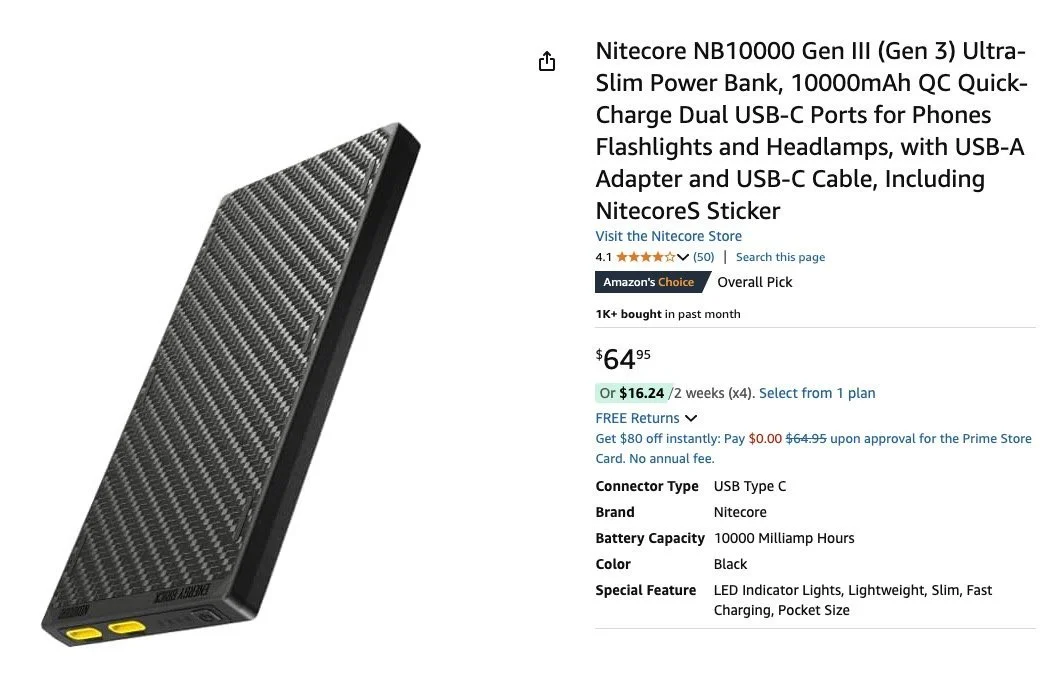
Anker and Nitecore makes great auxiliary batteries in a variety of sizes. With the larger batteries of modern phones, probably 5,000 mAh is the smallest you want to go, which should give you one full charge. (Geek note: “mAh” means milliamp hours, a way to describe battery capacity.)
The photo above is a few years old; now I'm using a 5000 mAh battery. but you get the idea. (Sharpie pen shown for scale)
If you're going on a longer trip, sharing your battery with partner(s) or don't mind carrying a little more weight, go with a 10,000 mAh battery. That can last last one person up to a week.
I like having both - a small one for short term emergency backup, and a 10,000 for longer trips.
A small auxiliary battery and charging cable together cost about $20, and weigh 3.5 ounces / 100 grams. Personally, I consider a battery and charging cable the 11th essential, and carry this tiny additional weight with me on every trip.
Cables . . .
iPhone Lightning. USB-A. Micro USB. USB-C . . . Aaaaaargh!
We all know that having 4+ different flavors of cables is a hassle! This is especially true when you're trying to minimize your gear. Let's hope the move to USB-C as a standard happens fast!
You can get a tiny 4 inch long charging cable for your iPhone; no need to bring the long cord you use at home. I'm sure there's one for Android folks as well.
Tip: cheap charging cables can get damaged getting banged around in your pack and fail when you most need them. Try to buy cables that are a little more durable, and consider bringing two of them on longer trips, they are inexpensive and extremely lightweight.
If you search online, you'll find loads of different battery options, many from off-brand companies. I’ve tried a few of these trying to save a few bucks, and been disappointed. I recommend you pay a tiny bit more and get a name brand like Anker or Nitecore.
Update: as of 2024, this is about the lightest weight and most compact 10,000 mAh charger on the market. I don't have one yet, but it comes highly recommended by some pro guide friends.