

Alpine Tips

Climb faster – by stopping less
Here’s a few simple ways to shave hours of of your climbing time. Individually, not so much, but taken together, it can save you major time.
Mountain trivia question: Most Pacific NW climbers know the vertical gain from Timberline Lodge to the top of Mt. Hood is about 5,000 feet. But how far is the linear distance from Timberline Lodge to the summit of Mt. Hood? Answer: about 3 miles – a lot less than most people think. “So”, you may reason, “even if I walk at the slow pace of 1 mph, I should be able to climb Hood in 3 hours.” If that’s even close to being true, why do many parties take upwards of 6-7 hours to reach the summit?
The answer lies largely in how often you stop. For most moderate snow ascents such as Hood, speeding up the “climb time” is much more a matter of minimizing breaks than it is actually walking faster. It’s simple - avoid time spent standing still. On a moderately paced climb, a fit climber should not really need to take breaks of more than 10 minutes. The constant two and three minute stops to adjust clothes and get a bite to eat can really add up to hours at the end of the day – especially if everyone on your team is doing them at different times! Here’s some tips to better organize your gear, clothes, food and pockets to shave time off your next climb.
Remember: keep often used items in pockets you can access while on the move, not in your pack.
Consider an add-on front pocket for your pack, like the Marmot Dry Rib. It’s a very handy place to store often-used goodies like sunscreen, GPS, map, gloves, hat, snacks, small water bottle, etc.
While the main food bag and larger water bottles can stay in your pack, keep snacks and a small water bottle in pockets or clipped to easily eat on the go.
Keep gloves and hat in pockets, not in your pack, to more easily regulate your temperature.
Have a versatile layering system with lots of venting zippers to minimize clothing breaks.
Don’t use an ice axe leash. Use a lanyard instead, clipped to your harness – so you can change hands quickly when switchbacking uphill.
Be competent in all the rope skills (clipping through protection, for example) needed for the climb.
In a larger party, agree to take a fixed break at a fixed time, such as a 3 minute break every 20 minutes. If you need something from your pack, wait until the entire group takes a pause together.

Downward Bound – options for faster downclimbing
There are several ways to descend. Generally, choose the fastest, and pick the right one for the skill of your team members.
When descending, options are basically these:
rappelling (slowest)
fixed line travel (next slowest)
downclimbing (fastest)
If the terrain can be downclimbed or all or most team members, that should usually be your first choice. If some of the team can downclimb but some don’t want to, send down the climbers first, then rap or travel fixed line with the rest - don’t make everyone rappel.
What if the terrain is a loose and rocky, with a high chance of climber-induced rockfall? The conservative, (and slow) approach is to send down only one person at a time through the shooting gallery. However, it’s often just as safe to send down 2 or more people at the same time, and making sure they stay close together, ideally on the same contour. That way, any rocks kicked loose bound harmlessly away, and two (or more) can descend in the same time as one.
One other option is what's called “downleading”. The second to last person descending can place some gear and clip the rope to it, to partially protect the last person who downclimbs. It's covered in more detail at this tip here.

Is there a wildfire near my climb? Check here
Use this great website to see all of the active wildfires in the Western US. Check this before you leave home in the summer - don’t let a distant fire shut down your trip.
A few years back, I was heading out the door out to try the West Ridge of Mt. Stuart in central Washington - an area notorious for summer fires. As we rolled out the driveway, I had a sudden thought. “Hey, I’m going back in and check for fires, I think I heard something on the news,” I said.
Sure enough, a call to the local US Forest Service office told me a fire had started the day before near the trailhead and all backcountry access was closed. If we hadn’t checked, we would have driven 5 hours for nothing. Even if a fire may be far away from your destination, the land management agency still may decide to close a big area. Don’t let this ruin your weekend, always call first!
Here are three websites and phone apps that can give you the most current fire information: 1) CalTopo, 2) Gaia GPS, and 3) Inciweb.
1 - CalTopo “Fire Activity” map overlay
From the always awesome CalTopo, click on the map overlay “Fire Activity”. The fire data come from a variety of sources, typically satellite-based. It shows where the active fronts of the fire (red and orange) are, which can be more useful than simply seeing the area that's been burned. This is my new go-to for active fire info. You can read more details at the CalTopo website.
This works on both CalTopo platforms, desktop and phone app. Plus, it's free! (Fire maps below from Sept 2020.)

Here's what it looks like on the CalTopo phone app. Tap the “map layer” icon in the top right corner, and check the box next to “fire activity” to add this overlay to your chosen base layer, here Open Street Map.

2 - Gaia GPS
Gaia GPS is a good place to check, because in addition to fire coverage, it shows smoke coverage forecasts which can be helpful also. It takes a few clicks, but follow the steps below and you'll have it set up in a minute or so.
Go to gaiagps.com. If you don’t have an account, make one for free. (Normally Gaia offers weather information like this only to Premium level subscribers, but to their credit, they make fire and smoke maps free to everyone, thanks Gaia!)
1 - Click “Layers” on the left side menu.

2 - Click “Add Map Layers”

3 - Click the “Weather” icon.

4 - Select anything in the purple boxes you want to see by clicking the green “plus” icon to add it to your map.

Click the back button. Toggle on the layer you want to see. Here's the 24 hour smoke forecast, yuck (July 24. 2021)

Here’s is the current Air Quality map. (Yikes, let's not go to North Central Washington this weekend.)

Finally, here’s the current wildfires map layer.

3 - InciWeb
InciWeb is the “Incident information system” for active wildfires throughout the west. You can click on each icon for more detailed information about each fire, such as the location, the lead agency fighting it, start date, how big it is, containment percentage, and expected date of containment. It also has links about campground, road and land closures.
A screen grab from Sept 2020, a major fire year:
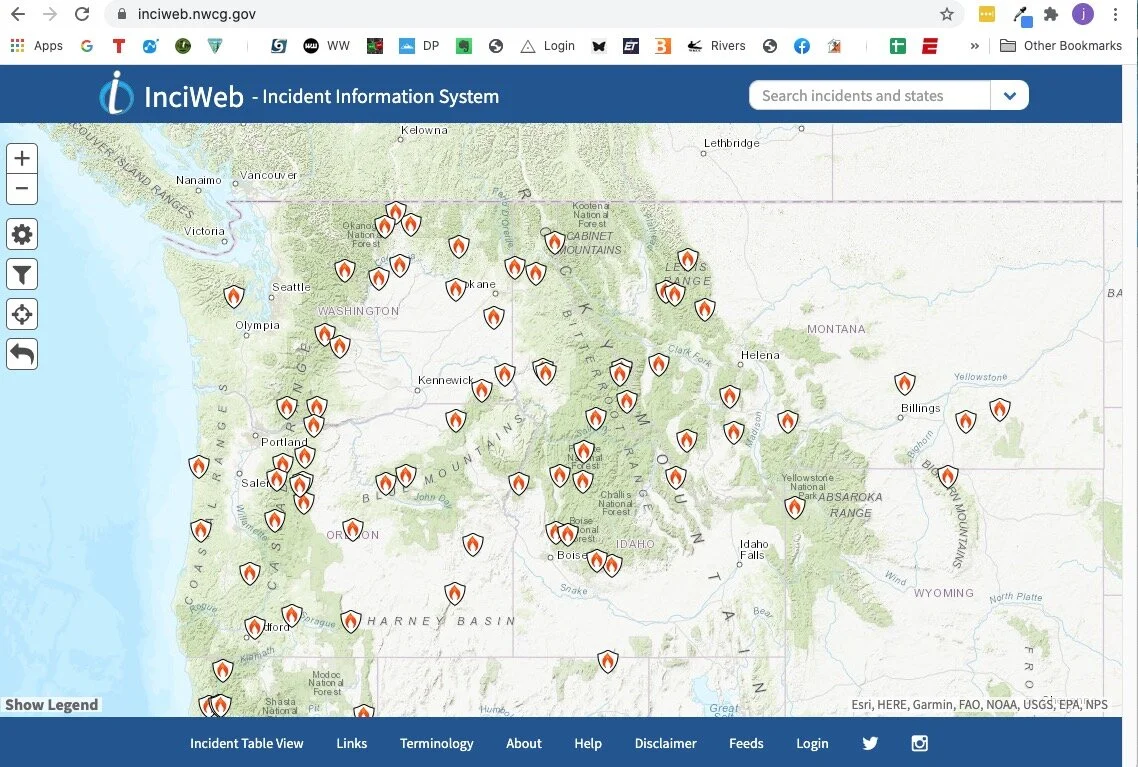
If you click on a fire icon, it brings up more specific information about that fire. If you scroll down the page a bit, there are some easy to miss tabs they can give you helpful info like evacuation announcements, area or trailhead closures, photographs, and more.


Bring a backup map as a PDF file
If you already have a PDF file of a map that you’ve made in Caltopo or other mapping software, why not save a copy to your phone? It’s free, fast and weighs 0.00 grams.
With modern mapping software such as Caltopo, it’s easier than ever to procure or make a PDF file of a good quality map. While you should of course have a printed map with you, why not also have a copy of the PDF on your phone?
(In addition to a map, you can take photos or scans of guidebook pages, or even an entire guidebook as a PDF file, if it's available. Or, you can really go for it and maybe purchase an entire guide book in Kindle format, and keep that on your phone as well.)
The map is free, a PDF file does not “weigh” anything, and it takes just a minute to add it to your phone. Having a backup copy of the map on your phone can be handy if your paper map is lost or destroyed, and it lets you share it with someone on your hike or climb who perhaps did not bring one. You can pan and zoom, and with a good pdf, be able to see even fine map detail.
Android people, I'm not sure about you, but there are several ways to view a PDF file on your iPhone. Here’s how I do it.
Save or download the map to your hard drive.
Email it to yourself and open the email on your phone with the native iPhone email app (not Gmail, Outlook, etc).
Tap the email to download the PDF, this should take a just couple of seconds.
Do a long touch on the PDF file. A window should open that gives different way to view or save it. I use the native iPhone “iBooks) app.
Tap “Open in iBooks”, and the pdf should open for viewing in iBooks.
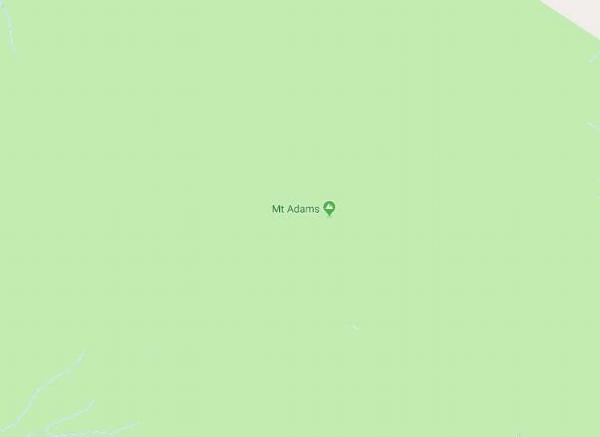
Below - example .pdf map made in Caltopo of the Adams Glacier route, Mt Adams, WA. (This is a screen grab, the actual PDF file has a better resolution than this.)


Google maps pro tip - Full 3D in satellite view
Want to make Google Maps act like Google Earth, and view the whole world in fly around 3-D satellite view? Here's how to do it.
Here’s a very cool yet little known function in Google maps - Satellite view 3-D fly around, which makes Google maps behave pretty much like Google Earth. This is great for scoping out your next backcountry adventure. Super simple, here's how to do it.
(Open Google maps up a new browser tab and give it a try!)
Zoom into your favorite mountain in Google maps.
Change to satellite view by clicking the satellite icon in the lower left corner. (Yes, it still looks pretty useless, but wait, it gets better!)
Click the “3D” button in the lower right corner.
Hold down the control key on your keyboard, and left click and drag.
Use the scroll wheel on your mouse to zoom in and out. (Yes, a mouse with a scroll wheel is a big help here.)
This gives you complete 3-D viewing. Click the 2-D button to go back into "direct overhead" view.
Before this feature, the only way you could do this was to zoom around in Google Earth, which takes longer to load and has a bit of a learning curve to effectively fly around.
Mt. Adams (WA) in 2D Google maps, standard view, YAWN!
Mt. Adams in 2D Google maps, satellite view. More useful! Click "3D" in the lower right.
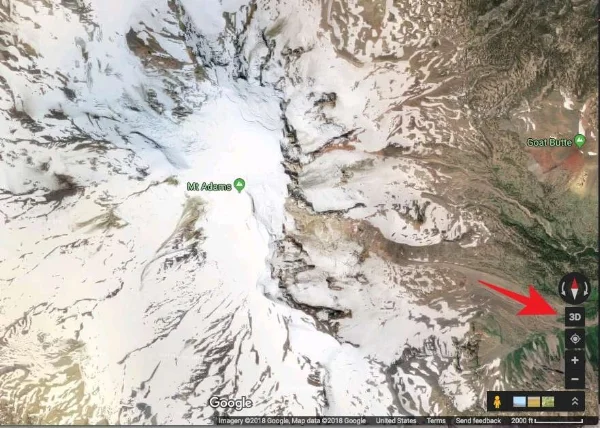
Now we're cooking! Zoom and pan around the mountain like Google Earth, to see the satellite view in 3-D.


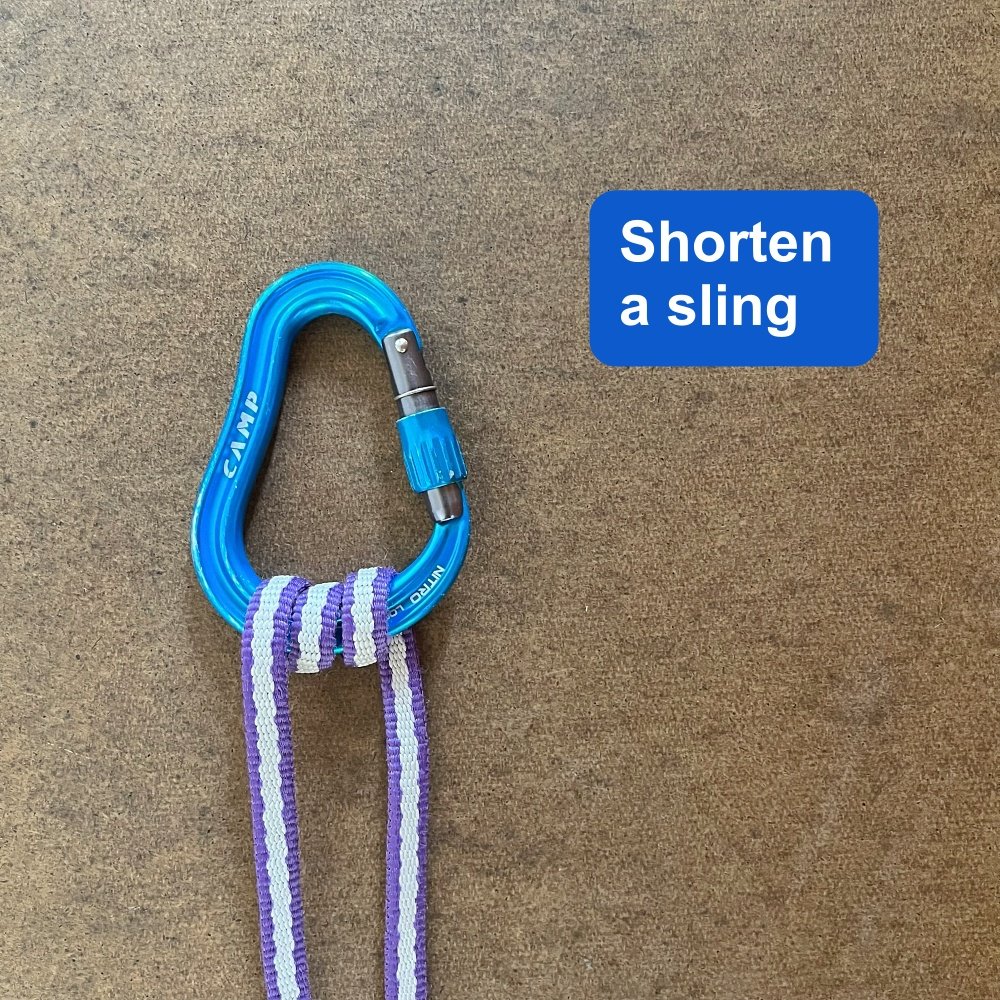
How to make the "alpine quickdraw"
You want to avoid having gear dangling below your knees. So, how to rack those 60 and 20 cm slings? Answer: the “alpine quick draw”.
A good rule of thumb in climbing is to never let anything hang below your knees. But what do you do with a single /60 cm or double / 120 cm runner to shorten it up for racking?
Answer: the “alpine quickdraw”.
A simple trick is this method, best described with a photo. This triples up the webbing material, shortening your runner to a manageable length. You can clip to gear it tripled like this, or remove two of the three strands from one carabiner to use it at full extension.
(I learned this crafty trick decades ago, and still remember my fascination at seeing it for the first time. At the time I thought it was the really clever! Hopefully if this is new to you, you’ll think somewhat the same thing. :-)
1 - Start with a runner and two carabiners.

2 - Pass one carabiner through the other.

3 - Clip the bottom loop.

Done! A short and compact draw that hangs nicely on your harness, but is easy to deploy at full length.

Safety note: Having a rubber band or something similar to prevent the bottom carabiner on a sport climbing quickdraw from rotating is fine. But you never want to do this on an “open” sling, as the rope can easily become completely unclipped from the carabiner without you noticing. More details at this article.


Glissading - not always your best option for descent
Glissading - You might have learned how to do it on your first day of climbing school. It can be fun, save time, and your quads muscles in certain ideal situation. But there are also a lot of reasons why you may want to avoid it.
Glissading, the skill of (mostly) controlled sliding down a snow slope either sitting or standing, can be a lot of fun and save you time and legs on the proper slope. Pacific NW routes where this can work well include Mt. Hood south side, Mt. Adams south side, the Muir snowfield on Mt. Rainier, and various routes on Mt. Shasta.
Beginning climbers often learn this technique on day 1 of snow school, and then mistakenly think that it's something to be done at every opportunity. (And, hopefully you learned this on day 1 of snow school as well, but it's worth repeating: never glissade with crampons on!)
However, glissading has some serious downsides, and saving a few minutes on the descent may not always be worth it. Before you glissade, consider these points:
Much greater chance of injury than simply walking (usually a broken/sprained ankle, going too fast and cratering into a rock, talus or scree, or dropping into an unseen crevasse)
You wear out your gear faster (seat of your pants and pack bottom)
You get your butt wet
You can lose gear strapped to the outside of your pack, like trekking poles and crampons unless it’s very well tied down
Questionable time savings – saving 20 minutes on a descent by glissading may not mean so much when you weigh it against the downsides mentioned above, and the fact that a round trip climb may take 8-10-12+ hours.

LED “keychain” lights
Micro LED lights are handy to have around the camp, in your emergency kit, in the car glove box, in your chalk bag zipper pocket . . . They’re inexpensive, so might as well buy a multi pack.

image: https://www.amazon.com/Finware-Keychain-Flashlight-Batteries-Included/dp/B01GVJFBUW
Tiny ultra-light, single-bulb LED lights might look like a toy for a keychain, but they’re useful for far more than that. Get a few of them, they’re cheap!
They cast enough light to easily follow a trail in pitch dark, or find that rappel anchor heading down from a longer-than-planned alpine day.
Consider putting a shoestring on it, or it’s going to get hopelessly lost. A shoestring lets you to keep it comfortably around your neck, even when you’re sleeping. You could also girth hitch it to a loop inside your tent. Use it as an in-tent light rather than blasting your tentmate with your face-melter 300 lumen climbing headlamp.
Get one that has a switch to turn it on without holding constant thumb pressure on it - not all lights have this feature.
Make a “lantern” in your tent - turn on a microlight, put it on top of a water bottle, and then either tape it or put a sock over it to hold it in place. The light will diffuse through the water, casting a soft romantic glow over you and your smelly climbing partner.
Keep one in your first aid or survival kit for day hiking - no need to carry a heavy flashlight as a backup on hikes when an LED light will probably light your way out in an emergency just fine.
Buy a bunch, keep them in various places. Tape one inside your helmet if there’s room. Does your chalk bag have a zipper? Put one in there. Car glove box? Sure.
Here's an Amazon link to get 5 for just $9. If you have a few extras, give them to your pals.

Fix your broken tent poles
Do you have a broken tent pole? No problem, there’s a Northwest company that can fix it for you.

image: https://www.loopnews.com/
A company in the Vancouver WA area specializes in creating replacement tent poles for most any brand and size of tent.
Check ‘em out: Tent Pole Technologies

Use a “sparker” for lighting stoves
There’s one tool that you can always rely on to light your camp stove. And it's not a lighter or matches.
Lighters and matches don’t always work when damp or wet, and can break or malfunction – especially the cheap ones. Lighters can be less effective at altitude. Even if your stove has a built in igniter, they can be uncooperative; it’s best to have a backup way to light it.
A sparking device, aka “firesteel”, will always light your stove (gas or butane) or help make a survival fire. They have no moving parts, work when wet and at altitude. Weight, about 50 grams, cost about $20.
The simpler sparker models have a striker and a sparker, while a more upscale version has a small bar of magnesium included. Shave off a few bits of magnesium, add a spark, and you get a burst of almost 2,000 degree C flame.
The Swedish company Light my Fire sells high quality sparkers; a solid addition to your 10 essentials kit.


Sterling rope technical manual
What are the two chemicals you should always avoid getting on your rope? If a rope is wet, is it less strong, and by how much? Can I safely mark my rope with a Sharpie pen? Learn all this and more from the experts at Sterling, in their technical manual.
Think you know “the ropes”? The Sterling Rope Company has a great 16 page technical manual (.pdf file). Check this link and learn a few tricks.
(It's a 6 MB file, be patient on the download, it may take a few seconds.)
Learn about . . .
The difference between S twist and Z twist
Details of rope construction
The differences in manufacturing process between a static and dynamic rope
The five requirements of UIAA rope testing
The dramatic loss of strength that happens to a wet rope
The two chemicals you should ALWAYS avoid getting on your rope
The Word on marking your rope with permanent (Sharpie) pens
Sterling rope technical manual

Backup battery and charging cable - the 11th Essential
If you bring electronics in the backcountry, (smartphone and GPS app), it's pretty much mandatory to carry an extra power source. Here’s a great choice, at about 3 oz and $20.

Phones, watches, satellite communication devices, rechargeable headlamps . . . Most of us are carrying more important electronics into the back country, so it's crucial to have a means of charging them.
While always putting your phone in airplane mode at the trailhead to save battery is good practice, having some backup power is inexpensive and lightweight.
Here’s a very detailed article I wrote about battery saving tips in the back country.
Some people only will take an auxiliary battery on a multi-day trip. That works great provided you remember to charge your phone fully in your car driving to the trailhead, but that is a little task that's easy to forget. For me, it's more reliable to just carry a fully charged extra battery and cable as standard practice.
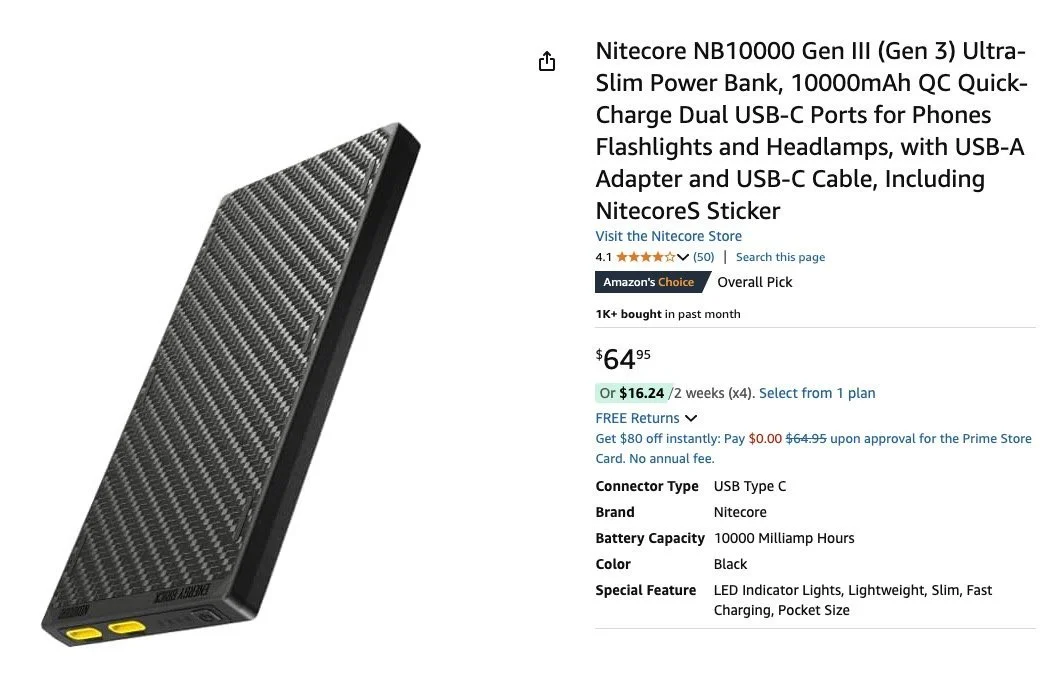
Anker and Nitecore makes great auxiliary batteries in a variety of sizes. With the larger batteries of modern phones, probably 5,000 mAh is the smallest you want to go, which should give you one full charge. (Geek note: “mAh” means milliamp hours, a way to describe battery capacity.)
The photo above is a few years old; now I'm using a 5000 mAh battery. but you get the idea. (Sharpie pen shown for scale)
If you're going on a longer trip, sharing your battery with partner(s) or don't mind carrying a little more weight, go with a 10,000 mAh battery. That can last last one person up to a week.
I like having both - a small one for short term emergency backup, and a 10,000 for longer trips.
A small auxiliary battery and charging cable together cost about $20, and weigh 3.5 ounces / 100 grams. Personally, I consider a battery and charging cable the 11th essential, and carry this tiny additional weight with me on every trip.
Cables . . .
iPhone Lightning. USB-A. Micro USB. USB-C . . . Aaaaaargh!
We all know that having 4+ different flavors of cables is a hassle! This is especially true when you're trying to minimize your gear. Let's hope the move to USB-C as a standard happens fast!
You can get a tiny 4 inch long charging cable for your iPhone; no need to bring the long cord you use at home. I'm sure there's one for Android folks as well.
Tip: cheap charging cables can get damaged getting banged around in your pack and fail when you most need them. Try to buy cables that are a little more durable, and consider bringing two of them on longer trips, they are inexpensive and extremely lightweight.
If you search online, you'll find loads of different battery options, many from off-brand companies. I’ve tried a few of these trying to save a few bucks, and been disappointed. I recommend you pay a tiny bit more and get a name brand like Anker or Nitecore.
Update: as of 2024, this is about the lightest weight and most compact 10,000 mAh charger on the market. I don't have one yet, but it comes highly recommended by some pro guide friends.
Steri-Strips for the first aid kit
Here's a great item to have in your first aid kit that most people don't carry.
Steri-Strips, a cross between a band-aid and a suture, are narrow strips of super strong first aid tape that really stick to skin and are used to close cuts in place of a suture. 3M makes them, so you know the adhesive is good stuff.
They're inexpensive, weigh nothing, and could save the day if you need to care for a substantial cut in the backcountry. Consider adding them to your first aid kit. Get them at better stocked pharmacies and medical supply stores, and through the usual online retailers.


Could this be the best free firestarter?
Want a terrific firestarter that’s free and burns great? Look no further than a supermarket - waxed cardboard produce boxes are your friend.
This tip is more for car camping or a home fireplace. For a superb fire starter, go to the produce section of any supermarket, and ask the produce person for a dark brown waxed cardboard box or two. (Or look around the back of the store and find a pile as shown below.)
These boxes are regular cardboard dipped in paraffin, so they can hold wet veggies like lettuce without falling apart. The boxes are free for the asking.
Tear the boxes into strips, and use them as starters for your next fire. They burn furiously for several minutes, are lightweight, mostly waterproof, and free. One box makes a LOT of fire starters!


Belaying the second from the anchor - pros and cons
Belaying a second can happen off your harness, or direct off the anchor. Learn the benefits of this technique - and one time to consider not using it.
Most climbers start out learning to belay off of their harness. For most snow climbs and most all instances of belaying a leader, this is still usually the best method. But for belaying a second when rock climbing, belaying directly from the anchor with either a Munter hitch or some version of an autolocking belay device has a host of advantages. Here’s a few of them.
Advantages . . .
better on difficult pitches (where fall is likely for the second), as it’s usually easier to catch and hold a fall
better for easy terrain (where second is moving fast and will likely not fall) as you can take in rope faster
puts less force on the anchor (only the weight of the second)
autolocks with Reverso, ATC Guide, or other modern belay devices (or just use a Munter hitch to keep it simple!)
belayer is free to move around more
easier to escape the belay and initiate a rescue
easy to rig a mechanical advantage haul to pull up the second if needed
easier to properly equalize the anchor toward the direction of load
Disadvantages . . .
fall directly impacts anchor (rarely a problem on rock if the anchor is stout.)
So, when might you want to belay the second off of your harness? Basically, when the anchor is anything less than 200% solid.
That means most of the time when you are snow climbing, and in many alpine rock climbing situations. When climbing alpine rock (which typically means many pitches over a long day and trying to move as efficiently as possible over relatively easy climbing) an "anchor" might be one decent cam plugged into a crack, or a sling around a small tree or over a rock horn, or some other single point of gear.
In this case, the belayer will typically sit down, try to brace their feet in a solid position, and belay off of their harness. By doing this, the belayer takes the impact force for any fall onto them, and the anchor is essentially backing up their stance.
Note: if you choose to use an auto locking blade device such as an ATC Guide or Petzl Reverso, keep in mind that there have been many serious accidents when people use these devices in correctly, often when trying to lower someone when the rope is under load. Be absolutely sure you know how to use these devices correctly before ever trying it on a real climb.

image: “Multi-Pitch Belaying- Potentially Fatal Errors to Avoid” - youtube.com/watch?v=s9np7B1Zao4

Belayer’s responsibilities to the climber
The belayer has a LOT more to do than it may first appear. Do you know all of these duties? Did I leave any out?
The belayer has many duties beyond feeding out or taking in rope. A good belayer, when belaying either a leader or a second, will consider doing the following:

image: https://www.petzl.com/US/en/Sport/Spotting-and-belaying-at-the-start-of-the-route?ActivityName=Rock-climbing
Belaying the leader, most important! If you're on the ground, spot the leader before (or even after) they make the first clip! No need to “belay” if there’s no gear in. This usually means the belayer drops the rope and stands with hands outstretched, ready to keep the leader’s head and upper body from smacking anything if they fall before clipping the first piece of gear. The moment the leader clips the first pro, the belayer drops their hands to the rope and starts the belay properly. Keep your thumbs tucked in and your fingers together (aka “spoon”), and not fingers spread out (aka ”fork”) to avoid injury.
If you are with a new partner and top roping, ask how much slack is desired. Many beginners want you to keep the rope fairly tight, while more experienced people will probably want a little slack.
Never pull the leader off by keeping rope too tight! Always gives them a meter or so of slack rope so they can move freely. If the leader is climbing above a ledge, you can snug it up the rope a little, but never restrict their movements.
Be attentive and watch; feed rope if they need to clip, take rope in if they are looking sketched.
Keep the rope out of the leader’s way before the first clip. This may mean you stand off to one side to keep the rope away from their feet.
Help build a multidirectional first gear placement, if needed.
Give encouragement to the climber, but avoid idle chatter. Keep your communication as short and clear as possible.
Tell leader about rope getting stuck in cracks or around horns (“flip rope”).
Warn leader (“grounder alert”) if they have climbed too far above their last piece of gear.
Tell leader about amount of remaining rope if it’s getting close to the end. Use the call, “feet 2-0”. (Most belayers underestimate the amount of rope left.)
Make sure the rope feeds freely. Flake the rope well, and watch for tangles. Tarps, rope bags or duffel bags are good for this.
If you're on a single pitch climb and plan to lower your leader, be sure the middle mark of the rope does not pass through your belay device, and you have closed the rope system by having a knot in the end of the rope. These steps prevents the common accident of dropping your climber when lowering because your rope is too short.
Tell leader if they back clip (more of an issue when sport climbing, not a concern with long runners).
When belaying the second up to your stance, as the second approaches the anchor, the belayer tells them two things: 1) where to clip and 2) where to stand.

image: https://www.petzl.com/US/en/Sport/Spotting-and-belaying-at-the-start-of-the-route?ActivityName=Rock-climbing

Slinging a boulder for an anchor - two cautions
When you put a sling around a boulder for an anchor, the angles can get wide very easily, magnifying the load.
A common anchor on alpine routes is the simple sling around a boulder or rock spike. Even though the boulder itself may be super solid, there are some things to watch for when using this method.
1) Check the boulder carefully all the way around for any sharp edges. A new sling that can hold 20kN can cut very easily under tension combined with the sharp edge of rock or a crystal.
2) A short sling around a large boulder may make a wide angle in the sling that put a larger-than-ideal load on the sling material. (An angle of 90 degrees or less is the rule of thumb, and 60 degrees or less is ideal). Solution: Use a longer sling to make the anchor angle smaller. The diagram below shows how a small change in sling angle and greatly increase the forces on your anchor.

The diagram is from the excellent book "The Complete Guide to Climbing and Mountaineering" by Pete Hill.
DIY - Mark your tent stakes for easier tracking
Dang, those little tent stakes are easy to lose if you put them down for a moment and don't remember where. Here’s a tip to help them stay found.
How many of you have had this situation happen? It’s early in the morning and you’re about to strike your tent. You casually pull the stakes, maybe toss them on the ground, rocks, snow. After the climb you get home and find you now have 7, not 8 stakes. Here’s two tips to help you out.
1) Spray paint part of each stake for easy visibility. A clean way to do this without having to hand hold each stake is to get a piece of scrap cardboard from a box. Make a small hole or slit in the cardboard for each stake. Shove about 3/4 of the stake through the cardboard. Spray paint one to two coats of some kind of easy to see color on the top of the stake. Day-Glo Orange is a good choice, as its easier to spot. Rustoleum brand works well.
2) To make sure you don’t lose any, store them in a Zip-lock bag and write the amount of stakes in the bag on it with an indelible marker. That will make a no-brainer out of the “how many stakes did I bring" question.

Is it a knot, hitch, or bend?
Does every climber need to know these definitions? No. But for the Type A personality, (which is probably most of us climbers) the difference between these three different terms is actually quite interesting.
Not all “knots” are true knots. Technically, a true knot is capable of holding its form on its own without another object such as a post, eye-bolt, or another rope to anchor it.
Example: Figure 8 on a bight

A hitch, by contrast, must be tied around something to hold together; remove the thing it’s tied to, and a hitch falls apart.
Example: clove hitch. Unclip this from the carabiner, and you don't have a knot at all.

A bend is a knot used to join two rope ends. Example: flat overhand bend
(Formerly known as the "EDK", or "European Death Knot"; let's not use that term anymore, OK?)
In practice, we use “knot” as an umbrella term to cover all these types, but the distinction is useful to know.
If the context makes it unclear what you mean, you can use the term “hard knot” to distinguish a true knot from a hitch or bend.

Shorten a sling with carabiner wraps
Sometimes, to better share the load on an anchor, it's helpful to shorten a sling just a centimeter or so at a time. Here's a nifty way to do it.
Often it's handy to temporarily shorten a sling or cord by just a cm or two, typically done when anchor building. Doing this can help fine-tune anchor load distribution by shortening the arm that's going to your strongest piece, adjust a cordelette if the direction of pull has changed a bit, or shorten one sling if the bolts you’re clipping are not quite in the same horizontal plane.
One easy way to do it is to simply wrap the sling a few times around the carabiner. With a skinny Dyneema sling like this, each wrap shortens the sling about 2 cm.
Probably best not to use more than two wraps. If you need to shorten your sling more than that, it’s probably time to rerig your anchor.
Other methods: put some twists in the sling, or tie a clove hitch.
Safety note: Don’t do this unless you're dealing with a completely static anchor. If you do this on lead the sling loops can loosen in such a way as to slip down over the gate and then when loaded can open the gate. That may be hard to visualize, but if you take the setup below, and jiggle it around a bit as might happen on a long pitch, and then just keep randomly loading it, one of those extra wraps could loosen up, slide around, and potentially open the gate.
2023 Update:
I’ve received a few frosty comments on this technique over the years, most of them saying something along the lines of “this is going to weaken the carabiner, because you're putting the load closer to the gate”, or something like that.
I was curious if this has any merit, so I had my buddy Ryan at HowNot2 test this. Guess what?
It DID NOT weaken the carabiner
It DID weaken the sling.
Ryan did two different break tests on this with a Dyneema sling. First test the sling broke at 12.4 kN, the second test is broke at 15.4 kN. The sling was rated (I think) 22 kN.
Would this be different with nylon? Probably. Is this concerning? Maybe. Does it concern me? Not really, because these numbers are still significantly higher than you're ever going to see in any recreational climbing situation. But it’s still an interesting data point that I wanted to share.
I don't think I can embed this short form YouTube video in my webpage, so here's a link to see it yourself.
Screen grab from Ryan's video is below.
