
Alpine Tips

Racking your cordage - Do the Twist
A basic climbing skill is knowing how to rack your cordage In a tidy and fast manner. One great method: Do the Twist. Learn how in this short video.
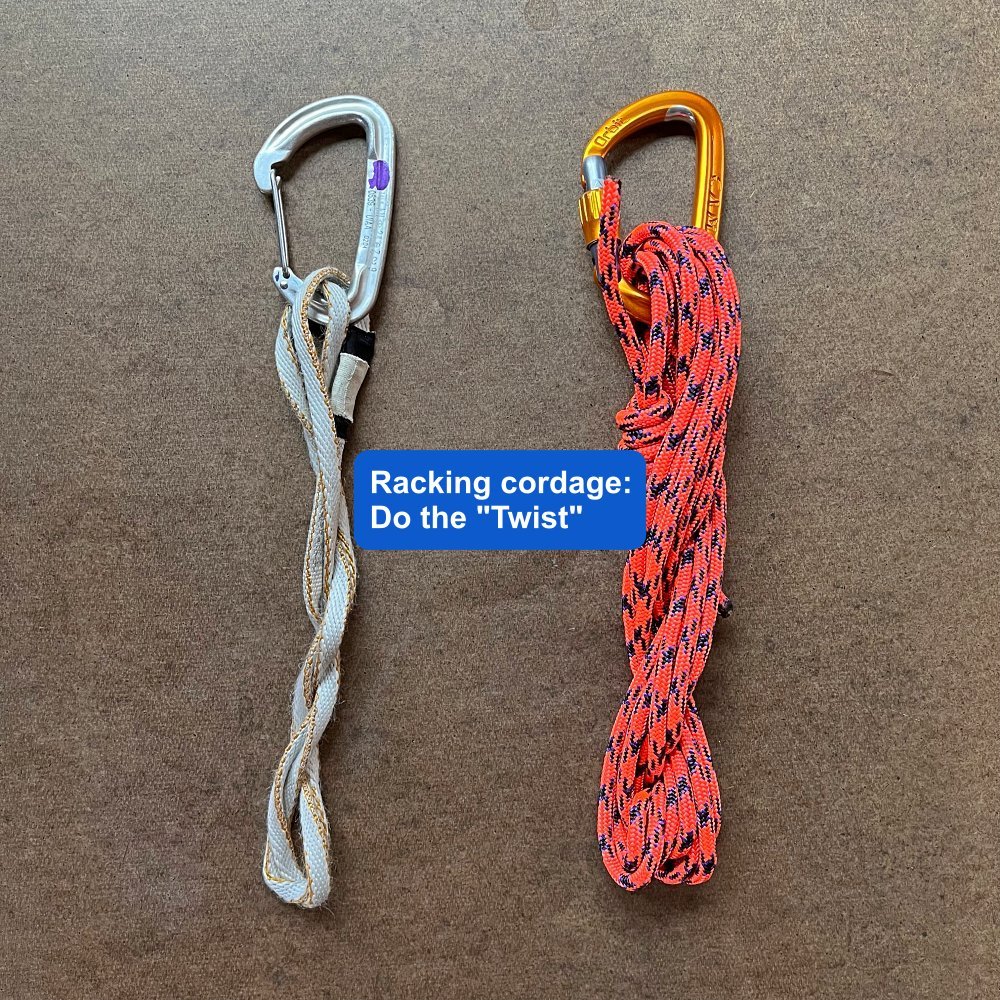
A basic climbing skill is learning to rack your cordage - slings, runners, cordelettes, prusiks - quickly, in a tidy loop, and making sure they never hang below your knees, where they can trip you up.
I've seen lots of people take several minutes to rack their cordelette with some cutesy macramé project. Yes, it may look nice on your harness, but I prefer simple and speedy, especially for gear that you're using every pitch. Here's one good way to rack it:
Do the Twist!
If you take any sort of loop (sewn or tied), twist it a few times, and then hold the ends together, the material will rather magically do this sort of double-helix twist around itself, resulting in a tidy, compact bundle.
It may look like a complete mess, but to deploy, simply unclip it, give it a shake or two, and it should return itself to full length, ready to use.
This also works with 60 cm slings and even a long cordelette. You need to double up these longer slings to get them down to about two feet long before you start.
As we'd like to say around here, this one is a better show than a tell. Here’s a quick video demo on how to do this.

Keeping track of a group in low visibility
Here are two simple and quick ways to be sure your team always stays together at night or in low visibility.
If it’s dark and/or a white out and you have a large group of people to keep together, here’s a couple of techniques. They might sound a little cheesy if you’re reading this on a bright sunny day, but each can bring peace of mind to the team, and some psychological comfort that everyone is part of the group and not isolated.
(Of course, the leader can remind people to take breaks when everyone in the group stops and not to randomly stop whenever they feel like it, which can easily lead to getting lost in the dark.)
1 - Assign everyone a buddy. After a break and when you’re ready to get going again, the leader calls out “buddy check”. Everyone on the team looks around and hopefully finds their buddy. If they see them, they don’t say anything. But if their buddy isn’t there, they give a shout to indicate someone is missing.
2 - Count off. Everyone on the team gets a consecutive number, and they shut out the number one at a time to make sure everyone is accounted for. Make one person the leader, “one”, so when they call “one”, everyone answers in order: “two”, “three”, etc.
This tip is partially from the excellent book "1001 Climbing Tips" by Andy Kirkpatrick


Bring some earplugs
Want to get a good night’s sleep on your next alpine climb? Bring some earplugs.
Getting a good (well, at least passable) night’s sleep can be a big factor in your climbing success. A tent flapping in the wind or a snoring tentmate can be easily thwarted with the humble earplug.
Tip – buy a pair that’s connected with a foot or so of string. When one falls out (and it will) it can be easily retrieved and won’t be lost in the folds of your sleeping bag.
Carry them in small plastic bag so the string doesn’t get too tangled up. Get the plugs at a good hardware store or online . They do get lost, even with the string, so get a few pairs when you’re shopping.


Caffeinated climbing - coffee options
There are lots of options for backcountry coffee, depending on your level of coffee snobbery.
Some of us just have to have that coffee jolt in the morning, but what to do on summit day when the team is ready to leave and there’s no time to brew a real cup of coffee? Here are a few ideas.
1) If you have an espresso maker at home, try this: make a few shots at home, let it cool, then transfer to a small plastic container with a solid lid. In camp, all you need to do is boil water, pour in the ‘spro, and you have an Americano in a few minutes, without fiddling with grounds, filters, and presses. If you lack a home brew espresso maker, just stop at a coffee house on the way to your climb and get a few shots to go. (A great tiny plastic container for this is Gerber kiddie juice bottles.)
2) Bring along a few tablets of No-Doz, Vivarin, or other caffeine tablets. Each tablet typically has 200mg of caffeine, as much as two decent cups of coffee. This might keep your headache away and give you a little giddyup as well. (Note that caffeine has a few side effects that make it not a good choice when climbing, among them making you urinate more. Use sparingly at altitude.) Another use for the caffeine tablets might be to give a teammate who is really slow a little extra boost, when you really don't have time to sit down and properly brew up coffee.
3) If you do have more time in camp, fire up a pot of “cowboy coffee”. Leave the frou-frou camping espresso maker at the REI store. To make real camp coffee all you need is good ground beans and a pot. First, boil some water - a tall and thin pot is best. Once the water reaches boiling, stir in the desired amount of coffee grounds (coarse grind is best), remove from heat and cover. Let the grounds sit for about 3 minutes. Remove the cover and pour a small amount of cold water over the surface of the hot coffee. Immediately give the container a solid whack or two on the side with a spoon. The cold water wants to travel to the bottom of the pot and as it descends, it will take most of the grounds with it. Take care not to agitate the pot too much as you may re-suspend the coffee grounds.
4) If you can handle instant coffee, Trader Joe’s (and most Asian grocery stores) sell small packets of premixed creamer, sugar, and instant coffee. This is a very fast and convenient solution, if not the tastiest.
5) For early morning trailhead departures, canned coffee is a good alternative. Check Trader Joe’s for some well-priced triple espresso lattes, yummy!

Post climb comfort
Plan ahead a bit, and enjoy a little luxury when you get back to the car after your epic.
We finished our climb and were back at the car at the trailhead after a long hike out. We were both sweaty, thirsty, and starving.
I started rummaging in my glove box in search of last summer’s Clif bar, and reached for the lukewarm gallon of water I always kept in the trunk .
Meanwhile, my climb partner . . .
strolled over to the small creek next to the trailhead and retrieved an icy cold adult malted beverage she stashed there 3 days back when we arrived.
After she cracked her beer, she wiped off the trail grime with a few unscented baby wipes she brought in a ziplock bag.
Then, she grabbed a bag of chips and inhaled the calories and salt that are so well earned after a big climb.
Finally, she changed into a fresh T-shirt, shorts and comfy sandals for the long drive home, and topped it off with a canned energy drink (also cold from the creek) to stay alert while driving.
She glanced over at me with a smirk. “So", she said, "how’s that Clif bar?”

Climb faster – by stopping less
Here’s a few simple ways to shave hours of of your climbing time. Individually, not so much, but taken together, it can save you major time.
Mountain trivia question: Most Pacific NW climbers know the vertical gain from Timberline Lodge to the top of Mt. Hood is about 5,000 feet. But how far is the linear distance from Timberline Lodge to the summit of Mt. Hood? Answer: about 3 miles – a lot less than most people think. “So”, you may reason, “even if I walk at the slow pace of 1 mph, I should be able to climb Hood in 3 hours.” If that’s even close to being true, why do many parties take upwards of 6-7 hours to reach the summit?
The answer lies largely in how often you stop. For most moderate snow ascents such as Hood, speeding up the “climb time” is much more a matter of minimizing breaks than it is actually walking faster. It’s simple - avoid time spent standing still. On a moderately paced climb, a fit climber should not really need to take breaks of more than 10 minutes. The constant two and three minute stops to adjust clothes and get a bite to eat can really add up to hours at the end of the day – especially if everyone on your team is doing them at different times! Here’s some tips to better organize your gear, clothes, food and pockets to shave time off your next climb.
Remember: keep often used items in pockets you can access while on the move, not in your pack.
Consider an add-on front pocket for your pack, like the Marmot Dry Rib. It’s a very handy place to store often-used goodies like sunscreen, GPS, map, gloves, hat, snacks, small water bottle, etc.
While the main food bag and larger water bottles can stay in your pack, keep snacks and a small water bottle in pockets or clipped to easily eat on the go.
Keep gloves and hat in pockets, not in your pack, to more easily regulate your temperature.
Have a versatile layering system with lots of venting zippers to minimize clothing breaks.
Don’t use an ice axe leash. Use a lanyard instead, clipped to your harness – so you can change hands quickly when switchbacking uphill.
Be competent in all the rope skills (clipping through protection, for example) needed for the climb.
In a larger party, agree to take a fixed break at a fixed time, such as a 3 minute break every 20 minutes. If you need something from your pack, wait until the entire group takes a pause together.

Downward Bound – options for faster downclimbing
There are several ways to descend. Generally, choose the fastest, and pick the right one for the skill of your team members.
When descending, options are basically these:
rappelling (slowest)
fixed line travel (next slowest)
downclimbing (fastest)
If the terrain can be downclimbed or all or most team members, that should usually be your first choice. If some of the team can downclimb but some don’t want to, send down the climbers first, then rap or travel fixed line with the rest - don’t make everyone rappel.
What if the terrain is a loose and rocky, with a high chance of climber-induced rockfall? The conservative, (and slow) approach is to send down only one person at a time through the shooting gallery. However, it’s often just as safe to send down 2 or more people at the same time, and making sure they stay close together, ideally on the same contour. That way, any rocks kicked loose bound harmlessly away, and two (or more) can descend in the same time as one.
One other option is what's called “downleading”. The second to last person descending can place some gear and clip the rope to it, to partially protect the last person who downclimbs. It's covered in more detail at this tip here.