

Alpine Tips

Sewn daisy chain as a gear sling
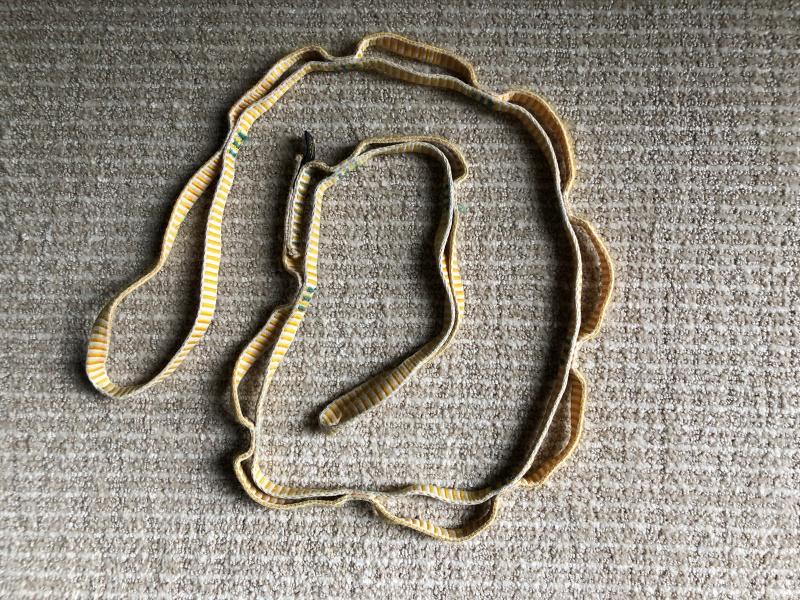
The sewn pocket daisy chain has a potentially lethal problem if you use it as a leash. Hopefully you're aware of this and have retired yours if you ever used it this way. Good news: it makes a pretty sweet gear sling,
Leash, lanyard, tether, daisy . . . Lots of different names for pretty much the same thing, a short sewn bit of webbing that connects you to the anchor, especially handy when you’re rappelling. (When you are going UP a route, it's generally best practice to use the rope you’re tied in with to directly connect to the anchor, not a leash.)
And no, I have absolutely no idea why this is called a daisy chain . . .
Modern “personal leashes”, such as the Metolius Personal Anchor System (PAS), are made of connected full strength loops. Use them for just about any kind of connection to the anchor, clip two adjacent loops, make a rappel extension, whatever, it's going to be bomber no matter where you clip it.
Metolius PAS. Each sewn loop is full strength (22 Kn)

image: metoliusclimbing.com/pas_personal_anchor_system.html
But, before the PAS came along, many climbers used a sewn pocket daisy chain as a personal leash. Even though this is designed for aid climbing and bodyweight only, the convenient pockets were too tempting to pass up. And hey, the sling as a whole is rated to 20+ Kn, right?
Sewn pocket daisy chain
Well, these pockets disguised a potentially lethal problem. Each pocket is sewn with bar tacking that's only rated to about 2 Kn (about 440 lbs.) Clipping one pocket is okay. But clip two pockets and put any sort of a serious load on it, you could potentially break the sewn bar tacks and be completely off your anchor! Large problem!
Clip ONE loop on a sewn pocket daisy? No worries.

Clip TWO adjacent loops on a sewn pocket daisy? Break those bar tacks and you’re gone, YIKES!

Fortunately, most modern climbers are aware of this potential problem with pocket daisy chains, so many folks have a semi-retired pocketed daisy that’s now collecting dust in the bottom of the gear bin. Well, here's a possible use for that.
The sewn pocket daisy makes a pretty sweet gear sling!
Hook it around your shoulder, and adjust it by clipping a carabiner or a quick link in the loop that fits your body.
Now, you have a bunch of sewn loops available, which keep all of your gear from bunching together, the main problem of the traditional single gear sling.
One more tip, for big wallers: A sewn pocket daisy like this is great for securing gear (rock pro, shoes, water bottles, stuff sacks) at your bivy/portaledge.


Backside clove hitch: transition to rappel
The “backside clove hitch”? Is that something you might find in a San Francisco leather bar? Nope, it's a new approach to transitioning from climbing to rappelling. It has a host of subtle benefits, and it's a Crafty Rope Trick well worth adding to your toolbox.
Note - This post discusses techniques and methods used in vertical rope work. If you do them wrong, you could die. Always practice vertical rope techniques under the supervision of a qualified instructor, and ideally in a progression: from flat ground, to staircase, to vertical close to the ground before you ever try them in a real climbing situation.
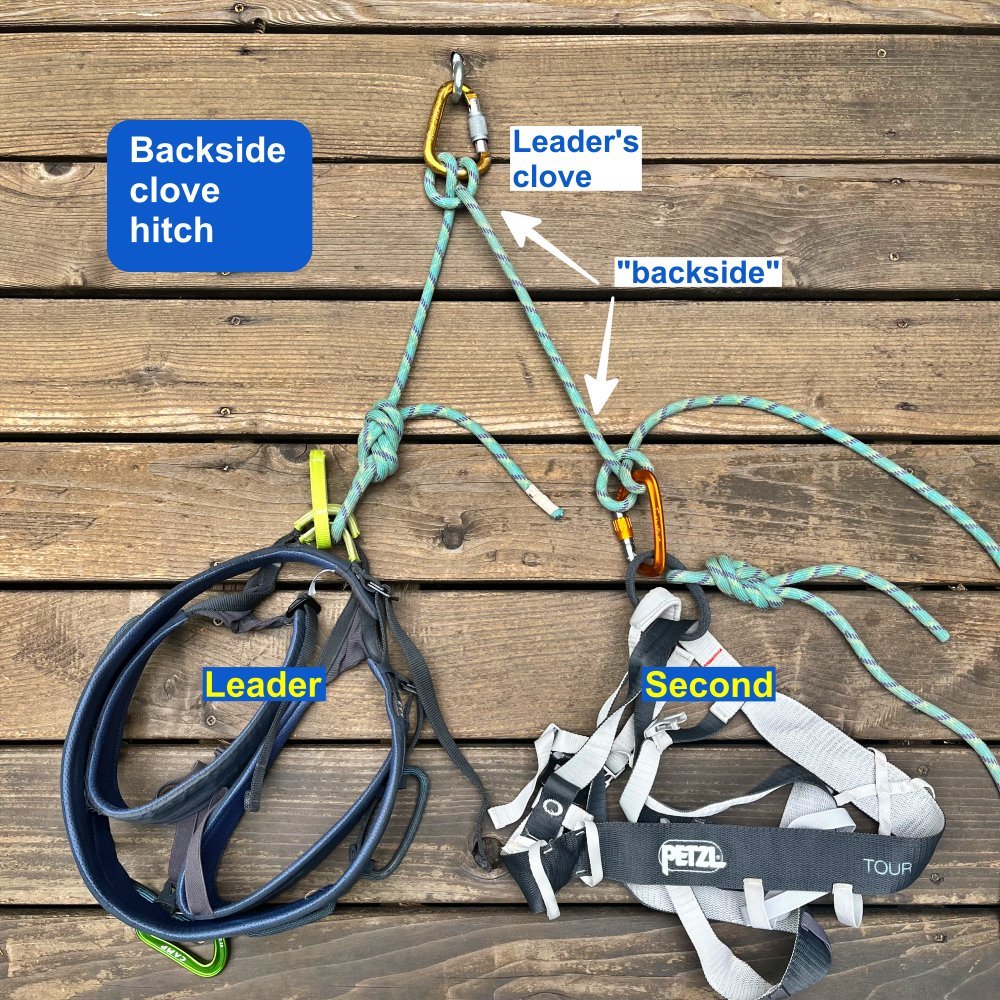
Using the backside of the leader’s clove hitch is a great way to transition from climbing to descending.
Advocated by IFMGA Guides Marc Chavin and Rob Coppolillo (authors of the excellent book “The Mountain Guide Manual”) this method uses the climbing rope coming off of the leader’s connection to the anchor as the primary anchor point for the follower, as opposed to the second clipping a tether to the anchor master point.
Lots of multi pitch routes require a rappel to get down. For many climbing teams, this transition period, from moving upwards to moving downwards, can be a bit of a cluster.
The traditional method is each climber using a tether/PAS to connect in close to the anchor, each person untying from their respective ends of the rope, threading the anchor and then each person rigging for a rappel separately. This can be awkward at tight stances, and often takes a LOT longer than necessary, especially with less experienced folks.
The backside clove hitch elegantly address some of these issues.
(Another term I've heard for this method is the “Backside Rappel Feed”, or BARF. I love it, but it hasn't caught on yet.)
It can take a bit of creative visualization to try to imagine how this works in your head. I have to say it took me a while before I got it figured out. But once I did, and realized the subtle benefits that come from this system, I knew it was going to become a regular part of my rappel routine.
I strongly suggest you try it on flat ground with a partner a couple of times to get the hang of it, and watch the video at the bottom of this page!
What are some benefits of the backside clove hitch?
1 - Cluster free anchor. By having the follower clipped to the backside of the leader’s rope, there’s no need for multiple leashes clustering up the anchor. You have plenty of room to stretch out and move around a bit, assuming the ledge allows you to do so. Your position isn’t limited by a short tether or PAS.
2 - Always using the dynamic rope to connect everyone to the anchor. Ropes are stretchy. Generally, tethers and slings, not so much. Stretchy is good. Use it when you can.
3 - (Close to) zero chance of dropping the rope. For a two person team to transfer to a rappel, of course one end of the rope needs to be freed up to pass through the anchor. With the backside clove hitch, this is simple: because the leader’s end of the rope is securing the entire team to the anchor, the follower’s end of the rope will always be the one threaded through the anchor. The leader remains tied to their end during the whole process. Rule number one in setting up a rappel is don’t drop the rope, and this method pretty much ensures that can never happen.
4 - Faster and less risky rappelling. After the follower threads their end of the rope and and pulls to the middle point, both climbers can rig for rappel. A low risk and fast way to do this is to rig an extended rappel with both climbers doing so at the same time. The extended rappel means climbers can check each other, which reduces risk. Because they both rig for rappel at the same time, and also increases speed, because the second can begin their rap the moment the first person is at the next anchor.
Here’s the general procedure:
When the leader is securely attached to the master point with the clove hitch, they tie a clove hitch or a loop knot (overhand, fig 8, butterfly, your choice) on the backside of their clove hitch connection. This hitch/knot gets a locking carabiner.
The second arrives at the anchor, and clips this locker to their belay loop.
The leader takes the follower off belay, and removes the belay device from the anchor.
The second unties, freeing up a rope end.
The team threads the rope end through the anchor, pulls it to the middle point, and tosses that strand.
Both climbers rig an extended rappel and a third hand backup.
Both climbers are now secured by their extended rappel. The second removes the hitch/loop knot and carabiner from the backside of the leader’s clove hitch. The leader unties, tosses down the second strand of rope, and cleans the anchor.
Do a safety check, and rappel.
In the video below, the second climber rappels first. However, there can be some advantages for the leader descending first. Here, the leader remains tied in the entire time, the second rigs their extended rappel above the leader. Doing this has a few extra benefits:
The leader can’t rappel off the end of the rope, because they are tied to one strand and it's blocked from above by the second.
It's a bit less rope management, because you only have to throw one strand instead of two.
You only have to tie a stopper knot in the one strand that you're throwing.
Whether you choose this method can depend on factors like the stance, team experience, and single pitch or multi pitch.
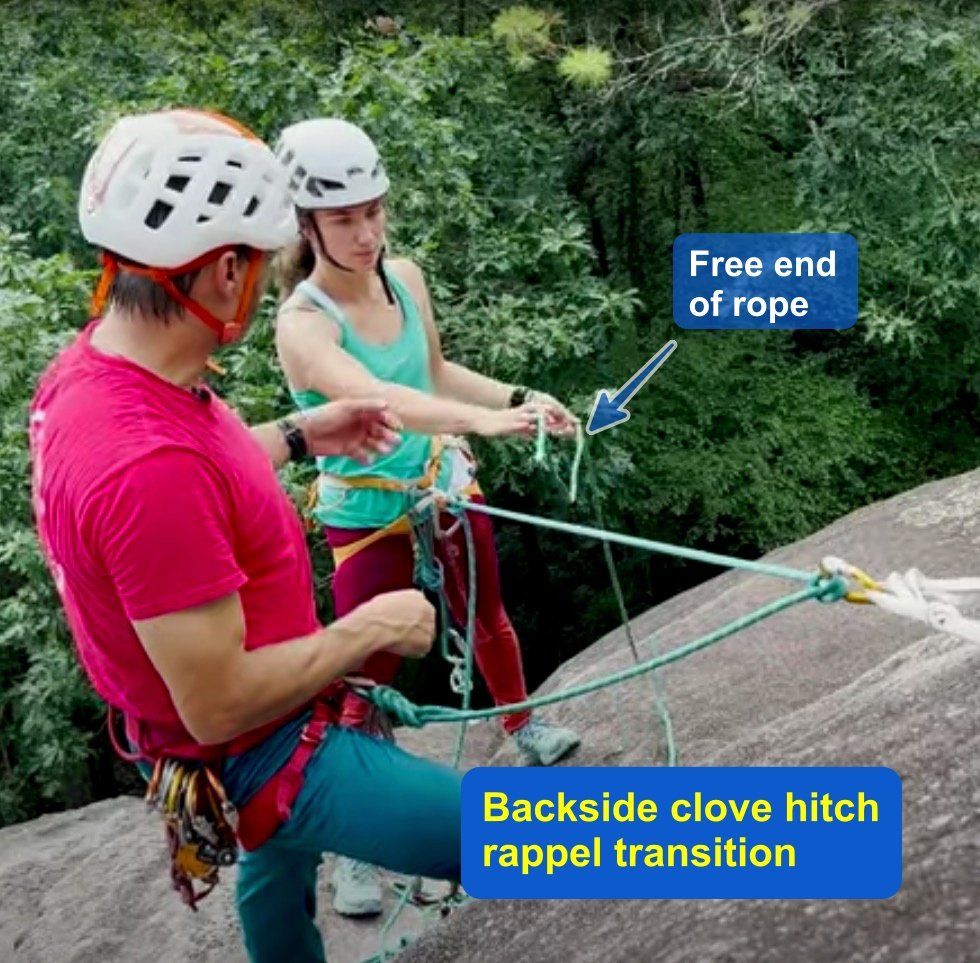
image: screen grab from https://youtu.be/feuVDCnS4g0
So, that's about it, It’s a fairly simple concept, that can make your transitions faster, smoother and safer. But it may require a big re-think of the way you're probably doing things, so absolutely practice in a controlled environment and see if it works for you.
As with most climbing techniques, it's a better show than a tell. Check out the video below from IFMGA Guide Karsten Delap showing the entire process.
In the video, Karsten also shares another clever use for the backside clove hitch method: removing twists from the rope.
If, for whatever reason, when the second arrives at the anchor there are twists in the rope, the second can temporarily clip to the backside of the leader’s clove as described above, untie from their end of the rope, remove the twists, and tie in again.


What's the mechanical advantage? It's relative!
Think you have a good understanding of a simple 1:1 and 2:1 mechanical advantage systems? Well, it turns out there's one very interesting variable: who’s doing the pulling? If you, (i.e, the load) are lifting yourself, the mechanical advantage increases! No, this is not very intuitive, and yes it is helpful for climbers. (Thanks to ropelab.com.au for the diagrams.)
The illustrations in this article, used with permission, come from the excellent website RopeLab, run by Australian rigging expert Richard Delaney. RopeLab has a ton of great material for anyone who wants to dive into ropes, rigging, and mechanical advantage, check it out! There's a fair amount of quality free information, but getting an annual subscription unlocks the entire website. You can also connect with Richard on Instagram and his YouTube channel, where he has loads of concise, informative videos.
These diagrams come from a Ropelab online mechanical advantage quiz, which you can find here.
Okay, clever rope wizards and mechanical advantage fans. Here are some questions and diagrams that might leave you scratching your noggin.
A standard principle in mechanical advantage systems is that any change of direction that's on the anchor only serves as a redirect, and does not add mechanical advantage. Well . . . that's true most of the time, but not when the “load is also doing the lifting.”
The mechanical advantage of the system depends not just on the rigging. It depends on who is doing the pulling - a person who’s “in the system” or a person who’s out of it. Let's look at a few examples.
1 - This image shows someone standing on the ground attempting to raise their partner. What’s the Ideal Mechanical Advantage of this system (ignoring friction)?

image: https://www.ropelab.com.au/ropelab-quiz-1-mechanical-advantage/
Answer: It's a 1:1 mechanical advantage. The person on the ground is pulling the weight of the person hanging from the rope 1:1 through a redirect. No mechanical advantage is gained. The person on the ground needs to pull 1 meter of rope to lift their partner 1 meter, so it's a 1:1.
2 - This image shows a person attempting to raise themself by pulling down on the rope. What’s the Ideal Mechanical Advantage of this system (ignoring friction)?

image: https://www.ropelab.com.au/ropelab-quiz-1-mechanical-advantage/
Answer: Exact same rigging as before, but this time the person hanging from the rope is doing the lifting. This time, the mechanical advantage is 2:1! For the climber to go up 1 meter, they need to pull 2 meters of rope through their hand, so the mechanical advantage is 2:1.
Richard Delaney, from the YouTube video link at the bottom of this page: “Mechanical advantage is technically the ratio of the applied force to the input force.” There are two strands of rope holding the climber’s weight. If the climber weighs 100, that means each strand is holding 50. If the climber pulls down on the rope with a force slightly more than 50, they will start to move up. This means the applied force is 100, and the input force is 50, so therefore we have a 2:1.
Does this leave you scratching your head? It did for me when I first saw it! Next time you see a sport climber after a fall, pulling down on the belay rope to lift themselves back up to their high point, this is how they’re doing it, with a 2:1.
3 - Let's take this idea a step further. This image shows someone attempting to raise their partner by pulling down on the rope. What’s the Ideal Mechanical Advantage (ignoring friction) of this system?

image: https://www.ropelab.com.au/ropelab-quiz-1-mechanical-advantage/
Answer: 2:1, with a redirect through a second anchor point. There are two rope strands supporting the climber’s weight, so it's a 2:1.
4 - This image shows a person attempting to raise themself by pulling down on the yellow rope. What’s the Ideal Mechanical Advantage (ignoring friction) of this system?

image: https://www.ropelab.com.au/ropelab-quiz-1-mechanical-advantage/
Answer: 3:1. Just as in example #2, if the person pulling on the rope is the same as the load, the mechanical advantage increases, even though the rigging is exactly the same. In this case, there are three rope strands supporting the climber’s weight. For the climber to move up 1 meter, 3 meters of rope needs to be pulled, so the mechanical advantage is 3:1.
Back to Richard’s explanation of the ratio of input force to applied force: We have THREE strands of rope holding the climber’s weight. If the climber weighs 100, that means each strand is holding 33. If the climber pulls down on the rope with a force slightly more than 33, they will start to move up. This means the applied force is 100, and the input force is 34, so therefore we have a 3:1.
Isn't that interesting? The mechanical advantage of the system depends not just on the rigging, but on where the pulling force is coming from.
Here’s a climbing application of this principle.
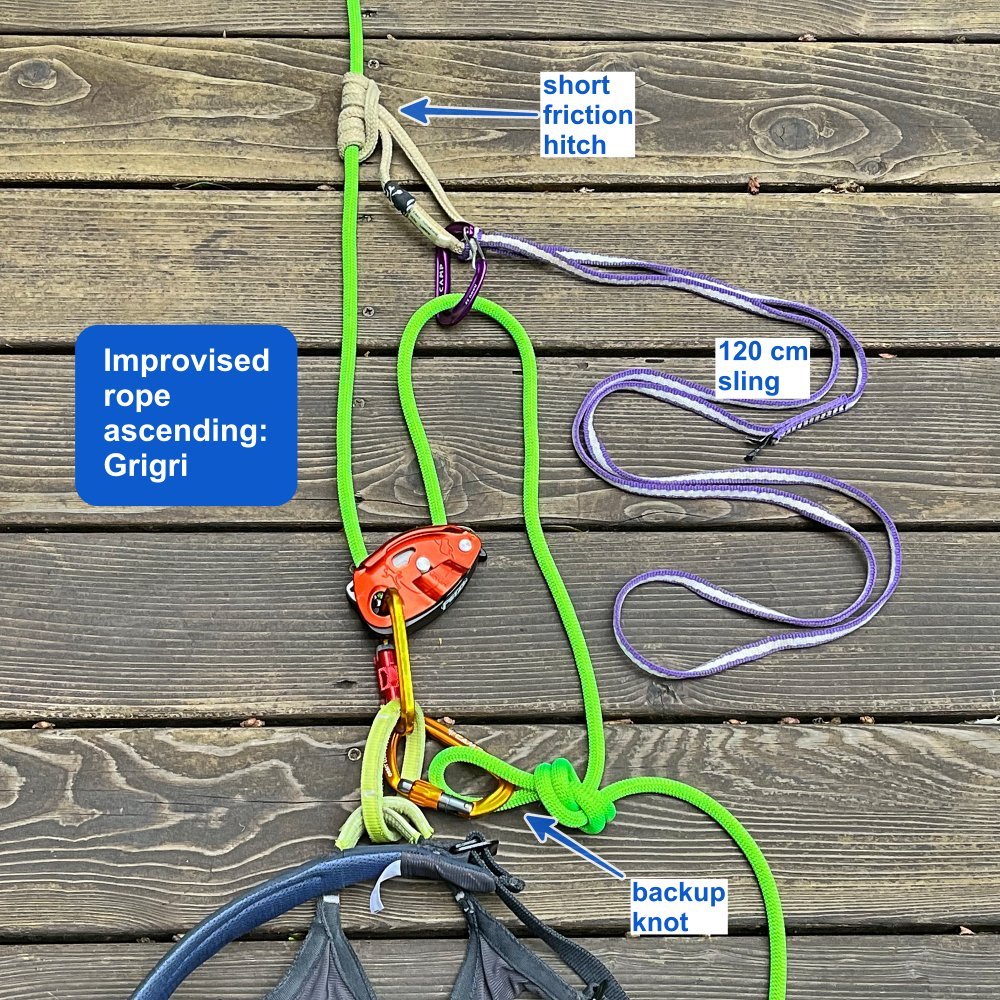
Below is a screen grab from a video featuring IFMGA Guide Jeff Ward ascending out of a crevasse. He's using this 3:1 mechanical advantage system to help him climb the rope. I have an entire article on this clever ascending system, read it here.

Here's the set up. This works way better than the traditional “go up the rope with two prusiks” method.
Here's another way to think about it, in a horizontal plane.
You're out 4x4 wheeling in your truck, and you get stuck. You take the winch cable from the front of your truck, put it around a tree anchor, and then bring it back and connect it to your truck. You turn on the winch and slowly pull yourself out. What is the mechanical advantage?
If you clip the end of the winch cable to the tree, you would have a 1:1. But if you attach it back to the truck, you create a 2:1, because the load (truck) is also doing the pulling.

image: https://www.ropelab.com.au/ropelab-quiz-1-mechanical-advantage/

Temporary middle mark on a rope for rappels
Doing multiple raps on a rope without a middle mark? Take a moment to add a temporary one so you can set up faster and safer rappels.
It’s great to climb on ropes with obvious middle marks, but someday you’ll definitely be climbing without one.
When you’re in this situation, and have multiple rappels, put a temporary middle mark on your rope with a strip of tape.
It won’t last through the day, but it’s going to make setting up all your subsequent rappels faster and easier.
It's not good practice to try to permanently mark the middle of your rope with tape, because it's going to probably become a sticky mess, and maybe even move from the correct spot, which could be dangerous. Only use tape as a temporary marker.
(Note: at one point I recommended dipping the middle of your rope in your chalk bag as another way to give it a temporary mark. However, I have since read some Edelrid technical documentation that excessive chalk on a rope may be harmful, so I don't recommend that anymore. Here's that link if you want to check it out, see page 34, ”Dirt”.)

If your rope doesn’t have a middle mark and you want to add one permanently, a good choice would be the Beal rope marker. It has a specially formulated ink in a handy dispenser that's designed for use on climbing ropes. It can be messy. Do it outside, lay down in a plastic bag under where you're working, and wear gloves.

Beal Rope Marker

Six features of your aider carabiner
The carabiner(s) clipped to the top of your aiders should be carefully selected, as big wall climbers will use it more than any other carabiner you own. Choose wisely.
The carabiners on the business end of your aid ladders will probably become your single most used piece of hardware. Choose them carefully.
When you find a good one, buy two, because you need one for each aider. Note these are all my personal preferences; consider it a starting point. Try a lot of different styles in your training and see what you like.
Consider these qualities for your aider carabiner:
Non-locking - Sounds obvious, but I’ve seen beginners have a locking carabiner on their aiders. This is a carabiner you’re going to be opening and closing hundreds of times a day on a big wall, and you for sure don’t want a locking mechanism getting in the way.
Oval (or other standard shape) - Depending on how you set up your aiders, you might be clipping several things into the bottom of the carabiner. Having the classic oval design gives room at the top to clip a big wad of webbing, and at the bottom to get in whatever else you need. Having said that, some people prefer a slightly easier handling of a bent gate carabiner. Generally, avoid a very asymmetrical design.
Standard size - You're after the Goldilocks carabiner, not too big, not too small, just right. You don’t want a mini carabiner; harder to clip bigger random things. And, no need for a wide mouth belay style HMS carabiner either. Big hands, get a bigger carabiner. And vice versa.
Solid gate, not wiregate. Wiregate carabiners are generally hard on your fingers to open hundreds of times a day, solid gates are a little more finger friendly.
Thin nose and thin metal stock - Having a narrow profile, or “nose” makes it easier to wiggle the carabiner into occasional small loops of webbing, rivet hangers, etc, and to unclip under load.
Distinct color - You can either buy an odd colored anodized carabiner, or even spray paint something creative yourself. Why is a distinct color important? You want to be able to glance your gear harness and always grab the aider fast. (Yes, it’s a good habit to always clipping your aider into the same spot on your harness every time, but having a distinctively colored carabiner makes it even easier to locate.)
Note that these carabiners are going to get pretty beat up, especially if you’re clipping lots of bolt ladders. Check it regularly for any small burrs of metal that might hook up on webbing, and retire them if you need to.
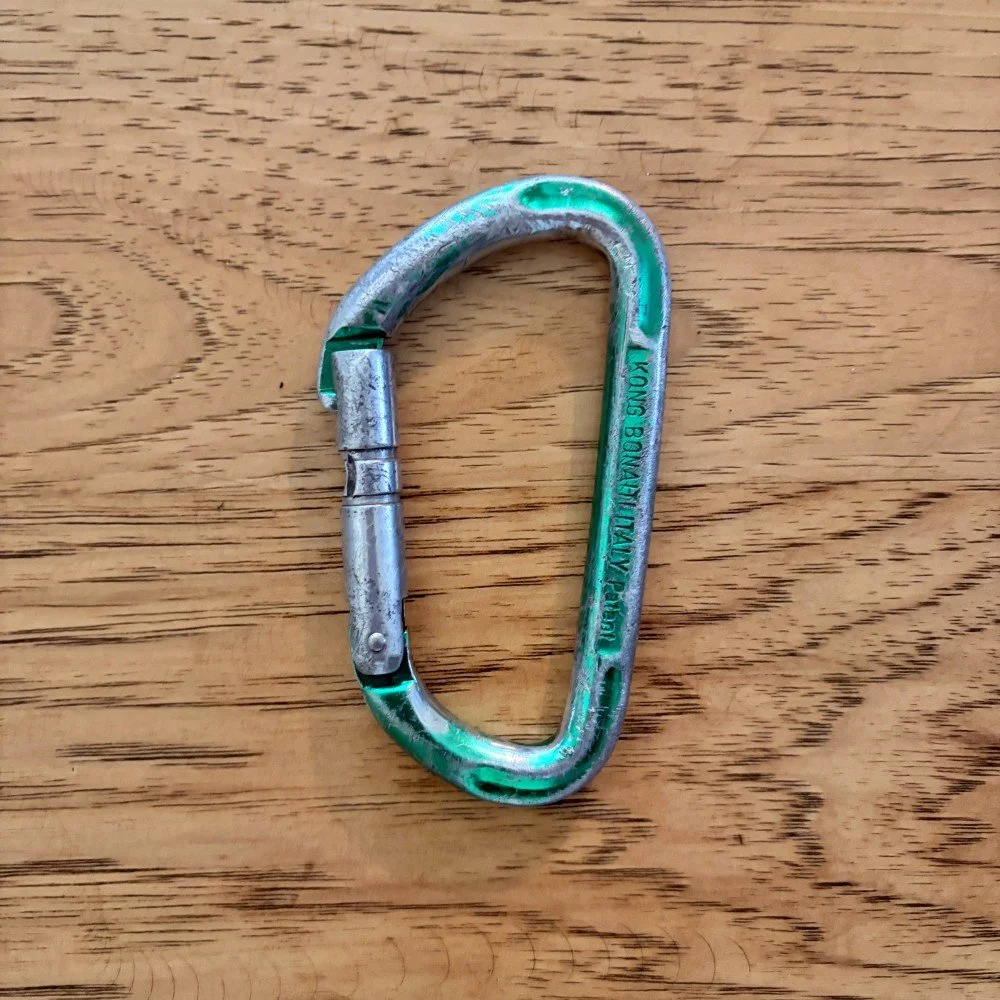
Here’s my first ladder carabiner, a beauty from Kong. Still works great. (Nothing else on my harness is this color, easy to spot!)
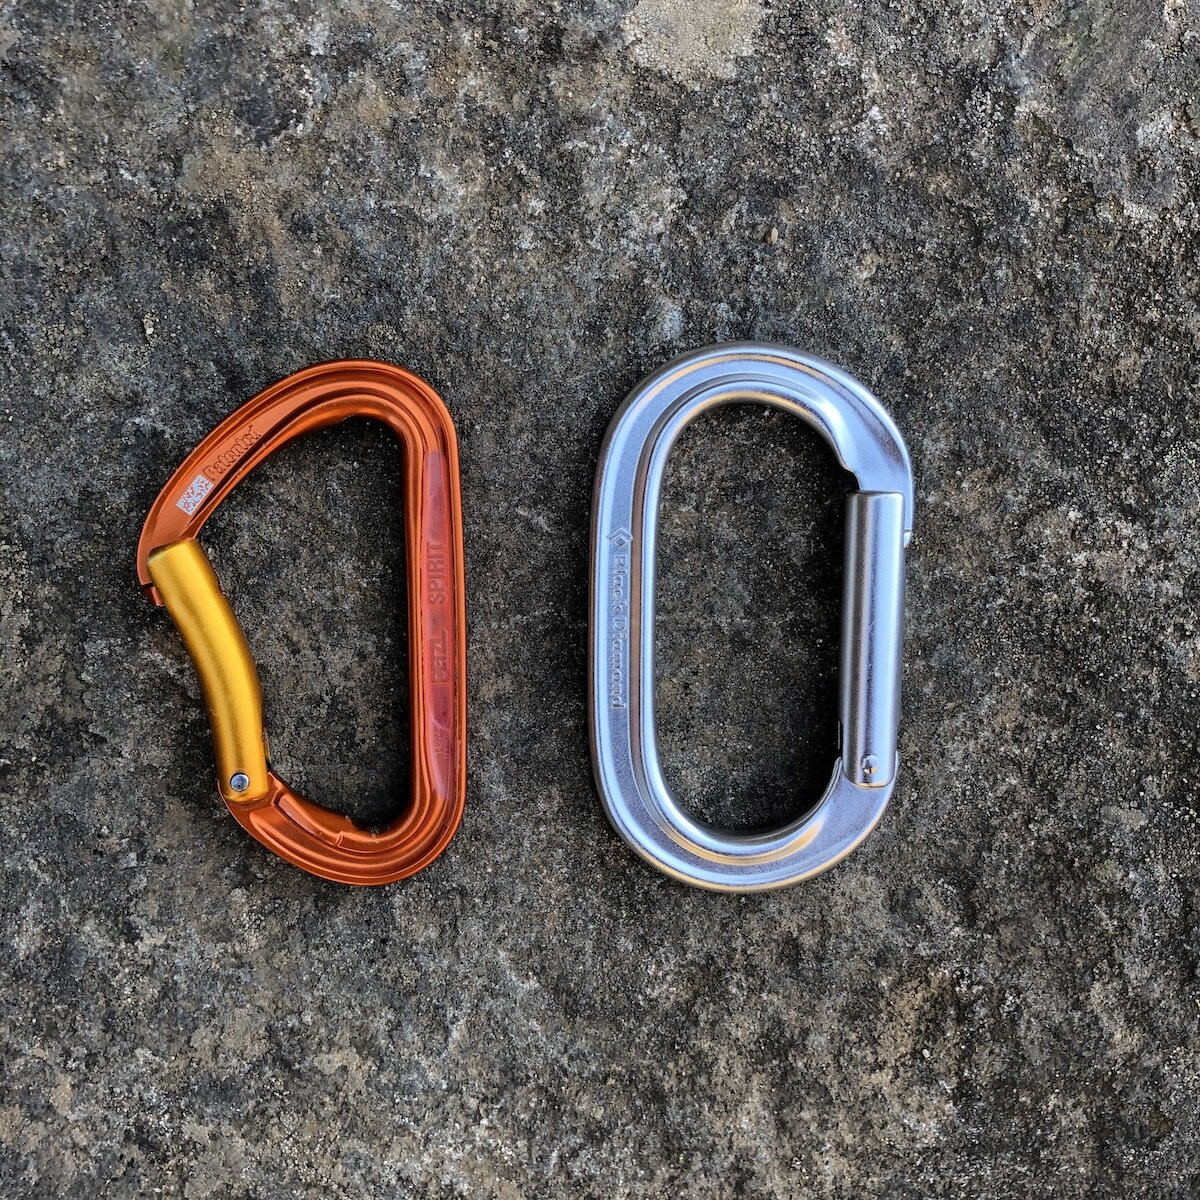
The Petzl Spirit and Black Diamond keylock oval carabiner, both tried and true design, are solid choices.
non-locker
bent gate and classic oval style (lots of room at both ends)
medium size, not too small
solid (not wire) gate
thin / narrow nose
okay, not a distinct color for that oval, but five out of six ain't bad. All you need is some spray paint!
(I think BD also makes a non-keylock oval carabiner; be sure you get the keylock, aka notchless, version.)
Also, check out the DMM PerfectO, a classic shaped oval carabiner that comes in lots of cool colors. No spray paint needed!

image: https://www.backcountry.com/dmm-perfecto-straight-gate-carabiner

Add a carabiner to easily adjust your clove hitch
You can quickly adjust your clove hitch connection by clipping a carabiner to the “heart” of the knot. This can be helpful for adjusting your position at the belay, as a back up when ascending a rope, or for lead rope soloing (advanced climbers only!)
Note - This post discusses techniques and methods used in vertical rope work. If you do them wrong, you could die. Always practice vertical rope techniques under the supervision of a qualified instructor, and ideally in a progression: from flat ground, to staircase, to vertical close to the ground before you ever try them in a real climbing situation.
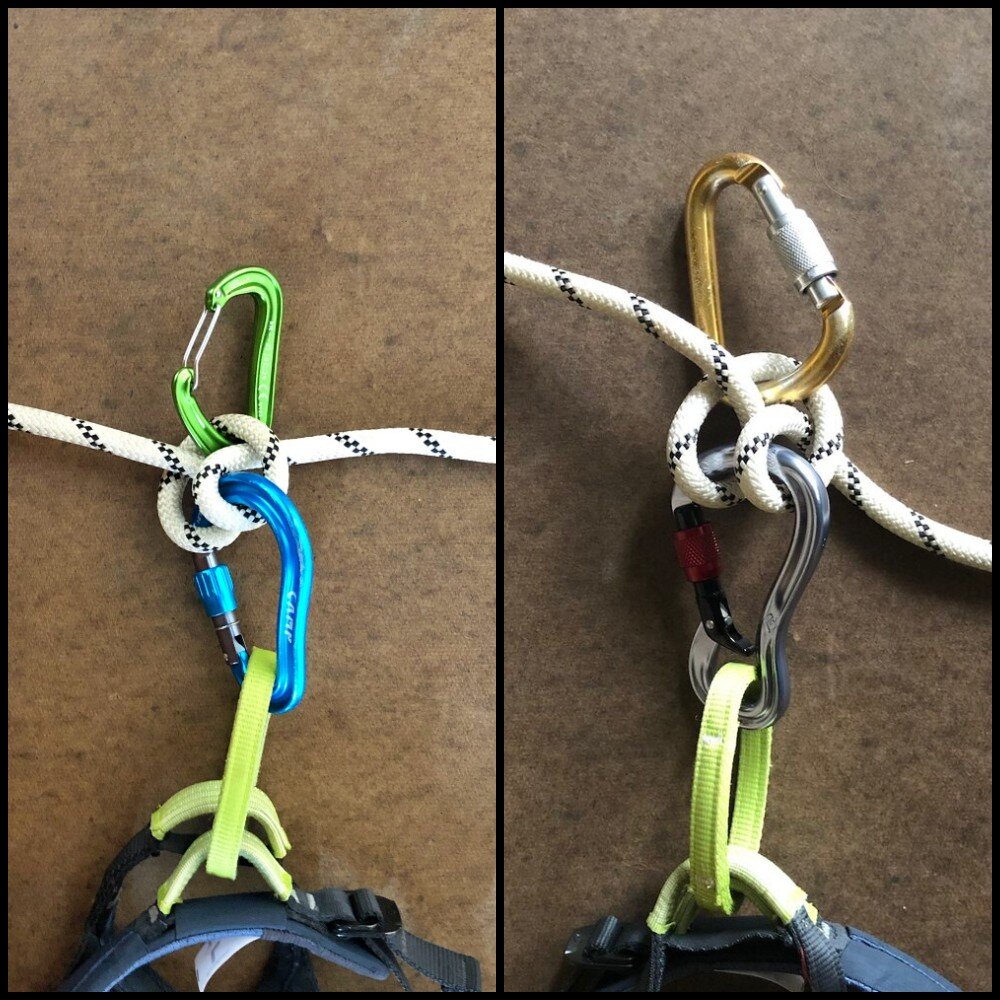
Here’s a #CraftyRopeTrick to easily adjust a clove hitch: clip a carabiner (locker or non locker, either works) into the top loop of the knot as shown above. Pulling on this carabiner creates slack, which you can then feed in either direction you need.
When might this be helpful?
Adjust your connection length to the anchor, say on a larger ledge when you want to move away from the master point to the edge to watch your partner. (In the photo, that's the set up on the left, with the non-locking carabiner.)
As a backup when you’re ascending a rope
For lead rope soloing / short fixing on a big wall (advanced climbers only!) In the photo, that's the set up on the right. Because that's your primary connection to the rope, a non-cross loading style carabiner on your harness and a locker in the clove hitch is recommended.
Some crazy rescue scenario, where you need to lead solo to save the day (without further compounding your troubles, of course . . . )
Note: Alpinesavvy does not endorse lead rope soloing. It's can be scary, it can be dangerous, and it’s an advanced maneuver that’s beyond the scope of what’s usually recommended here. I’ve done it a few times, and even on easy ground it was still spooky. If you do it wrong you could die or get seriously hurt. (And yes, that caveat also applies to lots of other things we do in climbing.) Consider yourself warned.
Notes . . .
If you fall, the carabiner in the clove will cinch down and stop you.
With the carabiner, there’s no chance of getting your finger pinched (or removed!) in the clove hitch, if you fell while pulling out a loop of rope.
Note the Black Diamond Gridlock carabiner on the belay loop, which minimizes the chance of carabiner cross loading or other unwanted weirdiosities.
Additional cautionary note: If the carabiner in the clove were to catch on to something at the same moment that you take a fall, the knot will fail. (Highly unlikely, but worth mentioning.)
Even a clove hitch failure should not mean a horrendous fall in most cases. In addition to the clove, you’re tied into the end of the rope. If you’re ascending a rope, you probably have back up knots as well.
Of course, try this on flat ground, then in a very controlled vertical environment close to the ground before EVER trying it on a real climb.
(Sort of) related note: if you're ever thinking of rope soloing on an ATC Guide in auto block mode, don’t do it!
If you take a lead fall onto an ATC in guide mode, it MIGHT result in some of the following: the rope becoming hopelessly jammed in the device, the blocking carabiner twisting and doing weird things, and the ropes becoming inverted and thus losing almost all braking power. In other words, don't do this.
Besides, Black Diamond does not recommend using their ATC Guide for lead soloing.
Read more on this issue here and here, and watch a video here.

Quick - which carabiner is stronger?
That big burly “belay” carabiner might appear to be stronger than the tiny “paper clip”, but check the load ratings to be sure. Good news: all carabiners certified for climbing are strong enough for anything you need.
Short version: modern, properly CE rated carabiners from a recognized manufacturer are going to be plenty strong enough for any climbing application. However, it's quite interesting that's some of the tiniest and lightest carabiners actually can have a higher strength rating than some of the biggest burliest ones.
It’s natural to think that a carabiner designed for belaying, with a large diameter and generally burly appearance, would be stronger than what are sometimes called a “paperclip” carabiner, used by many climbers merely for racking gear.
Let's have a look at the Petzl Attache, a long time at workhorse belay carabiner that's been around forever, and the Camp Nano, which is one of the lightest carabiner on the market.
No contest, right? The yellow carabiner has to be stronger. Just look at that thing, it’s stout!

But . . . let’s check the numbers.
Stamped on the side of every climbing rated carabiner are three important load ratings: end to end, cross load, and open gate. Readings are given in kilonewtons (kN), which is a metric unit of force, equal to about 100 kg, or 220 pounds.

Petzl Attache
End to end: 23 kN
Cross load: 7 kN
Open Gate: 6 kN
Camp Nano
End to end: 21 kN
Cross load: 8 kN
Open Gate: 9 kN
Surprised? Yeah, me too!
The Petzl Attache is stronger in the normal configuration, but the tiny Camp Nano is stronger in the cross loaded and open gate rating.


And check out the weight difference. The Petzl Attache at 78 grams weighs more than 3 TIMES the Camp Nano at 23 grams!
So, at 1/3 the weight, the Nano is stronger in two of the three carabiner strength ratings.
(This is more a tribute to modern engineering practices then any practical application, because any quality modern carabiner is strong enough for just about any use you can put to it, more below.)
Sometimes, you may hear people say, “I want to use that big, heavy, sturdy-looking carabiner because it’s stronger!” You might remind them of this post, or to have a look at the actual rating on the carabiner. The smallest carabiner on your rack may turn out to be “stronger” than the biggest one.
So, the Good News: pretty much all legit climbing carabiners you can buy have a CE rating. (“CE” is a certification mark that indicates conformity with health, safety, and environmental protection standards for products sold within the European Union.) CE ratings can vary a tiny bit depending on whether they are belay, oval, wiregate, but the general specs are: a MINIMUM strength of 20 kN end to end, 7 kN cross load, and 7kN open gate.
So, every CE rated carabiner is strong enough for any application you could ever think of. So relax, buy quality carabiners, and don’t worry about how strong they are.
(Just avoid open gate and cross loading on ANY carabiner.)
And if you want a deep dive into all things carabiner, this Black Diamond webpage is terrific.

Convert a 1:1 to a 3:1
When hauling on a big wall a 1:1 mechanical advantage system might need a boost, if your bag gets hung up or is dragging on a slab. Here's a quick way to increase your pulling power to a 3:1.
I learned this tip from big wall ace Andy Kirkpatrick’s excellent aid climbing and big wall book, “Higher Education”. Definitely recommended for all big wallers! Connect with Andy on his website and his Substack.
A few words on hauling, from Andy Kirkpatrick:
“Hauling is potentially one of the most dangerous aspects of big wall climbing. This translates to ultra-caution in all parts of your hauling system and interaction with bags, haul lines, docking cords, and pulleys. If you rush and make a mistake, drop a load or have it shift where it's not wanted, you could easily kill someone or yourself. I try and teach climbers to view their bags as dangerous creatures, like a great white shark, rhino, or raptor that is in their charge. The ability to keep them calm and under your control comes down to paranoia, foresight, and heavy respect for the damage they can do.”
When hauling light to moderate loads on a big wall, you can hopefully use a 1:1 mechanical advantage system most of the time. Yeah, it’s gonna hurt, but it’s usually going to be the fastest. (For bigger loads, you might prefer a 2:1 haul, which we cover extensively at this article.)
However, there may be times when you want to ramp up your pulling power from a 1:1 to 3:1. Typically, this happens when the bags are temporarily hung up, or are transitioning from being pulled from space onto a slab, or something else that introduces evil friction that you need to overcome. Or, maybe you're just feeling beat from a long day and want to make your haul easier, even if it takes a little longer.
Here's one way to set this up fairly quickly. You’ll need a bit of extra gear to do this, but hey you're big wall climbing so you have this with you, right? I’m showing this with pulleys for maximum efficiency. If you don't have those, you could also do it with carabiners at each change of direction, but you're going to be losing about 50% of your pulling efficiency, so pulleys are a better choice if you have them.
The basic idea is to make a 3:1 Z drag, with the pull strand redirected to the anchor point so you're pulling down instead of up. If that didn't make any sense, look through the photos below, and think it through. Once you understand the basic concepts, it takes just a minute or two to set up.
The photos are meant to illustrate the general procedure, and not to specify the exact gear that you should use. Everyone carries different equipment; use what you have.
Like with all big wall hauling systems, you practice this thoroughly until you have it dialed, with a realistic load, in a controlled environment, with the gear you’ll actually have with you.
Safety note: If you think your bag is slightly hung up, you can try this to get it free. However, if it's really stuck, it might be a better choice to rappel down (or have your second pendulum over, if possible) and actually remove the bag from the obstacle instead of putting a really large load on your hauling system.
Here's your basic 1:1 hauling system. The rope goes through Petzl Micro Traxion progress capture pulley at the anchor. There's a toothed cam on the pulley that captures the progress of your pull; if you let go of the rope, the pig does not slip down.
The Traxion is on a locking quickdraw. The quickdraw lets the pulley twist a bit and better align itself with the direction you're pulling, which slightly increases efficiency.
The rope going through the pulley on the anchor does not create any mechanical advantage. It merely changes the direction of the pulling force, in this case downward, so you can pull the rope down with your body weight rather than lifting up with your muscles. For every 1 meter of rope pulled down on the right strand, the pig goes up by 1 meter.

Step 1: Add a sling, carabiner, and pulley to the anchor. This will become the redirect for your pulling strand. Here, I girth hitched a 30 cm sling onto the top carabiner of the quick draw. This extends the redirect pulley a bit below the progress capture pulley so they don't clank around on each other. (If you have a schweet progress capture pulley with a hole at the bottom, like the Petzl Pro Traxion, skip the sling and clip the carabiner/pulley through that hole.)

Step 2: Clip an ascender upside down onto the load strand, add a carabiner and pulley, and clip the pull strand to the pulley. Here I'm using a Petzl Rollclip, an nifty integrated locking carabiner and high efficiency pulley wheel that works great in this application. But any combination of carabiner and pulley will work.
I'm using a handled ascender because that's pretty common gear you would have with you on a big wall. You can also clip a water bottle or two onto the top of the ascender, which can help it reset itself when you give it slack between pulls. However, any kind of a rope grabber would work here.
This is now your “tractor” pulley, meaning the one that's doing the work. If you pull upwards (toward the anchor) at this point, you have a 3:1.

Step 3: Clip the pull strand through the redirect carabiner that's on the anchor. Pulling upwards is a lot of work! We want to use our body weight and pull down. The redirect lets us do that.

Schweeeet! Now we have a 3:1, redirected for a downward pull. Pulling 3 meters of rope through the system will move the pig 1 meter. We have pulleys at every change of direction, which maximizes our efficiency. Again, you could use carabiners at every change of direction, but it's going to make the pulling significantly harder because of the extra friction. (Carabiners are about 50% efficient, a good quality pulley is about 90% efficient.)
Slide the ascender as far down toward the load as you can, and then pull downward, where the glove is. If raising a large load, you probably don't want to actually be yanking on the rope with your hand. Clip the pull strand through a Grigri or ascender, clip it to your harness, and start doing squats, using your bodyweight to lift. Or, you can clip another ascender to the rope where the glove is, clip an aider onto that, and then step down on the aider with your foot to lift the load. Use body weight, not arm strength.
When the ascender and redirect pulley come together, reset the system by sliding the ascender down toward the pig, and continue lifting. To help the blue ascender slide down on its own, you can clip a few cams onto it. The extra weight should help it reset itself.
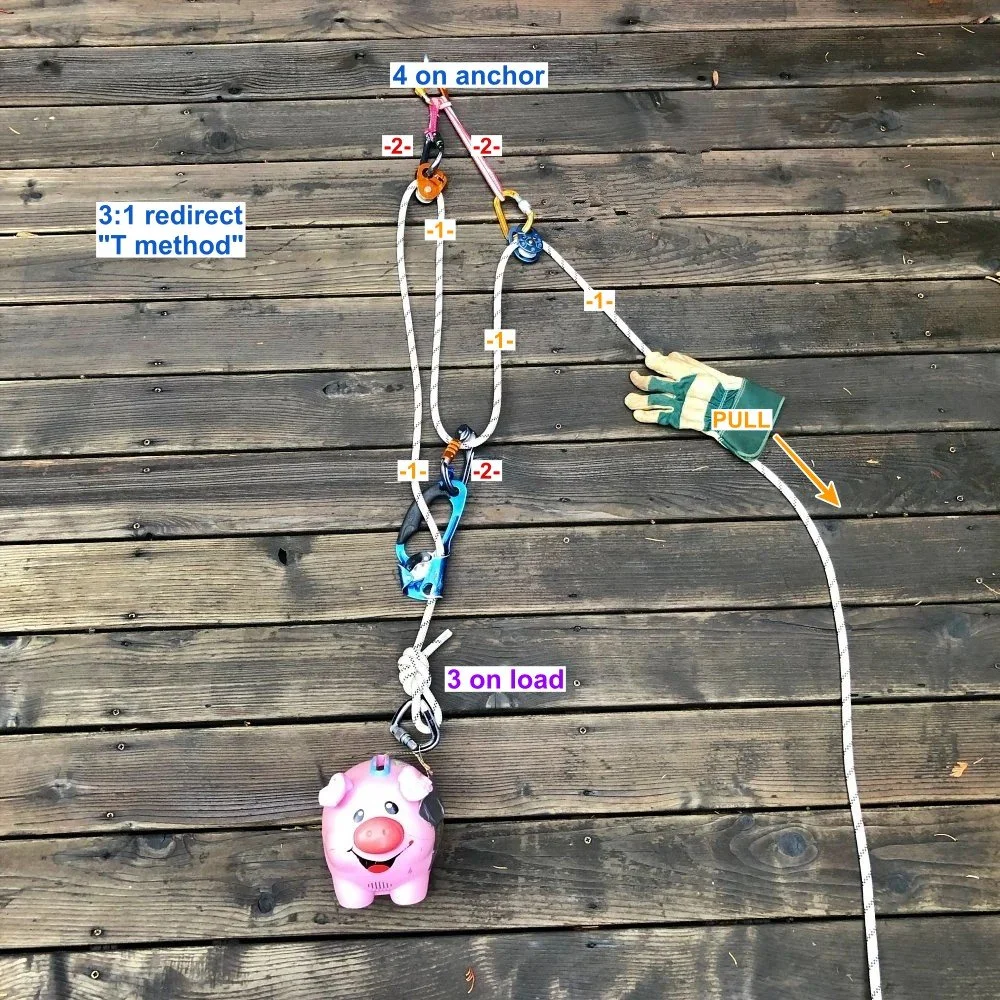
Here's a diagram of this anchor, using the “T method” for counting tensions, to show the theoretical mechanical advantage.
If you want to learn more about the T method, check out my article here.
Notice that by adding the redirect, we increase the force on the anchor to about 4x your pulling force, as opposed to two times of the pulling force with a normal Z drag.
The previous photos were done horizontally to spread out the gear and more easily see how it works. Here’s the same set up done vertically, so you can see how the ropes hang in (semi) real life.
You can easily convert back to the standard 1:1 at any time, by removing the tractor and the redirect.


The “25 foot” notice
When the leader approaches the anchor, giving notice to your belayer can expedite the climb.
This tip is from big wall expert Mark Hudon. See more great tips and El Cap route photos at his website, hudonpanos.com
When the leader gets close to the anchor, they yell down to the belayer, “25 feet” and an estimate of the time it might take to get there. This signals the belayer to wake up from their nap (napping, one of the joys of big wall belaying with a Grigri), start breaking down the anchor, make sure the haul bag is ready to be released, get ready to clean, etc.

4 reasons not to simul-rappel
Simul-rappelling has more than a few downsides, both in terms of speed and safety. If you choose to use it, be aware of the potential problems and be sure to practice in a controlled environment.
Simul-rappelling is a technique in which two climbers rappel a single strand of the rope at the same time, counterweighting each other.
While this is typically thought of as an advanced maneuver that you should only try when you really have to, such as an incoming lightning storm or on a very long multi pitch route, in some climbing circles it's being used as a more standard way to descend.
As you will discover below, I'm not much of a fan. Before I get into why that is the case, I'd like to mention a couple of situations when a simul-rappel might be a good idea.
If you need to rappel down some gully with loads of loose rock, a simul rap might work, because rocks that you kick down when you’re side-by-side won't nail anybody below. But, hopefully you don’t find yourself in a situation like this very often, as a standard rappel route should rarely be in dangerous areas like this.
Teaching a beginner to rappel - the more experienced person can descend right next to the beginner, and perhaps even be clipped to them, to offer advice and encouragement. (See below for a method that can reduce risk if your beginner friend screws up.)
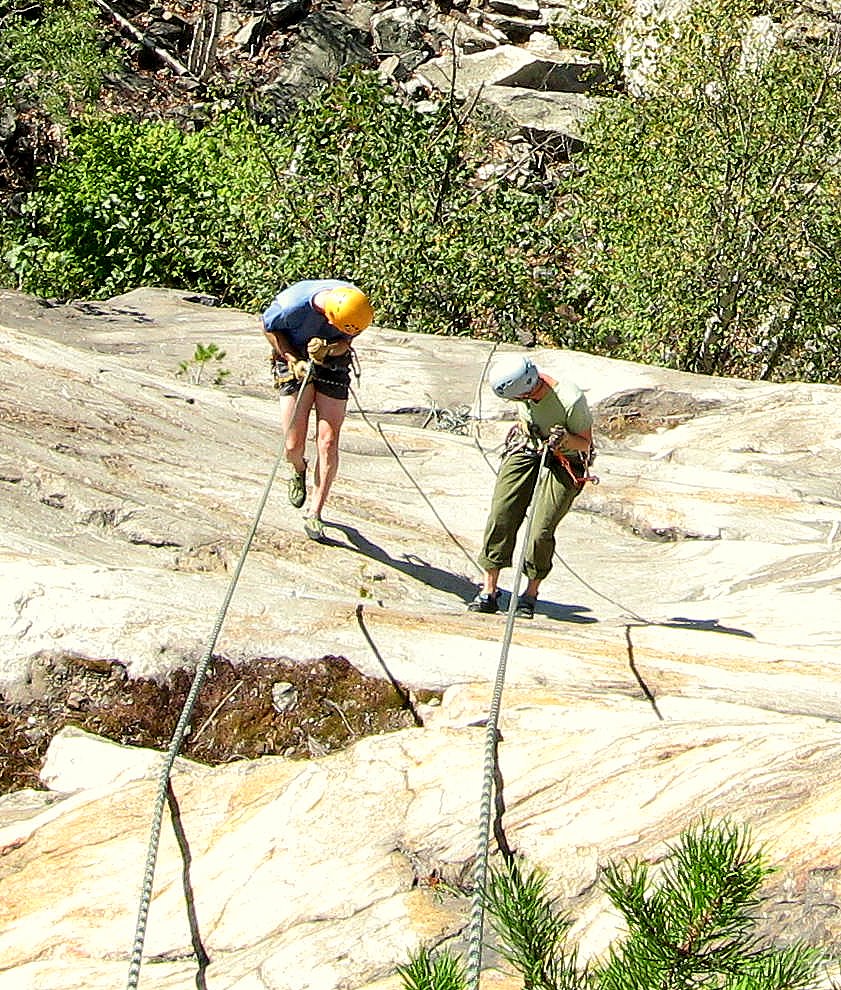
image: http://theconspiracytimes.blogspot.com
If you and your partner are both solidly experienced with the technique, and observe precautions such as:
Knots in the end of the rope
Using a third hand autoblock backup below your rappel device
Being sure both strands of the rope reach the next rappel station
Staying close to each other and maintaining good communication
Tethering yourselves together with a long sling (which does NOT mitigate the risk you might think, more below)
then simul-rapping it can be reasonably safe and possibly save you a little time.
But think about it: by the time you've done all this, could you have already been down rappelling the normal way?
Or, as some people have described it, “Being fast isn't particularly safe, and being safe is not particularly fast.”
Another option: pre-rig your rappel
If you want to improve your speed AND safety when rappelling, try pre-rigging your rappel. Both climbers rig at once, so they can check each other, and then the second can begin heading down the moment the first person is off rappel at the next anchor.
(One other tip, mentioned to me by a canyoneering expert: If you have to simul-rappel with someone who is a relative beginner, you can put a carabiner block on their side of the anchor. That way, if they screw up and tension goes off the rope on their side, the block will catch in the anchor and you will not fall.)
A note on tethering yourself to your partner as you descend . . .
Many people seem to think that this will somehow save you both if the rope starts slipping through one person's device uncontrollably. It doesn't.
Where it’s helpful is when you both arrive at the anchor. As soon as one person is clipped, essentially you both are. Because this moment of anchor arrival is the potential spot when one person can unweight the rope before the other person is ready, this can be helpful. But until you arrive at the anchor, being clipped to your partner doesn't do much to reduce your risk.
Here's an article by Andy Kirkpatrick, author of the book “Down”, offering his take on the hazards of simul-rappelling: “Murder-Suicide - the Case Against Simul-rappelling”.
(Yes, it has a dramatic title, and the argument is a bit one-sided. But Andy has never backed away from sharing his feelings on pretty much anything, this included.)
There are some major downsides to simul-rappelling, both in terms of safety and speed.
IFMGA Certified Guide Rob Coppolillo, co-author of “The Mountain Guide Manual”, wrote the following article in Climbing magazine which summarizes the shortcomings. Below is a direct copy/paste, in italics.
(Note, not mentioned by Rob is the hopefully obvious downside of doubling the load on the rappel anchor. If it’s bolts, probably not an issue. If it's anything slightly sketchy, then potentially a big issue.)
Simul-rappelling without both climbers having a backup (third-hand) on their respective brake strands doubles the chances of a catastrophe. Should one climber lose control, the rope will feed through his rappel device and begin sliding through the anchor.
If one climber unweights his rappel, it introduces slack into the system and the rope will slip at the anchor, effectively dropping the other climber. If this occurs at an unlucky moment, or the rope begins to pull unchecked through the first climber’s device, it can result in a tragedy.
Less-experienced climbers typically rappel slower on a single-strand of rope because the relatively low friction of a single-strand rappel makes them nervous. They elect to simul-rappel, but then fail to make up any time because of the slower rappel.
While simul-rappelling, both climbers arrive at the next rappel station nearly simultaneously, which can be awkward (and slow). Typically, one rappeller waits up top while the other manages the anchor and/or transition. Having one climber prep the station speeds up the second climber going off rappel. Often it would be faster (and safer) to simply rappel in a traditional fashion.
Finally, if you want a few more good reasons not to do it, here's a quote from Canadian expert climber Will Gadd’s personal website:
“Don’t simul-rap and otherwise get tricky on your raps until you’ve really, really figured your systems out, and even then simul-rapping doesn’t generally speed things up much. If you are going to simul rap then have knots in the ends of the ropes, have some sort of prussic attaching the one climber to the other’s rope (so if one person loses control both don’t plummet, and if this idea doesn’t make sense then definitely don’t simul-rap), consider putting a blocking knot on the weak climber’s side (with a quick link so it doesn’t pull through), use auto-blocks on each climber, etc. I did a lot of simul-rapping over the years but have pretty much given up on it in the last decade, it’s open to problems unless so many control measures are put in that it becomes very slow. Very, very rarely is simul-rapping justified by expediency . . .”

Three ways to improvise an arm sling
Using a triangular bandage for an arm sling is way old school. Learn three simple ways to use a coat and an extra T-shirt for a makeshift sling.
I saw a version of this in a recent wilderness first aid class that involved cutting up your shirt with scissors or a knife. It looked slick, but was pretty hard on the shirt! Here are three simple (and easier to remember) methods that don’t require you to cut up your gear.
Note - After you make one of these improvised swings, it's a fine idea to further secure that arm to your body so it doesn't flop around. Several ways to do this are an ace bandage, tape all around your torso, or a couple of heavy duty safety pins.
Method 1 - Elbow in coat hood
If you have a coat with a hood, insert the elbow of the injured arm into the hood, then tie the sleeves snug on your opposite shoulder.
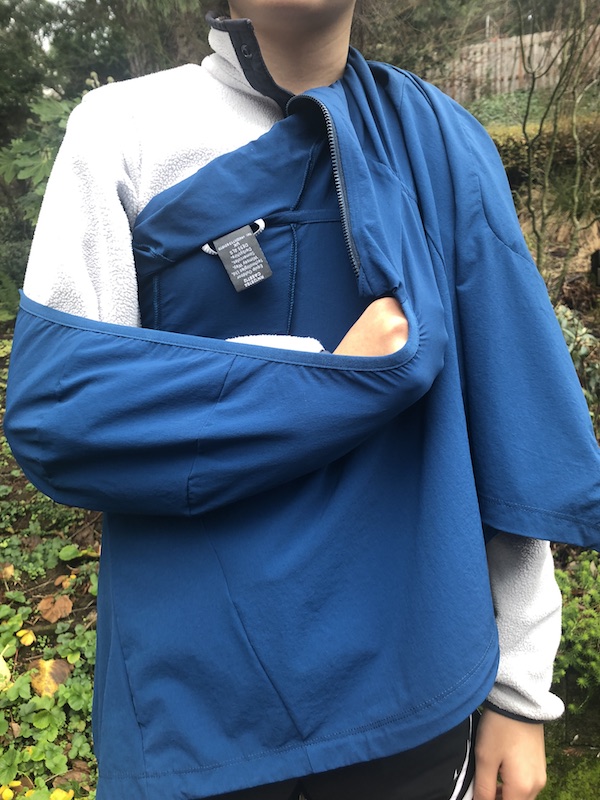
Method 2 - Elbow in coat sleeve
If you have a coat, insert the elbow of the injured arm into the sleeve of your coat, which will bend your elbow and put your hand somewhere on your upper chest. Zip up the coat (probably with the help of a friend) and your arm is secure.
(Bonus points to freak out your friend: Put your right hand inside your jacket, put your right sleeve in your pocket, and use your right hand some creative way - Pretend to have an actively beating “heart”, make it crawl out from the top of your shirt and start going around your neck, etc. Try it in a mirror, it looks amazing. :-)

Method 3 - Extra shirt “necklace”
If you only have one shirt, this works, but if you want your chest to stay covered, you’ll need a second shirt.
Take your extra shirt, put your head all the way through it, and leave it around your neck like a necklace.
Let's assume your right arm is injured. Reach your right arm underneath the sling shirt, insert your hand down the left sleeve, tuck your right elbow into the right sleeve. Finally, tuck the extra fabric around your right elbow.


Knotting the ends of your rappel rope - three approaches
Most climbers agree that putting some sort of knot in the end of your rappel rope is good insurance for not zinging off the end of it. But, there are several ways to approach this, with pros and cons to each.
It’s generally accepted as Best Practice to put a knot(s) in the ends of your rappel rope, to prevent the catastrophic accident of rapping off the ends. (This is also known as making a ”closed system”.)
Of course, if you’re rapping off a single pitch route and you can CLEARLY see that both ends of the rope are on the ground, a knot in the rope ends is not necessary. However, especially if you’re more of a beginning climber, it can be important to build good technique by repeating the same Best Practice all the time, so no one should chap on you if you decide to tie a knot in both ends of the rope.
There are a few different ways to approach this, and as with most aspects of climbing, no single one is right or wrong. Let’s explore each method and look at a few pros and cons.
Method 1 - Stopper knot in each strand
Method 2 - Tie both ends together
Method 3 - Clip both ends to your harness
Method 1 - Stopper knot in each strand
This is probably the most common technique. One benefit to this is that any twists generated by rappelling can work themselves out.
However, there are two reasons why you might not want to do this.
1 - A fairly common scenario that can lead to a Major Rappel Epic is forgetting to untie one or both knots in the rope before you start to pull the rope, and realizing, only too late, that you have a knot above you that will not pass through the rap anchor above.
F#$%^&*K!! Big Problem!!
(This usually happens when climbing with a new partner, when one of you likes to tie knots in the end of your rappel ropes, and the other one for some reason does not, and that other person decides to pull the rope without checking. Ask me how I know this . . . )
Do you or your partner REALLY want to put a prusik knot on that rope and ascend 60 meters, hoping like hell that stopper knot is somehow securely jammed in your anchor? The answer is NO, you definitely do not!
If you climb long enough, this will very likely happen to you, and hopefully you realize it FAST, when that damn knot is dangling only a couple of feet above your head, and you can do some crafty trick to pull it back down to you.
There are some ways to lower the chance of this happening.
If your rappel ends on the ground, make it the task of the first person down to untie both of the knots. You don't need them anymore.
If you have a multi pitch rappel, have the first person down use the “J loop” system: tie a figure 8 on a bight in both strands and clip it to the anchor. Now, the stopper nuts or no longer needed. The first person down can untie both of them, thread the pull strand threw the anchor, and tie one stopper knot in the new pull strand.
Develop the habit of maintaining control of the strand that's going up until the last possible moment when it gets pulled out of your hands. If you're sloppy with this and let loose and swing out away from you on an overhang or blow away from you if it's windy, you might find that knot is out of your reach even if you haven't started pulling yet. You don't have to hold it in your hands, you could simply clip it through a quick draw attached to either you or the anchor.
Very unlikely but very serious: You may tie a knot in one rope strand and forget to tie a knot in the other. If this were to happen, and the person rapping slides to the end of the rope, not only do they fall to the ground, they also could potentially pull the rope all the way through the anchor above, leaving your partner stranded. Depending on how remote your climb is, this could be an extremely serious situation.
Super important - ALWAYS be sure the knots in your rope are untied before you pull your rappel!
Note on stacked rappels and ONE stopper knot: This may well be the best solution of all for multi pitch rappelling: Both partners (or at least the second) use an extended rappel and pre-rig with an autoblock backup. Having the second person with their rappel device already on the rope and an autoblock fixes both strands of rope for the first person down, and the rope therefore can never slide through the anchor.
This means that you only need to tie a stopper knot in ONE strand of the rope. If the first person down were to rappel into the stopper knot for any reason, it can’t pull through the anchor because it's locked in place by the person above them. This also means that on multi pitch rappels, the first person down can thread the pull strand of the rope through the lower anchor, tie a stopper knot in it, and then pull the rope, which will pass through the upper anchor, and fall down past the lower anchor. No need to pull that strand back up to tie a second knot, a big time saver!
Method 2 - Tie both ends together
The solution to both of these problems is to tie both ends of the rope together. An flat overhand bend with about 1 foot of tail works fine.
This definitely eliminates problem number one, starting to pull the rope with a knot still in the end. If you start to pull the rope with both ends tied together, you have a closed loop, so you can easily retrieve it, untie the knot, and then continue pulling.
It also eliminates scenario number two, unlikely as it may be, because anyone who falls to the end of the rope is going to hit that knot and (probably) stop.
Many climbers dismiss this method because they think that twists in the road generated by rappelling have no way to work themselves out of the ends. The amount of rope twisting can vary a lot depending on the diameter and stiffness of your rope, your rappel device, etc., so experiment with this in a controlled environment and see how it works before you adopt it as a regular system.
Method 3 - Clip both ends to your harness
(advocated by Andy Kirkpatrick. See his great book, “1001 Climbing Tips, #252 for more.)
How about taking both ends of the rope and tying each one separately to your belay loop? This solves both the problem of rapping off the end of the rope and problem of pulling the rope before you untie the knot. If you get some twisting near the bottom, simply unclip the knots and continue down.
One clever modification to this, suggested by Andy: when attaching the rope ends, tie a figure 8 knot for the pull rope and an overhand knot for the other, to remind you which rope you're supposed to pull.
This gives an additional benefit: the rope is less likely to snag, because the rope is hanging in a loop below the rappeller. With this method you you don't even need to throw the ropes. This makes it a good idea if there are climbers below you, it’s windy, you have a low angle rappel, or terrain with lots of shrubs, blocks etc. for the rope to hang up. Flake out the ropes carefully on your ledge, lower a bight of rope, the rappeller starts down, and the partner feeds out remaining rope as needed.
An additional benefit to this method is because you only have at most 30 meters of rope hanging below you, (assuming you're using a 60 meter rope) you're reducing the risk of damaging your rope if you knock off any rocks.
This technique can become more important in blocky terrain, high winds, low visibility, or if you're not sure where the next anchor is. Or some epic combination of these - basically, all the rappel situations that are Less Than Ideal.


Add clip in tethers to your wall rack
Your gear rack is arguably the most important, and certainly most expensive, thing you have on a big wall. You absolutely, positively, never want to drop it. Here's a quick harness modification to be sure It always stays where it should.
Rule #1 of big wall climbing: everything has a clip in point.
There are a lot of critical items on the big wall climb, but probably the most important (and expensive!) one is your gear rack. You absolutely never want to drop it! Here's a way to minimize the chance of that ever happening.
Get two strands of stout cord, each one about arm’s length. (I’m kind of a cheapskate, so I use parachute cord; it’s rated to about 550 lbs. and plenty strong enough. 5mm cord would also be a good choice, and a bit more durable.)
In one end of the cord, tie a bowline around each shoulder strap of your gear rack so the cord is permanently attached. In the other end, tie a small figure 8 on a bight loop, just small enough to clip a carabiner. Repeat for the other cord and other shoulder strap.
When you finish your lead and are at the anchor, pull the two cords around to the front, and clip each one to a separate anchor component. Only then, after the rack is secured to the anchor by these two redundant points of connection, do you take it off your body.
By clipping to two parts of the anchor you spread it apart a little bit, giving easier access to restock the gear when your second arrives after cleaning the pitch.
This tip is from big wall experts Pete Zabrok and Mark Hudon


DIY - Homemade alcohol stove
You could spend $200+ on a high tech canister stove . . . or make one from a a cat food can in a few minutes. Unless you're melting a lot of snow for water, you really don't need to boil water in three minutes.
It's easy to be seduced by the sexy merchandising at your big outdoor store, especially the dizzying array of high-tech stoves. (Yes, I‘ve used it, and it’s an amazing snow melting inferno, but $240 for an MSR Reactor stove, seriously?!)

But, if you're tempted to get one of these, ask yourself this simple question. When I’m on a fair weather backpacking trip or climb, do I REALLY need to boil water in three minutes, or can I wait a few more? You know the answer. You can probably wait.
So, try this. How 'bouta stove:
that costs about $0.50 in parts
you can make in about 10 minutes with simple household tools (or even a Swiss Army Knife)
burns cheap, readily available fuel
burns silently
weighs under 1 ounce
has no moving parts that can break
boils a pint of water in about 8 minutes?
Check out the link at the button below.
Homemade alcohol stoves are big with long distance hikers, and have been solidly field tested. One popular model is called a "cat" stove, simply because it’s often made with an empty cat food can.
I've made a few of these stoves and they works great. It’s not designed to melt snow on an expedition, but for a shorter trip in mild weather it could easily serve as your main backpacking stove. If nothing else, it’s a fun evening project, good for scouts, and could well serve as a disaster preparedness item - with some rubbing alcohol and a few cat food cans, you can cook food after The Big Earthquake when gas and power may be down. A windscreen made from heavy duty tinfoil and a paperclip is a fine addition.
Here's a shot of my cat stove in action. Just a cat food can with two rows of holes.
(Note, the soot on the pan is not from the stove, it's from cooking over a real fire)


A great rappel check acronym - BRAKES
Having a standard system to check your rappelling set up before you head down the rock is a fine idea, especially for beginners. Here's an acronym to check all the relevant components.
Rarely does Alpinsavvy post material directly from another website. But in this case I will, because it’s pretty darn good.
A similar rappel check acronym I’ve used is BARK (Buckle, Anchor, Rap device, Knot) but I was never quite satisfied with that one, because it left out securing the ends of the rope, and putting in an auto block. This new acronym nicely covers both of those.
The below content is straight from Climbing magazine
BRAKES - a system check for rappelling
Prior to rappelling, you should check every aspect of your system. The rappelling safety acronym BRAKES, developed by Cyril Shokoples in 2005 and now widely used by climbing schools, can easily be employed as a pre-rappel checklist. It’s a good idea to go through this list out loud by stating each letter and touching the part of the system you’re checking. Confirm with your partner when possible that each component of the system has been set up appropriately and is going to be applied correctly.
B – Buckles: Check the buckles on your harness. Make sure they are snug and that all appropriate straps are doubled-back.
R – Rappel Device/Ropes: Check that the carabiner attached to your device is locked, both strands of the rope have been loaded correctly in the device, and the rope is properly threaded through the rappel anchor.
A – Anchor: Confirm that the anchor is strong. If it’s a tree, make sure it’s alive, large enough to hold your weight, and that it has a good root base. If it’s a boulder, ensure that it is not going to move. If rappelling off bolts or gear, confirm that they are suitably strong enough. Double-check that any webbing or cord isn’t damaged or too faded.
K – Knots: Check all the knots in the system. Make sure that knots adjoining two ropes in a double-rope rappel are correctly tied with enough tail.
E – Ends: Confirm that the ends of your ropes are on the ground or that they reach the next anchor. Confirm that your system is closed with knots at the end of your rappel lines.
S – Safety Backup/Sharp Edges: Use an autoblock backup and check to make sure that you aren’t going to rappel over any sharp edges.

The auto locking Munter hitch
While more of a trick knot used by guides, the auto locking Munter hitch can still be a good tool in your bag of Crafty Rope Tricks (CRT).
Note - This post discusses techniques and methods used in vertical rope work. If you do them wrong, you could die. Always practice vertical rope techniques under the supervision of a qualified instructor, and ideally in a progression: from flat ground, to staircase, to vertical close to the ground before you ever try them in a real climbing situation.
An old school yet effective way to belay your second is with a simple Munter hitch. The Munter has one advantage over an auto locking belay device such as a Black Diamond ATC or Petzl Reverso, in that you can easily lower your second if you need to. However, most people think that one of the downsides is that the Munter does not have the nifty auto lock feature that these belay devices offer.
Not so, grasshopper! With this crafty rope trick (CRT) you simply add one carabiner to a Munter hitch to make it autolocking. There are a couple of ways to do this.
Here’s one method. By adding the carabiner, the hitch remains in raising mode, and can't “flip” into lowering mode.

A few things to note:
Let’s start off by saying this is kind of a guide trick, and may not have a lot of utility for recreational climbers.
This knot is best used in situations where the chances of the second needing to be lowered is unlikely. This is a subjective choice that depends entirely on the skill of the climbing team. Also, it should probably not be used on any sort of traverse where you might swing into something vertical or overhanging. If there’s more than a slight chance that the second may need to be lowered, it’s probably better to use a regular Munter hitch or some other belay method.
Let’s start with a few general principles of Munter hitch belay.
As always when using a Munter hitch, it’s best to use a large pear-shaped “HMS” belay carabiner with round metal, which helps minimize friction.
Using a thinner rope or a new one with a sheath that’s a bit slippery works best. I’ve tried it with my ancient 10 mm workhorse rope with a fuzzed up sheath, and it’s quite a bit of work to feed that rope through the hitch.
You want to use two hands. Your”feed” hand pulls in slack rope and the the brake hand simultaneously pulls it down. If you only pull on the brake side of the rope, you’re going to get a lot more friction, do more work than you need to, and potentially get some twists into the rope.
Some specifics of using this hitch in auto lock mode:
You can add or remove this auto lock method into the Munter belay at any point in the pitch when your follower is coming up. For example, if the climbing starts off easy and then gets hard for the final part of the route, you could have your follower in auto lock mode for the easy part, and then simply remove the blocking carabiner when they get to the crux, so you have an option to lower them if necessary.
Or, you can belay mostly without the auto lock. If you need to put on a jacket, sort out the ropes, take a photo, whatever, you can put it into lock mode, do your business, and then remove the locker and go back to normal. Can't do that with any other type of belay device that I can think of.
Be sure the hitch is set up in “raise” mode before you clip the blocking carabiner.
Test this before your follower begins, to be sure it is locking up properly.
One handy use for this knot is for light hauling, such as a backpack or light haul bag. The blocking function serves to capture the progress of your haul. Typically, another semi-obscure knot called the garda hitch would be used in this situation, but many people find this knot to be, shall we say, temperamental.
Another use of the auto locking munter hitch is to climb a rope. If you're short on gear, like a plaquette style device (Reverso), Grigri, extra friction hitch, etc., the auto lock munter can be your progress capture on your harness. This is definitely a trick use of the knot and something you wanna practice in a controlled environment before you ever use it for real!
This knot suffers from the same general problem as a standard plaquette device like the Petzl Reverso: if your follower is weighting the rope and needs to be lowered, you can’t easily do so.
By far the easiest way to transition to lowering mode is to have your follower unweight the rope just enough for you to unclip the blocking carabiner from the load strand. Once the carabiner is gone, you’re back to a normal Munter hitch, and can easily lower your follower.
If that’s not possible, there is in fact a way to release this when loaded. Use a small locking carabiner for the blocking carabiner. Unclip the loaded rope from the blocking carabiner. This should allow the hitch to flip into lowering mode, and the small carabiner should pass through the large carabiner. Having a third hand autoblock backup on the brake strand before you do this is highly recommended. Yes, this is kind of clunky, and it's probably better to avoid that situation in the first place, but it is possible.
As stated clearly at the top of this post, please practice this in a controlled environment before you ever do it in real life!
Here's a nice video on how to do this.
Here’s a second method, which results in less friction. Depending on your rope, this might be a big help. Watch the video for the whole scoop. (Start about 2:00 for the action.)
At first glance it looks like a bit of a mess, but it works remarkably well.

Crevasse Rescue - skip the munter mule overhand
The munter mule overhand, or MMO knot, is a load releasable hitch. While it can be helpful in advanced rope rescue scenarios, it’s not required in crevasse rescue, and in the opinion of various experts, does not need to be taught to beginners.
Or, “just say no to the MMO”
Short version: In my opinion (and that of many experts) the munter mule overhand knot (from here on referred to as the MMO) is not a required component of a crevasse rescue system. Including it in a beginner crevasse rescue class adds further unnecessary complexity to an already very complicated situation. It’s fine when taught to intermediate or advanced climbers, and it certainly has a place in more advanced rescue scenarios, but it’s probably best not to teach it to newer climbers.
Long version: You’re considering taking a class in crevasse rescue from your local mountaineering club. You read the class curriculum online, and see that requires that you tie an MMO knot at the anchor to make a “releasable system”.
In addition, the generally always awesome and hilarious cartoon book, “Glacier Mountaineering: An Illustrated Guide to Glacier Travel and Crevasse Rescue”, says to use one also.
Conversely, the following reputable sources do NOT suggest using an MMO for crevasse rescue:
Book: “The Freedom of the Hills”
Book: “The Mountain Guide Manual” a reference book for, you guessed it, professional guides
The American Alpine Institute (AAI, see their crevasse rescue sequence here.)
YouTube instructional videos presented by professional mountain guides
The munter mule overhand with a cordelette
(Note: Mule knot not snugged up against Munter hitch to show the various parts more clearly. Carabiner through the overhand knot for extra credit.)

So, what’s the dealio, you may be wondering. Do I really need an MMO for crevasse rescue, or not?
To help answer this, ask yourself a few questions.
Is the MMO a seldom used, specialized rescue knot, that’s tricky for most people, especially beginners, to tie correctly? Answer, yes.
Is it likely that you’re going to forget how to tie a seldom used, specialized rescue knot, that you never use in your day-to-day climbing, years from in a rescue scenario that’s already stressful and complicated? Answer, yes.
Is it possible to rig a successful mechanical advantage crevasse rescue system without using this knot? Answer, yes.
Are the vast majority of crevasse rescues performed by raising only, without ever needing to lower at all? Answer, yes.
Is it possible to lower a victim safely (if for some reason you need to) without having an MMO in the system? Answer, yes.
I’ve watched several crevasse rescue videos made by AMGA (American Mountain Guide Association) certified guides on YouTube, and none of them use an MMO. Why is this? Probable answer - see the previous five questions.
(If you watch the excellent crevasse rescue videos made by AMGA certified guides that you’ll find on the video portion of AlpineSavvy, nowhere do you see this knot.)
Additional note: The MMO, as it’s usually taught, requires a cordelette. Which is probably okay if you have three or more people on your rope team and everyone has one. But if you’re a two person team, you probably already used your cordlette to build the 2 piece anchor, so you don’t have a second one for the MMO.
Let’s get back to the purpose of having an MMO in the first place, which is to have a “releasable system”. Why is this needed?
Typical answer - if the person in the crevasse needs to be lowered, the releasable system lets you do so. Reality - if you want to lower them, all you need to is pull about 1 inch up on the whole raising system, loosen the holding prusik, then lower. You can easily do this without the complications of an MMO.
(There is one additional highly unlikely rescue scenario, and that’s if the hauling team on top gets over enthusiastic, does not monitor the fallen climber during the pull, and somehow manages the epic screwup of pulling the fallen climber into the lip of the crevasse. In this case, theoretically, you may not even be able to get 1 inch more lift out of the raising system to loosen the prusik initiate the lower.)
Well, there is a way to do it. It involves getting out your knife and VERY carefully cutting that prusik knot, thus removing it from the system and getting your victim out of the problem that you caused. In this rare case, it could be argued that a MMO would be a superior solution, but it’s so unlikely to ever happen that in my mind it’s not worth planning for.
Takeaway: the MMO component of a crevasse rescue system is entirely optional, and in a beginner level class, adds needless complexity and a difficult-to-remember component to an already stressful and challenging situation.
Most people starting to learn crevasse rescue have their heads completely full with the steps that REALLY need to happen. Thus, most people don’t have any room for anything optional or overly complicated, or in this case both.
Once you have the basic crevasse rescue skills down, or certainly if you’re on a professional mountain rescue team, then you can start adding in more advanced components such as two person rescue and releasable systems. But for beginners, teach the basics, make sure they understand it inside and out, and keep it simple.
That's probably why “Freedom of the Hills and “The Mountain Guide Manual” don’t teach it.
Just say no to the MMO.

Spot, don’t belay, before the first clip
When does a good belayer not belay? Before their partner has made the first clip. Avoid this common beginner mistake.
An all too common scenario at beginner climbing areas is a new belayer attentively clutching the rope with both hands, while their partner is sketching upwards toward the first bolt or gear placement.
Until the leader clips the first bolt or gear, your job as belayer to spot them like they’re bouldering. Both your hands should be up, thumbs tucked into your palm, and your main task is to keep their head from hitting the ground should they fall before they clip.
Anticipate how much rope is needed from the ground to the first clip or placement, and feed enough rope through your belay device so the leader is never restrained while moving or clipping.
The moment they clip, you instantly change to belay mode, with your hand on the brake and feeding rope as usual.
Of course, this is a non-issue if you’re using a stick clip when sport climbing to attach the rope to the first bolt.
Here’s (more or less) how to do it. Note the climbing rope in the right hand, ready to return to belay mode right after the leader makes the first clip.

image: from https://www.youtube.com/watch?v=S_F1MfVGOzk
And this video, starting about 1: 32

Assorted "vertical camping" tips
Big wall climbing can offer enough suffering when you're actually moving upwards. Once you reach the bivy, you’ve earned a little comfort. Here are some tips from wall expert Mark Hudon to stay warm, dry and cozy.
Many of these tips are from Mark Hudon, a Yosemite big wall veteran. His systems are thoughtful, dialed, and generously explained both on his website and various online forums. The following collection of tips were mostly taken from a post on his website. You can read the entire thing at hudonpanos.com. Here, I'm posting the ones that seem especially brilliant, but I encourage you to go to his site and read the whole article.
See related post - Portaledge set up - Top Tips

Each climber has their own separate haul bag. Mark likes the Metolius Half Dome, about 125 liters. If you are a little taller, you can get the next size up which is only a little bit more in cost and weight. (Here's another post about had to choose a haulbag.)
You want to minimize rummaging around in the bag during the day when you’re climbing. Before you leave your bivy in the morning, pull out items you think you might need to access during the day and keep those handy. This might include snacks, water, lip balm, sunscreen, wind shell, warm hat, visor cap, and camera/phone. Keep these in a wall bucket or sturdy small big wall bag like a Fish Gear Beef Bag that hangs outside of the haul bag on a gear tether cord.
Mark has a comprehensive clothing list, see his website for details. All fleece and synthetic; no down, no cotton. He keeps it all in two separate size large Metolius Big Wall Stuff sacks. These bags are stout, have nice clip in points, are fairly inexpensive, and (best of all) from a company based in Bend, Oregon (my home state).
Mark organizes his core equipment into five different color coded stuff sacks: clothing (2 sacks) kitchen, food, personal care, and technology. This makes pulling out exactly what you need from the bottom of the haul bag a lot easier. (Any small item will migrate to the bottom of the bag unless it’s clipped to something or in a stuff sack.) Every stuff sack has a carabiner clipped to it.
Personal care bag: Mostly small stuff to deal with the constant dings and cuts that are going to happen to your fingers. Athletic tape, Advil, sunscreen, hand lotion, earplugs, unscented baby wipes, and paper towels instead of toilet paper. A little Bag Balm underneath a Band-Aid can really help heal your hands overnight. Take care of little cuts early before they become a larger problem.
Technology bag: phone, maybe a Bluetooth speaker, maybe a Kindle reader, all fully charged up, fully charged large spare battery and needed charging cables, headlamp with spare battery, camera, 2 way radio.
Once your ledge is set up, bring all of your stuff sacks out of the haul bag and clip them to your ledge. You want everything close at hand and avoid burrowing in the bag any more than necessary. You will need 8-10 spare “bivy” carabiners for this, so be sure and bring some. It's helpful to make these bivy carabiners all one obvious color or strange style that you don't use for climbing. Some people even mark them with spray paint.
Bring a multitool. A decent sized one, with good needle nose pliers. If you need to untie a welded knot, that's gonna be your best friend. Along with a good knife blade, bottle opener, maybe a can opener. (I heard a story of some guys who went up El Cap with a bunch of canned food, and somebody forgot the can opener, whooooops!)
Everything needs a clip in point. If it doesn't have one, you're going to lose it. Tie these at home if possible, and bring extra small diameter cord to improvise as needed. Bank line, a sort of heavy duty black twine rated to over 300 pounds, is an excellent choice for adding tie in loops.
Everything has its own designated carabiner. Anything you're gonna need on your bivy / ledge has to have both a clipping point and designated carabiner that lives on it. Attach the clipping point and get those carabiners at home. Smaller wiregate carabiners, like Camp Nano or Metolius Mini work great. I like to buy these all in the same unique color, so they don't get mixed up with the main climbing rack. I prefer carabiners properly rated for climbing, not keychain carabiners from the hardware store.
Consider using an old-school sewn daisy chain with pockets (photo at top) to help organize your belay. Having a confusing cluster at your anchor is stressful, because you are never quite sure what you can safely unclip. By using a dedicated sewn daisy chain(s) to clip things like rope bags, water bottles, etc, you can have a much cleaner and more manageable belay. Read more on this here.
Once your ledge is set up, try using a separate length of rope to tie your harness to the anchor, rather than the climbing rope itself. Get 6-7 meters of some old rope (about 8-9 mm) that's only used to tie you to some solid point on the anchor once everything is set up. Tie one end to the anchor, tie a barrel/stopper knot on the other end, and use your Grigri or a friction hitch to adjust your position as you move around the anchor. You certainly don't need to use all 20 feet, but if you're at a larger ledge, you want to be able to freely move around. This lets you tuck away all your lead rope to keep things a bit more tidy.
You generate a surprising amount of garbage on a big wall climb. You need a plan to deal with it. Having some sort of extra stout bag or stuff sack will be needed. It's easy to overlook this, ask me how I know. You can hang this below your main haul bags on a gear tether.
If the weather is hot, taking a midday siesta to avoid the sun can be a great idea. Bring earplugs and an eye mask to help you take a nap.
Do NOT bring a down sleeping bag, regardless of how sunny the weather forecast might be.
Having a thin fleece sleeping bag liner gives warmth and feels great against your dirty skin. Having a bivy sack offers further moisture protection for your bag and makes it warmer.
If you’re warm and dry in your portaledge, do everything you possibly can to stay that way. Anything that gets wet on a big wall is probably going to stay that way for a while. That means not going outside into the rain to fix another pitch unless you absolutely have to.
Many modern ledges have flies with some rigging to keep them away from your face. If yours does not, bring a tent pole that you can rig inside the fly to help push it away from you, so you have a bit more room.
Speaking of staying dry in your ledge, bring a sponge to mop up spills, drips or condensation inside your fly.
Metolius Big Wall Stuff Sacks, perfect for organizing your vertical camping.

image: https://www.metoliusclimbing.com/big_wall_stuff_sacks.html

Girth hitch a cam hook to your aider
Cam hooks, while they may appear about as secure as a tortilla chip, are essential tools for modern clean aid climbing. Here’s a trick for deploying them that offers convenience and extra reach.
The humble cam hook is an essential modern aid climbing tool for moving quickly in crack systems that are generally too narrow for spring loaded cams; i.e., slightly smaller than Donald Trump's pinky finger.
Instead of fiddling with a micro stopper or (gasp!) banging in a piton, just slot a cam hook vertically into that micro crack, carefully step onto it, and it magically locks itself into place. The first few times you won't quite believe that it actually is going to hold, but your trust and confidence will grow quickly.
Repeat as needed by alternating your aiders, and when the runout starts getting spooky, then put in solid gear. (That little stopper you place with a gentle tug for fall protection will be a lot easier for your second to clean than one you have bounce tested with your full weight.)
It's best not to bounce test cam hook placements if you’re doing several in a row. Just ease onto the upper placement with a firm step into the aider, and move up.
You want to buy at least two cam hooks, one for each aider. Fortunately they are quite inexpensive. MountainTools is a fine place to score some. They come in four sizes, with the middle two generally being the most useful. Pictured below is I think the Leeper medium, which has worked well for me.


Note that cam hooks are generally not used in soft rock like sandstone, because the force they can generate can literally break the rock. The smaller size hook, the more force is generated. Apparently the newer cam hooks made by Moses have a model called “fragile flake” that’s acceptable for use in softer rock, but I haven’t used them.
The typical way to deploy cam hooks is to have them on a short loop of webbing, and clip them to the top of your aiders when you need to use it. (Like this; a perfect placement in my wooden deck!) Yes, that webbing loop could be about 2 inches shorter, but we’ll get to that in a moment.

However, here’s an alternate set up - if you anticipate a lot of cam hooking, you can girth hitch the hook directly to the top loop of your aider. like this:

This offers a few benefits.
You can deploy your hook fast; no reaching for gear on your harness
You get a few extra inches of reach on the placement, because there’s no carabiner involved
You can never drop the hook
You could tie the hook directly into the top of your aider. However, this makes the hook pretty much permanently attached to the aider, because the water knot connecting the webbing is going to get welded. Aid climbing is confusing and clustered enough without adding anything unnecessary into the equation, so in climbing where you don’t need the hook, it’s cleaner and tidier NOT to have it always on the business end of your aider.
With a girth hitch, the cam hook is ready to use fast when you need it, but is easily removed when you don't.
To rig this, get 18 inches of 1/2 inch webbing for each hook (or 3 feet for 2 hooks). Yes, this looks like a lot of webbing, and you may have an inch or so left over, but those darn water knots always seem to take more webbing and than you think.
Tie a water knot through the cam hole to make a loop, that's a half inch or so longer than the length of the cam. You’ll probably have to experiment a couple of times to get this loop just the right size. If the loop is too big, you lose reach on every placement. If the loop is too small, you won't be able to girth hitch it.
Water knots are notorious for loosening under repeated cycling loads, so tighten down the knot with a pair of pliers, and check it often to be sure it's not loosening up.
The original and classic cam hooks were made by Ed Leeper, so they are sometimes referred to as Leeper hooks. They are now manufactured by Moses, and available through various outdoor retailers, such as MountainTools.
Here’s a nice video that shows the basics of using cam hooks.