
Alpine Tips

Racking your cordage - Do the Twist
A basic climbing skill is knowing how to rack your cordage In a tidy and fast manner. One great method: Do the Twist. Learn how in this short video.
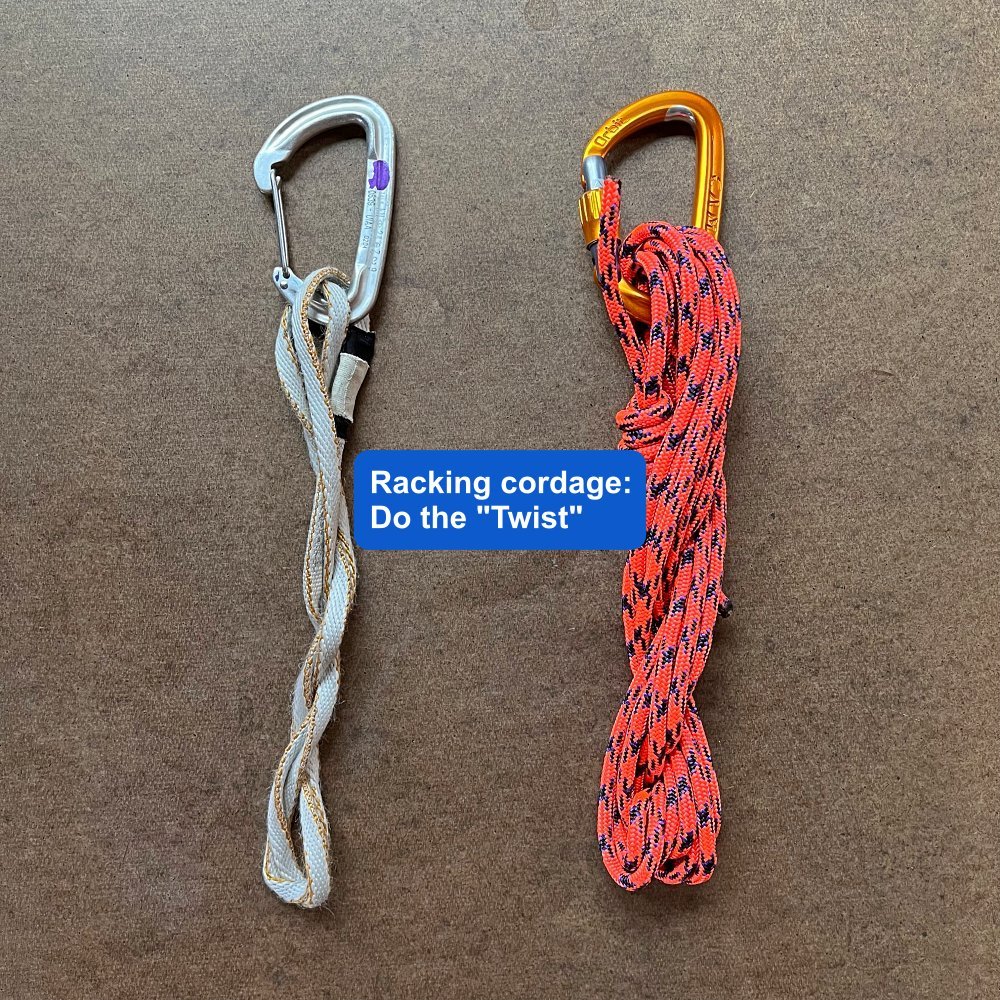
A basic climbing skill is learning to rack your cordage - slings, runners, cordelettes, prusiks - quickly, in a tidy loop, and making sure they never hang below your knees, where they can trip you up.
I've seen lots of people take several minutes to rack their cordelette with some cutesy macramé project. Yes, it may look nice on your harness, but I prefer simple and speedy, especially for gear that you're using every pitch. Here's one good way to rack it:
Do the Twist!
If you take any sort of loop (sewn or tied), twist it a few times, and then hold the ends together, the material will rather magically do this sort of double-helix twist around itself, resulting in a tidy, compact bundle.
It may look like a complete mess, but to deploy, simply unclip it, give it a shake or two, and it should return itself to full length, ready to use.
This also works with 60 cm slings and even a long cordelette. You need to double up these longer slings to get them down to about two feet long before you start.
As we'd like to say around here, this one is a better show than a tell. Here’s a quick video demo on how to do this.

Cordelettes - what length and diameter?
Cordelettes - If you want to use one, the first choice is diameter and length. There are some standards, but which one you pick might depend on what kind of climbing you’re mostly doing. (If you climb a lot on snow and rock, you might want to get one for each.)
If you choose to carry a cordelette, the first questions are: what diameter, and how long?
For snow climbing or glacier travel, consider 4 meters of 6 mm cord.
For rock climbing, consider 5 to 7 meters of 7 mm cord.
6 mm cord is dramatically less strong than 7 mm. But, on snow or lower angle alpine ice, you can build anchors usually pretty much wherever you want to, and usually the impact of a fall is going to be fairly low. Because of this, you can probably use a shorter, smaller diameter cord.
On rock, it’s the opposite. You’re going to have potentially higher impacts on the anchor, and your placements have to align with what the rock offers you and the gear you have left, which means they may be farther apart. Both of these point to using a longer, larger diameter cord.
Cord strength (a kilonewton is a metric unit of force, equal to about 220 pounds)
5mm - 5.5 kN
6mm - 7.5 Kn
7mm - 13 kN
Look at that jump in strength going from 6mm to 7mm! For me, that’s a pretty compelling reason to use 7 mm cord for rock climbing. But hey, don't take my word for it, keep on reading for more expert opinion.
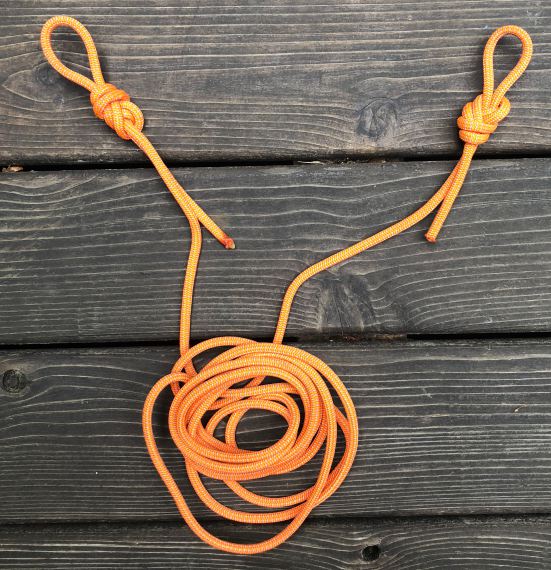
Try tying it “bunny ears” style, with a small figure 8 or overhand loop in each end, rather than the standard configuration of one big loop. Because the bunny ears style gives you a wider reach, you may find you can get away with a shorter length cordelette. But try climbing on the slightly longer cord for a while and see what you like. (You can always cut off a meter if you think it’s too long, but you definitely can’t add one back on.)
Expert climber Steph Davis address the cord diameter issue on her blog, by consult with an expert from Mammut. He says to always use 7 mm cord. (Bold text below is mine,)
From: https://stephdavis.co/blog/cordelettes-for-climbing/
“Although some climbers may use cord thinner than 7mm for constructing belay anchors, it is important to note just how much stronger the slings and 7mm cord are in comparison, especially when you consider that these are often weakened by knotting them and by concentrated wear at the knots.
We definitely do not advise people to use 5 and 6mm cord for anchor construction, and if climbers choose to do so they should be acutely aware that they are putting themselves at extra risk by doing so and take any necessary precautions (frequent wear-checks, being extra conservative in deciding what is worn and discarding it, always placing protection specifically to protect the belay from high impact, using a dynamic belay device and techniques, terrain and belay location choices, etc).
A calculated risk may be acceptable to some people if it is truly calculated, but done out of ignorance or by guesswork it is asking for trouble. Because most people aren’t willing or able to objectively test these out for themselves to see what their true level of safety (or lack thereof) is, if a nylon cord is used I’d strongly recommend using 7mm for anchor construction, and if the weight and bulk is a significant problem using a Contact sling with a 22kn breaking strength, remembering to tie into the anchor with the rope.”
Dave Furman, Hardgoods Category Manager, Mammut Sports Group, USA and Canada

Glissading - not always your best option for descent
Glissading - You might have learned how to do it on your first day of climbing school. It can be fun, save time, and your quads muscles in certain ideal situation. But there are also a lot of reasons why you may want to avoid it.
Glissading, the skill of (mostly) controlled sliding down a snow slope either sitting or standing, can be a lot of fun and save you time and legs on the proper slope. Pacific NW routes where this can work well include Mt. Hood south side, Mt. Adams south side, the Muir snowfield on Mt. Rainier, and various routes on Mt. Shasta.
Beginning climbers often learn this technique on day 1 of snow school, and then mistakenly think that it's something to be done at every opportunity. (And, hopefully you learned this on day 1 of snow school as well, but it's worth repeating: never glissade with crampons on!)
However, glissading has some serious downsides, and saving a few minutes on the descent may not always be worth it. Before you glissade, consider these points:
Much greater chance of injury than simply walking (usually a broken/sprained ankle, going too fast and cratering into a rock, talus or scree, or dropping into an unseen crevasse)
You wear out your gear faster (seat of your pants and pack bottom)
You get your butt wet
You can lose gear strapped to the outside of your pack, like trekking poles and crampons unless it’s very well tied down
Questionable time savings – saving 20 minutes on a descent by glissading may not mean so much when you weigh it against the downsides mentioned above, and the fact that a round trip climb may take 8-10-12+ hours.

Belayer’s responsibilities to the climber
The belayer has a LOT more to do than it may first appear. Do you know all of these duties? Did I leave any out?
The belayer has many duties beyond feeding out or taking in rope. A good belayer, when belaying either a leader or a second, will consider doing the following:

image: https://www.petzl.com/US/en/Sport/Spotting-and-belaying-at-the-start-of-the-route?ActivityName=Rock-climbing
Belaying the leader, most important! If you're on the ground, spot the leader before (or even after) they make the first clip! No need to “belay” if there’s no gear in. This usually means the belayer drops the rope and stands with hands outstretched, ready to keep the leader’s head and upper body from smacking anything if they fall before clipping the first piece of gear. The moment the leader clips the first pro, the belayer drops their hands to the rope and starts the belay properly. Keep your thumbs tucked in and your fingers together (aka “spoon”), and not fingers spread out (aka ”fork”) to avoid injury.
If you are with a new partner and top roping, ask how much slack is desired. Many beginners want you to keep the rope fairly tight, while more experienced people will probably want a little slack.
Never pull the leader off by keeping rope too tight! Always gives them a meter or so of slack rope so they can move freely. If the leader is climbing above a ledge, you can snug it up the rope a little, but never restrict their movements.
Be attentive and watch; feed rope if they need to clip, take rope in if they are looking sketched.
Keep the rope out of the leader’s way before the first clip. This may mean you stand off to one side to keep the rope away from their feet.
Help build a multidirectional first gear placement, if needed.
Give encouragement to the climber, but avoid idle chatter. Keep your communication as short and clear as possible.
Tell leader about rope getting stuck in cracks or around horns (“flip rope”).
Warn leader (“grounder alert”) if they have climbed too far above their last piece of gear.
Tell leader about amount of remaining rope if it’s getting close to the end. Use the call, “feet 2-0”. (Most belayers underestimate the amount of rope left.)
Make sure the rope feeds freely. Flake the rope well, and watch for tangles. Tarps, rope bags or duffel bags are good for this.
If you're on a single pitch climb and plan to lower your leader, be sure the middle mark of the rope does not pass through your belay device, and you have closed the rope system by having a knot in the end of the rope. These steps prevents the common accident of dropping your climber when lowering because your rope is too short.
Tell leader if they back clip (more of an issue when sport climbing, not a concern with long runners).
When belaying the second up to your stance, as the second approaches the anchor, the belayer tells them two things: 1) where to clip and 2) where to stand.

image: https://www.petzl.com/US/en/Sport/Spotting-and-belaying-at-the-start-of-the-route?ActivityName=Rock-climbing