

Alpine Tips

Face your tent door into the breeze to avoid bugs
Mosquitos. We all hate ’em. Here's a tip to help keep them at bay.
When it’s breezy, mosquitoes will congregate on the lee side of objects to avoid being blown away. So pitch your tent door into the breeze. You’ll be able to enter without bringing the swarm in with you.
Ridgelines often have more wind than hollows or valleys. If it's really buggy, try to camp on a ridgeline if you can.
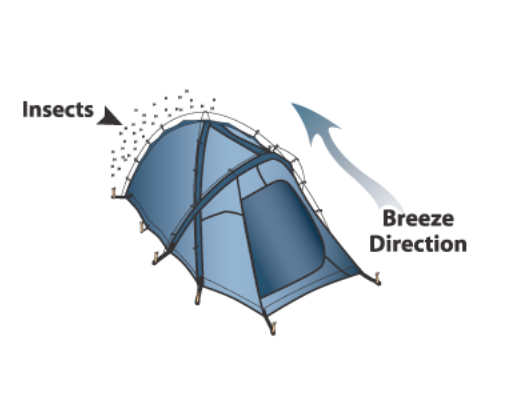
Face the door of your tent toward an oncoming breeze to help avoid mosquitoes.

The three types of mechanical advantage
Mechanical advantage (MA) systems have been described as like a blind date: what’s promised is always better than what's delivered. There can be a significant difference between theoretical, calculated, and real-world mechanical advantage. Learn what these are and see some examples.
This article has some diagrams made with the very cool rope rigging software, vRigger.
Use discount code “ALPINESAVVY” to get 10% off vRigger software.

Short version : sort of like a blind date, the mechanical advantage you’re hoping for is never as good as what was promised. =^)
Mechanical advantage (MA) systems are typically described with a nice, tidy number, like 2:1, 3:1, or 6:1. In theory, this means with a 3:1 system, one unit of input force (that’s you pulling on the rope) results in three units of output force that gets applied to the load.
So in theory, with a 3:1, you can move a 100 kg load by pulling with only 33 kg of force. Wouldn't that be nice!
While this is a convenient number to generally describe an MA system, unfortunately you’ll never achieve that in real life. Why?
There actually three different flavors of MA that need to be considered:
Ideal
Theoretical
Actual
Let’s have a look at each one.
Ideal MA
With a 3:1 system, you need to pull 3 meters of rope through the system to move the load 1 meter. With a 6:1 system, you need to pull 6 meters of rope to move the load 1 meter. Pretty simple idea, right?
Unfortunately this would only be true in an imaginary universe with no friction. While the ideal MA is useful for generally describing a system, it doesn’t tell you much about the pulling force that’s actually applied to the load. So for now, we’ll step away from it.
Theoretical MA
In the real world, every time the rope changes direction, friction enters the system. Your pulling energy, instead of being 100% transmitted along the rope, is converted to heat from the friction, and this heat is lost to the atmosphere. With a good quality pulley this friction will be minimal. With a carabiner this friction is substantial.
The term used to describe friction in rigging systems is efficiency.
A good quality pulley is around 90% efficient. That means that 90% of your pulling force gets moved through the system and you only lose 10% to friction. That's good! On the other hand, using a carabiner, which is about 50% efficient, means that you lose 50% of that input force to friction, and only half of it comes out the other side of the carabiner. That's not so good!
By using a technique called the “T method”, it’s fairly easy to calculate the friction involved in your system to get a more realistic view of the “pull” needed to move your load.
Here’s a quick example of the T method on a 2:1 system, one with a pulley and one with a carabiner. (This diagram was made with a very cool software, vRigger.
Use discount code “AlpineSavvy” to get 10% off vRigger software.
When you start looking at Theoretical MA, things get interesting!
On the left, using a high-efficiency pulley on the load, you need to pull with less force, but you also have a higher load on the anchor.
On the right, with a low efficiency carabiner on the load, you need to pull with more force, but that puts a lower load onto the anchor.

images made with vRigger
Have another look at “El Puerco” at the top of the page. Both set ups are for a theoretical 3:1.
The one on the left is set up with good quality pulleys at every change of direction. With that, you get about the best possible MA of 2.7 to 1.
However, the system on the right, which is one often improvised by climbers with minimal gear, introduces a lot more friction into the system from the Grigri and carabiner. This gives a rather pathetic calculated MA of 1.65 to 1. Big difference!
Side note: Do mechanical advantage systems magnify load on the anchor?
An MA system, in theory, does not magnify the load on the anchor. At the theoretical level, with a simple system like a 2:1 or 3:1, you're never going to apply more load on the anchor then the weight of your load.
At rest, the anchor sees the weight of your load.
When you're pulling, you are supporting some of the load with your hand, so that gets subtracted from the load on the anchor.
However, when you start adding in real world factors, such as friction of the rope running over an edge, forces can start to become higher than the load. But, at a theoretical level, it's important to know that the MA system itself does not magically increase anchor force.
Actual (aka real world) MA
Finally, there’s the third flavor of mechanical advantage, actual.

Actual MA is the actual result of all the messy and hard-to-quantify variables encountered when actually trying to pull something. For example:
the rope running over a ledge or through climbing protection (LOTS of friction can come from this; ledges are bad)
rope strands that cross, are twisted or rub (try to minimize this)
whether your rope is dynamic or static (static is better)
Whether your rope sheath is old and crusty or new and slippery (slippery is better)
the diameter of the rope (smaller is better)
the diameter of your pulley wheel (larger is better)
the angle of your pulling hands relative to the anchor (try to pull in line with the other rope strands)
So, squirrely things like that! You might have calculated your MA with the T method perfectly, but when you start introducing some of these other factors into your system, your real world MA decreases even further. About the only way we can measure this is using scales and load cells with a real load.
So, the takeaway: theoretical MA will always be greater than calculated MA, and calculated MA will always be greater than real world MA.

The 3:1 Spanish Burton haul system
After you have the basics of a 2:1, 3:1 and 6:1 hauling system dialed, rope geeks and mechanical advantage fans might want to learn some more esoteric rigging. Here's one of them, the 3:1 Spanish Burton. It lets you pull down, instead of up, which could be helpful in a vertical haul. Practice with it, it's fun!
When learning mechanical advantage for rope rescue, I think it’s important to start with the basics: a 2:1 “C” and a 3:1 “Z”.
Once you have those dialed, one can be added on top of another one to create what’s called a compound 6:1 if you need extra pulling power.
In just about every rope rescue scenario, some combination of a 2:1, 3:1 or 6:1 should cover all of your needs.
However, if you like playing around with ropes (and I know you do, otherwise you wouldn't be reading this) here’s an interesting one to learn: the 3:1 Spanish Burton.
(No, I have absolutely no idea why it’s called the “Spanish Burton”. Guessing it had to do with a guy named Burton who found himself on a Spanish sailboat about 400 years ago . . . )
Why might the Spanish Burton be applicable in rope rescue?
In a vertical lift, you can pull DOWN with your body weight to lift the load. (In a more typical 3:1 Z drag, you need to pull UP.) For a vertical lift, it's helpful to have the anchor point as high up as possible so you can use your body weight most effectively.
It lets you set up a 3:1 with basically zero extra rope. Such as, you're only carrying a meter or two of extra rope, your partner falls in a crevasse, and you need to set up a 3:1. (Yes I know, not super-practical, but could be helpful.)
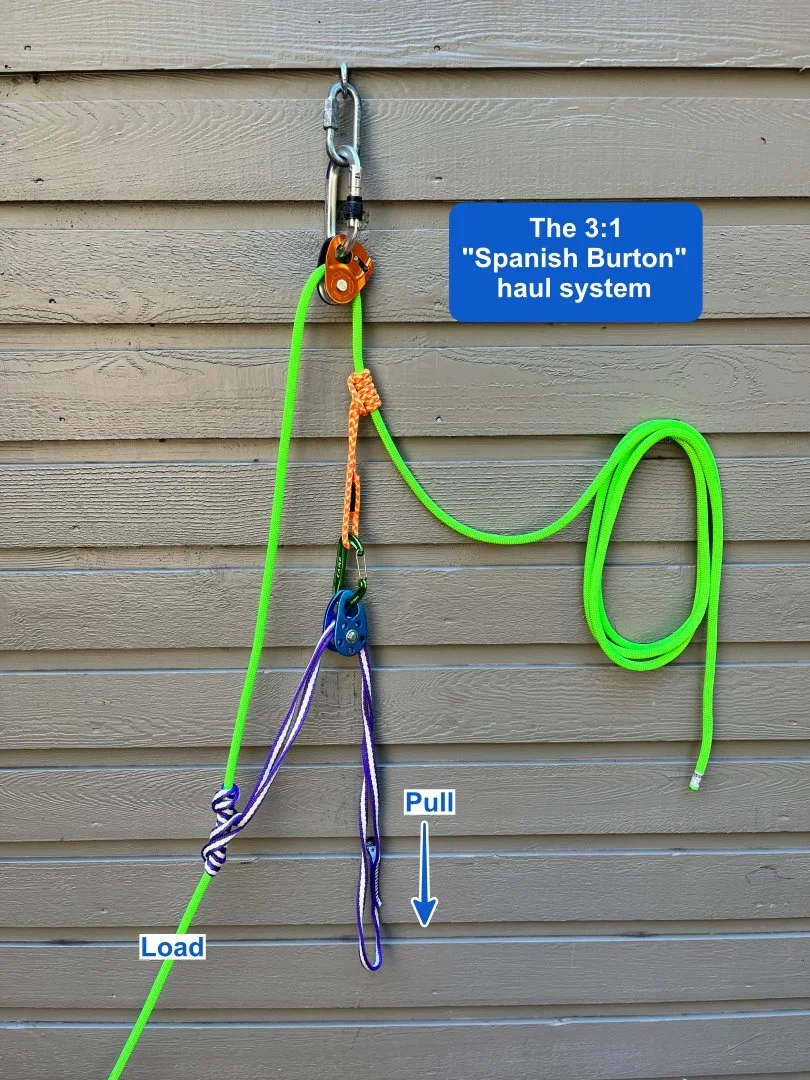
Spanish Burton rigging notes . . .
The purple sling is tied to the green rope with a Klemheist hitch. You could also use another rope grab here, like a Tibloc. (I used a sling here; any bit of cord or sling will work.)
The 120 cm purple sling means you need to reset the system often. If you have more room to work, you could replace this with an untied cordelette, which would give you a much longer pull.
The always handy Petzl Micro Traxion is the progress capture pulley on the anchor.
We have two “traveling” rope grabs moving toward each other. This means you need to reset your system more often, which can be a hassle if you have a small workspace, or no big deal if you have a large area to work in, like on a snowfield.
Note that the Spanish Burton increases the load on the anchor. For example, if you pull with 1 “unit” of force, this puts a load of about 4 “units” on the anchor. Compare this with a traditional 3:1 Z drag. With a Z drag, if you pull with 1 unit of force, you have 2 units of force on the anchor. If your anchor is unquestionably strong, no worries. If it's not, this may be something to consider.
Using the “T method” to determine the mechanical advantage
There's a technique called the “T method”, or the tension method, which can determine the mechanical advantage of many rigging systems.
We start with an input force of 1, that's your hand pulling on the purple sling.
At the blue pulley, the input force is doubled to 2. That gets transmitted to the prusik hitch, and to the green rope.
The 2 on the green rope goes into the Traxion. That is doubled for a total force of 4 on the anchor.
The input force of 2 comes out of the Traxion on the other side as 2.
This force of 2 travels down the green rope on the load side. There, it meets the force of 1 on the left side of the purple sling.
You add those together for total mechanical advantage of 3:1.

If you want to learn more about this, here’s an excellent tutorial video on how to count tensions using the T method.