
Alpine Tips
“Cast”, don’t throw, your rappel rope
Snarled rappel ropes suck! To avoid them, take the time to stack the rope and toss just a weighted end, rather than a large coil. Think of it as “casting” a fishing line; there's a weight on the end, and the line spools cleanly from the reel. Here are some good ways to do this.

Getting your rope down a cliff face when rappelling may seem very simple. But there are many nuances to doing it efficiently, which can save you huge amounts of time and frustration. Here are some suggestions.
Main idea #1: “Cast”, don't “throw”.
This idea is emphasized by Andy Kirkpatrick in his excellent book on descending mountains, “Down.” Think of casting a fishing line. There's a weight (lure) on the end. The line is carefully spooled on the reel. The weight is cast over the water, and the line smoothly follows it from the reel. No snags, no snares.
“Casting” rappel ropes uses the same concept. Create a weight with one end of the rope, prepare the rest of the rope carefully, and toss the weight to carry down the rope.
Let's start using that verb, “cast”, instead of “throw”, to emphasize the concept. “Throwing” the rope relies on luck. “Casting” relies on technique.
Main idea #2: The terrain dictates your rope toss method.
The method in the diagrams below can work best if you have a ledge to stand on with minimal rocks on it, and no one below you might get klonked by the rope. For other situations, lowering some or all of the rope can be better than throwing.
Completely overhanging or vertical smooth rock? You can probably simply lower one end of the rope at a time without even throwing it.
Reasonably vertical terrain? Try lowering down a bit less than half of one strand (for a 60 meter rope, that’d be 15 meters of one 30 meter side), and then making a simple butterfly loop as shown below, to cast down the remaining 15 meters.
Lower angle terrain, maybe with trees, boulders, obstacles? That's when making a weight and giving it a real cast can be the best approach.
Rappelling at a busy crag, with people below you? Consider lowering the rope as much as you can so you don't nail anyone with the rope, and hopefully so you don't have to scream “ROPE” either.
Main idea #3: Prep your rope before you throw.
You might feel like you're saving time by hucking the rope as quickly as possible from your anchor. Most of the time, you won't be. The time you “save” by making a sloppy rope toss will be likely used up when you stop on rappel to decluster your rope. It's better practice to take a minute or so to prepare your rope first, hopefully with the help of your partner, and make a good, clean cast to start with.
It's almost always better to separate the rope into two strands and lower or throw each one separately.

Image credit: Andy Kirkpatrick from the book “down”, shared with permission
The classic beginner toss (which yes, I did many times my first year or so of climbing, and paid the price) is making one giant butterfly coil with both strands (photo above on the right). You might rarely get lucky and have a clean toss, but most times it's going to make a guaranteed snarl. Please don't do this.
(Method number two, a slight improvement, is to make one big butterfly coil in each strand and throw those one at a time. You have slightly better odds of getting a clean throw than with both coils together, but it's still highly likely you're going to have a snarl. Still not recommended for the most part.)
There are many approaches to efficiently getting your rope down the cliff. If you have any sort of a ledge, here's one good way.
Check out the diagram above on the left. Each strand is carefully flaked or even serpentine coiled on the ledge. Each half of the rope is separate from the other.
Two cautions: 1) This method can drag down some stones from the ledge you're standing on, so you might want to avoid this if you have rocks around your feet and people below you. 2) Keep your feet away from the rope that will be zinging off the ledge.
If you’re on steeper rock and don't have a convenient ledge to flake the rope, you can feed out about rope out so it drapes down the cliff below you, and then toss the weight. Another option is to butterfly coil over your partner’s outstretched arms, and then cast the end. The same basic concept applies: prepare each strand carefully, toss each one separately, and have some sort of weight that carries the rest of the rope.
After tying a stopper knot in the free end of the rope, you need form a weight of some kind; think of this your “lure”. You “cast the “lure”, and this pulls the rest of the rope down.
(Like all things in climbing, this is situationally dependent. If there's a crowd of people below you, you probably don't want to toss a bundle of rope that might klonk somebody. Likewise if there's a large deep crack below you, and there's a chance the rope could swing into it, you may not want to try this method. But most of the rest of the time it should work pretty well.)
Here are two short videos showing the “rope cast” in action, from @benmarkhartguiding on Instagram. (Click images to see the videos.)


There are several ways to do make the weight. Here's my favorite, known in some circles as the “rope bomb.” This works especially well if you need to get your rope down a slab or other lower-angle terrain. (The carabiner isn’t needed, it’s shown for scale.)
After tying a stopper knot in the end, make a small butterfly coil with short loops. I like to make 10 loops, with five on each side.
Finish it off by simply wrapping the rope a few times around the coils. This does not have to be very tidy.
When this mini-butterfly coil hits the end of the rope, it will usually untie itself. If not, just give it a shake or kick when you rap down to it.


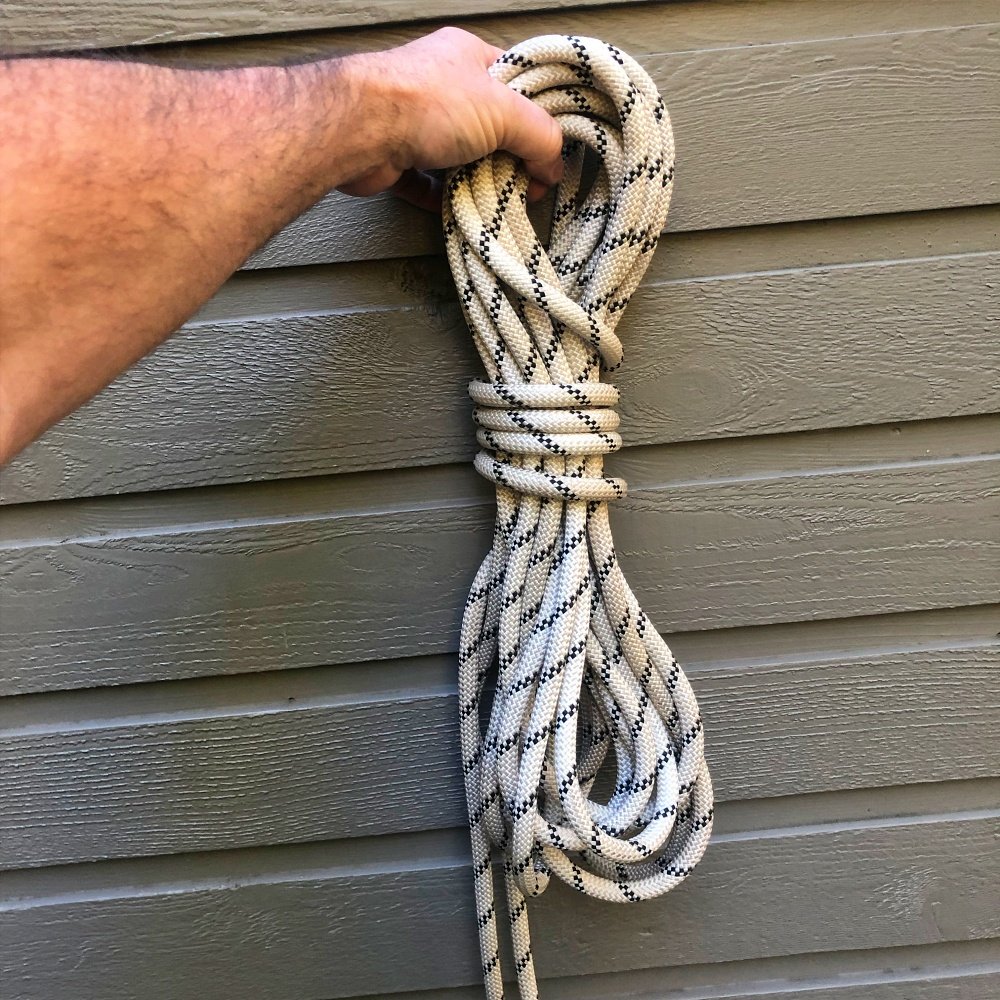
Another way to close your rope system is to rappel while being tied into the end of the rope. If you do that, you could cast your rope as shown below.
Note that in this case, with a double rope rappel, you’re casting the middle of the rope, not the ends.
You get the idea. Take an extra minute or so, properly flake your rope, cast a weight like a “rope bomb” rather than hucking off 30 meters in a huge coil, and your chances of a cluster-free rappel are much better.

Image credit: Andy Kirkpatrick from the book “down”, shared with permission
Finally, here's a nice video from IFMGA Guide Jeff Ward showing several different methods. The first one is what we demonstrated above, he calls it a “torpedo”.
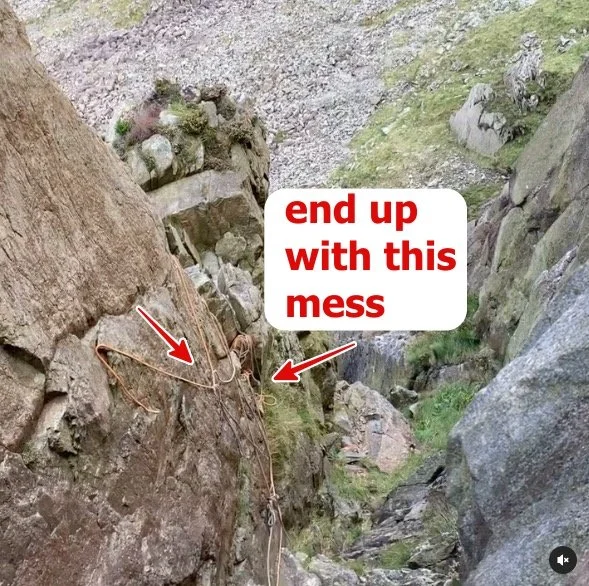
Finally, if you read this far, here's a short Instagram video on how NOT to throw your rope.
Below are a couple of screen grabs.

And finally, if you read this far, here's a pretty hilarious short Instagram video about throwing ropes on a windy day.


Creating redundancy in rappel anchors
When tethering to a rappel anchor, it can be comforting to know that you’re connected to both “halves” of the anchor hardware instead of just one; especially true at a hanging stance or with questionable anchor hardware. Here are a few simple ways to make a redundant connection when rigging to rappel.
Say you have a rappel anchor like the one shown below. The bolts are solid, and you're standing on a decent ledge. In this case, many people would be just fine with each partner clipping to one bolt as shown, and rigging to rappel.
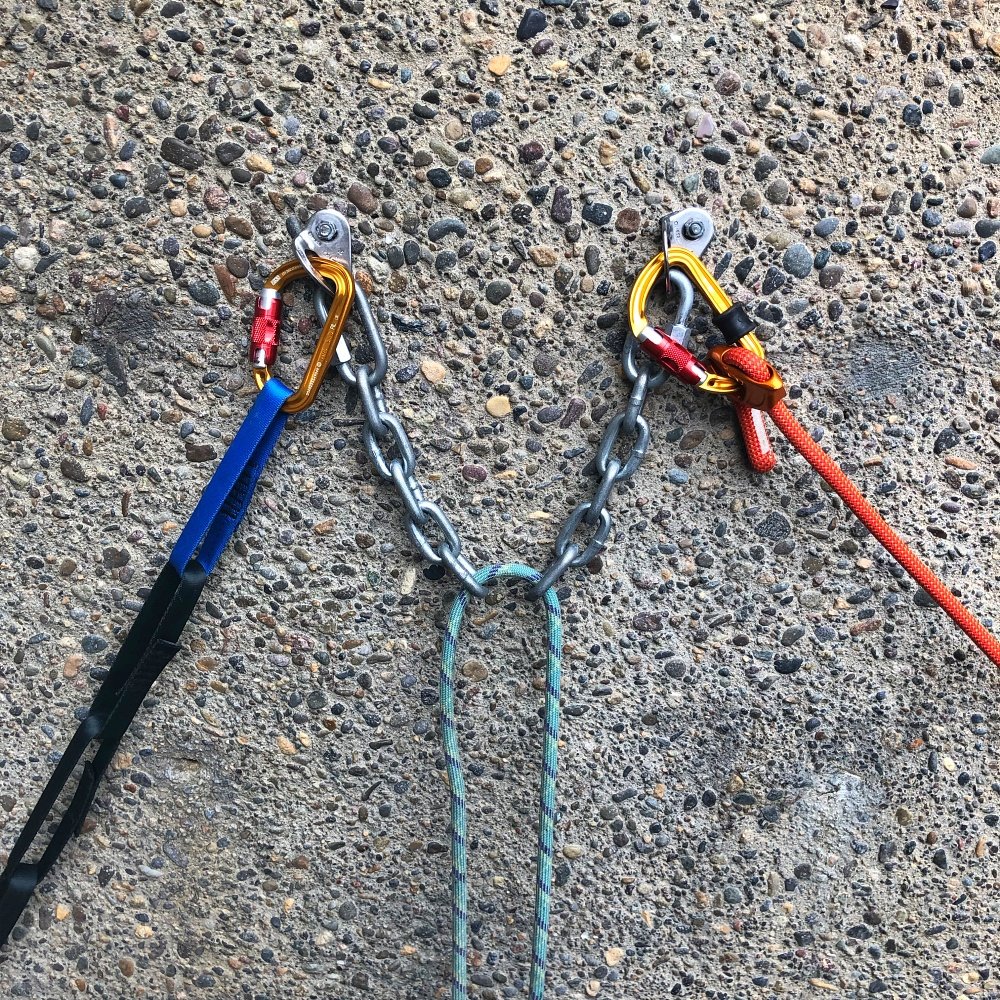
However, each person is clipped to 1/2 of the anchor system, with no redundancy. If the bolts are at all questionable, or if you're on a hanging stance with your weight on the hardware, many people would prefer some kind of rigging that connects both bolts, in the highly unlikely event one of them fails. It's very simple to do and takes a few seconds with gear you already have, so why not?
Let's look at some ways to do that.
(Hopefully this is blindingly obvious, but the last person to descend cleans whatever extra gear you've added.)
Method 1 - Connect each “half” with a quickdraw
Schweet! Now, each partner can clip to “half” of the anchor, knowing that it's connected to the other half. You can clip your tether, or the quickdraw, to any part of the anchor hardware that's convenient.

Method 2 - Use a “real” anchor (quad, 120 or 60 cm sling)
Whatever anchor system you used on the way up, you can probably also use it on the way down.
Note, if you’re using a pre-rigged or stacked rappel, you only need one anchor for descending. After both partners are pre-rigged, unclip the quad and send it down with the first person. If you're not using a pre-rigged rappel, then you'll probably need two anchors for descending. (Which should not be a problem, because you of course used two anchors on your way up.)
Quad
Because the quad provides a pair of redundant clipping points that can be pulled in different directions, this can be good at a hanging stance so one partner doesn't yank the other one around. In the photo, we’re using a 180 cm Dyneema sling. Learn lots more about the quad anchor here.
Notice how the green carabiners are clipped over the top of the quick links. If there was a chance of a large load on the carabiners, this is not best practice, because the carabiners can sometimes be loaded at a strange angle and even break. However, the loads in this situation are so low, it's fine to clip them like this.
Clipping on top of the anchor hardware also makes it a lot easier for someone to clean the anchor while the rope is loaded.

120 cm / double sling with a bight knot
Here’s a 120 cm sling, tied with a figure 8 on a bight for a statically equalized anchor. (Isn't that a pretty blue? It's an Edelrid Aramid sling, which is quickly becoming my new favorite for anchor building. It's very durable, super strong, and best of all, really easy to untie after loading.)
Note the figure 8 on a bight in the sling rather than an overhand. Doing this takes up a bit more of the cord, moving the master point slightly higher, and makes the knot even easier to untie.

60 cm sling with girth hitch
Only have a single length / 60 cm sling and the bolts are reasonably close together? No problem. Clip each one and make a girth hitch master point. If you tied an overhand knot you’d probably need a longer sling, but a girth hitch takes up so little material that you can use a 60 cm.
You get the idea. Each of these methods connects the two “halves” of the anchor, giving full redundancy for both partners on your way down.


The no twist Munter hitch rappel
Rapping on a munter hitch can twist your rope, making pulling it difficult to impossible. But, if you use the right technique, you can rappel twist free! Check out this clever method and short video from Petzl Germany to learn how.
Note - This post discusses techniques and methods used in vertical rope work. If you do them wrong, you could die. Always practice vertical rope techniques under the supervision of a qualified instructor, and ideally in a progression: from flat ground, to staircase, to vertical close to the ground before you ever try them in a real climbing situation.
Rappelling on a Munter hitch is considered by some to be an outdated, old school technique, right up there with hip belays, hexes, and braiding a harness out of blackberry vines.
However, in some cases it can still be useful:
If you know you have some short rappels on a canyon explore, ski mountaineering trip, bushwhack hike or similar, and want to take minimal gear.
Ropes are frozen and hard to get into a rappel device; sometimes the Munter is the only thing that can work.
You're using ultra skinny 6 mm static cord (like the Petzl RAD line) which is too small for a standard rappel device.
You don't have enough locking carabiners (or forgot, or never learned how) to set up a carabiner brake.
Dropped or forgot your device (whoops!) and for whatever reason do not want to be lowered.
Have to rappel in some kind of emergency situation (river rescue?) when you're seriously short on gear.
Need to rappel past an overhand knot (advanced maneuver, learn about it here).
Want to earn some Euro style points =^)
Why can a Munter rappel be problematic?
Not creating enough friction (more concerning with small diameter newer ropes or single strand)
Depending on which way you face the carabiner, the rope can rub against the gate
Most important, the normal way it’s done can twist the holy hell out of your rope! This is more than an annoyance, because if you have twisty “pigtails” in your rope and then try to pull it through the rappel anchor, the twists can bunch up and cause the rope to get completely stuck at the anchor, big problem!
(Side note: here's a good way to remove any kind of twisting from your rope: clip a tube style belay device into any sort of an anchor around head height, and feed the rope through the device.)
Below: Standard way to set up a Munter rappel. Pretty much guaranteed to twist your rope.
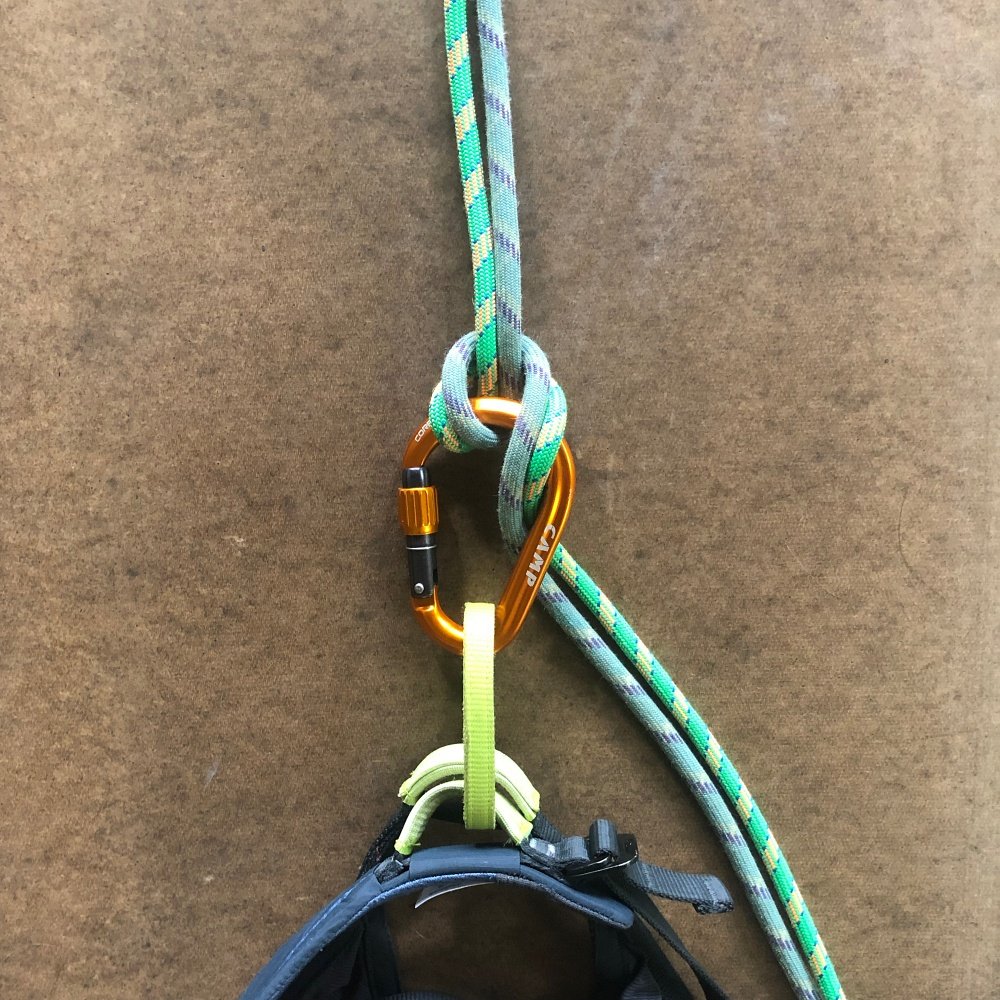
However, there’s a simple modification you can do to the hitch that will keep those evil twists away.
I first saw this technique in a video from Petzl Germany. I will say I was a little skeptical when I first saw this, but I've tried it a couple of times and it works just fine.
Pass the brake strands over the TOP of the hitch, then pass them back UNDER the carabiner to your right hand. Rappel normally, with no twisting.
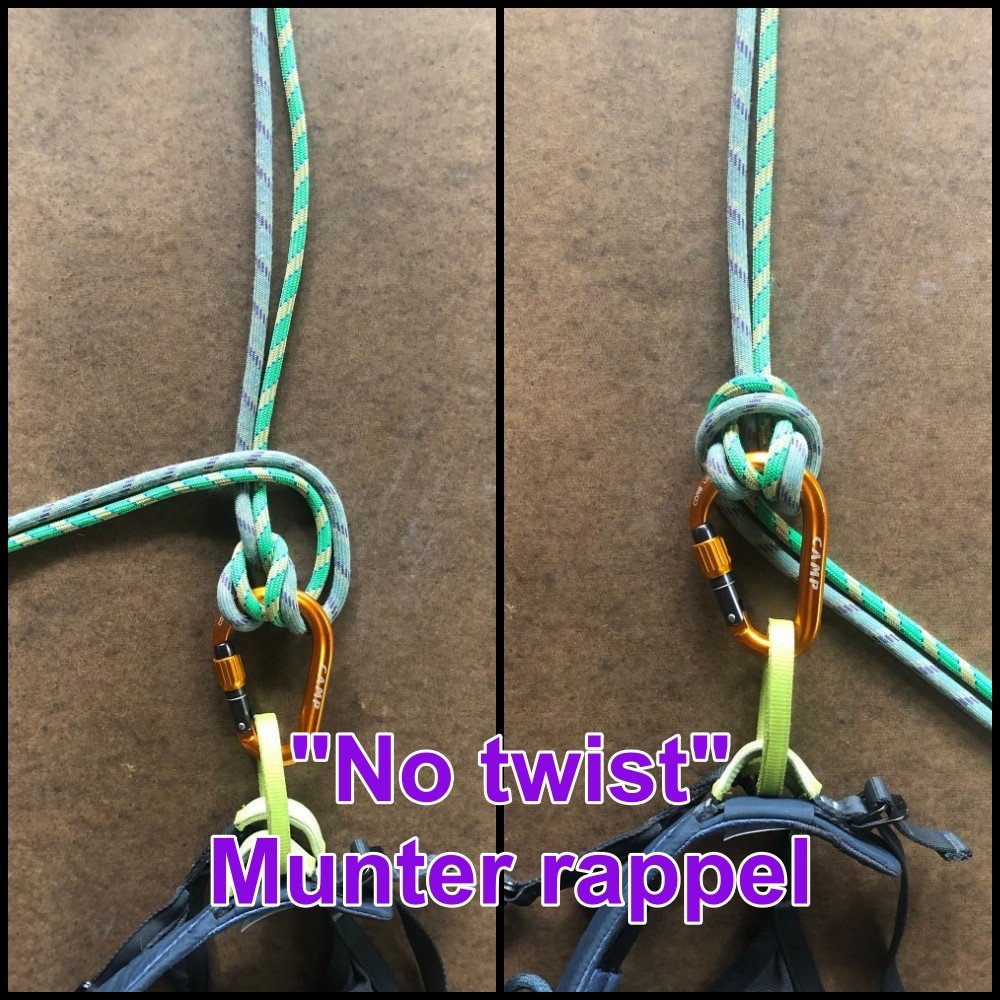
Notes . . .
This adds a little more friction and slightly slows down your rappel, but most of the time that's a good thing. If you have fat, old, crusty ropes, and you don't weigh much, it might add too much friction. As mentioned at the top of the page, practice in a controlled environment is mandatory.
This method works best on a standard harnesses with a fairly stiff belay loop. If you have a lightweight alpine harness with a “floppy” belay loop, the loop can twist when you do this, and it doesn't work so well.
You might be familiar with the “Supermunter.” This is a Munter hitch, with the brake strand making an extra pass around the hitch and being clipped to the carabiner. This can be a very useful tool for lowering huge loads on a skinny rope, but it's not recommended for one person on a double rope rappel because it adds too much friction and you probably won't be able to move. More on the “Supermunter” at this article. This modified hitch is very close to a Supermunter.
When practicing, don't be too concerned which strand of rope is on the top or the bottom. The ropes tend to put themselves in the proper orientation when you put weight on it and start actually descending.
I'm certainly not saying you should start rappelling on a Munter all the time. But if you ever need to, keep in mind that with this technique a Munter rappel works fine with minimal twisting.
Single strand with a “super Munter”
Another option for the Munter rappel is to descend on a single strand, and use a “super Munter”. Fix the rope at the anchor so it can't slide through, rig a super munter on one strand with a large carabiner, and down you go. Depending on your weight and the rope diameter, this should work well with a single strand and also result in a no-twist rappel. (Of course, the last person down on fixes the rope and needs to descend on two strands.)
Check out the short video from Petzl to see how it's done.

Rappelling - How to pass other teams
Many climbers think it's a given that you must always thread your rope through existing hardware when rappelling, but that's not always the case. Here's a simple but unconventional technique that can allow teams to pass each other with greater speed and reduced frustration.
Note - This post discusses techniques and methods used in vertical rope work. If you do them wrong, you could die. Always practice vertical rope techniques under the supervision of a qualified instructor, and ideally in a progression: from flat ground, to staircase, to vertical close to the ground before you ever try them in a real climbing situation.
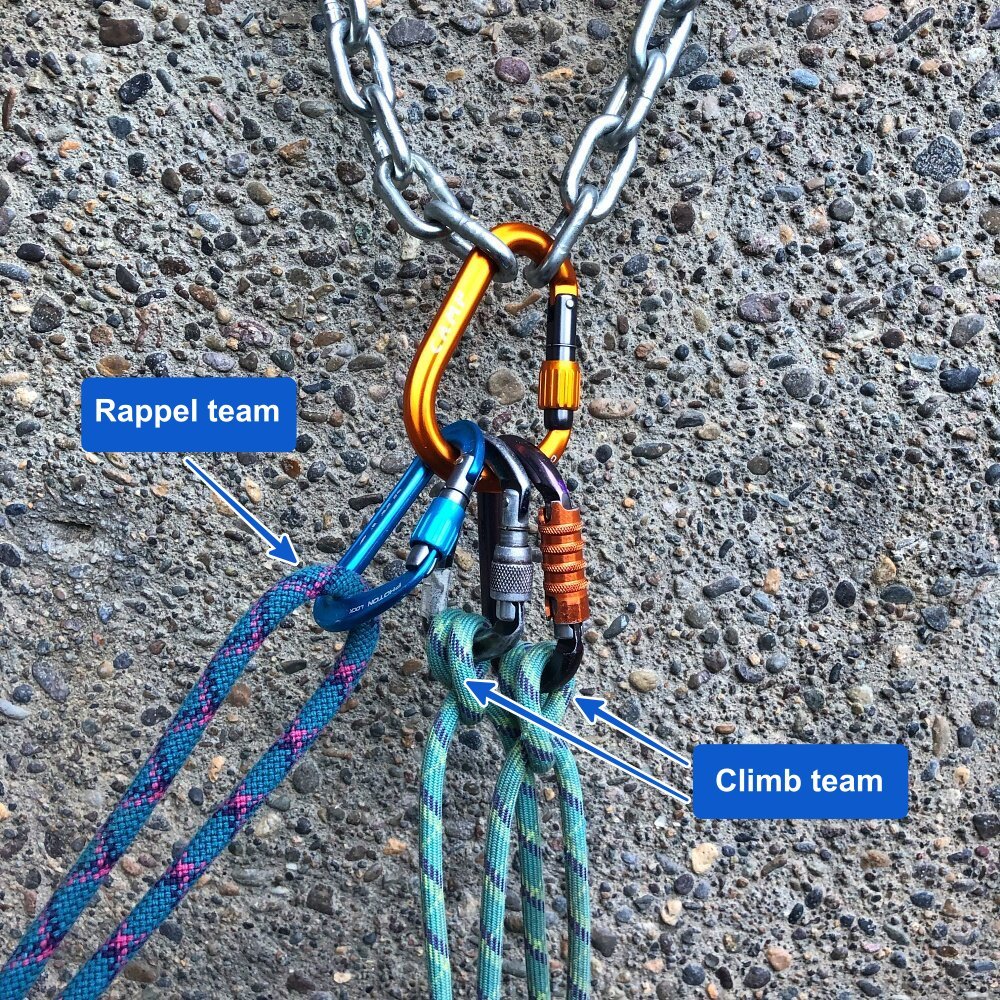
Short version: the climbing team adds one of their locking carabiners onto their anchor. The rapelling team uses this carabiner to clip their rope, without threading the rope through the actual anchor hardware.
“You should never clip the rappel rings/chains for your anchor when ascending, because rappelling teams need to use them!”
Have you ever heard that one?
On a popular multi-pitch route with no walk off, where the descent rappel is the same as the climb, it's very common for a rappelling (descending) team needing to get past a climbing (ascending) team. (Red Rock Nevada, I’m looking at you.)
On a big wall climb, a team that's bailing / retreating may need to do many rappels, potentially onto other teams coming up the same route where the anchors might well be clogged with the typical big wall cluster.
The objective is simple: for the teams to pass as quickly, safely (and politely) as possible. So, what's a good way to do this?
While it’s probably drilled into your mind that when rappelling, you ALWAYS thread your rope through the existing hardware (chains, quicklink, ring) you actually don’t have to do this. All you really need is a safe place to attach your rappel rope.
To expedite passing, consider this (unconventional) method: the climbing team clips one of their locking carabiners to the master point of their anchor, and the rappelling team clips their rope to the climbing team’s carabiner.
To be clear, I am NOT saying that you should do this every time, or that you should build anchors that always obstruct the rappel hardware. Depending on the situation, it might be a better call for the descending team to use the chains, not your master point. This is another simply another tool in the toolbox for more advanced climbers.
What's cool about this method?
There's no finagling the rappel rope underneath any existing anchor cluster. Instead, it gets clipped on TOP of everything that’s already built. (This can be even more important on a big wall, where anchor chains might be clogged with gear and pretty much inaccessible.)
This can be a bit faster to set up, because you're simply clipping the middle mark to a carabiner, instead of threading the rope through the hardware and pulling half of it through.
To be fair, let's look at some possible downsides:
The climbing team can’t leave their anchor until the rappelling team is finished. Most of the time this shouldn’t be a problem, because a competent team rappelling should be down and through the anchor in just a few minutes. (If the climbing team is pretty much ready leave the anchor, then the rappelling team can simply wait for a couple minutes until the anchor is completely free.)
The climbing team may not have a spare locking carabiner. (Maybe the rappelling team can be generous and donate one of theirs.)
Having a legible and accurate middle mark on your rope is pretty much required. Fortunately most newer ropes have this. If yours does not, get a Beal rope marking pen and add one.
Hopefully obvious, but if the climbing team is on a sketchy anchor and the rappelling team is not comfortable using it, then you need to work out something else. (On popular routes, hopefully all the established anchors are well-maintained, so this should not be a problem.)
If the rappelling team has any rope issues, like tossing the rope, starting down, then having it get stuck or some other weirdness, the climbing team might be pretty much unable to move until it gets sorted out. Hopefully the team heading down is competent enough to get through smoothly and make a decent rope throw, but there's potential for a hang up here.
Maintaining good vibes:
While descending parties usually have the right-of-way, there’s no reason for anyone to be a jerk. You and your partner are out to have a good day climbing, same as the other team.
Whoever raps first, it might be wise to hang out (literally) for a minute next to the lower anchor, explain your approach, and get some buy-in from the other team before you just swing in and start rigging. Conversely, if you’re the ascending team and someone raps down to your anchor, explain to them that you have a way to make the pass happen faster, which benefits everyone. (Not many people are aware of this method, and you hopefully can use it as a teachable moment.)
Here's how to set it up.
The ascending team is using the bottom chain link as their master point. What inconsiderate jerks, how can anyone rappel past that!?
(Yeah, I know most people don't build anchors like this, but let’s use an extreme example - even when the chains are completely blocked, you can still rappel past it.)

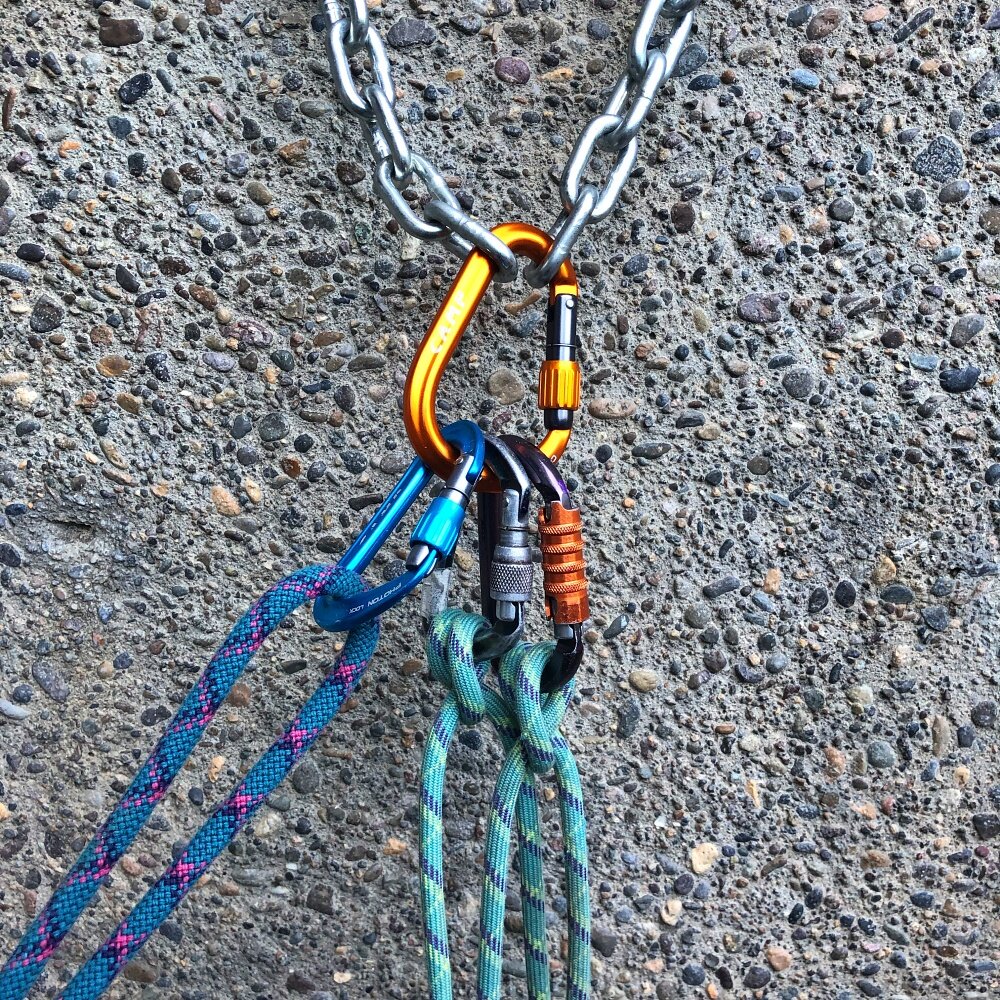
No problem! The ascending team simply adds one of their locking carabiners (blue) to their master point carabiner . . .
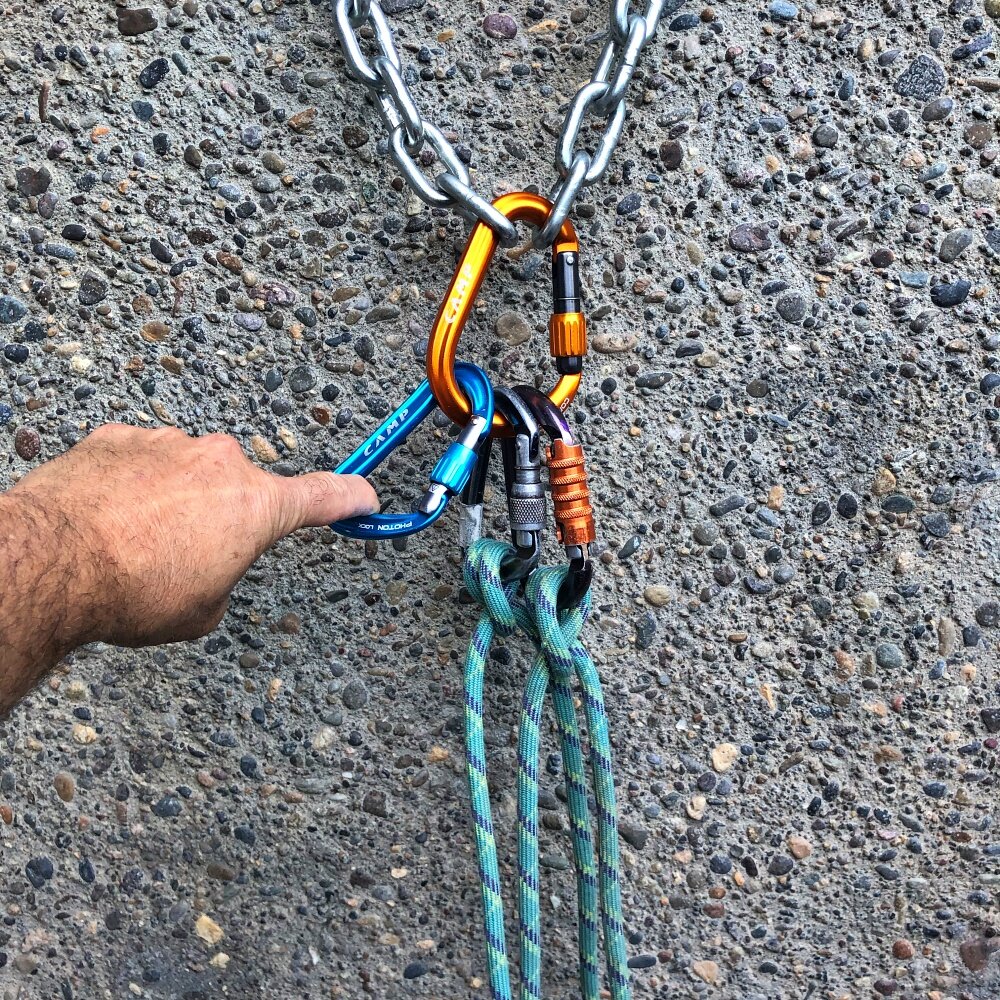
. . . and the descending team clips their rope (blue) into the ascending team’s locker.
Are you concerned about multi-directional loading on the master carabiner? It's not really a problem.)

Rappelling overhangs and traverses
Rappelling when you have an overhang and/or a traverse can be especially challenging. Main concept: keep yourself close to the wall by placing gear. Here are some more detailed tips about how to handle it.
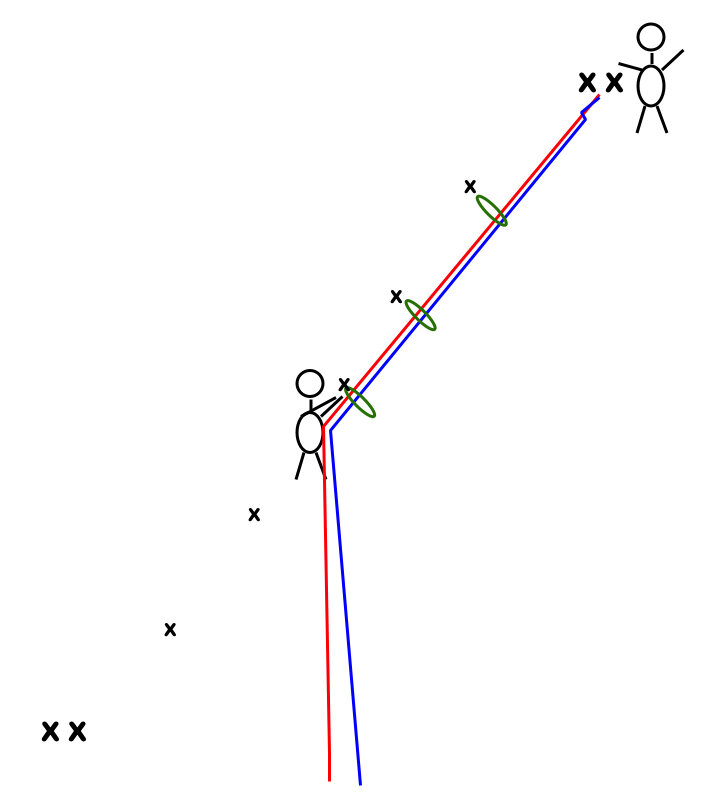
Another masterpiece from the Alpinesavvy graphic design department . . . We’re hiring, hint hint. =^)
Rappelling overhanging and/or traversing terrain can be tricky! What if a rappel traverses off to one side to the next anchor (above), but gravity wants to take you straight down? Or how about, you go over the lip, and find yourself hanging in space, unable to reach the rock? How do you handle one or both of these?
(Note: You will hopefully climb for your whole life and never have to do this, because thoughtfully placed rappel routes should avoid such obstacles. But if you're adventure climbing, get off route, have an accident and need-to-get-the-hell-down right now, or have some other weirdness, this tip might save your bacon, so keep it in the tool kit.)
Solution: stay close to the rock, and your required direction, by clipping protection while rappelling.
Consider using some or all of these techniques to reduce your risk and stay close to the wall. Some terms below describe gear you might have on a big wall climb, but the same general ideas work for all rappels.
Especially if the route is overhanging, and if it’s a full rope length, talking/shouting commands (like “Off rappel!”) may be difficult to hear. Have a solid communication plan of silent rope pulls, FRS radios, or something similar so you can clearly communicate.
First person down takes the rack. If you have any sort of a stick clip or a cheater stick (which you might have on an aid climb) bring that as well. First person down keeps aiders and ascenders (if you have them) on their harness in case they need to ascend the rope.
Rig the ropes for a standard rappel, but then fix both strands to the anchor.
Here’s one of several ways to fix the rope. Note the Flemish bend that's joining the two ropes together. While the flat overhand bend would probably be fine here, the Flemish bend is definitely stronger and perhaps a better choice because you're putting all your weight just on one strand of rope.

Consider having the first person down rappel on a single strand with a Grigri. Doing this lets them pendulum as needed, go hands-free (with a backup knot) to place gear and sort out rope tangles, and ascend the rope if needed. Ascending might be required if they rappel past the anchor or find themselves hanging in space. Ascending the rope is much easier on a single strand.
If you don't have a Grigri, be sure and use a third hand autoblock backup.
First person down clips the other (here, white) strand of rope through a quick draw on their harness. This keeps the rope within reach.
First person down places gear (or clips bolts) as they go, to stay close to the wall and in the desired direction. Both rope strands are clipped to the gear.
Note: The first person should not extend these directionals with a long runner. You want to keep the rope as close to the wall as possible. Unlike lead climbing, when doing this can cause rope drag, there’s no rope drag when you’re rappelling. The second person down will be very happy you did not put long slings on your gear placements!
When the first person arrives at the lower anchor, they fix both strands of rope to the anchor with a few extra meters of slack. The slack allows the second person some extra rope to pull themselves closer to the rock to clean gear as needed, and possibly do a lower out. (The second person can also use an untied cordelette as a mini lower out cord, a crafty rope trick discussed in this article.)
SUPER IMPORTANT: The second person removes the knot that’s fixing both strands to the upper anchor.
The second person brings down any heavier backpacks and/or haul bags. Don’t put a heavy backpack on your back. Hang a medium weight pack from your belay loop, or for heavy loads, use the technique of “riding the pig”, as discussed here.
The second person rappels on a standard tube device with an auto block back up. They clean the gear as they rappel. When they get close to the lower anchor, the first person down can pull them in with the slack in the rope.
It is CRUCIAL to maintain control of the ropes at the lower anchor after the second person arrives. This is especially true for rappels that overhang, traverse, and/or in high winds. If you carelessly let go of both rope strands, they could easily swing or blow out of reach, potentially stranding you. Consequences could range from slightly embarrassing to completely lethal! You can minimize the chances of this happening by using the “J loop” technique, where the first person down ties both strands of the rope to the lower anchor. Learn more about the J loop here.
YIKES, don't let this happen to you! Image credit: Andy Kirkpatrick, from his book “Down”, shared with permission. Check out his website, andy-kirkpatrick.com

Image credit: Andy Kirkpatrick
Here's another tip for a traversing rappel: pull the rope strand on the side you’re traversing towards. In the diagram below, the rappel traverses to climber’s right. So, putting the knot on the right side of the anchor will likely result in less friction and easier pull. This applies to single and double rope rappels.
(This is why a knot block was not used in the photo above with the Grigri; it would put the pulling rope on the wrong side of the anchor.) Image credit: Andy Kirkpatrick, from his book, “Down”, shared with permission. Check out his website, andy-kirkpatrick.com

Image credit: Andy Kirkpatrick
Here’s a last ditch crafty rope trick if you ever find yourself free-hanging in space away from the rock. (Disclaimer, I have never tried this, but it sounds like it MIGHT work.)
You need to plan ahead a bit for this with a backpack, a heavy rack, etc.
Lower the backpack below you on an extra length of rope, cordelette, etc. Be sure it is securely tied to your harness so you can’t drop it. Start the backpack swinging back and forth, perpendicular to the rock. In theory, this pendulum motion will also start your body swinging as well, which may bring you in close enough to grab the rock or place some gear.
Have I done this? No!
Does it sound scary? Yes!
Do you want to be on a belay from the second rope or at least have a Grigri so you can go hands-free? Yes!
Is it better to avoid a shenanigan like this whenever possible by placing gear and staying close to the rock? Yes!

Close your rappel system with the “J loop”
Hopefully you know the importance of “closing the rope system” by always having the rope ends tied either to a harness or a stopper knot. Here's an extension of that idea for multi pitch rappels: the J loop.
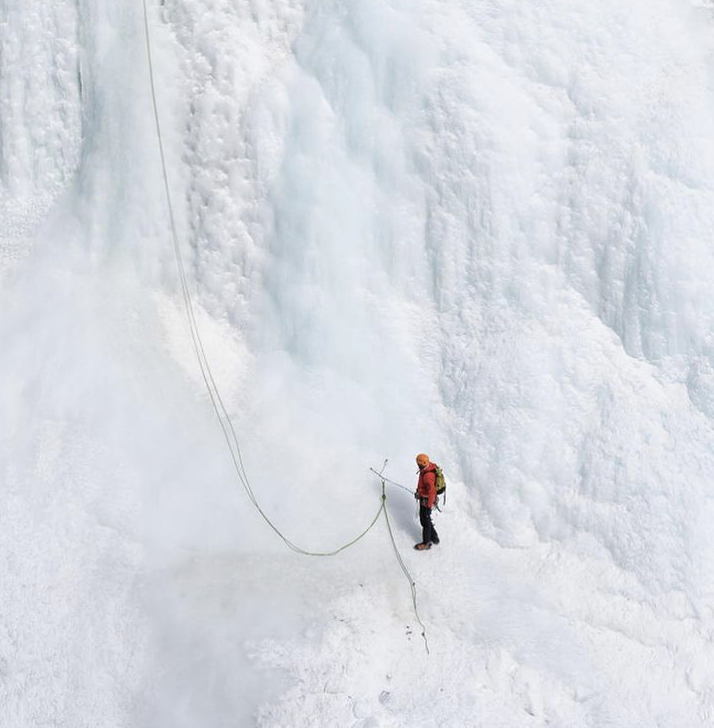
image: @seanisaacguiding, instagram.com/p/CJHp9lSjKBk/
On a multi pitch rappel, the first person down can add an important safeguard to the system by tying the rope strands to the lower anchor. This is known by some as a “J loop”, because it makes a big letter “J."
To secure the rope, you have several options. A clove hitch on each strand is a good choice. Because the hitch falls apart when you remove it from the carabiner, you don't have to remember to untie yet another knot. An overhand on a bight / BHK tied in both strands is also effective, because if you forget to untie it, you have a closed loop.
Avoid tying a separate bight knot in each strand. Why? Because it's all too easy to forget to untie it, start pulling the rope, and then realize too late that you have a knot above you, big problem!
On a traversing rappel, you need to be VERY careful to always control the ends of the rope. Using J loop can help you avoid the potentially very serious problem shown in the diagram below.

IMAGE CREDIT: ANDY KIRKPATRICK
How does the J loop help reduce your risk?
Your partner can’t rappel off the ends of the rope, because it's tied to the anchor.
It makes it much less likely that the ends of the rope can swing or blow potentially out of your reach after your second arrives and goes off rappel, which could be a VERY serious problem if the rappel is traversing, overhanging, windy, or some combination of these.
It makes it much more likely that the first person down will remember to untie the stopper knots in the end of the rope. (After the J loop is tied, the stopper knots are no longer needed.)
In a traversing or overhanging rappel, the J loop helps guide your partner more smoothly into the anchor.
Finally, in the extremely unlikely catastrophe of the top rappel anchor failing, all may not be lost, because the rope is tied to the lower anchor.
Here's a nice diagram from Petzl showing the method. Note the BHK / overhand knot in both strands, and the end of purple, the pull rope, already threaded through the anchor master point. (The purple rope does not yet have a stopper knot in the end of it, that's the next step.)
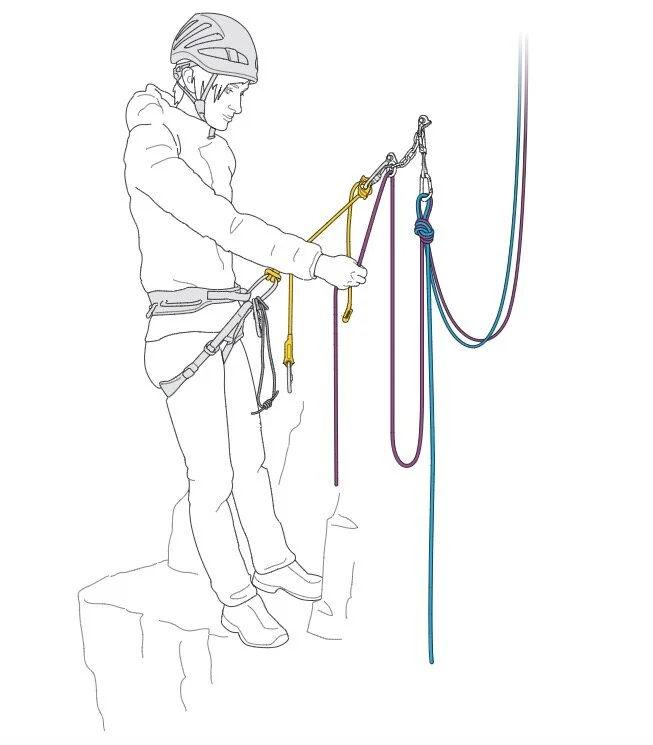
image: https://www.petzl.com/US/en/Sport/Rappelling
For the first rappeller, the step-by-step procedure might look something like this. (This is one of several sequences that can work, not the only way.)
First person descending rigs for a standard rappel: using both strands of the rope, a stopper knot in each end of the rope, and an autoblock backup.
First rappeler arrives at the lower anchor. Clip tether to anchor. Keep your rappel device and auto block on the rope for now.
Feed 2-3 arm lengths of slack through your rappel device and auto block so your partner can get started.
Yell “off rappel”.
Optional but recommended: test pull. If your partner is not pre-rigged, do a test pull of the rope by pulling down a few meters on the pull strand to be sure it moves properly. Your partner above can answer this silent signal by pulling the rope back up. Be sure you have discussed this beforehand, so your partner up top knows what your test pull means, otherwise they might have a mild freak out. (If your partner is pre-rigged, you can’t do this step, because their auto block holds the rope in place.) If communication is difficult, note that the test pull can be a good non-verbal signal that you’re off rappel.
Tie a clove hitch in each strand and clip it with a locker onto some strong component of the anchor. Leave about 2 meters of slack to form the “J”. This slack allows you to do a test pull, and gives the second enough rope to descend.
Sweet, the rope is now secure in a J loop. Give yourself a high five. =^)
Untie the stopper knots in the end of each rope strand; you don't need them anymore.
Your smoking hot rappel device has now cooled off. Remove the rope from your rappel device and autoblock.
Pass the “pull” strand through the anchor, and tie a stopper knot in the pull end.
Wait for your partner to arrive. If for some reason they're not using an auto block backup, you can give them a firefighter belay. If they do have an auto block, there’s no need for the firefighter belay. That gives you a little break, whew! Use it to check the weather, grab a snack/water, get out your headlamp, scope the next rappel, read the topo, etc.
Once your partner arrives and is tethered to the lower anchor, untie the clove hitches.
Have a quick systems check: Both partners safely tethered, no twists or crosses in the rope, knot removed from the strand that’s going up.
Pull the rope slowly. Keep control of the end of the “up” strand until the last moment; don't let go of it and have it swing out of reach before you have to. (If the rope gets stuck as you're starting the pull, keeping control of the “up” strand greatly increases your options to solve the problem!)