

Alpine Tips

Rappelling overhangs and traverses
Rappelling when you have an overhang and/or a traverse can be especially challenging. Main concept: keep yourself close to the wall by placing gear. Here are some more detailed tips about how to handle it.
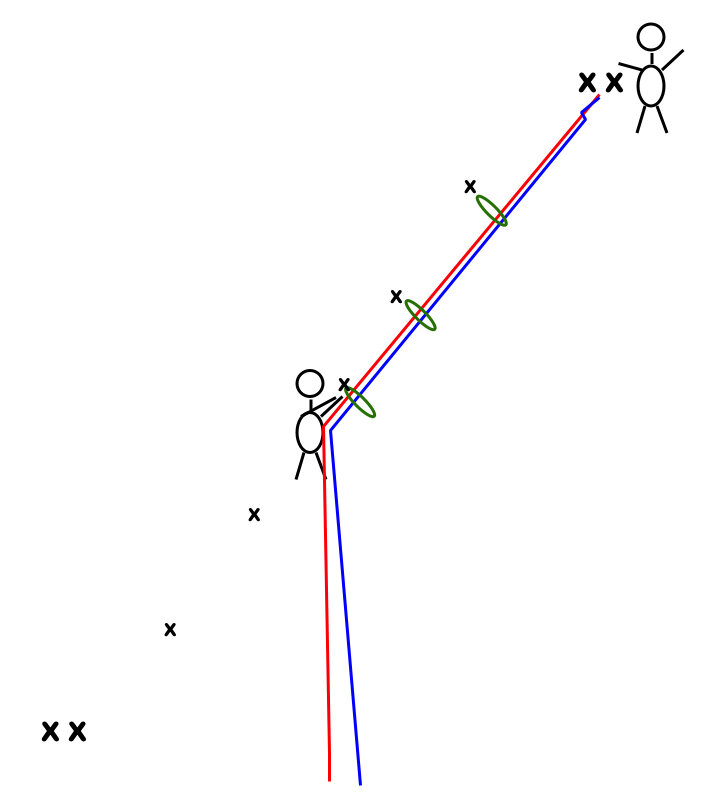
Another masterpiece from the Alpinesavvy graphic design department . . . We’re hiring, hint hint. =^)
Rappelling overhanging and/or traversing terrain can be tricky! What if a rappel traverses off to one side to the next anchor (above), but gravity wants to take you straight down? Or how about, you go over the lip, and find yourself hanging in space, unable to reach the rock? How do you handle one or both of these?
(Note: You will hopefully climb for your whole life and never have to do this, because thoughtfully placed rappel routes should avoid such obstacles. But if you're adventure climbing, get off route, have an accident and need-to-get-the-hell-down right now, or have some other weirdness, this tip might save your bacon, so keep it in the tool kit.)
Solution: stay close to the rock, and your required direction, by clipping protection while rappelling.
Consider using some or all of these techniques to reduce your risk and stay close to the wall. Some terms below describe gear you might have on a big wall climb, but the same general ideas work for all rappels.
Especially if the route is overhanging, and if it’s a full rope length, talking/shouting commands (like “Off rappel!”) may be difficult to hear. Have a solid communication plan of silent rope pulls, FRS radios, or something similar so you can clearly communicate.
First person down takes the rack. If you have any sort of a stick clip or a cheater stick (which you might have on an aid climb) bring that as well. First person down keeps aiders and ascenders (if you have them) on their harness in case they need to ascend the rope.
Rig the ropes for a standard rappel, but then fix both strands to the anchor.
Here’s one of several ways to fix the rope. Note the Flemish bend that's joining the two ropes together. While the flat overhand bend would probably be fine here, the Flemish bend is definitely stronger and perhaps a better choice because you're putting all your weight just on one strand of rope.

Consider having the first person down rappel on a single strand with a Grigri. Doing this lets them pendulum as needed, go hands-free (with a backup knot) to place gear and sort out rope tangles, and ascend the rope if needed. Ascending might be required if they rappel past the anchor or find themselves hanging in space. Ascending the rope is much easier on a single strand.
If you don't have a Grigri, be sure and use a third hand autoblock backup.
First person down clips the other (here, white) strand of rope through a quick draw on their harness. This keeps the rope within reach.
First person down places gear (or clips bolts) as they go, to stay close to the wall and in the desired direction. Both rope strands are clipped to the gear.
Note: The first person should not extend these directionals with a long runner. You want to keep the rope as close to the wall as possible. Unlike lead climbing, when doing this can cause rope drag, there’s no rope drag when you’re rappelling. The second person down will be very happy you did not put long slings on your gear placements!
When the first person arrives at the lower anchor, they fix both strands of rope to the anchor with a few extra meters of slack. The slack allows the second person some extra rope to pull themselves closer to the rock to clean gear as needed, and possibly do a lower out. (The second person can also use an untied cordelette as a mini lower out cord, a crafty rope trick discussed in this article.)
SUPER IMPORTANT: The second person removes the knot that’s fixing both strands to the upper anchor.
The second person brings down any heavier backpacks and/or haul bags. Don’t put a heavy backpack on your back. Hang a medium weight pack from your belay loop, or for heavy loads, use the technique of “riding the pig”, as discussed here.
The second person rappels on a standard tube device with an auto block back up. They clean the gear as they rappel. When they get close to the lower anchor, the first person down can pull them in with the slack in the rope.
It is CRUCIAL to maintain control of the ropes at the lower anchor after the second person arrives. This is especially true for rappels that overhang, traverse, and/or in high winds. If you carelessly let go of both rope strands, they could easily swing or blow out of reach, potentially stranding you. Consequences could range from slightly embarrassing to completely lethal! You can minimize the chances of this happening by using the “J loop” technique, where the first person down ties both strands of the rope to the lower anchor. Learn more about the J loop here.
YIKES, don't let this happen to you! Image credit: Andy Kirkpatrick, from his book “Down”, shared with permission. Check out his website, andy-kirkpatrick.com

Image credit: Andy Kirkpatrick
Here's another tip for a traversing rappel: pull the rope strand on the side you’re traversing towards. In the diagram below, the rappel traverses to climber’s right. So, putting the knot on the right side of the anchor will likely result in less friction and easier pull. This applies to single and double rope rappels.
(This is why a knot block was not used in the photo above with the Grigri; it would put the pulling rope on the wrong side of the anchor.) Image credit: Andy Kirkpatrick, from his book, “Down”, shared with permission. Check out his website, andy-kirkpatrick.com

Image credit: Andy Kirkpatrick
Here’s a last ditch crafty rope trick if you ever find yourself free-hanging in space away from the rock. (Disclaimer, I have never tried this, but it sounds like it MIGHT work.)
You need to plan ahead a bit for this with a backpack, a heavy rack, etc.
Lower the backpack below you on an extra length of rope, cordelette, etc. Be sure it is securely tied to your harness so you can’t drop it. Start the backpack swinging back and forth, perpendicular to the rock. In theory, this pendulum motion will also start your body swinging as well, which may bring you in close enough to grab the rock or place some gear.
Have I done this? No!
Does it sound scary? Yes!
Do you want to be on a belay from the second rope or at least have a Grigri so you can go hands-free? Yes!
Is it better to avoid a shenanigan like this whenever possible by placing gear and staying close to the rock? Yes!

Close your rappel system with the “J loop”
Hopefully you know the importance of “closing the rope system” by always having the rope ends tied either to a harness or a stopper knot. Here's an extension of that idea for multi pitch rappels: the J loop.
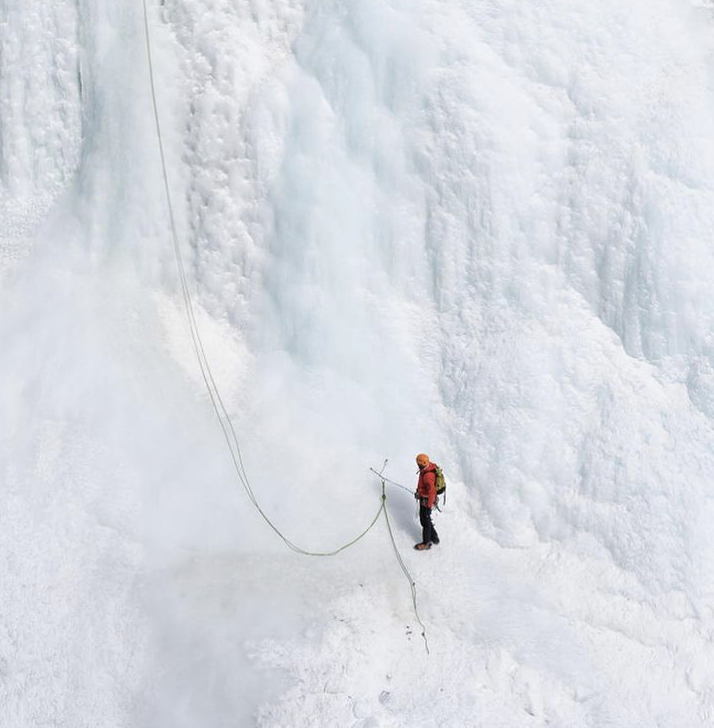
image: @seanisaacguiding, instagram.com/p/CJHp9lSjKBk/
On a multi pitch rappel, the first person down can add an important safeguard to the system by tying the rope strands to the lower anchor. This is known by some as a “J loop”, because it makes a big letter “J."
To secure the rope, you have several options. A clove hitch on each strand is a good choice. Because the hitch falls apart when you remove it from the carabiner, you don't have to remember to untie yet another knot. An overhand on a bight / BHK tied in both strands is also effective, because if you forget to untie it, you have a closed loop.
Avoid tying a separate bight knot in each strand. Why? Because it's all too easy to forget to untie it, start pulling the rope, and then realize too late that you have a knot above you, big problem!
On a traversing rappel, you need to be VERY careful to always control the ends of the rope. Using J loop can help you avoid the potentially very serious problem shown in the diagram below.

IMAGE CREDIT: ANDY KIRKPATRICK
How does the J loop help reduce your risk?
Your partner can’t rappel off the ends of the rope, because it's tied to the anchor.
It makes it much less likely that the ends of the rope can swing or blow potentially out of your reach after your second arrives and goes off rappel, which could be a VERY serious problem if the rappel is traversing, overhanging, windy, or some combination of these.
It makes it much more likely that the first person down will remember to untie the stopper knots in the end of the rope. (After the J loop is tied, the stopper knots are no longer needed.)
In a traversing or overhanging rappel, the J loop helps guide your partner more smoothly into the anchor.
Finally, in the extremely unlikely catastrophe of the top rappel anchor failing, all may not be lost, because the rope is tied to the lower anchor.
Here's a nice diagram from Petzl showing the method. Note the BHK / overhand knot in both strands, and the end of purple, the pull rope, already threaded through the anchor master point. (The purple rope does not yet have a stopper knot in the end of it, that's the next step.)
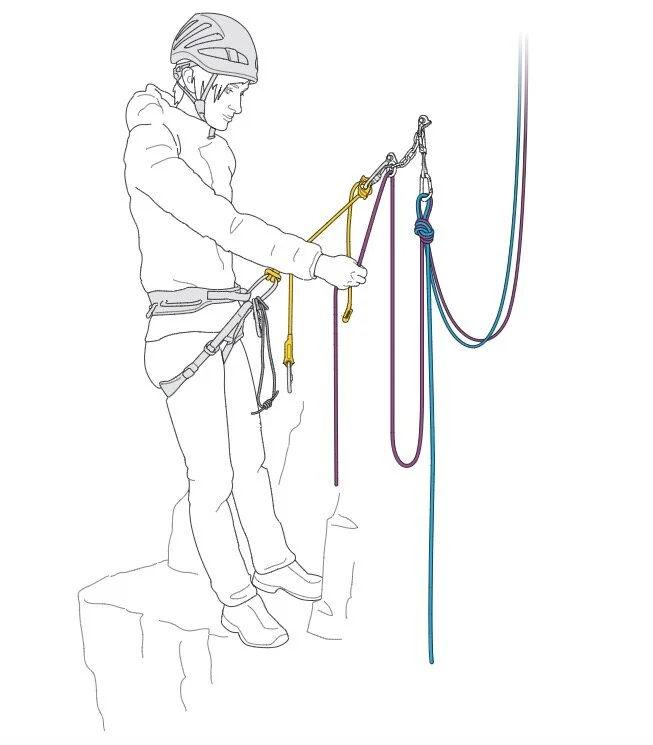
image: https://www.petzl.com/US/en/Sport/Rappelling
For the first rappeller, the step-by-step procedure might look something like this. (This is one of several sequences that can work, not the only way.)
First person descending rigs for a standard rappel: using both strands of the rope, a stopper knot in each end of the rope, and an autoblock backup.
First rappeler arrives at the lower anchor. Clip tether to anchor. Keep your rappel device and auto block on the rope for now.
Feed 2-3 arm lengths of slack through your rappel device and auto block so your partner can get started.
Yell “off rappel”.
Optional but recommended: test pull. If your partner is not pre-rigged, do a test pull of the rope by pulling down a few meters on the pull strand to be sure it moves properly. Your partner above can answer this silent signal by pulling the rope back up. Be sure you have discussed this beforehand, so your partner up top knows what your test pull means, otherwise they might have a mild freak out. (If your partner is pre-rigged, you can’t do this step, because their auto block holds the rope in place.) If communication is difficult, note that the test pull can be a good non-verbal signal that you’re off rappel.
Tie a clove hitch in each strand and clip it with a locker onto some strong component of the anchor. Leave about 2 meters of slack to form the “J”. This slack allows you to do a test pull, and gives the second enough rope to descend.
Sweet, the rope is now secure in a J loop. Give yourself a high five. =^)
Untie the stopper knots in the end of each rope strand; you don't need them anymore.
Your smoking hot rappel device has now cooled off. Remove the rope from your rappel device and autoblock.
Pass the “pull” strand through the anchor, and tie a stopper knot in the pull end.
Wait for your partner to arrive. If for some reason they're not using an auto block backup, you can give them a firefighter belay. If they do have an auto block, there’s no need for the firefighter belay. That gives you a little break, whew! Use it to check the weather, grab a snack/water, get out your headlamp, scope the next rappel, read the topo, etc.
Once your partner arrives and is tethered to the lower anchor, untie the clove hitches.
Have a quick systems check: Both partners safely tethered, no twists or crosses in the rope, knot removed from the strand that’s going up.
Pull the rope slowly. Keep control of the end of the “up” strand until the last moment; don't let go of it and have it swing out of reach before you have to. (If the rope gets stuck as you're starting the pull, keeping control of the “up” strand greatly increases your options to solve the problem!)

When and how to belay a rappel
There are some circumstances where belaying a rappeller is a good choice. Learn two of those situations, and a quick way to set it up.
Note - This post discusses techniques and methods used in vertical rope work. If you do them wrong, you could die. Always practice vertical rope techniques under the supervision of a qualified instructor, and ideally in a progression: from flat ground, to staircase, to vertical close to the ground before you ever try them in a real climbing situation.
A belayed rappel is something many climbers think might be helpful only with a nervous beginner who needs the extra reassurance of a belay, or maybe an injured partner.
There’s another application - when you're rappelling into unfamiliar terrain with the location of the next anchors uncertain or nonexistent.
If there’s a reasonable chance that the person rappelling can’t locate the existing anchor (or a suitable place to build one) and needs to climb back up, it's going to be much easier to do so if they can be belayed by a separate rope strand. So, think of it as not really safeguarding the way down, but more to safeguard the rappeller climbing back up, should they need to do so.
Here's one way to set up a belayed rappel with two ropes.
(The same method applies with one rope. In the photos below, where you see the ropes tied together, imagine that’s the middle mark if you were using one rope.)
Here's the complete set up, ready to go. Yes it is a little confusing, so let's break it down step-by-step in the photos below.

Step 1:
Pass blue rope through the anchors, tie it to the green rope with a flat overhand bend.
Tie a stopper knot in blue, toss the blue rope.
Be sure that your green rope is stacked neatly, or in a rope bag or something similar.

Step 2:
Clip a locking carabiner, HMS preferred, to the master point.
Tie a butterfly in the blue rope, and clip it to this locker.
(Some people get freaked out about three-way loading on the blue carabiner. Black Diamond tested this, and it broke at at around 21 kN, which is the rated strength of the carabiner under a normal load. So, under the body weight of one person rappelling, it's not gonna be a problem.)

Step 3:
First person rappelling goes on rappel, single strand, blue rope. (Harness and third hand / autoblock not shown for clarity.)
Rigging an extended rappel (not shown) or using a Grigri or similar assisted braking belay device is a fine idea, because both of these can be easily converted to an ascending system if needed, as we cover here and here.

Step 4:
Take a second HMS carabiner (yellow), and clip it to the first one.
Tie a Munter hitch on this second locker.
Tie a bight knot in the end of the green rope.

Step 5:
With another locker, the rappeler clips the bight knot to their belay loop. Alternatively, you could skip this carabiner and bight knot, and tie in with a retraced figure 8. (Harness not shown for clarity.)
Schweeeeeet, now you're ready to go. First person down raps on blue rope, single strand. Person above feeds out green rope through the Munter hitch.
If the rapper has to go back up for any reason, they have a top rope belay for any part they can climb, with the option of ascending up the rappel rope (or even getting an assisted hoist) if it gets steeper. Depending on the terrain, this is probably faster and less strenuous than prusiking both strands, which they would probably have to do if they didn’t set it up like this.
When the first person reaches the ground (helpfully pulling down all of the green rope on their way) the top person cleans the carabiners and raps normally on two strands.

Here's a close-up of the rigging.

Note for belaying a beginner . . .
Anytime you're working with beginners who are just learning to rappel, it can be a good idea to not only have a belay, but also some kind of releasable system on the rappel rope. If they freeze on the rappel, get their shirt stuck in the device, whatever, you can release the system and get them to the ground.
Here's a modified way to set this up: Instead of fixing the rappel rope with a butterfly, fix it with a munter mule overhand (MMO), with at least 2-3 meters of slack behind it. If the rappeller gets hair or clothing stuck in their device, you can tension and hold the rappeller on the belay rope, then release and lower on the MMO. This creates some slack in the rappel rope, so the blockage can be removed.
In a more formal instructional situation, you're probably going to have a set up with a completely separate belay rope that's not tied to the rappel rope, which makes any mild rescue shenanigans you need to do quite a bit easier. But the main method shown here is a good compromise when on a real climb and needing to improvise a bit.