
Alpine Tips

Big wall anchors: a middle ground
A big wall anchor does not have to be a 25 carabiner engineering project, nor modern minimalist. There's a broad middle ground that gives you redundancy for your hauling system, is fast to set up, sufficiently strong, and has no knots to untie. Let's look at a few ways to set this up.
A few words on hauling, from the excellent big wall climbing book, “Higher Education”, by Andy Kirkpatrick (Buy it here):
“Hauling is potentially one of the most dangerous aspects of big wall climbing. This translates to ultra-caution in all parts of your hauling system and interaction with bags, haul lines, docking cords, and pulleys. If you rush and make a mistake, drop a load or have it shift where it's not wanted, you could easily kill someone or yourself. I try and teach climbers to view their bags as dangerous creatures, like a great white shark, rhino, or raptor that is in their charge. The ability to keep them calm and under your control comes down to paranoia, foresight, and heavy respect for the damage they can do.”
Big wall anchors can take many different forms. Let’s see some examples.
Old school hardman sketchy
A caption here could be: “I’m so happy to still be alive after jugging this rope connected to a few RURPs strung together by clove hitches . . . (Photo by Dave Diegelman, climber, Dale Bard, Sea of Dreams, El Capitan, 1978)
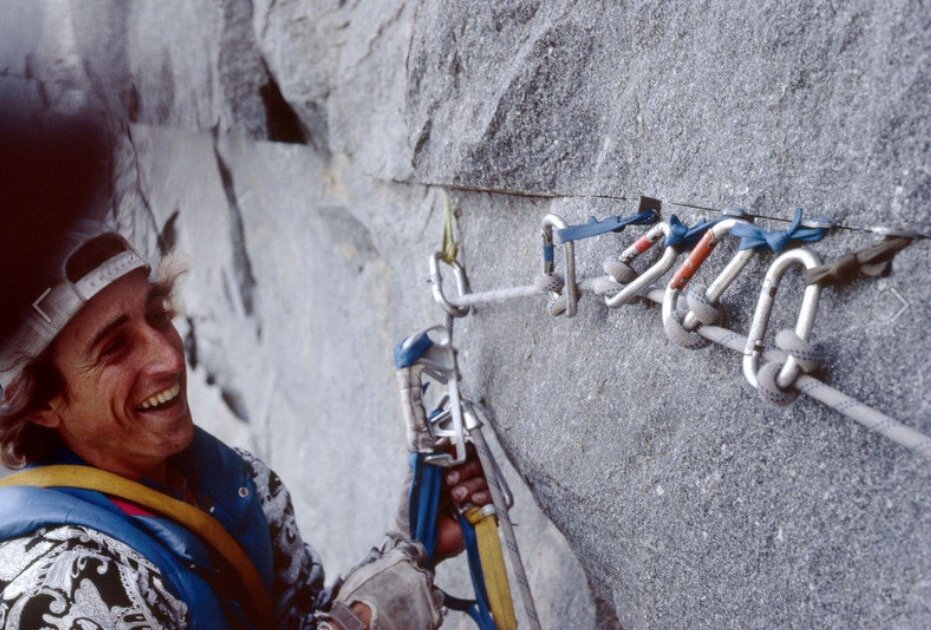
Photo by Dave Diegelman, climber, Dale Bard, Sea of Dreams, El Capitan, 1978
Modern minimalist
“Build your anchor with the rope, and haul from one bolt” anchor. (Purple and red cords are docking tethers for the haul bag.) Photo: Mark Hudon
Some big wall experts will tell you that it's fine to haul off of one bolt. Well, it probably is fine in bulletproof Yosemite granite, on a well-travelled route with newish 3/8” inch bolts on every anchor. But not everybody climbs with such sweet anchors, do they? How about a sandstone wall in Utah, where are the anchors are often older and in much softer rock? Maybe not!
Do you want your pet velociraptor tied to just one bolt, when including another one takes just a few seconds and a couple of extra pieces of gear? (Remember, never let anyone else dictate your level of comfort or safety, no matter what their credentials might be.)
The photo below shows making the with anchor with the lead rope. This can work if you are thoughtful and organized with your belay set up (aka experienced), but it can be a frustrating time suck if you start making rookie mistakes like clipping a heavy load over the top of the lead rope (ask me how I know this . . .) If this works for you, great, but if you're getting started in big wall climbing, having some sort of equalized masterpoint(s) and not using the lead rope to make the anchor, might be a better approach.
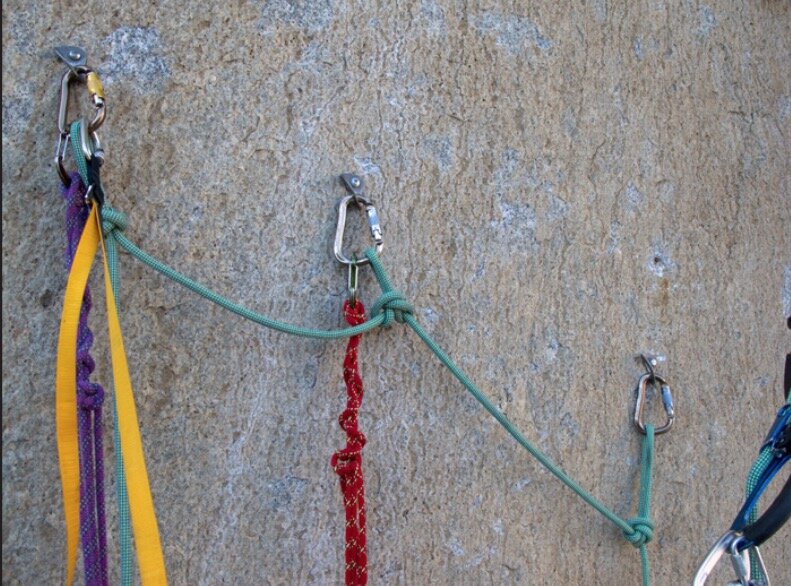
photo: mark Hudon, hudonpanos,com
Classic overbuilt
Quite possibly one of the best climbing illustrations ever, by the always amazing Mike Clelland, from (I think) Climbing magazine. Redundancy, definitely. 24+ carabiners and an engineering project, also definitely. Probably overbuilt for most people, but still a great drawing.

image credit: Mike Clelland
Ideally, big wall anchors have the following qualities:
Adequate strength - Adequate strength means strong enough for the intended loads, and not overbuilt. It also means adequate enough not to give you the slightest hesitation or stress about whether the anchor is going to hold.
Simplicity - A tangled rat’s nest of slings and rope is confusing and potentially unsafe, because it’s not easy to see what can safely be unclipped and what cannot.
Consistency - Ideally, you and your partner have the same system that you agree on and that you’re able to use at pretty much every anchor. The gear to do this is already packaged up in two identical “anchor kits”. One of these is in use at the current anchor, and the other is either on the leader’s harness or on the zip line ready to send up to them when they finish the pitch. A classic beginner mistake is to build a random anchor with whatever gear can be scavenged from your depleted rack after you’ve led your pitch. Please don't do this.
Zero to minimal knots - Tying knots, as in a cordelette style anchor, takes more time, energy, cursing and hassle to untie when you’re breaking down the anchor. Try to avoid knots in your anchor whenever possible.
Sketchy old school, modern minimalist, and classic overbuilt are not your only options. There’s a large middle ground, where your anchor can be strong enough, with a fast set up and easy break down, yet still have redundancy for your hauling point to keep your rhino under control.
For this example, let's assume:
Tina the Tiger led the last pitch and built the anchor.
A typical big wall trade route anchor of three horizontal bolts.
A hanging belay with no friction-inducing ledge. (If you do have the haul rope running over a ledge, then having your haul point as high as possible will help minimize evil friction.)
The hauling load is shared between two points; no hauling from a single bolt without a backup. (Of course you CAN choose to haul from one bolt; we’re not in this example.)
Tina fixed the lead rope (green) for her second to the right bolt with a butterfly knot, and backed it up with a clove to the middle bolt. You probably don't need an equalized master point to fix the rope for your second, because it’s holding pretty much just their body weight. Back up the rope, yes. Equalize it to a master point, probably not.
Tina’s partner is coming up on the right, so she set up the hauling point on the opposite side, in this case the left. Don't make your partner climb over the haul bags if you don't have to. (Note: if the next pitch traverses to say the right, you usually want to set up the haul on the right, so you can lower out the bags without them smacking into you.)
Certain parts of a real life anchor are omitted for clarity, such as rope bags, the leader’s daisies, etc.
Generally speaking, having the haul point higher is better, because it can give you a more efficient pulling stroke and can minimize friction from any ledges that the rope might be rubbing on. The longer the runners you’re using, the lower the hauling point will be. Keep this in mind when setting up your anchor.
Method 1 - Haul from one bolt, and back it up with a sling to an adjacent bolt
Let's start with the one bolt method, but give it a little more security with a back up sling. Most of the time, try to make this your go-to. Reason: it keeps your hauling point high, which is often better ergonomically, and can minimize evil friction if the haul rope is running over any rock edges.
You have one bolt that looks totally bomber, and it's nice and high. Schweeet! Simply back this up with a sling to a neighbor bolt. In the highly unlikely event the left bolt fails, you're backed up by the middle bolt. (This tip is from the outstanding big wall instruction book “Hooking Up” by Pete Zabrok and Fabio Elli, highly recommended.)

Method 2 - Two single runners
This is a simple yet often overlooked technique that can work great if the bolts are more or less level. Strong, redundant, distributed load, fast set up, and zero knots to untie when you're done. If you need to shorten a runner a little bit to better distribute the load, you can add some twists or make a few wraps around a carabiner, as we cover in this tip here.

Method 3 - Metolius PAS (or similar sewn loop tether, NOT a daisy chain with bar tacked pockets)
This also offers bomber strength, a quick set up, decent load distribution, and with the extra bonus of lots of places to clip things to full strength loops when you need to. It’s extremely handy to have multiple clipping points like this.

Metolius makes a longer version of the PAS called an “Anchor Chain”, which could be a good option if the bolts are a bit farther apart, or if you need a few more places to clip things. (Each sewn loop is rated 22 kN.)

Metolius Anchor Chain, image: Metolius.com
Method 4 - Quad anchor from 180 cm sling
You can make a quad anchor out of a 180 cm sling and keep the knots in it permanently tied. (Yes, a 180 cm sling is a little hard to find. Try a Google search for “Mammut Contact” or “Petzl Pur’Anneau”. ) Again, this gives a fast set up and good equalization, and offers several different places to clip in stuff.

Method 5 - Girth (or clove) hitch at the master point
This might look like a cordelette that would be a hassle to untie, but check out the master point: it's tied with a girth hitch. This makes it easy to untie even after it's been severely loaded. Yes, a girth hitch is fine to use at the master point, we cover it in depth here. You could use a clove hitch also, which we cover in this Tip.

Each of these systems offers quick set up, zero knots to struggle with, just a few extra pieces of gear, and redundancy and load distribution at the hauling point. For those not ready to embrace anchor minimalism, these methods offer a good compromise.

How to lead a roof on aid, by Petzl
Aid climbing through a roof can be insanely awkward and strenuous . . . or, pretty straightforward if you have the proper gear and technique. Check out these great diagrams from Petzl on how to do it, and learn some ways to practice before you get on the real stone.
Aid leading through a roof can be incredibly strenuous and awkward . . . or, if you have an adjustable tether, it can be pretty straightforward.
The always amazing Petzl website has a nice sequence of diagrams of how to do this. They show it using their nifty Petzl “Evolv Adjust” adjustable tether designed for aid climbing, but any sort of adjustable tether, such as the popular Yates, will work.
In fact, you may find the Yates tether actually works a little better, because it's easy to release under tension, while the Petzl one is not, at least for me.
If you're a beginner aid climber and your route has any sort of a roof on it (such as the famous “Kor Roof” pitch on the South Face of Washington Column in Yosemite), studying the sequence below will be extremely helpful, hint hint!
Practice! If you're in Yosemite, before you head up the wall take a training lap or three on the LeConte Boulder, which has a nice practice bolt ladder on it. If you don't have any real rock, get resourceful: hang some slings from the underside of an outdoor staircase/fire escape, a stout tree limb, or something similar. Please, do yourself (and any teams that might be stuck behind you) a big favor, and get this critical skill dialed before you try it on a real route.
The link to the Petzl website showing these drawings is here. But, if this page disappears, I screen grabbed the diagrams and put them below. (Dear Petzl graphic design department: You’re amazing! If you want to pick up a little freelance work on the weekends, please give me a call.)
All images below are by Petzl.com
Notes: Lanyard to A is cinched in tight. Feet can give some opposing tension to make the clip to B. The first thing clipped to B is a quick draw. Your lanyard and aider get clipped to the top carabiner of the quick draw.

image: https://www.petzl.com/INT/en/Sport/Aid-climbing-progression
Using your nifty adjustable tether, put some tension on B. (This is about the time when you'll want to kiss the person who invented adjustable tethers . . .)

image: https://www.petzl.com/INT/en/Sport/Aid-climbing-progression
This can be the tricky part. You need to release your weight from the adjustable tether off A, and slowly lower yourself out to hang beneath B. Having an adjustable tether that can release in a controlled way while under tension makes this process a LOT easier! Note in the diagram below, the climber is pulling toward A with their left hand, to create a little slack so they can do a little lower out with the tether.

image: https://www.petzl.com/INT/en/Sport/Aid-climbing-progression
Walk up the ladder hanging from B, and use your adjustable lanyard to hoist yourself up close to B. Then clip the rope to the bottom of the quickdraw. Repeat this sequence as needed to clear the roof.

image: https://www.petzl.com/INT/en/Sport/Aid-climbing-progression

Big wall beverage holder
Here's a way to repurpose some gear at your big wall bivy so you’ll never spill that precious can of . . . prune juice.
This tip come from big wall ace Pete Zabrok and his excellent new book “Hooking Up - The Ultimate Big Wall and Aid Climbing Manual”. Highly recommended for aspiring aid climbers!
One of the more vexing questions for big wall climbers is, “Where da heck do I put my beverage?! The last thing you want at your bivy is spilling that precious can of . . . prune juice, but there is a serious lack of flat spots to put it. (An extra chalk bag, of course without chalk, also works well with this.)
Fortunately, resourceful big wallers came up with a crafty solution.


El Capitan "Gigapixel Climbing Routes"
This amazing photo project stitches together more than 2,000 images into one single, super high resolution photo of El Capitan. Add onto this redlining of routes and over 2,000 more photos of a climbing team going up the nose, and you have some serious rock climber eye candy.

This made the rounds in Yosemite circles a few months back, but it’s such an amazing photo project that it deserves a wider audience.
The photography wizards Eric Hanson of Blueplanet VR and Greg Downing of HyperAcuity created an extremely high resolution, zoomable image of El Capitan, complete with red lining of routes and a climbing team in action on the Nose. You just need to see this, click the button below, zoom in, and be amazed.
The technical details of how this photo was created go something like this: a high definition camera took about 2,000 images of El Capitan, and then the images were stitched together to make one single super high res image.
Then, all the climbing routes were drawn on the photo.
And to top it off, another 2,000 or so photos were taken of two climbers on a one day climb of the Nose route, and these were added to the photo.
You don’t have to have ambitions of El Capitan to appreciate the technical expertise, creativity, and beauty of this project.
And, if you do want to climb El Cap, this could be a terrific planning and route finding resource.
(For example, you can see in this photo exactly how far down you need to lower down of the Boot Flake to properly execute the famous King Swing on the Nose :-)


Two clever ways to transition from aid to free climbing
When aid climbing, the transition from your nice comfy aider steps into free climbing a few 5.6 moves can be surprisingly terrifying. After you know these two clever tips from big wall expert Chris McNamara, it's a LOT easier.
The transition from aid climbing to free climbing can range from slightly awkward to semi-terrifying, but with the right techniques it doesn't have to be.
I REALLY wish I knew about these techniques on my first couple of walls!
Fortunately big wall expert Chris McNamara made a great YouTube video showing how it’s done.
There are two methods shown here.
Method #1: clip a sling and stand in it. This works well when you have a few moves of free climbing followed by more aid.
Method #2: clip the rope to your ladder, and leave your ladder behind. This may be a better choice if you have free climbing with no more aiding, such as when you’re approaching an anchor.
Aid to free transition #1 - Use a sling as a ladder
Place a piece as high as you can.
Clip a 120 cm / double sling to the gear, clip a carabiner to the sling, and clip your lead rope into this carabiner.
Key move: step into the bottom of the double sling. The sling effectively becomes a ladder step.
Reach down, unclip your previous ladder, roll it up to get it out of the way and clip it to your harness.
Stand up in the sling and start free climbing.
Aid to free transition #2 - Use a ladder as a sling
Place a piece as high as you can.
Clip ladder to the gear.
Clip a carabiner onto the ladder pretty much anywhere, and clip the lead rope into that as protection.
Step up in your ladder, start free climbing, and simply leave the ladder behind. This is easier if you don’t use a tether on your ladder.
You can reach down and remove your lower ladder before you do this if you want to, or simply leave that one behind as well.
Check out both these transition methods from big wall ace Chris McNamara.

Andy Kirkpatrick - Tips on staying alive on a big wall
British big wall expert Andy Kirkpatrick has some battle-tested advice for staying relatively comfortable on a big wall, even when the weather goes sideways. These tips are from his excellent book, “Higher Education” - highly recommended reading!
British hardman Andy Kirkpatrick has not only climbed El Capitan more than 30 times, he’s also climbed remote big wall expedition routes in some extremely cold and harsh conditions all over the world. He knows a LOT about staying warm and coming back in one piece.
Most of the tips below are from his excellent big wall book, “Higher Education”, definitely recommended reading if you want to climb the big stuff.

image: “Higher Education” book cover, by Andy Kirkpatrick
Some solid big wall / aid tips from Andy:
This is hopefully painfully obvious, but always bring a rain fly for your portaledge, no matter how cheerful the forecast.
Always try to stay dry, or at least as dry as you can. “You will always be wet in a storm, but there’s a difference between damp and warm, and soaking and shivering.”
If you’re already warm and dry, do everything you can to stay that way. That means, don’t leave your nice dry portaledge to go out in the rain and fix a pitch. If you’re leading and starting to get wet, really think through whether you should be pushing on in the storm, or retreating back to your dry ledge.
Even in summer conditions, bring clothing like you’re on a winter alpine route. When you’re hauling 100 kg of gear, and you’ve got a 170 liter haul bag, bringing some extra warm gear that you already own is really not that big a deal.
What kind of warm gear? Synthetic sleeping bag, (never down) with a minimum rating of 20 Fahrenheit. Long underwear, top and bottom, at least one pair of warm socks for sleeping, fleece top, Das Parka type synthetic belay jacket, balaclava, gloves.
Use a bivy sack over your sleeping bag, in addition to the fly on your ledge.
Do everything you can to keep your sleeping bag dry. It's your largest piece of warm “clothing” and last line of defense. If all of your clothes are truly wet, consider wrapping the sleeping bag inside of a bivy sack over you like a blanket rather than you being inside the bag.
Avoid getting into a dry sleeping bag with wet clothes. Change into dry clothes first, or take off all your clothes and get into your bag.
Bring a small sponge to mop up water and condensation.
If you know a storm is coming in, make sure you have everything you need in or accessible to your ledge, so you don’t have to go out in the storm and burrow through your haul bag.

2 tips for hot weather big walls
Headed to Yosemite or Zion in the summer to try a big wall? It’s gonna be HOT! Here are two lightweight and inexpensive things to bring to make your vertical camping trip a little more bearable.
This tip come from big wall expert Andy Kirkpatrick. Check out his excellent book on big wall climbing, “Higher Education.”
Yosemite valley or Zion in the summer can be a reflector oven on a big wall. If you find yourself in the heat, here are two easy ways to stay a bit cooler.
small folding umbrella
water mist/spray bottle
Between some instant shade and evaporative cooling, you can stay a lot more comfortable at that multi-hour belay.
Know what time of day your route will be in the shade, and plan strategically around that. Taking a nap in your portaledge in the heat of the day might be a great call.
That will give you some time to think about why most people like to climb in Zion and Yosemite Valley in the spring and autumn. :-) If you're in Yosemite in the summer and want to climb, consider heading to the higher elevation Tuolumne Meadows area.
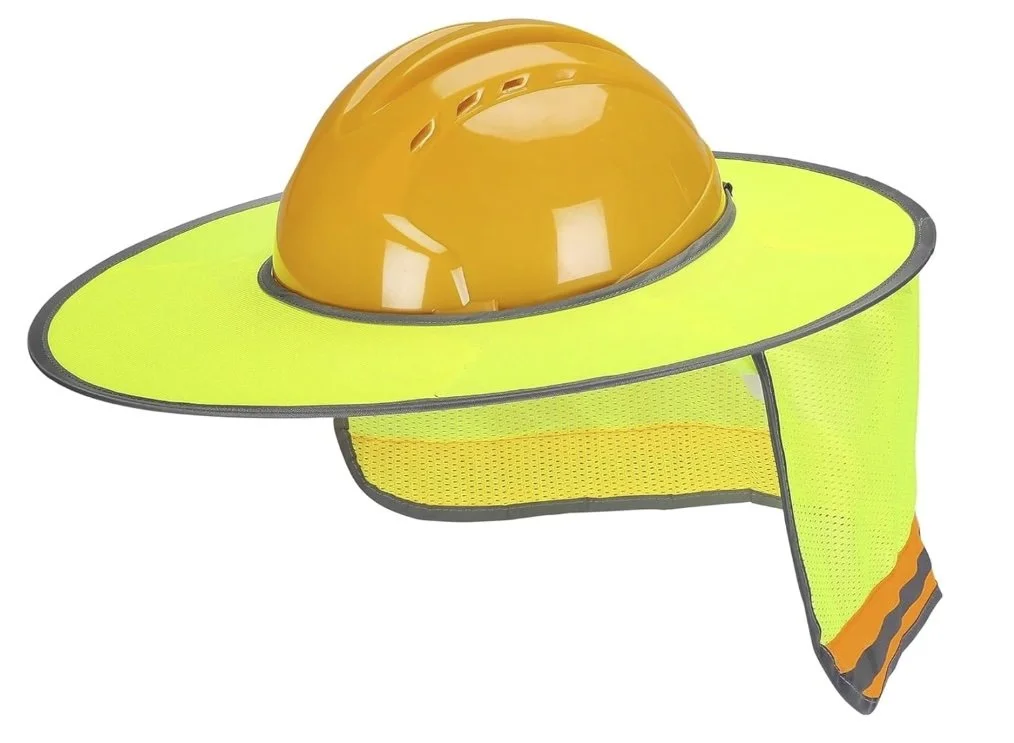
One more option to stay cooler: a sun brim for your helmet.

How to rack your aiders
Aid ladders always seem to be trying to trip you up. And when you're free climbing, you have to keep them tidy and out-of-the-way, but instantly accessible to transition back to aid. Here's a great technique to do just that, from expert climber Libby Sauter.
This tip was shown to me by Libby Sauter, expert climber and holder of the women’s team speed ascent of the Nose on El Capitan. Thanks Libby!
A good rule of thumb for just about any kind of climbing is never have anything hanging below your knees. So, what to do about those pesky aid ladders that always want to trip you up, when you're either gearing up at the base of the route, or transitioning between aid climbing and free climbing?
Here’s a crafty way to quickly roll up your aiders to get them out-of-the-way, yet make them instantly accessible to unroll when you need them. And if you do it right, there won't be any twists.
Take the second step of your aid ladder, and pass the hero loop under the step.
Repeat with the fourth step of the ladder, and again with the sixth.
Finally, clip the hero loop onto your aider carabiner. This should be a designated carabiner that always lives on the business end of your aiders.
You should have a nice compact bundle, looking like the photo below.
To deploy, just unclip the hero loop from the carabiner, and give a shake. The aider should fall down untwisted, ready to climb.
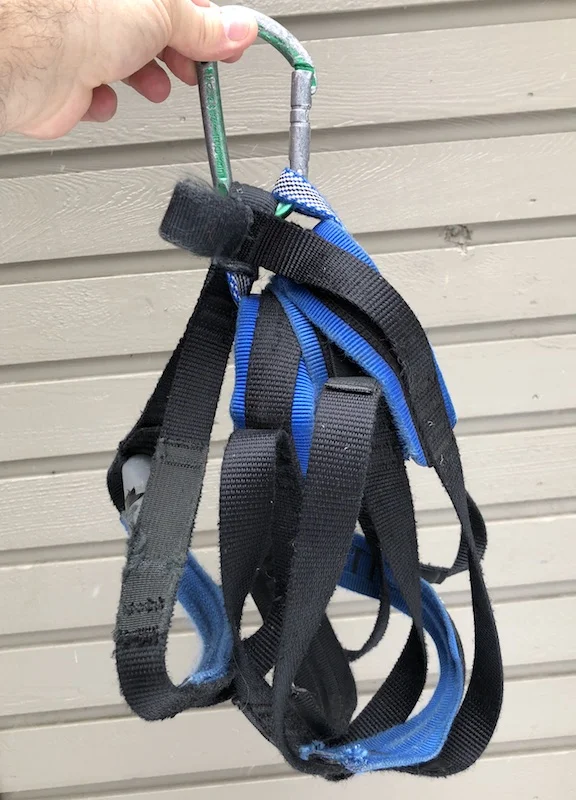
It’s a better show than a tell. Here’s a short video showing how it’s done.

Hauling directly from a Traxion pulley
Connecting your haul rope to the haul bags with a Micro Traxion (or similar progress capturing pulley) can make your life easier in a lot of ways. (Thanks to big wall expert Mark Hudon for this tip.)
Credits: This system is also known as the “far end haul”. I believe it was originally invented by legendary Yosemite dirtbag Chongo, and shown to me initially by Mark Hudon. Check out Mark’s great website for more on this.
Note the haul line going directly to the Petzl mini Traxion.
(Also note the haul line clipped in with a locker to the top part of the swivel as a backup.)
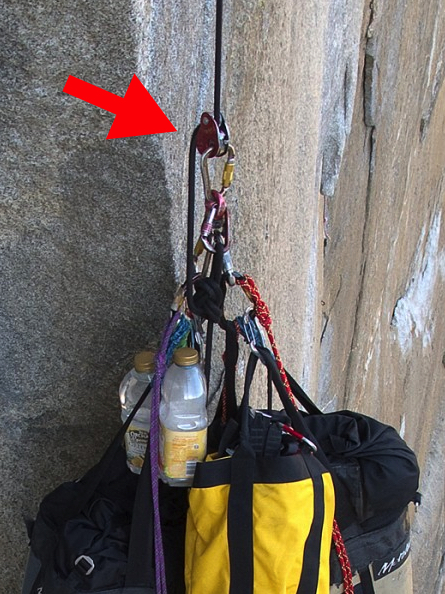
image: mark hudon
The traditional big wall set up to rig your haul rope to the haul bags is to pretty much connect them directly, something like this:
Figure 8 on a bight (or better yet, a butterfly knot, easier to untie after loading) on the end of haul rope
Locking carabiner
Swivel (optional but highly recommended)
Another locking carabiner attached to haul bag(s)
However, with the addition of just one more piece of (admittedly expensive) gear, you can make your life a whole lot easier in certain situations. All you do is add a progress capturing pulley, (aka PCP) like a Petzl Micro Traxion, to the locking carabiner upstream from the swivel, put your haul rope through that. Note that you set this up on the ground from the very first haul, and keep it on the system the entire climb.
Also note that you do not remove this PCP and use it as part of your hauling system, you need a separate PCP for that. (Yes, this sport is expensive . . .)
The rig looks like this:
Haul rope through Micro Traxion (make sure it’s threaded the right way, duh)
Micro Traxion to locking carabiner
Locking carabiner to top of swivel
Bottom of swivel to locking carabiner
Locking carabiner to haul bag(s)
Here’s a close up or one way to rig it. Note the haul line is clipped above the swivel with a locker as a backup to the Traxion. Docking cord is attached to the long haul bag strap with a quicklink.
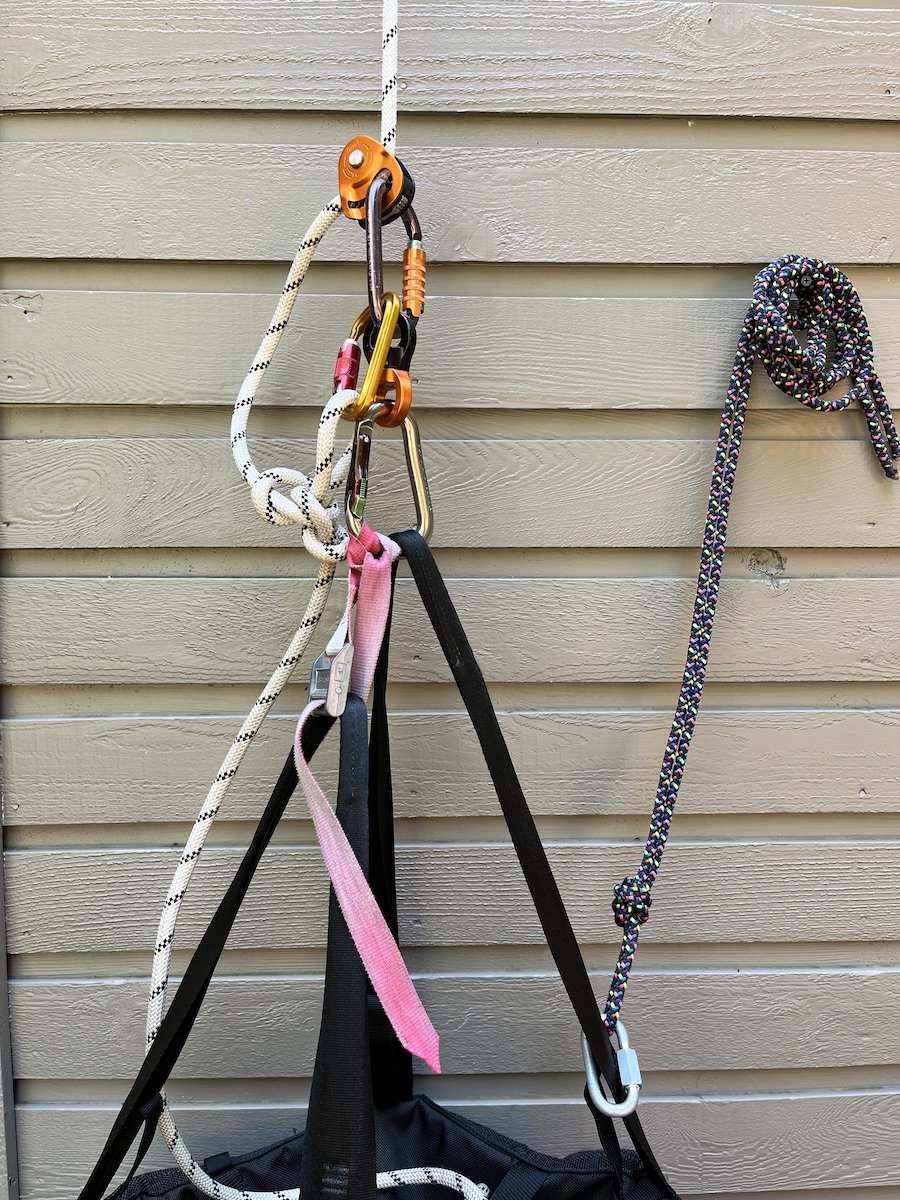
No, the teeth on the pulley do not damage the rope. That was my first reaction, isn’t the rope going to get shredded? But nope, it does not. (You ARE using a burly haul rope with a stout sheath, right?)
About the only downside to this system is that you’re adding one more bit of gear that costs about $100. But the upsides can be significant.
Here's a fancier way to set it up, from big wall expert Skot’s Wall Gear.
Here, Skot is using a pair of rappel rings (gold) along with a combination swivel and locking carabiner (appears to be the Director Swivel Boss from DMM). This makes a more compact set up, with zero chance cross loading the rings. Sweeeeet!

PHOTO: @SKOTFROMTHEDOCK, HTTPS://WWW.INSTAGRAM.COM/P/C2NMW-BY0-3/
The far end haul
Having a Traxion on the load also lets you set up what’s called a “far end haul”, which at first seems like some sort of sorcery. The far end haul system allows you to lift your load with a theoretical 2:1 mechanical advantage (MA) by pulling on the “far end” of the rope, rather than from the primary anchor. Here's a detailed article on how to set it up, along with some how-to videos.

But, even if you’re not soloing, it has a few advantages.
You never again need to futz with the old school “water bottle knot protector” that slides up and down the haul line and gets in your way. If you don't have a knot, you don't need a knot protector, right?
You can pull all the extra haul line through the Traxion before you release the bags from their docking cords, and use the extra haul rope to lower out the bags. (Remember to tie that back up knot after you pull all the extra rope through the Traxion; it’s easy to forget this,)
You never have a loaded/welded haul rope knot to untie.
The far end haul can minimize rope abrasion, because the haul rope doesn’t move.
If you have to haul from a point or over a ledge with a LOT of rope friction, you can instead far end haul and have zero friction.
You can easily move the bags around at the anchor; more below.
Simply by redirecting the tail end of the haul rope through a higher anchor point, you can generate a 2:1 mechanical advantage to unweight the bags. This lets you do various shenanigans like transferring the docking cord from one part of the anchor to another. And I can tell ya, if you’re a beginning wall climber, you are just about guaranteed to have some flavor of anchor fustercluck that will require this, ask me how I know this!
If you didn’t have this set up, unweighting the bags once they are settled on the anchor is probably going to be a significant pig wrestle. You want to avoid pig wrestling whenever possible.
Here’s a video by wall ace Mark Hudon who shows exactly how to do this. Rather ingenious, no?

What size haul bag should I get?
There aren't a lot of manufacturers, nor whistles and bells when it comes to haul bags. The main choice is what size. Surprisingly, you can get a lot more room for a very small increase in weight and cost.
I think the short answer to this is the largest size that you can comfortably carry. If you're under about 5’5”, the larger bags are going to have shoulder straps and waist loops that may not fit your body very well.
How long are the walls you're planning to climb? Are you heading up a short outing in Zion National Park, where you're probably going to be on the wall for maximum one night? Then you can use a smaller bag. Or, are you heading up El Capitan on an outing of more than about three days? Then you probably want the biggest bag you can manage.
Haul bag sizing and pricing is kind of an interesting situation.
Let's look at Metolius, one of the most popular brands. Their largest two bags are called the El Cap and the Half Dome. (Costs are as of Feb 2019)
El Cap: 157 liters, weight 3.6 kg, cost $229
Half Dome: 125 liters, weight 3.4 kg, cost $219
So, for only $10 more money, and a weight increase of only 0.2 kg, you get an extra 32 liters of storage! For me, that's a no brainer. I'm getting the El Cap.
Below: the Metolius haul bag line up. From left to right, Half Dome is #3, El Cap is #4.
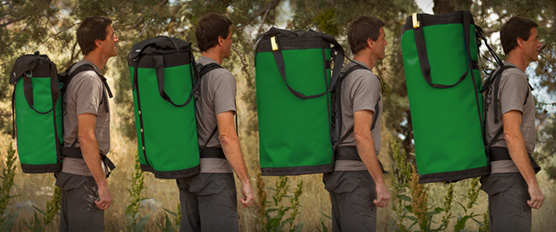
image: https://www.metoliusclimbing.com/haul_bags.html
Having some extra room in your haul bag, rather than packing everything into it like a Chinese puzzle, can make your life a lot easier.
And, of course, you don't want to fit everything in your haul bag anyway. For things like your portaledge, garbage bag, poop tube, wall bucket and your day bag, you probably will be using gear tethers anyway, like we described on this tip.