
Alpine Tips

Anchor overview - a German perspective
The German Mountain and Ski Guides Association (VDBS) published a short PDF file of recommended anchor building practices. Many of them are strikingly different than those used in many parts of the world. Let’s learn some new anchor setups!
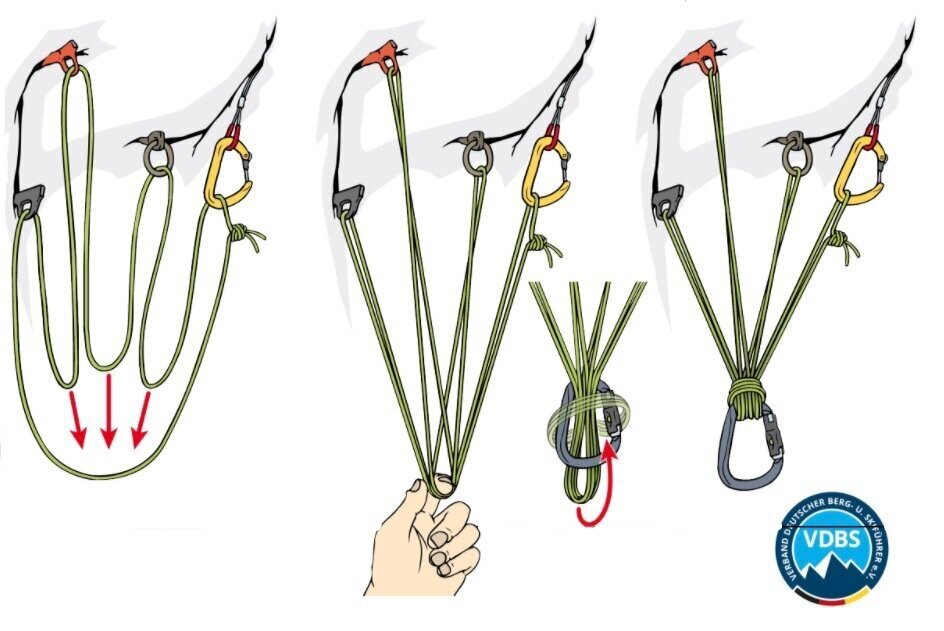
image credit: Georg Sojer / Chris Semmel / VDBS
The German Mountain and Ski Guides Association (“Verband Deutscher Berg und Skiführer” or “VDBS”) has a well deserved reputation for professionalism and technical expertise.
German Mountain Guide / Bergfuhrer Chris Semmel published an interesting PDF file that summarizes some modern, “VSBS approved” approaches to anchor building.
Many of them are quite different than what's used in the United States, so let's have a look!
Suggestion: When we encounter a technique that’s different from the one we currently use, it’s good to keep an open mind. There are few absolutes in climbing, “gotta do it this way or else”. Most everything else is somewhat subjective. Always practice new methods on the ground first, ideally with a qualified instructor.
A few notes . . .
All images on this page are credited to Georg Sojer, Chris Semmel and the VDBS.
Side note: Georg is a superb and funny cartoonist! Follow him on on the Insta: @sojercartoon
Many of these anchors originated in the “South Tirol”, (Dolomites) which is in northern Italy and not Germany, but credit still goes to Chris and the VDBS. Let's not get hung up on country of origin here, okay?
Graphics with the “VDBS “ logo are the recommended practice. Graphics without the logo are “alternative” methods.
The images are screen grabs from a zoomed in PDF file, so sorry if the quality is not so great.
I'm sure there are some native German speakers reading this who might take issue with some of my translation. I had help from a friend who is self-professed 90% fluent, so any mistakes I blame on him. =^) Let's stay focused on the image content and not get bogged down in tiny translation errors, okay?
Alpinesavvy tries not to offer advice, only ideas and information. I’m absolutely not saying that you should go out and start using these techniques tomorrow, especially without knowing the context and having appropriate instruction. I say again, having appropriate instruction. (Doing this may require a trip to Europe, lucky you.)
I'm not posting every graphic in the entire document, rather the ones I found personally interesting. I encourage you to check out the whole PDF file yourself; click the button below.
The title of the PDF: ”Standplatzlogik VDBS 2019 - Ausbildungsstandard VDBS & Alternativen”
This translates as “Belay stance logic - VDBS training standards and alternatives.” This title alone caught my attention. It's “Professional German Guide Training Standards”, not, “random stuff I saw on the Internet that might work for anchor building.” =^)
Let’s get to it!
Anchor 1 - Let's start off with something not familiar to Americans, a single bolt.
Yes, that's right, one bolt, no redundancy, that's all you got, better get comfortable with it. It's probably a glue in, it's probably about 20+ cm long, and you can probably hang a bulldozer off of it, but it's still one bolt.
It appears that the leader is cloved hitched directly to the yellow carabiner, and brings up the second with a Munter hitch on the black carabiner.

image credit: Georg Sojer / Chris Semmel / VDBS

image credit: Georg Sojer / Chris Semmel / VDBS
Anchor 2 - Here's an anchor set up more familiar to the rest of the world, “two solid fixed points”
Do you see a sling, a quad, a cordelette, or any attempt at equalization? Nope! If you want to build an anchor using the rope, this is about as simple as it gets. All the load is obviously on the left bolt, with the right bolt only serving as a backup in the (1 in 100,000?) chance that the left bolt fails.
This reflects a different approach to anchor building in areas that have top-quality twin bolted anchors - there's really no need to try to equalize.
(Note, the rope is tied to the belay loop and not the harness tie in points. Not a standard practice in the US and not recommended by most harness manufacturers, but apparently acceptable to the VDBS, so in this case I'm gonna call it good.)

image credit: Georg Sojer / Chris Semmel / VDBS
Here's another approach, in the diagram on the right. Instead of clove hitch, you can make a bight knot and belay from that.

image credit: Georg Sojer / Chris Semmel / VDBS - https://drive.google.com/file/d/1rpPxbNOHjCQNFZmnI-qB9iEXun7Q4Qyf/view
Side note: Check out how the rope is tied to the harness in the diagram above: to the belay loop! This is definitely not standard practice in North America, but maybe in Germany?
Have a look at the screen grab below from the Edelrid website. It clearly shows that tying to the belay loop is acceptable.

image: https://media.edelrid.de/images/attribut/54507_GAL_Gurte_Sport_ANSICHT.pdf
Anchor 3 - The fixed point belay
Again, used with two solid bolts, and again, this puts all of the load on the left bolt with the right serving as backup. This time, instead of using the rope and two clove hitches to connect the bolts, you use a double length (120 cm) sling instead. The sling is tied with a double loop bowline on the left, and either a clove hitch with the end clipped, as shown on the left, or a simple overhand knot, as shown on the right.
This technique can be used here as shown, to bring up your partner(s), and it can also be used to belay the leader directly from the anchor. AlpineSavvy has a detailed article on the fixed point belay technique, read it here.
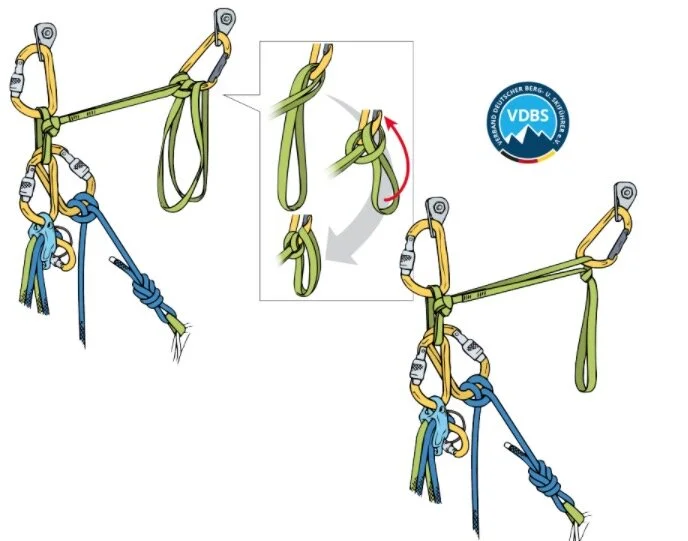
image credit: Georg Sojer / Chris Semmel / VDBS
In the right side margin is this text. It's highlighted, I'm guessing it's pretty important. =^)
Yellow: “Dyneema at the belay as linear connection sling with double bowline: width starting at 10 mm recommended (careful with older 6 or 8 mm slings) In red: “NO old dyneema slings with knots at the belay”

image credit: Chris Semmel / VDBS
Takeaway: (I would guess that the applies to using Dyneema slings for any kind of anchor, not just a fixed point as shown.)
Dyneema slings are fine to use when building an anchor.
It's best practice to use slings that are 10+ mm.
It's okay to put knots in them, provided the slings are relatively new.
Anchor 4 - Swinging leads with a rope anchor
Now, this is interesting. Lots of people think that if you build an anchor with the rope, you can’t block lead. You have to swap leads, because there's nowhere for the second to easily secure themselves.
Well, the set up below lets you swap leads!
It took me a minute or two to digest what was going on, look at the photo below and think it through. Using the quick draw on the top bolt is the key move.
This one is fairly complicated and definitely one to practice on the ground first!
Left: The second is belayed up on the light green rope with a munter hitch.
Center: The second clove hitches into the upper carabiner on the bottom bolt, removes the bottom carabiner, passes the rope behind the connection to the leader, and then clove hitches to the top carabiner of the quick draw.
Right: The leader is put on belay with a munter hitch from the bottom bolt, and clips the quick draw as the first piece for the next pitch.

image credit: Georg Sojer / Chris Semmel / VDBS
Anchor 5 -Now we're getting into alpine anchors, with “2 fragile fixed points”.
(See, your German is getting better already!) “Standard for load distribution.”
Notice, static equalization only. No sliding X, so no chance of suddenly loading the remaining anchor. An overhand knot on the left, and a girth hitch on the right. Yes, a girth hitch, it's fine to use that at the master point. Get used to it, you're about to see a few more. Learn more about the girth hitch master point here.
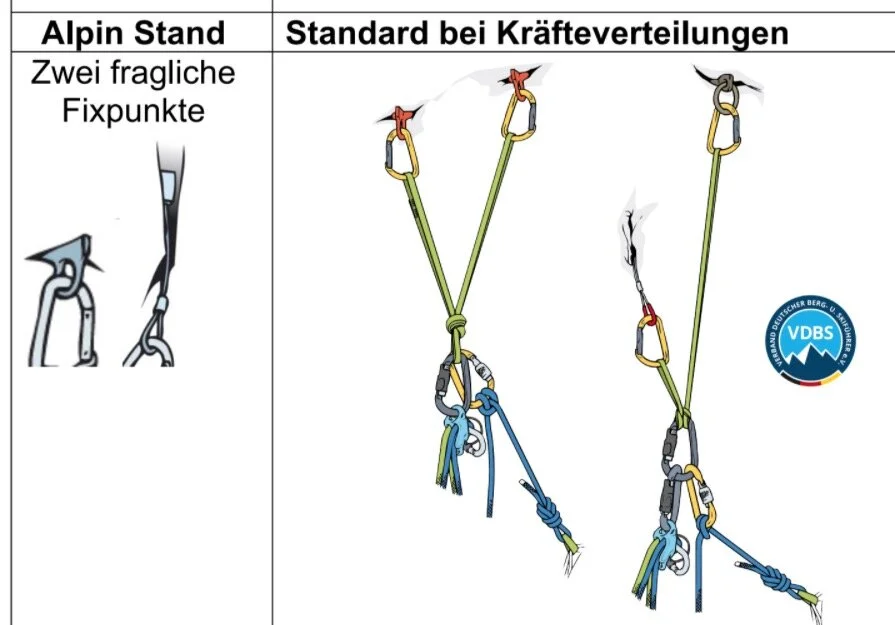
image credit: Georg Sojer / Chris Semmel / VDBS
Anchor 6 - Girth hitch on the ring at the top, pass a bight through the piton at the bottom, and then girth hitch the master point carabiner.
Many people would assume this anchor would require three carabiners, but in fact you only need one. You can rig this same anchor if you find yourself at a chain anchor and are low on carabiners; learn how from this article.

image credit: Georg Sojer / Chris Semmel / VDBS
Anchor 7 - Look, another girth hitch at the master point!
Also note, this is tied with an open, or untied cordelette. This lets you thread one end through the two pitons and the ring, and then re-tie the cord.
This can be a good method on rock that has a lot of fractures, pockets, or protrusions, because there are fewer carabiners that might be loaded sideways at strange angles.
Historical and geographical note, this style of anchor originated in the Dolomites in northern Italy, where there are lots of fixed pieces of gear in often marginal rock with lots of strange bumps and protrusions. This area is called the “Sud Tirol”, or South Tirol.
Can you see how the cord is tied into a loop? Looks like that's called in German a “paketknoten”, or “parcel knot” which is kind of a 1.5 overhand bend. (Personally I'm fine with a standard flat overhand bend here, although probably with slightly longer tails than what’s shown.)

image credit: Georg Sojer / Chris Semmel / VDBS
Here's a similar version, this time with a caption in English. (For any of you still wondering whether a girth hitch at the master point is a valid technique, hopefully you're convinced by now.) This is from a PDF file called: “Standplatzübersicht VDBS DAV 2020”
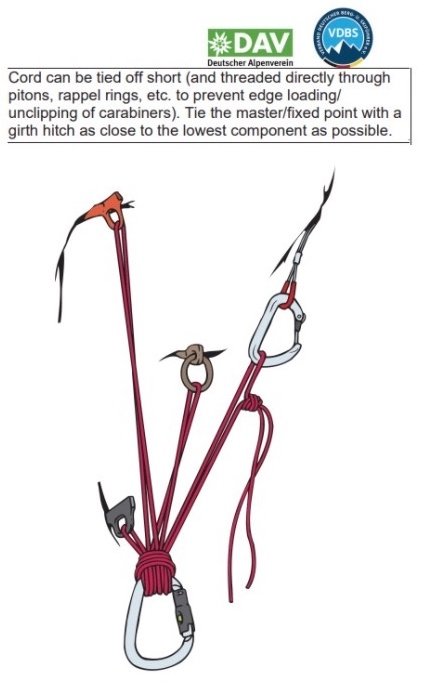
image credit: Georg Sojer / Chris Semmel / VDBS
Here’s how to tie the Paketknoten / parcel knot.
Anchor 8 - Hopefully you never have to make a five piece anchor, but if you do, you might want to remember this technique.
The clove hitches require a lot less cord compared to the traditional cordelette, where you’d have to pull down loops between each piece of gear.
(There’s a three-piece variation of this, called the “V clove” anchor, here's an article about it.)
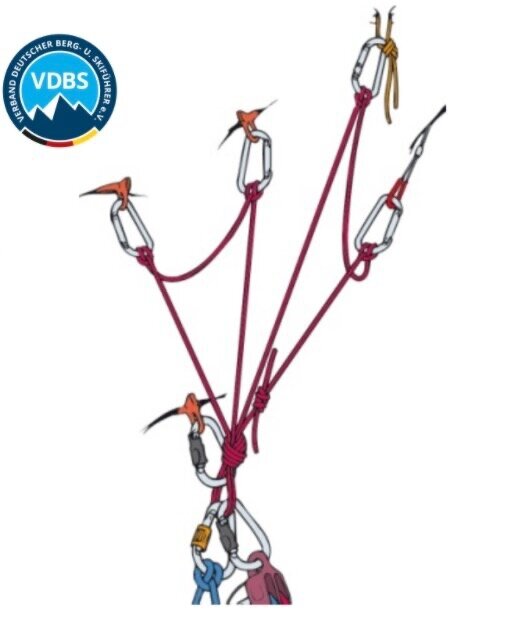
image credit: Georg Sojer / Chris Semmel / VDBS
That's about all. Hopefully this may have broadened your perspective a bit on acceptable anchor building practices.
Again, anchors are often dependent on context and intended use, so it can be a bit tricky to extrapolate from a single diagram what are appropriate real world uses.
Please seek qualified instruction for learning critical skills like this.
And finally, if you've read this far, everyone has at one point wished for an octopus anchor =^)

image credit: Georg Sojer / Chris Semmel / VDBS - https://drive.google.com/file/d/1rpPxbNOHjCQNFZmnI-qB9iEXun7Q4Qyf/view

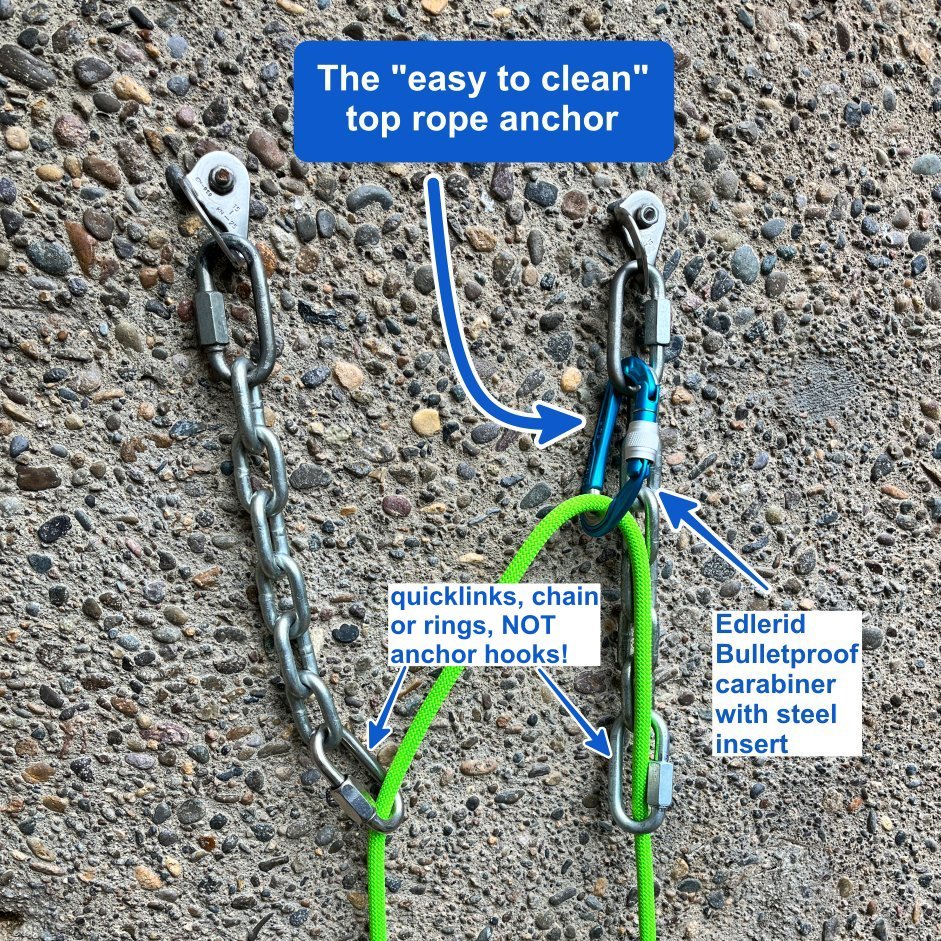
The "easy-to-clean" toprope anchor
Are you top rope climbing with someone who doesn't know how to clean and lower from an anchor? Here's a simple way to rig a top rope to make cleaning and lowering safe and simple for the last person.
Modern “clip & lower” anchor hardware like fixed steel carabiners and Mussy hooks allow faster and simpler transitions from climbing to lowering, and are a great development at many popular climbing areas. However, they are still catching on, and many routes will have a chain anchor without clip & lower hardware. That usually means you need to build your own anchor of some sort, because it’s generally bad practice top rope directly through the anchor hardware. (Hopefully you know that already . . .)
Typically, the most experienced person will lead the route, which means the beginner climbs second and cleans the anchor. Of course, learning to safely clean and lower is an important skill to learn eventually. But if you're climbing with someone who does not have it down, here’s a way to rig your anchor to keep it simple and low risk for the last person up.
Important cautionary note at the bottom of this article, please read all of it!
The first person leading the route, usually the most experienced, can rig the anchor is shown. You can now top rope off this anchor all day, and all the wear-and-tear from the rope goes your bottom carabiner, not on the fixed hardware.
If you’re toproping a lot, you might want to use steel carabiner or maybe the cool Edelrid “Bulletproof” carabiners. These are aluminum and have a steel insert at the bottom where the rope goes, meaning they will last much longer.
Notice how the carabiner is clipped through the quick link which means it's facing out, perpendicular to the rock. This can help minimize rope twists.
For the last person up (typically less experienced) to clean the anchor, it couldn’t be much easier. They simply clean the carabiner and call for a take and lower.
To clarify, lowering directly from the anchor chains is only for the LAST person, not everyone who’s top roping the route. Avoid top roping through fixed gear.
Concerns, grumbles, FAQ . . .
“You should never top rope through fixed gear.” That's generally true. It might seem like that's what's happening here, but it's not. As soon as the rope is weighted, all the force goes onto the carabiner and there's no significant wear on the rings.
“It’s not equalized.” That’s correct, because it doesn’t need to be. You're climbing on two modern bolts, each of which is rated to at least 25 kN. In the extremely unlikely (1 in 100,000?) event that the left bolt were to fail, the rope will be caught on the right bolt. (If equalization is important to you, simply clip a second carabiner into the quick link on the right side hanger.)
“If the bolt fails, it’ll shock load the other one. ” Not a concern. This is a top rope anchor with your stretchy dynamic rope absorbing almost all the force of the very modest fall, if a very unlikely bolt failure ever were to happen. (Again, if this concerns you, just clip a second carabiner to the right bolt.)
“Do I need a locker?” Not really. A standard snap gate carabiner is fine here. If the rope were to detach from the carabiner, it’s still going through the rings. But if it makes you happy to use a locker, go for it.
“Lowering through chains is bad, rappelling is better.” With modern anchor hardware that's inexpensive and easily replaceable, it’s now preferred practice (in most areas) for the last climber to lower, not rappel, from the anchor. This anchor is set up perfectly for that: large long-lasting 50 kN stainless steel rings at the bottom, connected to a quick link for easy replacement. This is per the recommendation of the American Alpine Club.
Caution: Don't do this on “open” anchor hardware (like anchor hooks)
This technique should only be used on “closed” anchor hardware, such as a ring, quick link, or chain, where there is no possibility of the rope coming unclipped. Do NOT use this technique on “open” anchor hardware, such as anchor (aka Mussy) hooks, carabiners, or a ram’s horn / pigtail.
In autumn 2023, there was a fatal accident in Alabama. It involved a beginning climber who was cleaning an anchor hook anchor, that had a locking carabiner added to minimize wear on the hooks. The carabiner was removed, somehow the rope unclipped from the hooks, and she fell.
Short version: for anchor hooks, do NOT add a carabiner on the anchor for the rope. If you do toprope through your own equipment, extend quick draws or slings BELOW the level of the hooks, and put the rope through your own gear that way. This reduces, but does not eliminate, the risk of the above accident happening again.
Also, NEVER have someone clean an anchor who is not 110% solid on the correct procedure. The proper learning sequence should be: 1) instruction on the ground, until the person can demonstrate several times in a row the correct sequence. Then, 2) doing it with an instructor off the ground, hanging at the actual anchor, where they can be directly supervised. (This means NOT yelling instructions from the base of the cliff!)

Here’s an analysis of the accident from IFMGA Certified Guide Karsten Delap.
Here's another video from Karsten showing some ways to build your own anchor with your own gear, and then transfer to the anchor hooks when it's time to lower off for the last person.

Anchor-induced rope twisting
Certain configurations of anchor hardware can put a mean twist in your rope. Learn how to spot these culprits, how to re-rig an anchor with additional hardware to minimize the problem, and a way to quickly remove twists from your rope.

Some configurations of anchor hardware can give you a smooth easy rope pull with no twists. Others can add some snarls to your rope. Here are a few examples of each.
Side note: if the rock below the anchor is slab / lower angle, that often leads to more twists. If it’s hanging pretty much freely or vertical, it’s usually less twisting.
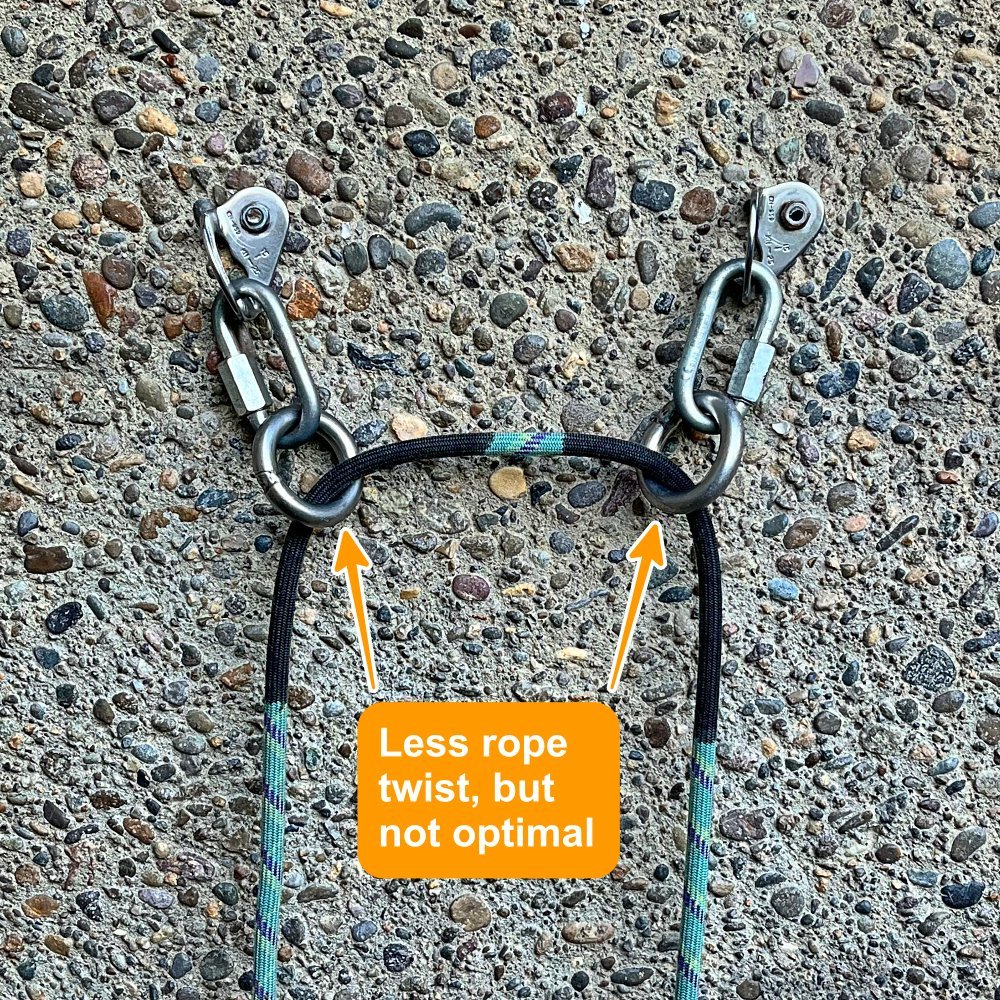
Do you need to rappel, lower off, or redirect a lower from an anchor rigged like the top photo? Be prepared for some possible rope twisting.
When you run a weighted rope through anchor point(s) with the bottom link(s( lying flat against the rock like this, the rope drags at these two spots and starts spiraling, which can put some serious pigtails in your rope.
The general concept: the more friction and direction changes, the more twisting will happen.
(It's unlikely you will ever see this, because any halfway competent route setter will add another link so it looks like the second photo below, but it's possible; I've seen it a few times.)
If you have two extra quick links with you, or maybe want to donate a couple of carabiners, you can add those to the anchor to improve it as shown below. You might want to tape the gates of the carabiner closed, to discourage people from stealing them.
If you don't have any hardware to enhance the anchor, there's probably not much you can do about it. If rappelling, try to separate the rope strands when you pull them, so one doesn’t twist around the other which might make pulling your rope difficult to impossible. If it's your local crag, be a good citizen, climb up there another day with some hardware and re-rig it as shown below.
One improvement: add a second set of either welded steel rings (preferred, as they rotate and last longer) or good quality quick links. Note that these are now perpendicular to the rock. This results in an easier rope pull with less twisting. But, depending on a few other variables, your rope might still get a bit pigtailed.
Of course, if adding rings you’ll need to open the sleeve of the existing quick link, so be sure and bring some pliers.
It helps if the bolts are aligned horizontally. If one bolt is a bit higher than the other in this setup, you still might get a little rope twist, but not nearly as badly as you might without the second link/ring.
The closer together the rings are, generally the less rope twist you will have.
Lowering someone tends to create more twists, because the rope has a higher load. If come across anchors like the image below, you might be better off rappelling rather than lowering.
Anytime you're putting a quick link on an anchor, especially at a popular climbing area, it's best practice to use at least 8 mm (and perhaps even 10 mm) and ideally proper CE climbing rated quick links rather than random ones from the hardware store. CAMP is one of several manufacturers to offer strong, inexpensive, CE rated quick links, read an article about that here.
One more quick link note: it's best practice to place quicklinks so the threaded sleeve closes in a downward direction. That way, if the sleeve ever loosens, gravity helps hold it closed. As the saying goes, ”Screw down so you don't screw up.”
If you’re setting quick links in a more permanent position, give them a good crank with some pliers or a wrench and maybe some Loctite on the threads. If you do that, it doesn't matter which way the threaded sleeve is facing.
A great way to rig a rappel anchor for minimal rope twisting is to have two points that come together at the same level.

Even better, a single point of connection. Like this welded ring rated for something ridiculous like more than 80 kN. Yes, it’s not redundant, but you can trust this absolutely.

Tip: If your rope does get twisted, when you get to the bottom or maybe the next lower anchor, try pulling the entire rope through a tube style belay device clipped above you. This can be a fast way to remove the pigtails. Read how to do that at this article.


Use a quicklink as a wrench
Need to tighten or maybe loosen a quick link you find at an anchor? If you have another quick link with you, you might be able to use it as an improvised “wrench”. Not as good as pliers, but probably better than just your fingers.
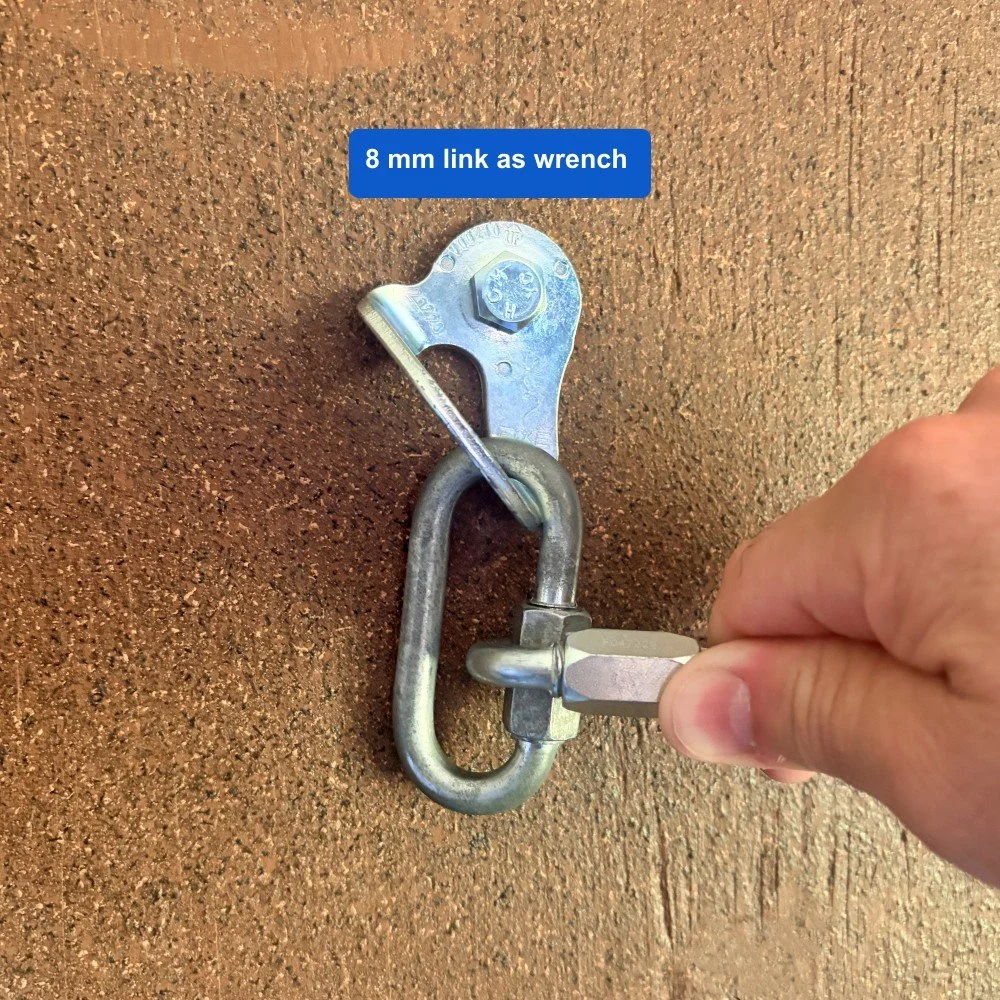
Quicklinks are common rappel hardware, but they can loosen over time. Here’s a way to snug ‘em back up - use another quicklink.
This lets you apply a lot more torque then you can with just your fingers.
Notes:
This method is meant for field improv. Obviously the best tool for this job is a crescent wrench or pliers.
You can use a quick link to tighten (or loosen) another quick link, or potentially to snug down a loose bolt.
It's best practice to install quick links so the sleeve threads down to close, not upwards. That way it's more likely to stay closed.
If you’re installing these as part of anchor hardware, you can use some thread lock to encourage them to stay closed.
Quick links are a rather heavy, single use piece of gear, and many people will choose not to carry them. For some routes it makes make sense to have them, for others perhaps not.
It's best practice to use proper CE rated quick links for climbing rather than random ones from the hardware store. CAMP makes inexpensive, super-strong quick CE rated links in three different sizes, read more about those here.
A 6 mm long quicklink fits (sort of) on the head of a 3/8” / 10 mm bolt, if you need to tighten the actual bolt.
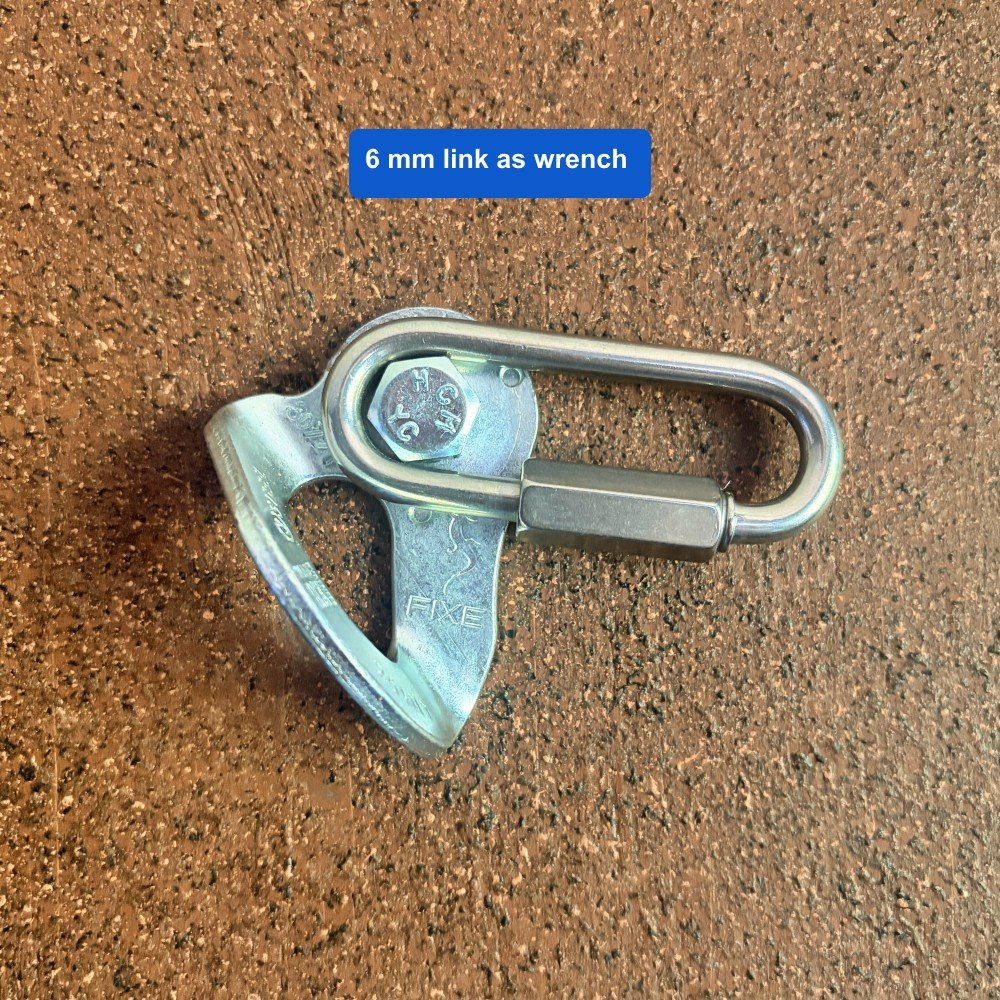
Like many things in climbing, it's a better show than a tell. Here's a short video I made to show how it works.