

Alpine Tips

Learn the "SWAMP" anchor
Need to build a quick 2 piece anchor and all you have left is a shoulder length sling? The SWAMP anchor is your new best friend! Learn it here.

I first saw this anchor in action at Smith Rock in central Oregon about 15 years ago. I was in the “mouth” on Monkey Face, belaying my partner on the airy aid pitch. While waiting, a Canadian guide popped up from another route, and set up this anchor in about 15 seconds to fix the rope for his partner. “DANG”, I said, “That’s pretty slick, I've never seen an anchor built like that before.” He said it was common practice in Canada and the UK, where he had lived for a while.
I'm sure this rig has some different names of different parts of the world, but in the US it’s known as a “SWAMP” anchor, which stands for “Shelf Without A Master Point.” (I think this name is kind of lame, but I don't have anything better. If you know it by a different name, please tell me.)
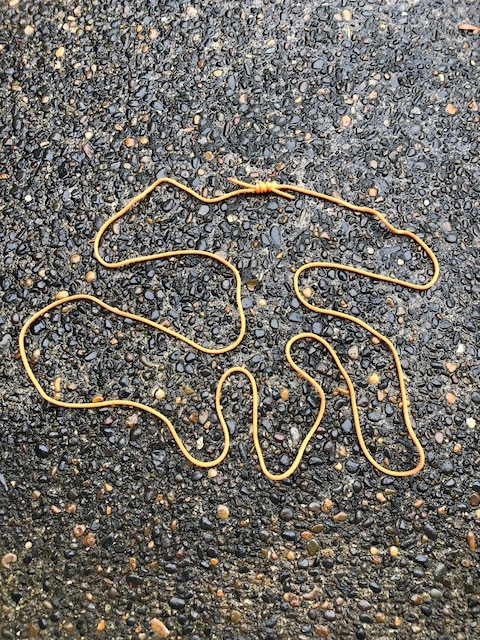
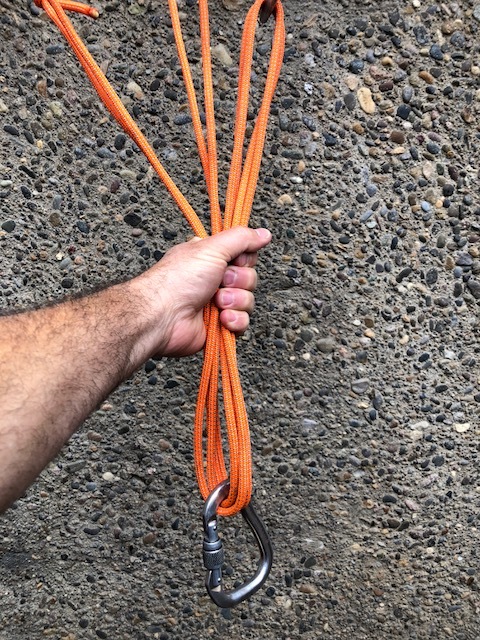
The SWAMP anchor is simply an overhand knot tied in about the middle of a sling. Each end of the sling gets clipped to an anchor / bolt, and a master point locker gets clipped to the two loops made by the knot.
Fast to make, simple, minimal gear, decent load distribution, no extension, and completely redundant, pretty sweet!
Downsides: 1) no shelf (but those are a bit overrated, IMHO) and 2) might be a bit hard to untie after loading, depending on the sling material. (Some folks seem concerned about lack of redundancy if one leg were to be cut and then a heavy load applied to the other leg. In a recreational climbing scenario I think this is extremely unlikely to happen, but in other anchor applications it might be a concern.)
Tying a standard cordelette style rig with a 60 cm sling usually doesn’t work, because the knot and loop take up too much of the sling material.
A girth hitch master point solves pretty much the same issue and is easier to untie. Try them both and see which one you like better.
As seen in the video, this is only used on a 2 piece anchor.
It’s completely redundant and non-extending, but like all statically equalized systems, does not do so well in the load distribution / equalization department. However, if you have a well defined direction of pull, and all you've got to build your anchor is one shoulder length sling, this can be a good #CraftyRopeTrick to have in the toolkit.
Let's address one common objection right off the bat: how strong is this? Yes you are completely reliant on that one knot holding. Good news: #SuperGoodEnough!
I tested this configuration with Ryan Jenks / HowNot2.com in spring 2023, and the results are below. About 20 kN in Dyneema, and about 28 kN in nylon. Being that your rope is going to break around 16 or 18, I think 20 is just fine.

Here’s a nice video posted by Josh Beckner, an IFMGA certified guide, covering just about all aspects of building 2 piece anchors. The SWAMP is demonstrated starting at 11:10.
And, here’s a photo sequence showing how it’s done.
Clip a single runner to one bolt or gear placement.

Tie an overhand knot in about the middle of the sling.

Clip the sling to the second bolt or gear placement.

FInally, clip in the master point carabiner and rotate the knot upwards a bit so it doesn’t abrade on the rock. Done!

You can also tie it with a double length / 120 cm sling. Can we call this the “Double SWAMP?”
Double over the sling, tie an overhand knot, clip one loop to each bolt.


The "bunny ears" cordelette
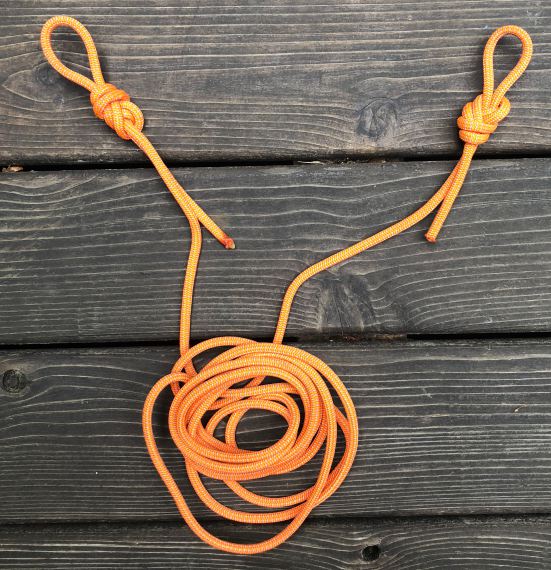
Move over, old school cordelette-tied-in-one-huge-loop. Carrying a cordelette that’s “open”, or untied, can be more versatile. If you tie a small loop in each end, also known as “bunny ears”, you can reach placements that are farther apart, carry a shorter amount of cord, and rig an alpine block and tackle.
A standard cordelette is about 6 meters of 7mm cord, tied into one giant loop typically with a more or less permanent double fisherman's knot.
There are other ways to rig it. One is the bunny ears cordelette.
You may not want to carry this with the loops permanently tied, because after a while they're probably going to stay that way. Instead, you can carry it in an “open” configuration, meaning not tied at all. If you're in a situation where the bunny ears could be useful, take a second or two and tie them.
Take the same 6 meters of cord, but rather than tying it in a loop, instead tie a small loop in each end (figure 8 on a bight or overhand; figure 8 is easier to untie). By small, we’re talking an inch or so in diameter, as you only need to clip a carabiner with it. Be sure and dress the knot well and leave a good long tail of 3-4 inches.

So, what's so cool about the bunny ears system? Mostly, it's more versatile.
You can wrap the entire cord around a giant tree or boulder, or thread one end under and around a big boulder or chockstone. (It's best practice to not use a single strand of cord around a rock; better to double it up.)
No annoying knot getting in the way.
You can use it to make an “alpine block and tackle”, as shown in this Tip.
You can use it to connect three pieces of gear that are really far apart, by a clipping one “ear” to each of the outside pieces.
Because the “ears” give you a greater reach, you can use a cord length that’s a few feet shorter. This results in a lighter and less bulky piece of kit to carry with you. (But, first try it with the full 6 meters, and then cut it down later if you think you need to.)
How strong is it?
From my strength ratings page, we see that 7 mm cord is rated about 13 kN, while 6 mm cord is rated to only about 7.5 kN.
Using the rule of thumb that a knot decreases the strength of the cord by about 50%, that tells us the arms of a 7 mm bunny ears should be about 7KN, which should be fine.
For a long time, I thought that doing this with 6 mm standard cord would be a bad idea, because a single strand with a knot with only be rated around 4 kN.
However, I tested this with my buddy Ryan Jenks from howNOT.com, and guess what? 6 mm cord set up just like below broke around 15 kN! For me, that is #SuperGoodEnough. Here's a link to the video if you want to see the testing.
If you used some stronger cord with a Dyneema or Kevlar core like Sterling VT-X (15 kN), or Sterling Powercord (19 kN), then your bunny ears cordelette would be even stronger.

Below, the “bunny ears are used to clip three pieces of gear that are quite far apart. (And yes, anchor critics, the angle between the left and center strand is a little wider than is ideal . . .)
(and yes, there’s no “shelf” if you rig it this way, but the shelf is an optional part of an anchor. Want to tie in to the master point yourself and belay your second from the master point? No problem, shelf not needed.)

You can use it to connect three pieces of gear that are fairly close together, by clipping both ears to one piece. This gives you about the same “size” you’d have if you tied it in the traditional “one huge loop” style.

And, with some clever rigging, you can even connect two bolts that are side-by-side at chest level in a standard sport anchor configuration. In this case, the two ears are clipped to the left bolt, and the remaining strand is passed through the carabiner on the right bolt, doubling the cord and halving the distance.
This makes a tidy, compact anchor with two adjacent bolts. even with a huge long cordelette.

You know that Murphy's Law of using a cordelette, that the dang double fisherman’s knot always ends up right where you’re trying to tie the master point? That little hassle is gone with this system. (And yeah, I know you can mitigate that by clove hitching the knot next to your highest gear placement.)
On longer alpine climbs, bringing a cordelette gives you a ready-made source of material for rappel anchors. With the bunny ears rig, the small loop knots are usually fairly easy to untie, giving you more rap anchor material. When you tie a cordelette in a permanent fisherman’s knot, that sucker is going to get welded shut after a few climbs, and is just about impossible to untie unless you use needle nose pliers.
So . . . it works for anchors spread far, medium and close together, and easier to untie to cut up for rap anchors. What's not to like?
PS - Don't take my word for it, it's on the Petzl website.

image: https://www.petzl.com/CA/en/Sport/Installing-an-equalized-belay-station

Cordelettes - General Tips
Using a cordelette is standard practice for many climbers when building multi-piece gear anchors. But, there’s a few more tricks than the standard set up that can make your life easier. Learn a few here.
Many climbers consider the cordelette a standard piece of gear, as it lets you quickly connect two or more points of protection into a redundant, non-extending, and fairly well distributed anchor.
What are some advantages?
Fairly inexpensive (especially compared to a 240 cm Dyneema sling, which some climbers prefer over a standard cordelette)
You can cut it up and leave it for rappel anchors
You can rig it “bunny ears” style, to utilize anchors that are very far apart
Cordelette vary in terms of length and diameter, but a textbook cordelette is “7 and 7”: about 7 meters of 7mm cord, tied into one large loop with a well-dressed knot. Traditionally this was a double fisherman’s, but a more modern method is a simple flat overhand. It can be a little shorter or a little longer, and tied with 6 mm or even 5.5 mm high tech cord, but “7 and 7” is good starting point.
There are a LOT of crafty ways to use a cordelette - bunny ears, the “open” cordelette with no knot at all, overhand knot - but we’ll cover those in detail on other tips. For today, let's look at the textbook rigging, tied in one large loop.
A garden variety cordelette.
Note the striking resemblance to the Flying Spaghetti Monster. =^)

Here’s a few Crafty Rope Tricks and general cordelette tips that you probably won’t find in the textbook.
1 - The length and diameter can depend on your climbing preferences
Climb on snow a lot? Consider a 6 mm 14-15 foot cordelette. More a rock person? Maybe a 7 mm 20 foot cord is a better choice. Forces are probably lower on snow, and you can put protection wherever you want it. Forces on rock can be higher, and protection might be farther apart. Read more at this tip.
2 - A trick for close placements
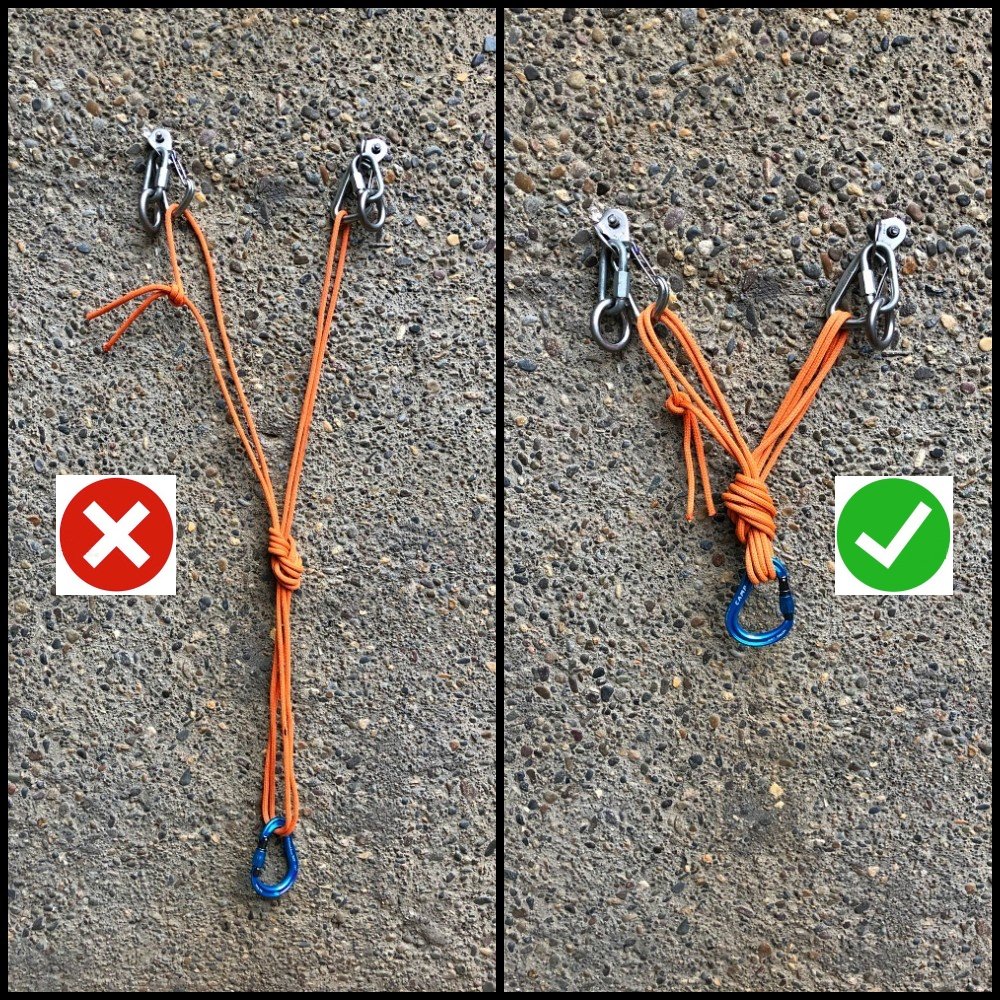
If you’re using two gear placements close together, like a bolted sport anchor, your cordelette in normal configuration will probably be too long, resulting in a master point that hangs too low. (A good rule of thumb in anchor building is that the anchor master point should always be at waist level or higher, ideally around your chest.)
Here’s one of several ways to handle the situation: rather than the standard method of clipping the cordelette into the carabiners, instead pass one or even two loops of the cord through the carabiner, and then back to the master point. This doubles the cord in one or more of the legs and raises your master point, resulting in a more compact and easy-to-manage anchor.
Left: Standard method, too long, belay at your ankles. (There's nothing actually unsafe about this, just awkward and inconvenient.)
Right: double the strands through the carabiner, moves the master point nice and high.
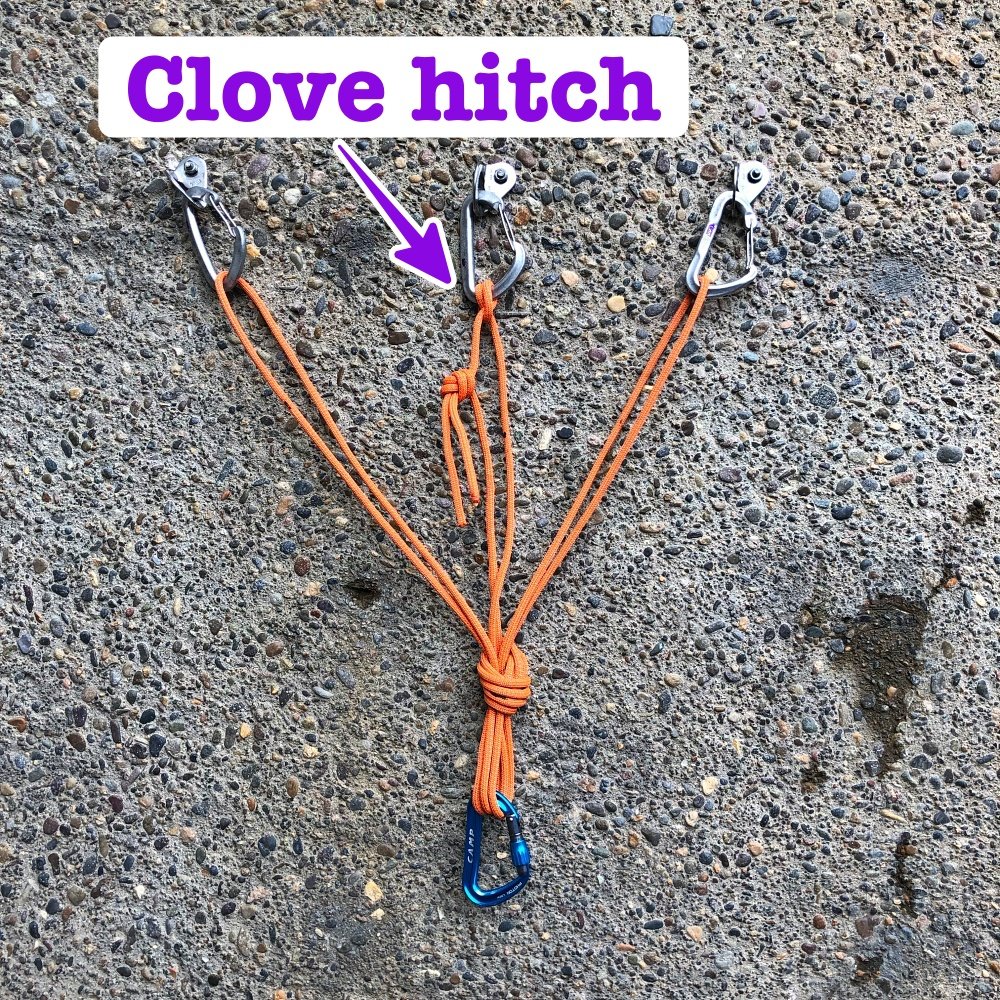
3 - Clove hitch the knot to the highest piece
Murphy’s Law of cordelettes: the darn double fisherman’s knot always ends up in the wrong place! Eliminate this problem by clove hitching the cord next to the knot next to your highest piece of gear. This keeps the joining knot fixed next to the protection and out of the way of your master point.
4 - Shorten it a bit
Most of the time your cordelette is going to feel either too short or too long. If it’s too short, try to add a separate sling to the piece of gear that’s farthest away.
If it’s too long, rather than clipping the cordelette loop to the gear, instead pass the loop through one of the the carabiners. This makes four strands of cord coming off that piece of gear rather then two, which will raise your anchor master point. Remember, you ideally want to master point to be about chest level, and not below your waist if you can avoid it.
Right side strand is passed through the carabiner, not clipped to it.
5 - Try to keep all strands about the same length.
This means that if one piece of gear is much higher than the others, try to add a separate runner to the top piece to bring it more level with the other placements. If you build a cordelette anchor with legs of very different lengths, a majority of force is going to go to the shortest leg, because that’s stretching less than the other two. If you have to do this, try to be sure that the gear you have on that short leg is as solid as possible.
6 - Anticipate the direction of pull and “aim” the cordelette at this point.
When belaying a second, the direction of force will usually be toward the last gear placement you made on lead. Try to equalize the anchor as best as you can by pointing it at this direction.
7 - Tie a figure 8 at the master point if you have enough cord to do it
Many people tie an overhand knot at the master point, but a figure 8 is better, if you have the rope for it. Reason? The figure 8 absorbs more fall force than an overhand, and thus transmits less of that force to the gear. It's also easier to untie.
8 - Clip the belay carabiner into the cord BEFORE you tie the master point knot.
The carabiner gives you a sort of handle and keeps the cord loops tidy when you tie the knot.

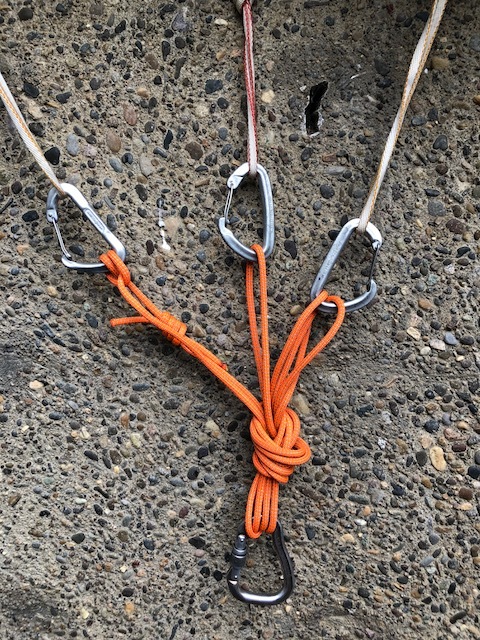
9 - For a monolith like a tree or a rock pillar, use both strands on one side for the shelf.
In the photo below, if you clipped the shelf is shown on the left, you have a 50% chance of clipping the same strand twice. Most all the time this is okay, but it's technically not redundant. It's better practice to clip as shown on the right: clipping the carabiner between both strands on ONE side or the left, or the other. This ensures that you are capturing both strands, maintaining redundancy.
Note this is the opposite of what you would do if each side of the cordelette went to a multi-piece anchor, so it might take a minute to get your head around this. =^)


Securing yourself near a cliff top
Setting up a top rope anchor from above can place you dangerously close to the cliff edge. Here’s a simple and fast way to safeguard yourself whenever you’re working close to a drop off.

When setting up a toprope or rappel anchor on a clifftop, a good rule of thumb: secure yourself if you’re within 2 meters of the edge.
This distance may be greater if the terrain slopes toward the void, there’s loose gravel/stones underfoot, the rock is wet, or other factors.
A fatal accident happened at Horsethief Butte Washington in 2009, apparently because climbers were setting top rope anchors in an exposed area without an adequate backup.
Let’s learn from this tragedy and never let it happen again.
There are various ways to secure yourself. One method that uses a minimum of gear is to use your climbing rope.
First, locate or build a secure anchor well back from the cliff edge. This anchor can be a stout boulder or rock spike, tree, or a constructed gear anchor.
Tie one end of your climbing rope to this anchor.
Tie a friction hitch (prusik, klemheist, or autoblock) to the fixed line, and clip the friction hitch to your belay loop with a locking carabiner. (You can use a Grigri for this, but they can slide under a mild load, so I prefer a friction hitch.)
Walk to about 2 meters from the cliff edge, sliding the friction hitch along the rope as you walk. Then, pull up about 3 meters of slack rope, tie a figure eight or overhand on a bight, and clip this with a locking carabiner to your belay loop. The friction knot allows you to walk out to an exposed area under a self belay. The bight knot backup is there in case the friction hitch fails in any way. With this simple rig, you can work at the edge of a cliff fully protected from falling.
If you’re building a toprope anchor, after the anchor is built, simply pass the free end of your fixed safety line through the master point carabiner, and drop it to the ground. Then walk away from the cliff edge (still attached to your safety line) to a secure area, untie the end of the fixed rope, and toss it to the ground. The rope should be through your anchor and both ends should be on the ground, ready to climb.
What about a Grigri?
A Grigri can work, but it can start to creep along the rope if you don't keep constant weight on it. If you have to actually rappel to go over an edge to access the anchors, it can be a good choice. If I'm staying more or less at the top, I prefer a friction hitch, as it’s more reliable. Try both and see what you prefer.
Here's a short video I made showing this method, and why a Grigri sometimes doesn't work so well.
Here's a nice Instagram video from IFMGA Certified Guide Karsten Delap showing the whole process, using the actual climbing rope and a Grigri to access anchors below the edge.
A report of the Horsethief Butte accident is below.
From The Columbian newspaper:
Deaths of rock climbers in Gorge blamed on error
Tuesday, May 26 2009
BY JOHN BRANTON
COLUMBIAN STAFF WRITER
A state investigation of a rock-climbing accident that claimed the life of a Washougal man and his sister-in-law has determined they fell due to errors in placing metal stoppers in cracks and attaching them to their webbing.
The early afternoon fall on April 5 killed Tony “T.C.” Silva of Washougal and Laura Dyal-Silva of Oregon during a family outing at Horsethief Butte, in Columbia Hills State Park in Klickitat County.
Tony Silva was a popular and well-respected detective with the Gresham, Ore., Police Department who was known for his advanced computer skills and helping other officers.
An investigation revealed that the deaths were accidental and not caused by equipment failure, Lt. Julie Myer of the Washington State Patrol, based in Olympia, said Tuesday.
For such a climb, three wedgelike metal stoppers, wider on top and narrower on bottom, typically would be placed in cracks, Myer said. The climbers would fasten their webbing to cables on the stoppers.
Myer said Dyal-Silva had more training than Tony Silva, who was attempting to lodge the three stoppers.
Tony Silva had successfully placed one stopper and attached it to the climbers’ webbing.
The second stopper had been placed in another crack, but wasn’t attached to the webbing.
The fact that the webbing was all one color, gray, may have caused some confusion about whether the second stopper was attached to it, Myer said.
Tony Silva is believed to have been working on placing the third stopper when something happened, perhaps a slip. At least one witness said Tony Silva fell first, then Dyal-Silva, who was attached to the system with him.
Their webbing was attached to only one stopper, Myer said.
“We know he was connected to one stopper that failed when all their weight got onto it,” Myer said.
They fell about 42 feet.
Dyal-Silva’s husband, Bobby Silva, had been on top of the cliff but went down to get the families’ children out of the sun, Myer said.
Rock climbing takes a lot of training said Myer, herself a climber.
“You have to constantly practice to retain that skill level.”

Cordelettes - what length and diameter?
Cordelettes - If you want to use one, the first choice is diameter and length. There are some standards, but which one you pick might depend on what kind of climbing you’re mostly doing. (If you climb a lot on snow and rock, you might want to get one for each.)
If you choose to carry a cordelette, the first questions are: what diameter, and how long?
For snow climbing or glacier travel, consider 4 meters of 6 mm cord.
For rock climbing, consider 5 to 7 meters of 7 mm cord.
6 mm cord is dramatically less strong than 7 mm. But, on snow or lower angle alpine ice, you can build anchors usually pretty much wherever you want to, and usually the impact of a fall is going to be fairly low. Because of this, you can probably use a shorter, smaller diameter cord.
On rock, it’s the opposite. You’re going to have potentially higher impacts on the anchor, and your placements have to align with what the rock offers you and the gear you have left, which means they may be farther apart. Both of these point to using a longer, larger diameter cord.
Cord strength (a kilonewton is a metric unit of force, equal to about 220 pounds)
5mm - 5.5 kN
6mm - 7.5 Kn
7mm - 13 kN
Look at that jump in strength going from 6mm to 7mm! For me, that’s a pretty compelling reason to use 7 mm cord for rock climbing. But hey, don't take my word for it, keep on reading for more expert opinion.
Try tying it “bunny ears” style, with a small figure 8 or overhand loop in each end, rather than the standard configuration of one big loop. Because the bunny ears style gives you a wider reach, you may find you can get away with a shorter length cordelette. But try climbing on the slightly longer cord for a while and see what you like. (You can always cut off a meter if you think it’s too long, but you definitely can’t add one back on.)
Expert climber Steph Davis address the cord diameter issue on her blog, by consult with an expert from Mammut. He says to always use 7 mm cord. (Bold text below is mine,)
From: https://stephdavis.co/blog/cordelettes-for-climbing/
“Although some climbers may use cord thinner than 7mm for constructing belay anchors, it is important to note just how much stronger the slings and 7mm cord are in comparison, especially when you consider that these are often weakened by knotting them and by concentrated wear at the knots.
We definitely do not advise people to use 5 and 6mm cord for anchor construction, and if climbers choose to do so they should be acutely aware that they are putting themselves at extra risk by doing so and take any necessary precautions (frequent wear-checks, being extra conservative in deciding what is worn and discarding it, always placing protection specifically to protect the belay from high impact, using a dynamic belay device and techniques, terrain and belay location choices, etc).
A calculated risk may be acceptable to some people if it is truly calculated, but done out of ignorance or by guesswork it is asking for trouble. Because most people aren’t willing or able to objectively test these out for themselves to see what their true level of safety (or lack thereof) is, if a nylon cord is used I’d strongly recommend using 7mm for anchor construction, and if the weight and bulk is a significant problem using a Contact sling with a 22kn breaking strength, remembering to tie into the anchor with the rope.”
Dave Furman, Hardgoods Category Manager, Mammut Sports Group, USA and Canada

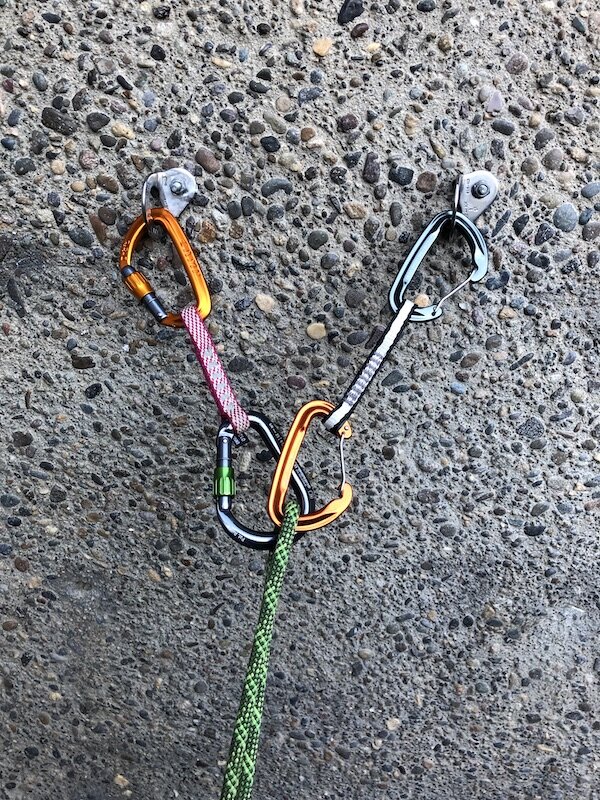
Locking carabiners for sport anchor quickdraws
A majority of sport climbers are fine with using two standard quickdraws for their anchor. Most of the time, that's probably cool, but for instructional settings or your own peace of mind, you can go one step further and use lockers on everything.
A standard single pitch anchor is for the leader to simply clip two standard quick draws to the bolts (opposite and opposed at the master point) and lower off.
Gates on the quick draws are facing away from each other, or outward. This makes the bottom gates opposite and opposed and also mostly keeps the bottom gates from potentially messing with each other.
Nothing wrong with this setup. The fact that it is been done literally millions of times without incident should probably tell you that it's an acceptable practice.

Having said that, many people prefer at least one designated “locker draw” as part of the anchor.
If you’re in an instructional setting, with many people top roping off the same unattended anchor all day, without a more experienced person going up regularly to check things, locking carabiners can add great peace of mind.
Because it's a top rope, you’re not right there next to the anchor to see if any carabiners are getting cross loaded, gates getting unscrewed, or other strangeness that could lead to an anchor being compromised.
(Sidenote: there are lots of other handy uses for having a locker draw, you can learn them here.)
Personally, I pretty much always use one locker draw on top rope anchors.
This is an easy and inexpensive set up. You probably already have a few extra locking carabiners around, and spare “dogbone” draws are only $5-$6 apiece.
If you’re inclined to be a little more cautious, using lockers on your sport anchors can be a little extra insurance, with low cost and high confidence factor. Look at it this way: Other climbers might call you a little paranoid, but there's really not much downside to doing this.
“I don't want to climb with that guy, he's too safety conscious.” That's the kind of criticism many people don't mind hearing. =^)
As I like to say here at Alpinesavvy, it's YOU who’s accountable for your level of comfort and acceptable risk. It doesn't get to be dictated by anyone else, regardless of their experience or credentials.
Now, we have a locker draw in place of one of the regular quickdraws. Definitely a bit more security here. (The angle of the rope running through the carabiners will add a bit of friction, but it's still acceptable.)
Here’s an (overly cautious?) alternative. Similar setup, this time with two locker draws. Long dogbones, round stock carabiners at the bottom for a smooth lower, and super secure.
There's no way to objectively prove this, but personally I don't think that extra locker draw offers much tangible improvement and safety. But hey if it gives you a warm fuzzy feeling and you want to do it, go right ahead.


“Wrap 3, Pull 2” - about the strongest anchor possible
Need to make an absolutely bombproof anchor around a tree, for a rappel or maybe to pull your car out of a ditch? Try this.
The "wrap 3, pull 2" has long a preferred anchor method with rescue teams for rigging on trees or similar round objects. What are some benefits to this anchor?
Super strong, because the load is distributed among many strands of webbing instead of one or two. (This anchor tests around 35-40 kN.)
Load distributing, to a certain extent
Pretty much zero force is applied to the knot, which otherwise would be the weak point of the system
But, it has a few downsides:
Require a LOT of 1 inch webbing
Can take a while to tie, if you don't practice it much
Is not redundant (when tied in the typical way)
Strengthwise, it’s overkill for most recreational climbing situations. (If your carabiner is rated around 20 kN, you shouldn't need an anchor that can hold 40.)
But, if you are a rescue person, or want to use it in a high load situation like river rescue or maybe pulling your car out of the ditch, it can be handy to learn.
You need is a long (10+ feet) length of 1 inch webbing.
Note that you can’t make this anchor with a sling that's sewn into a loop. You have to have a single long piece of webbing.
To make the “wrap 3 pull 2” anchor:
Make three wraps with the webbing around a large solid object. This is probably a tree.
Tie the free ends in an overhand knot (or water knot) with at least 3 inches of tail.
Now, pull / wiggle the two strands of the webbing that don’t have the knot in them, leaving the actual knot against the tree.
Clip your master point carabiner to these two strands extending away from the tree.
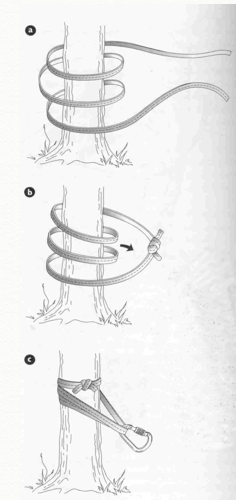
Diagram: Freedom of the Hills, 7th edition, The Mountaineers Press

Slinging a boulder for an anchor - two cautions
When you put a sling around a boulder for an anchor, the angles can get wide very easily, magnifying the load.
A common anchor on alpine routes is the simple sling around a boulder or rock spike. Even though the boulder itself may be super solid, there are some things to watch for when using this method.
1) Check the boulder carefully all the way around for any sharp edges. A new sling that can hold 20kN can cut very easily under tension combined with the sharp edge of rock or a crystal.
2) A short sling around a large boulder may make a wide angle in the sling that put a larger-than-ideal load on the sling material. (An angle of 90 degrees or less is the rule of thumb, and 60 degrees or less is ideal). Solution: Use a longer sling to make the anchor angle smaller. The diagram below shows how a small change in sling angle and greatly increase the forces on your anchor.

The diagram is from the excellent book "The Complete Guide to Climbing and Mountaineering" by Pete Hill.