
Two ways to follow a runout traverse

Premium Members can read the entire article here:
Note - This post discusses ADVANCED techniques and methods used in vertical rope work. If you do them wrong, you could die. Always practice vertical rope techniques under the supervision of a qualified instructor, and ideally in a progression: from flat ground, to vertical close to the ground before you ever try them in a real climbing situation.
This tip and the diagrams comes from Vdiff Climbing. Vdiff offers high-quality online climbing courses with lots of tips and clever drawings like this, recommended! Diagrams are shared here with permission.
So, this is leading a traverse, not following one, but the potential problem is about the same . . .
Follow Caiocomix for more great comix like this!
image: caiocomix
Hopefully, you won't find yourself seconding a long, tricky traverse very often. If you do, this #CraftyRopeTrick could reduce your risk.
If you take a fall on a very runout or unprotectable traverse, you'll probably have a very scary pendulum fall. This might be just as bad, or maybe even worse, for the follower rather than the leader.
To make things happier for the follower, you could use one of two techniques:
lower out
back roping
Let's have a look at each one.
Method 1 - the lower out
This is typically used by big wall climbers ascending a fixed rope; this is a modification of that technique. If you only have one rope, you'll need to do the lower out.
To do this, you need a lot of extra rope - at least three times the distance between the last piece of gear and your partner. You do NOT want to run out of rope halfway through this maneuver, so definitely test it in a controlled environment before you try it for real!
Here's how to set up a lower out.
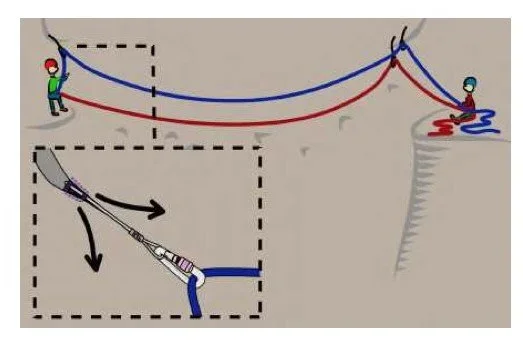
1 - When you reach the last gear placement the leader made, clip to it with a tether. Be sure this piece is solid and that it can take a downward and sideways pull. If it’s questionable, back it up and try to equalize it with another piece. (You’ll leave this gear behind, so give it a kiss goodbye. =^)
2 - Attach a Grigri to the rope as shown in the close-up.
By using a Grigri to lower yourself out, this can dramatically reduce the consequences of a fall, if your lower out price were to fail. If that happened, the Grigri should lock, stopping you from falling to the end of the rope. You will still have a pendulum swing, but much less if you lowered off simply being tied into the rope end.
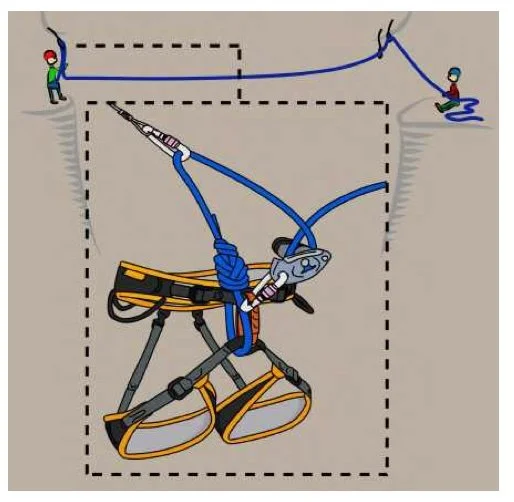
image: Vdiff Climbing
3 - Tell your partner that you’re ready to lower. Unclip your tether, and weight your Grigri. As your partner feeds rope to you, you pull the handle on your Grigri and slowly lower yourself out from the protection.
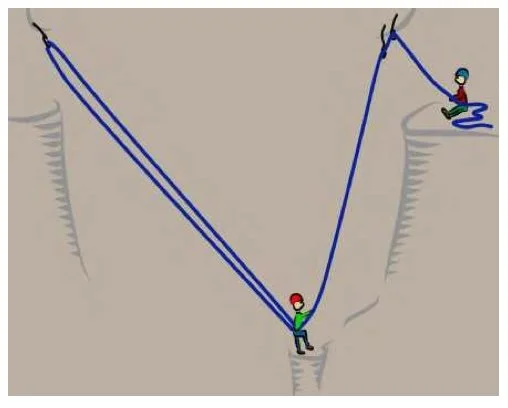
image: Vdiff Climbing
You will come to a stop pretty much underneath the last piece of gear that the leader placed. Tie a backup knot on the other side of your Grigri and clip it to your belay loop.
Untie your original tie in knot, and be SURE you untied the figure 8! Pull the rope through the protection as shown.
If the terrain above you is climbable, climb up to your leader on belay . If it's not, have them fix the rope and you ascend the fixed rope. Here's one way to do that.
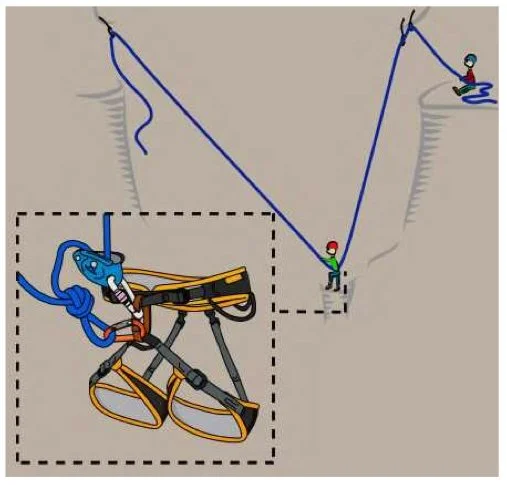
image: Vdiff Climbing
Method 2 - back roping
You can use the backroping method if you have two ropes.
You will need at least twice as much rope as the distance between the leader and the second. Be sure you have this extra rope available before you ever think about rigging this.
Here's how to set up a back rope.
1 - The second needs to be tied to both ropes. The second clips one of the ropes to a solid piece of gear, which can take a downward and sideways pull. (You’ll leave this gear behind, so give it a kiss goodbye. =^)
What are the additional two steps of correctly rigging a back rope?
What advantaged does this have over the lower out method described above?
