
Alpine Tips

Why bother learning advanced techniques?
A good approach when learning climbing: have a small selection of standard techniques that you know 110%, that you use pretty much all the time. However, when your experience and skill increase, it can be good to have more tools in the toolbox in the rare event you might need them. Here's a great quote from Andy Kirkpatrick on this.
“I already know how to build an anchor, set up a rappel, and belay in the normal way. Why should I learn . . .
Five different ways to set up a top rope anchor?
Rappel with a carabiner brake?
Belay from above with a Munter hitch?
Ascend a rope with a prusik tied with a shoelace?”
British expedition and big wall climbing expert Andy Kirkpatrick has an answer, from his outstanding book, “Down”:


Rope management - clip knots to a big carabiner
Here's a quick and simple way to manage the rope at the belay - tie slip knots as the rope comes in, and clip the loops to a largemouth carabiner. (Works even better on a big wall.)
(I first read this tip in the British climbing magazine “High” about 15 years ago, and I believe the article was written by Andy Kirkpatrick, so I‘ll give him credit here for the idea.)
Here's a link to a newer article on Andy's website that covers this in more detail.
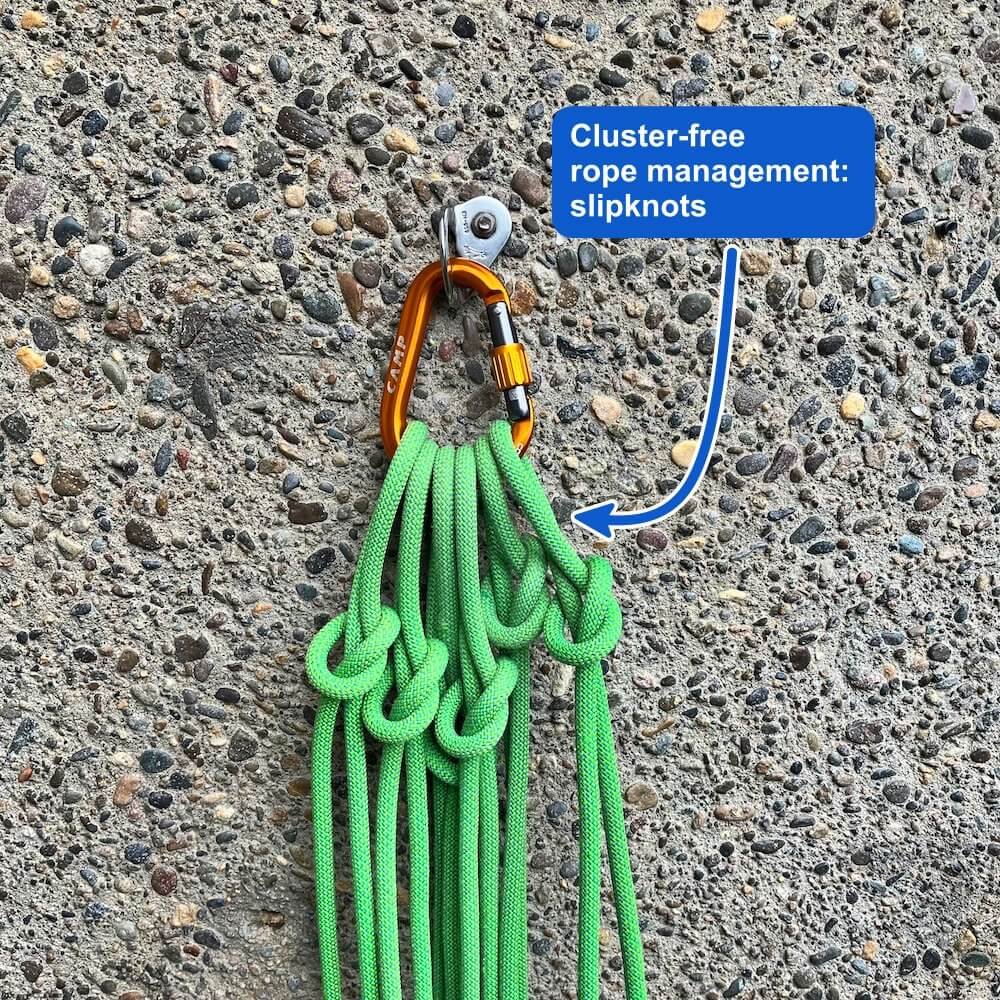
Good rope management on a multi pitch climb is one of the keys to efficient belay transitions. There are various approaches to keeping your ropes tidy. Any system that keeps the rope out from under foot and from snagging on rocks, roots, cracks, and is easy to feed out snag-free on the next pitch, is a good choice.
What are some common methods?
If you're standing on a nice big ledge, lucky you, just make a “pancake pile”.
At a steeper stance, you can lay butterfly coils across your lap (lap coiling). I’m not a fan, as having 60 m of rope hanging right off of your tie in point is a hassle.
You can make coils and clip them into a sling. This can work pretty well, but unless you make tidy coils, you can get a royal mess can you try to feed out the rope.
Here’s an easy and elegant alternative for multi pitch rope management, that works for swinging leads or block leading.
Take a wide mouth locking carabiner, such as the CAMP Core Lock (above) and clip it somewhere to the anchor.
As the second climbs up and the belayer takes in slack, the belayer ties a slip knot every 10 meters or so and clips the loop to the big carabiner. Keep these loops loose so they are easy to untie; don’t snug them down or worry about dressing them very well. For a 60 meter rope, this will give you at most six knots in the carabiner, with the rope loops hanging about 5 meters or so down from the belay (hopefully not getting in the way of your partner as they get close to you). Do NOT lock the carabiner gate.
If the belayer is using a Grigri or plaquette style belay device guide mode, this is even easier.
When the second arrives at the anchor, the rope is in tidy loops and ready for the second to lead out. If you’re swapping leads, you’re all set to go, because the last loop to be clipped should be the first loop for the new leader to head out.
To belay the new leader, the belayer simply unclips a loop, pulls with one hand remove the slipknot, and the rope is ready to feed.
If you want to make your loops shorter, simply add a second large carabiner to the anchor and continue clipping slipknot loops to that after the first carabiner is full.
If you can, start with slightly larger loops, and make subsequent loops slightly smaller, so each loop will pull up and feed cleanly without getting tangled with the other ones.
If you're leading in blocks (with the same person leading several pitches in a row) simply rotate the carabiner clockwise 180 degrees, so the wide part is clipped to the bolt. Now the last loop that you clipped is the first one that you can unclip, which lets you block lead smoothly. (That's probably a little confusing; try it once and you'll figure it out.)
Sidenote: I received a surprising amount of hate mail when I posted this on Instagram. “This is a crazy system, I can't imagine trying to unclip a knot while I'm lead belaying, have you ever actually even tried this, blah blah blah . . .”
Idea: If you find it difficult to unclip a loosely tied slip knot with one hand and untie it, you should probably work on your skills. Yes, having a Grigri or similar assisted braking device can give you a momentary backup if you do need two hands for a second to untie the knot.
Plus, think about it this way: if your leader is moving fast, that probably means the climbing is easy for them, and they should be ready to take a momentary break of a few seconds about every 10 meters, so you can untie a knot. Conversely, if your leader is moving slowly, then the climbing is difficult. But, because they’re moving slowly, that easily gives you time to reach down and untie the knot. Either way, the system works.
The purpose of Alpinesavvy is to give ideas and information, not advice. I'm certainly not saying everybody has to use the system, but don't knock it until you try it.
Finally, keep in mind the source, Andy Kirkpatrick - he knows his stuff.
And, speaking of Andy, let's look at a couple of alternatives from his excellent website.
You don't actually even need a carabiner at all. You can tie off the rope onto the arms of the cord that makes up your anchor.

Image: https://www.andy-kirkpatrick.com/blog/view/rope-belay-wrangling
Or, you can make a sort of daisy chain. (I have not tried this variation, but it looks like it should work.)

Image: https://www.andy-kirkpatrick.com/blog/view/rope-belay-wrangling
Here's a nice video clip from Petzl via Facebook that shows a similar system. (Sorry I can’t embed this video on my webpage, you need to click the link to see it.)
This works slightly differently for big wall climbing.
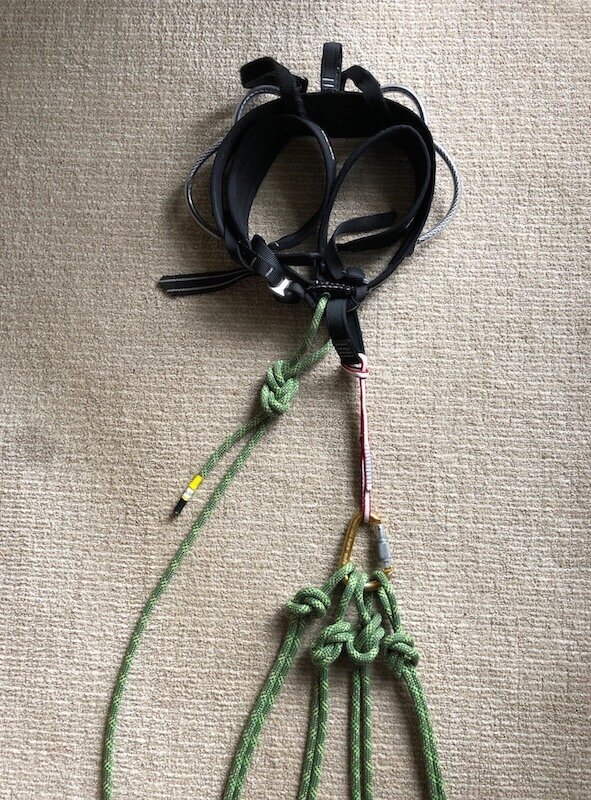
As the second ascends the fixed rope and cleans the gear, they have a large carabiner hanging from a short sling (usually about 30 cm) from their belay loop. The short sling is somewhat optional, but it declusters the front of your harness a bit and makes it slightly easier to clip in the knots. The second ties a backup knot every 10 meters or so and clips it to the carabiner.
This backup knot system is pretty standard practice in big walling, as it does two main things: 1) Protects the cleaner from a huge fall in the event their ascenders become detached from the rope, and 2) Helps prevent the rope from blowing / swinging sideways and getting hung up somewhere where you don't want it to be.
The one downside to this technique: as the cleaner nears the top of the pitch, most of the weight of the rope hanging off of their harness instead of having it hanging weightlessly beneath them. If there isn't a knot in the end of the rope that might get snagged, and if the pitch goes pretty much straight up, and if there is no wind, it might be a better call to not tie the backup knots and just let the rope hang free.
The trick is when you get to the top, you keep all of the loops tied into the carabiner, and transfer that onto the anchor. Ta dah, instant rope management for the lead rope, everything is already tied up in short 5 meter long loops, ready to belay the leader. No rope bag needed. As mentioned above, if you’re leading in blocks, you unclip the loops for a moment and reverse them, so the correct knot is on top for whoever is leading the next pitch.
Another tip for a big wall climbing: this same system of rope management can work for the haul rope also. As you pull up your piggage, generating slack in the haul rope, simply tie off a slipknot loop every 10 meters or so to keep things tidy. (But a dedicated rope bag usually is best.)
For big wall climbing, this is how the harness of the second would look when cleaning and tying the back up knots.

Team of 3 in moderate terrain? Try end roping
If you have a team of three on a moderate climb that still requires a rope, end roping can be a good strategy that balances speed and relative safety.
Note - This post discusses techniques and methods used in vertical rope work. If you do them wrong, you could die. Always practice vertical rope techniques under the supervision of a qualified instructor, and ideally in a progression: from flat ground, to staircase, to vertical close to the ground before you ever try them in a real climbing situation.
Scenario: You have a team of three climbers and one rope. You’re in moderate technical terrain - low fifth class rock with good climbers, 4th class with occasional “steps” of harder moves, a open big slab, or fairly steep snow. The terrain falls lies that in-between spot, ranging from “No prob, I can solo this!”, to, “Hmm, I think I want a rope!”
This might be a good time for end roping.
Look! It’s our friend Sticky! She’s back, and climbing with her 2 pals. Hi Sticky!
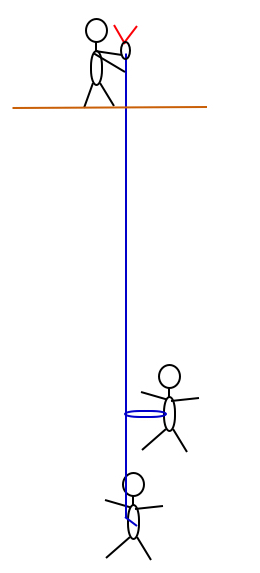
This is a technique often suited to alpine climbing, where you may have many pitches of easy to moderate climbing, and speed can become more important. It’s best not to use it on much anything higher than mid 5th class.
The leader heads out as usual, but the two followers tie in close to each other near the end of the rope. (End roping, get it?) The leader then belays up both followers at once.
The “end” follower ties in to the rope end as usual with a rewoven figure 8 knot. The “middle” follower, about 4-5 meters away from the end person, ties in with one of several ways, more below.
With the middle person on a large bight of rope, it gives them some freedom of movement. If the end person falls, the middle person may not be pulled off because of this loop. And, it means the followers do not have to be moving at the exact same rate.
A few things to note:
You need to use a single rated rope, not a skinny twin or double.
This is ideally for rock and maybe steeper snow. For ice climbing, you always want your seconds on separate ropes and end roping is not a good choice.
The anchor needs to be especially stout, because it could potentially be loaded with the weight of two people with a little slack in the rope.
If the last person falls, it’s possible they will pull off the middle person. Because of this, it’s best if the strongest climber of the two followers is on the end of the rope.
This is really only a safe system up to low fifth class for most people. For more difficult terrain, you probably need a different rope system.
If you're in an area where the rope is going to be potentially loaded over sharp rock edges, keep in mind that you could be putting a double load on the rope if the seconds fall together.
This works best if the route is pretty much straight up. If you start any kind of a traverse, a slip by either of the two followers will probably result in a fall for both of them.
Communication between the belayer and the followers needs to be clear and obvious, in case something goes wrong. If the route is long, it goes out of sight around the corner, it's a windy day and it's hard to hear each other, or all of the above, this may not be the best technique.
The large loop connecting the middle person to the rope is a bit of a trade off. The loop can give you more freedom of movement, but it also can also be a tripping hazard. Use your judgment here. A smaller loop (1-2 feet) might be a better choice depending on terrain, skill of the climbers, if you have crampons or not, etc.
Use some common sense. If the consequences of a fall are low, meaning the terrain is a slab or snow or not very blocky, and it goes pretty much straight up, and your climbing team is skilled enough to mean a very low chance of a fall, this technique will probably work fine.
Anything more advanced or difficult than this, you're probably better off using a two rope system and bringing up each climber on a separate rope.
There are a few ways for the middle person to connect to the rope. Here’s one that's pretty straightforward - tying in directly to your harness with the rope. There are a few ways to do it. This example uses a bowline knot.
1 - Tie an overhand knot, leaving a large bight of rope about 5 feet long.

2 - Pass this bight through the two tie in points on your harness, and tie a bowline knot. (Yes, you use both strands of rope, and this might look a little funky if you've never done it before. It's the exact motions as tying a bowline with one strand of rope.)

3 - Finally, secure the tail of the bowline with a locking carabiner to the loop through your harness.

Another option is to clip this bight of rope to the middle’s belay loop with two carabiners, opposite and opposed, with at least one being a locker. (If you are feeling a bit bold, one good locker with the carabiner properly aligned with no chance of cross loading is probably okay too. It's really up to your personal level of acceptable risk. Me, I like two carabiners.)
Cross loading the carabiners is the main thing we're trying to avoid here. There are several ways to avoid this:
Use the belay loop rather than the harness tie in points, as this minimizes tri-axial carabiner loading.
You can tie a clove hitch in the bight loop and crank that down on your carabiners.
You could use a nifty new-school locking belay carabiner, like the Black Diamond Gridlock, that has a clip that captures the carabiner so it can’t be cross loaded.
Basic set up: overhand on a bight with 2 opposite and opposed carabiners.

Add a clove hitch and cinch it down to hold the carabiners in place.

Or, go with the sweet Black Diamond gridlock or similar carabiner designed to resist cross loading.

image: blackdiamondequipment.com

The Kiwi coil – shorten the rope on varied terrain
When your rope team is transitioning between glacier travel, pitched climbing and easy terrain, you probably don’t want the rope at full length, especially for the easy parts. Solution: the Kiwi coil.

Image: https://youtu.be/PD6jYQobGXU
Taking in coils of rope to shorten the distance between you and others on your rope team, (aka the Kiwi Coil, apparently named after the New Zealand guides who invented it) is a very useful but often misunderstood and underutilized technique. Often, quickly shortening your rope, tying it off, and then walking just a few feet away from others on your rope team is faster, safer, and a more efficient way to move in alpine terrain than keeping your rope team stretched out.
Consider this scenario:
You and your two pals are on the Disappointment Cleaver route on Mt. Rainier.
From your high camp at Camp Muir, you first cross a glacier for about 15 minutes.
Then go up a rock/scree spur for about 20 minutes.
Then another 30 minute glacier crossing.
Then get on the rock/scree of the Cleaver for an hour or so, then back again on to glacial ice, . . . you get the picture.
Of course, you need to be roped up with proper distance between partners on the glacier. But when you get to the rock sections and don’t need a rope for safety, what you do? You have three choices: 1) completely untie and store the rope, 2) continue walking with 40 or so feet of rope between you, and 3) shorten the rope and tie it off.
Plans one and two both have drawbacks.
Completely untying, coiling and storing the rope can take a lot of time, if you need to do it repeatedly on a longer route.
Continuing to walk on easy terrain with 40 feet of rope stretched between you is a Big Hassle, as the rope will constantly get caught on small outcrops of rock or snow, and possibly cause rockfall on you or others.
A better technique is to take in coils of rope until you are just a few meters away from your partner, then securely tying the rope off. After a bit of practice, you’ll be able to do it in a minute or so without even stopping. When you again find yourself on terrain where you need a full rope length between you, dropping the coils and stretching out the rope takes just a few seconds.
Note: Tying off coils of rope like this may not be the best choice for glacier travel. It can work, but with an extra step: tying a bight knot in the rope heading to your partner and clipping that to your belay loop. This does a couple of things. 1) makes it easier to arrest a fall from your teammate without you being yanked onto your face, and makes it easier to transfer the load onto a rescue anchor, because you can easily unclip from the rope coils.
For glacier travel, a more common method is for the end climbers to take in about 30 feet / 10 meters of rope, clip into a fig 8 or butterfly loop, and then simply stash the extra rope in or on their packs.
While the technique is simple, it is rather hard to describe in words. (But I’ll try:)
Take in coils around your neck
Take a bight of rope about 1 meter long
Pass the bight through your tie in loop and the coiled rope loops
Tie off the bight with an overhand knot on the load strand of the rope
Cinch the knot tight against the coils
Clear as mud, right? Fortunately, here’s a great instructional video from the excellent American Mountain Guide Association (AMGA) video series, featuring IFMGA Certified Guide Emilie Drinkwater of Cloudsplitter Mountain Guides.

“Cheapskate locker” - use tape on a carabiner gate
Short on locking carabiners? Tape the gate closed to make a “cheapskate locker”.

Note: This is not standard climbing practice. Whenever possible, use a locking carabiner or two normal carabiners, opposite and opposed. This technique is for improv, emergency, and backup situations only.
Eventually you’ll find yourself in a climbing situation where you might need a secure carabiner setup, but you don’t have any more locking carabiners nor an extra regular carabiner to rig the “opposite and opposed” set up. When might this happen?
Building multiple rappel anchors with your own gear, where you may need to conserve your equipment and want to leave only a single carabiner behind at the anchor.
Building any kind of rappel anchor with your own gear; after all, you’re a proud and frugal dirtbag climber! Why leave behind a $20 locker when you could leave behind a $6 regular carabiner with a taped gate? Some people are comfortable rappelling from a single non-locking carabiner. I’m not.
Some kind of unusual, improvised situation (swift water rescue, backcountry scrambling with minimal gear, etc) when you may not have a locking carabiner.
Big wall climbing, where it seems like you're always short on lockers. Wall climbers have used this “tape the gate” trick for decades.
Provided you don’t need to open and close the carabiner, a simple solution is the “cheapskate locker”. Use a regular carabiner and tape the gate closed.
Cheapskate locker tips:
If you plan on removing the tape, or to make it easier for the next person who wants to, fold the tape end back over itself to leave a little “grab tab”.
Typically for most anchors, you have the gate down and facing out, aka “clip and flip”. But for a retreat rappel carabiner, you may want the gate “up and out” with the opening at the top, which means it's farther away from the rope. This may add a slight bit of extra security; if it gives you a warm fuzzy feeling, then go for it.
I've certainly heard from a few people on social media that this is a wacky and unsafe practice. Unusual, maybe. Unsafe, absolutely not.
Still skeptical? Read this article in Rock and Ice, written by IFMGA Guide Jeff Ward. He shares the crafty tip about pre-wrapping a bit of tape onto a carabiner so you're already set to make a cheapskate locker. This tip is especially clever, because you may not have a roll of athletic tape on a long alpine route. Prep a few carabiners ahead of time if you think you might need them, and you 're ready to go. See photos below.
Jeff writes: “I also like to have a few carabiners with tape wound around the spine. Once the anchor is rigged for the rappel, you can unwind some of the tape to “lock” the carabiner gates closed. Taped biners are more useful than quick links since you can also use them for climbing, and they are less likely to be stolen by the next team. Having a metal point on the anchor prevents the ropes from sawing and damaging it, and makes the ropes easier to pull.”
Here’s a second article from Climbing magazine:
“Instead of leaving an expensive locker or two non-lockers, put a few wraps of climbing tape around the gate and nose of the non-locking carabiner, so that it acts like the sleeve of a locking carabiner. By no means does this replace a locking carabiner, but if you’re faced with having minimal gear to get down and want to add some safety to rappelling off one non-locking carabiner, this will do the trick.”
Julie Ellison, former Editor of Climbing magazine
There was an awful accident on El Capitan, when a haul bag somehow came loose and fell onto someone. Connecting the haul bag to the haul rope needs to be an absolutely bulletproof connection. This seems like a fine time to use a locker, and further secure it by wrapping that sucker with tape. I don't know all the details on this accident so I can't say for sure if a secure carabiner might've prevented the problem, but for everyday hauling, it can add some peace of mind.
Here's a photo from big wall ace Kevin DeWeese / @failfalling. Yep, that’s a portaledge hanging off of a single dodgy looking bolt/rivet, quite a spicy way to spend the night! Kevin backed that up with the taped gate carabiner and a butterfly on the blue rope.

1 - Take one of your least favorite carabiners. Tear off about 4 inches/12 cm of athletic tape. (I like hockey tape.)

2 - Wrap the tape around the spine of the carabiner. Don't wrap it too tight, it'll be harder to get off.

3 - When you need a cheapskate locker, unwrap the tape and rewrap it around the gate opening. To make it easy for you or someone else to remove, fold the last bit of tape back onto itself, as shown.
