
Alpine Tips

Lowering Out - Consider using a designated cord
Lowering out can be a bit nerve racking for the second, especially if you haven’t done it very often. Here’s a technique might speed up and simplify the process - use a designated lower out cord rather than the climbing rope.
This tip is from big wall expert Mark Hudon. See some more tips and El Cap Route photos at his website.

Monkey Face, Smith Rock Oregon, image credit: Wayne Wallace
Many aid routes have long bolt ladders, such as the first couple of pitches of Leaning Tower in Yosemite and Monkey Face (shown above) at Smith Rock Oregon.
If the bolts go pretty much straight up, cleaning them is easy. But if the bolts traverse, and/or the rock becomes overhanging, and/or (especially) if the leader decides to backclean, cleaning becomes more difficult. When you reach the offending bolt/protection you’ll know it, because of the sharp angle of the rope as it shoots off to one side.
As the second, you may curse your backcleaning leader with enthusiasm: You’ll be stuck at the bolt, unable to clean the quickdraw because of the rope tension pulling off to one side.
In this situation, the standard technique is to remove the top ascender/aider, reclip it above the piece, and weight that aider. In theory, this removes the tension from the rope below, letting you clean the gear. (It can be a LOT easier to do this if you have a Grigri, recommended gear for cleaning traverses.)
This works fine on moderate traverses, but not so well if it's more extreme. When the next clipped piece is 4+ feet to the right, because you’ll be left hanging in space, unable to reach the piece you were trying to get out. More importantly, your lower aider will likely have been sucked into the quickdraw in such a way that you will be unable to get it out without cutting the quickdraw . . . Plus, unclipping your ascenders and re-clipping them to tensioned rope heading off sideways can be a little tricky and introduces the possibility you didn’t re-clip them correctly, which could be a Big Problem.
For a shorter lower outs, or for cleaning a roof or a traverse, consider this: use a designated short lower out cord.
Note that on a lower out, you leave the gear behind. So, it works best through a fixed point. If you're going to lower it through your own gear, better not go too far or you won't be able to swing back to clean it! (Just about every big wall climber makes this mistake at least once . . .)
Using a designated lower out cord like this can be especially helpful when climbing with folks relatively new to aid climbing, who may not have the more advanced following / cleaning skills.
The cord I like is a simply 5 or 6 mm cord, about 15 feet / 5 meters. This works perfectly for cleaning the bolts on Monkey Face as shown in the top photo, as well as roofs and traverses.
(Mark suggests using a longer length, about 40 feet / 13 meters for lower outs on big walls that are under about 20 feet. Much longer than this, you're probably better off using the climbing rope in the traditional manner. Check the topo, and bring a cord of the appropriate length for the lower outs that you anticipate.)
Keep the cord bundled up out of the way on your harness until you need it. If the second knows that the pitch they’ll be cleaning requires a lower out, they can tie a figure 8 on a bight with the cord through their belay loop before they leave the belay. You should be looking at the route topo and knowing that a move like this is coming up, right? If you see the leader doing a pendulum, or maybe even a couple of horizontal hook moves, you should anticipate having to do a lower out.
Here’s a much better way to clean a traversing bolt ladder.
Once at the lower point (which is some sort of permanently fixed gear, like cord/webbing, bolt with hanger, piton, stopper. etc), here’s what you do:
Tie your lower out cord to your belay loop.
Clip a spare carabiner to your belay loop.
Attach a fifi hook to your harness. Yes, usually you only use a fifi for leading, but in some cases like this, it's pretty handy for cleaning as well. Just keep it on your harness all the time. (I prefer girth hitching it through the top tie in point.)
Note: in the photos, tethers, aid ladders and the often-handy Grigri are omitted for clarity.
If there’s a mess of old tattered webbing at the lower point, cut away the junk with your knife and leave only one good piece. If you don't, there's a chance your lower out cord is going to get stuck in the tat when you try to pull it. This is more likely to happen when you use the standard method with the rope, which involves passing ad pulling a bight through the lower out point, but still, do people behind you a favor and cut away the junk. If you want to be even more courteous for the next team, add a quick link or your least favorite carabiner.
Pass the free end of your lowering cord through the lower out point.
Tie a munter hitch on the lowering cord, and clip it to the free carabiner on your belay loop.
Hoist on the free end to pull yourself close in to the lower out point, holding your weight on the munter hitch.
This takes the tension off the rope you’re ascending, which lets you unclip the lead rope and clean the carabiner the leader probably left there.
Slowly lower yourself out with the munter hitch. You will hopefully now be hanging directly below the piece of gear the leader placed after they did the pendulum. Hopefully it was not more than about 7 feet away, because you can only lower yourself half the distance of the length of your cord. If you're not quite in the fall line, be prepared for a little swing. (Yes, this will be exciting!) Let go of the munter hitch, and pull your lower out cord through the lower out point and back to your harness.
Here's the basic set up, using an untied / open cordelette that's about 5 meters long. (It can be much longer, this short length was easier for the photo.) Tie the rope to your belay loop.
For clarity, the following photos don’t have the normal gear you’d need cleaning on a big wall, such as the lead rope, ascenders, aiders, daisy chains, etc.


Using gear tethers for items outside your haul bag
On a big wall, not everything is going to fit into your haul bag. No worries! Use gear tethers to hang your extra stuff outside of your bag and keep it accessible.

image: from the outstanding book “higher education” by Andy Kirkpatrick, used with permission
Not everything is going to fit in your haul bag. And, there are some things you don't want to put in there! Typically, these items might be your portaledge, poop tube, gear bag, garbage sack, empty water bottles, day bag and maybe a gear bucket.
The Old School technique for dealing with extra items like this was to clip them underneath your haul bag. Even if you've never climbed a big wall, you can probably imagine what type of problems this creates. Every time you’d need to access your extra items, you'd have to finagle yourself underneath your haul bag, a major and unnecessary hassle.
Fortunately, there’s a Superior System - gear tethers. Rather than clipping your gear under the bag, you tie it with the tether attached to the top. This allows you to grab the gear tether, and simply pull up whatever you need.
A tether is simply a length of cord about 5 meters long. Typically the cord is 8 mm. (If you're attaching something heavy, 10 mm is a little easier on your tired wall hands.)
Tie a figure 8 on a bight in the middle and clip it with a locking carabiner to your main hauling carabiner. This gives you two tethers about 2.5 meters long each.
Get another 5 meters section of cord of a different color, and do the same thing. The color coding helps you remember which rope to pull.
And, as long as you’re buying 8 mm cord, you might as well get yourself another 15 feet to use as a docking tether for the actual haul bag, which we cover in this Tip. (Ideally the docking cord is a different color from the cords you use for gear tethers, to be sure you don’t accidently release the wrong one.)
Be sure the cords are long enough so whatever is attached to them hangs below your haul bag, otherwise it gets pinched between the bag and the rock.
Important: everything on a gear tether has to be on a locking carabiner. (Use a ”cheapskate locker” if you need to, a regular carabiner taped shut.)
Here's a fancy way to set it up, from big wall expert Skot’s Wall Gear.
Here, Skot is using a pair of rappel rings (gold) along with a combination swivel and locking carabiner (appears to be the Director Swivel Boss from DMM). This makes a more compact set up, with zero chance cross loading the rings.
Note that each bag has one docking cord, and at least two gear tethers.

An excellent use of gear tethers. Image: Mark Hudon

image: https://hudonpanos.com/Wall-Tips/All-Things-Haul-Bag.pdf

Double portaledge, or two singles?
Buying a portaledge is $$$! You want to be sure and make the right choice. What are the pros and cons to a single versus a double ledge?
A portaledge is probably the single most expensive item of gear or you'll ever buy for climbing. So, you want to be sure you get the right one for you. Double or single? There are arguments for both approaches, but consider:
Double portaledge benefits
a double weighs a lot less then two singles - maybe not a big deal when you are hauling, but you'll definitely notice it on the hike out. (Metolius Bomb Shelter example: about 11 lbs. for a single compared to about 13 lbs. for a double)
a double is less $$$ than two singles
a double usually is faster to set up then two singles
a double can be easier to set up at a cramped bivy; while two singles often requires some crafty placement, with one of them sometimes in a Less Than Ideal (LTI) position or off of a marginal anchor, or both
Even for the solo climber, a double offers you more room inside to put your gear, lounge on, and hunker down in in the event of a storm.
(Downside in a storm: the doubles can become a larger sail, potentially tossing you around.)
Why might you choose a single portaledge?
If you are fairly small, a single is easier to set up, or you're fairly tall, giving you room to sleep diagonally.
Singles typically get more “square footage of bed space” per person
If you know you have stinky feet or snore a lot or have some, show we say, intestinal issues, having a little distance and privacy and your partner might be a good thing. Ergo, single.
Recommended double portaledge: Metolius Bomb Shelter or John Middendorf's D4 ledge, available at bigwallgear.com

image: www.metoliusclimbing.com
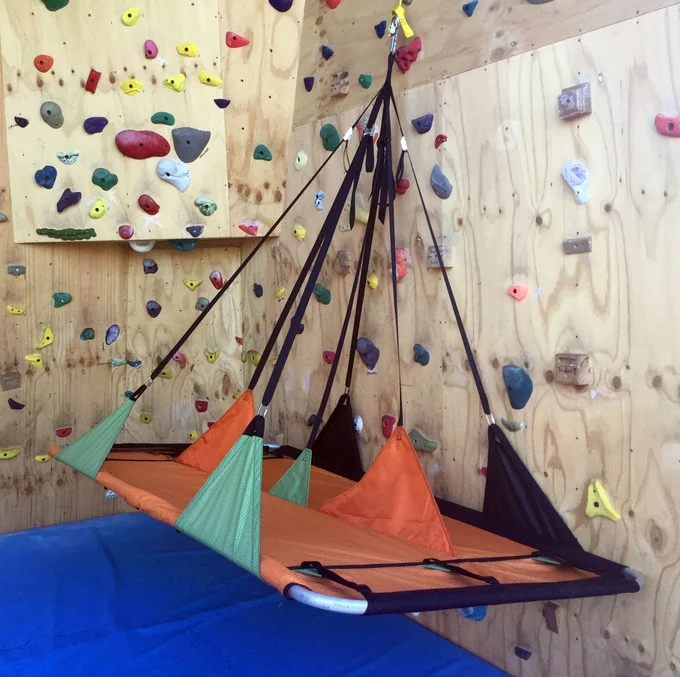
image: https://www.kickstarter.com/projects/1188459201/the-d4-portaledge

Mini carabiners for your big wall bivy
You're gonna need a lot of carabiners when it's time to set up camp. Get the smallest, least expensive, fully rated and ideally color-coded carabiners you can find.

To make an organized camp on a big wall, you’ll need 10-20 spare carabiners to clip things securely onto your ledge.
Avoid scavenging carabiners from your lead rack to clip stuff to your bivy. (Ask me how I know this.) This will definitely slow you down in the morning when you break down your camp and then need to restore the carabiners to the proper spot.
Designate these carabiners to a specific piece of gear at home, not at the base of the route.
Personally, I prefer carabiners be properly rated for actual climbing, and not the El Cheapo little “keychain” carabiners that you might get at the hardware store check out. You might remember that the little pink carabiner is not load rated, but what if your partner doesn't know that? What if it's dark and you accidentally grab the wrong one? Considering your wall rack probably cost more than $3,000, dropping another $50 to get some camping carabiners isn’t that big a deal.
Get all of them the same unique color. That way you know they’re for camping-only, and you don't get them mixed up with your lead rack.
Lots of manufacturers make tiny wiregate carabiners. A good choice is the CAMP Nano.
Lots of cool colors
Fully load rated at 21 kN
low cost, about $7
Hopefully everything you bring on a big wall has its own stuff sack or clip in point. If you need to add clip points onto pretty much anything, some wonderful cord to use is bank line. It's inexpensive, super strong, and holds knots very well.
If you’re not big wall climbing, mini carabiners also work great for hanging a lantern or headlamp from your tent, attaching light items to the outside of your backpack or hanging your food to keep it away from critters.
For the big wall cheapskates . . .
If you do choose to save a few bucks and get a accessory carabiner that's NOT rated for climbing, this accessory carabiner from Avant is a good choice.
Hopefully it’s wildly obvious that this is not something you ever want on your lead climbing rack, even if you grab it in the dark!
Be sure your partner knows it's only for camping and never for climbing.
This is an accessory carabiner from Avant Climbing, available at Hownot2.com.


Big wall haul rope options: length, diameter, static or dynamic?
Big wall climbers have to choose between three variables when choosing a haul rope. Here is one great option.
This tip is from big wall expert Mark Hudon. See more great tips and El Cap route photos at his website, hudonpanos.com
There are lots of different flavors of rope to choose from, but here’s one that should suit just about everybody:
10 mm
60-70 meters
static rope
10 mm minimum because you want burley; haul ropes take a LOT of abuse!
60-70 meters long, because you can use the tail of the rope as a lower out line, and 70 meters is long enough for any pitch. A 60 meter rope should work fine for most routes as well.
Static, because hauling on a dynamic rope is not so fun; you have to pull all of the stretch out of the road before you even start to move your haul bag. However, some big wallers like using a dynamic rope for hauling, reasoning that if the lead rope were to be damaged, you could continue on with the haul rope. Like with most things in climbing, this can come down to subjective preferences, so give each one a try on a practice wall and see which method you like.
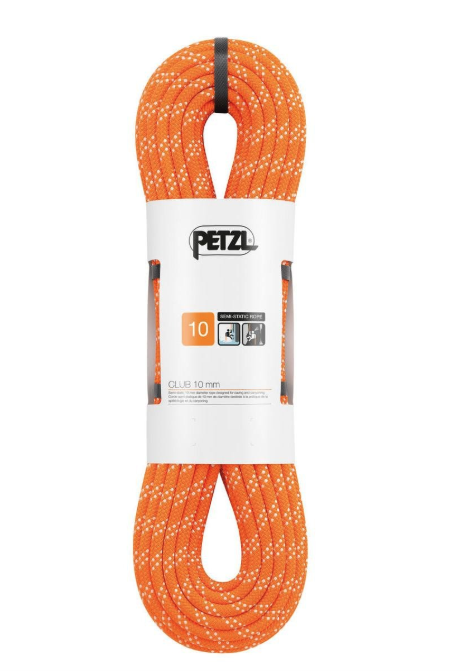
Petzl "club" 70 m static rope. image from gotyourgear.

Portaledge set up - Top Tips
Setting up your portaledge and getting it dialed to the perfect height can be an acrobatic and frustrating challenge. Here are some wall-tested tips to make it a lot easier.
Some of these tips are from big wall expert Mark Hudon. See more tips and El Cap route photos at his website and Instagram.
Some diagrams here are from vDiff, an outstanding online big wall course. Images from this course are shared here with permission.
See related post - Assorted "vertical camping" tips
Here are several possibilities to rig your ledge and haulbags.
The combinations to do this are near limitless, here are just a few examples to get you started.
(Images and captions, shared with permission, are from VDiffclimbing.com. I highly recommend this online big wall course.)
Haulbags docked on left bolt, backed up to main point. Portaledge hanging from trad gear, backed up to right bolt.

image, used with permission : https://www.vdiffclimbing.com/big-wall-camping/
Haulbag docked on left bolt, backed up to main point. Portaledge hanging from right bolt, backed up to center bolt.
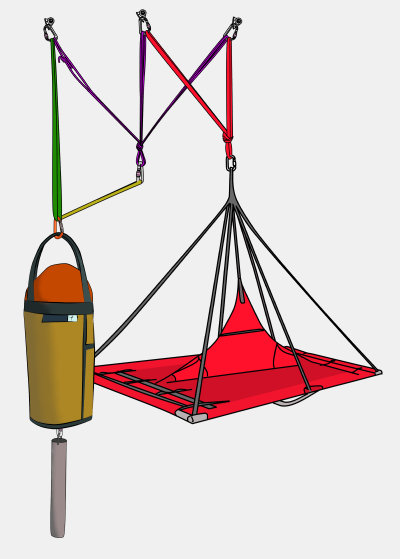
image, used with permission : https://www.vdiffclimbing.com/big-wall-camping/
Haulbags docked and backed up on main point. Both portaledges hanging from trad gear, backed up to a bolt.
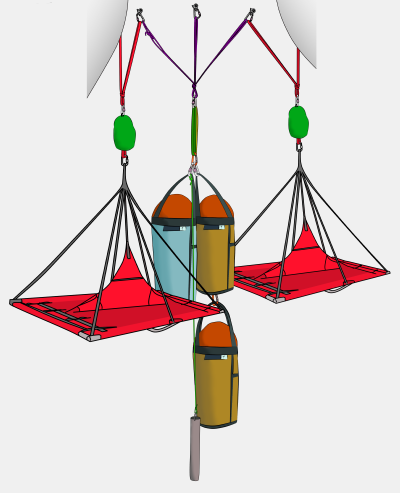
image, used with permission : https://www.vdiffclimbing.com/big-wall-camping/
Give yourself enough room to set up your ledge, but stay secure. You need to move around a lot when you're setting up your ledge. To give yourself enough slack to do this, take a large bight of lead rope, tie it to the same anchor bolt as your ledge, and attach yourself to this rope with a GriGri.
Between using aid ladders and this extra rope, you should have enough room to swing around and set up your ledge. Because you are clipped into a closed loop, there's no way you can slide off the end.
It's pretty much a one person job. Setting up the ledge is generally best done by one person. While you're setting up the ledge, your partner can be unpacking the haul bags, sorting the rack for the next day, and stacking the ropes in rope bags.
Keep suspension straps long. The suspension straps are not really for setting the height of your ledge. They’re more for fine-tuning and balancing. For the most part, they should be kept long and extended. If you shorten them up, they merely reduce the living space in your ledge.
Pay attention to the door on your rain fly, and make sure it faces your haul bags. For example, if your rain fly door opens to the left, you want to hang your ledge on the right side of the anchor, and have your haul bags docked on the left side of the anchor. This offers easier access to the bags once you're zipped inside your rain fly.
When tightening the floor tensioner straps, clip a carabiner to the straps, and pull on the carabiner to tighten up the floor. The carabiner gives you an ergonomic handle to really crank down on the tension straps, which is much easier on your tired wall hands. Tension the outside corners first, then the inside straps.

photo: Mark Hudon
Hang from a fifi hook or adjustable daisy when leveling the ledge. The last step is to adjust the long straps that hang from the anchor point to make the ledge hang level. Fine-tuning this can be tricky to do when you’re actually standing or sitting on the ledge, as your body weight is constantly shifting the natural "angle of the dangle" of your ledge. Try this simple trick: First, loosen all leveling straps to their full length. Then, hang by your fifi hook or adjustable daisy from the anchor point of the ledge, putting no body weight on the ledge itself, while you adjust the length to make it (more or less) level. This lets the ledge hang in its natural position, but with you close enough to the corners so you can reach all the straps.

Yates adjustable daisy
Attach a Yates adjustable daisy to the top clip in point of your portaledge. This gives you an easy way to adjust the exact height. Generally, this ideal position is about 2/3 of the way up the side of your haul bag. (Of course, this varies depending on the belay and bolt configuration.) This allows you to stand up in your ledge and easily rummage around in your bag. Adjustable daisies should be retired from lead climbing once they start to get fuzzy and worn out, and a “retired” daisy works fine for this ledge connection.
This Yates adjustable daisy is not the only connection of the portaledge to the anchor. Do you really want to be sleeping hanging off only some flat webbing in a cam buckle? I didn't think so. Mark’s pro tip: permanently tie 10 feet or so of 8 mm cord to the top of your ledge, and then have that go off to another bolt to back up the adjustable daisy.
Once the ledge is set up, transfer everything you need for the night to stay comfy from the haul bags. Ideally, you do this once, because getting in and out of the bags multiple times is a hassle.
Have your gear in color-coded stuff sacks. Mark likes different color coded bags: kitchen, food, clothing, personal care, and technology. This makes pulling out exactly what you need from the bottom of the haul bag a lot easier. You can get some sweet big wall stuff sacks from High Mountain Gear.
Consider hanging an aid ladder (or sewn pocket daisychain) close to your end of the ledge. You can use the steps or loops to clip in most all of your personal gear, and not have it dangle in your face when you're sleeping.
Having some sewn tie in points points added onto your ledge makes it much easier to keep your stuff safe and secure. Learn how to use a Speedy Stitcher awl to make your own, or make friends with your local shoe repair shop, who probably has a sewing machine that's older than you are that's sturdy enough to sew through heavy duty webbing.
Consider getting a dozen or so small “bivy carabiners” that are only used for clipping stuff bags, shoes, water bottle, etc. onto your ledge. It's helpful if these carabiners are all one model and color, so can tell at a glance they’re for camping, not climbing. In case you ever mix them up, be sure and buy proper rated climbing carabiners and not the cheapo keychain carabiners from the hardware store.
Here's a solution to one of the most annoying and scary parts of portaledge camping. With your ledge only hanging from one suspension point, when you put weight on one corner (like the one nearest your haul bag when you need to get something) your ledge wants to flip you out into space. Solution: run a sling, or maybe a cordelette with a clove hitch to adjust the length properly) to that corner of the ledge, and clip that cord to the anchor. Now you can stand on that corner and your ledge won't flip you.
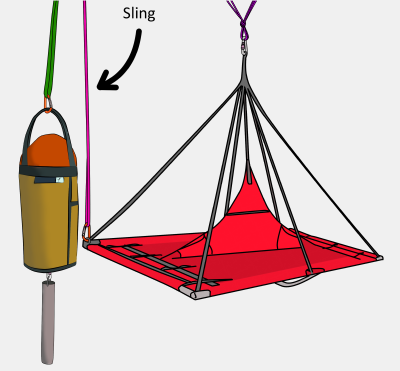
image, used with permission : https://www.vdiffclimbing.com/big-wall-camping/
When you have it all dialed, you’ll be a happy vertical camper, like this guy!

image from Morning in the Portaledge - https://www.youtube.com/watch?v=GnxpesLE1Q0

Big wall - what's the leader’s first tasks at the anchor?
Yes, you just had a hair-raising lead, and all you want to do at the anchors is catch your breath and maybe pop a Valium. Sorry, you've got a few tasks first.
This tip is from big wall expert Mark Hudon. See more great tips and El Cap route photos at his website, hudonpanos.com
Once the leader arrives at the anchor after a big wall lead, they have one main task: Get your second off of the anchor below you as quickly as possible, and THEN get comfortable.
But the second can't do much until the leader does 3 things:
Build a simple strong anchor as quickly as possible
Fix the lead rope for your second
Set up your haul system and pull a few strokes to get the haul bags off the anchor
Do these in order. (If communication is difficult because of wind, a long pitch, or the route going out of sight, when the second sees the haul bags start to move, they automatically know that the lead rope is already fixed for them.)
Only after all this happens can the second start breaking down THEIR anchor and start cleaning.
After these 3 tasks are done, only THEN can the leader take a break!
When you're big wall leading, resist the temptation to kick back, take pictures, relax, etc. right when you get to the anchor; you still have work to do.
Side note: Should the leader pull up slack rope before fixing?
Usually, no.
However, on a shorter pitch, it might help for the leader to pull up the lead rope until it comes tight-ish on the second before fixing. Doing this means the second doesn’t have to carry the entire weight of the rope hanging below them as they’re cleaning, which can save them quite a bit of energy. (Of course, if there are any lower outs or other sneaky maneuvers where the second requires extra rope, be sure to leave them enough slack to make that move.)